# production-grade-agentic-system
**Repository Path**: WoShiAFanTi/production-grade-agentic-system
## Basic Information
- **Project Name**: production-grade-agentic-system
- **Description**: No description available
- **Primary Language**: Python
- **License**: MIT
- **Default Branch**: master
- **Homepage**: None
- **GVP Project**: No
## Statistics
- **Stars**: 0
- **Forks**: 0
- **Created**: 2026-05-27
- **Last Updated**: 2026-05-27
## Categories & Tags
**Categories**: Uncategorized
**Tags**: None
## README
# Production-Grade Agentic AI System
Modern **agentic AI systems**, whether running in **development, staging, or production**, are built as a **set of well-defined architectural layers** rather than a single service. Each layer is responsible for a specific concern such as **agent orchestration, memory management, security controls, scalability, and fault handling**. A production-grade agentic system typically combines these layers to ensure agents remain reliable, observable, and safe under real-world workloads.
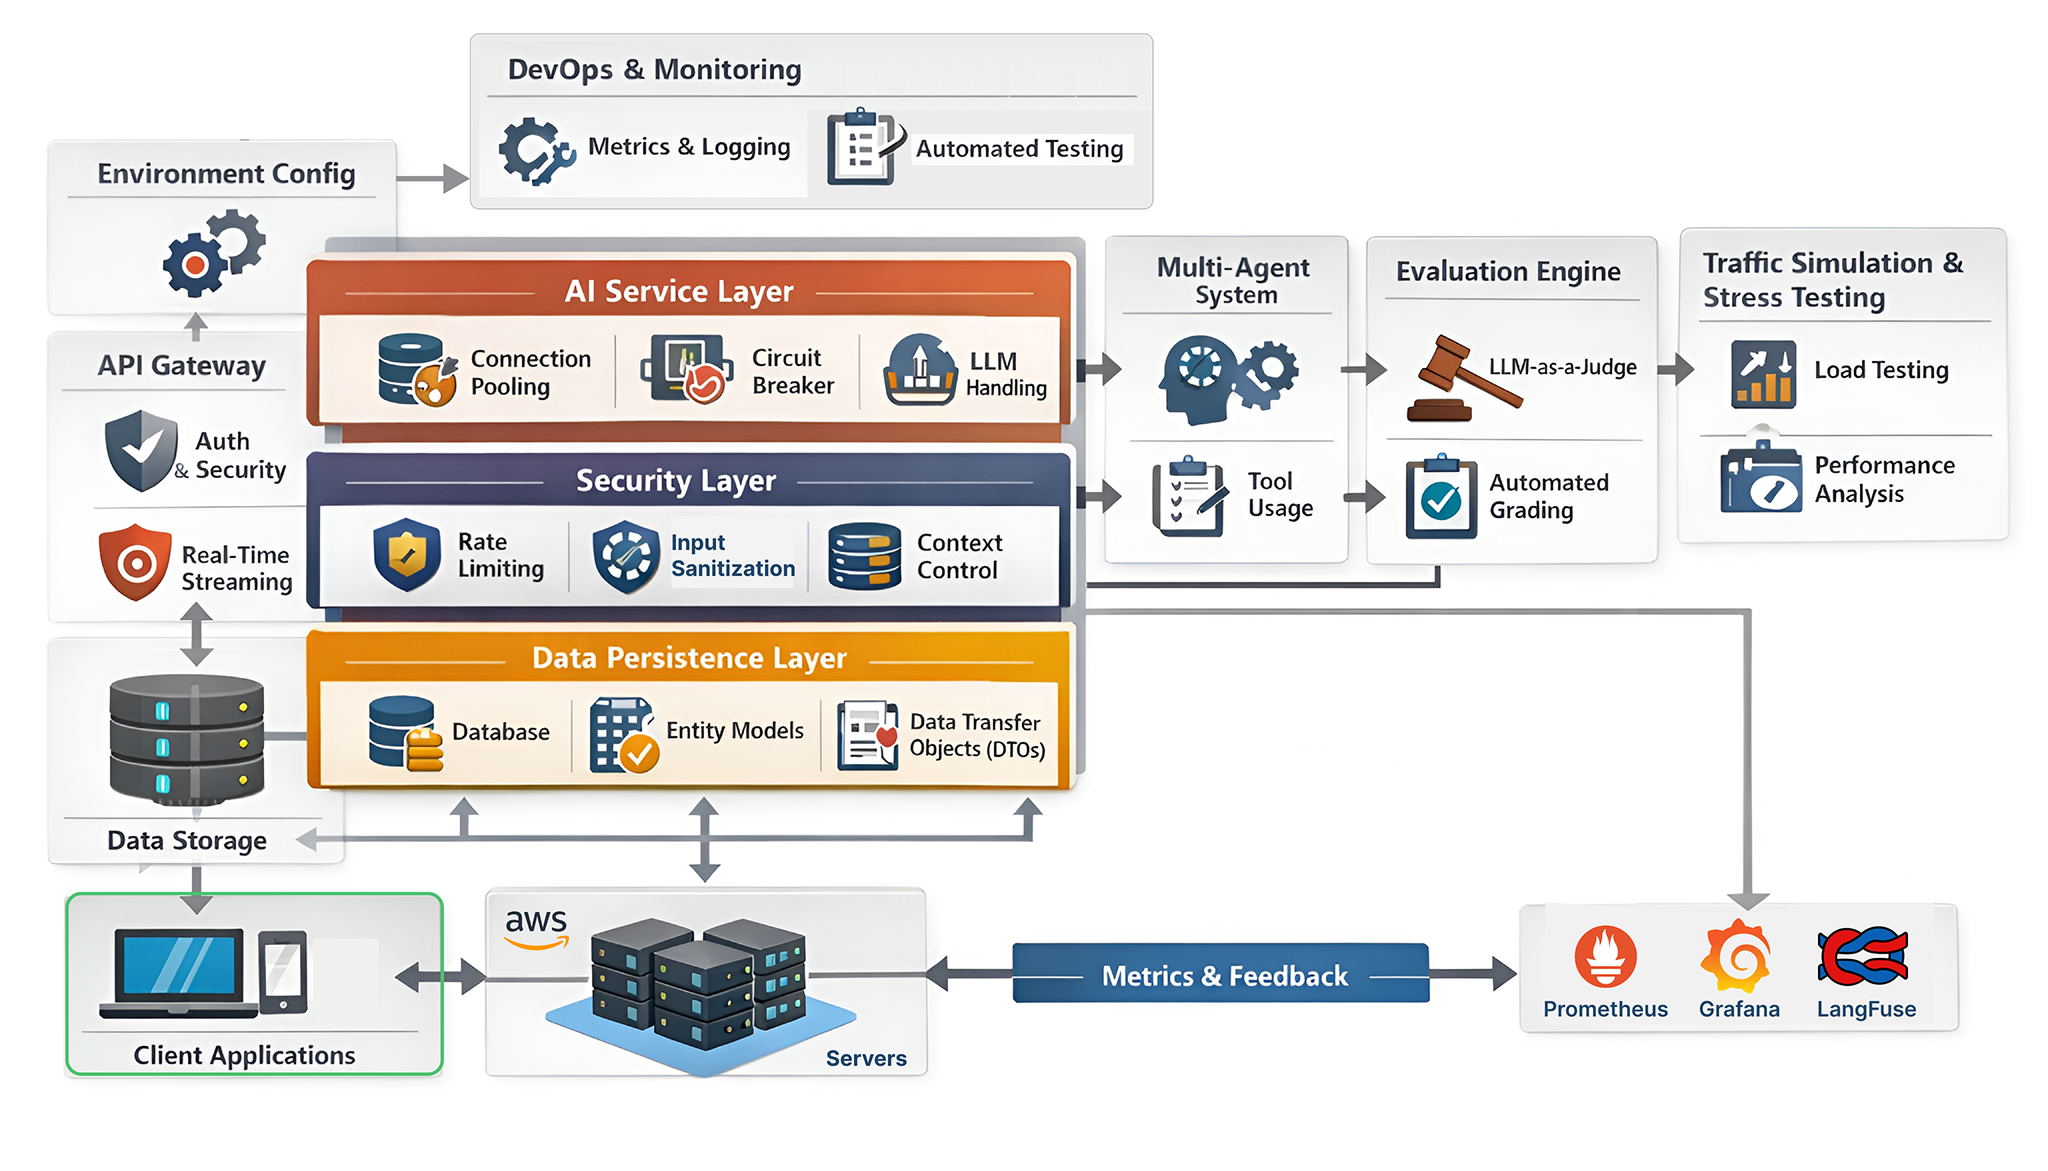
*Production Grade Agentic System (Created by Fareed Khan)*
There are **two key aspects** that must be continuously monitored in an agentic system.
1. The first is **agent behavior**, which includes reasoning accuracy, tool usage correctness, memory consistency, safety boundaries, and context handling across multiple turns and agents.
2. The second is **system reliability and performance**, covering latency, availability, throughput, cost efficiency, failure recovery, and dependency health across the entire architecture.
Both are important for operating **multi-agent systems** reliably at scale.
In this blog, we will build all the core architectural layers needed to deploy a production-ready agentic system, **so teams can confidently deploy AI agents in their own infrastructure or for their clients.**
You can clone the repo:
```bash
git clone https://github.com/FareedKhan-dev/production-grade-agentic-system
cd production-grade-agentic-system
```
## Table of Content
* [Creating Modular Codebase](#ab61)
* [Managing Dependencies](#d7f1)
* [Setting Environment Configuration](#dfa0)
* [Containerization Strategy](#66e6)
* [Building Data Persistence Layer](#c31d)
* [Structured Modeling](#49d1)
* [Entity Definition](#da20)
* [Data Transfer Objects (DTOs)](#0bdf)
* [Security & Safeguards Layer](#1942)
* [Rate Limiting Feature](#1649)
* [Sanitization Check Logic](#ed53)
* [Context Management](#2115)
* [The Service Layer for AI Agents](#9ef9)
* [Connection Pooling](#c497)
* [LLM Unavailability Handling](#2fe7)
* [Circuit Breaking](#0d26)
* [Multi-Agentic Architecture](#2767)
* [Long-Term Memory Integration](#097b)
* [Tool Calling Feature](#6f9a)
* [Building The API Gateway](#458a)
* [Auth Endpoints](#8a02)
* [Real-Time Streaming](#0d8e)
* [Observability & Operational Testing](#86b1)
* [Creating Metrics to Evaluate](#0055)
* [Middleware Based Testing](#9c23)
* [Streaming Endpoints Interaction](#47b1)
* [Context Management Using Async](#5e3d)
* [DevOps Automation](#1b72)
* [Evaluation Framework](#ff63)
* [LLM-as-a-Judge](#9e4a)
* [Automated Grading](#e936)
* [Architecture Stress Testing](#f484)
* [Simulating our Traffic](#8f52)
* [Performance Analysis](#0703)
## Creating Modular Codebase
Normally, Python projects start small and gradually become messy as they grow. When building production-grade systems, developers typically adopt a **Modular Architecture** approach.
This means separating different components of the application into distinct modules. By doing so, it becomes easier to maintain, test, and update individual parts without impacting the entire system.
Let’s create a structured directory layout for our AI system:
```bash
├── app/ # Main Application Source Code
│ ├── api/ # API Route Handlers
│ │ └── v1/ # Versioned API (v1 endpoints)
│ ├── core/ # Core Application Config & Logic
│ │ ├── langgraph/ # AI Agent / LangGraph Logic
│ │ │ └── tools/ # Agent Tools (search, actions, etc.)
│ │ └── prompts/ # AI System & Agent Prompts
│ ├── models/ # Database Models (SQLModel)
│ ├── schemas/ # Data Validation Schemas (Pydantic)
│ ├── services/ # Business Logic Layer
│ └── utils/ # Shared Helper Utilities
├── evals/ # AI Evaluation Framework
│ └── metrics/ # Evaluation Metrics & Criteria
│ └── prompts/ # LLM-as-a-Judge Prompt Definitions
├── grafana/ # Grafana Observability Configuration
│ └── dashboards/ # Grafana Dashboards
│ └── json/ # Dashboard JSON Definitions
├── prometheus/ # Prometheus Monitoring Configuration
├── scripts/ # DevOps & Local Automation Scripts
│ └── rules/ # Project Rules for Cursor
└── .github/ # GitHub Configuration
└── workflows/ # GitHub Actions CI/CD Workflows
```
**This directory structure might seem complex to you at first but we are following a generic best-practice pattern** that is used in many agentic systems or even in pure software engineering. Each folder has a specific purpose:
* `app/`: Contains the main application code, including API routes, core logic, database models, and utility functions.
* `evals/`: Houses the evaluation framework for assessing AI performance using various metrics and prompts
* `grafana/` and `prometheus/`: Store configuration files for monitoring and observability tools.
You can see many components have their own subfolders (like `langgraph/` and `tools/`) to further separate concerns. We are going to build out each of these modules step-by-step in the upcoming sections and also understand why each part is important.
### **Managing Dependencies**
The very first step in building a production-grade AI system is to create a dependency management strategy. Normally small projects start with a simple `requirements.txt` file and for a more complex project, we have to use `pyproject.toml` because it supports more advanced features like dependency resolution, versioning, and build system specifications.
Let’s create a `pyproject.toml` file for our project and start adding our dependencies and other configurations.
```ini
# ==========================
# Project Metadata
# ==========================
# Basic information about your Python project as defined by PEP 621
[project]
name = "My Agentic AI System" # The distribution/package name
version = "0.1.0" # Current project version (semantic versioning recommended)
description = "Deploying it as a SASS" # Short description shown on package indexes
readme = "README.md" # README file used for long description
requires-python = ">=3.13" # Minimum supported Python version
```
The first section defines the project metadata like name, version, description, and Python version requirement. This information is useful when publishing the package to package indexes like PyPI.
Then comes the core dependencies section where we list all the libraries our project relies on.
Since we are building an agentic AI system (For ≤10K users actively using our agent), we need a range of libraries for web framework, database, authentication, AI orchestration, observability, and more.
```ini
# ==========================
# Core Runtime Dependencies
# ==========================
# These packages are installed whenever your project is installed
# They define the core functionality of the application
dependencies = [
# --- Web framework & server ---
"fastapi>=0.121.0", # High-performance async web framework
"uvicorn>=0.34.0", # ASGI server used to run FastAPI
"asgiref>=3.8.1", # ASGI utilities (sync/async bridges)
"uvloop>=0.22.1", # Faster event loop for asyncio
# --- LangChain / LangGraph ecosystem ---
"langchain>=1.0.5", # High-level LLM orchestration framework
"langchain-core>=1.0.4", # Core abstractions for LangChain
"langchain-openai>=1.0.2", # OpenAI integrations for LangChain
"langchain-community>=0.4.1", # Community-maintained LangChain tools
"langgraph>=1.0.2", # Graph-based agent/state workflows
"langgraph-checkpoint-postgres>=3.0.1",# PostgreSQL-based LangGraph checkpointing
# --- Observability & tracing ---
"langfuse==3.9.1", # LLM tracing, monitoring, and evaluation
"structlog>=25.2.0", # Structured logging
# --- Authentication & security ---
"passlib[bcrypt]>=1.7.4", # Password hashing utilities
"bcrypt>=4.3.0", # Low-level bcrypt hashing
"python-jose[cryptography]>=3.4.0", # JWT handling and cryptography
"email-validator>=2.2.0", # Email validation for auth flows
# --- Database & persistence ---
"psycopg2-binary>=2.9.10", # PostgreSQL driver
"sqlmodel>=0.0.24", # SQLAlchemy + Pydantic ORM
"supabase>=2.15.0", # Supabase client SDK
# --- Configuration & environment ---
"pydantic[email]>=2.11.1", # Data validation with email support
"pydantic-settings>=2.8.1", # Settings management via environment variables
"python-dotenv>=1.1.0", # Load environment variables from .env files
# --- API utilities ---
"python-multipart>=0.0.20", # Multipart/form-data support (file uploads)
"slowapi>=0.1.9", # Rate limiting for FastAPI
# --- Metrics & monitoring ---
"prometheus-client>=0.19.0", # Prometheus metrics exporter
"starlette-prometheus>=0.7.0",# Prometheus middleware for Starlette/FastAPI
# --- Search & external tools ---
"duckduckgo-search>=3.9.0", # DuckDuckGo search integration
"ddgs>=9.6.0", # DuckDuckGo search client (alternative)
# --- Reliability & utilities ---
"tenacity>=9.1.2", # Retry logic for unstable operations
"tqdm>=4.67.1", # Progress bars
"colorama>=0.4.6", # Colored terminal output
# --- Memory / agent tooling ---
"mem0ai>=1.0.0", # AI memory management library
]
```
You might have notice (This must be important in almost all cases) that we are using specific versions for each dependency (using `>=` operator). This is extremely important in production systems to avoid **dependency hell** where different libraries require incompatible versions of the same package.
Then comes the development dependencies section. There is a very high possibility that when you build something or if it’s in development phase, many developers are going to work on the same codebase. To ensure code quality and consistency, we need a set of development tools like linters, formatters, and type checkers.
```ini
# ==========================
# Optional Dependencies
# ==========================
# Extra dependency sets that can be installed with:
# pip install .[dev]
[project.optional-dependencies]
dev = [
"black", # Code formatter
"isort", # Import sorter
"flake8", # Linting tool
"ruff", # Fast Python linter (modern replacement for flake8)
"djlint==1.36.4", # Linter/formatter for HTML & templates
]
```
Then we define dependency groups for testing. This allows us to logically group related dependencies together. For example, all testing-related libraries can be grouped under a `test` group.
```ini
# ==========================
# Dependency Groups (PEP 735-style)
# ==========================
# Logical grouping of dependencies, commonly used with modern tooling
[dependency-groups]
test = [
"httpx>=0.28.1", # Async HTTP client for testing APIs
"pytest>=8.3.5", # Testing framework
]
# ==========================
# Pytest Configuration
# ==========================
[tool.pytest.ini_options]
markers = [
"slow: marks tests as slow (deselect with '-m \"not slow\"')",
]
python_files = [
"test_*.py",
"*_test.py",
"tests.py",
]
# ==========================
# Black (Code Formatter)
# ==========================
[tool.black]
line-length = 119 # Maximum line length
exclude = "venv|migrations" # Files/directories to skip
# ==========================
# Flake8 (Linting)
# ==========================
[tool.flake8]
docstring-convention = "all" # Enforce docstring conventions
ignore = [
"D107", "D212", "E501", "W503", "W605", "D203", "D100",
]
exclude = "venv|migrations"
max-line-length = 119
# ==========================
# Radon (Cyclomatic Complexity)
# ==========================
# Maximum allowed cyclomatic complexity
radon-max-cc = 10
# ==========================
# isort (Import Sorting)
# ==========================
[tool.isort]
profile = "black" # Compatible with Black
multi_line_output = "VERTICAL_HANGING_INDENT"
force_grid_wrap = 2
line_length = 119
skip = ["migrations", "venv"]
# ==========================
# Pylint Configuration
# ==========================
[tool.pylint."messages control"]
disable = [
"line-too-long",
"trailing-whitespace",
"missing-function-docstring",
"consider-using-f-string",
"import-error",
"too-few-public-methods",
"redefined-outer-name",
]
[tool.pylint.master]
ignore = "migrations"
# ==========================
# Ruff (Fast Linter)
# ==========================
[tool.ruff]
line-length = 119
exclude = ["migrations", "*.ipynb", "venv"]
[tool.ruff.lint]
# Per-file ignores
[tool.ruff.lint.per-file-ignores]
"__init__.py" = ["E402"] # Allow imports not at top in __init__.py
```
Lets understand the remaining configuration one by one …
* `Dependency Groups`: It allows us to create logical groups of dependencies. For example, we have a `test` group that includes libraries needed for testing and so on.
* `Pytest Configuration`: Using this we can customize how pytest discovers and runs tests in our project.
* `Black`: It helps us maintain consistent code formatting across the codebase.
* `Flake8`: It is a linting tool that checks for code style violations and potential errors.
* `Radon`: It helps us monitor cyclomatic (complexity of our code to keep it maintainable.
* `isort`: It automatically sorts imports in our Python files to keep them organized.)
We have also defined some additional linters and configurations like `Pylint` and `Ruff` that help us catch potential issues. Following dependencies are totally optional but I highly recommend using them in production-systems because your codebase will grow in the future and without them, it might become unmanageable.
### Setting **Environment Configuration**
Now we are going to set the most common configurations which in developer language, we call it **Settings Management**.
Normally in small projects, developers use a simple `.env` file to store environment variables. But a proper settings management strategy is to name it `.env.example` and commit it to version control.
```bash
# Different environment configurations
.env.[development|staging|production] # e.g. .env.development
```
You might be wondering why not just use `.env`?
Because it allows us to maintain distinct, isolated configurations for different environments (like enabling debug mode in development but disabling it in production) simultaneously without constantly editing a single file to switch contexts.
So, let’s create a `.env.example` file and add all the necessary environment variables with placeholder values.
```bash
# ==================================================
# Application Settings
# ==================================================
APP_ENV=development # Application environment (development | staging | production)
PROJECT_NAME="Project Name" # Human-readable project name
VERSION=1.0.0 # Application version
DEBUG=true # Enable debug mode (disable in production)
```
Similar to before, the very first section defines basic application settings like environment, project name, version, and debug mode.
Then comes the API settings where we define the base path for our API versioning.
```bash
# ==================================================
# API Settings
# ==================================================
API_V1_STR=/api/v1 # Base path prefix for API versioning
# ==================================================
# CORS (Cross-Origin Resource Sharing) Settings
# ==================================================
# Comma-separated list of allowed frontend origins
ALLOWED_ORIGINS="http://localhost:3000,http://localhost:8000"
# ==================================================
# Langfuse Observability Settings
# ==================================================
# Used for LLM tracing, monitoring, and analytics
LANGFUSE_PUBLIC_KEY="your-langfuse-public-key" # Public Langfuse API key
LANGFUSE_SECRET_KEY="your-langfuse-secret-key" # Secret Langfuse API key
LANGFUSE_HOST=https://cloud.langfuse.com # Langfuse cloud endpoint
```
`API_V1_STR` allows us to version our API endpoints easily, this is the standard practice that we normally see many public APIs follow especially the AI model providers like OpenAI, Cohere, etc.
Then comes the `CORS Settings` which is important for web applications to control which frontend domains can access our backend API (through which we can integrate ai agents).
We are also going to use industry standard`Langfuse` for observability and monitoring of our LLM interactions. So, we need to set the necessary API keys and host URL.
```bash
# ==================================================
# LLM (Large Language Model) Settings
# ==================================================
OPENAI_API_KEY="your-llm-api-key" # API key for LLM provider (e.g. OpenAI)
DEFAULT_LLM_MODEL=gpt-4o-mini # Default model used for chat/completions
DEFAULT_LLM_TEMPERATURE=0.2 # Controls randomness (0.0 = deterministic, 1.0 = creative)
# ==================================================
# JWT (Authentication) Settings
# ==================================================
JWT_SECRET_KEY="your-jwt-secret-key" # Secret used to sign JWT tokens
JWT_ALGORITHM=HS256 # JWT signing algorithm
JWT_ACCESS_TOKEN_EXPIRE_DAYS=30 # Token expiration time (in days)
# ==================================================
# Database (PostgreSQL) Settings
# ==================================================
POSTGRES_HOST=db # Database host (Docker service name or hostname)
POSTGRES_DB=mydb # Database name
POSTGRES_USER=myuser # Database username
POSTGRES_PORT=5432 # Database port
POSTGRES_PASSWORD=mypassword # Database password
# Connection pooling settings
POSTGRES_POOL_SIZE=5 # Base number of persistent DB connections
POSTGRES_MAX_OVERFLOW=10 # Extra connections allowed above pool size
```
We are going to use `OpenAI` as our primary LLM provider so we need to set the API key, default model, and temperature settings.
Then comes the `JWT Settings` which plays an important role in authentication and session management. We need to set a secret key for signing tokens, the algorithm to encode/decode them, and the token expiration time.
For the database, we are using `PostgreSQL` which is a industrial-strength relational database. Normally when your agentic system scales, you need to have proper connection pooling settings to avoid overwhelming the database with too many connections. Here we are setting the pool size of 5 and allowing a maximum overflow of 10 connections.
```bash
# ==================================================
# Rate Limiting Settings (SlowAPI)
# ==================================================
# Default limits applied to all routes
RATE_LIMIT_DEFAULT="1000 per day,200 per hour"
# Endpoint-specific limits
RATE_LIMIT_CHAT="100 per minute" # Chat endpoint
RATE_LIMIT_CHAT_STREAM="100 per minute" # Streaming chat endpoint
RATE_LIMIT_MESSAGES="200 per minute" # Message creation endpoint
RATE_LIMIT_LOGIN="100 per minute" # Login/auth endpoint
# ==================================================
# Logging Settings
# ==================================================
LOG_LEVEL=DEBUG # Logging verbosity (DEBUG, INFO, WARNING, ERROR)
LOG_FORMAT=console # Log output format (console | json)
```
Finally, we have the `Rate Limiting` and `Logging` settings to make sure our API is protected from abuse and we have proper logging for debugging and monitoring.
Now that we have our dependency management and settings management strategies in place, we are ready to start working on the core logic of our AI system and the first step to use these settings in our application code.
We need to create a `app/core/config.py` file that will load these environment variables using `Pydantic Settings Management`.
Let’s import the necessary modules first:
```python
# Importing necessary modules for configuration management
import json # For handling JSON data
import os # For interacting with the operating system
from enum import Enum # For creating enumerations
from pathlib import Path # For working with file paths
from typing import ( # For type annotations
Any, # Represents any type
Dict, # Represents a dictionary type
List, # Represents a list type
Optional, # Represents an optional value
Union, # Represents a union of types
)
from dotenv import load_dotenv # For loading environment variables from .env files
```
These are some basic imports we need for file handling, type annotations, and loading environment variables from `.env.example` file.
Next, we need to define our environment types using an enumeration.
```python
# Define environment types
class Environment(str, Enum):
"""Application environment types.
Defines the possible environments the application can run in:
development, staging, production, and test.
"""
DEVELOPMENT = "development"
STAGING = "staging"
PRODUCTION = "production"
TEST = "test"
```
Any project typically has multiple environments like development, staging, production, and test each serving a different purpose.
After defining the environment types, we need a function to determine the current environment based on an environment variable.
```python
# Determine environment
def get_environment() -> Environment:
"""Get the current environment.
Returns:
Environment: The current environment (development, staging, production, or test)
"""
match os.getenv("APP_ENV", "development").lower():
case "production" | "prod":
return Environment.PRODUCTION
case "staging" | "stage":
return Environment.STAGING
case "test":
return Environment.TEST
case _:
return Environment.DEVELOPMENT
```
We can use the `APP_ENV` environment variable to determine which environment we are currently in. If it's not set, we default to `development`.
Finally, we need to load the appropriate `.env` file based on the current environment.
```python
# Load appropriate .env file based on environment
def load_env_file():
"""Load environment-specific .env file."""
env = get_environment()
print(f"Loading environment: {env}")
base_dir = os.path.dirname(os.path.dirname(os.path.dirname(__file__)))
# Define env files in priority order
env_files = [
os.path.join(base_dir, f".env.{env.value}.local"),
os.path.join(base_dir, f".env.{env.value}"),
os.path.join(base_dir, ".env.local"),
os.path.join(base_dir, ".env"),
]
# Load the first env file that exists
for env_file in env_files:
if os.path.isfile(env_file):
load_dotenv(dotenv_path=env_file)
print(f"Loaded environment from {env_file}")
return env_file
# Fall back to default if no env file found
return None
```
We need to call this function immediately to load the environment variables when the application starts.
```python
# Call the function to load the env file
ENV_FILE = load_env_file()
```
In many cases, we have environment variables that are lists or dictionaries. So, we need utility functions to parse those values correctly.
```python
# Parse list values from environment variables
def parse_list_from_env(env_key, default=None):
"""Parse a comma-separated list from an environment variable."""
value = os.getenv(env_key)
if not value:
return default or []
# Remove quotes if they exist
value = value.strip("\"'")
# Handle single value case
if "," not in value:
return [value]
# Split comma-separated values
return [item.strip() for item in value.split(",") if item.strip()]
# Parse dict of lists from environment variables with prefix
def parse_dict_of_lists_from_env(prefix, default_dict=None):
"""Parse dictionary of lists from environment variables with a common prefix."""
result = default_dict or {}
# Look for all env vars with the given prefix
for key, value in os.environ.items():
if key.startswith(prefix):
endpoint = key[len(prefix) :].lower() # Extract endpoint name
# Parse the values for this endpoint
if value:
value = value.strip("\"'")
if "," in value:
result[endpoint] = [item.strip() for item in value.split(",") if item.strip()]
else:
result[endpoint] = [value]
return result
```
We are parsing comma-separated lists and dictionaries of lists from environment variables to make it easier to work with them in our code.
Now we can define our main `Settings` class that will hold all the configuration values for our application. It will read from environment variables and apply defaults where necessary.
```python
class Settings:
"""
Centralized application configuration.
Loads from environment variables and applies defaults.
"""
def __init__(self):
# Set the current environment
self.ENVIRONMENT = get_environment()
# ==========================
# Application Basics
# ==========================
self.PROJECT_NAME = os.getenv("PROJECT_NAME", "FastAPI LangGraph Agent")
self.VERSION = os.getenv("VERSION", "1.0.0")
self.API_V1_STR = os.getenv("API_V1_STR", "/api/v1")
self.DEBUG = os.getenv("DEBUG", "false").lower() in ("true", "1", "t", "yes")
# Parse CORS origins using our helper
self.ALLOWED_ORIGINS = parse_list_from_env("ALLOWED_ORIGINS", ["*"])
# ==========================
# LLM & LangGraph
# ==========================
self.OPENAI_API_KEY = os.getenv("OPENAI_API_KEY", "")
self.DEFAULT_LLM_MODEL = os.getenv("DEFAULT_LLM_MODEL", "gpt-4o-mini")
self.DEFAULT_LLM_TEMPERATURE = float(os.getenv("DEFAULT_LLM_TEMPERATURE", "0.2"))
# Agent specific settings
self.MAX_TOKENS = int(os.getenv("MAX_TOKENS", "2000"))
self.MAX_LLM_CALL_RETRIES = int(os.getenv("MAX_LLM_CALL_RETRIES", "3"))
# ==========================
# Observability (Langfuse)
# ==========================
self.LANGFUSE_PUBLIC_KEY = os.getenv("LANGFUSE_PUBLIC_KEY", "")
self.LANGFUSE_SECRET_KEY = os.getenv("LANGFUSE_SECRET_KEY", "")
self.LANGFUSE_HOST = os.getenv("LANGFUSE_HOST", "https://cloud.langfuse.com")
# ==========================
# Database (PostgreSQL)
# ==========================
self.POSTGRES_HOST = os.getenv("POSTGRES_HOST", "localhost")
self.POSTGRES_PORT = int(os.getenv("POSTGRES_PORT", "5432"))
self.POSTGRES_DB = os.getenv("POSTGRES_DB", "postgres")
self.POSTGRES_USER = os.getenv("POSTGRES_USER", "postgres")
self.POSTGRES_PASSWORD = os.getenv("POSTGRES_PASSWORD", "postgres")
# Pool settings are critical for high-concurrency agents
self.POSTGRES_POOL_SIZE = int(os.getenv("POSTGRES_POOL_SIZE", "20"))
self.POSTGRES_MAX_OVERFLOW = int(os.getenv("POSTGRES_MAX_OVERFLOW", "10"))
# LangGraph persistence tables
self.CHECKPOINT_TABLES = ["checkpoint_blobs", "checkpoint_writes", "checkpoints"]
# ==========================
# Security (JWT)
# ==========================
self.JWT_SECRET_KEY = os.getenv("JWT_SECRET_KEY", "unsafe-secret-for-dev")
self.JWT_ALGORITHM = os.getenv("JWT_ALGORITHM", "HS256")
self.JWT_ACCESS_TOKEN_EXPIRE_DAYS = int(os.getenv("JWT_ACCESS_TOKEN_EXPIRE_DAYS", "30"))
# ==========================
# Rate Limiting
# ==========================
self.RATE_LIMIT_DEFAULT = parse_list_from_env("RATE_LIMIT_DEFAULT", ["200 per day", "50 per hour"])
# Define endpoint specific limits
self.RATE_LIMIT_ENDPOINTS = {
"chat": parse_list_from_env("RATE_LIMIT_CHAT", ["30 per minute"]),
"chat_stream": parse_list_from_env("RATE_LIMIT_CHAT_STREAM", ["20 per minute"]),
"auth": parse_list_from_env("RATE_LIMIT_LOGIN", ["20 per minute"]),
"root": parse_list_from_env("RATE_LIMIT_ROOT", ["10 per minute"]),
"health": parse_list_from_env("RATE_LIMIT_HEALTH", ["20 per minute"]),
}
# Apply logic to override settings based on environment
self.apply_environment_settings()
def apply_environment_settings(self):
"""
Apply rigorous overrides based on the active environment.
This ensures production security even if .env is misconfigured.
"""
if self.ENVIRONMENT == Environment.DEVELOPMENT:
self.DEBUG = True
self.LOG_LEVEL = "DEBUG"
self.LOG_FORMAT = "console"
# Relax rate limits for local development
self.RATE_LIMIT_DEFAULT = ["1000 per day", "200 per hour"]
elif self.ENVIRONMENT == Environment.PRODUCTION:
self.DEBUG = False
self.LOG_LEVEL = "WARNING"
self.LOG_FORMAT = "json"
# Stricter limits for production
self.RATE_LIMIT_DEFAULT = ["200 per day", "50 per hour"]
```
In our `Settings` class, we read various configuration values from environment variables, applying sensible defaults where necessary. We also have an `apply_environment_settings` method that adjusts certain settings based on whether we are in development or production mode.
You can also see `checkpoint_tables` which defines the necessary tables for LangGraph persistence in PostgreSQL.
Finally, we initialize a global `settings` object that can be imported and used throughout the application.
```python
# Initialize the global settings object
settings = Settings()
```
So far, we have created a dependency management strategy and a settings management for our production-grade AI system.
### **Containerization Strategy**
Now we have to create a `docker-compose.yml` file which will define all the services our application needs to function.
The reason why we are using dockerization is because in a production-grade system, components like the database, monitoring tools, and the API don’t run in isolation, they need to talk to each other and Docker Compose is the standard way to orchestrate multi-container Docker applications.
First, we have to define the Database service. Since we are building an AI agent that needs **Long-Term Memory**, a standard PostgreSQL database is not enough. We need vector similarity search capabilities.
```yaml
version: '3.8'
# ==================================================
# Docker Compose Configuration
# ==================================================
# This file defines all services required to run the
# application locally or in a single-node environment.
services:
# ==================================================
# PostgreSQL + pgvector Database
# ==================================================
db:
image: pgvector/pgvector:pg16 # PostgreSQL 16 with pgvector extension enabled
environment:
- POSTGRES_DB=${POSTGRES_DB} # Database name
- POSTGRES_USER=${POSTGRES_USER} # Database user
- POSTGRES_PASSWORD=${POSTGRES_PASSWORD} # Database password
ports:
- "5432:5432" # Expose PostgreSQL to host (dev use only)
volumes:
- postgres-data:/var/lib/postgresql/data # Persistent database storage
healthcheck:
test: ["CMD-SHELL", "pg_isready -U ${POSTGRES_USER} -d ${POSTGRES_DB}"]
interval: 10s
timeout: 5s
retries: 5
restart: always
networks:
- monitoring
```
We are explicitly using the `pgvector/pgvector:pg16` image instead of the standard `postgres` image. This gives us the vector extensions out-of-the-box, which are required by `mem0ai` and LangGraph checkpointing.
We also include a `healthcheck` this is important in deployment because our API service needs to wait until the database is fully ready to accept connections before it tries to start up.
Next, we define our main Application service. This is where our FastAPI code runs.
```yaml
# ==================================================
# FastAPI Application Service
# ==================================================
app:
build:
context: . # Build image from project root
args:
APP_ENV: ${APP_ENV:-development} # Build-time environment
ports:
- "8000:8000" # Expose FastAPI service
volumes:
- ./app:/app/app # Hot-reload application code
- ./logs:/app/logs # Persist application logs
env_file:
- .env.${APP_ENV:-development} # Load environment-specific variables
environment:
- APP_ENV=${APP_ENV:-development}
- JWT_SECRET_KEY=${JWT_SECRET_KEY:-supersecretkeythatshouldbechangedforproduction}
depends_on:
db:
condition: service_healthy # Wait until DB is ready
healthcheck:
test: ["CMD", "curl", "-f", "http://localhost:8000/health"]
interval: 30s
timeout: 10s
retries: 3
start_period: 10s
restart: on-failure
networks:
- monitoring
```
Notice the `volumes` section here. We are mapping our local `./app` folder to the container's `/app` directory. This enables **Hot-Reloading**.
If you change a line of python code in your editor, the container detects it and restarts the server instantly. This is common practice and provides a great developer experience without sacrificing the isolation of Docker.
Now, a production system is flying blind without observability. The dev team need to know if their API is slow or if errors are spiking. For this, we use the `Prometheus + Grafana` stack.
```yaml
# ==================================================
# Prometheus (Metrics Collection)
# ==================================================
prometheus:
image: prom/prometheus:latest
ports:
- "9090:9090" # Prometheus UI
volumes:
- ./prometheus/prometheus.yml:/etc/prometheus/prometheus.yml
command:
- '--config.file=/etc/prometheus/prometheus.yml'
networks:
- monitoring
restart: always
```
Prometheus is the “collector” it scrapes metrics from our FastAPI app (like request latency or error rates) every few seconds. We mount a configuration file so we can tell it exactly where to look for our app.
Then we add Grafana, which is the “visualizer”.
```yaml
# ==================================================
# Grafana (Metrics Visualization)
# ==================================================
grafana:
image: grafana/grafana:latest
ports:
- "3000:3000" # Grafana UI
volumes:
- grafana-storage:/var/lib/grafana
- ./grafana/dashboards:/etc/grafana/provisioning/dashboards
- ./grafana/dashboards/dashboards.yml:/etc/grafana/provisioning/dashboards/dashboards.yml
environment:
- GF_SECURITY_ADMIN_PASSWORD=admin
- GF_USERS_ALLOW_SIGN_UP=false
networks:
- monitoring
restart: always
```
Grafana takes the raw data from Prometheus and turns it into beautiful charts. By mounting the `./grafana/dashboards` volume, we can "provision" our dashboards as code. This means when you spin up the container, your charts are already there, no manual setup required.
Finally, the third important piece is to track the health of the containers themselves (CPU usage, Memory leaks, etc.). For this, we use `cAdvisor`. It's a lightweight monitoring agent developed by Google that provides real-time insights into container resource usage and performance.
```yaml
# ==================================================
# cAdvisor (Container Metrics)
# ==================================================
cadvisor:
image: gcr.io/cadvisor/cadvisor:latest
ports:
- "8080:8080" # cAdvisor UI
volumes:
- /:/rootfs:ro
- /var/run:/var/run:rw
- /sys:/sys:ro
- /var/lib/docker/:/var/lib/docker:ro
networks:
- monitoring
restart: always
# ==================================================
# Networks & Volumes
# ==================================================
networks:
monitoring:
driver: bridge # Shared network for all services
volumes:
grafana-storage: # Persist Grafana dashboards & data
postgres-data: # Persist PostgreSQL data
```
We wrap everything up by defining a shared `monitoring` network so all these services can talk to each other securely, and named `volumes` to ensure our database and dashboard settings survive even if we restart the containers.
## Building Data Persistence Layer
We have a running database but it is currently empty. An AI system relies heavily on **Structured Data**. We aren’t just throwing JSON blobs into a NoSQL store, we need strict relationships between Users, their Chat Sessions, and the AI’s State.

*Data Persistence Layer (Created by Fareed Khan)*
To handle this, we are going to use **SQLModel**. It is a library that combines **SQLAlchemy** (for database interaction) and **Pydantic** (for data validation).
### **Structured Modeling**
**SQLModel** is also among the most modern ORMs available in Python, Let’s start defining our data models.
In software engineering, **Don’t Repeat Yourself (DRY)** is a core principle. Since almost every table in our database will need a timestamp to track when a record was created, we shouldn’t copy-paste that logic into every file. instead, we create a `BaseModel`.
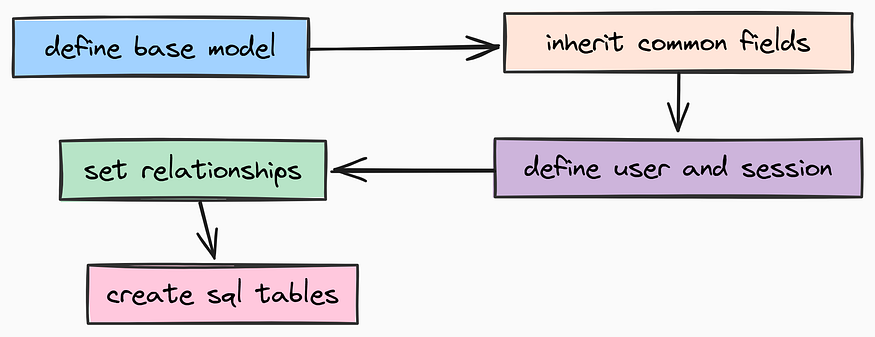
*Structured Modeling (Created by Fareed Khan)*
For that, create `app/models/base.py` file which will hold our abstract base model:
```python
from datetime import datetime, UTC
from typing import List, Optional
from sqlmodel import Field, SQLModel, Relationship
# ==================================================
# Base Database Model
# ==================================================
class BaseModel(SQLModel):
"""
Abstract base model that adds common fields to all tables.
Using an abstract class ensures consistency across our schema.
"""
# Always use UTC in production to avoid timezone headaches
created_at: datetime = Field(default_factory=lambda: datetime.now(UTC))
```
This class is pretty straightforward. It adds a `created_at` timestamp to any model that inherits from it.
Now we can build our core entities. The most fundamental requirement for any user-facing system is **Authentication**. We need a good User model that handles credentials securely.
### **Entity Definition**
Similar to how api based ai models providers handle user data, we will create a `User` model with email and hashed password fields.
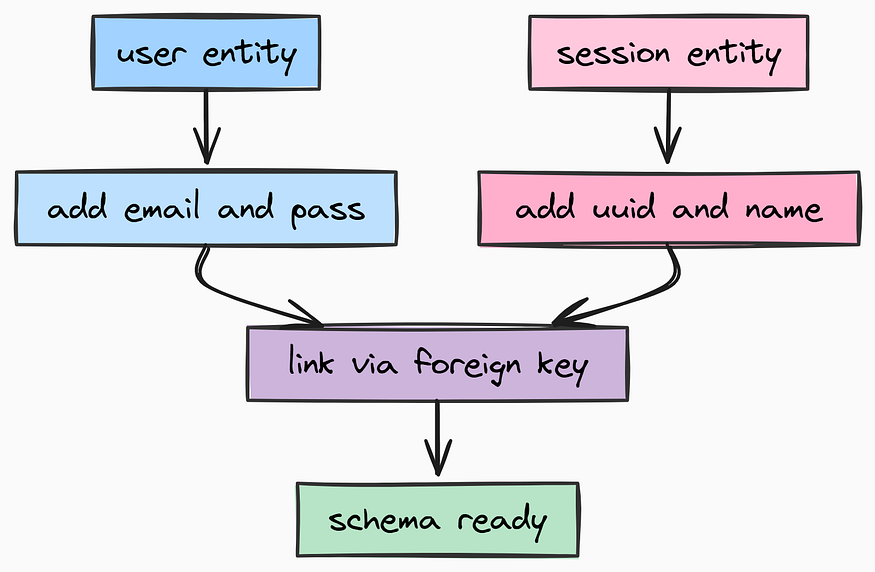
*Entity Definition (Created by Fareed Khan)*
Create `app/models/user.py` file to define the User model:
```python
from typing import TYPE_CHECKING, List
import bcrypt
from sqlmodel import Field, Relationship
from app.models.base import BaseModel
# Prevent circular imports for type hinting
if TYPE_CHECKING:
from app.models.session import Session
# ==================================================
# User Model
# ==================================================
class User(BaseModel, table=True):
"""
Represents a registered user in the system.
"""
# Primary Key
id: int = Field(default=None, primary_key=True)
# Email must be unique and indexed for fast lookups during login
email: str = Field(unique=True, index=True)
# NEVER store plain text passwords. We store the Bcrypt hash.
hashed_password: str
# Relationship: One user has many chat sessions
sessions: List["Session"] = Relationship(back_populates="user")
def verify_password(self, password: str) -> bool:
"""
Verifies a raw password against the stored hash.
"""
return bcrypt.checkpw(password.encode("utf-8"), self.hashed_password.encode("utf-8"))
@staticmethod
def hash_password(password: str) -> str:
"""
Generates a secure Bcrypt hash/salt for a new password.
"""
salt = bcrypt.gensalt()
return bcrypt.hashpw(password.encode("utf-8"), salt).decode("utf-8")
```
We embedded the password hashing logic directly into the model. This is an implementation of **Encapsulation** the logic for handling user data lives *with* the user data, preventing security mistakes elsewhere in the app.
Next, we need to organize our AI interactions. Users don’t just have one giant endless conversation, they have distinct **Sessions** (or “Chats”). For that we need to create `app/models/session.py`.
```python
from typing import TYPE_CHECKING, List
from sqlmodel import Field, Relationship
from app.models.base import BaseModel
if TYPE_CHECKING:
from app.models.user import User
# ==================================================
# Session Model
# ==================================================
class Session(BaseModel, table=True):
"""
Represents a specific chat conversation/thread.
This links the AI's memory to a specific context.
"""
# We use String IDs (UUIDs) for sessions to make them hard to guess
id: str = Field(primary_key=True)
# Foreign Key: Links this session to a specific user
user_id: int = Field(foreign_key="user.id")
# Optional friendly name for the chat (e.g., "Recipe Ideas")
name: str = Field(default="")
# Relationship link back to the User
user: "User" = Relationship(back_populates="sessions")
```
This creates a `Session` model that links to the `User` model via a foreign key. Each session represents a distinct conversation context for the AI.
### **Data Transfer Objects (DTOs)**
Finally, we need a model for **LangGraph Persistence**. LangGraph is stateful, if the server restarts, we don’t want the AI to forget what step it was on.
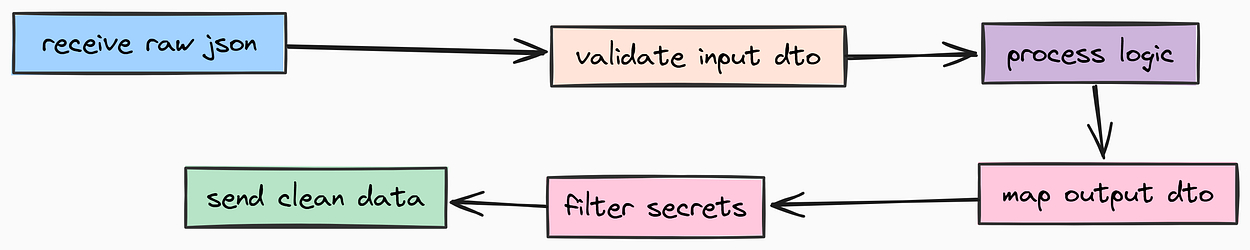
*DTOs (Created by Fareed Khan)*
We need a `Thread` model that acts as an anchor for these checkpoints. Create `app/models/thread.py`.
```python
from datetime import UTC, datetime
from sqlmodel import Field, SQLModel
# ==================================================
# Thread Model (LangGraph State)
# ==================================================
class Thread(SQLModel, table=True):
"""
Acts as a lightweight anchor for LangGraph checkpoints.
The actual state blob is stored by the AsyncPostgresSaver,
but we need this table to validate thread existence.
"""
id: str = Field(primary_key=True)
created_at: datetime = Field(default_factory=lambda: datetime.now(UTC))
```
To keep our imports clean in the rest of the application, we aggregate these models into a single entry point and that exist in our `app/models/database.py`.
```python
"""
Database Models Export.
This allows simple imports like: `from app.models.database import User, Thread`
"""
from app.models.thread import Thread
# Explicitly define what is exported
__all__ = ["Thread"]
```
Now that we have our database structure, we need to address **Data Transfer**.
A common mistake in beginner API development is exposing your database models directly to the user. This is dangerous (it leaks internal fields like `hashed_password`) and rigid. In production systems, we use **Schemas** (often called DTOs - Data Transfer Objects).
These schemas define the “contract” between your API and the outside world.
Let’s define the schemas for **Authentication**. We need strict validation here passwords must meet complexity requirements, and emails must be valid formats. For that we need to have a separate auth schema file so we should create `app/schemas/auth.py`.
```python
import re
from datetime import datetime
from pydantic import BaseModel, EmailStr, Field, SecretStr, field_validator
# ==================================================
# Authentication Schemas
# ==================================================
class UserCreate(BaseModel):
"""
Schema for user registration inputs.
"""
email: EmailStr = Field(..., description="User's email address")
# SecretStr prevents the password from being logged in tracebacks
password: SecretStr = Field(..., description="User's password", min_length=8, max_length=64)
@field_validator("password")
@classmethod
def validate_password(cls, v: SecretStr) -> SecretStr:
"""
Enforce strong password policies.
"""
password = v.get_secret_value()
if len(password) < 8:
raise ValueError("Password must be at least 8 characters long")
if not re.search(r"[A-Z]", password):
raise ValueError("Password must contain at least one uppercase letter")
if not re.search(r"[0-9]", password):
raise ValueError("Password must contain at least one number")
if not re.search(r'[!@#$%^&*(),.?":{}|<>]', password):
raise ValueError("Password must contain at least one special character")
return v
class Token(BaseModel):
"""
Schema for the JWT Access Token response.
"""
access_token: str = Field(..., description="The JWT access token")
token_type: str = Field(default="bearer", description="The type of token")
expires_at: datetime = Field(..., description="The token expiration timestamp")
class UserResponse(BaseModel):
"""
Public user profile schema (safe to return to frontend).
Notice we exclude the password here.
"""
id: int
email: str
token: Token
```
Next, we define the schemas in `app/schemas/chat.py` for the **Chat Interface**. This handles the input message from the user and the streaming response from the AI.
```python
import re
from typing import List, Literal
from pydantic import BaseModel, Field, field_validator
# ==================================================
# Chat Schemas
# ==================================================
class Message(BaseModel):
"""
Represents a single message in the conversation history.
"""
role: Literal["user", "assistant", "system"] = Field(..., description="Who sent the message")
content: str = Field(..., description="The message content", min_length=1, max_length=3000)
@field_validator("content")
@classmethod
def validate_content(cls, v: str) -> str:
"""
Sanitization: Prevent basic XSS or injection attacks.
"""
if re.search(r".*?", v, re.IGNORECASE | re.DOTALL):
raise ValueError("Content contains potentially harmful script tags")
return v
class ChatRequest(BaseModel):
"""
Payload sent to the /chat endpoint.
"""
messages: List[Message] = Field(..., min_length=1)
class ChatResponse(BaseModel):
"""
Standard response from the /chat endpoint.
"""
messages: List[Message]
class StreamResponse(BaseModel):
"""
Chunk format for Server-Sent Events (SSE) streaming.
"""
content: str = Field(default="")
done: bool = Field(default=False)
```
Finally, we need a schema for **LangGraph State**. LangGraph works by passing a state object between nodes (Agents, Tools, Memory). We need to explicitly define what that state looks like. Let’s create `app/schemas/graph.py`:
```python
from typing import Annotated
from langgraph.graph.message import add_messages
from pydantic import BaseModel, Field
# ==================================================
# LangGraph State Schema
# ==================================================
class GraphState(BaseModel):
"""
The central state object passed between graph nodes.
"""
# 'add_messages' is a reducer. It tells LangGraph:
# "When a new message comes in, append it to the list rather than overwriting it."
messages: Annotated[list, add_messages] = Field(
default_factory=list,
description="The conversation history"
)
# Context retrieved from Long-Term Memory (mem0ai)
long_term_memory: str = Field(
default="",
description="Relevant context extracted from vector store"
)
```
With our **Models** (Database Layer) and **Schemas** (API Layer) strictly defined, we have built a type-safe foundation for our application. We can now be confident that bad data won’t corrupt our database, and sensitive data won’t leak to our users.
## Security & Safeguards Layer
In a production environment, you cannot trust user input, and you cannot allow unlimited access to your resources.
You have also see in many API providers like together.ai, you see limited requests per minute to prevent abuse. This helps protect your infrastructure and control costs.
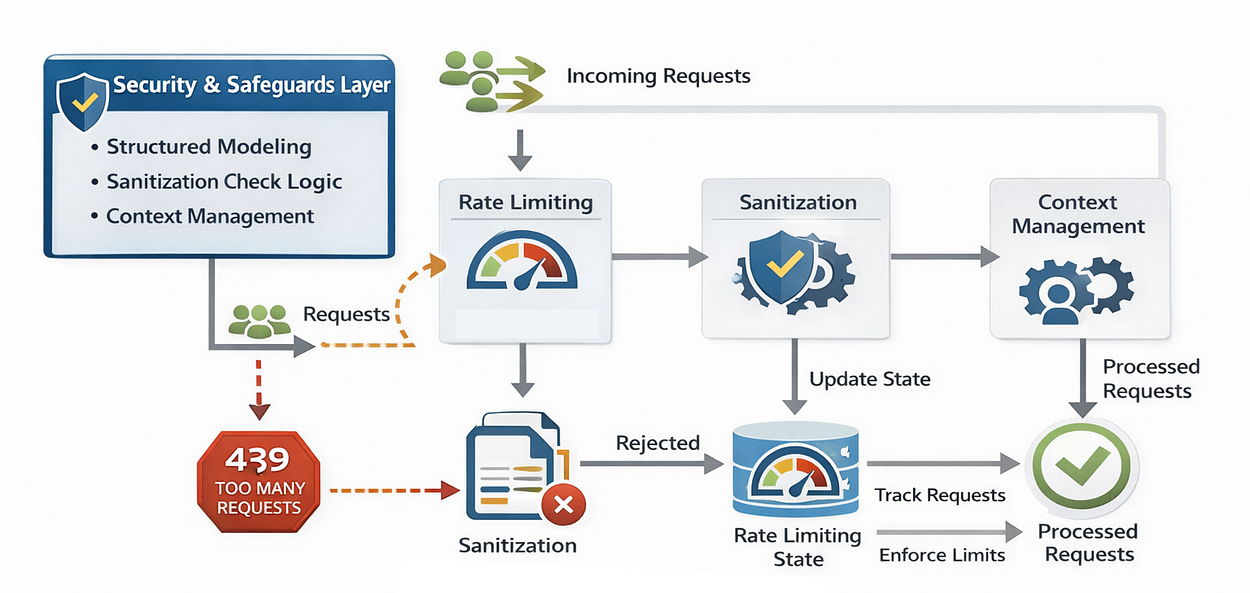
*Security Layer (Created by Fareed Khan)*
If you deploy an AI agent without safeguards, two things will happen:
1. **Abuse:** Bots will hammer your API, driving up your OpenAI bill.
2. **Security Exploits:** Malicious users will attempt injection attacks.
### Rate Limiting Feature
We need to implement **Rate Limiting** and **Sanitization utilities** before we write our business logic.
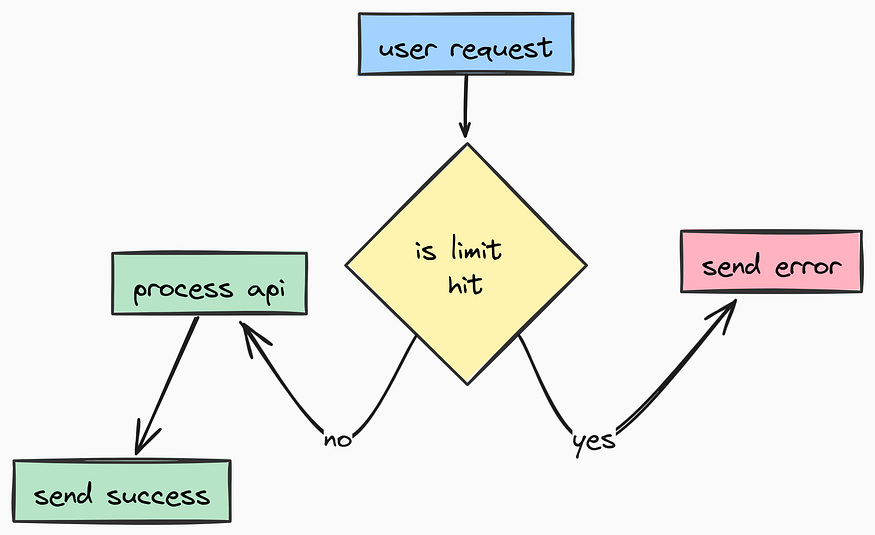
*Rate Limit test (Created by Fareed Khan)*
First, let’s look at Rate Limiting. We are going to use `SlowAPI`, a library that integrates easily with FastAPI. We need to define *how* we identify a unique user (usually by IP address) and apply the default limits we defined in our settings earlier. Let's create a `app/core/limiter.py` for this:
```python
from slowapi import Limiter
from slowapi.util import get_remote_address
from app.core.config import settings
# ==================================================
# Rate Limiter Configuration
# ==================================================
# We initialize the Limiter using the remote address (IP) as the key.
# you might need to adjust `key_func` to look at X-Forwarded-For headers.
limiter = Limiter(
key_func=get_remote_address,
default_limits=settings.RATE_LIMIT_DEFAULT
)
```
This way we can later decorate any specific API route with `@limiter.limit(...)` to apply granular control.
### Sanitization Check Logic
Next, we need **Sanitization**. Even though modern frontend frameworks handle a lot of XSS (Cross-Site Scripting) protection, a backend API should never blindly trust incoming strings.
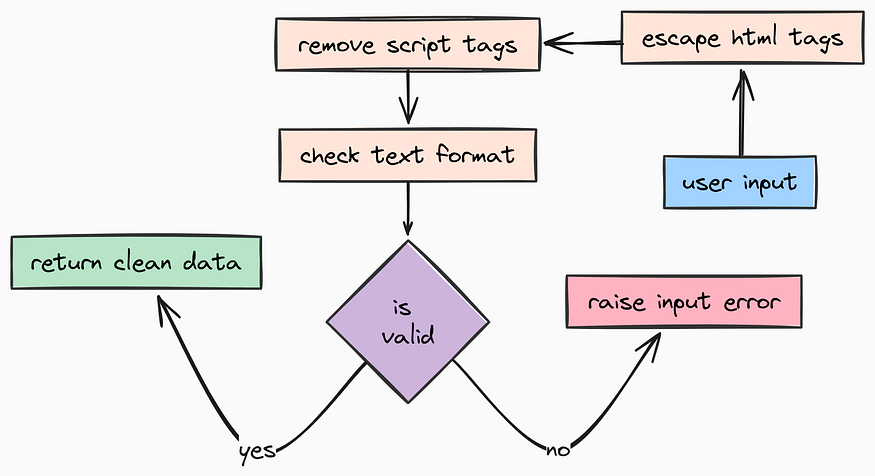
*Sanitization Check (Created by Fareed Khan)*
We need a utility function to sanitize strings. We will create `app/utils/sanitization.py` for this step:
```ruby
import html
import re
from typing import Any, Dict, List
# ==================================================
# Input Sanitization Utilities
# ==================================================
def sanitize_string(value: str) -> str:
"""
Sanitize a string to prevent XSS and other injection attacks.
"""
if not isinstance(value, str):
value = str(value)
# 1. HTML Escape: Converts