# LibtorchDetection
**Repository Path**: XuanMo1234/LibtorchDetection
## Basic Information
- **Project Name**: LibtorchDetection
- **Description**: No description available
- **Primary Language**: Unknown
- **License**: MIT
- **Default Branch**: main
- **Homepage**: None
- **GVP Project**: No
## Statistics
- **Stars**: 0
- **Forks**: 0
- **Created**: 2021-12-15
- **Last Updated**: 2021-12-15
## Categories & Tags
**Categories**: Uncategorized
**Tags**: None
## README

**C++ Library with Neural Networks for Object
Detection Based on [LibTorch](https://pytorch.org/).**
### [📚 Libtorch Tutorials 📚](https://github.com/AllentDan/LibtorchTutorials)
Visit [Libtorch Tutorials Project](https://github.com/AllentDan/LibtorchTutorials) if you want to know more about Libtorch Detection library.
### 📋 Table of content
1. [Examples](#examples)
2. [Train your own data](#trainingOwn)
3. [Installation](#installation)
4. [To do list](#todo)
5. [Thanks](#thanks)
6. [Citing](#citing)
7. [License](#license)
8. [Related repository](#related_repos)
### 💡 Examples
1. Download the [VOC](http://host.robots.ox.ac.uk/pascal/VOC/voc2012/VOCtrainval_11-May-2012.tar) image dataset, and split the dataset into train and val parts as follows:
```
dataset
├── train
│ ├── images
| | ├──xxx.jpg
| | └......
│ ├── labels
| | ├──xxx.xml
| | └......
├── val
│ ├── images
| | ├──zzz.jpg
| | └......
│ ├── labels
| | ├──zzz.xml
| | └......
```
2. Download the yolo4_tiny pretrained weight [here](https://github.com/AllentDan/LibtorchDetection/releases/download/0.1/yolo4_tiny.pt). And load it into your cpp project as follows:
```cpp
Detector detector;
detector.Initialize(-1, /*gpu id, -1 for cpu*/
416, /*resize width*/
416, /*resize height*/
"your path to class name.txt");
detector.Train("your path to dataset dir",
".jpg", /*image type*/
30,/*training epochs*/
4, /*batch size*/
0.001, /*learning rate*/
"path to save detector.pt",
"path to load pretrained yolo4_tiny.pt");
```
3. Predicting test. A detector.pt file is provided in the project [here](https://github.com/AllentDan/LibtorchDetection/releases/download/0.1/detector.pt) (trained on VOC for one epoch, just for testing...). Click and download, then you can directly test the detection result through:
```cpp
cv::Mat image = cv::imread("your path to 2007_005331.jpg");
Detector detector;
detector.Initialize(0, 416, 416, "your path to voc_classes.txt");
detector.LoadWeight("detector.pt"/*the saved .pt path*/);
detector.Predict(image, true,/*show result or not*/, 0.1, /*confidence thresh*/, 0.3/*nms thresh*/);
```
the predicted result shows as follow:
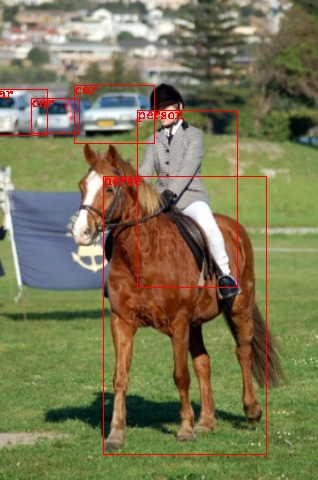
### 🧑🚀 Train your own data
- Create your own dataset. Using [labelImg](https://github.com/tzutalin/labelImg) through "pip install" and label your images. Split the output xml files and images into folders just like the example above.
- Training or testing. Just like the example of VOC detection, replace with your own dataset path.
### 🛠 Installation
**Dependency:**
- [Opencv 3+](https://opencv.org/releases/)
- [Libtorch 1.7+](https://pytorch.org/)
**Windows:**
Configure the environment for libtorch development. [Visual studio](https://allentdan.github.io/2020/03/05/windows-libtorch-configuration/) and [Qt Creator](https://allentdan.github.io/2020/03/05/QT-Creator-Opencv-Libtorch-CUDA-English/) are verified for libtorch1.7+.
**Linux && MacOS:**
Install libtorch and opencv.
For libtorch, follow the official pytorch c++ tutorials [here](https://pytorch.org/tutorials/advanced/cpp_export.html).
For opencv, follow the official opencv install steps [here](https://github.com/opencv/opencv).
If you have already configured them both, congratulations!!! Download the pretrained weight [here](https://github.com/AllentDan/LibtorchDetection/releases/download/0.1/yolo4_tiny.pt) and a demo .pt file [here](https://github.com/AllentDan/LibtorchDetection/releases/download/0.1/detector.pt) into weights. Change the CMAKE_PREFIX_PATH to your own in CMakeLists.txt. Then just do the following:
```
cd build
cmake ..
make
./LibtorchDetection
```
### ⏳ ToDo
- [ ] More detection architectures, mainly one-stage algorithms.
- [ ] Data augmentations.
- [ ] Training tricks.
### 🤝 Thanks
This project is under developing. By now, these projects helps a lot.
- [official pytorch](https://github.com/pytorch/pytorch)
- [yolo4 tiny](https://github.com/bubbliiiing/yolov4-tiny-pytorch)
- [labelImg](https://github.com/tzutalin/labelImg)
- [tiny xml](https://github.com/leethomason/tinyxml2)
### 📝 Citing
```
@misc{Chunyu:2021,
Author = {Chunyu Dong},
Title = {Libtorch Detection},
Year = {2021},
Publisher = {GitHub},
Journal = {GitHub repository},
Howpublished = {\url{https://github.com/AllentDan/LibtorchDetection}}
}
```
### 🛡️ License
Project is distributed under [MIT License](https://github.com/qubvel/segmentation_models.pytorch/blob/master/LICENSE).
## Related repository
Based on libtorch, I released following repositories:
- [LibtorchTutorials](https://github.com/AllentDan/LibtorchTutorials)
- [LibtorchSegmentation](https://github.com/AllentDan/LibtorchSegmentation)
- [LibtorchDetection](https://github.com/AllentDan/LibtorchDetection)
Last but not least, **don't forget** your star...
Feel free to commit issues or pull requests, contributors wanted.