# SpringCloudH2020
**Repository Path**: alanlxx/SpringCloudH2020
## Basic Information
- **Project Name**: SpringCloudH2020
- **Description**: 1230000000000000000
- **Primary Language**: Unknown
- **License**: Not specified
- **Default Branch**: master
- **Homepage**: None
- **GVP Project**: No
## Statistics
- **Stars**: 0
- **Forks**: 0
- **Created**: 2021-02-08
- **Last Updated**: 2022-07-01
## Categories & Tags
**Categories**: Uncategorized
**Tags**: SpringCloud, SpringBoot
## README
# Spring Cloud learning notes
## 一、什么是微服务架构
1. 微服务架构是一种`架构模式`,将`单一`的应用程序划分为`一组`小的服务,
2. 服务之间相互配合,提供一个完整的服务体系,
3. 每个服务`独立`的运行在`进程`中,采用`轻量级的通信机制`相互协作(通常基于HTTP的Restful API)
4. 每个服务都围绕着`一个`具体的业务进行构建,并且能够`独立`部署到生产环境等
## 二、微服务架构中有什么
1. 服务注册与发现 7. 配置中心
2. 服务调用 8. 服务网关
3. 服务熔断 9. 服务监控
4. 服务负载均衡 10. 全链路追踪
5. 服务降级 11. 自动化构建部署
6. 服务消息队列 12. 服务调度
## 三、什么是Spring Cloud
Spring Cloud 是微服务一站式解决方案,是多种微服务架构落地技术的集合体,称为微服务全家桶,为微 服务提供统一管理
## 四、Spring Cloud 与 Spring Boot 版本对应 查看
https://start.spring.io/actuator/info
## 五、注册与发现
### 什么是服务治理
传统的RPC远程调用框架中,管理服务与服务之间的依赖关系比较复杂,所以需要服务治理,
管理服务之间的`依赖关系`,可以实现服务调用,`复杂均衡`,`容错`等,实现服务注册与发现
### 什么是服务注册
当服务`启动的时候`,会把服务的信息(比如:服务通讯地址,服务别名等)注册到注册到`注册中心`上,
服务消费者通过`别名`的方式在注册中心上获取实际的服务通讯地址,实现RPC调用
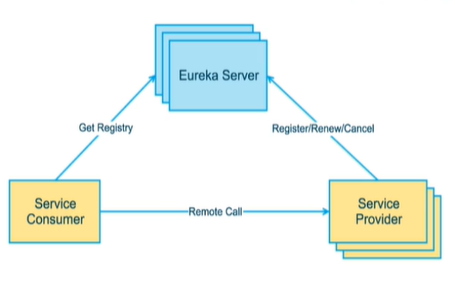
### Eureka
**Eureka包括两个组件 Eureka Client 和 Eureka Server**
#### Eureka Client
是一个Java客户端,用于简化 Eureka Server 交互,同时 也具备一个内置的 使用`轮询负载`算法的 负载均衡器,在服务启动后,会向 Eureka Server 发送心跳包(`周期默认为30秒`),如果 Eureka Server 在`多个心跳周期`内没有收到 服务发送过来的心跳包, Eureka Server 将会从服务列表中移除该服 务(`默认90秒`)
#### **Eureka Server**
在服务启动的时候,会向 Eureka Server 中注册相关信息,这样 Eureka Server 就会将信息保存到 注册表中
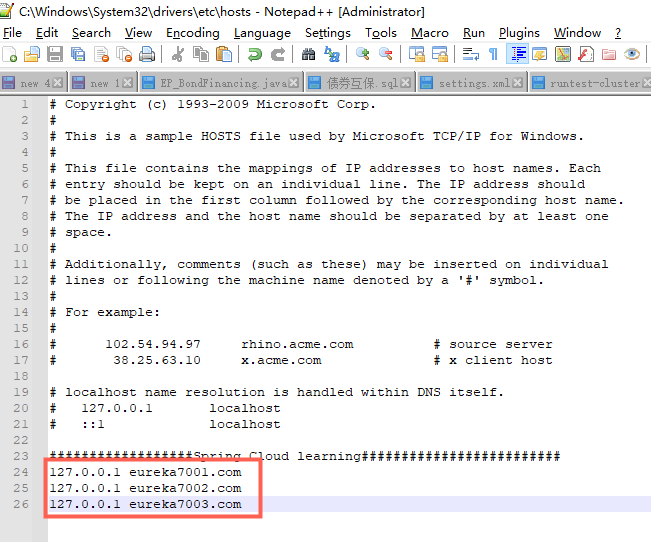
#### Eureka 集群安装
1. **修改本地 host 文件**
路径:C:\Windows\System32\drivers\etc
### CAP理论

C:强一致性
A:高可用性
P:分区容错性
(P:是分布式架构一定要满足的)
Eureka满足的是:AP Zookeeper满足的是:CP Consul满足的是:CP Nacos:AP
## 六、负载均衡
### RestTemplate
#### getForObject() 和 getForEntity() 区别
getForObject() 响应体为数据转化为对象,可以理解为JSON串
getForEntity() 返回的是ResponseEntity对象,包含一些详细的信息,比如响应头,状态码,响应体等
### LB(Load Balance)负载均衡是什么
简单来说就是,将用户请求平摊的分配到多个服务器上,从而达到系统的高可用
#### 集中式LB是什么
在服务消费方和服务提供方之间,使用一个LB设施,由LB通过某种策略将请求发送到服务提供方
#### 进程内LB是什么
将LB逻辑集成到服务消费方,消费方从注册中心在获取到服务列表,然后选择出合适的服务器请求
Ribbon 就属于进程内LB
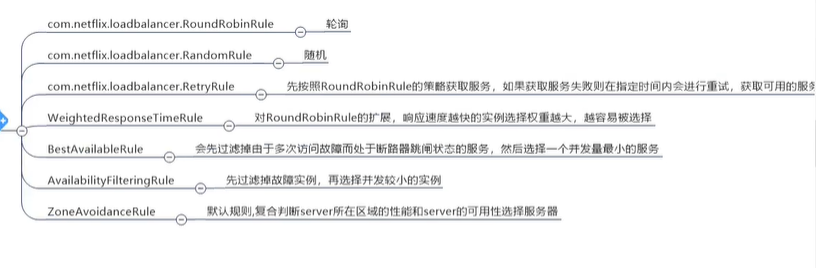
### Ribbon
Spring Cloud Ribbon 是基于NetFlix Ribbon 实现的一个客户端,负载均衡工具
主要提供客户端的负载均衡算法和服务调用
#### Ribbon 和 Nginx 有什么区别
Nginx 是 服务端负载均衡,客户端所有的请求交给Nginx ,由Nginx 发起请求,负载均衡实在服务端实现的
Ribbon 在调用微服务的时候,会在注册中心把服务列表缓存到 JVM 中,从而在本地实现RPC远程调用
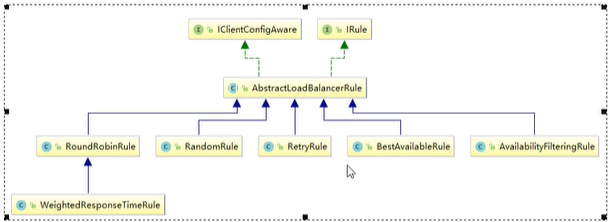
#### Ribbon 实现定制化负载均衡规则
1. 创建Config配置类,(注意:配置类不能放在能够被@ComentScan扫描到的包下,SpringBoot启动类 带有@ComentScan注解)
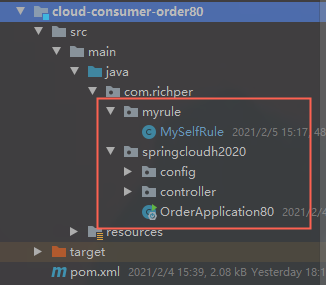
```java
package com.richper.myrule;
import com.netflix.loadbalancer.BestAvailableRule;
import com.netflix.loadbalancer.IRule;
import org.springframework.cloud.client.loadbalancer.LoadBalanced;
import org.springframework.context.annotation.Bean;
import org.springframework.context.annotation.Configuration;
@Configuration
public class MySelfRule {
// @Bean
// @LoadBalanced
// public IRule randomRule(){
// return new RandomRule();
// }
@Bean
@LoadBalanced
public IRule BestAvailableRule(){
return new BestAvailableRule();
}
}
```
2. 启动类加注解,表明使用的负载均衡配置
@RibbonClient(name = "CLOUD-PAYMENT-SERVICE",configuration = MySelfRule.class)
name表示 微服务名称,configuration表示配置类
```java
package com.richper.springcloudh2020;
import com.richper.myrule.MySelfRule;
import org.springframework.boot.SpringApplication;
import org.springframework.boot.autoconfigure.SpringBootApplication;
import org.springframework.cloud.netflix.eureka.EnableEurekaClient;
import org.springframework.cloud.netflix.ribbon.RibbonClient;
@SpringBootApplication
@EnableEurekaClient
@RibbonClient(name = "CLOUD-PAYMENT-SERVICE",configuration = MySelfRule.class)
public class OrderApplication80 {
public static void main(String[] args) {
SpringApplication.run(OrderApplication80.class,args);
}
}
```
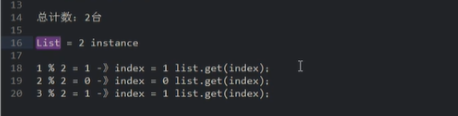
#### Ribbon轮询算法原理
注意:(服务重启后,接口请求次数会被重置为1)

### Feign
### 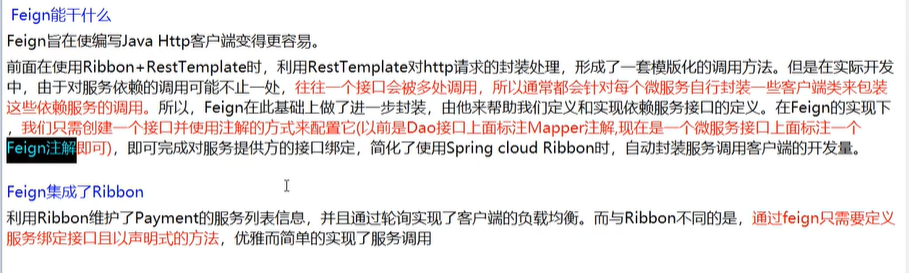
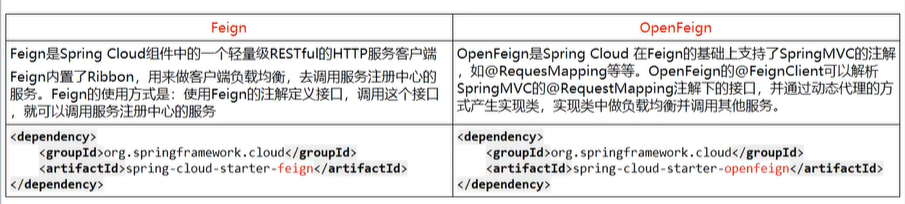
#### Feign 和 openFeign 区别
#### OpenFeign 超时时间控制
openFeign 底层是 Ribbon , 其默认超时时间为1秒,响应时间超过1秒就会报异常
设置 超时时间:
```properties
ribbon:
#设置为5秒
ReadTimeout: 5000
#设置为5秒
ConnectTimeout: 5000
```
#### OpenFeign日志级别
**配置:**
```properties
logging:
level:
com.richper.springcloudh2020.service.OrderFeignService: debug
```
```java
package com.richper.springcloudh2020.config;
import feign.Logger;
import org.springframework.context.annotation.Bean;
import org.springframework.context.annotation.Configuration;
@Configuration
public class FeignConfig {
@Bean
Logger.Level level(){
return Logger.Level.FULL;
}
}
```
## 七、服务降级
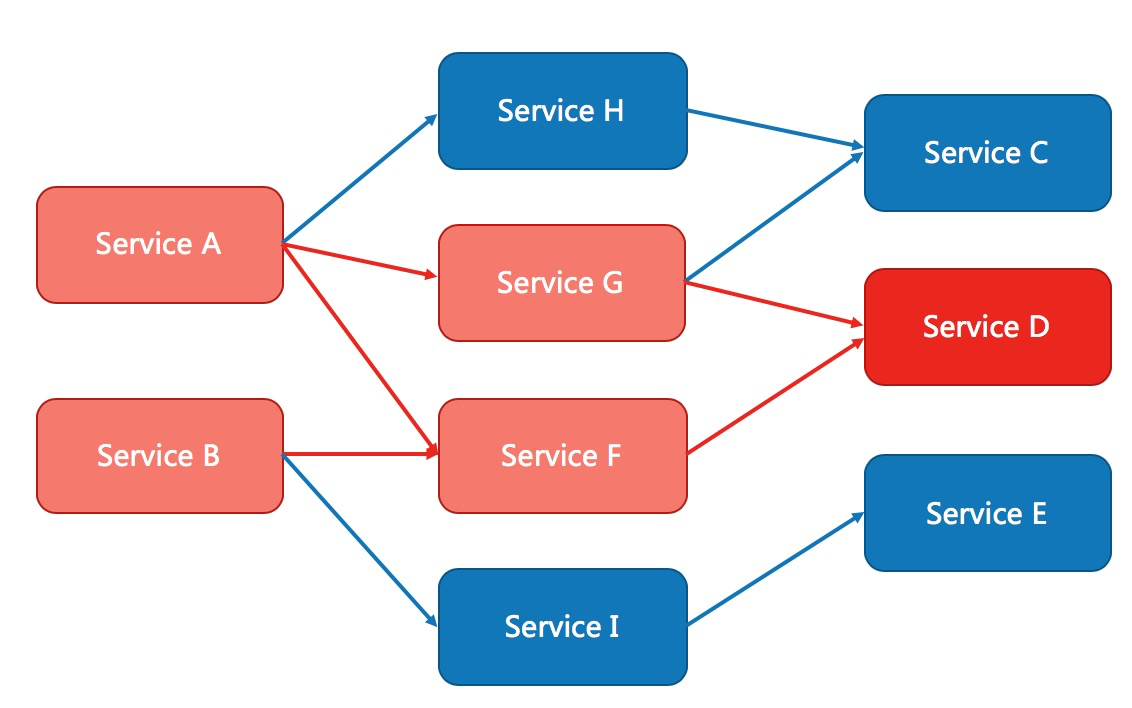
### 服务雪崩
在一个调用链中,A调用B,B调用C,C调用D
当一个服务出现故障时,导致整条链路故障的情形被称为服务雪崩
### 服务降级
1. 当下游响应过慢时,下游主动放弃一些不太重要的业务,释放资源,提高响应速度。
2.当下游不可用时,上有主动调用本地降级逻辑,避免卡顿,响应用户。
### 服务熔断
当一个下游服务出现故障或者响应过慢时,上游服务为了保证可用性不在调用此服务,直接返回,快速释 放资源。服务恢复正常以后,恢复调用链路
### 服务限流
常用算法:计数器、令牌桶、漏桶。
### Hystrix
#### 服务降级
##### 单个方法配置
客户端启动 80 需要 开启 feign hystrix配置 服务提供方不需要配置,直接使用注解配置
```properties
#启用Hystrix
feign:
hystrix:
enabled: true
```
```java
@GetMapping("/payment_timeOut")
@HystrixCommand(fallbackMethod = "payment_timeOutHandler",commandProperties = {
@HystrixProperty(name = "execution.isolation.thread.timeoutInMilliseconds",value = "1500")
})
public String payment_timeOut(){
return hystrixOrderService.payment_timeOut();
}
public String payment_timeOutHandler(){
return "线程池:"+Thread.currentThread().getName()+" 80系统忙,请稍后再试。, ┭┮﹏┭┮";
}
```
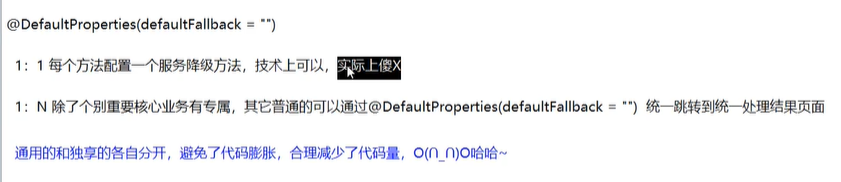
##### 统一配置:
###### 第一种:
```java
package com.richper.springcloudh2020.controller;
import com.netflix.hystrix.contrib.javanica.annotation.DefaultProperties;
import com.netflix.hystrix.contrib.javanica.annotation.HystrixCommand;
import com.richper.springcloudh2020.service.HystrixOrderService;
import org.springframework.web.bind.annotation.GetMapping;
import org.springframework.web.bind.annotation.RequestMapping;
import org.springframework.web.bind.annotation.RestController;
import javax.annotation.Resource;
@RestController
@RequestMapping("/consumer")
@DefaultProperties(defaultFallback = "payment_timeOutHandler")
public class HystrixOrderController {
@Resource
private HystrixOrderService hystrixOrderService;
@GetMapping("/payment_ok")
public String payment_ok(){
return hystrixOrderService.payment_ok();
}
@GetMapping("/payment_timeOut")
// @HystrixCommand(fallbackMethod = "payment_timeOutHandler",commandProperties = {
// @HystrixProperty(name = "execution.isolation.thread.timeoutInMilliseconds",value = "1500")
// })
@HystrixCommand
public String payment_timeOut(){
return hystrixOrderService.payment_timeOut();
}
public String payment_timeOutHandler(){
return "线程池:"+Thread.currentThread().getName()+" 80系统忙,请稍后再试。, ┭┮﹏┭┮";
}
}
```
###### 第二种:
1.创建HystrixOrderFallBack 实现 HystrixOrderService 类
```java
package com.richper.springcloudh2020.service.fallback;
import com.richper.springcloudh2020.service.HystrixOrderService;
import org.springframework.stereotype.Component;
@Component
public class HystrixOrderFallBack implements HystrixOrderService {
@Override
public String payment_ok() {
return Thread.currentThread().getName()+" payment_ok-8005服务宕机请稍后再试, ┭┮﹏┭┮";
}
@Override
public String payment_timeOut() {
return Thread.currentThread().getName()+" payment_timeOut-8005服务宕机请稍后再试, ┭┮﹏┭┮";
}
}
```
2. HystrixOrderService 注解 @FeignClient 添加 属性: fallback = HystrixOrderFallBack .class
```java
package com.richper.springcloudh2020.service;
import com.richper.springcloudh2020.service.fallback.HystrixOrderFallBack;
import org.springframework.cloud.openfeign.FeignClient;
import org.springframework.stereotype.Component;
import org.springframework.web.bind.annotation.GetMapping;
@FeignClient(value = "CLOUD-HYSTRIX-PAYMENT-SERVICE",fallback = HystrixOrderFallBack.class)
@Component
public interface HystrixOrderService {
@GetMapping("/payment_ok")
String payment_ok();
@GetMapping("/payment_timeOut")
String payment_timeOut();
}
```
#### 服务熔断
pom 依赖:
```xml
org.springframework.cloud
spring-cloud-starter-netflix-hystrix
```
启动类配置 注解 : @EnableCircuitBreaker
```java
package com.richper.springcloudh2020;
import com.netflix.hystrix.contrib.metrics.eventstream.HystrixMetricsStreamServlet;
import lombok.extern.slf4j.Slf4j;
import org.springframework.boot.SpringApplication;
import org.springframework.boot.autoconfigure.SpringBootApplication;
import org.springframework.boot.web.servlet.ServletRegistrationBean;
import org.springframework.cloud.client.circuitbreaker.EnableCircuitBreaker;
import org.springframework.cloud.netflix.eureka.EnableEurekaClient;
import org.springframework.context.annotation.Bean;
@SpringBootApplication
@EnableEurekaClient
@EnableCircuitBreaker
public class HystrixPaymentApp8005 {
public static void main(String[] args) {
SpringApplication.run(HystrixPaymentApp8005.class,args);
}
/**
* 配置 hystrix dashboard 监控平台配置 spring cloud 升级后留下的坑 9001 监控 8001
* @return
*/
@Bean
public ServletRegistrationBean getServlet(){
HystrixMetricsStreamServlet streamServlet = new HystrixMetricsStreamServlet();
ServletRegistrationBean servletRegistrationBean = new ServletRegistrationBean<>(streamServlet);
servletRegistrationBean.setLoadOnStartup(1);
servletRegistrationBean.addUrlMappings("/hystrix.stream");
servletRegistrationBean.setName("HystrixMetricsStreamServlet");
return servletRegistrationBean;
}
}
```
controller 示例:
```java
package com.richper.springcloudh2020.controller;
import cn.hutool.core.util.IdUtil;
import com.netflix.hystrix.contrib.javanica.annotation.HystrixCommand;
import com.netflix.hystrix.contrib.javanica.annotation.HystrixProperty;
import org.springframework.web.bind.annotation.GetMapping;
import org.springframework.web.bind.annotation.PathVariable;
import org.springframework.web.bind.annotation.RestController;
import java.util.concurrent.TimeUnit;
@RestController
public class HystrixPaymentController {
//================服务熔断========华丽的分割线========服务熔断==================
@GetMapping("/div/{id}")
@HystrixCommand(fallbackMethod = "divFuse",commandProperties = {
@HystrixProperty(name = "circuitBreaker.enabled",value = "true"),//开启断路器,默认为false
@HystrixProperty(name = "circuitBreaker.requestVolumeThreshold",value = "10"),// 时间范围内请求次数
@HystrixProperty(name = "circuitBreaker.sleepWindowInMilliseconds",value = "10000"),//时间范围
@HystrixProperty(name = "circuitBreaker.errorThresholdPercentage",value = "60")//时间范围内达到60%的错误率
})
//================注释========华丽的分割线========注释==================
//10秒范围内10次请求达到60%的错误率,断路器从关闭状态更改为打开状态,
// 在下一个时间范围内,尝试着通过一个请求,看服务是否恢复,如果没有恢复,则还是打开状态,
// 如果恢复了,则关闭断路器,恢复服务调用链
public String div(@PathVariable("id") int id){
if (id <= 0){
throw new RuntimeException("ID不能为0");
}
int i = 100 / id;
return Thread.currentThread().getName()+" -> IdUtil.simpleUUID() :100 ➗ "+id+" = "+i;
}
public String divFuse(int id){
return Thread.currentThread().getName()+" :8005服务异常请稍后再试...id不能为0";
}
}
```
#### 导致服务降级的几种原因
1.断路器为打开状态
2.信号量、队列满了
3.线程池没有可用资源处理
4.请求超时、异常、宕机等
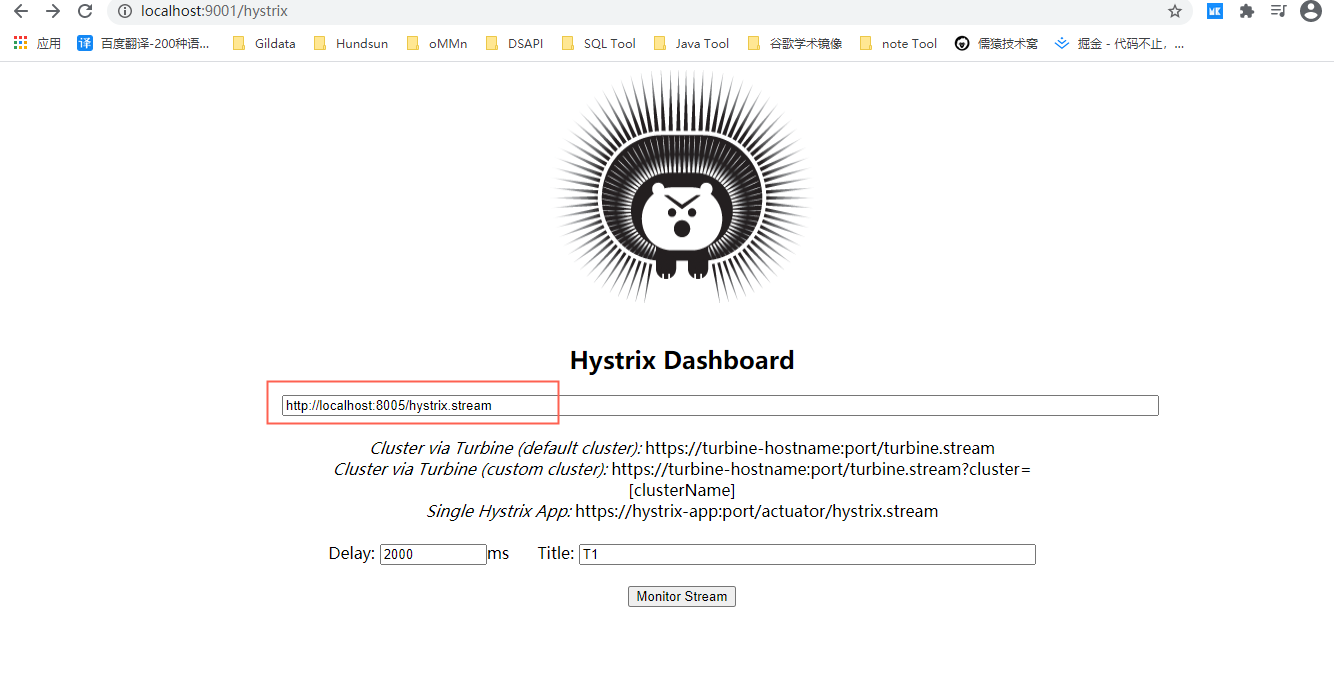
### Hystrix仪表盘图像化监控
##### DashBoard 配置:
1. 添加pom 依赖
```xml
org.springframework.cloud
spring-cloud-starter-netflix-hystrix-dashboard
org.springframework.cloud
spring-cloud-starter-netflix-hystrix
org.springframework.cloud
spring-cloud-starter-openfeign
org.springframework.cloud
spring-cloud-starter-netflix-eureka-client
com.richper.SpringCloudH2020
cloud-api-commons
${project.version}
org.springframework.boot
spring-boot-starter-web
org.springframework.boot
spring-boot-starter-actuator
org.springframework.boot
spring-boot-devtools
runtime
true
org.projectlombok
lombok
true
org.springframework.boot
spring-boot-starter-test
test
```
2.配置文件注册进Eurerka
```properties
server:
port: 9001
spring:
application:
name: cloud-consumer-dashboard-service
# #热部署
# devtools:
# restart:
# enabled: true #是否支持热部署
eureka:
client:
#是否将自己注册进EurekaServer,默认为:true
register-with-eureka: true
#是否从EurekaServer抓取已有的注册信息,默认为:true,单节点无所谓,集群必须设置为true,才能配合ribbon使用负载均衡
fetch-registry: true
service-url:
defaultZone: http://localhost:7001/eureka
# 集群版 http://eureka7001.com:7001/eureka,http://eureka7002.com:7002/eureka
# defaultZone: http://eureka7001.com:7001/eureka,http://eureka7002.com:7002/eureka,http://eureka7003.com:7003/eureka
instance:
instance-id: dashboard9001
# 访问路径可以显示ip地址
prefer-ip-address: true
```
3.启动类
```java
package com.richper.springcloudh2020;
import org.springframework.boot.SpringApplication;
import org.springframework.boot.autoconfigure.SpringBootApplication;
import org.springframework.cloud.netflix.hystrix.dashboard.EnableHystrixDashboard;
@SpringBootApplication
@EnableHystrixDashboard
public class DashboardApplication9001 {
public static void main(String[] args) {
SpringApplication.run(DashboardApplication9001.class,args);
}
}
```
##### 服务端配置(被监听端)配置:
1.添加Pom依赖 注意 web 和 actuator 依赖必须要有的 是核心包
```xml
org.springframework.cloud
spring-cloud-starter-netflix-hystrix
org.springframework.cloud
spring-cloud-starter-netflix-eureka-client
com.richper.SpringCloudH2020
cloud-api-commons
${project.version}
org.springframework.boot
spring-boot-starter-web
org.springframework.boot
spring-boot-starter-actuator
org.mybatis.spring.boot
mybatis-spring-boot-starter
com.alibaba
druid-spring-boot-starter
mysql
mysql-connector-java
org.springframework.boot
spring-boot-starter-jdbc
org.springframework.boot
spring-boot-devtools
runtime
true
org.projectlombok
lombok
true
org.springframework.boot
spring-boot-starter-test
test
```
启动类加配置:
```java
package com.richper.springcloudh2020;
import com.netflix.hystrix.contrib.metrics.eventstream.HystrixMetricsStreamServlet;
import lombok.extern.slf4j.Slf4j;
import org.springframework.boot.SpringApplication;
import org.springframework.boot.autoconfigure.SpringBootApplication;
import org.springframework.boot.web.servlet.ServletRegistrationBean;
import org.springframework.cloud.client.circuitbreaker.EnableCircuitBreaker;
import org.springframework.cloud.netflix.eureka.EnableEurekaClient;
import org.springframework.context.annotation.Bean;
@SpringBootApplication
@EnableEurekaClient
@EnableCircuitBreaker
public class HystrixPaymentApp8005 {
public static void main(String[] args) {
SpringApplication.run(HystrixPaymentApp8005.class,args);
}
/**
* 配置 hystrix dashboard 监控平台配置 spring cloud 升级后留下的坑 9001 监控 8001
* @return
*/
@Bean
public ServletRegistrationBean getServlet(){
HystrixMetricsStreamServlet streamServlet = new HystrixMetricsStreamServlet();
ServletRegistrationBean servletRegistrationBean = new ServletRegistrationBean<>(streamServlet);
servletRegistrationBean.setLoadOnStartup(1);
servletRegistrationBean.addUrlMappings("/hystrix.stream");
servletRegistrationBean.setName("HystrixMetricsStreamServlet");
return servletRegistrationBean;
}
}
```
##### 测试访问
地址:http://localhost:9001/hystrix
创建监听:http://localhost:8005/hystrix.stream
注:http://localhost:端口号/hystrix.stream
## 八、服务网关
### Zuul 和 spring cloud GateWay 有什么区别?
`zuul` 采用的是 I/O 阻塞式架构模式,性能上不是特别的占优势,在 zuul 的基础上 改进 `zuul 2` 使用 `Netty`非阻塞 和 长连接的方式,但是 `zuul 2` 出了点问题,`spring` 出了 `GateWay` 也是基于`Netty` 非阻塞 和 长连接 方式,底层用的是 `webFlux` 和 `Netty`
### GateWay路由配置
在 网关 微服务上配置
第一种 配置文件:
```properties
server:
port: 9527
spring:
application:
#微服务名称
name: cloud-getway-service
cloud:
gateway:
routes:
- id: payment_route # 路由的id,没有规定规则但要求唯一,建议配合服务名
#路由 匹配后提供服务的路由地址
uri: http://localhost:8005
predicates:
- Path=/payment_ok # 断言,路径相匹配的进行路由
- id: payment_route2
uri: http://localhost:8005
predicates:
Path=/div/** #断言,路径相匹配的进行路由 /div/** 表示 /div/{id} 后面的参数
#热部署配置
devtools:
restart:
enabled: true #是否支持热部署
eureka:
client:
#是否将自己注册进EurekaServer,默认为:true
register-with-eureka: true
#是否从EurekaServer抓取已有的注册信息,默认为:true,单节点无所谓,集群必须设置为true,才能配合ribbon使用负载均衡
fetch-registry: true
service-url:
defaultZone: http://localhost:7001/eureka
# 集群版 http://eureka7001.com:7001/eureka,http://eureka7002.com:7002/eureka
# defaultZone: http://eureka7001.com:7001/eureka,http://eureka7002.com:7002/eureka,http://eureka7003.com:7003/eureka
instance:
instance-id: getway9527
# 访问路径可以显示ip地址
prefer-ip-address: true
#每隔 30秒 向服务注册段发送一次心跳包,默认30秒
lease-renewal-interval-in-seconds: 30
#注册服务端 收到心跳包最后一次后等待时间上限35秒,默认90秒,超时将会剔除此服务
lease-expiration-duration-in-seconds: 35
```
第二种 配置类:
```java
package com.richper.springcloudh2020.config;
import org.springframework.cloud.gateway.route.RouteLocator;
import org.springframework.cloud.gateway.route.builder.RouteLocatorBuilder;
import org.springframework.context.annotation.Bean;
import org.springframework.context.annotation.Configuration;
@Configuration
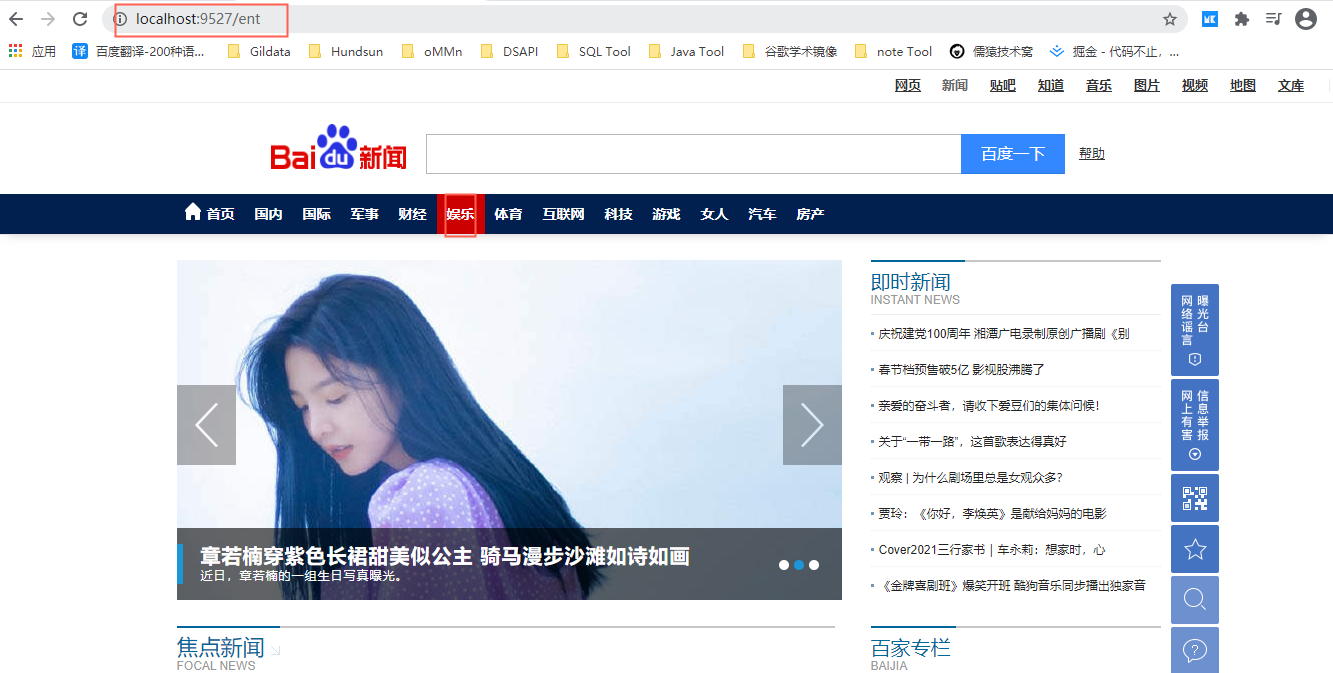
public class GetWayConfig {
@Bean
public RouteLocator consumerRoute(RouteLocatorBuilder routeLocatorBuilder){
return routeLocatorBuilder.routes().
route("route_1",r -> r.path("/guonei").uri("http://news.baidu.com/guonei")).
route("route_2",r -> r.path("/lady").uri("http://news.baidu.com/lady")).
route("route_3",r -> r.path("/mil").uri("http://news.baidu.com/mil")).
route("route_4",r -> r.path("/guoji").uri("http://news.baidu.com/guoji")).
route("route_5",r -> r.path("/finance").uri("http://news.baidu.com/finance")).
route("route_6",r -> r.path("/ent").uri("http://news.baidu.com/ent")).
route("route_7",r -> r.path("/sports").uri("http://news.baidu.com/sports")).
route("route_8",r -> r.path("/internet").uri("http://news.baidu.com/internet")).
route("route_9",r -> r.path("/tech").uri("http://news.baidu.com/tech")).
route("route_10",r -> r.path("/game").uri("http://news.baidu.com/game")).
route("route_11",r -> r.path("/auto").uri("http://news.baidu.com/auto")).
route("route_12",r -> r.path("/house").uri("http://news.baidu.com/house")).
route("route_12",r -> r.path("/").uri("http://news.baidu.com/"))
.build();
}
}
```
示例
### GateWay动态路由配置:
在 网关 微服务上配置
#### 动态路由 实现 轮询负载
配置类:
```properties
server:
port: 9527
spring:
application:
#微服务名称
name: cloud-getway-service
cloud:
gateway:
discovery:
locator:
enabled: true #开启从注册中心动态创建路由功能,利用微服务名进行路由
routes:
- id: payment_route # 路由的id,没有规定规则但要求唯一,建议配合服务名
#匹配后提供服务的路由地址
# uri: http://localhost:8005
uri: lb://CLOUD-HYSTRIX-PAYMENT-SERVICE #更改为 微服务名称
predicates:
- Path=/id # 断言,路径相匹配的进行路由
- id: payment_route2
# uri: http://localhost:8005
uri: lb://CLOUD-HYSTRIX-PAYMENT-SERVICE #更改为 微服务名称
predicates:
Path=/div/** #断言,路径相匹配的进行路由 /div/** 表示 /div/{id} 后面的参数
#热部署配置
devtools:
restart:
enabled: true #是否支持热部署
eureka:
client:
#是否将自己注册进EurekaServer,默认为:true
register-with-eureka: true
#是否从EurekaServer抓取已有的注册信息,默认为:true,单节点无所谓,集群必须设置为true,才能配合ribbon使用负载均衡
fetch-registry: true
service-url:
defaultZone: http://localhost:7001/eureka
# 集群版 http://eureka7001.com:7001/eureka,http://eureka7002.com:7002/eureka
# defaultZone: http://eureka7001.com:7001/eureka,http://eureka7002.com:7002/eureka,http://eureka7003.com:7003/eureka
instance:
instance-id: getway9527
# 访问路径可以显示ip地址
prefer-ip-address: true
#每隔 30秒 向服务注册段发送一次心跳包,默认30秒
lease-renewal-interval-in-seconds: 30
#注册服务端 收到心跳包最后一次后等待时间上限35秒,默认90秒,超时将会剔除此服务
lease-expiration-duration-in-seconds: 35
```
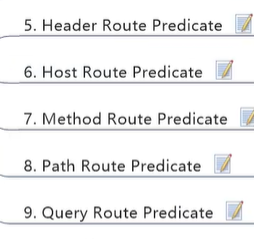
#### GateWay 断言 类型
##### Path: 匹配路径
例:- Path=/lb/**
##### After: 当前日期在指定日期之后
例:- After=2021-02-09T13:39:54.368+08:00[Asia/Shanghai]
在2021年2月9号下午13点39分54秒之后 上海时间
日期格式获取:
```java
import java.time.ZonedDateTime;
public class T {
public static void main(String[] args) {
ZonedDateTime zdt = ZonedDateTime.now();
System.out.println(zdt);//2021-02-09T13:39:54.368+08:00[Asia/Shanghai]
}
}
```
##### **Before**:当前日期在指定日期之前
例:- Before=2021-02-09T13:39:54.368+08:00[Asia/Shanghai]
Between: 当前日期在指定日期区间
例:- Between=2021-02-09T13:39:54.368+08:00[Asia/Shanghai],2021-03-09T13:39:54.368+08:00[Asia/Shanghai]
两个日期之间逗号分隔
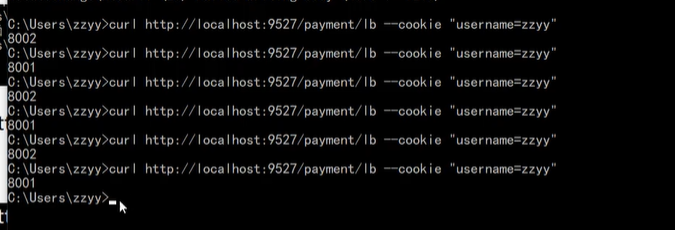
##### Cookie: cookie匹配
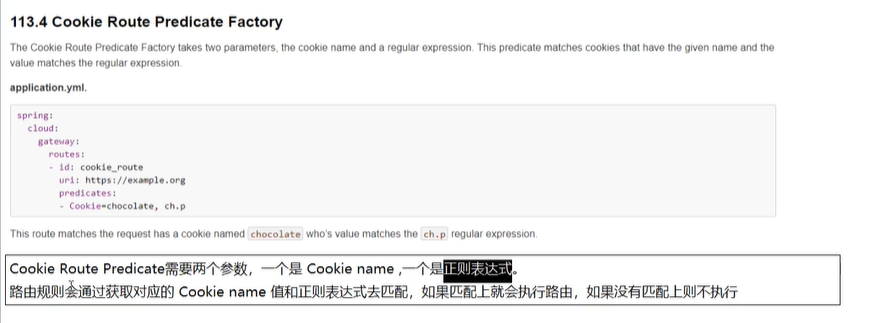
例:- Cookie=username,zzyy
测试: curl http://localhost:9627/paymebt/lb --cokie “username,zzyy”
#####
##### 等等….
文档地址:https://docs.spring.io/spring-cloud-gateway/docs/current/reference/html/#gateway-request-predicates-factories
### GateWay 过滤器(Filter)
第一种:文档地址:https://docs.spring.io/spring-cloud-gateway/docs/current/reference/html/#gatewayfilter-factories
第二种:
#### GateWay 自定义全局过滤器
定义Filter类 实现 GlobalFilter 和 Ordered 接口
```java
package com.richper.springcloudh2020.filter;
import org.springframework.cloud.gateway.filter.GatewayFilterChain;
import org.springframework.cloud.gateway.filter.GlobalFilter;
import org.springframework.core.Ordered;
import org.springframework.http.HttpStatus;
import org.springframework.http.server.reactive.ServerHttpResponse;
import org.springframework.stereotype.Component;
import org.springframework.web.server.ServerWebExchange;
import reactor.core.publisher.Mono;
@Component
public class RequestFilter implements GlobalFilter, Ordered {
@Override
public Mono filter(ServerWebExchange exchange, GatewayFilterChain chain) {
String userName = exchange.getRequest().getQueryParams().getFirst("userName");
if (userName == null) {//userName 为空 拦截,非法请求
ServerHttpResponse response = exchange.getResponse();
//设置 响应状态码,为 不接受 NOT_ACCEPTABLE
response.setStatusCode(HttpStatus.NOT_ACCEPTABLE);
return response.setComplete();
}
return chain.filter(exchange);
}
/**
* 过滤器加载的顺序,返回的值越小,代表这个过滤器越 先 被加载
* @return
*/
@Override
public int getOrder() {
return 0;
}
}
```
## 九、配置中心

### spring cloud config
#### 1.创建gitee仓库 或者 github 等
#### 2.创建server端配置中心
如:cloud-config-center3344
##### 添加 pom 依赖
```xml
org.springframework.cloud
spring-cloud-config-server
org.springframework.cloud
spring-cloud-starter-netflix-eureka-client
org.springframework.boot
spring-boot-starter-web
org.springframework.boot
spring-boot-starter-actuator
org.springframework.boot
spring-boot-devtools
runtime
true
org.springframework.boot
spring-boot-starter-test
test
```
##### 配置 application.yml
```properties
server:
port: 3344
spring:
application:
name: cloud-config-server
cloud:
config:
server:
git:
uri: https://gitee.com/alanlxx/SpringCloudH2020Config.git #gitee项目地址
search-paths:
- SpringCloudH2020Config #项目名
# username: 账号
# password: 密码
label: master #读取分支
#热部署
devtools:
restart:
enabled: true #是否支持热部署
eureka:
client:
#是否将自己注册进EurekaServer,默认为:true
register-with-eureka: true
#是否从EurekaServer抓取已有的注册信息,默认为:true,单节点无所谓,集群必须设置为true,才能配合ribbon使用负载均衡
fetch-registry: true
service-url:
defaultZone: http://localhost:7001/eureka
# 集群版 http://eureka7001.com:7001/eureka,http://eureka7002.com:7002/eureka
# defaultZone: http://eureka7001.com:7001/eureka,http://eureka7002.com:7002/eureka,http://eureka7003.com:7003/eureka
instance:
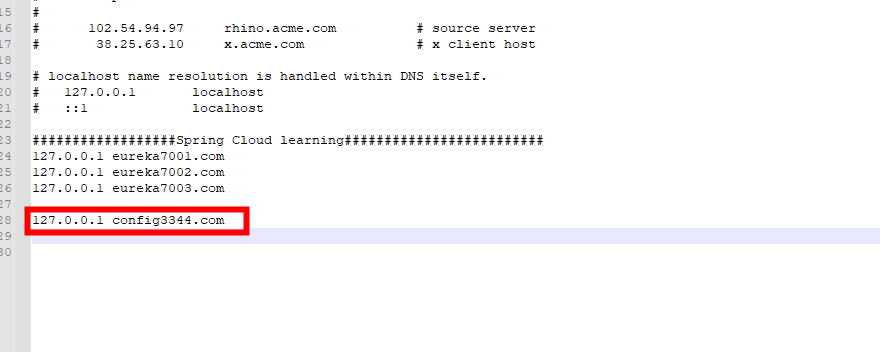
instance-id: config3344
# 访问路径可以显示ip地址
prefer-ip-address: true
```
#### 3.配置 本地 host 文件
##### 路径:C:\Windows\System32\drivers\etc
如:
#### 4.访问gitee文件方式
##### 三种,

#### 5.创建client端配置中心
如:cloud-config-center3355
##### 添加 pom 依赖
```xml
org.springframework.cloud
spring-cloud-starter-config
org.springframework.cloud
spring-cloud-starter-netflix-eureka-client
org.springframework.boot
spring-boot-starter-web
org.springframework.boot
spring-boot-starter-actuator
org.springframework.boot
spring-boot-devtools
runtime
true
org.springframework.boot
spring-boot-starter-test
test
```
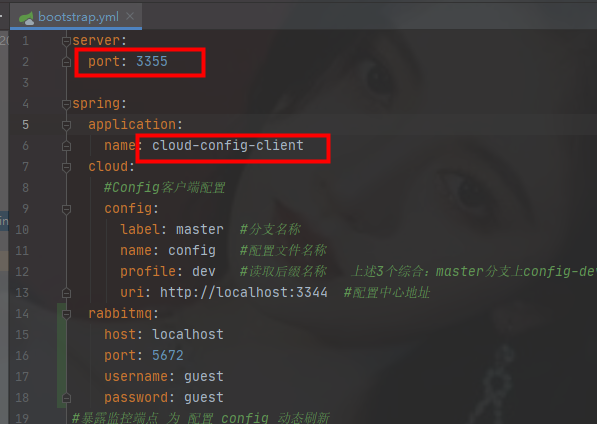
##### 添加 bootstrap.yml 配置文件 而不是 application.yml 两者区别在下方解释
```yaml
server:
port: 3355
spring:
application:
name: cloud-config-client
cloud:
#Config客户端配置
config:
label: master #分支名称
name: config #配置文件名称
profile: dev #读取后缀名称 上述3个综合:master分支上config-dev.yml的配置文件被读取http://config3344.com:3344/master/config-dev.yml
uri: http://localhost:3344 #配置中心地址
#热部署
devtools:
restart:
enabled: true #是否支持热部署
eureka:
client:
#是否将自己注册进EurekaServer,默认为:true
register-with-eureka: true
#是否从EurekaServer抓取已有的注册信息,默认为:true,单节点无所谓,集群必须设置为true,才能配合ribbon使用负载均衡
fetch-registry: true
service-url:
defaultZone: http://localhost:7001/eureka
# 集群版 http://eureka7001.com:7001/eureka,http://eureka7002.com:7002/eureka
# defaultZone: http://eureka7001.com:7001/eureka,http://eureka7002.com:7002/eureka,http://eureka7003.com:7003/eureka
instance:
instance-id: config3344
# 访问路径可以显示ip地址
prefer-ip-address: true
```
##### 添加 controller 提供服务,向外暴漏
```java
package com.richper.springcloudh2020.controller;
import org.springframework.beans.factory.annotation.Value;
import org.springframework.web.bind.annotation.GetMapping;
import org.springframework.web.bind.annotation.RestController;
@RestController
public class ConfigCenterController {
@Value("${config.info}")
private String configInfo;
@GetMapping("/getConfigInfo")
public String getConfigInfo(){
return configInfo;
}
}
```
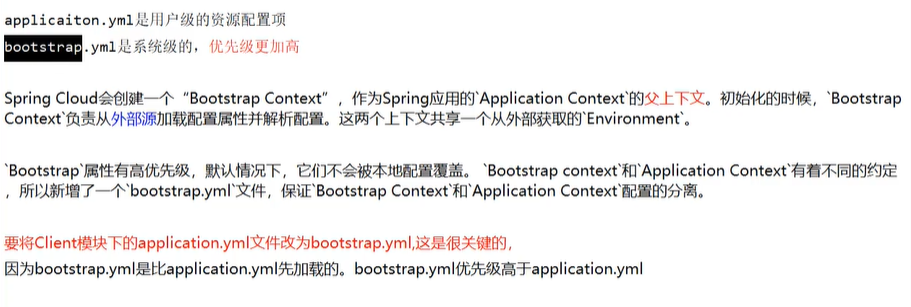
##### bootstrap.yml 和 application.yml 区别
#### 6.配置 client 端配置中心 手动动态刷新
添加 pom 依赖
```xml
org.springframework.boot
spring-boot-starter-actuator
```
配置 bootstrap.yml
```yaml
server:
port: 3355
spring:
application:
name: cloud-config-client
cloud:
#Config客户端配置
config:
label: master #分支名称
name: config #配置文件名称
profile: dev #读取后缀名称 上述3个综合:master分支上config-dev.yml的配置文件被读取http://config3344.com:3344/master/config-dev.yml
uri: http://localhost:3344 #配置中心地址
#暴露监控端点 为 配置 config 动态刷新
management:
endpoints:
web:
exposure:
include: "*"
#热部署
devtools:
restart:
enabled: true #是否支持热部署
eureka:
client:
#是否将自己注册进EurekaServer,默认为:true
register-with-eureka: true
#是否从EurekaServer抓取已有的注册信息,默认为:true,单节点无所谓,集群必须设置为true,才能配合ribbon使用负载均衡
fetch-registry: true
service-url:
defaultZone: http://localhost:7001/eureka
# 集群版 http://eureka7001.com:7001/eureka,http://eureka7002.com:7002/eureka
# defaultZone: http://eureka7001.com:7001/eureka,http://eureka7002.com:7002/eureka,http://eureka7003.com:7003/eureka
instance:
instance-id: config3344
# 访问路径可以显示ip地址
prefer-ip-address: true
```
Controller 添加 注解
```java
package com.richper.springcloudh2020.controller;
import org.springframework.beans.factory.annotation.Value;
import org.springframework.cloud.context.config.annotation.RefreshScope;
import org.springframework.web.bind.annotation.GetMapping;
import org.springframework.web.bind.annotation.RestController;
@RestController
@RefreshScope
public class ConfigCenterController {
@Value("${config.info}")
private String configInfo;
@GetMapping("/getConfigInfo")
public String getConfigInfo(){
return configInfo;
}
}
```
最后一步 刷新 3355 服务
发送 POST 请求 更新
此例子为 window cmd 窗口发送 POST 请求 localhost:3355 服务为例
```bat
curl -X POST "http://localhost:3355/actuator/refresh"
```
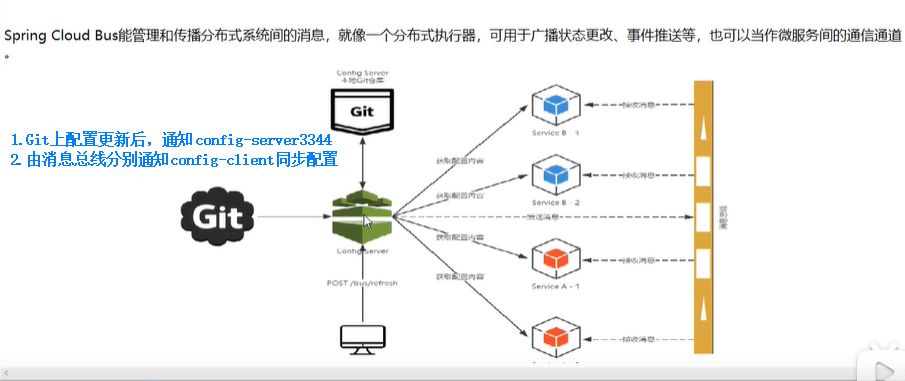
## 十、消息总线
### spring cloud bus 消息总线
#### 是什么、能做什么、原理是什么:

#### Erlang、RabbitMQ 安装
Erlang安装地址:https://www.erlang.org/download/otp_win64_21.3.exe
RabbitMQ 安装地址:http://dl.bintray.com/rabbitmq/all/rabbitmq-server/3.7.14/rabbitmq-server-3.7.14
RabbitMQ必须有Erlang环境才可以运行,连接的版本号可以修改对应版本号下载
安装好之后进入RabbtMQ的sbin目录执行命令
```cmd
rabbitmq-plugins enable rabbitmq_management
```
执行完之后会出现以下程序
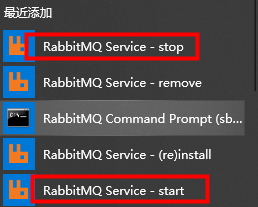
执行 start 运行完之后,可以打开网址:http://localhost:15672/
默认账号密码为:guest
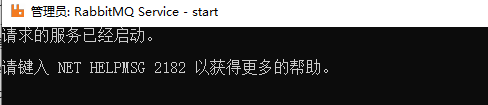
如果 安装完之后仍无法访问 如下
进入 sbin目录 打开cmd
输入以下命令:
打开RabbitMQ节点
`rabbitmqctl start_app`
开启RabbitMQ管理模块的插件,并配置到RabbitMQ节点上
`rabbitmq-plugins enable rabbitmq_management`
关闭rabbitMQ节点
`rabbitmqctl stop`
#### 动态刷新全局广播配置 实现一处更新处处生效
##### 1.config-server3344 配置中心 配置
添加 pom 依赖
```xml
org.springframework.cloud
spring-cloud-starter-bus-amqp
```
yml 配置文件 配置 增加了 rabbitMQ相关配置 暴露bus刷新配置的端点
```properties
server:
port: 3344
spring:
application:
name: cloud-config-server
cloud:
config:
server:
git:
uri: https://gitee.com/alanlxx/SpringCloudH2020Config.git #gitee项目地址
# uri: git@github.com:alanlxx/SpringCloudH2020Config.git #gitee项目地址
search-paths:
- SpringCloudH2020Config #项目名
# username: 账号
# password: 密码
label: master #读取分支
#rabbitmq相关配置
rabbitmq:
host: localhost
port: 5672
username: guest
password: guest
#热部署
devtools:
restart:
enabled: true #是否支持热部署
eureka:
client:
#是否将自己注册进EurekaServer,默认为:true
register-with-eureka: true
#是否从EurekaServer抓取已有的注册信息,默认为:true,单节点无所谓,集群必须设置为true,才能配合ribbon使用负载均衡
fetch-registry: true
service-url:
defaultZone: http://localhost:7001/eureka
# 集群版 http://eureka7001.com:7001/eureka,http://eureka7002.com:7002/eureka
# defaultZone: http://eureka7001.com:7001/eureka,http://eureka7002.com:7002/eureka,http://eureka7003.com:7003/eureka
instance:
instance-id: config3344
# 访问路径可以显示ip地址
prefer-ip-address: true
##rabbitmq相关配置,暴露bus刷新配置的端点
management:
endpoints: #暴露bus刷新配置的端点
web:
exposure:
include: 'bus-refresh'
```
##### 2.config-client3355、config-client3366 等 client端配置
添加 pom 依赖
```xml
org.springframework.cloud
spring-cloud-starter-bus-amqp
```
配置 yml 配置文件 添加了 RabbitMQ配置
```properties
server:
port: 3355
spring:
application:
name: cloud-config-client
cloud:
#Config客户端配置
config:
label: master #分支名称
name: config #配置文件名称
profile: dev #读取后缀名称 上述3个综合:master分支上config-dev.yml的配置文件被读取http://config3344.com:3344/master/config-dev.yml
uri: http://localhost:3344 #配置中心地址
rabbitmq:
host: localhost
port: 5672
username: guest
password: guest
#暴露监控端点 为 配置 config 动态刷新
management:
endpoints:
web:
exposure:
include: "*"
#热部署
devtools:
restart:
enabled: true #是否支持热部署
eureka:
client:
#是否将自己注册进EurekaServer,默认为:true
register-with-eureka: true
#是否从EurekaServer抓取已有的注册信息,默认为:true,单节点无所谓,集群必须设置为true,才能配合ribbon使用负载均衡
fetch-registry: true
service-url:
defaultZone: http://localhost:7001/eureka
# 集群版 http://eureka7001.com:7001/eureka,http://eureka7002.com:7002/eureka
# defaultZone: http://eureka7001.com:7001/eureka,http://eureka7002.com:7002/eureka,http://eureka7003.com:7003/eureka
instance:
instance-id: config3355
# 访问路径可以显示ip地址
prefer-ip-address: true
```
3.刷新config-server3344服务端 POST请求
例如:curl -X POST "http://localhost:3344/actuator/bus-refresh"
```
curl -X POST "http://localhost:3344/actuator/bus-refresh"
```
#### 动态刷新定点广播配置 指定通知
全局通知配置完毕之后
唯一不同的是 POST 请求刷新
curl -X POST "http://localhost:3344/actuator/bus-refresh/微服务名称:端口号"
例:
```cmd
curl -X POST "http://localhost:3344/actuator/bus-refresh/cloud-config-client:3355"
```
## 十一、消息驱动
### spring cloud stream
统一消息中间件,可以让我们不用关注消息中间件(MQ)的细节,让开发、维护、切换降低难度,
stream驱动进行统一管理
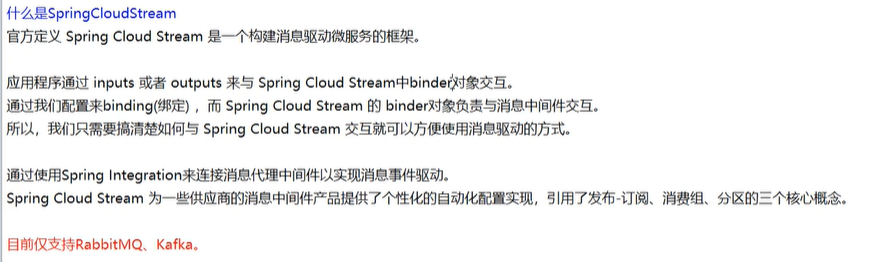
中文手册:https://m.wang1314.com/doc/webapp/topic/20971999.html
通过定义绑定器Binder作为中间层,实现了应用程序和消息中间件之间的细节解耦
## 十二、Spring Cloud Alibaba
### 1.简介
Spring Cloud Alibaba 旨在为微服务开发提供一站式解决方案。该项目包含了开发分布式应用和服务所需的组件,让开发者可以使用Spring Cloud编程模型轻松开发分布式应用。
Spring Cloud 阿里巴巴的特点:
1. **流量控制和服务降级**:支持WebServlet、WebFlux、OpenFeign、RestTemplate、Dubbo接入限流降级功能。可以在运行时通过控制台实时修改限流和降级规则,同时支持限流Metrics的监控。
2. **服务注册和发现**:可以注册服务,客户端可以使用 Spring 管理的 bean,自动集成 Ribbon 来发现实例。
3. **分布式配置**:支持分布式系统中的外化配置,配置改变时自动刷新。
4. **Rpc Service**:扩展 Spring Cloud 客户端 RestTemplate 和 OpenFeign 以支持调用 Dubbo RPC 服务。
5. **事件驱动**:支持构建与共享消息系统连接的高度可扩展的事件驱动微服务。
6. **分布式事务**:支持高性能、易用的分布式事务解决方案。
7. **阿里云对象存储**:海量、安全、低成本、高可靠的云存储服务。支持随时随地在任何应用程序中存储和访问任何类型的数据。
8. **阿里云SchedulerX**:精准、高可靠、高可用的定时作业调度服务,响应时间秒级。
9. **阿里云短信**:覆盖全球的短信服务,阿里短信提供便捷、高效、智能的通讯能力,帮助企业快速联系客户。
手册地址:https://spring-cloud-alibaba-group.github.io/github-pages/greenwich/spring-cloud-alibaba.html
gitHub:https://github.com/alibaba/spring-cloud-alibaba
### 2.Nacos
官网:https://nacos.io/zh-cn/
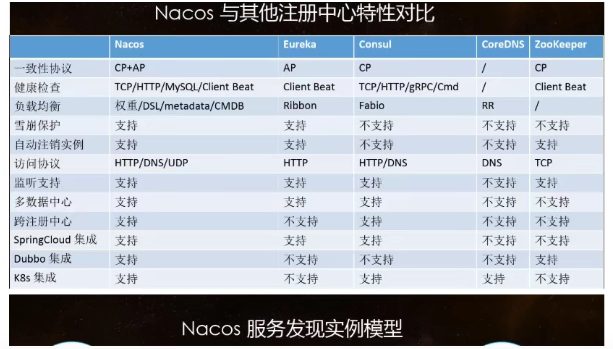
Nacos是注册中心+配置中心的组合
**nacos = Eureka+Config+bus**
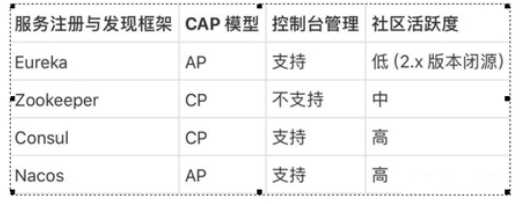
注册中心比较
**Nacos支持CP和AP之间的切换**
下载,解压之后可以直接运行**bin**目录下的**startup.cmd**
访问地址:http://localhost:8848/nacos
默认账号密码为: nacos
**注册中心**
**服务提供者**
1. 新建Moudle
```
cloudalibaba-provider-payment9001
```
2. pom
SpringCloud ailibaba nacos maven配置
```xml
com.alibaba.cloud
spring-cloud-starter-alibaba-nacos-discovery
org.springframework.boot
spring-boot-starter-web
org.springframework.boot
spring-boot-starter-actuator
org.springframework.boot
spring-boot-devtools
runtime
true
org.projectlombok
lombok
true
org.springframework.boot
spring-boot-starter-test
test
```
3. yml
```yaml
server:
port: 9001
spring:
application:
name: nacos-payment-provider
cloud:
nacos:
discovery:
server-addr: localhost:8848 #配置Nacos地址
#暴漏监控服务
management:
endpoints:
web:
exposure:
include: '*'
```
4. 主启动类
@EnableDiscoveryClient 注解
```java
package com.richper.springcloudh2020;
import org.springframework.boot.SpringApplication;
import org.springframework.boot.autoconfigure.SpringBootApplication;
import org.springframework.cloud.client.discovery.EnableDiscoveryClient;
@SpringBootApplication
@EnableDiscoveryClient
public class NacosPayment9001 {
public static void main(String[] args) {
SpringApplication.run(NacosPayment9001.class,args);
}
}
```
5. 业务类
```java
package com.richper.springcloudh2020.controller;
import org.springframework.beans.factory.annotation.Value;
import org.springframework.web.bind.annotation.GetMapping;
import org.springframework.web.bind.annotation.PathVariable;
import org.springframework.web.bind.annotation.RestController;
@RestController
public class PaymentController {
@Value("${server.port}")
private String port;
@GetMapping("/getPayment/{id}")
public String getPayment(@PathVariable String id){
return "nacos registry,server port:"+port+",id:"+id;
}
}
```
6. 测试
nacos 底层封装有 netflix-ribbon 所以天生支持负载均衡
**服务消费者**
1. 新建Moudle
```
cloudalibaba-consumer-nacos-order83
```
2. pom
```xml
com.alibaba.cloud
spring-cloud-starter-alibaba-nacos-discovery
com.richper.springcloudh2020
cloud-api-commons
${project.version}
org.springframework.boot
spring-boot-starter-web
org.springframework.boot
spring-boot-starter-actuator
org.springframework.boot
spring-boot-devtools
runtime
true
org.projectlombok
lombok
true
org.springframework.boot
spring-boot-starter-test
test
```
3. yml
```yaml
server:
port: 83
spring:
application:
name: nacos-order-consumer
cloud:
nacos:
discovery:
server-addr: localhost:8848
#消费者将要去访问的微服务名称(注册成功进nacos的微服务提供者)
service-url:
nacos-user-service: http://nacos-payment-provider #用注解的形式,在Controller中获取服务URL
```
4. 主启动类
```java
package com.richper.springcloudh2020;
import org.springframework.boot.SpringApplication;
import org.springframework.boot.autoconfigure.SpringBootApplication;
import org.springframework.cloud.client.discovery.EnableDiscoveryClient;
@SpringBootApplication
@EnableDiscoveryClient
public class NacosOrder83 {
public static void main(String[] args) {
SpringApplication.run(NacosOrder83.class,args);
}
}
```
5. RestTemplate 配置
```java
package com.richper.springcloudh2020.config;
import org.springframework.cloud.client.loadbalancer.LoadBalanced;
import org.springframework.context.annotation.Bean;
import org.springframework.context.annotation.Configuration;
import org.springframework.web.client.RestTemplate;
@Configuration
public class ApplicationContextConfig {
@Bean
@LoadBalanced
public RestTemplate getRestTemplate(){
return new RestTemplate();
}
}
```
6. 业务类
```java
package com.richper.springcloudh2020.controller;
import org.springframework.beans.factory.annotation.Value;
import org.springframework.web.bind.annotation.GetMapping;
import org.springframework.web.bind.annotation.PathVariable;
import org.springframework.web.bind.annotation.RequestMapping;
import org.springframework.web.bind.annotation.RestController;
import org.springframework.web.client.RestTemplate;
import javax.annotation.Resource;
@RestController
@RequestMapping("/consumer")
public class OrderController83 {
@Value("${service-url.nacos-user-service}")
private String serverURL;
@Resource
private RestTemplate restTemplate;
@GetMapping("/getPayment/{id}")
public String getPayment(@PathVariable String id){
return restTemplate.getForObject(serverURL+"/getPayment/"+id,String.class);
}
}
```
**配置中心**
**例子Moudle**:cloudalibaba-config-nacos-client3377
nacos配置文件例子:
注意:config:后面一定要有空格,info:后面也是
config:
info: nacos,version 1.0.3
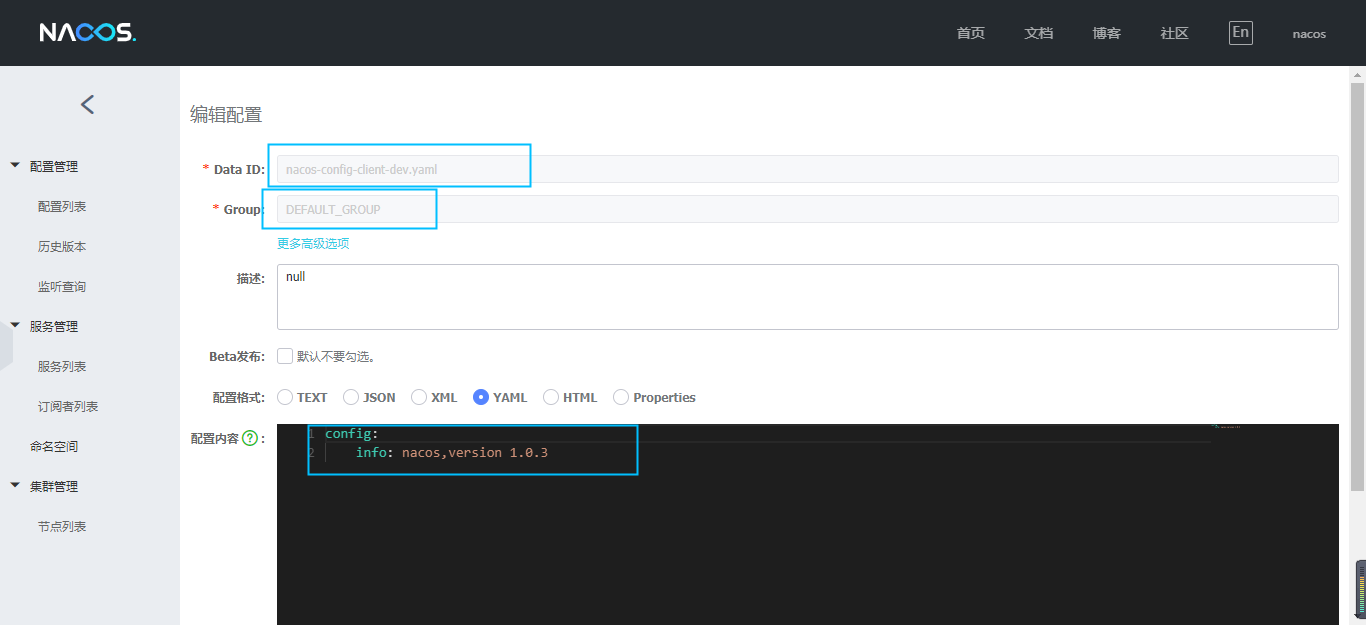
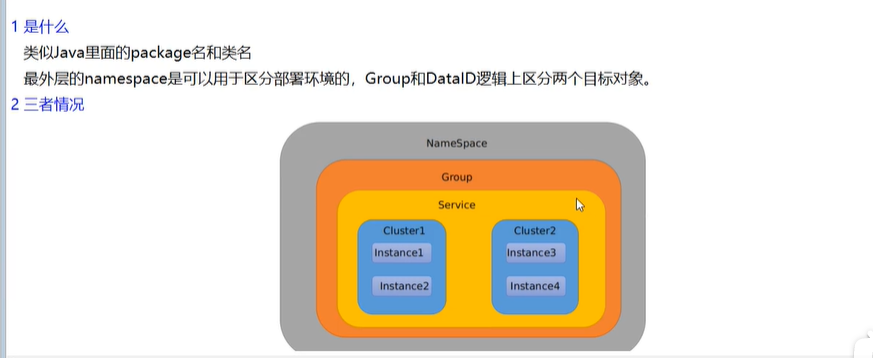
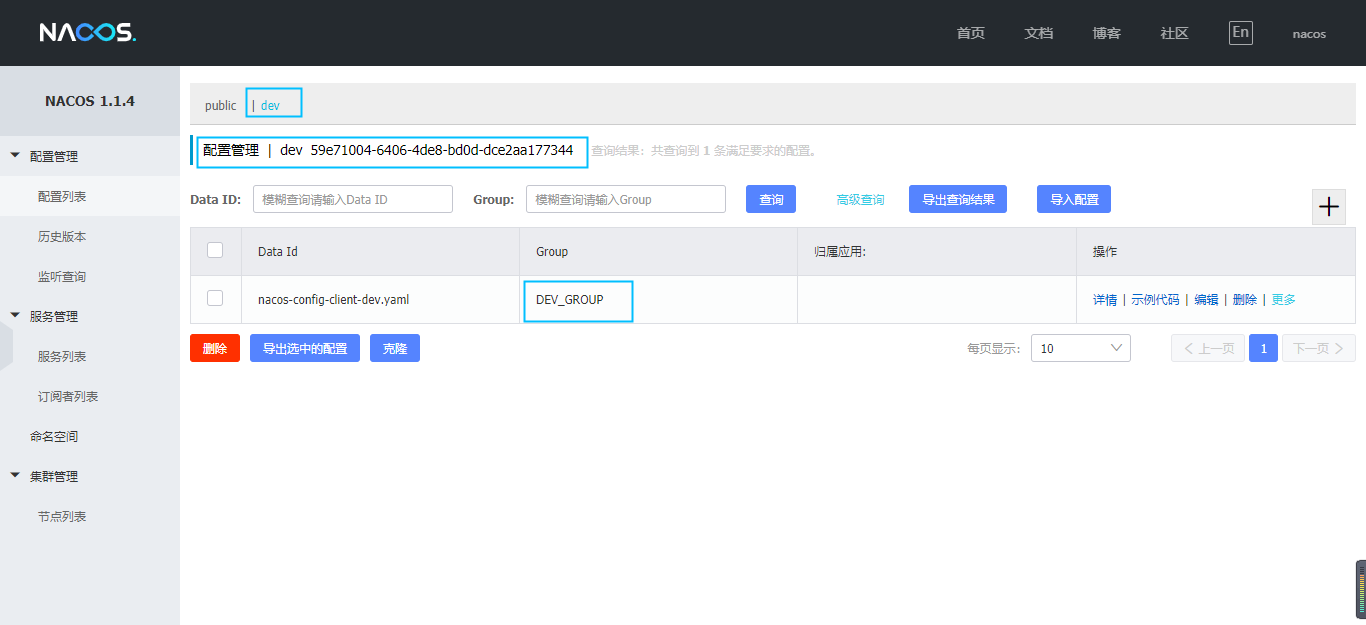
**nacos命名空间、分组和dataId三者之间的关系**


**命名空间,分组配置**


**nacos集群和持久化配置**
**集群架构**
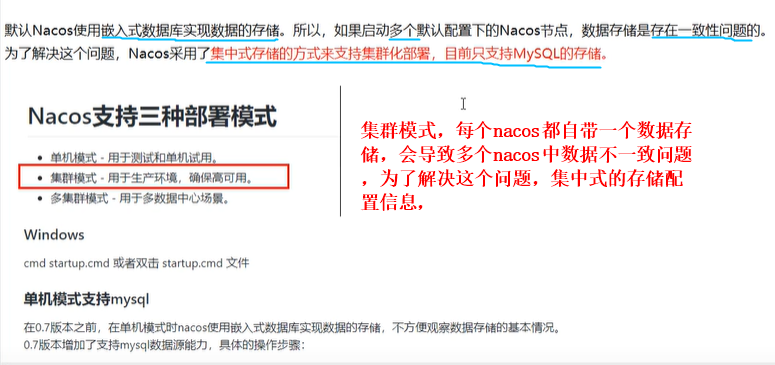
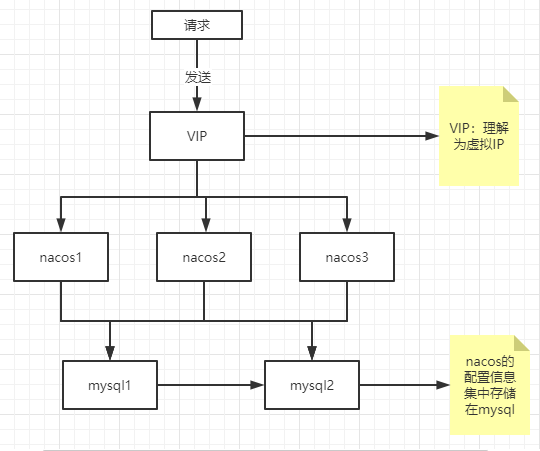
**`nacos`默认存储在`Derby`内嵌数据库中**
nacos官方集群架构说明:https://nacos.io/zh-cn/docs/cluster-mode-quick-start.html
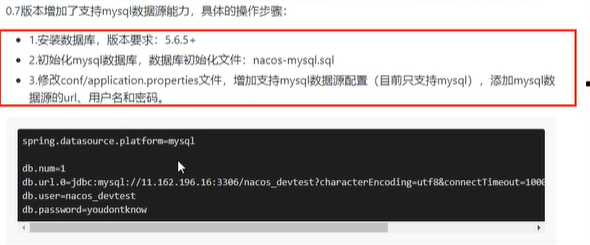
**内置数据库切换成外置数据库(`MySQL`)步骤**
1. 初始化数据库脚本,
`conf`目录下`nacos-mysql.sql`脚本,执行创建数据库以及数据库表
2. 修改properties配置文件
`conf`目录下`application.properties`配置文件末尾追加
```properties
spring.datasource.platform=mysql
db.num=1
db.url.0=jdbc:mysql://11.162.196.16:3306/nacos_devtest?characterEncoding=utf8&connectTimeout=1000&socketTimeout=3000&autoReconnect=true
db.user=nacos_devtest
db.password=youdontknow
```
**注意:数据库名,数据库地址、账号、密码要填写正确~~**
3. 重启`nacos`
**nacos集群配置**
待补充…
### 3.Sentinel
**官网文档**:https://sentinelguard.io/zh-cn/docs/introduction.html
**GitHub**:https://github.com/alibaba/Sentinel
**`Sentinel` 介绍**
`Sentinel` 是面向分布式服务架构的流量控制组件,主要以流量为切入点,从流量控制、熔断降级、系统自适应保护等多个维度来帮助您保障微服务的稳定性。
#### Sentinel 基本概念
##### 资源
资源是 Sentinel 的关键概念。它可以是 Java 应用程序中的任何内容,例如,由应用程序提供的服务,或由应用程序调用的其它应用提供的服务,甚至可以是一段代码。在接下来的文档中,我们都会用资源来描述代码块。
只要通过 Sentinel API 定义的代码,就是资源,能够被 Sentinel 保护起来。大部分情况下,可以使用方法签名,URL,甚至服务名称作为资源名来标示资源。
##### 规则
围绕资源的实时状态设定的规则,可以包括流量控制规则、熔断降级规则以及系统保护规则。所有规则可以动态实时调整。
#### Sentinel 功能和设计理念
##### 流量控制
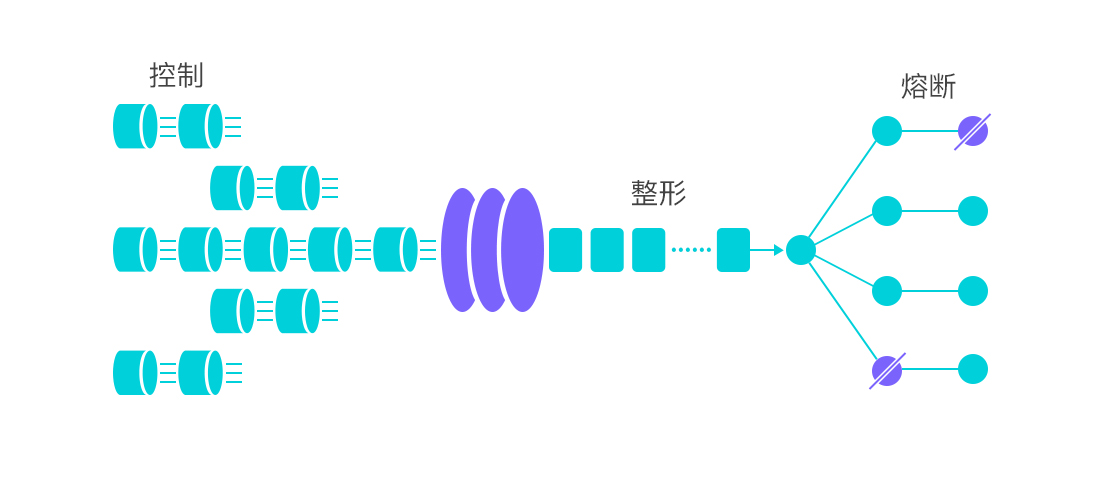
流量控制在网络传输中是一个常用的概念,它用于调整网络包的发送数据。然而,从系统稳定性角度考虑,在处理请求的速度上,也有非常多的讲究。任意时间到来的请求往往是随机不可控的,而系统的处理能力是有限的。我们需要根据系统的处理能力对流量进行控制。Sentinel 作为一个调配器,可以根据需要把随机的请求调整成合适的形状,如下图所示:
流量控制有以下几个角度:
- 资源的调用关系,例如资源的调用链路,资源和资源之间的关系;
- 运行指标,例如 QPS、线程池、系统负载等;
- 控制的效果,例如直接限流、冷启动、排队等。
Sentinel 的设计理念是让您自由选择控制的角度,并进行灵活组合,从而达到想要的效果。
##### 熔断降级
###### 什么是熔断降级
除了流量控制以外,降低调用链路中的不稳定资源也是 Sentinel 的使命之一。由于调用关系的复杂性,如果调用链路中的某个资源出现了不稳定,最终会导致请求发生堆积。这个问题和 [Hystrix](https://github.com/Netflix/Hystrix/wiki#what-problem-does-hystrix-solve) 里面描述的问题是一样的。
Sentinel 和 Hystrix 的原则是一致的: 当调用链路中某个资源出现不稳定,例如,表现为 timeout,异常比例升高的时候,则对这个资源的调用进行限制,并让请求快速失败,避免影响到其它的资源,最终产生雪崩的效果。
###### 熔断降级设计理念
在限制的手段上,Sentinel 和 Hystrix 采取了完全不一样的方法。
Hystrix 通过[线程池](https://github.com/Netflix/Hystrix/wiki/How-it-Works#benefits-of-thread-pools)的方式,来对依赖(在我们的概念中对应资源)进行了隔离。这样做的好处是资源和资源之间做到了最彻底的隔离。缺点是除了增加了线程切换的成本,还需要预先给各个资源做线程池大小的分配。
Sentinel 对这个问题采取了两种手段:
- 通过并发线程数进行限制
和资源池隔离的方法不同,Sentinel 通过限制资源并发线程的数量,来减少不稳定资源对其它资源的影响。这样不但没有线程切换的损耗,也不需要您预先分配线程池的大小。当某个资源出现不稳定的情况下,例如响应时间变长,对资源的直接影响就是会造成线程数的逐步堆积。当线程数在特定资源上堆积到一定的数量之后,对该资源的新请求就会被拒绝。堆积的线程完成任务后才开始继续接收请求。
- 通过响应时间对资源进行降级
除了对并发线程数进行控制以外,Sentinel 还可以通过响应时间来快速降级不稳定的资源。当依赖的资源出现响应时间过长后,所有对该资源的访问都会被直接拒绝,直到过了指定的时间窗口之后才重新恢复。
###### **系统负载保护**
Sentinel 同时提供[系统维度的自适应保护能力](https://sentinelguard.io/zh-cn/docs/system-adaptive-protection.html)。防止雪崩,是系统防护中重要的一环。当系统负载较高的 时候,如果还持续让请求进入,可能会导致系统崩溃,无法响应。在集群环境下,网络负载均衡会把本应这台 机器承载的流量转发到其它的机器上去。如果这个时候其它的机器也处在一个边缘状态的时候,这个增加的流 量就会导致这台机器也崩溃,最后导致整个集群不可用。
针对这个情况,Sentinel 提供了对应的保护机制,让系统的入口流量和系统的负载达到一个平衡,保证系 统在能力范围之内处理最多的请求。
#### **`Sentinel` 是如何工作的**
`Sentinel` 的主要工作机制如下:
- 对主流框架提供适配或者显示的 `API`,来定义需要保护的资源,并提供设施对资源进行实时统计和调用链路分析。
- 根据预设的规则,结合对资源的实时统计信息,对流量进行控制。同时,`Sentinel` 提供开放的接口,方便您定义及改变规则。
- `Sentinel` 提供实时的监控系统,方便您快速了解目前系统的状态。