# OpenVLC
**Repository Path**: an_hongjun/open-vlc
## Basic Information
- **Project Name**: OpenVLC
- **Description**: 仓库镜像:https://github.com/openvlc/OpenVLC
- **Primary Language**: Unknown
- **License**: Not specified
- **Default Branch**: master
- **Homepage**: None
- **GVP Project**: No
## Statistics
- **Stars**: 0
- **Forks**: 0
- **Created**: 2023-05-23
- **Last Updated**: 2024-11-25
## Categories & Tags
**Categories**: Uncategorized
**Tags**: None
## README
# OpenVLC
本仓库为https://github.com/openvlc/OpenVLC的镜像仓库。
This is the repository for the OpenVLC platform, an open-source, flexible and low-cost Visible Light Communication System platform. The research and development is led by IMDEA Networks Institute, Spain, but anyone is welcome to contribute.
## New OpenVLC1.3 version

We are delighted to announce that OpenVLC1.3 is ready for delivery! OpenVLC1.3 can now achieve a throughput of 400 Kb/s at the Transport Layer at a distance of more than 3 meter, powered simply by the BeagleBone Black!
Details on how to get started are introduced below.
## Instructions
OpenVLC needs just a few components to work:
1. **BEAGLEBONE Black (BBB) Board** _**(needs Rev C produced from 2017; you need to connect an external 5V power supply to the BBB):**_ cost $ 45 - $ 60; AM3359 1 GHz, 4 timers, 65 GPIOs
2. **OpenVLC1.3 RevA cape:** the VLC front-end
3. **OpenVLC1.3 driver:** software defined MAC and PHY layer (implemented as Linux driver) and firmware (to control the programmable real time units of the BBB (PRU))
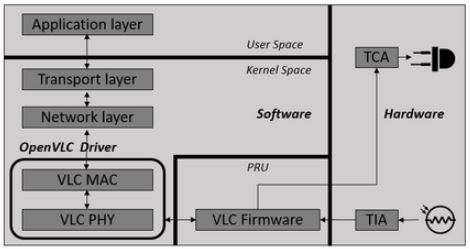
The software solution is implemented as a Linux driver that can communicate directly with the cape and the Linux networking stack. In OpenVLC, the VLC interface is set up as a new communication interface that can take advantage of the vast range of Linux tools.
### Design of OpenVLC
The new OpenVLC1.3 takes advantage of the programmable real time units (PRU) included in the BBB. This,and the new receiver design allow us to increase the transmission frequency to 1 MHz and, thus, the communication rate. One cape can work as Transmitter (TX) or Receiver (RX).
### Testing the cape
Although OpenVLC 1.3 cape is designed to be connected to the BBB, its functionalities can be tried without one. This step is not essential and requires additional devices such as a waveform generator or an oscilloscope. But it can be useful to test its correct functioning before plugging it to the BBB and to avoid possible damages to the board.
#### TX mode
Set the connections shown in image below. Connect a 5 V power supply to the jack port. To emulate a transmission with OpenVLC 1.3 you can produce in the cape pin TX SIGNAL (P8_45 in BBB) a square wave between 0 and 3.3 V at 1 MHz. The LED should light on without any noticeable blinking. Modulated light can be measured with a fast light-sensing device (photodiode) connected to an oscilloscope.
To test constant illumination, connect TX SIGNAL to GND and the pin next to it (P8_46) to 3.3 V. The LED should provide similar illumination level than in the previous case.

#### RX mode
Set the connections shown in image below. Connect a 5 V power supply to the jack port. Produce a square wave between 0 and 3.3 V at 1 MHz at ADC CS, and a square wave between 0 and 3.3 V at 48 MHz at ADC SCLK. You can read the serial digital output from the ADC in the cape on pin RX SIGNAL.

### Experimental Setup
#### Creating the SD Card
We need to flash the BBB with a Debian image. To do that we need a SD Card with at least 4 GB. Follow these steps:
* Format the SD Card with SD card formatter with overwrite format.
* Download the image from the link https://debian.beagleboard.org/images/bone-debian-8.7-iot-armhf-2017-03-19-4gb.img.xz
* Write the image _”bone-debian-8.7-iot-armhf-2017-03-19-4gb”_ to the SD Card. If you use Windows, you may use Win32 Disk Imager. For Linux, you may use the command line dd.
#### Flashing the BBB
Now that we have the SD Card ready with the image, we need to flash the BBB. Follow these steps:
* With the power disconnected, insert the SD Card into the BBB and power it up with the USB cable.
* Connect through SSH to the IP 192.168.7.2.
* In order to run the OS on the SD Card, flash it into the BBB: go to _/opt/scripts/tools/eMMC_ and run _sudo ./bbb-eMMC-flasher-eewiki-ext4.sh_
* Wait until the script of previous steps reports the following message: “eMMC has been flashed”. Once it finishes, disconnect the usb cable and with the BBB switched off, remove the SD Card.
#### Setting up the OS
The firsts steps are to prepare the beaglebone. This must be done in the OpenVLC board operating as TX as well as in the OpenVLC board operating as RX. These are the steps:
* Disable the HDMI: The HDMI uses some PRU pins that we need. To disable the HDMI cape edit the uEnv.txt file: _sudo nano /boot/uEnv.txt_ and uncomment the line: _dtb=am335x-boneblack-emmc-overlay.dtb_
* Reboot the OpenVLC board. The HDMI is disable after rebooting.
* Install the headers: Connect the beaglebone to the Internet, and then update with: _sudo apt-get update_
* Then the board is ready to install the headers with: _sudo apt-get install linux-headers-$(uname -r)_
The code is in github at https://github.com/openvlc/OpenVLC. In Latest_Version subdirectory you will find the Driver (kernel) and PRU code folders. Just fetch them by using _sudo git clone https://github.com/openvlc/OpenVLC_, and copy them into the path ”/home/Debian”.
#### Connecting the cape
Connecting the cape to the BBB is quite easy. You just need to plug the cape to the correct pins as shown in the image below:
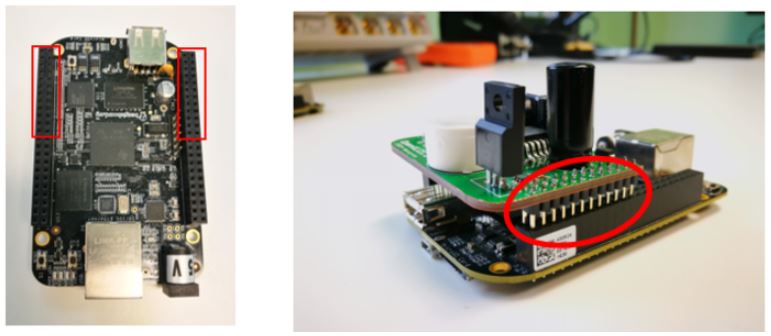
Once it’s plugged, connect the 5 V power supply and that’s all.
**ATTENTION:** Be careful not to bend the components that stand out when you press or pull the cape.
#### Setting up the TX/RX
There are two parts in the TX/RX, the kernel driver and the PRU code. Follow these steps:
* In order to load the kernel driver, run the following command inside the Driver folder: _sudo ./load_test.sh._ With this script, you can change the IP taken by the interface. That’s the IP in the VLC network, so TX and RX must have different IPs (for example TX: 192.168.0.1 and RX 192.168.0.2).
* Once the module driver is installed, make sure that proper paths and symbolic links have been made for the PRU compiler (clpru) and linker (lnkpru). The following commands can be used to this end:
_cd /usr/share/ti/cgt-pru_
_sudo mkdir bin_
_cd bin_
_sudo ln -s /usr/bin/clpru clpru_
_sudo ln -s /usr/bin/lnkpru lnkpru_
* Then go to the PRU folder, enter TX/RX and run sudo _./deploy.sh_. This will boot up the PRUs with the code necessary to transmit and receive VLC data.
#### Working with the TX/RX
Once you have done the steps above in TX and RX, you can start using VLC as a common network interface.
You could measure the achievable throughput by using the iperf tool. To this end, launch iperf in client mode at the TX (_sudo iperf -c 192.168.0.2 -u -b 400k -l 800 -p 10001 -t 100_) and in server mode at the RX (_sudo iperf -u -l 800 -s -i3 -B 192.168.0.2 -p 10001_). Make sure that TX and RX have different IPs and the IP of the RX (iperf server) is 192.168.0.2.
The image below shows the results of an iperf test at 2.5 meters of distance:

### Feedback
If you have doubts and questions about these instructions, please leave your message in our Google group: https://groups.google.com/forum/#!forum/openvlc
## What is Visible Light Communication - LiFi?
Visible Light Communication (VLC), sometimes also referred to as “LiFi", uses standard off-the-shelf visible light LEDs to transmit data using the visible light spectrum. VLC is receiving strong attention from the designers of the 5G networks and beyond. VLC can enable new pervasive wireless systems in the context of the Internet of Things.
## Our Mission
The lack of an open-source and low-cost reference platform is hindering the progresses of research and industry in VLC systems. A general-purpose platform would add momentum to VLC and would open up new avenues of VLC research and spark the interest of researchers and engineers. We take an initial step toward this and we design OpenVLC, an open-source Visible Light Communication platform for fast prototyping of new system protocols to build a LiFi network. It runs on a cost-effective yet powerful credit-card-sized embedded board.
## Questions
If you have any questions, you can contact us at openvlc.networks@imdea.org and post your questions at https://groups.google.com/forum/#!forum/openvlc
## Citation
If you use openVLC for your research, please cite "A. Galisteo, D. Juara, D. Giustiniano, "Research in Visible Light Communication Systems with OpenVLC1.3", IEEE World Forum on Internet of Things (WF-IoT) 2019."
## License
Driver code of OpenVLC is released under GNU General Public License v3.0 - see the [LICENSE_driver.md](Latest_Version/LICENSE_driver.md) file for details. PRU code of OpenVLC is released under BSD-2 license - see the [LICENSE_pru.md](Latest_Version/LICENSE_pru.md) file for details.