# ComfyUI-MultiGPU
**Repository Path**: analyzesystem/ComfyUI-MultiGPU
## Basic Information
- **Project Name**: ComfyUI-MultiGPU
- **Description**: No description available
- **Primary Language**: Unknown
- **License**: GPL-3.0
- **Default Branch**: dev
- **Homepage**: None
- **GVP Project**: No
## Statistics
- **Stars**: 0
- **Forks**: 0
- **Created**: 2025-03-05
- **Last Updated**: 2025-03-06
## Categories & Tags
**Categories**: Uncategorized
**Tags**: None
## README
# ComfyUI-MultiGPU: Tools to free up your primary GPU’s VRAM by using your CPU or additional GPUs[^1]
Free almost all of your GPU for what matters: Maximum latent space processing
## The Core of ComfyUI-MultiGPU:
[^1]: This **enhances memory management,** not parallel processing. Workflow steps still execute sequentially, but with components (in full or in part) loaded across your specified devices. *Performance gains* come from avoiding repeated model loading/unloading when VRAM is constrained. *Capability gains* come from offloading as much of the model (VAE/CLIP/UNet) off of your main **compute** device as possible—allowing you to maximize latent space for actual computation.
1. **DisTorch Virtual VRAM for UNet Loaders**: Move UNet layers off your compute GPU
- Automatic distribution to RAM or other GPUs
- One-number control of VRAM usage
- Support for all GGUF models
2. **CLIP Offloading**: Two solutions for LLM-based and standard CLIP models:
- **MultiGPU CLIP**: Full offload to CPU or secondary GPU
- Works for all CLIP models, including Single-, Dual-, and Triple-CLIP loaders and their GGUF variants
- **DisTorch Virtual VRAM CLIP**: Layer distribution for LLM-based CLIP (T5/llava-llama)
- Keeps compute on the main GPU for faster processing than a full offload
3. **MultiGPU VAE**: Move VAE processing wherever you need it
- CPU or secondary GPU options
- Compatible with all major VAE types
- Flexible decode location
**All components work together to maximize** your GPU’s available VRAM for latent space and efficient `compute`. The `custom_node` achieves this by modifying only **two** functions—one from **ComfyUI core** to make loaders “device-aware,” and the other from [ComfyUI-GGUF](https://github.com/city96/ComfyUI-GGUF) to allocate `GGML` layers for **UNet or CLIP** GGUF-quantized models.[^2]
[^2]: This custom_node modifies ComfyUI’s memory management behavior **only** while it is active. It does **not** alter Comfy core or ComfyUI-GGUF code on disk. When removed, ComfyUI reverts to normal. While functional for standard GPU and CPU configurations, edge cases may exist. You can crash your Comfy system if you use this node recklessly.
**NEW** DisTorch 2.0: Virtual VRAM Made Simple
DisTorch 2.0 in Action
## What's New?
DisTorch now features simple Virtual VRAM control that lets you offload model layers from your GPU with zero configuration. Just set how much VRAM you want to free up, and DisTorch handles the rest.
## How It Works
- **Virtual VRAM**: Defaults to 4GB - just adjust it based on your needs
- **Two Modes**:
- **Default**: Offloads to system RAM
- **Multi-GPU**: Distributes across other GPUs (optional)
## 🎯 Key Benefits
- Free up GPU VRAM instantly without complex settings
- Run larger models by offloading layers to other system RAM
- Use all your main GPU's VRAM for actual `compute` / latent processing
- Seamlessly distribute GGML layers across multiple GPUs if available
- Allows **you** to easily shift from ___on-device speed___ to ___open-device capability___ with a simple one-number change

DisTorch 2.0 Node with one simple number to tune its Vitual VRAM to your needs
## 💡 Quick Start
1. Load any GGUF model using a DisTorch node
2. Set your Virtual VRAM amount (default: 4GB, in this example we chose 8GB)
3. Toggle "Use Other VRAM" if you have multiple GPUs[^3]
4. That's it!
[^3]: DisTorch's Virtual VRAM aims to span as few a devices as possible. I recommend users try both ways (VRAM/DRAM) and see which works best for you.
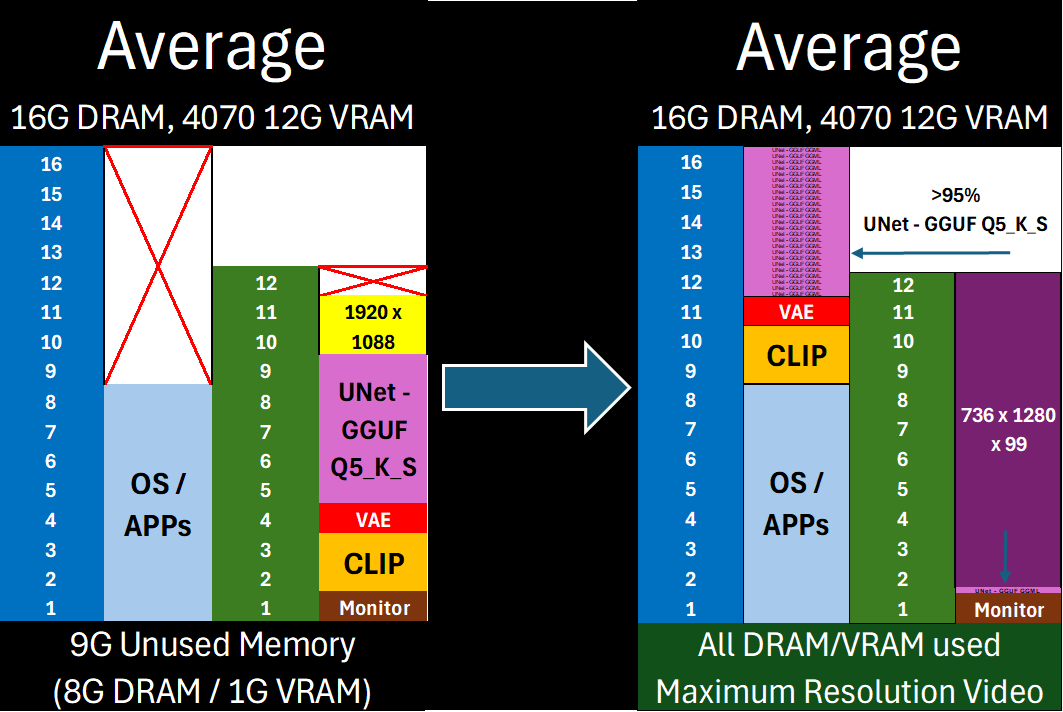
## 🔄 Real-World Example
With a 12GB GPU running an 8GB model:
- Set Virtual VRAM to 4GB
- DisTorch moves 4GB of model layers to RAM
- Your GPU now has extra VRAM for larger batches, higher resolutions, or longer video
## 🚀 Compatibility
Works with all GGUF-quantized ComfyUI/ComfyUI-GGUF-supported UNet/CLIP models.
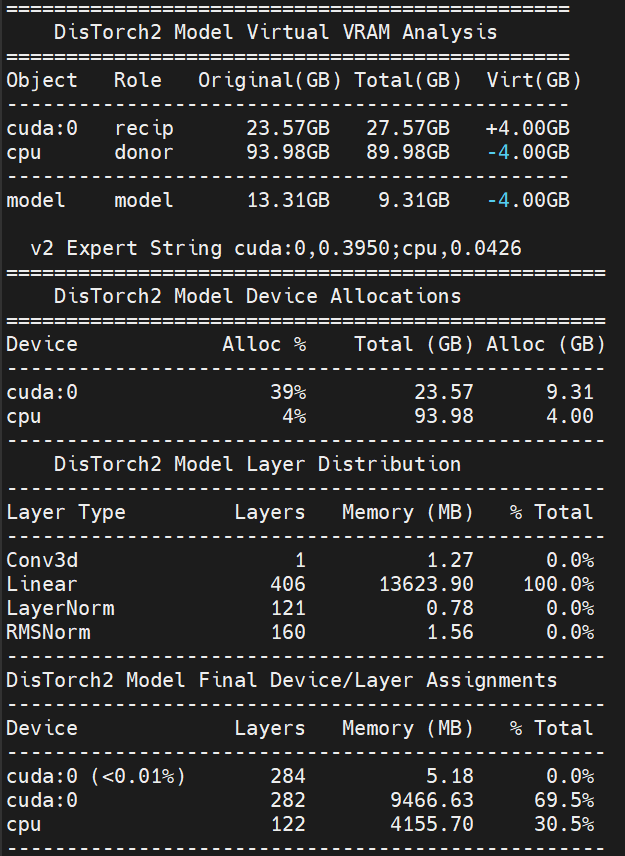
⚙️ Expert users: For those of you who were here for the 1.0 release of DisTorch, manual allocation strings still available for advanced configurations. Each log will contain the allocation string for the run so it can be easily recreated and/or manipulated for more sophisticated setups.
The new Virtual VRAM even lets you offload ALL of the model and still run compute on your CUDA device!
## Installation
Installation via [ComfyUI-Manager](https://github.com/ltdrdata/ComfyUI-Manager) is preferred. Simply search for `ComfyUI-MultiGPU` in the list of nodes and follow installation instructions.
## Manual Installation
Clone [this repository](https://github.com/pollockjj/ComfyUI-MultiGPU) inside `ComfyUI/custom_nodes/`.
## Nodes
The extension automatically creates MultiGPU versions of loader nodes. Each MultiGPU node has the same functionality as its original counterpart but adds a `device` parameter that allows you to specify the GPU to use.
Currently supported nodes (automatically detected if available):
- Standard [ComfyUI](https://github.com/comfyanonymous/ComfyUI) model loaders:
- CheckpointLoaderSimpleMultiGPU
- CLIPLoaderMultiGPU
- ControlNetLoaderMultiGPU
- DualCLIPLoaderMultiGPU
- TripleCLIPLoaderMultiGPU
- UNETLoaderMultiGPU
- VAELoaderMultiGPU
- GGUF loaders (requires [ComfyUI-GGUF](https://github.com/city96/ComfyUI-GGUF)):
- UnetLoaderGGUFMultiGPU (supports quantized models like [flux1-dev-gguf](https://huggingface.co/city96/FLUX.1-dev-gguf))
- UnetLoaderGGUFAdvancedMultiGPU
- CLIPLoaderGGUFMultiGPU
- DualCLIPLoaderGGUFMultiGPU
- TripleCLIPLoaderGGUFMultiGPU
- XLabAI FLUX ControlNet (requires [x-flux-comfy](https://github.com/XLabAI/x-flux-comfyui)):
- LoadFluxControlNetMultiGPU
- Florence2 (requires [ComfyUI-Florence2](https://github.com/kijai/ComfyUI-Florence2)):
- Florence2ModelLoaderMultiGPU
- DownloadAndLoadFlorence2ModelMultiGPU
- LTX Video Custom Checkpoint Loader (requires [ComfyUI-LTXVideo](https://github.com/Lightricks/ComfyUI-LTXVideo)):
- LTXVLoaderMultiGPU
- NF4 Checkpoint Format Loader(requires [ComfyUI_bitsandbytes_NF4](https://github.com/comfyanonymous/ComfyUI_bitsandbytes_NF4)):
- CheckpointLoaderNF4MultiGPU
- HunyuanVideoWrapper (requires [ComfyUI-HunyuanVideoWrapper](https://github.com/kijai/ComfyUI-HunyuanVideoWrapper)):
- HyVideoModelLoaderMultiGPU
- HyVideoModelLoaderDiffSynthMultiGPU (**NEW** - MultiGPU-specific node for offloading to an `offload_device` using MultiGPU's device selectors)
- HyVideoVAELoaderMultiGPU
- DownloadAndLoadHyVideoTextEncoderMultiGPU
- **Native to ComfyUI-MultiGPU**
- DeviceSelectorMultiGPU - Allows user to link loaders together to use the same selected device
- HunyuanVideoEmbeddingsAdapter - Allows Kijai's excellent IP2V CLIP for HunyuanVideo to be used with Comfy Core sampler.
All MultiGPU nodes available for your install can be found in the "multigpu" category in the node menu.
## Example workflows
All workflows have been tested on a 2x 3090 linux setup, a 4070 win 11 setup, and a 3090/1070ti linux setup.
### Split GGUF-quantized UNet and CLIP models across multiple devices using DisTorch
- [hunyuan_ip2v_distorch_gguf.json](https://github.com/pollockjj/ComfyUI-MultiGPU/blob/main/examples/hunyuan_ip2v_distorch_gguf.json)
This workflow attaches a HunyuanVideo GGUF-quantized model on `cuda:0` for compute and distrubutes its UNet across itself and the `cpu`. Kijai's IP2V clip loader is loaded on the `cpu`. While the VAE is loaded on GPU 1 directly and uses `cuda:1` for compute.
- [examples/hunyuan_gguf_distorch.json](https://github.com/pollockjj/ComfyUI-MultiGPU/blob/main/examples/hunyuan_gguf_distorch.json)
This workflow attaches a HunyuanVideo GGUF-quantized model on `cuda:0` for compute and distrubutes its UNet across itself, a secondary CUDA device, and the system's main memory (`cpu`) using a new DisTorch distributed-load methodology. The text encoder now attaches itself to `cuda:1` and splits iteself between `cuda:1` amd `cpu` layers. While the VAE is loaded on GPU 1 directly and uses `cuda:1` for compute.
- [examples/flux1dev_gguf_distorch.json](https://github.com/pollockjj/ComfyUI-MultiGPU/blob/main/examples/flux1dev_gguf_distorch.json)
This workflow loads a FLUX.1-dev model on `cuda:0` for compute and distrubutes its UNet across multiple CUDA devices using new DisTorch distributed-load methodology. While the text encoders and VAE are loaded on GPU 1 and use `cuda:1` for compute.
### Split Hunyuan Video generation across multiple resources
- [examples/hunyuanvideowrapper_native_vae.json](https://github.com/pollockjj/ComfyUI-MultiGPU/blob/main/examples/hunyuanvideowrapper_native_vae.json)
This workflow uses two of the custom_node's loaders - putting the main video model on cuda0 and the CLIP onto the CPU. This workflow uses Comfy's native VAE loader to load the VAE onto a second cuda device, keeping model, VAE, and CLIP in their operating memory space at all times. This allows the benefit of kijai's proecessing node with the flexibility of a MultiGPU setup.
- [examples/hunyuanvideowrapper_select_device.json](https://github.com/pollockjj/ComfyUI-MultiGPU/blob/main/examples/hunyuanvideowrapper_select_device.json)
This workflow loads the main video model and VAE onto the cuda device and the CLIP onto the cpu. The model and VAE are linked in this example due to kijai's own extensive memory management assuming model and VAE are on the same device.
### Split FLUX.1-dev across two GPUs
- [examples/flux1dev_2gpu.json](https://github.com/pollockjj/ComfyUI-MultiGPU/blob/main/examples/flux1dev_2gpu.json)
This workflow loads a FLUX.1-dev model and splits its components across two GPUs. The UNet model is loaded on GPU 1 while the text encoders and VAE are loaded on GPU 0.
### Split FLUX.1-dev between the CPU and a single GPU
- [examples/flux1dev_cpu_1gpu_GGUF.json](https://github.com/pollockjj/ComfyUI-MultiGPU/blob/main/examples/flux1dev_cpu_1gpu_GGUF.json)
This workflow demonstrates splitting a quantized, GGUF FLUX.1-dev model between a CPU and a single GPU. The UNet model is loaded on the GPU, while the VAE and text encoders are handled by the CPU. Requires [ComfyUI-GGUF](https://github.com/city96/ComfyUI-GGUF).
### Using GGUF quantized models across GPUs
- [examples/flux1dev_2gpu_GGUF.json](https://github.com/pollockjj/ComfyUI-MultiGPU/blob/main/examples/flux1dev_2gpu_GGUF.json)
This workflow demonstrates using quantized GGUF models split across multiple GPUs for reduced VRAM usage with the UNet on GPU 1, VAE and text encoders on GPU 0. Requires [ComfyUI-GGUF](https://github.com/city96/ComfyUI-GGUF).
### Using GGUF quantized models across a CPU and a single GPU for video generation
- [examples/hunyuan_cpu_1gpu_GGUF.json](https://github.com/pollockjj/ComfyUI-MultiGPU/blob/main/examples/hunyuan_cpu_1gpu_GGUF.json)
This workflow demonstrates using quantized GGUF models for Hunyan Video split across the CPU and one GPU. In this instance, a quantized video model's UNet and VAE are on GPU 0, whereas a split of one standard and one GGUF model text encoder are on the CPU. Requires [ComfyUI-GGUF](https://github.com/city96/ComfyUI-GGUF).
### Using GGUF quantized models across GPUs for video generation
- [examples/hunyuan_2gpu_GGUF.json](https://github.com/pollockjj/ComfyUI-MultiGPU/blob/main/examples/hunyuan_2gpu_GGUF.json)
This workflow demonstrates using quantized GGUF models for Hunyan Video split across multiple GPUs. In this instance, a quantized video model's UNet is on GPU 0 whereas the VAE and text encoders are on GPU 1. Requires [ComfyUI-GGUF](https://github.com/city96/ComfyUI-GGUF).
### Loading two SDXL checkpoints on different GPUs
- [examples/sdxl_2gpu.json](https://github.com/pollockjj/ComfyUI-MultiGPU/blob/main/examples/sdxl_2gpu.json)
This workflow loads two SDXL checkpoints on two different GPUs. The first checkpoint is loaded on GPU 0, and the second checkpoint is loaded on GPU 1.
### FLUX.1-dev and SDXL in the same workflow
- [examples/flux1dev_sdxl_2gpu.json](https://github.com/pollockjj/ComfyUI-MultiGPU/blob/main/examples/flux1dev_sdxl_2gpu.json)
This workflow loads a FLUX.1-dev model and an SDXL model in the same workflow. The FLUX.1-dev model has its UNet on GPU 1 with VAE and text encoders on GPU 0, while the SDXL model uses separate allocations on GPU 0.
### Image to Prompt to Image to Video Generation Pipeline
- [examples/florence2_flux1dev_ltxv_cpu_2gpu.json](https://github.com/pollockjj/ComfyUI-MultiGPU/blob/main/examples/florence2_flux1dev_ltxv_cpu_2gpu.json)
This workflow creates an img2txt2img2vid video generation pipeline by:
1. Loading the Florence2 model on the CPU and providing a starting image for analysis and generating a text response
2. Loading FLUX.1 Dev UNET on GPU 1, with CLIP and VAE on the CPU and generating an image using the Florence2 text as a prompt
3. Loading the LTX Video UNet and VAE on GPU 2, and LTX-encoded CLIP on the CPU, and taking the resulting FLUX.1 image and provide it as the starting image for an LTX Video image-to-video generation
4. Generate a 5 second video based on the provided image
All models are distributed across available the available CPU and GPUs with no model reloading on dual 3090s. Requires [ComfyUI-GGUF](https://github.com/city96/ComfyUI-GGUF) and [ComfyUI-LTXVideo](https://github.com/Lightricks/ComfyUI-LTXVideo)
### Using DeviceSelectorMultiGPU
- [examples/device_selector_lowvram_flux_controlnet.json](https://github.com/pollockjj/ComfyUI-MultiGPU/blob/main/examples/device_selector_lowvram_flux_controlnet.json)
This workflow loads a GGUF version of FLUX.1-dev onto a cuda device and the T5 CLIP onto the CPU. The FLUX.1-dev fill controlnet model by alimama-creative [FLUX.1-dev-Controlnet-Inpainting-Alpha controlnet model](https://huggingface.co/alimama-creative/FLUX.1-dev-Controlnet-Inpainting-Alpha/tree/main) illustrating linking two loaders together so their resources always remain in-sync.
#### LLM-Guided Video Generation
- [examples/llamacpp_ltxv_2gpu_GGUF.json](https://github.com/pollockjj/ComfyUI-MultiGPU/blob/main/examples/llamacpp_ltxv_2gpu_GGUF.json)
This workflow demonstrates:
1. Using a local LLM (loaded on first GPU via llama.cpp) to take a text suggestion and craft an LTX Video prompt
2. Feeding the enhanced prompt to LTXVideo (loaded on second GPU) for video generation
Requires appropriate LLM. Requires [ComfyUI-GGUF](https://github.com/city96/ComfyUI-GGUF).
## Support
If you encounter problems, please [open an issue](https://github.com/pollockjj/ComfyUI-MultiGPU/issues/new). Attach the workflow if possible.
## Credits
Originally created by [Alexander Dzhoganov](https://github.com/AlexanderDzhoganov).
Implementation improved by [City96](https://v100s.net/).
Currently maintained by [pollockjj](https://github.com/pollockjj).