# mykit-cache
**Repository Path**: binghe001/mykit-cache
## Basic Information
- **Project Name**: mykit-cache
- **Description**: 🔥🔥🔥 mykit架构中独立出来的mykit-cache组件,封装了mykit架构下对于缓存cache的各种操作,使用者只需要引入相关的Jar包,即可实现对缓存的轻松操作。
- **Primary Language**: Java
- **License**: Apache-2.0
- **Default Branch**: master
- **Homepage**: None
- **GVP Project**: No
## Statistics
- **Stars**: 18
- **Forks**: 13
- **Created**: 2021-08-23
- **Last Updated**: 2025-12-23
## Categories & Tags
**Categories**: Uncategorized
**Tags**: None
## README
# 作者及联系方式
作者:冰河
微信:sun_shine_lyz, hacker-binghe
QQ:2711098650
微信公众号: 冰河技术
# 框架简述
mykit架构中独立出来的mykit-cache组件,封装了mykit架构下对于缓存cache的各种操作,使用者只需要引入相关的Jar包,即可实现对缓存的轻松操作。
# 框架结构描述
封装了对于缓存的操作,支持Memcached、Redis、Ehcache等分布式缓存数据库,同时支持Spring的注解,通过Spring的注解可实现设置缓存的失效时间和主动刷新缓存
## 总体结构如下所示。
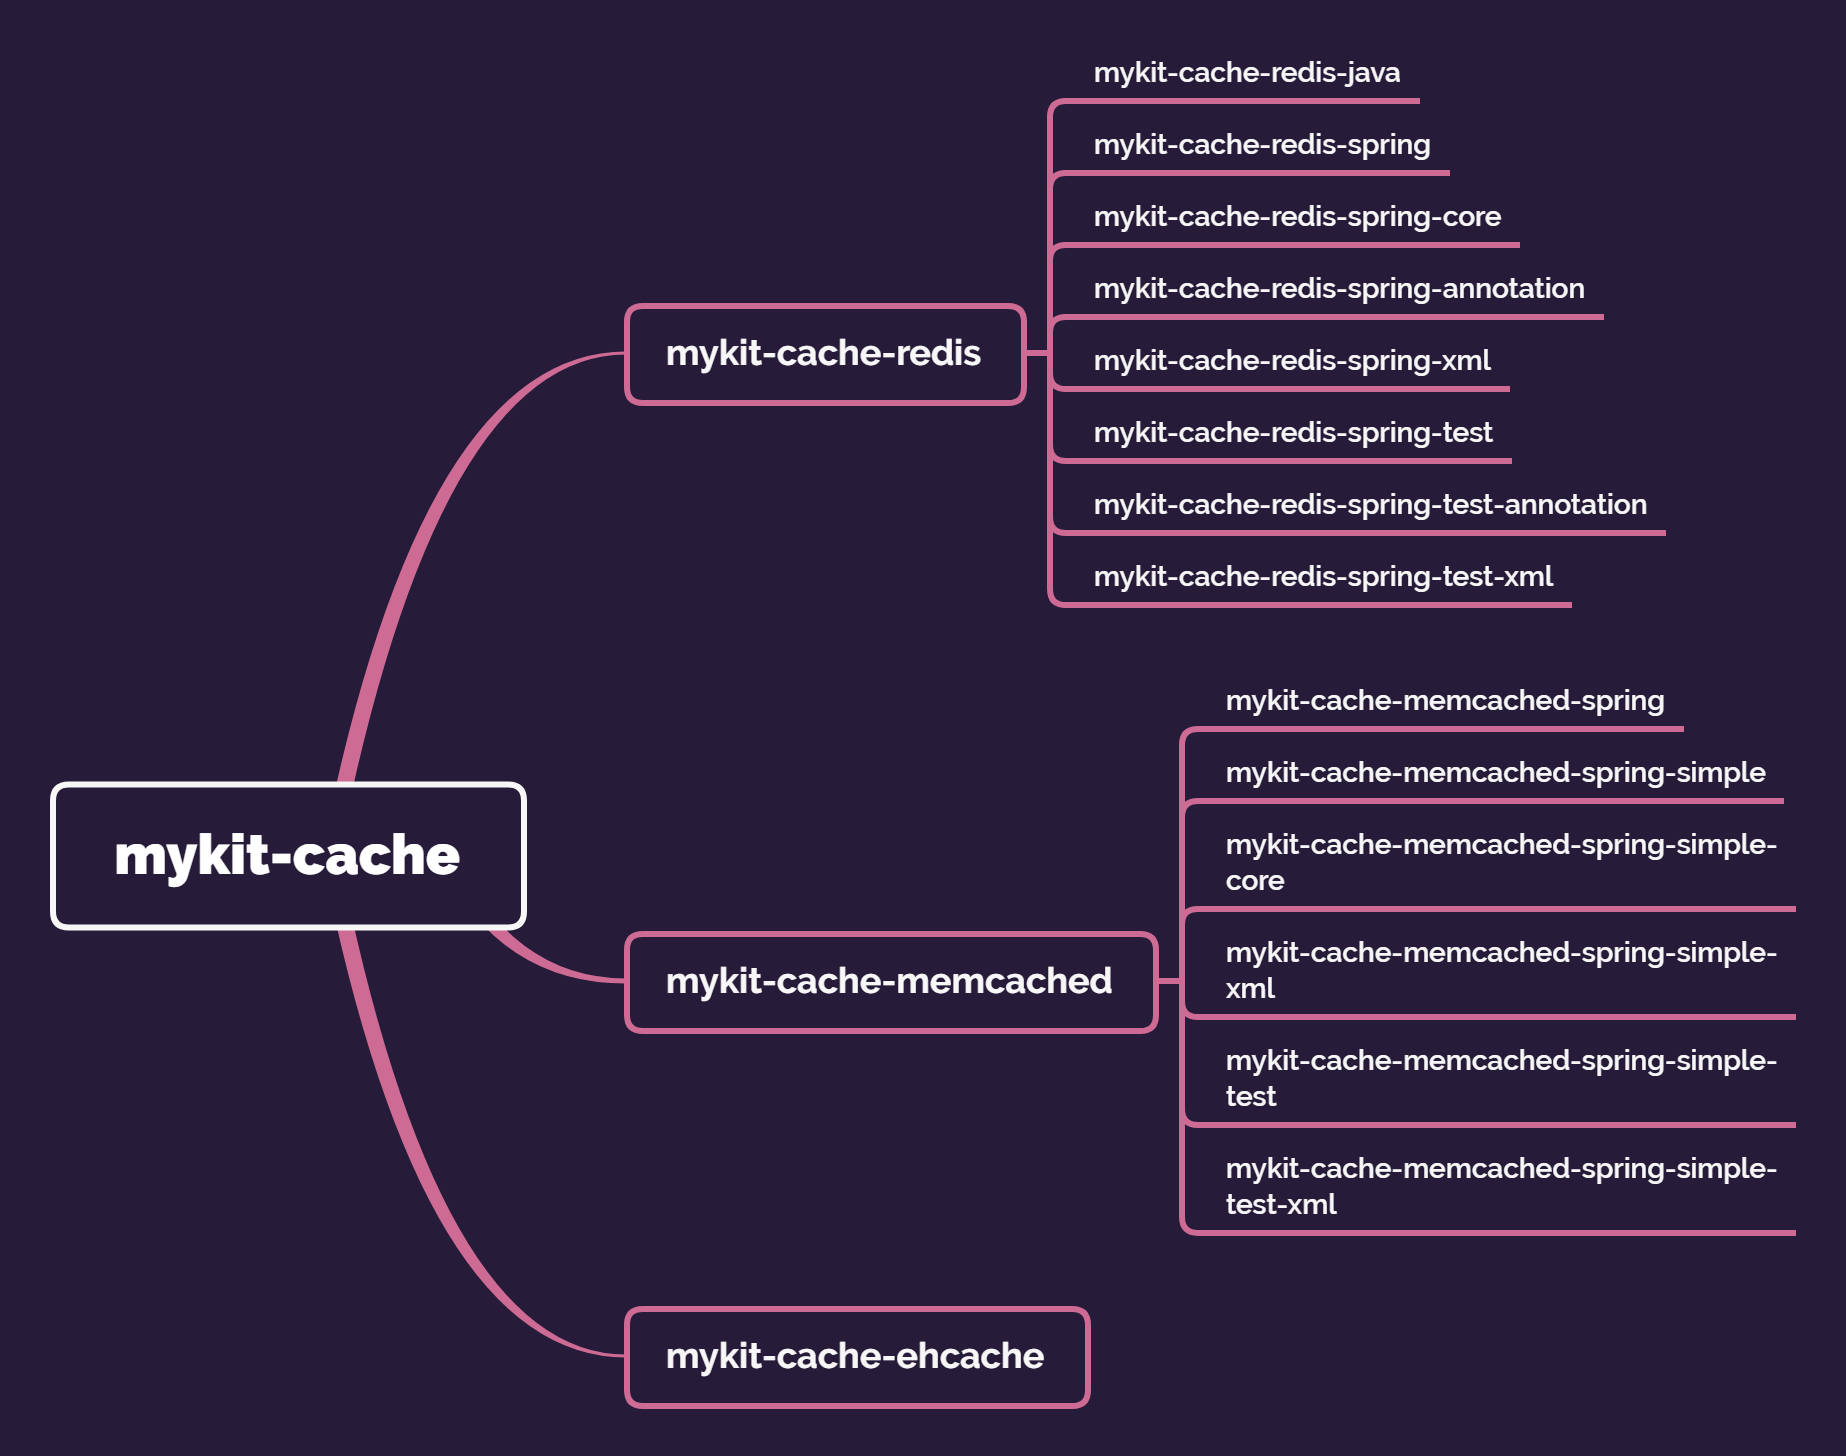
## mykit-cache-memcached
mykit-cache架构下与Memcached缓存相关的组件
### mykit-cache-memcached-spring
mykit-cache-memcached 下主要与 Spring 整合 Memcached 操作相关的组件,支持通过注解设置缓存有效时间
### mykit-cache-memcached-spring-simple
mykit-cache-memcached-spring下主要使用simple-spring-memcached内核实现注解缓存的组件,支持通过注解设置缓存有效时间,
兼容Memcached服务器宕机或因其他原因无法连接Memcached服务器的情况,主要方式为抛出相关异常信息后继续执行原方法。
### mykit-cache-memcached-spring-simple-core
mykit-cache-memcached-spring-simple下的核心模块,提供核心配置项
### mykit-cache-memcached-spring-simple-xml
mykit-cache-memcached-spring-simple下以XML方式管理Spring容器的插件类,提供Spring容器管理Memcached的核心配置,
其他项目或工程只需引入此插件,同时在自身的Spring配置文件中加载此组件的Memcached的核心配置即可。
### mykit-cache-memcached-spring-simple-test
通用测试工程,主要测试mykit-cache-memcached-spring下主要以simple-spring-memcached为内核的缓存操作,此插件模块主要提供主要的测试用例封装类。
### mykit-cache-memcached-spring-simple-test-xml
mykit-cache-memcached-spring下测试simple-spring-memcached为内核的缓存操作的入口工程,
测试入口类为:io.mykit.cache.test.memcached.test.xml.MemcachedTest, 同时,需要将此工程
下的classpath:properties/memcached.properties文件中的simple.memcache.server属性配置为自身Memcached服务器的IP和端口。
## mykit-cache-redis
mykit-cache架构下与Redis缓存相关的组件
### mykit-cache-redis-java
mykit-cache-redis 下单独以Java方式使用Redis缓存的封装。
### mykit-cache-redis-spring
mykit-cache-redis 下主要与 Spring 整合 Redis操作相关的组件,支持通过注解设置缓存有效时间和主动刷新缓存
### mykit-cache-redis-spring-core
mykit-cache-redis-spring 下主要提供Spring整合Redis的通用工具方法等,核心实现由此模块提供
### mykit-cache-redis-spring-annotation
mykit-cache-redis-spring 下主要与 Spring 整合 Redis操作相关的组件,支持通过注解设置缓存有效时间和主动刷新缓存,
主要以Java注解的形式实现Spring容器的管理操作,兼容Redis集群宕机或其他原因无法连接Redis集群时的情况,
如果Redis集群宕机或其他原因无法连接Redis集群时,打印相关的日志,并继续向下执行原有方法。
### mykit-cache-redis-spring-xml
mykit-cache-redis-spring 下主要与 Spring 整合 Redis操作相关的组件,支持通过注解设置缓存有效时间和主动刷新缓存,
主要以XML配置的形式实现Spring容器的管理操作,不兼容Redis集群宕机或其他原因无法连接Redis集群时的情况,
如果Redis集群宕机或其他原因无法连接Redis集群时,抛出异常,退出执行。
### mykit-cache-redis-spring-test
mykit-cache-redis-spring 下测试Spring整合Redis的核心测试用例类,提供主要的测试封装;
### mykit-cache-redis-spring-test-annotation
mykit-cache-redis-spring 下测试以Java注解形式管理Spring容器的测试入口,
对mykit-cache-redis-spring-annotation提供单元测试用例,
测试入口为:io.mykit.cache.test.redis.spring.annotation.test.TestRedisConfig,
执行测试方法前需要先根据自身的Redis集群情况配置classpath:properties/redis.properties文件,
将redis.properties中的Redis集群的节点IP和端口修改为自身的Redis集群节点的IP和端口
### mykit-cache-redis-spring-test-xml
mykit-cache-redis-spring 下测试以XML配置形式管理Spring容器的测试入口,
mykit-cache-redis-spring-xml的测试模块,对mykit-cache-redis-spring-xml提供单元测试用例,
测试的入口为io.mykit.cache.test.redis.spring.test.xml.RedisTest,
执行测试方法前需要先根据自身的Redis集群情况配置classpath:properties/redis.properties文件,
将redis.properties中的Redis集群的节点IP和端口修改为自身的Redis集群节点的IP和端口
## mykit-cache-ehcache
mykit-cache架构下与ehcache缓存相关的组件
## mykit-cache-ehcache-spring
mykit-cache-ehcache 下主要与 Spring 整合Ehcache操作相关的组件,支持通过注解设置缓存有效时间
# 使用场景
## 总体场景
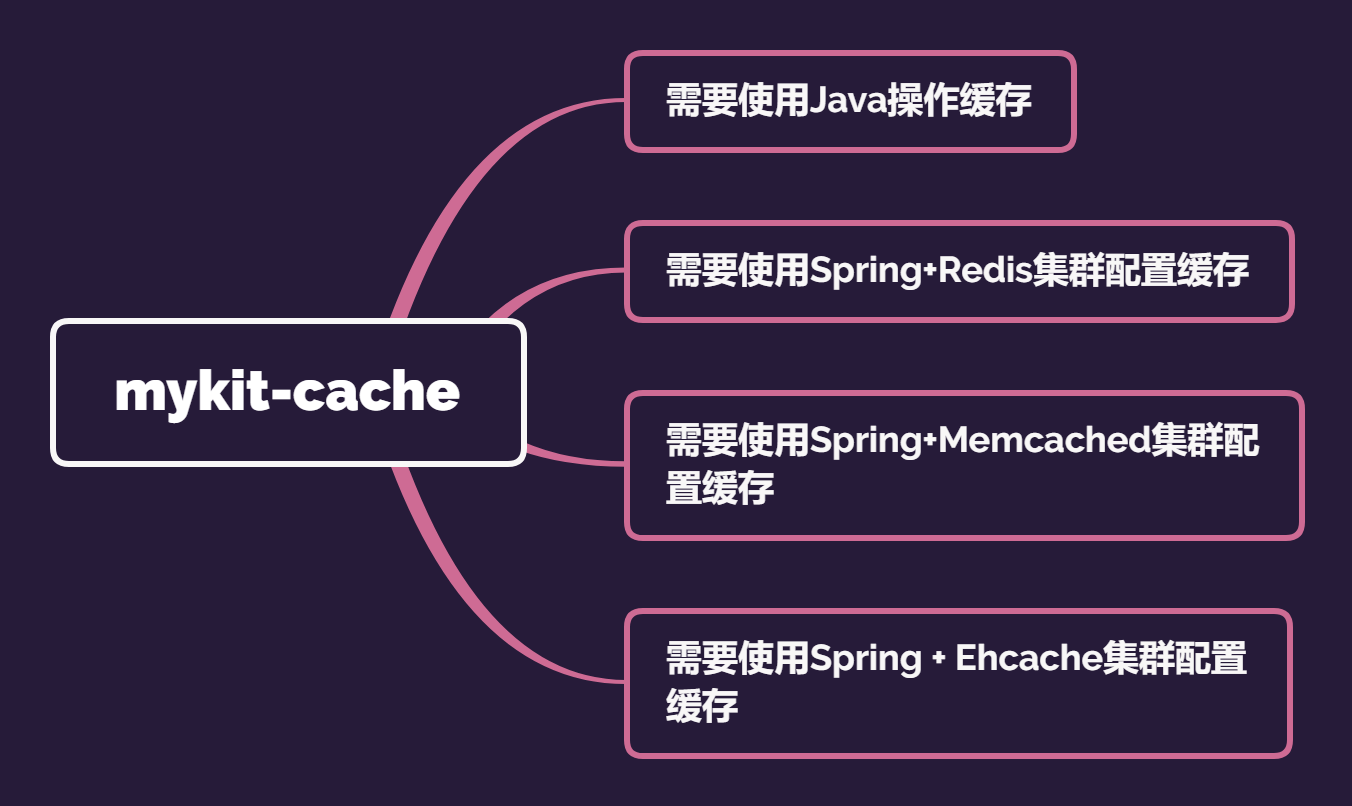
## 1、需要使用Java直接操作Redis:
1)在Maven的pom.xml文件中加入如下配置:
```xml
io.mykit.cache
mykit-cache-redis-java
1.0.0-SNAPSHOT
```
2)在项目的resources目录下创建Redis的配置文件redis.properties文件
如果是Redis单机模式,则redis.properties文件的内容如下所示。
```
redis.host=10.2.2.231
redis.port=6379
redis.max_idle=200
redis.max_wait=10000
redis.max_total=1024
redis.timeout=3000
redis.test_on_borrow=true
```
如果是Redis集群模式,则redis.properties文件的内容如下所示。
```
#Redis集群模式
redis.cluster.password=
redis.cluster.max.total=100
redis.cluster.max.idle=20
redis.cluster.min.idle=10
redis.cluster.timeout=2000
redis.cluster.maxAttempts=100
redis.cluster.redisDefaultExpiration=3600
redis.cluster.usePrefix=true
redis.cluster.blockWhenExhausted=true
redis.cluster.maxWaitMillis=3000
redis.cluster.testOnBorrow=false
redis.cluster.testOnReturn=false
redis.cluster.testWhileIdle=true
redis.cluster.minEvictableIdleTimeMillis=60000
redis.cluster.timeBetweenEvictionRunsMillis=30000
redis.cluster.numTestsPerEvictionRun=-1
redis.cluster.defaultExpirationKey=defaultExpirationKey
redis.cluster.expirationSecondTime=300
redis.cluster.preloadSecondTime=280
# virsual env
redis.cluster.node.one=192.168.175.151
redis.cluster.node.one.port=7001
redis.cluster.node.two=192.168.175.151
redis.cluster.node.two.port=7002
redis.cluster.node.three=192.168.175.151
redis.cluster.node.three.port=7003
redis.cluster.node.four=192.168.175.151
redis.cluster.node.four.port=7004
redis.cluster.node.five=192.168.175.151
redis.cluster.node.five.port=7005
redis.cluster.node.six=192.168.175.151
redis.cluster.node.six.port=7006
redis.cluster.node.seven=192.168.175.151
redis.cluster.node.seven.port=7006
```
### 注意:
配置redis.properties文件时,可以修改Redis的IP和端口号,但是文件中的Key必须与上述示例给出的Key相同,否则Redis客户端无法连接到Redis服务器。
3)在Java程序中使用Redis缓存
如果配置的是单机模式,则使用如下方式使用Redis缓存
```
Jedis jedis = RedisBuilder.getInstance();
jedis.set("name", "binghe");
String value = jedis.get("name");
System.out.println(value);
```
如果配置的是集群环境,则使用如下方式使用Redis缓存
``` java
JedisCluster jedisCluster = RedisClusterBuilder.getInstance();
jedisCluster.set("name", "binghe");
String value = jedisCluster.get("name");
System.out.println(value);
```
## 2、需要使用Spring+Redis集群配置缓存:
1)需要兼容Redis集群宕机或其他原因无法连接Redis集群时的情况:
在Maven的pom.xml中加入如下配置即可:
```xml
io.mykit.cache
mykit-cache-redis-spring-annotation
1.0.0-SNAPSHOT
```
此时,还需要根据具体情况在自身项目的合适模块中创建Redis的配置类,主要的功能为提供以Java注解的形式配置Spring和Redis集群整合的Spring容器管理,
示例程序为:mykit-cache-redis-spring-test-annotation测试模块中的io.mykit.cache.test.redis.spring.annotation.config.AnnotationConfig类。
```
package io.mykit.cache.test.redis.spring.annotation.config;
import io.mykit.cache.redis.spring.annotation.config.CacheRedisConfig;
import org.springframework.cache.annotation.EnableCaching;
import org.springframework.context.annotation.ComponentScan;
import org.springframework.context.annotation.Configuration;
import org.springframework.context.annotation.EnableAspectJAutoProxy;
import org.springframework.context.annotation.PropertySource;
/**
* @author binghe
* @version 1.0.0
* @description 提供以Java注解的形式配置Spring和Redis集群整合的Spring容器管理
*/
@Configuration
@EnableCaching
@EnableAspectJAutoProxy(proxyTargetClass = true)
@ComponentScan(value = {"io.mykit.cache"})
@PropertySource(value = {"classpath:properties/redis-default.properties", "classpath:properties/redis.properties"})
public class AnnotationConfig extends CacheRedisConfig {
}
```
2)不需要兼容Redis集群宕机或其他原因无法连接Redis集群时的情况:
在Maven的pom.xml中加入如下配置即可:
io.mykit.cache
mykit-cache-redis-spring-xml
1.0.0-SNAPSHOT
此时还需要根据具体情况在自身项目的spring配置文件中,进行相关的配置,主要的配置项有:开启Spring注解扫描及代理,扫描的基本类中加入io.mykit.cache包,并按照顺序加载
classpath*:properties/redis-default.properties, classpath*:properties/redis.properties文件,具体实例为:mykit-cache-redis-spring-test-xml下的classpath:spring/spring-context.xml
配置文件:
```
```
注意:
1、无论需不需要兼容Redis集群宕机或其他原因无法连接Redis集群时的情况,都需要在自身项目的classpath目录下创建redis.properties文件,配置自身Redis集群节点的IP和端口,
目前,mykit-cache-redis-spring-annotation和mykit-cache-redis-spring-xml最多支持7台Redis集群,可根据自身实际情况扩展;
如果自身的Redis集群不足7台,可在redis.properties文件中配置重复的Redis集群节点的IP和端口;
2、在自身项目的classpath目录下创建redis.properties文件,此文件名不是强制要求的,可使用其他的文件名代替,但是此文件名必须和spring配置文件中加载的redis配置文件名以及
以Java注解形式管理Spring容器的配置类中加载的redis配置文件名保持一致;
3、自定义的Redis集群配置文件中的集群节点IP和端口的配置项名称必须和实例classpath:properties/redis.properties配置文件中的集群节点IP和端口的配置项名称相同;
4、配置实例:
比如,在我自己项目中的classpath:properties下redis集群的配置文件为redis.properties,具体内容如下:
```
#redis cluster config
redis.cluster.defaultExpirationKey=defaultExpirationKey
redis.cluster.expirationSecondTime=300000
redis.cluster.preloadSecondTime=280000
#node info
redis.cluster.node.one=10.2.2.231
redis.cluster.node.one.port=7001
redis.cluster.node.two=10.2.2.231
redis.cluster.node.two.port=7002
redis.cluster.node.three=10.2.2.231
redis.cluster.node.three.port=7003
redis.cluster.node.four=10.2.2.231
redis.cluster.node.four.port=7004
redis.cluster.node.five=10.2.2.231
redis.cluster.node.five.port=7005
redis.cluster.node.six=10.2.2.231
redis.cluster.node.six.port=7006
redis.cluster.node.seven=10.2.2.231
redis.cluster.node.seven.port=7006
```
则在我项目的spring配置文件中需要加载的配置文件为:
```
```
或者在我项目的配置类中需要加载的配置文件注解为:
```
@PropertySource(value = {"classpath:properties/redis-default.properties", "classpath:properties/redis.properties"})
```
也就是说:classpath:properties/redis-default.properties文件要写到自定义的配置文件的前面,框架会先加载classpath:properties/redis-default.properties,
然后加载自定义的配置文件,如果自定义的配置文件中存在与classpath:properties/redis-default.properties文件相同的属性配置,则框架会
用自定义的配置属性覆盖classpath:properties/redis-default.properties中相同的属性
5、具体使用
1)在相关的查询方法上加上无key属性的@Cacheable注解:
```
@Cacheable(value={"test#10#2"})
```
没有配置@Cacheable的key属性,此时的@Cacheable的key属性值按照一定策略自定生成,即以当前类名(完整包名+类名)+方法名+方法类型列表+方法参数列表的HashCode为当前@Cacheable的key属性。
具体的key生成策略类为mykit-cache-redis-spring-core中的io.mykit.cache.redis.spring.cache.CacheKeyGenerator类;
2)在相关的查询方法上加上有key属性的@Cacheable注解
```
@Cacheable(value={"test#10#2"} key="key" + ".#defaultValue")
```
配置了@Cacheable的key属性,此时@Cacheable的key属性值为key拼接参数defaultValue的值的结果的HashCode值。
注意:
1、@Cacheable注解中没有key属性,框架会为@Cacheable生成Key属性,也就是说key属性不是必须的;
2、@Cacheable注解没有配置key属性,则以当前类名(完整包名+类名)+方法名+方法类型列表+方法参数列表的HashCode为当前@Cacheable的key属性;
3、@Cacheable注解配置了key属性,则以当前key的HashCode作为当前@Cacheable的key属性;
4、@Cacheable的value属性中我们配置的值为 test#10#2,此时表示@Cacheable的缓存名称为test,其中10表示缓存有效时长(单位为秒),2表示距离缓存失效的剩余时长(单位为秒),
即@Cacheable的value属性配置格式为:缓存名称#expireTime#reloadTime,框架规定必须以#作为分隔符
expireTime:表示缓存的有效时长,单位秒;
reloadTime:表示距离缓存失效的剩余时长,单位秒;
expireTime 需要大于 reloadTime,否则无意义
5、@Cacheable的value属性说明
以缓存名称#expireTime#reloadTime格式配置@Cacheable的value属性后,框架会将查询结果放到缓存中,有效时长为expireTime秒,距离缓存失效的剩余时长为reloadTime秒;
当在将数据存入缓存时,经过了0秒——(expireTime-reloadTime)秒时间范围时,再次调用方法,则直接从缓存中获取数据;
当在将数据存入缓存时,经过了reloadTime秒——expireTime秒时间范围时,再次调用方法,框架会通过代理和反射的方式主动调用原方法从真正的数据源获取数据后刷新缓存;
当在将数据存入缓存时,经过了超过expireTime秒的时间,则缓存失效,再次调用方法,则执行原方法查询数据,框架会自动将查询结果存入缓存;
当框架通过代理和反射的方式主动调用原方法从真正的数据源获取数据后刷新缓存时,为防止请求的多个线程同时执行刷新缓存的操作,框架提供了分布式锁来保证只有一个线程执行刷新缓存操作;
框架主动调用原方法从真正的数据源获取数据后刷新缓存的操作与用户的请求操作是异步的,不会影响用户请求的性能;
框架主动调用原方法从真正的数据源获取数据后刷新缓存的操作对用户请求透明,即用户感知不到框架主动刷新缓存的操作;
其他:
1)当 @Cacheable 的Value只配置了缓存名称,比如配置为@Cacheable(value="test")
此时的expireTime默认为redis配置文件的redis.cluster.expirationSecondTime属性值,单位为秒;reloadTime默认为redis配置文件的redis.cluster.preloadSecondTime属性值,单位为秒;
属性值的加载顺序为:优先加载自定义的redis配置文件的redis.cluster.expirationSecondTime属性值和redis.cluster.preloadSecondTime属性值,如果自定义的redis配置文件无相关的属性值;
则从框架默认的redis配置文件redis-default.properties文件中加载;
2)当 @Cacheable 的Value配置缓存名称和失效时长,比如配置为@Cacheable(value="test#10")
此时的reloadTime默认为redis配置文件的redis.cluster.preloadSecondTime属性值,单位为秒;
属性值的加载顺序为:优先加载自定义的redis配置文件的redis.cluster.preloadSecondTime属性值,如果自定义的redis配置文件无相关的属性值;
则从框架默认的redis配置文件redis-default.properties文件中加载;
3)当 @Cacheable 的Value配置缓存名称、失效时长和距离缓存失效的剩余时长,比如配置为:@Cacheable(value="test#10#2")
此时不会加载默认的expireTime和reloadTime,框架会直接使用@Cacheable注解中value属性配置的expireTime和reloadTime;
4)无论@Cacheable的Value属性是否配置了缓存时长信息,则都不会出现只配置reloadTime,没有配置expireTime的情况,框架规定的value属性格式为:缓存名称#expireTime#reloadTime
即只会出现的格式为:
缓存名称
缓存名称#expireTime
缓存名称#expireTime#reloadTime
不会存在单独出现reloadTime的情况,会出现配置了缓存名称#expireTime,reloadTime使用配置文件默认的时长配置的情况;
# 注意事项
1、mykit-cache-redis-spring-xml引用和mykit-cache-redis-spring-annotation引用是互斥的,即在一个工程中mykit-cache-redis-spring-xml和mykit-cache-redis-spring-annotation只能同时引用一个;
2、mykit-cache-redis-spring-xml和mykit-cache-redis-spring-annotation的功能是一样的,但是mykit-cache-redis-spring-annotation工程兼容Redis集群宕机或其他原因无法连接Redis集群时的情况;
3、如果Redis集群宕机或其他原因无法连接Redis集群时,则mykit-cache-redis-spring-xml会抛出异常,退出执行;而mykit-cache-redis-spring-annotation则会打印相关的异常信息,继续向下执行原来的方法。
4、如果你的项目中以XML配置的方式,配置了Spring容器和SpringMVC,而你想以兼容Redis集群宕机或其他原因连接不上Redis集群的方式配置缓存,可以经过如下配置:
1)在项目中添加如下配置类:
SpringContextConfig:配置Spring容器:
```
package io.mykit.cache.redis.spring.utils.config;
import org.springframework.cache.annotation.EnableCaching;
import org.springframework.context.annotation.ComponentScan;
import org.springframework.context.annotation.Configuration;
import org.springframework.context.annotation.EnableAspectJAutoProxy;
import org.springframework.context.annotation.ImportResource;
import org.springframework.context.annotation.PropertySource;
import io.mykit.cache.redis.spring.annotation.config.CacheRedisConfig;
/**
* @ClassName SpringContextConfig
* @Description Spring Java配置
* @author binghe
*/
@Configuration
@EnableCaching
@EnableAspectJAutoProxy(proxyTargetClass = true)
@ComponentScan(value = {"io.mykit.cache"})
@PropertySource(value = {"classpath:properties/redis-default.properties", "classpath:properties/redis.properties"})
@ImportResource("classpath:spring/applicationContext.xml")
public class SpringContextConfig extends CacheRedisConfig{
}
```
SpringMVCConfig:配置SpringMVC:
```
package io.mykit.cache.redis.spring.utils.config;
import org.springframework.context.annotation.Configuration;
import org.springframework.context.annotation.ImportResource;
/**
* @ClassName SpringMVCConfig
* @Description SpringMVC Java配置
* @author binghe
*/
@Configuration
@ImportResource("classpath:spring/SpringMVC-servlet.xml")
public class SpringMVCConfig {
}
```
2)web项目的web.xml修改如下:
```
org.springframework.web.context.ContextLoaderListener
contextClass
org.springframework.web.context.support.AnnotationConfigWebApplicationContext
contextConfigLocation
io.mykit.cache.redis.spring.utils.config.SpringContextConfig
org.springframework.web.util.IntrospectorCleanupListener
SpringMVC
org.springframework.web.servlet.DispatcherServlet
contextClass
org.springframework.web.context.support.AnnotationConfigWebApplicationContext
contextConfigLocation
io.mykit.cache.redis.spring.utils.config.SpringMVCConfig
1
SpringMVC
/
```
## 3、需要使用Spring+Memcached集群配置缓存
1、需要在工程的pom.xml中引用
```
io.mykit.cache
mykit-cache-memcached-spring-simple-xml
1.0.0-SNAPSHOT
```
注意:框架的此模块不支持主动刷新缓存,底层核心使用的是simple-spring-memcached内核。
2、使用方法
1)在自身项目的classpath:properties目录下新建Memcached的配置文件,比如:memcached.properties文件,配置连接Memcached的属性;
属性配置如下:
```
#simple memcached config
simple.memcache.server=127.0.0.1:12000
simple.memcache.consistenthashing=true
simple.memcache.connectionpoolsize=1
simple.memcache.optimizeget=false
simple.memcache.optimizemergebuffer=false
simple.memcache.mergefactor=50
simple.memcache.usebinaryprotocol=true
simple.memcache.connectiontimeout=3000
simple.memcache.operationtimeout=2000
simple.memcache.enableheartbeat=true
simple.memcache.failureMode=false
```
注意:自定义的memcached文件的属性,必须和memcached-default.properties默认配置的属性key相同,也就是和上述配置的key相同,但可以不用覆盖上述完整的配置,
可以只配置:
```
simple.memcache.server=192.168.209.121:12000
```
来覆盖simple.memcache.server属性
2)在自身项目的classpath目录下新建spring配置文件,比如:spring-context.xml,配置内容如下:
```
```
根据上述配置加载properties文件顺序,框架会用自定义的memcached.properties文件属性覆盖memcached-default.properties文件的属性。
如果memcached-default.properties文件中存在memcached.properties中不存在的属性,框架会用memcached-default.properties中默认的属性。
至此,就可以使用simple-spring-memcached提供的注解来配置使用缓存了。
3、simple-spring-memcached介绍
3-1、基本介绍
simple-spring-memcached本质上是采用了AOP的方式来实现缓存的调用和管理,其核心组件声明了一些Advice,当遇到相应的切入点时,会执行这些Advice来对memcached加以管理。
切入点是通过标签的方式来进行声明的,在项目开发时,通常在DAO的方法上加以相应的标签描述,来表示组件对该方法的拦截
组件所提供的切入点主要包括以下几种:
ReadThroughSingleCache、ReadThroughMultiCache、ReadThroughAssignCache
1)当遇到查询方法声明这些切入点时,组件首先会从缓存中读取数据,取到数据则跳过查询方法,直接返回。
取不到数据在执行查询方法,并将查询结果放入缓存,以便下一次获取。
InvalidateSingleCache、InvalidateMultiCache、InvalidateAssignCache
2)当遇到删除方法声明这些切入点时,组件会删除缓存中的对应实体,以便下次从缓存中读取出的数据状态是最新的
UpdateSingleCache、UpdateMultiCache、UpdateAssignCache
3-2、注解说明
各Annotation的详细说明
ReadThroughSingleCache
作用:读取Cache中数据,如果不存在,则将读取的数据存入Cachekey生成规则:ParameterValueKeyProvider指定的参数,如果该参数对象中包含CacheKeyMethod注解的方法,则调用其方法,否则调用toString方法
```
@ReadThroughSingleCache(namespace = "Alpha", expiration = 30)
public String getDateString(@ParameterValueKeyProvider final String key) {
final Date now = new Date();
try {
Thread.sleep(1500);
} catch (InterruptedException ex) {
}
return now.toString() + ":" + now.getTime();
}
```
InvalidateSingleCache
作用:失效Cache中的数据
key生成规则:
1)使用 ParameterValueKeyProvider注解时,与ReadThroughSingleCache一致
2)使用 ReturnValueKeyProvider 注解时,key为返回的对象的CacheKeyMethod或toString方法生成
```
@InvalidateSingleCache(namespace = "Charlie")
public void updateRandomString(@ParameterValueKeyProvider final Long key) {
// Nothing really to do here.
}
@InvalidateSingleCache(namespace = "Charlie")
@ReturnValueKeyProvider
public Long updateRandomStringAgain(final Long key) {
return key;
}
```
UpdateSingleCache
作用:更新Cache中的数据
key生成规则:ParameterValueKeyProvider指定
1)ParameterDataUpdateContent:方法参数中的数据,作为更新缓存的数据
2)ReturnDataUpdateContent:方法调用后生成的数据,作为更新缓存的数据
注:上述两个注解,必须与Update*系列的注解一起使用
```
@UpdateSingleCache(namespace = "Alpha", expiration = 30)
public void overrideDateString(final int trash, @ParameterValueKeyProvider final String key,
@ParameterDataUpdateContent final String overrideData) {
}
@UpdateSingleCache(namespace = "Bravo", expiration = 300)
@ReturnDataUpdateContent
public String updateTimestampValue(@ParameterValueKeyProvider final Long key) {
try {
Thread.sleep(100);
} catch (InterruptedException ex) {
}
final Long now = new Date().getTime();
final String result = now.toString() + "-U-" + key.toString();
return result;
}
```
ReadThroughAssignCache
作用:读取Cache中数据,如果不存在,则将读取的数据存入Cache
key生成规则: ReadThroughAssignCache 注解中的 assignedKey 字段指定
```
@ReadThroughAssignCache(assignedKey = "SomePhatKey", namespace = "Echo", expiration = 3000)
public List getAssignStrings() {
try {
Thread.sleep(500);
} catch (InterruptedException ex) {
}
final List results = new ArrayList();
final long extra = System.currentTimeMillis() % 20;
final String base = System.currentTimeMillis() + "";
for (int ix = 0; ix < 20 + extra; ix++) {
results.add(ix + "-" + base);
}
return results;
}
```
InvalidateAssignCache
作用:失效缓存中指定key的数据
key生成规则:assignedKey 字段指定
```
@InvalidateAssignCache(assignedKey = "SomePhatKey", namespace = "Echo")
public void invalidateAssignStrings() {
}
```
UpdateAssignCache
作用:更新指定缓存
key生成规则:assignedKey 字段指定
```
@UpdateAssignCache(assignedKey = "SomePhatKey", namespace = "Echo", expiration = 3000)
public void updateAssignStrings(int bubpkus, @ParameterDataUpdateContent final List newData) {
}
```
## 4、需要使用Spring + Ehcache集群配置缓存
## 框架此模块暂时不做实现,由于Spring与Ehcache的整合过于简单,可自行实现Spring与Ehcache的整合,这个不提供封装了。
## spring4配置基于注解的ehcache缓存
## 一、 ehcache配置文件ehcache.xml
```
```
## 二、 spring-cache注解及ehcache bean配置
```
```
## 三、 确认开启了spring的aop支持
```
```
## 四、 Spring的cache注解的使用
### 1. @Cacheable
@Cacheable 主要的参数
* value
缓存的名称,在 spring 配置文件中定义,必须指定至少一个
例如:
@Cacheable(value=”mycache”) 或者
@Cacheable(value={”cache1”,”cache2”}
* key
缓存的 key,可以为空,如果指定要按照 SpEL 表达式编写,如果不指定,则缺省按照方法的所有参数进行组合
例如:
@Cacheable(value=”testcache”,key=”#userName”)
* condition
缓存的条件,可以为空,使用 SpEL 编写,返回 true 或者 false,只有为 true 才进行缓存
例如:
@Cacheable(value=”testcache”,condition=”#userName.length()
如下示例:
```
@Cacheable(value = "statisticServiceCache", key = "'activityChartData_' + #urlID")
public ResultInfo getActivityChartData(String urlID, Date startMonth,Date endMonth) {
…
}
```
这个注解用于,在调用被注解的方法时,首先检查当前缓存系统中是否存在键值为key的缓存。如果存在,则直接返回缓存对象,不执行该方法。如果不存在,则调用该方法,并将得到的返回值写入缓存中。
### 2. @CachePut
@CachePut 主要的参数
* value
缓存的名称,在 spring 配置文件中定义,必须指定至少一个
例如:
@Cacheable(value=”mycache”) 或者
@Cacheable(value={”cache1”,”cache2”}
* key
缓存的 key,可以为空,如果指定要按照 SpEL 表达式编写,如果不指定,则缺省按照方法的所有参数进行组合
例如:
@Cacheable(value=”testcache”,key=”#userName”)
* condition
缓存的条件,可以为空,使用 SpEL 编写,返回 true 或者 false,只有为 true 才进行缓存
例如:
@Cacheable(value=”testcache”,condition=”#userName.leng
@CachePut用于写入缓存,但是与@ Cacheable不同,@CachePut注解的方法始终执行,然后将方法的返回值写入缓存,此注解主要用于新增或更新缓存。
### 3. @CacheEvict
@CacheEvict 主要的参数
* value
缓存的名称,在 spring 配置文件中定义,必须指定至少一个
例如:
@CachEvict(value=”mycache”) 或者
@CachEvict(value={”cache1”,”cache2”}
* key
缓存的 key,可以为空,如果指定要按照 SpEL 表达式编写,如果不指定,则缺省按照方法的所有参数进行组合
例如:
@CachEvict(value=”testcache”,key=”#userName”)
* condition
缓存的条件,可以为空,使用 SpEL 编写,返回 true 或者 false,只有为 true 才清空缓存
例如:
@CachEvict(value=”testcache”,
condition=”#userName.length()>2”)
* allEntries
是否清空所有缓存内容,缺省为 false,如果指定为 true,则方法调用后将立即清空所有缓存
例如:
@CachEvict(value=”testcache”,allEntries=true)
* beforeInvocation
是否在方法执行前就清空,缺省为 false,如果指定为 true,则在方法还没有执行的时候就清空缓存,缺省情况下,如果方法执行抛出异常,则不会清空缓存
例如:
@CachEvict(value=”testcache”,beforeInvocation=true)
@CacheEvict用于删除缓存
# 注意
无论使用哪种模块,需要在相关的项目中配置ApplicationContext到SpringContextWrapper中。
示例代码如下:
```
package io.mykit.cache.test.redis.spring.utils;
import io.mykit.cache.redis.spring.context.SpringContextWrapper;
import lombok.extern.slf4j.Slf4j;
import org.springframework.context.ApplicationContext;
import org.springframework.context.ApplicationContextAware;
import org.springframework.stereotype.Component;
import redis.clients.util.Hashing;
/**
* @author binghe
* @version 1.0.0
* @description 以静态变量保存Spring ApplicationContext, 可在任何代码任何地方任何时候中取出ApplicaitonContext.
*/
@Slf4j
@Component
public class SpringContext implements ApplicationContextAware {
private static ApplicationContext applicationContext;
/**
* 实现ApplicationContextAware接口的context注入函数, 将其存入静态变量.
*/
@Override
public void setApplicationContext(ApplicationContext applicationContext) {
SpringContext.applicationContext = applicationContext; // NOSONAR
log.debug(SpringContext.class.getName() + " 类加载的路径:" + this.getClass().getResource("/").getPath() + ", hashcode:" + Hashing.MURMUR_HASH.hash(this.getClass().getResource("/").getPath()));
log.debug(SpringContext.class.getName() + " applicationContext===>>>" + applicationContext);
SpringContextWrapper.setApplicationContext(SpringContextWrapper.getContextKey(this.getClass()), applicationContext);
}
/**
* 取得存储在静态变量中的ApplicationContext.
* @return ApplicationContext对象
*/
public static ApplicationContext getApplicationContext() {
checkApplicationContext();
return applicationContext;
}
/**
* 从静态变量ApplicationContext中取得Bean, 自动转型为所赋值对象的类型.
* @param name Spring中Bean的名称
* @return 泛型对象
*/
@SuppressWarnings("unchecked")
public static T getBean(String name) {
checkApplicationContext();
return (T) applicationContext.getBean(name);
}
/**
* 从静态变量ApplicationContext中取得Bean, 自动转型为所赋值对象的类型.
* @param clazz 指定的clazz对象
* @return 泛型对象
*/
public static T getBean(Class clazz) {
checkApplicationContext();
return (T) applicationContext.getBean(clazz);
}
/**
* 清除applicationContext静态变量.
*/
public static void cleanApplicationContext() {
applicationContext = null;
}
private static void checkApplicationContext() {
if (applicationContext == null) {
throw new IllegalStateException("applicaitonContext未注入,请在applicationContext.xml中定义SpringContextHolder");
}
}
}
```
# 备注
本项目还在开发中,目前未添加到Maven中央仓库,后续开发完成会添加到Maven中央仓库
# 扫一扫关注微信公众号
**你在刷抖音,玩游戏的时候,别人都在这里学习,成长,提升,人与人最大的差距其实就是思维。你可能不信,优秀的人,总是在一起。**
扫一扫关注冰河技术微信公众号
