# huge-genealogy
**Repository Path**: bury_the_family/huge-genealogy
## Basic Information
- **Project Name**: huge-genealogy
- **Description**: 基于Hugegraph的家族族谱
- **Primary Language**: Unknown
- **License**: Not specified
- **Default Branch**: master
- **Homepage**: None
- **GVP Project**: No
## Statistics
- **Stars**: 7
- **Forks**: 4
- **Created**: 2022-04-03
- **Last Updated**: 2026-01-13
## Categories & Tags
**Categories**: Uncategorized
**Tags**: None
## README
# huge-genealogy
[toc]
# hugegraph入门
## 图数据介绍
### 各数据库对比
### 图数据库基本介绍
## 图数据简介
### 小猪佩奇引入

## hugegraph介绍
### hugegraph基本介绍

### 演示版本
| 名称 | 描述 | 下载/版本 |
| :--------------- | :---------------------- | :----------------------------------------------------------- |
| HugeGraph-Server | HugeGraph的主程序 | [0.12.0](https://github.com/hugegraph/hugegraph/releases/download/v0.12.0/hugegraph-0.12.0.tar.gz) |
| HugeGraph-Hubble | 基于Web的可视化图形界面 | [1.6.0](https://github.com/hugegraph/hugegraph-hubble/releases/download/v1.6.0/hugegraph-hubble-1.6.0.tar.gz) |
| HugeGraph-Loader | 数据导入工具 | [0.12.0](https://github.com/hugegraph/hugegraph-loader/releases/download/v0.12.0/hugegraph-loader-0.12.0.tar.gz) |
| HugeGraph-Tools | 命令行工具集 | [1.6.0](https://github.com/hugegraph/hugegraph-tools/releases/download/v1.6.0/hugegraph-tools-1.6.0.tar.gz) |
## hugegraph-server
### 下载、安装
#### 下载
参考地址:https://hugegraph.github.io/hugegraph-doc/download.html
##### 直接下载release包
- 1.github release地址
```
https://github.com/hugegraph/hugegraph/releases
```
- 2.github release 0.12.0 包地址
```
https://github.com/hugegraph/hugegraph/releases/download/v0.12.0/hugegraph-0.12.0.tar.gz
```
##### 下载源码
###### 编译
- 1.zip源码包
```
https://github.com/hugegraph/hugegraph/archive/refs/tags/v0.12.0.zip
```
- 2.tar.gz源码包
```
https://github.com/hugegraph/hugegraph/archive/refs/tags/v0.12.0.tar.gz
```
###### 打包
```shell
cd hugegraph
mvn package -DskipTests
```
## hugegraph-hubble
### 下载、安装
##### 直接下载release包
- 1.github release地址
```
https://github.com/hugegraph/hugegraph-hubble/releases
```
- 2.github release 1.6.0 包地址
```
https://github.com/hugegraph/hugegraph-hubble/releases/download/v1.6.0/hugegraph-hubble-1.6.0.tar.gz
```
### 启动、测试
```
./start-hubble.sh
```
## hugegraph-loader
### 下载
##### 直接下载release包
- 1.github release地址
```
https://github.com/hugegraph/hugegraph-loader/releases
```
- 2.github release 0.12.0 包地址
```
https://github.com/hugegraph/hugegraph-loader/releases/download/v0.12.0/hugegraph-loader-0.12.0.tar.gz
```
### 示例导入
#### 模型定义
##### schema.groovy
```groovy
// 创建一些属性
schema.propertyKey("name").asText().ifNotExist().create();
schema.propertyKey("age").asInt().ifNotExist().create();
schema.propertyKey("city").asText().ifNotExist().create();
schema.propertyKey("date").asText().ifNotExist().create();
schema.propertyKey("price").asDouble().ifNotExist().create();
// 创建 person 顶点类型,其拥有三个属性:name, age, city,主键是 name
schema.vertexLabel("person").properties("name", "age", "city").primaryKeys("name").ifNotExist().create();
// 创建 software 顶点类型,其拥有两个属性:name, price,主键是 name
schema.vertexLabel("software").properties("name", "price").primaryKeys("name").ifNotExist().create();
// 创建 knows 边类型,这类边是从 person 指向 person 的
schema.edgeLabel("knows").sourceLabel("person").targetLabel("person").ifNotExist().create();
// 创建 created 边类型,这类边是从 person 指向 software 的
schema.edgeLabel("created").sourceLabel("person").targetLabel("software").ifNotExist().create();
```
#### 数据准备
顶点文件:`example/file/vertex_person.csv`
```csv
marko,29,Beijing
vadas,27,Hongkong
josh,32,Beijing
peter,35,Shanghai
"li,nary",26,"Wu,han"
```
顶点文件:`example/file/vertex_software.txt`
```text
name|lang|price
lop|java|328
ripple|java|199
```
边文件:`example/file/edge_knows.json`
```json
{"source_name": "marko", "target_name": "vadas", "date": "20160110", "weight": 0.5}
{"source_name": "marko", "target_name": "josh", "date": "20130220", "weight": 1.0}
```
边文件:`example/file/edge_created.json`
```json
{"aname": "marko", "bname": "lop", "date": "20171210", "weight": 0.4}
{"aname": "josh", "bname": "lop", "date": "20091111", "weight": 0.4}
{"aname": "josh", "bname": "ripple", "date": "20171210", "weight": 1.0}
{"aname": "peter", "bname": "lop", "date": "20170324", "weight": 0.2}
```
#### 数据源映射文件
```json
{
"vertices": [
{
"label": "person",
"input": {
"type": "file",
"path": "example/vertex_person.csv",
"format": "CSV",
"header": ["name", "age", "city"],
"charset": "UTF-8"
},
"mapping": {
"name": "name",
"age": "age",
"city": "city"
}
},
{
"label": "software",
"input": {
"type": "file",
"path": "example/vertex_software.text",
"format": "TEXT",
"delimiter": "|",
"charset": "GBK"
}
}
],
"edges": [
{
"label": "knows",
"source": ["source_name"],
"target": ["target_name"],
"input": {
"type": "file",
"path": "example/edge_knows.json",
"format": "JSON"
},
"mapping": {
"source_name": "name",
"target_name": "name"
}
},
{
"label": "created",
"source": ["aname"],
"target": ["bname"],
"input": {
"type": "file",
"path": "example/edge_created.json",
"format": "JSON"
},
"mapping": {
"aname": "name",
"bname": "name"
}
}
]
}
```
#### 导入
```
sh bin/hugegraph-loader.sh -g hugegraph -f example/file/struct.json -s example/file/schema.groovy
```
## hugegraph 基本API
### 演示基本查询
- Graph Schema
- [Schema](https://hugegraph.github.io/hugegraph-doc/clients/restful-api/schema.html)
- HugeGraph 提供单一接口获取某个图的全部 Schema 信息,包括:PropertyKey、VertexLabel、EdgeLabel 和 IndexLabel。
- [PropertyKey](https://hugegraph.github.io/hugegraph-doc/clients/restful-api/propertykey.html)
Params说明:
- name:属性类型名称,必填
- data_type:属性类型数据类型,包括:bool、byte、int、long、float、double、string、date、uuid、blob,默认string类型
- cardinality:属性类型基数,包括:single、list、set,默认single
请求体字段说明:
- id:属性类型id值
- properties:属性的属性,对于属性而言,此项为空
- ~~user_data:设置属性类型的通用信息,比如可设置age属性的取值范围,最小为0,最大为100;目前此项不做任何校验,只为后期拓展提供预留入口~~
#### 1.2.1 创建一个 PropertyKey
#### ~~1.2.2 为已存在的 PropertyKey 添加或移除 userdata~~
#### 1.2.3 获取所有的 PropertyKey
#### 1.2.4 根据name获取PropertyKey
#### 1.2.5 根据name删除PropertyKey
- [VertexLabel](https://hugegraph.github.io/hugegraph-doc/clients/restful-api/vertexlabel.html)
Params说明
- id:顶点类型id值
- name:顶点类型名称,必填
- id_strategy: 顶点类型的ID策略,主键ID、自动生成、自定义字符串、自定义数字、自定义UUID,默认主键ID
- properties: 顶点类型关联的属性类型
- primary_keys: 主键属性,当ID策略为PRIMARY_KEY时必须有值,其他ID策略时必须为空;
- enable_label_index: 是否开启类型索引,默认关闭
- index_names:顶点类型创建的索引,详情见3.4
- nullable_keys:可为空的属性
- user_data:设置顶点类型的通用信息,作用同属性类型
#### 1.3.1 创建一个VertexLabel
#### ~~1.3.2 为已存在的VertexLabel添加properties或userdata,或者移除userdata(目前不支持移除properties)~~
#### 1.3.3 获取所有的VertexLabel
#### 1.3.4 根据name获取VertexLabel
#### 1.3.5 根据name删除VertexLabel
- [EdgeLabel](https://hugegraph.github.io/hugegraph-doc/clients/restful-api/edgelabel.html)
假设已经创建好了1.2.3中的 PropertyKeys 和 1.3.3中的 VertexLabels
Params说明
- name:顶点类型名称,必填
- source_label: 源顶点类型的名称,必填
- target_label: 目标顶点类型的名称,必填
- frequency:两个点之间是否可以有多条边,可以取值SINGLE和MULTIPLE,非必填,默认值SINGLE
- properties: 边类型关联的属性类型,选填
- sort_keys: 当允许关联多次时,指定区分键属性列表
- nullable_keys:可为空的属性,选填,默认可为空
- enable_label_index: 是否开启类型索引,默认关闭
#### 1.4.1 创建一个EdgeLabel
#### ~~1.4.2 为已存在的EdgeLabel添加properties或userdata,或者移除userdata(目前不支持移除properties)~~
#### 1.4.3 获取所有的EdgeLabel
#### 1.4.4 根据name获取EdgeLabel
#### 1.4.5 根据name删除EdgeLabel
- [IndexLabel](https://hugegraph.github.io/hugegraph-doc/clients/restful-api/indexlabel.html)
假设已经创建好了1.1.3中的 PropertyKeys 、1.2.3中的 VertexLabels 以及 1.3.3中的 EdgeLabels
#### 1.5.1 创建一个IndexLabel
#### 1.5.2 获取所有的IndexLabel
#### 1.5.3 根据name获取IndexLabel
#### 1.5.4 根据name删除IndexLabel
- [Rebuild](https://hugegraph.github.io/hugegraph-doc/clients/restful-api/rebuild.html)
#### 1.6.1 重建IndexLabel
#### 1.6.2 VertexLabel对应的全部索引重建
#### 1.6.3 EdgeLabel对应的全部索引重建
- Graph Vertex & Edge
- [Vertex](https://hugegraph.github.io/hugegraph-doc/clients/restful-api/vertex.html)
顶点类型中的 Id 策略决定了顶点的 Id 类型,其对应关系如下:
| Id_Strategy | id type |
| :--------------- | :------ |
| AUTOMATIC | number |
| PRIMARY_KEY | string |
| CUSTOMIZE_STRING | string |
| CUSTOMIZE_NUMBER | number |
| CUSTOMIZE_UUID | uuid |
顶点的 `GET/PUT/DELETE` API 中 url 的 id 部分传入的应是带有类型信息的 id 值,这个类型信息用 json 串是否带引号表示,也就是说:
- 当 id 类型为 number 时,url 中的 id 不带引号,形如 xxx/vertices/123456
- 当 id 类型为 string 时,url 中的 id 带引号,形如 xxx/vertices/"123456"
#### 2.1.1 创建一个顶点
#### 2.1.2 创建多个顶点
#### 2.1.3 更新顶点属性
#### 2.1.4 批量更新顶点属性
批量更新顶点的属性,并支持多种更新策略,包括
- SUM: 数值累加
- BIGGER: 两个数字/日期取更大的
- SMALLER: 两个数字/日期取更小的
- UNION: Set属性取并集
- INTERSECTION: Set属性取交集
- APPEND: List属性追加元素
- ELIMINATE: List/Set属性删除元素
- OVERRIDE: 覆盖已有属性,如果新属性为null,则仍然使用旧属性
#### 2.1.5 删除顶点属性
#### 2.1.6 获取符合条件的顶点
#### 2.1.7 根据Id获取顶点
#### 2.1.8 根据Id删除顶点
- [Edge](https://hugegraph.github.io/hugegraph-doc/clients/restful-api/edge.html)
顶点 id 格式的修改也影响到了边的 Id 以及源顶点和目标顶点 id 的格式。
EdgeId是由 `src-vertex-id + direction + label + sort-values + tgt-vertex-id` 拼接而成, 但是这里的顶点id类型不是通过引号区分的,而是根据前缀区分:
- 当 id 类型为 number 时,EdgeId 的顶点 id 前有一个前缀`L` ,形如 "L123456>1>>L987654"
- 当 id 类型为 string 时,EdgeId 的顶点 id 前有一个前缀`S` ,形如 "S1:peter>1>>S2:lop"
#### 2.2.1 创建一条边
#### 2.2.2 创建多条边
#### 2.2.3 更新边属性
#### 2.2.4 批量更新边属性
#### 2.2.5 删除边属性
#### 2.2.6 获取符合条件的边
#### 2.2.7 根据Id获取边
#### 2.2.8 根据Id删除边
- [Traverser](https://hugegraph.github.io/hugegraph-doc/clients/restful-api/traverser.html)
3.2.8 Shortest Path
- [Rank](https://hugegraph.github.io/hugegraph-doc/clients/restful-api/rank.html)
- [Variable](https://hugegraph.github.io/hugegraph-doc/clients/restful-api/variable.html)
- [Graphs](https://hugegraph.github.io/hugegraph-doc/clients/restful-api/graphs.html)
- [Task](https://hugegraph.github.io/hugegraph-doc/clients/restful-api/task.html)
- [Gremlin](https://hugegraph.github.io/hugegraph-doc/clients/restful-api/gremlin.html)
- [Authentication](https://hugegraph.github.io/hugegraph-doc/clients/restful-api/auth.html)
- [Other](https://hugegraph.github.io/hugegraph-doc/clients/restful-api/other.html)
Q&A
- 1.Hugegraph 图是什么概念?为什么仅支持3张图?
- 2.
## 应用1:基于hugegraph的家族族谱
### 产品规划
#### 1.产品定位
| 属性 | 属性值 |
| ----------------- | -------------------------- |
| 产品名称 | HugeGenealogy |
| 适用人群 | 大多数国人 |
| 数据来源 | 广大人民群众 |
| 研发成本 | 前端+后端+服务器成本 |
| 域名 | huge-genelogy.izliang.com |
| 消费人群 | any |
| 网站风格 | 中规中矩 |
| 预计QPS | 10 |
| 服务分片 | 1 |
| 产品核心竞争力 | 无,希望广大网友集思广益。 |
| 用户需要登录-生产 | UGC |
| 用户需要登录-查看 | 增加爬虫门槛 |
| 数据开源 | 定时推送GitHub |
| 程序开源 | 定时提交GitHub |
| | |
| | |
| | |
#### 2.竞品分析
| 产品名称 | 竞品指标 | 说明 |
| ------------ | -------- | ---- |
| 全历史 | 用户量 | |
| 全历史 | 数据类型 | |
| FamilySearch | | |
| | | |
| | | |
| | | |
#### 3.产品特点
- 1.纯UGC生产
- 2.开发成本低
- 3.未来发展-无
### 技术设计
#### 1.模型设计
##### 1.人物模型设计
| 属性 | 名称 | 数据类型 |
| ------------ | -------- | -------- |
| Id | 用户ID | bigInt |
| username | 用户名 | String |
| Sumary | 概述 | String |
| profilePhoto | 头像 | String |
| createTime | 创建时间 | bigint |
| updateTime | 更新时间 | bigint |
| Sex | 性别 | Int |
| birthday | 出生时间 | bigint |
| deathTime | 死亡时间 | bigint |
| version | 乐观锁 | bigint |
##### 2.关系模型设计
| 属性 | 名称 | 数据类型 |
| ------------ | -------------------- | -------- |
| relationName | 关系名称 | String |
| relationType | 关系类型,单向、双向 | String |
| createTime | 创建时间 | bigint |
| updateTime | 更新时间 | bigint |
| buildTime | 关系建立时间 | bigint |
| expireTime | 关系断开时间 | bigint |
| version | 乐观锁 | bigint |
##### 3.家族模型设计
#### 2.数据来源
##### 1.数据爬取
##### 2.人工UGC
#### 3.技术论证
### 技术实现
#### 1.架构设计
#### 2.前端设计
vue构建工程
```shell
izliang@localhost VueProjects % vue init webpack huge-genealogy
? Project name huge-genealogy
? Project description A Vue.js project
? Author izliang <291376303@qq.com>
? Vue build standalone
? Install vue-router? Yes
? Use ESLint to lint your code? No
? Set up unit tests No
? Setup e2e tests with Nightwatch? No
? Should we run `npm install` for you after the project has been created? (recommended) npm
```
#### 3.后端设计
#### 4.数据库设计
#### 5.测试
### 上线
#### 1.上线部署
### 后续维护
#### 1.分布式部署Hugegraph
#### 2.定时备份图数据
### 工程构建能力
- 1.创建父子maven包,解耦,抽象
- 2.构建依赖管理
- 3.独立依赖打包
- 4.依赖抽离,减少包体积
```xml
1.8
2.0.0-RELEASE
0.0.1-Release
UTF-8
1.8
1.8
```
依赖打包
```xml
src/main/resources
true
org.apache.maven.plugins
maven-resources-plugin
2.7
@
false
org.apache.maven.plugins
maven-compiler-plugin
3.1
${java.version}
${java.version}
${project.build.sourceEncoding}
true
true
256m
1024m
org.apache.maven.plugins
maven-jar-plugin
2.3.1
com.xxxx
true
./lib
false
org.apache.maven.plugins
maven-dependency-plugin
copy
package
copy-dependencies
../../install/lib
false
false
true
```
## 基于Springcloud 的微服务
### 注册中心+配置中心
Nacos
用户登录 100万QPS
100个用户服务 每一个服务1万QPS
1000个用户服务
1.修改用户ID1
2.修改用户ID1
操作同一个数据库
用户登录 http://aaa.com/login?user=111&pwd=2222 ->
网关DNS -> Server接收到http请求(消费者) -> [路由表] <根据路由规则> ->用户服务(提供者)http接口
CAP
zookeeper CP 型
nacos AP 型 注册中心和配置中心的作用。
MQ消费者和生产者
MQ 消息队列,消费者和生产者
我:-> 在吗?
你:<- 在吗?
你:->吃饭了吗?
我:<-吃饭了吗?
### 项目依赖版本
| 组件 | 版本 | 说明 |
| ------------------------ | ------- | ---- |
| Springboot | 2.6.3 | |
| spring-boot-dependencies | 2.6.3 | |
| | | |
| | | |
| | | |
| lombok | 1.18.22 | |
| hugegraph-client | 2.0.1 | |
| | | |
第三方组件版本
| 组件 | 版本 | 说明 |
| ----- | ------------------------------------------------------------ | ---- |
| Nacos | [2.0.4 (Jan 18, 2022)](https://github.com/alibaba/nacos/releases/tag/2.0.4) | |
| | | |
| | | |
| | | |
| | | |
| | | |
### 避坑指南
- 1.nacos对接使用springcloud对接
- 2.尽量选择稳定,选择大多数人使用的版本。
- 3.springcloud 较新版本bootstarp.* 配置文件是不生效的。如果想要使用bootstrap.yml作为基本配置,需要增加一下依赖。
```xml
org.springframework.cloud
spring-cloud-starter-bootstrap
```
- 4. springcloud lb::// 协议需要使用
springcloud全家桶组合
| springboot版本 | springcloud版本 | springcloud-alibaba版本 | springcloud-gateway版本 | springcloud-netflix版本 |
| -------------- | --------------- | ----------------------- | ----------------------- | ----------------------- |
| 2.6.3 | 2021.0.0 | 2021.0.1.0 | 3.1.1 | 3.1.1 |
```xml
2021.0.1.0
3.1.1
3.1.1
2021.0.0
com.alibaba.cloud
spring-cloud-alibaba-dependencies
${spring-cloud-alibaba.version}
pom
import
org.springframework.cloud
spring-cloud-netflix-dependencies
${spring-cloud-netflix.version}
pom
import
org.springframework.cloud
spring-cloud-gateway-dependencies
${spring-cloud-gateway.version}
pom
import
org.springframework.cloud
spring-cloud-dependencies
${spring-cloud.version}
pom
import
```
swagger整合
https://github.com/springdoc/springdoc-openapi
| springboot版本 | springdoc-openapi版本 |
| -------------- | --------------------- |
| 2.6.3 | 1.6.7 |
ID生成器
结构设计
```mermaid
graph
对外服务 --> 实现
实现 --> HttpServer
实现 --> RPC
实现 --> ...
HttpServer --> 核心ID服务
RPC --> 核心ID服务
... --> 核心ID服务
核心ID服务 --> Service
Service --> getNextId=key
Service --> getNextIds=key,step
Service --> init=key
getNextId=key --> 底层实现
getNextIds=key,step --> 底层实现
init=key --> 底层实现
底层实现 --> MYSQL
底层实现 --> Redis
底层实现 --> PGSQL
底层实现 --> TiDB
```
流程设计
数据库设计
postgresql安装
Docker-compose.yml
```yaml
version: '3'
services:
postgres:
image: postgres
container_name: postgres
# restart: always
privileged: true
environment:
POSTGRES_USER: postgres
POSTGRES_PASSWORD: DCtVn7kHxEP0A0XvKIRnCy6xqKaxAa3G
PGDATA: /var/lib/postgresql/data1
POSTGRES_DB: pg
TZ: Asia/Shanghai
ports:
- 5432:5432
volumes:
- ./data:/var/lib/postgresql/data1
```
数据库设计工具
数据库连接工具
Postico
## **[chiner](https://gitee.com/robergroup/chiner)**
下载地址:https://gitee.com/robergroup/chiner/releases
数据库设计
hg_ids
数据表设计
hg_ids_config
| 字段名 | 数据类型 | 说明 | 索引 |
| ------- | -------- | ---- | ---- |
| Id | Int | | |
| Key | String | | |
| Step | Int | | |
| Value | Int | | |
| Version | Int | | |
模块设计
```
├── config
│ └── MybatisPlusConfig.java
├── model
│ └── IdConfig.java
└── repo
└── IdConfigMapper.java
```
 Swagger整合
Springboot 2.6.x 版本使用springdoc非swagger。
官网地址:https://springdoc.org/index.html
Maven依赖
```
org.springdoc
springdoc-openapi-ui
1.6.7
```
Java配置configbean
```java
package com.izliang.hg.test.web.config;
/**
* @author :izliang
* @date :Created in 2022/4/10 下午8:21
* @description:
* https://blog.csdn.net/xinzuini/article/details/122815531?utm_medium=distribute.pc_relevant.none-task-blog-2~default~baidujs_title~default-0.pc_relevant_paycolumn_v3&spm=1001.2101.3001.4242.1&utm_relevant_index=3
*/
import org.springdoc.core.GroupedOpenApi;
import org.springframework.beans.BeansException;
import org.springframework.beans.factory.config.BeanPostProcessor;
import org.springframework.context.annotation.Bean;
import org.springframework.context.annotation.Configuration;
import java.lang.reflect.Field;
import java.util.List;
import java.util.stream.Collectors;
/**
* Swagger 配置相关
*/
@Configuration
public class Swagger3 {
@Bean
public GroupedOpenApi api()
{
return GroupedOpenApi.builder()
.group("OpenApiController")
.packagesToScan("com.izliang.hg.test.web.controller")
.build();
}
}
```
常用注解
Controller
```
@Tag(name = "Test", description = "Just a test endpoint")
```
Method
```
@Operation(summary = "测试Swagger")
```
Model
```
@Schema
```
地址
```
http://127.0.0.1:10000/swagger-ui/index.html
```

分布式ID设计图

用户服务
图片上传服务
# 使用STS临时访问凭证访问OSS
更新时间:2022-01-19 14:01
您可以通过STS服务给其他用户颁发一个临时访问凭证。该用户可使用临时访问凭证在规定时间内访问您的OSS资源。临时访问凭证无需透露您的长期密钥,使您的OSS资源访问更加安全。
## 适用场景
假设您是一个移动App开发者,希望使用阿里云OSS服务来保存App的终端用户数据,并且要保证每个App用户之间的数据隔离。此时,您可以使用STS授权用户直接访问OSS。
使用STS授权用户直接访问OSS的流程如下:
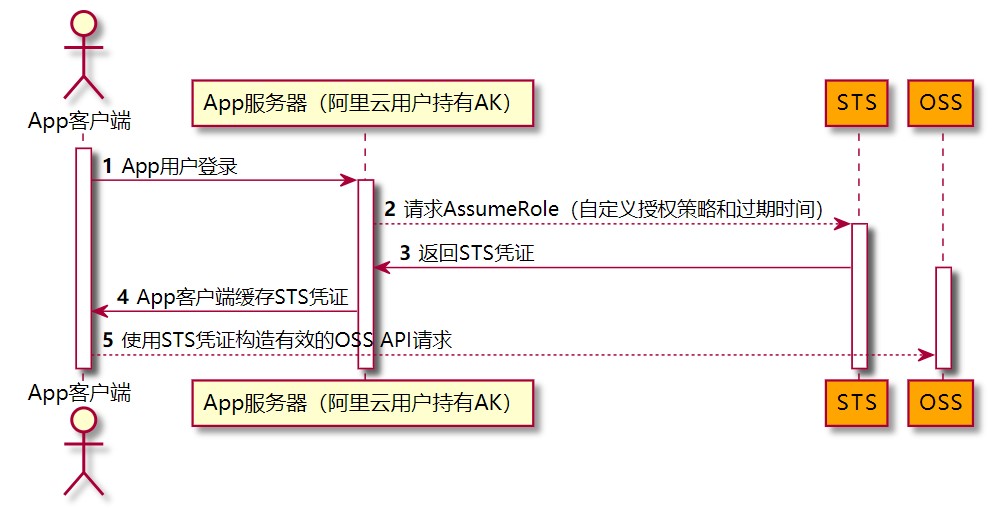
1. App用户登录。App用户和云账号无关,它是App的终端用户,App服务器支持App用户登录。对于每个有效的App用户来说,需要App服务器能定义出每个App用户的最小访问权限。
2. App服务器请求STS服务获取一个安全令牌(SecurityToken)。在调用STS之前,App服务器需要确定App用户的最小访问权限(用RAM Policy来自定义授权策略)以及凭证的过期时间。然后通过扮演角色(AssumeRole)来获取一个代表角色身份的安全令牌(SecurityToken)。
3. STS返回给App服务器一个临时访问凭证,包括一个安全令牌(SecurityToken)、临时访问密钥(AccessKeyId和AccessKeySecret)以及过期时间。
4. App服务器将临时访问凭证返回给App客户端,App客户端可以缓存这个凭证。当凭证失效时,App客户端需要向App服务器申请新的临时访问凭证。例如,临时访问凭证有效期为1小时,那么App客户端可以每30分钟向App服务器请求更新临时访问凭证。
5. App客户端使用本地缓存的临时访问凭证去请求OSS API。OSS收到访问请求后,会通过STS服务来验证访问凭证,正确响应用户请求。
## 步骤一:创建RAM用户
1. 登录[RAM控制台](https://ram.console.aliyun.com/)。
2. 在左侧导航栏,选择***\*身份管理\** > \**用户\****。
3. 单击**创建用户**。
4. 输入**登录名称**和**显示名称**。
5. 在**访问方式**区域下,选择**Open API 调用访问**,然后单击**确定**。
6. 单击**复制**,保存访问密钥(AccessKey ID 和 AccessKey Secret)。
## 步骤二:为RAM用户授予请求AssumeRole的权限
1. 单击已创建RAM用户右侧对应的**添加权限**。
2. 在**添加权限**页面,选择**AliyunSTSAssumeRoleAccess**系统策略。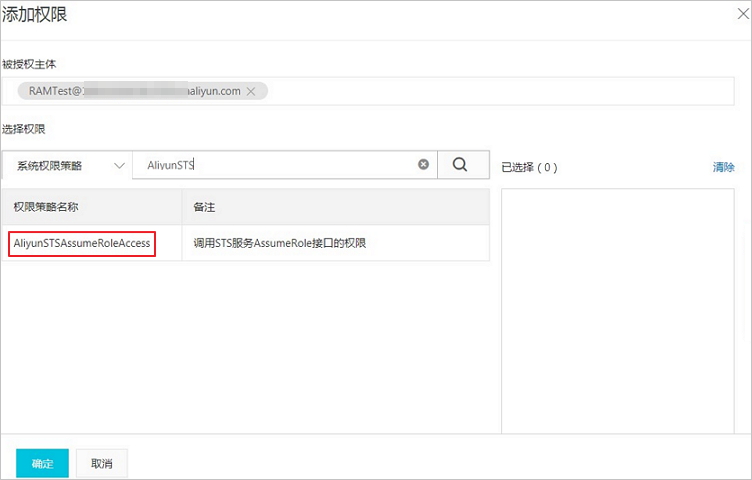
3. 单击**确定**。
## 步骤三:创建用于获取临时访问凭证的角色
1. 在左侧导航栏,选择***\*身份管理\** > \**角色\****。
2. 单击**创建角色**,选择可信实体类型为**阿里云账号**,单击**下一步**。
3. **角色名称**填写为RamOssTest,**选择云账号**为**当前云账号**。
4. 单击**完成**。角色创建完成后,单击**关闭**。
5. 在**RAM角色管理**页面,搜索框输入角色名称RamOssTest。
6. 单击**复制**,保存角色的ARN。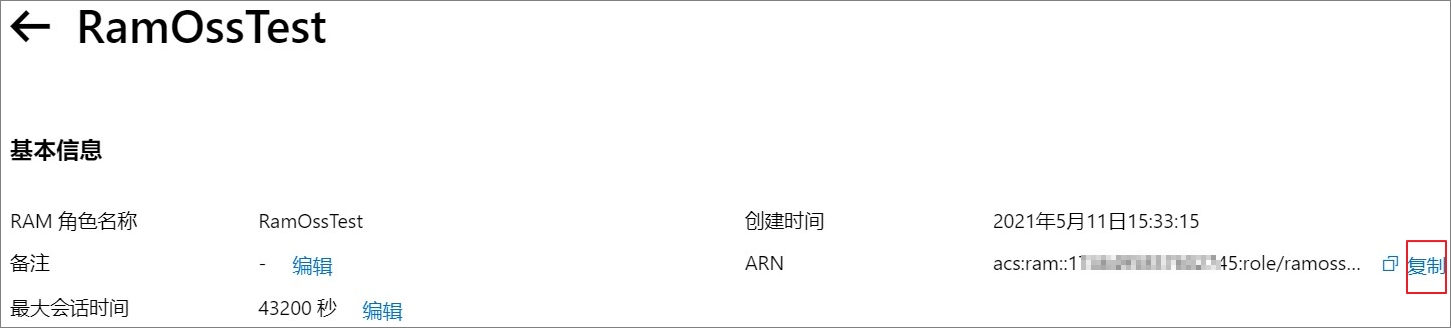
## 步骤四:为角色授予上传文件的权限
1. 创建上传文件的自定义权限策略。
1. 在左侧导航栏,选择***\*权限管理\** > \**权限策略\****。
2. 单击**创建权限策略**。
3. 在
创建权限策略
页面,单击
脚本编辑
,然后在策略文档输入框中赋予角色向目标存储空间examplebucket下的目录exampledir上传文件的权限。具体配置示例如下。
**警告** 以下示例仅供参考。您需要根据实际需求配置更细粒度的授权策略,防止出现权限过大的风险。关于更细粒度的授权策略配置详情,请参见[通过RAM或STS服务向其他用户授权](https://help.aliyun.com/document_detail/199058.htm#section-vav-5et-c7g)。
```javascript
{
"Version": "1",
"Statement": [
{
"Effect": "Allow",
"Action": [
"oss:PutObject"
],
"Resource": [
"acs:oss:*:*:examplebucket/exampledir",
"acs:oss:*:*:examplebucket/exampledir/*"
]
}
]
}
```
4. 策略配置完成后,单击**下一步**。
5. 在**基本信息**区域,填写策略**名称**为RamTestPolicy,然后单击**确定**。
2. 为RAM角色
RamOssTest
授予自定义权限策略。
1. 在左侧导航栏,选择***\*身份管理\** > \**角色\****。
2. 在**角色**页面,找到目标RAM角色RamOssTest。
3. 单击RAM角色RamOssTest右侧的**添加权限**。
4. 在**添加权限**页面下的**自定义策略**页签,选择已创建的自定义权限策略RamTestPolicy。
5. 单击**确定**。
## 步骤五:获取临时访问凭证
您可以通过调用STS服务接口[AssumeRole](https://help.aliyun.com/document_detail/28763.htm#reference-clc-3sv-xdb) 或者使用[各语言STS SDK](https://help.aliyun.com/document_detail/121136.htm#reference-w5t-25v-xdb)来获取临时访问凭证。
以下代码用于获取临时访问凭证:
```java
import com.aliyuncs.DefaultAcsClient;
import com.aliyuncs.exceptions.ClientException;
import com.aliyuncs.http.MethodType;
import com.aliyuncs.profile.DefaultProfile;
import com.aliyuncs.profile.IClientProfile;
import com.aliyuncs.sts.model.v20150401.AssumeRoleRequest;
import com.aliyuncs.sts.model.v20150401.AssumeRoleResponse;
public class StsServiceSample {
public static void main(String[] args) {
// STS接入地址,例如sts.cn-hangzhou.aliyuncs.com。
String endpoint = "";
// 填写步骤1生成的访问密钥AccessKey ID和AccessKey Secret。
String AccessKeyId = "";
String accessKeySecret = "";
// 填写步骤3获取的角色ARN。
String roleArn = "";
// 自定义角色会话名称,用来区分不同的令牌,例如可填写为SessionTest。
String roleSessionName = "";
// 以下Policy用于限制仅允许使用临时访问凭证向目标存储空间examplebucket上传文件。
// 临时访问凭证最后获得的权限是步骤4设置的角色权限和该Policy设置权限的交集,即仅允许将文件上传至目标存储空间examplebucket下的exampledir目录。
String policy = "{\n" +
" \"Version\": \"1\", \n" +
" \"Statement\": [\n" +
" {\n" +
" \"Action\": [\n" +
" \"oss:PutObject\"\n" +
" ], \n" +
" \"Resource\": [\n" +
" \"acs:oss:*:*:examplebucket/*\" \n" +
" ], \n" +
" \"Effect\": \"Allow\"\n" +
" }\n" +
" ]\n" +
"}";
try {
// regionId表示RAM的地域ID。以华东1(杭州)地域为例,regionID填写为cn-hangzhou。也可以保留默认值,默认值为空字符串("")。
String regionId = "";
// 添加endpoint。适用于Java SDK 3.12.0及以上版本。
DefaultProfile.addEndpoint(regionId, "Sts", endpoint);
// 添加endpoint。适用于Java SDK 3.12.0以下版本。
// DefaultProfile.addEndpoint("",regionId, "Sts", endpoint);
// 构造default profile。
IClientProfile profile = DefaultProfile.getProfile(regionId, AccessKeyId, accessKeySecret);
// 构造client。
DefaultAcsClient client = new DefaultAcsClient(profile);
final AssumeRoleRequest request = new AssumeRoleRequest();
// 适用于Java SDK 3.12.0及以上版本。
request.setSysMethod(MethodType.POST);
// 适用于Java SDK 3.12.0以下版本。
//request.setMethod(MethodType.POST);
request.setRoleArn(roleArn);
request.setRoleSessionName(roleSessionName);
request.setPolicy(policy); // 如果policy为空,则用户将获得该角色下所有权限。
request.setDurationSeconds(3600L); // 设置临时访问凭证的有效时间为3600秒。
final AssumeRoleResponse response = client.getAcsResponse(request);
System.out.println("Expiration: " + response.getCredentials().getExpiration());
System.out.println("Access Key Id: " + response.getCredentials().getAccessKeyId());
System.out.println("Access Key Secret: " + response.getCredentials().getAccessKeySecret());
System.out.println("Security Token: " + response.getCredentials().getSecurityToken());
System.out.println("RequestId: " + response.getRequestId());
} catch (ClientException e) {
System.out.println("Failed:");
System.out.println("Error code: " + e.getErrCode());
System.out.println("Error message: " + e.getErrMsg());
System.out.println("RequestId: " + e.getRequestId());
}
}
}
```
**说明**
- 临时访问凭证有效时间单位为秒,最小值为900,最大值以当前角色设定的最大会话时间为准。详情请参见[设置角色最大会话时间](https://help.aliyun.com/document_detail/166256.htm#task-2498608)。
- 有关角色会话名称`roleSessionName`的命名规范,请参见[AssumeRole](https://help.aliyun.com/document_detail/28763.htm#reference-clc-3sv-xdb)。
### dubbo整合
#### 1.抽象公共包
#### 2.服务提供者
#### 3.服务消费者
## 应用2:基于hugegraph的好友推荐
## 应用3:基于hugegraph的GNN深度学习
## 附录1
### 常用gremline语句
Swagger整合
Springboot 2.6.x 版本使用springdoc非swagger。
官网地址:https://springdoc.org/index.html
Maven依赖
```
org.springdoc
springdoc-openapi-ui
1.6.7
```
Java配置configbean
```java
package com.izliang.hg.test.web.config;
/**
* @author :izliang
* @date :Created in 2022/4/10 下午8:21
* @description:
* https://blog.csdn.net/xinzuini/article/details/122815531?utm_medium=distribute.pc_relevant.none-task-blog-2~default~baidujs_title~default-0.pc_relevant_paycolumn_v3&spm=1001.2101.3001.4242.1&utm_relevant_index=3
*/
import org.springdoc.core.GroupedOpenApi;
import org.springframework.beans.BeansException;
import org.springframework.beans.factory.config.BeanPostProcessor;
import org.springframework.context.annotation.Bean;
import org.springframework.context.annotation.Configuration;
import java.lang.reflect.Field;
import java.util.List;
import java.util.stream.Collectors;
/**
* Swagger 配置相关
*/
@Configuration
public class Swagger3 {
@Bean
public GroupedOpenApi api()
{
return GroupedOpenApi.builder()
.group("OpenApiController")
.packagesToScan("com.izliang.hg.test.web.controller")
.build();
}
}
```
常用注解
Controller
```
@Tag(name = "Test", description = "Just a test endpoint")
```
Method
```
@Operation(summary = "测试Swagger")
```
Model
```
@Schema
```
地址
```
http://127.0.0.1:10000/swagger-ui/index.html
```

分布式ID设计图

用户服务
图片上传服务
# 使用STS临时访问凭证访问OSS
更新时间:2022-01-19 14:01
您可以通过STS服务给其他用户颁发一个临时访问凭证。该用户可使用临时访问凭证在规定时间内访问您的OSS资源。临时访问凭证无需透露您的长期密钥,使您的OSS资源访问更加安全。
## 适用场景
假设您是一个移动App开发者,希望使用阿里云OSS服务来保存App的终端用户数据,并且要保证每个App用户之间的数据隔离。此时,您可以使用STS授权用户直接访问OSS。
使用STS授权用户直接访问OSS的流程如下:

1. App用户登录。App用户和云账号无关,它是App的终端用户,App服务器支持App用户登录。对于每个有效的App用户来说,需要App服务器能定义出每个App用户的最小访问权限。
2. App服务器请求STS服务获取一个安全令牌(SecurityToken)。在调用STS之前,App服务器需要确定App用户的最小访问权限(用RAM Policy来自定义授权策略)以及凭证的过期时间。然后通过扮演角色(AssumeRole)来获取一个代表角色身份的安全令牌(SecurityToken)。
3. STS返回给App服务器一个临时访问凭证,包括一个安全令牌(SecurityToken)、临时访问密钥(AccessKeyId和AccessKeySecret)以及过期时间。
4. App服务器将临时访问凭证返回给App客户端,App客户端可以缓存这个凭证。当凭证失效时,App客户端需要向App服务器申请新的临时访问凭证。例如,临时访问凭证有效期为1小时,那么App客户端可以每30分钟向App服务器请求更新临时访问凭证。
5. App客户端使用本地缓存的临时访问凭证去请求OSS API。OSS收到访问请求后,会通过STS服务来验证访问凭证,正确响应用户请求。
## 步骤一:创建RAM用户
1. 登录[RAM控制台](https://ram.console.aliyun.com/)。
2. 在左侧导航栏,选择***\*身份管理\** > \**用户\****。
3. 单击**创建用户**。
4. 输入**登录名称**和**显示名称**。
5. 在**访问方式**区域下,选择**Open API 调用访问**,然后单击**确定**。
6. 单击**复制**,保存访问密钥(AccessKey ID 和 AccessKey Secret)。
## 步骤二:为RAM用户授予请求AssumeRole的权限
1. 单击已创建RAM用户右侧对应的**添加权限**。
2. 在**添加权限**页面,选择**AliyunSTSAssumeRoleAccess**系统策略。
3. 单击**确定**。
## 步骤三:创建用于获取临时访问凭证的角色
1. 在左侧导航栏,选择***\*身份管理\** > \**角色\****。
2. 单击**创建角色**,选择可信实体类型为**阿里云账号**,单击**下一步**。
3. **角色名称**填写为RamOssTest,**选择云账号**为**当前云账号**。
4. 单击**完成**。角色创建完成后,单击**关闭**。
5. 在**RAM角色管理**页面,搜索框输入角色名称RamOssTest。
6. 单击**复制**,保存角色的ARN。
## 步骤四:为角色授予上传文件的权限
1. 创建上传文件的自定义权限策略。
1. 在左侧导航栏,选择***\*权限管理\** > \**权限策略\****。
2. 单击**创建权限策略**。
3. 在
创建权限策略
页面,单击
脚本编辑
,然后在策略文档输入框中赋予角色向目标存储空间examplebucket下的目录exampledir上传文件的权限。具体配置示例如下。
**警告** 以下示例仅供参考。您需要根据实际需求配置更细粒度的授权策略,防止出现权限过大的风险。关于更细粒度的授权策略配置详情,请参见[通过RAM或STS服务向其他用户授权](https://help.aliyun.com/document_detail/199058.htm#section-vav-5et-c7g)。
```javascript
{
"Version": "1",
"Statement": [
{
"Effect": "Allow",
"Action": [
"oss:PutObject"
],
"Resource": [
"acs:oss:*:*:examplebucket/exampledir",
"acs:oss:*:*:examplebucket/exampledir/*"
]
}
]
}
```
4. 策略配置完成后,单击**下一步**。
5. 在**基本信息**区域,填写策略**名称**为RamTestPolicy,然后单击**确定**。
2. 为RAM角色
RamOssTest
授予自定义权限策略。
1. 在左侧导航栏,选择***\*身份管理\** > \**角色\****。
2. 在**角色**页面,找到目标RAM角色RamOssTest。
3. 单击RAM角色RamOssTest右侧的**添加权限**。
4. 在**添加权限**页面下的**自定义策略**页签,选择已创建的自定义权限策略RamTestPolicy。
5. 单击**确定**。
## 步骤五:获取临时访问凭证
您可以通过调用STS服务接口[AssumeRole](https://help.aliyun.com/document_detail/28763.htm#reference-clc-3sv-xdb) 或者使用[各语言STS SDK](https://help.aliyun.com/document_detail/121136.htm#reference-w5t-25v-xdb)来获取临时访问凭证。
以下代码用于获取临时访问凭证:
```java
import com.aliyuncs.DefaultAcsClient;
import com.aliyuncs.exceptions.ClientException;
import com.aliyuncs.http.MethodType;
import com.aliyuncs.profile.DefaultProfile;
import com.aliyuncs.profile.IClientProfile;
import com.aliyuncs.sts.model.v20150401.AssumeRoleRequest;
import com.aliyuncs.sts.model.v20150401.AssumeRoleResponse;
public class StsServiceSample {
public static void main(String[] args) {
// STS接入地址,例如sts.cn-hangzhou.aliyuncs.com。
String endpoint = "";
// 填写步骤1生成的访问密钥AccessKey ID和AccessKey Secret。
String AccessKeyId = "";
String accessKeySecret = "";
// 填写步骤3获取的角色ARN。
String roleArn = "";
// 自定义角色会话名称,用来区分不同的令牌,例如可填写为SessionTest。
String roleSessionName = "";
// 以下Policy用于限制仅允许使用临时访问凭证向目标存储空间examplebucket上传文件。
// 临时访问凭证最后获得的权限是步骤4设置的角色权限和该Policy设置权限的交集,即仅允许将文件上传至目标存储空间examplebucket下的exampledir目录。
String policy = "{\n" +
" \"Version\": \"1\", \n" +
" \"Statement\": [\n" +
" {\n" +
" \"Action\": [\n" +
" \"oss:PutObject\"\n" +
" ], \n" +
" \"Resource\": [\n" +
" \"acs:oss:*:*:examplebucket/*\" \n" +
" ], \n" +
" \"Effect\": \"Allow\"\n" +
" }\n" +
" ]\n" +
"}";
try {
// regionId表示RAM的地域ID。以华东1(杭州)地域为例,regionID填写为cn-hangzhou。也可以保留默认值,默认值为空字符串("")。
String regionId = "";
// 添加endpoint。适用于Java SDK 3.12.0及以上版本。
DefaultProfile.addEndpoint(regionId, "Sts", endpoint);
// 添加endpoint。适用于Java SDK 3.12.0以下版本。
// DefaultProfile.addEndpoint("",regionId, "Sts", endpoint);
// 构造default profile。
IClientProfile profile = DefaultProfile.getProfile(regionId, AccessKeyId, accessKeySecret);
// 构造client。
DefaultAcsClient client = new DefaultAcsClient(profile);
final AssumeRoleRequest request = new AssumeRoleRequest();
// 适用于Java SDK 3.12.0及以上版本。
request.setSysMethod(MethodType.POST);
// 适用于Java SDK 3.12.0以下版本。
//request.setMethod(MethodType.POST);
request.setRoleArn(roleArn);
request.setRoleSessionName(roleSessionName);
request.setPolicy(policy); // 如果policy为空,则用户将获得该角色下所有权限。
request.setDurationSeconds(3600L); // 设置临时访问凭证的有效时间为3600秒。
final AssumeRoleResponse response = client.getAcsResponse(request);
System.out.println("Expiration: " + response.getCredentials().getExpiration());
System.out.println("Access Key Id: " + response.getCredentials().getAccessKeyId());
System.out.println("Access Key Secret: " + response.getCredentials().getAccessKeySecret());
System.out.println("Security Token: " + response.getCredentials().getSecurityToken());
System.out.println("RequestId: " + response.getRequestId());
} catch (ClientException e) {
System.out.println("Failed:");
System.out.println("Error code: " + e.getErrCode());
System.out.println("Error message: " + e.getErrMsg());
System.out.println("RequestId: " + e.getRequestId());
}
}
}
```
**说明**
- 临时访问凭证有效时间单位为秒,最小值为900,最大值以当前角色设定的最大会话时间为准。详情请参见[设置角色最大会话时间](https://help.aliyun.com/document_detail/166256.htm#task-2498608)。
- 有关角色会话名称`roleSessionName`的命名规范,请参见[AssumeRole](https://help.aliyun.com/document_detail/28763.htm#reference-clc-3sv-xdb)。
### dubbo整合
#### 1.抽象公共包
#### 2.服务提供者
#### 3.服务消费者
## 应用2:基于hugegraph的好友推荐
## 应用3:基于hugegraph的GNN深度学习
## 附录1
### 常用gremline语句