

代码拉取完成,页面将自动刷新
同步操作将从 Roby/AutoUpdater.NET 强制同步,此操作会覆盖自 Fork 仓库以来所做的任何修改,且无法恢复!!!
确定后同步将在后台操作,完成时将刷新页面,请耐心等待。
![]()
![]()
AutoUpdater.NET is a class library that allows .NET developers to easily add auto update functionality to their classic desktop application projects.


PM> Install-Package Autoupdater.NET.Official
AutoUpdater.NET downloads the XML file containing update information from your server. It uses this XML file to get the information about the latest version of the software. If latest version of the software is greater then current version of the software installed on User's PC then AutoUpdater.NET shows update dialog to the user. If user press the update button to update the software then It downloads the update file (Installer) from URL provided in XML file and executes the installer file it just downloaded. It is a job of installer after this point to carry out the update. If you provide zip file URL instead of installer then AutoUpdater.NET will extract the contents of zip file to application directory.
AutoUpdater.NET uses XML file located on a server to get the release information about the latest version of the software. You need to create XML file like below and then you need to upload it to your server.
<?xml version="1.0" encoding="UTF-8"?>
<item>
    <version>2.0.0.0</version>
    <url>http://rbsoft.org/downloads/AutoUpdaterTest.zip</url>
    <changelog>https://github.com/ravibpatel/AutoUpdater.NET/releases</changelog>
    <mandatory>false</mandatory>
</item>
There are two things you need to provide in XML file as you can see above.
<mandatory mode="2">true</mandatory>
<checksum algorithm="MD5">Update file Checksum</checksum>
After you done creating and uploading XML file, It is very easy to add a auto update functionality to your application. First you need to add following line at the top of your form.
using AutoUpdaterDotNET;
Now you just need to add following line to your main form constructor or in Form_Load event. You can add this line anywhere you like. If you don't like to check for update when application starts then you can create a Check for update button and add this line to Button_Click event.
AutoUpdater.Start("http://rbsoft.org/updates/AutoUpdaterTest.xml");
Start method of AutoUpdater class takes URL of the XML file you uploaded to server as a parameter.
AutoUpdater.Start should be called from UI thread.
AutoUpdater.NET uses Assembly version to determine the current version of the application. You can update it by going to Properties of the project as shown in following screenshot.
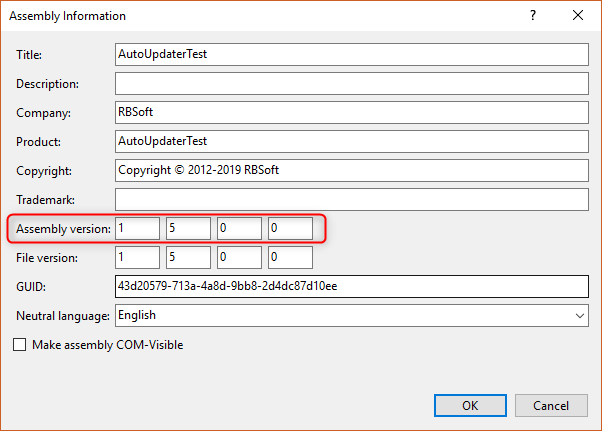
Version specified in XML file should be higher than Assembly version to trigger the update.
If you want to provide your own Assembly then you can do it by providing second argument of Start method as shown below.
AutoUpdater.Start("http://rbsoft.org/updates/AutoUpdaterTest.xml", myAssembly);
If you like to use ftp XML URL to check for updates or download the update file then you can provide you FTP credentials in alternative Start method as shown below.
AutoUpdater.Start("ftp://rbsoft.org/updates/AutoUpdaterTest.xml", new NetworkCredential("FtpUserName", "FtpPassword"));
If you are using FTP download URL in the XML file then credentials provided here will be used to authenticate the request.
If you don't want to show Skip button on Update form then just add following line with above code.
AutoUpdater.ShowSkipButton = false;
If you don't want to show Remind Later button on Update form then just add following line with above code.
AutoUpdater.ShowRemindLaterButton = false;
If you want to ignore previously set Remind Later and Skip settings then you can set Mandatory property to true. It will also hide Skip and Remind Later button. If you set Mandatory to true in code then value of Mandatory in your XML file will be ignored.
AutoUpdater.Mandatory = true;
You can enable forced updates by setting Mandatory property to true and setting UpdateMode to value of Mode.Forced or Mode.ForcedDownload. Mode.Forced option will hide Remind Later, Skip and Close buttons on the standard update dialog. Mode.ForcedDownload option will skip the standard update dialog and start downloading and updating the application without user interaction. Mode.ForceDownload option will also ignore value of OpenDownloadPage flag.
AutoUpdater.Mandatory = true;
AutoUpdater.UpdateMode = Mode.Forced;
You can provide Basic Authetication for XML, Update file and Change Log as shown in below code.
BasicAuthentication basicAuthentication = new BasicAuthentication("myUserName", "myPassword");
AutoUpdater.BasicAuthXML = AutoUpdater.BasicAuthDownload = AutoUpdater.BasicAuthChangeLog = basicAuthentication;
Set the User-Agent string to be used for HTTP web requests so you can differentiate them in your web server request logs.
AutoUpdater.HttpUserAgent = "AutoUpdater";
You can turn on error reporting by adding below code. If you do this AutoUpdater.NET will show error message, if there is no update available or if it can't get to the XML file from web server.
AutoUpdater.ReportErrors = true;
If your application doesn't need administrator privileges to replace old version then you can set RunUpdateAsAdmin to false.
AutoUpdater.RunUpdateAsAdmin = false;
If you don't want to download the latest version of the application and just want to open the URL between url tags of your XML file then you need to add following line with above code.
AutoUpdater.OpenDownloadPage = true;
This kind of scenario is useful if you want to show some information to users before they download the latest version of an application.
If you don't want users to select Remind Later time when they press the Remind Later button of update dialog then you need to add following lines with above code.
AutoUpdater.LetUserSelectRemindLater = false;
AutoUpdater.RemindLaterTimeSpan = RemindLaterFormat.Days;
AutoUpdater.RemindLaterAt = 2;
In above example when user press Remind Later button of update dialog, It will remind user for update after 2 days.
If your XML and Update file can only be used from certain Proxy Server then you can use following settings to tell AutoUpdater.NET to use that proxy. Currently, if your Changelog URL is also restricted to Proxy server then you should omit changelog tag from XML file cause it is not supported using Proxy Server.
var proxy = new WebProxy("ProxyIP:ProxyPort", true)
{
    Credentials = new NetworkCredential("ProxyUserName", "ProxyPassword")
};
AutoUpdater.Proxy = proxy;
You can specify where you want to download the update file by assigning DownloadPath field as shown below. It will be used for ZipExtractor too.
AutoUpdater.DownloadPath = Environment.CurrentDirectory;
You can specify the size of the update form by using below code.
AutoUpdater.UpdateFormSize = new System.Drawing.Size(800, 600);
You can call Start method inside Timer to check for updates frequently.
System.Timers.Timer timer = new System.Timers.Timer
{
    Interval = 2 * 60 * 1000,
    SynchronizingObject = this
};
timer.Elapsed += delegate
{
    AutoUpdater.Start("http://rbsoft.org/updates/AutoUpdaterTest.xml");
};
timer.Start();
DispatcherTimer timer = new DispatcherTimer {Interval = TimeSpan.FromMinutes(2)};
timer.Tick += delegate
{
    AutoUpdater.Start("http://rbsoft.org/updates/AutoUpdaterTestWPF.xml");
};
timer.Start();
If you like to handle Application exit logic yourself then you can use ApplicationExitEvent like below. This is very useful if you like to do something before closing the application.
AutoUpdater.ApplicationExitEvent += AutoUpdater_ApplicationExitEvent;

private void AutoUpdater_ApplicationExitEvent()
{
    Text = @"Closing application...";
    Thread.Sleep(5000);
    Application.Exit();
}
Sometimes as a developer you need to maintain look and feel for the entire application similarly or you just need to do something before update. In this type of scenarios you can handle the updates manually by subscribing to an event. You can do it by adding following line with above code.
AutoUpdater.CheckForUpdateEvent += AutoUpdaterOnCheckForUpdateEvent;

private void AutoUpdaterOnCheckForUpdateEvent(UpdateInfoEventArgs args)
{
    if (args != null)
    {
        if (args.IsUpdateAvailable)
        {
            DialogResult dialogResult;
            if (args.Mandatory)
            {
                dialogResult =
                    MessageBox.Show(
                        $@"There is new version {args.CurrentVersion} available. You are using version {args.InstalledVersion}. This is required update. Press Ok to begin updating the application.", @"Update Available",
                        MessageBoxButtons.OK,
                        MessageBoxIcon.Information);
            }
            else
            {
                dialogResult =
                    MessageBox.Show(
                        $@"There is new version {args.CurrentVersion} available. You are using version {
                                args.InstalledVersion
                            }. Do you want to update the application now?", @"Update Available",
                        MessageBoxButtons.YesNo,
                        MessageBoxIcon.Information);
            }

            // Uncomment the following line if you want to show standard update dialog instead.
            // AutoUpdater.ShowUpdateForm();

            if (dialogResult.Equals(DialogResult.Yes) || dialogResult.Equals(DialogResult.OK))
            {
                try
                {
                    if (AutoUpdater.DownloadUpdate())
                    {
                        Application.Exit();
                    }
                }
                catch (Exception exception)
                {
                    MessageBox.Show(exception.Message, exception.GetType().ToString(), MessageBoxButtons.OK,
                        MessageBoxIcon.Error);
                }
            }
        }
        else
        {
            MessageBox.Show(@"There is no update available please try again later.", @"No update available",
                MessageBoxButtons.OK, MessageBoxIcon.Information);
        }
    }
    else
    {
        MessageBox.Show(
                @"There is a problem reaching update server please check your internet connection and try again later.",
                @"Update check failed", MessageBoxButtons.OK, MessageBoxIcon.Error);
    }
}
When you do this it will execute the code in above event when AutoUpdater.Start method is called instead of showing the update dialog. UpdateInfoEventArgs object carries all the information you need about the update. If its null then it means AutoUpdater.NET can't reach the XML file on your server. UpdateInfoEventArgs has following information about the update.
If you want to use other format instead of XML as a AppCast file then you need to handle the parsing logic by subscribing to ParseUpdateInfoEvent. You can do it as follows.
AutoUpdater.ParseUpdateInfoEvent += AutoUpdaterOnParseUpdateInfoEvent;
AutoUpdater.Start("http://rbsoft.org/updates/AutoUpdaterTest.json");

private void AutoUpdaterOnParseUpdateInfoEvent(ParseUpdateInfoEventArgs args)
{
    dynamic json = JsonConvert.DeserializeObject(args.RemoteData);
    args.UpdateInfo = new UpdateInfoEventArgs
    {
        CurrentVersion = json.version,
        ChangelogURL = json.changelog,
        Mandatory = json.mandatory,
        DownloadURL = json.url
    };
}
{
    "version":"2.0.0.0",
    "url":"http://rbsoft.org/downloads/AutoUpdaterTest.zip",
    "changelog":"https://github.com/ravibpatel/AutoUpdater.NET/releases",
    "mandatory":true
}
此处可能存在不合适展示的内容,页面不予展示。您可通过相关编辑功能自查并修改。
如您确认内容无涉及 不当用语 / 纯广告导流 / 暴力 / 低俗色情 / 侵权 / 盗版 / 虚假 / 无价值内容或违法国家有关法律法规的内容,可点击提交进行申诉,我们将尽快为您处理。


