# tf_trt_models
**Repository Path**: cake_with_cake/tf_trt_models
## Basic Information
- **Project Name**: tf_trt_models
- **Description**: TensorFlow models accelerated with NVIDIA TensorRT
- **Primary Language**: Unknown
- **License**: BSD-3-Clause
- **Default Branch**: master
- **Homepage**: None
- **GVP Project**: No
## Statistics
- **Stars**: 0
- **Forks**: 0
- **Created**: 2020-06-26
- **Last Updated**: 2024-05-06
## Categories & Tags
**Categories**: Uncategorized
**Tags**: None
## README
TensorFlow/TensorRT Models on Jetson
====================================
This repository was forked from NVIDIA's [tf_trt_models](https://github.com/NVIDIA-Jetson/tf_trt_models) repository. It contains sctipts to optimize TensorFlow models with TensorRT, as well as scripts for testing/demo. The models are sourced from the [TensorFlow models repository](https://github.com/tensorflow/models). This repository mainly focuses on **object detection** models.
* [Setup](#setup)
* [Object Detection](#od)
* [Models](#od_models)
* [Real-time Object Detection with TensorRT Optimized Models](#rt_od)
* [Applying the Hand Detector Model](#hand)
Setup
-----
Refer to these blog posts for more details:
* [TensorFlow/TensorRT Models on Jetson TX2](https://jkjung-avt.github.io/tf-trt-models/)
* [TensorFlow/TensorRT (TF-TRT) Revisited](https://jkjung-avt.github.io/tf-trt-revisited/).
Otherwise, here are the steps:
1. Flash the target Jetson TX2 system with either JetPack-3.2.1 (TensorRT 3.0 GA included) or JetPack 3.3 (TensorRT 4.0 GA). (I have also tested the code on Jetson Nano with JetPack-4.2.)
2. Install OpenCV 3.4.x on Jetson. Reference: [How to Install OpenCV (3.4.0) on Jetson TX2](https://jkjung-avt.github.io/opencv3-on-tx2/) or [Installing OpenCV 3.4.6 on Jetson Nano](https://jkjung-avt.github.io/opencv-on-nano/).
3. Download and install tensorflow-1.8.0 (with TensorRT support). More specifically, download [this pip wheel](https://nvidia.app.box.com/v/TF180-Py35-wTRT) if you are using JetPack-3.2.1, or [this pip wheel](https://drive.google.com/open?id=1bAUNe26fKgGXuJiZYs1eT2ig8SCj2gW-) if you are using JetPack-3.3. Then install it with `pip3`.
```
$ sudo pip3 install tensorflow-1.8.0-cp35-cp35m-linux_aarch64.whl
```
**2019-05-24 update:** Originally I encountered "extremely long TF-TRT model loading time issue" when I tested with tensorflow-1.9.0+. That's why I recommended tensorflow-1.8.0 before. Recently I realized the issue was due to the python3 'protobuf' module, and I have a solution. I documented the solution in my [TensorFlow/TensorRT (TF-TRT) Revisted](https://jkjung-avt.github.io/tf-trt-revisited/) post. With the solution applied, you could actually use any tensorflow of version 1.8.0 or higher, as long as it has the TenroRT support. For example, you could [build/install tensorflow-1.12.2 from source](https://jkjung-avt.github.io/build-tensorflow-1.12.2/), or just use a pip3 wheel provided by NVIDIA.
4. Clone this repository. (Do use this repository instead of NVIDIA's original tf_trt_models repository, if you would like to run the script described below.)
```
$ cd ~/project
$ git clone --recursive https://github.com/jkjung-avt/tf_trt_models
$ cd tf_trt_models
```
5. Run the installation script.
```
$ ./install.sh
```
Object Detection
----------------
Please refer to the original [NVIDIA-Jetson/tf_trt_models](https://github.com/NVIDIA-Jetson/tf_trt_models) for code snippets which demonstrate how to download pretrained object detection models, how to build TensorFlow graph and how to optimize the models with TensorRT.
### Models
The author has tested various TensorFlow object detection models and shared the result on [NVIDIA's Jetson TX2 Developer Forum](https://devtalk.nvidia.com/default/topic/1037019/jetson-tx2/tensorflow-object-detection-and-image-classification-accelerated-for-nvidia-jetson/post/5288250/#5288250).
Note the benchmark timings were gathered after the Jetson TX2 was placed in MAX-N mode. To set TX2 into MAX-N mode, run the following commands in a terminal:
```
$ sudo nvpmodel -m 0
$ sudo ~/jetson_clocks.sh
```
### Real-time Object Detection with TensorRT Optimized Models
The `camera_tf_trt.py` script supports video inputs from one of the following sources: (1) a video file, say mp4, (2) an image file, say jpg or png, (3) an RTSP stream from an IP CAM, (4) a USB webcam, (5) the Jetson onboard camera. Check out the help message about how to invoke the script with a specific video source.
```
$ python3 camera_tf_trt.py --help
usage: camera_tf_trt.py [-h] [--file] [--image] [--filename FILENAME] [--rtsp]
[--uri RTSP_URI] [--latency RTSP_LATENCY] [--usb]
[--vid VIDEO_DEV] [--width IMAGE_WIDTH]
[--height IMAGE_HEIGHT] [--model MODEL] [--build]
[--tensorboard] [--labelmap LABELMAP_FILE]
[--num-classes NUM_CLASSES] [--confidence CONF_TH]
This script captures and displays live camera video, and does real-time object
detection with TF-TRT model on Jetson TX2/TX1
optional arguments:
-h, --help show this help message and exit
--file use a video file as input (remember to also set
--filename)
--image use an image file as input (remember to also set
--filename)
--filename FILENAME video file name, e.g. test.mp4
--rtsp use IP CAM (remember to also set --uri)
--uri RTSP_URI RTSP URI, e.g. rtsp://192.168.1.64:554
--latency RTSP_LATENCY
latency in ms for RTSP [200]
--usb use USB webcam (remember to also set --vid)
--vid VIDEO_DEV device # of USB webcam (/dev/video?) [1]
--width IMAGE_WIDTH image width [1280]
--height IMAGE_HEIGHT
image height [720]
--model MODEL tf-trt object detecion model [ssd_inception_v2_coco]
--build re-build TRT pb file (instead of usingthe previously
built version)
--tensorboard write optimized graph summary to TensorBoard
--labelmap LABELMAP_FILE
[third_party/models/research/object_detection/data/msc
oco_label_map.pbtxt]
--num-classes NUM_CLASSES
number of object classes [90]
--confidence CONF_TH confidence threshold [0.3]
```
The `--model` option could only be set to `ssd_inception_v2_coco` (default) or `ssd_mobilenet_v1` now. It would likely be extended to support more object detection models in the future. The `--build` option only needs to be done once for each object detection model. The TensorRT optimized graph would be saved/cached into a protobuf file, so that later invocations of the script could load the cached graph directly without going through the optimization process again.
Example #1: build TensorRT optimized 'ssd_mobilenet_v1_coco' model and run real-time object detection with USB webcam.
```
$ python3 camera_tf_trt.py --usb --model ssd_mobilenet_v1_coco --build
```
Example #2: verify the optimized 'ssd_mobilenet_v1_coco' model with NVIDIA's original 'huskies.jpg' picture.
```
$ python3 camera_tf_trt.py --image --filename examples/detection/data/huskies.jpg --model ssd_mobilenet_v1_coco
```
Here is the result of example #2.

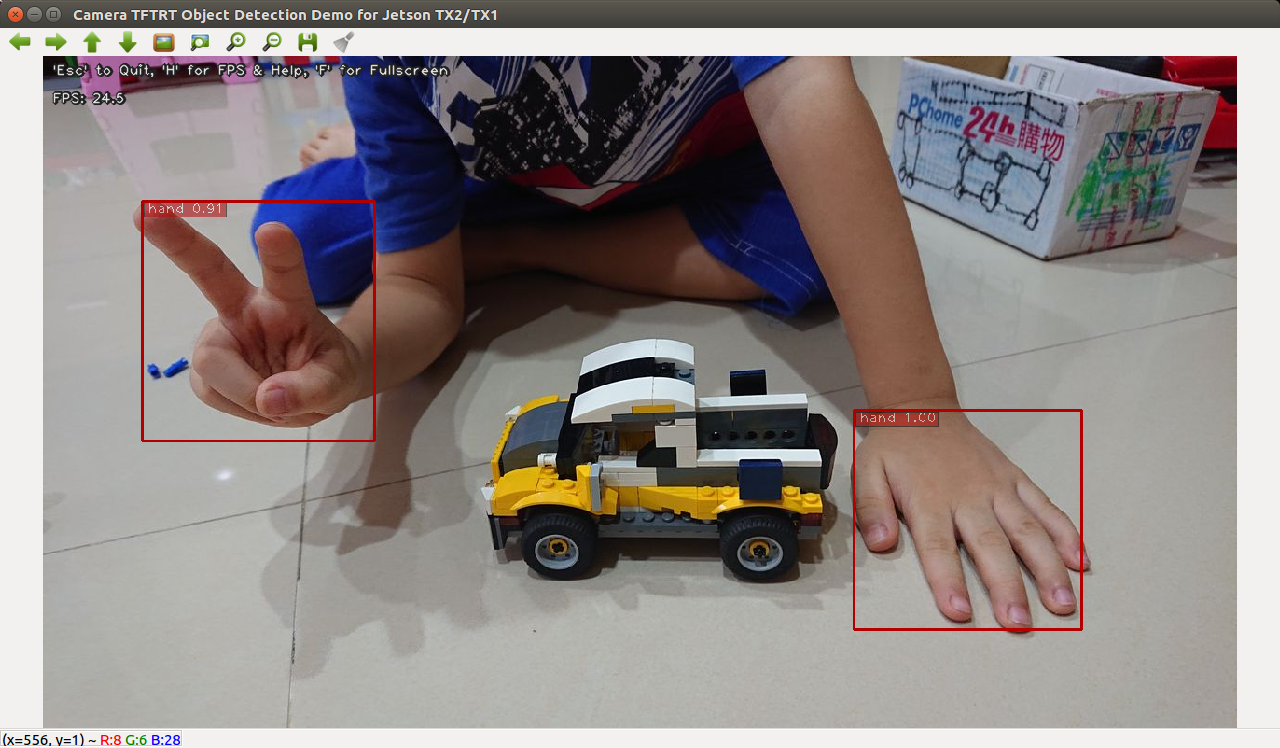
Applying the Hand Detector Model
--------------------------------
Refer to the following blog posts for more details:
* [Training a Hand Detector with TensorFlow Object Detection API](https://jkjung-avt.github.io/hand-detection-tutorial/)
* [Deploying the Hand Detector onto Jetson TX2](https://jkjung-avt.github.io/hand-detection-on-tx2/)
After you've trained your own hand detector with one of the following models, you'll be able to optimize the model with TF-TRT and run it on TX2.
```
ssd_mobilenet_v1_egohands
ssd_mobilenet_v2_egohands
ssdlite_mobilenet_v2_egohands
ssd_inception_v2_egohands
faster_rcnn_resnet50_egohands
faster_rcnn_resnet101_egohands
faster_rcnn_inception_v2_egohands
```
Be sure to copy your trained model checkpoint files into the corresponding `data/xxx_egohands/` folder. Say, you've done that for `ssd_mobilenet_v1_egohands`. Then you could optimize the model and test it with an image like this:
```shell
$ python3 camera_tf_trt.py --image \
--filename jk-son-hands.jpg \
--model ssd_mobilenet_v1_egohands \
--labelmap data/egohands_label_map.pbtxt \
--num-classes 1 \
--build
```