# betterTodos
**Repository Path**: charleydeng/betterTodos
## Basic Information
- **Project Name**: betterTodos
- **Description**: 番茄时钟,待办清单,找到跟你一起进步的好友,成为最好的自己
- **Primary Language**: TypeScript
- **License**: Not specified
- **Default Branch**: master
- **Homepage**: None
- **GVP Project**: No
## Statistics
- **Stars**: 1
- **Forks**: 0
- **Created**: 2022-05-18
- **Last Updated**: 2022-05-19
## Categories & Tags
**Categories**: Uncategorized
**Tags**: None
## README
# 初始化项目
- 如何使用使用 Vite 搭建项目
- 如何在 Vite 中集成 `typescript`
- 如何在 Vite 中集成 `vue-router4` 和 `pinia`
- 如何使用 vue3 的伴侣 `vueuse`
- 如何在项目中集成 `eslint` 和 `prettier` 保证代码质量
- 如何规范化 `git` 提交信息
## 使用 vite-cli 命令
### 法一:常规做法
```
# pnpm
pnpm create vite
# npm
npm init vite@latest
# yarn
yarn create vite
```
### 法二:快速初始化
```
# pnpm
pnpm create vite project-name -- --template vue-ts
# npm 6.x
npm init vite@latest project-name --template vue-ts
# npm 7+, 需要额外的双横线:
npm init vite@latest project-name -- --template vue-ts
# yarn
yarn create vite project-name --template vue-ts
```
## 基本配置
### 保证 node 的使用
```
pnpm i @types/node --save-dev
```
### 修改 `tsconfig.json`
```json
{
"compilerOptions": {
"typeRoots": [
// 要包含的类型声明文件路径列表
"node_modules/@types",
"src/types"
],
"target": "esnext",
"useDefineForClassFields": true,
"module": "esnext",
"moduleResolution": "node",
"strict": true,
"jsx": "preserve",
"sourceMap": true,
"resolveJsonModule": true,
"esModuleInterop": true,
"lib": ["esnext", "dom"],
"baseUrl": "./",
"paths": {
//模块名到基于 baseUrl的路径映射的列表(配置别名)
"@": ["src"],
"@/*": ["src/*"]
}
},
"include": ["src/**/*.ts", "src/**/*.d.ts", "src/**/*.tsx", "src/**/*.vue"]
}
```
### 修改 `vite.config.ts`
```typescript
import { defineConfig } from 'vite'
import vue from '@vitejs/plugin-vue'
import * as path from 'path'
// https://vitejs.dev/config/
export default defineConfig({
resolve: {
//设置别名
alias: {
'@': path.resolve(__dirname, 'src'),
},
},
plugins: [vue()],
server: {
port: 8080, //启动端口
hmr: {
host: '127.0.0.1',
port: 8080,
},
// 设置 https 代理
proxy: {
'/api': {
target: 'your https address',
changeOrigin: true,
rewrite: (path: string) => path.replace(/^\/api/, ''),
},
},
},
})
```
### 给自定义的环境变量获得类型提示
默认情况下,Vite 在 [`vite/client.d.ts`](https://github.com/vitejs/vite/blob/main/packages/vite/client.d.ts) 中为 `import.meta.env` 提供了类型定义。随着在 `.env[mode]` 文件中自定义了越来越多的环境变量,你可能想要在代码中获取这些以 `VITE_` 为前缀的用户自定义环境变量的 TypeScript 智能提示。
要想做到这一点,你可以在 `src` 目录下创建一个 `env.d.ts` 文件,接着按下面这样增加 `ImportMetaEnv` 的定义:
```typescript
///
interface ImportMetaEnv {
readonly VITE_APP_TITLE: string
// 更多环境变量...
}
interface ImportMeta {
readonly env: ImportMetaEnv
}
```
## 统一代码风格
### 集成 `eslint`
#### 安装
```
pnpm i eslint eslint-plugin-vue --save-dev
```
由于 ESLint 默认使用 [Espree](https://link.juejin.cn/?target=https%3A%2F%2Fgithub.com%2Feslint%2Fespree) 进行语法解析,无法识别 TypeScript 的一些语法,故我们需要安装 [`@typescript-eslint/parser`](https://link.juejin.cn/?target=https%3A%2F%2Fgithub.com%2Ftypescript-eslint%2Ftypescript-eslint%2Ftree%2Fmaster%2Fpackages%2Fparser) 替代掉默认的解析器
```
pnpm install @typescript-eslint/parser --save-dev
```
安装对应的插件 [@typescript-eslint/eslint-plugin](https://link.juejin.cn/?target=https%3A%2F%2Fgithub.com%2Ftypescript-eslint%2Ftypescript-eslint%2Ftree%2Fmaster%2Fpackages%2Feslint-plugin) 它作为 eslint 默认规则的补充,提供了一些额外的适用于 ts 语法的规则。
```
pnpm install @typescript-eslint/eslint-plugin --save-dev
```
#### 创建配置文件
`.eslintrc.js` 或 `.eslintrc.json`
```javascript
module.exports = {
parser: 'vue-eslint-parser',
parserOptions: {
parser: '@typescript-eslint/parser',
ecmaVersion: 2020,
sourceType: 'module',
ecmaFeatures: {
jsx: true
}
},
extends: [
'plugin:vue/vue3-recommended',
'plugin:@typescript-eslint/recommended',
],
rules: {
// override/add rules settings here, such as:
'no-console': process.env.NODE_ENV === 'production' ? 'error' : 'off',
'no-debugger': process.env.NODE_ENV === 'production' ? 'error' : 'off',
'no-var': 'off',
semi: ['error', 'never'], //强制不使用分号
// 'quotes': [2, 'single'],//强制使用单引号
'no-trailing-spaces': 2, //不允许行末空格
'no-plusplus': 'off', // 允许使用++
'no-await-in-loop': 'error', // 禁止在循环中使用await
};
```
#### 创建忽略文件
`.eslintignore`
```
node_modules/
dist/
index.html
```
#### 命令行式运行
修改 `package.json`
```
{
...
"scripts": {
...
"eslint:comment": "使用 ESLint 检查并自动修复 src 目录下所有扩展名为 .js 和 .vue 的文件",
"eslint": "eslint --ext .js,.vue,.ts,.jsx --ignore-path .gitignore --fix src",
}
...
}
```
### 集成 `prettier`
#### 安装
```javascript
pnpm i prettier eslint-config-prettier eslint-plugin-prettier --save-dev //解决prettier和eslint的冲突
```
#### 创建配置文件
`prettier.config.js` 或 `.prettierrc.js`
prettier 的配置似乎是每次更改后都要重新打开 vscode 才能生效
```javascript
module.exports = {
// 一行最多 80 字符
printWidth: 80,
// 使用 4 个空格缩进
tabWidth: 4,
// 使用 tab 缩进,而使用空格
useTabs: true,
// // 行尾需要有分号
semi: false,
// 使用单引号代替双引号
singleQuote: true,
// 对象的 key 仅在必要时用引号
quoteProps: 'as-needed',
// jsx 不使用单引号,而使用双引号
jsxSingleQuote: false,
// 末尾使用逗号
trailingComma: 'all',
// 大括号内的首尾需要空格 { foo: bar }
bracketSpacing: true,
// jsx 标签的反尖括号需要换行
bracketSameLine: false,
// 箭头函数,只有一个参数的时候,不需要括号
arrowParens: 'avoid',
// 每个文件格式化的范围是文件的全部内容
rangeStart: 0,
rangeEnd: Infinity,
// 不需要写文件开头的 @prettier
requirePragma: false,
// 不需要自动在文件开头插入 @prettier
insertPragma: false,
// 使用默认的折行标准
proseWrap: 'preserve',
// 根据显示样式决定 html 要不要折行
htmlWhitespaceSensitivity: 'css',
// 换行符使用 lf
endOfLine: 'auto',
}
```
#### 修改 `.eslintrc.js` 配置
```javascript
module.exports = {
...
extends: [
'plugin:vue/vue3-recommended',
'plugin:@typescript-eslint/recommended',
'prettier',//解决prettier和eslint的冲突
'plugin:prettier/recommended'//解决prettier和eslint的冲突
],
...
};
```
#### 命令行式运行
修改 `package.json`
```
{
...
"scripts": {
...
"prettier:comment": "自动格式化当前目录下的所有文件",
"prettier": "prettier --write"
}
...
}
复制代码
```
### 自动检查并修复
#### 安装`Eslint`插件
新版 `vscode` 需要手动启用 `eslint` 插件,在右下角查看 eslint 工作状态,可以点击开启。(如下图)

右下角查看 eslint 工作状态,点击会输出日志。(如下图)

根据输出日志,进行修复
#### 若保存没有按照 eslint 的规则修复
这可能是因为你的 `vscode` 开启了保存自动格式化(代码格式化),先打开 `首选项 > 设置`,搜索 `format on save`,然后关闭这个选项(如下图)

## 规范 git 提交
### 利用 `commitizen` + `commitlint`
- **commitlint**
- commit 信息校验工具
- **commitizen**
- 辅助 commit 信息 ,就像这样,通过选择输入,规范提交信息
#### 安装
```shell
pnpm install -D commitizen cz-conventional-changelog @commitlint/config-conventional @commitlint/cli commitlint-config-cz cz-customizable
```
**@commitlint/config-conventional** 这是一个规范配置,标识采用什么规范来执行消息校验, 这个默认是**_Angular_**的提交规范
| **类型** | **描述** |
| -------- | ------------------------------------------------------ |
| build | 编译相关的修改,例如发布版本、对项目构建或者依赖的改动 |
| chore | 其他修改, 比如改变构建流程、或者增加依赖库、工具等 |
| ci | 持续集成修改 |
| docs | 文档修改 |
| feat | 新特性、新功能 |
| fix | 修改 bug |
| perf | 优化相关,比如提升性能、体验 |
| refactor | 代码重构 |
| revert | 回滚到上一个版本 |
| style | 代码格式修改, 注意不是 css 修改 |
| test | 测试用例修改 |
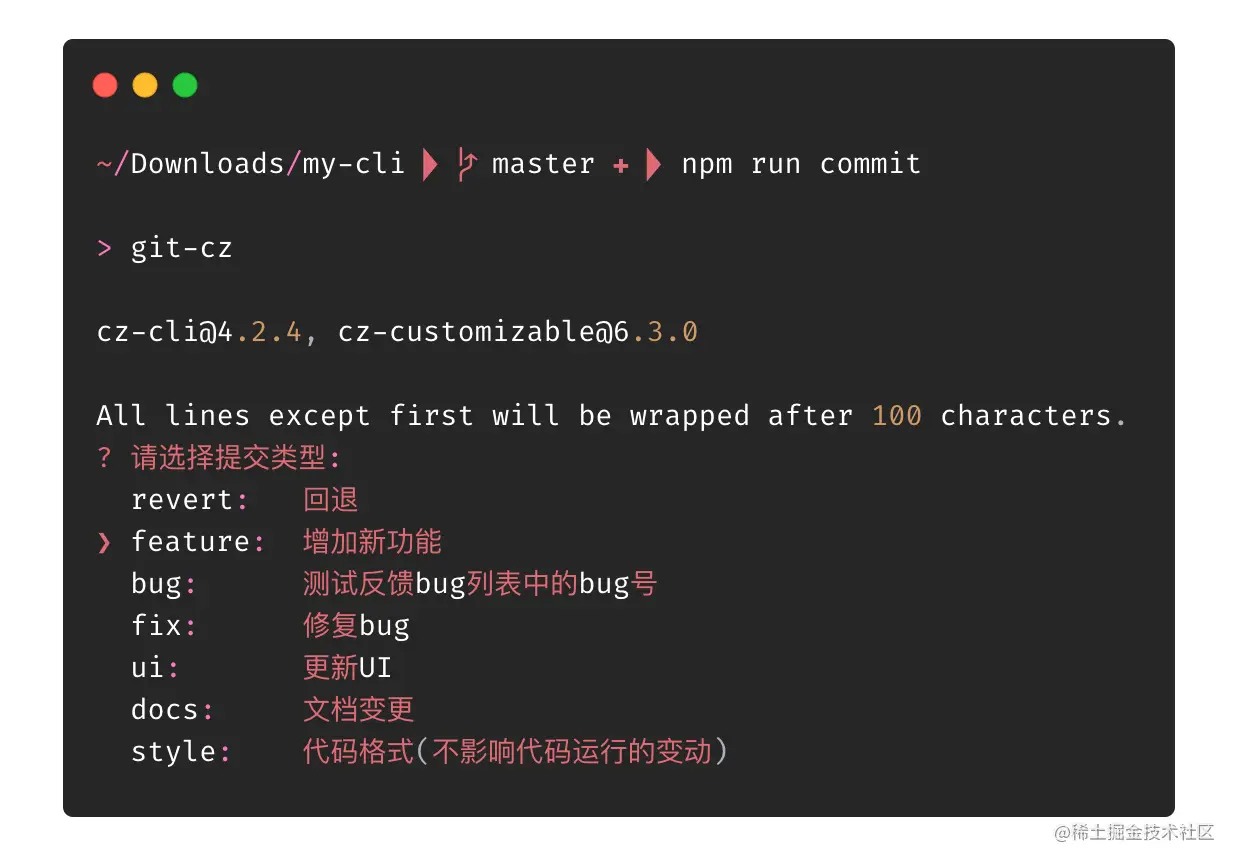
自定义提交规范 commitlint-config-cz cz-customizable
辅助提交依赖 cz-conventional-changelog
#### 配置 `package.json`
```
{
...
"scripts": {
"commit:comment": "引导设置规范化的提交信息",
"commit":"git-cz",
},
"config": {
"commitizen": {
"path": "node_modules/cz-customizable" //将原来commit配置,变更为自定义配置
}
},
...
}
```
#### 新增配置 `commitlint.config.js`
[commitlint 官网](https://commitlint.js.org/#/reference-rules)
```javascript
module.exports = {
extends: ['@commitlint/config-conventional', 'cz'],
rules: {
'type-enum': [
2,
'always',
[
'feature', // 新功能(feature)
'bug', // 此项特别针对bug号,用于向测试反馈bug列表的bug修改情况
'fix', // 修补bug
'ui', // 更新 ui
'docs', // 文档(documentation)
'style', // 格式(不影响代码运行的变动)
'perf', // 性能优化
'release', // 发布
'deploy', // 部署
'refactor', // 重构(即不是新增功能,也不是修改bug的代码变动)
'test', // 增加测试
'chore', // 构建过程或辅助工具的变动
'revert', // feat(pencil): add ‘graphiteWidth’ option (撤销之前的commit)
'merge', // 合并分支, 例如: merge(前端页面): feature-xxxx修改线程地址
'build', // 打包
],
],
// 格式 小写
'type-case': [2, 'always', 'lower-case'],
// 不能为空
'type-empty': [2, 'never'],
// 范围不能为空
'scope-empty': [2, 'never'],
// 范围格式
'scope-case': [0],
// 主要 message 不能为空
'subject-empty': [2, 'never'],
// 以什么为结束标志,禁用
'subject-full-stop': [0, 'never'],
// 格式,禁用
'subject-case': [0, 'never'],
// 以空行开头
'body-leading-blank': [1, 'always'],
'header-max-length': [0, 'always', 72],
},
}
```
#### 自定义提示则添加 `.cz-config.js`
```javascript
module.exports = {
types: [
{ value: 'feature', name: 'feature: 增加新功能' },
{ value: 'bug', name: 'bug: 测试反馈bug列表中的bug号' },
{ value: 'fix', name: 'fix: 修复bug' },
{ value: 'ui', name: 'ui: 更新UI' },
{ value: 'docs', name: 'docs: 文档变更' },
{ value: 'style', name: 'style: 代码格式(不影响代码运行的变动)' },
{ value: 'perf', name: 'perf: 性能优化' },
{ value: 'refactor', name: 'refactor: 重构(既不是增加feature,也不是修复bug)' },
{ value: 'release', name: 'release: 发布' },
{ value: 'deploy', name: 'deploy: 部署' },
{ value: 'test', name: 'test: 增加测试' },
{ value: 'chore', name: 'chore: 构建过程或辅助工具的变动(更改配置文件)' },
{ value: 'revert', name: 'revert: 回退' },
{ value: 'build', name: 'build: 打包' },
],
// override the messages, defaults are as follows
messages: {
type: '请选择提交类型:',
customScope: '请输入您修改的范围(可选):',
subject: '请简要描述提交 message (必填):',
body: '请输入详细描述(可选,待优化去除,跳过即可):',
footer: '请输入要关闭的issue(待优化去除,跳过即可):',
confirmCommit: '确认使用以上信息提交?(y/n/e/h)',
},
allowCustomScopes: true,
skipQuestions: ['body', 'footer'],
subjectLimit: 72,
}
```
#### 交互界面测试
- 到目前只是规范了 git 的提交信息,我们对提交前代码的检查还没有做到位,例如 ESLint、Prettier,毕竟谁都会有疏忽的时候,
- 那么现在我们的 husky 就闪亮登场了
### husky +lint-staged
`lint-staged` 是一个只检测`git`暂存区的`lint`工具,`husky`是一个用来给我们的项目添加`git hook`的工具,`git hook`是进行 git 操作会触发的脚本,例如:提交的时候会触发`pre-commit`钩子,输入提交信息会触发`commit-msg`钩子。 我们用`husky`安装`pre-commit`钩子,我们就可以在进行`git commit`操作的时候,运行我们的脚本来检测待提交的代码是否规范,便可以只对暂存区的文件进行检查。
安装
```shell
# 1.安装
pnpm i husky lint-staged -D
# 2.生成 .husky 的文件夹
npx husky install
# 3.添加 hooks,会在 .husky 目录下生成一个 pre-commit 脚本文件
npx husky add .husky/pre-commit "npx --no-install lint-staged"
# 4.添加 commit-msg
npx husky add .husky/commit-msg 'npx --no-install commitlint --edit "$1"'
```
添加配置 `package.json`
```json
{
...
"lint-staged": {
"*.{js,vue,ts,jsx,tsx}": [
"prettier --write",
"eslint --ignore-path .gitignore --fix src"
],
"*.{html,css,less,scss,md}": [
"prettier --write"
]
},
...
}
```
## 版本控制(可选)
- [standard-version](https://link.juejin.cn/?target=https%3A%2F%2Fgithub.com%2Fconventional-changelog%2Fstandard-version) 或者 [conventional-changelog](https://link.juejin.cn/?target=https%3A%2F%2Fgithub.com%2Fconventional-changelog%2Fconventional-changelog)
## 组件库按需引入
> 可选很多,根据自己项目的需求去进行选择即可
[参考这篇文章](https://www.cnblogs.com/ximenchuifa/p/16022177.html)
## 集成各种插件
```
pnpm i pinia --save
pnpm i vue-router --save
pnpm i @vueuse/core
# .scss and .sass
pnpm i -D sass
# .less
pnpm i -D less
pnpm i axios
```
# 配置路由
## 基本配置
`index.ts`文件向外暴露出注册路由的函数
```typescript
import { App } from 'vue'
import { createRouter, createWebHistory } from 'vue-router'
import routes from './routes'
const router = createRouter({
history: createWebHistory(),
routes,
scrollBehavior() {
return { top: 0 }
},
})
export async function setupRouter(app: App) {
app.use(router)
await router.isReady()
}
```
在 `main.ts` 中调用注册路由的函数
```typescript
import { createApp } from 'vue'
import App from './App.vue'
import store from './store'
import { setupRouter } from './router'
async function main() {
const app = createApp(App)
app.use(store)
await setupRouter(app)
app.mount('#app')
}
main()
```
把 routes 配置项单独抽离成一个文件 `routes.ts`
```typescript
import { RouteRecordRaw } from 'vue-router'
const routes: RouteRecordRaw[] = [
{
path: '/',
name: 'home',
component: () => import('../views/home.vue'),
},
]
export default routes
```
## 自动注册布局的路由
在`router`目录下新建`autoload`目录,再在`autoload`目录下新建`layoutsRoutes.ts`文件
```typescript
import { RouteRecordRaw } from 'vue-router'
const layouts = import.meta.globEager('@/layouts/*.vue')
const views = import.meta.globEager(`@/views/*/*.vue`)
function getLayoutsRoutes() {
const layoutRoutes: RouteRecordRaw[] = []
Object.entries(layouts).forEach(([filePath, module]) => {
const fileName = filePath.replace(/.+layouts\/|\.vue/gi, '')
const route = configRoute(fileName, module)
route.children = getChildrenRoutes(fileName)
layoutRoutes.push(route)
})
return layoutRoutes
}
/*下面这两个函数就是为上面那个函数服务的*/
function getChildrenRoutes(dirName: string) {
const childrenRoutes: RouteRecordRaw[] = []
Object.entries(views).forEach(([filePath, module]) => {
if (filePath.includes(dirName)) {
const fileName = filePath.replace(/.+views\/|\.vue/gi, '')
childrenRoutes.push(configRoute(fileName, module))
}
})
return childrenRoutes
}
// eslint-disable-next-line @typescript-eslint/no-explicit-any
function configRoute(fileName: string, module: { [key: string]: any }) {
const route: RouteRecordRaw = {
path: `/${fileName}`,
name: fileName,
component: module.default,
}
return Object.assign(route, module.default?.route) //如果模块有route对象,则将其里面的属性添加到(或覆盖掉)这里的route中
}
export default getLayoutsRoutes()
```
在`route.ts`中引入布局路由
```typescript
import { RouteRecordRaw } from 'vue-router'
import layoutRoutes from './autoload/layoutsRoutes'
const routes: RouteRecordRaw[] = [
{
path: '/',
name: 'home',
component: () => import('@/views/home.vue'),
},
...layoutRoutes,
]
const routes = import.meta.env.VITE_IS_AUTOLOAD === 'true' ? getLayoutsRoutes() : [] //根据环境变量判断是否自动加载路由
export default routes
```
# 安装 mock
[参考官网即可](https://github.com/vbenjs/vite-plugin-mock)
# 配置 axios
## 创建 Axios 类
`Axios.ts`
```typescript
import axios, { AxiosRequestConfig } from 'axios'
import { ResponseData } from '@/apis/types'
export default class Axios {
private instance
constructor(config: AxiosRequestConfig) {
this.instance = axios.create(config)
this.interceptors()
}
public async request>(config: AxiosRequestConfig): Promise {
return new Promise(async (resolve, reject) => {
try {
const response = await this.instance.request(config)
resolve(response.data)
} catch (error) {
reject(error)
}
})
}
private interceptors() {
this.interceptorsRequest()
this.interceptorsResponse()
}
private interceptorsRequest() {
this.instance.interceptors.request.use(
config => {
return config
},
error => {
return Promise.reject(error)
},
)
}
private interceptorsResponse() {
this.instance.interceptors.response.use(
response => {
// 2xx 范围内的状态码都会触发该函数。
return response.data
},
error => {
// 超出 2xx 范围的状态码都会触发该函数。
return Promise.reject(error)
},
)
}
}
```
## 根据 Axios 类创建一个实例
`index.ts`
```typescript
import Axios from '@/apis/Axios'
export const http = new Axios({
baseURL: `${import.meta.env.VITE_API_BASE_URL}/api`,
timeout: 5000,
headers: {},
})
```
## 创建 user 的 api
`user.ts`
```typescript
import { http } from '@/apis/index'
interface User {
name: string
age: number
}
const userApis = {
info: function () {
return http.request({
url: '/info',
})
},
}
export default userApis
```
# 全局组件自动注册
就在`main.ts`里加个函数
```typescript
function autoloadGlobalComponent(app: App) {
const components = import.meta.globEager('@/components/global/**/*.vue')
Object.entries(components).forEach(([filePath, component]) => {
const componentName = filePath.replace(/.+global\/|\.vue/gi, '')
app.component(componentName, component.default)
})
}
```
# 表单验证
## 安装扩展包
`pnpm i vee-validate@next @vee-validate/rules @vee-validate/i18n`
## 使用
### 通过组件的方式去使用 validate
```vue
```
### 通过 api 的方式去使用 validate
```vue
```
### 实际使用
#### 先封装好下载的那四个包
```typescript
import * as veeValidate from 'vee-validate'
import rules from '@vee-validate/rules'
import { localize } from '@vee-validate/i18n'
import zh_CN from '@vee-validate/i18n/dist/locale/zh_CN.json'
import * as yup from 'yup' //yup也是提供一些定义好的规则的,跟@vee-validate/rules一样,所以其实是二者选其一就可以了,yup更强大
veeValidate.configure({
//配置要写在定义规则的上面,否则中文会有问题
generateMessage: localize('zh_CN', zh_CN), //配置语言
validateOnInput: true, //配置是否在输入时进行验证
})
Object.keys(rules).forEach(key => {
//把所有规则都定义好
veeValidate.defineRule(key, rules[key])
})
const modules = { yup, ...veeValidate }
export default modules
```
#### 使用
```vue
auth/login
```