# winning-spring-cloud
**Repository Path**: chensj881008/winning-spring-cloud
## Basic Information
- **Project Name**: winning-spring-cloud
- **Description**: winning-spring-cloud
- **Primary Language**: Java
- **License**: Not specified
- **Default Branch**: master
- **Homepage**: None
- **GVP Project**: No
## Statistics
- **Stars**: 0
- **Forks**: 2
- **Created**: 2019-04-09
- **Last Updated**: 2021-07-30
## Categories & Tags
**Categories**: Uncategorized
**Tags**: None
## README
# Spring Cloud
[TOC]
## 一、常用注解
### 1.1 Spring 注解
#### `@SpringBootTest`
@SpringBootTest(webEnvironment = SpringBootTest.WebEnvironment.RANDOM_PORT)
为Web 测试环境的端口为随机端口的配置
#### `@ConfigurationProperties`
设置属性的信息 如`prefix`就是前缀
#### `@Configuration`
用于定义配置类,可替换xml配置文件,被注解的类内部包含有一个或多个被@Bean注解的方法
@Configuration注解的配置类有如下要求:
1. @Configuration不可以是final类型;
2. @Configuration不可以是匿名类;
3. 嵌套的configuration必须是静态类。
#### `@AutoConfigureAfter`和`@AutoConfigureBefore`
* @AutoConfigureBefore : 自动注入在什么类加载前
* @AutoConfigureAfter: 自动注入在什么类加载后
#### `@PathVariable`
可以获取`RESTful`风格的`Uri`路径上的参数。
#### `@EnableEurekaServer`
开启Eureka Server
#### `@EnableEurekaClient`
开启Eureka Client
#### `@EnableDiscoveryClient`
开启客户端注册
> spring cloud中discovery service有许多种实现(eureka、consul、zookeeper等等),
> `@EnableDiscoveryClient`基于`spring-cloud-commons`,
> `@EnableEurekaClient`基于`spring-cloud-netflix`。
> 其实用更简单的话来说,就是如果选用的注册中心是`eureka`,那么就推荐`@EnableEurekaClient`,
> 如果是其他的注册中心,那么推荐使用`@EnableDiscoveryClient`。
#### `@Import`
`@Import(EurekaServerInitializerConfiguration.class)`
* 将标记的class注入到spring IOC容器中
* 只能注解在类上,以及唯一的参数value上可以配置3种类型的值Configuration,ImportSelector,ImportBeanDefinitionRegistrar
* **基于Configuration也就是直接填对应的class数组**
```java
@Import({Square.class,Circular.class})
```
* **基于自定义ImportSelector的使用**
```java
/**
* 定义一个我自己的ImportSelector
*
* @author zhangqh
* @date 2018年5月1日
*/
public class MyImportSelector implements ImportSelector{
public String[] selectImports(AnnotationMetadata importingClassMetadata) {
return new String[]{"com.zhang.bean.Triangle"};
}
}
// 使用@Import
@Import({Square.class,Circular.class,MyImportSelector.class})
```
* **基于ImportBeanDefinitionRegistrar的使用**
```java
/**
* 定义一个自定的ImportBeanDefinitionRegistrar
*
* @author zhangqh
* @date 2018年5月1日
*/
public class MyImportBeanDefinitionRegistrar implements ImportBeanDefinitionRegistrar{
public void registerBeanDefinitions(
AnnotationMetadata importingClassMetadata,
BeanDefinitionRegistry registry) {
// new一个RootBeanDefinition
RootBeanDefinition rootBeanDefinition = new RootBeanDefinition(Rectangle.class);
// 注册一个名字叫rectangle的bean
registry.registerBeanDefinition("rectangle", rootBeanDefinition);
}
}
// 使用@Import
@Import({Square.class,Circular.class,MyImportSelector.class,MyImportBeanDefinitionRegistrar.class})
```
#### `@Conditional`
`@Conditional`是Spring4新提供的注解,它的作用是按照一定的条件进行判断,满足条件给容器注册bean。
```java
//此注解可以标注在类和方法上
@Target({ElementType.TYPE, ElementType.METHOD})
@Retention(RetentionPolicy.RUNTIME)
@Documented
public @interface Conditional {
Class[] value();
}
```
从代码中可以看到,需要传入一个Class数组,并且需要继承Condition接口:
```java
public interface Condition {
boolean matches(ConditionContext var1, AnnotatedTypeMetadata var2);
}
```
Condition是个接口,需要实现matches方法,返回true则注入bean,false则不注入。
#### `@ConditionalOnMissingBean`
(仅仅在当前上下文中不存在某个对象时,才会实例化一个Bean)
该注解表示,如果存在它修饰的类的bean,则不需要再创建这个bean
如果当前容器中已经有bean了,就不注入备用bean,如果没有,则注入备用bean
#### `@ConditionalOnClass`
(某个class位于类路径上,才会实例化一个Bean)
该注解的参数对应的类必须存在,否则不解析该注解修饰的配置类
注解@ConditionalOnClass和@Bean,可以仅当某些类存在于 classpath 上时候才创建某个Bean
常规使用代码如下:
```java
// 仅当类 java.util.HashMap 存在于 classpath 上时才创建一个bean : beanA
// 注意这里使用了 @ConditionalOnClass 的属性value,
@Bean
@ConditionalOnClass(value={java.util.HashMap.class})
public A beanA(){}
// 仅当类 com.sample.Dummy 存在于 classpath 上时才创建一个bean : beanB
// 注意这里使用了 @ConditionalOnClass 的属性 name,
@Bean
@ConditionalOnClass(name="com.sample.Dummy")
public B beanB(){}
```
`name`or `value`
- `name` : 不确定指定类在`classpath` 上
- `value` : 确定指定类在 `classpath` 上
#### @ConditionalOnBean
仅仅在当前上下文中存在某个对象时,才会实例化一个Bean
#### @ConditionalOnExpression
当表达式为true的时候,才会实例化一个Bean
#### @ConditionalOnMissingClass
某个class类路径上不存在的时候,才会实例化一个Bean)
#### @ConditionalOnNotWebApplication
(不是web应用)
#### `@Autowired`
用来注入已有的bean,required`默认为true,当为false的时候,表示忽略当前要注入的bean,如果有直接注入,没有跳过,不会报错
### 1.2 java元注解
java中元注解有四个: @Retention @Target @Document @Inherited;
```java
@Retention:注解的保留位置
@Retention(RetentionPolicy.SOURCE) //注解仅存在于源码中,在class字节码文件中不包含
@Retention(RetentionPolicy.CLASS) // 默认的保留策略,注解会在class字节码文件中存在,但运行时无法获得,
@Retention(RetentionPolicy.RUNTIME) // 注解会在class字节码文件中存在,在运行时可以通过反射获取到
@Target:注解的作用目标
@Target(ElementType.TYPE) //接口、类、枚举、注解
@Target(ElementType.FIELD) //字段、枚举的常量
@Target(ElementType.METHOD) //方法
@Target(ElementType.PARAMETER) //方法参数
@Target(ElementType.CONSTRUCTOR) //构造函数
@Target(ElementType.LOCAL_VARIABLE)//局部变量
@Target(ElementType.ANNOTATION_TYPE)//注解
@Target(ElementType.PACKAGE) ///包
@Document:说明该注解将被包含在javadoc中
@Inherited:说明子类可以继承父类中的该注解
```
### 1.3 常用启动命令
```bash
$ mvn spring-boot:run
$ mvn spring-boot:run -Dspring-boot.run.profiles=c1
```
## 二、坑点
### 2.1`eureka client`配置问题
使用如下配置时,启动后会自动关闭
在spring cloud `Finchley.RELEASE`、`Greenwich.RELEASE`都有问题
```xml
org.springframework.cloud
spring-cloud-starter-netflix-eureka-client
org.springframework.boot
spring-boot-starter-test
test
```
必须添加如下的引用,才不会启动后关闭
```xml
org.springframework.boot
spring-boot-starter-web
```
### 2.2 mysql time zone
问题:The server time zone value 'Öйú±ê׼ʱ¼ä' is unrecognized or represents more than one time zone....
解决方案:
```bash
show variables like '%time_zone%';
set global time_zone='+8:00';
```
或者在my.ini中增加[mysqld]下面的配置
```bash
default-time-zone='+08:00'
```
### 2.3 Feign @PathVariable设置
使用Feign的时候,如果参数中带有@PathVariable形式的参数,则要用value=""标明对应的参数,否则会抛出IllegalStateException异常
```java
@PutMapping("/disuseable/{sn}")
ApiResponse disUseAble(@PathVariable String sn); // wrong
```
修改为
```java
@PutMapping("/disuseable/{sn}")
ApiResponse disUseAble(@PathVariable(value="sn") String sn); // right
```
### 2.4 hystrix
问题版本: **[Dalston.SR5]**
在使用Hystrix的时候,`spring-boot-actuator`中配置的如下项目:
```yaml
management:
port: ${server.port}
context-path: /moniter
```
将会导致Hystrix Dashboard无法连接到监控后台,导致使用/hystrix.stream 无法显示当前ping的信息,
需要将上面的参数删除后,即可显示信息。
## 三、[Eureka](https://github.com/Netflix/eureka/wiki) 治理中心
### 3.1 Eureka概念
#### (1)Register-服务注册
当Eureka Client向Eureka Server注册时,Eureka Client 提供自身的元数据,比如 IP 地址、端口、运行状况H1标的 Uri 主页地址等信息。
#### (2)Renew-服务续约
Eureka CLIent 在默认的情况下会每隔 30 秒发送一次心跳来进行服务续约。通过服务续约来告知Eureka Server该Eureka Client 仍然可用,没有出现故障。正常情况下,如果Eureka Server在90 秒内没有收到 ureka Client 的心跳, Eureka Server 会将 Eureka Client 实例从注册列表中删除。注意:官网建议不要更改服务续约的间隔时间。
#### (3)Fetch Registries-获取服务注册列表信息
Eureka Client从Eureka Server 获取服务注册表信息,井将其缓存在本地。Eureka Client会
使用服务注册列表信息查找其他服务的信息,从而进行远程调用。该注册列表信息定时(每30 秒) 更新一次,每次返回注册列表信息可能与 Eureka Client 的缓存信息不同,Eureka Client会自己处理这些信息。如果由于某种原因导致注册列表信息不能及时匹配,Eureka Client 会重新获取整个注册表信息。 Eureka Server 缓存了所有的服务注册列表信息,并将整个注册列表以及每个应用程序 信息进行了压缩,压缩内容和没有压缩的内容完全相同。 Eureka Client和Eureka Server 可以使用 JSON和XML 数据格式进行通信。在默认的情况下, Eureka Client使用JSON 格式的方式来获取服务注册列表的信息。
#### (4)Cancel-服务下线
Eureka Client 在程序关闭时可以向 Eureka Server 发送下线请求。发送请求后,该客户端的
实例信息将从Eureka Server 的服务注册列表中删除。该下线请求不会自动完成,需要在程序关闭时调用以下代码:
```java
DiscoveryManager.getinstance().shutdownComponent();
```
#### (5)Eviction-服务剔除
在默认情况下,当 Eureka Client 90 秒没有向 Eureka Server 发送服务续约(即心跳〉时,Eureka Server 会将该服务实例从服务注册列表删除,即服务剔除。
### 3.2 Eureka 架构

在这个架构中有两个角色 ,即 Eureka Server和Eureka Client。而Eureka Client 又分为Applicaton Service和Application Client 即服务提供者和服务消费者。每个区域有一个Eureka 集群,并且每个区域至少有一个 Eureka Server 可以处理区域故障,以防服务器瘫痪。
Eureka Client向Eureka Server注册, 将自己的客户端信息提交给 Eureka Server。然后,Eureka Client通过向 Eureka Server 发送心跳(每 30 次)来续约服务。如果某个客户端不能持续续约,那Eureka Server 判定该客户端不可用,该不可用的客户端将在大约 90 秒后从Eureka Server服务注册列表中删除。服务注册列表信息和服务续约信息会被复制到集群中的每个Eureka Server节点。来自任何区域的Eureka Client 都可以获取整个系统的服务注册列表信息,根据这些注 列表信息,Application Client 可以远程调用Applicaton Service 来消费服务。
### 3.3 服务注册
#### 3.3.1 Eureka Client
服务注册,即Eureka Client向Eureka Server 提交自己的服务信息,包括 IP 地址、端口、Serviceld 等信息。如果 Eureka Client 置文件中没有配置 Serviceld ,则默认为配置文件中配置的服务名 ,即`$ {spring application.name }`的值。
当Eureka Client 启动时,会将自身 的服务信息发送到 Eureka Server 这个过程其实非常简单,现在来从源码的角度分析服务注册的过程。在Maven的依赖包下,找到`eureka-client-1.9.8.jar`包。在`com.netflix.discovery`包下有`DiscoveryClient`类,该类包含了
Eureka Client向Eureka Server注册和续约的相关方法。其中,`DiscoveryClient`实现了`EurekaClient`
并且它是单例模式(`@Singleton`),而 `EurekaClient`继承了`LookupService`接口之间的关系:

在`DiscoveryClient`类中有 个服务注册的方法`register()`, 该方法Http请求`Eureka Server`注册,代码如下:
```java
boolean register() throws Throwable {
logger.info(PREFIX + "{}: registering service...", appPathIdentifier);
EurekaHttpResponse httpResponse;
try {
httpResponse = eurekaTransport.registrationClient.register(instanceInfo);
} catch (Exception e) {
logger.warn(PREFIX + "{} - registration failed {}", appPathIdentifier, e.getMessage(), e);
throw e;
}
if (logger.isInfoEnabled()) {
logger.info(PREFIX + "{} - registration status: {}", appPathIdentifier, httpResponse.getStatusCode());
}
return httpResponse.getStatusCode() == Status.NO_CONTENT.getStatusCode();
}
```
这个方法的调用则是来至于`InstanceInfoReplicator`,该类实现了`Runnable`接口,在`run()`方法中调用了`DiscoveryClient.register()`
```java
@Override
public void run() {
try {
// 刷新 应用实例信息
discoveryClient.refreshInstanceInfo();
// 判断 应用实例信息 是否数据不一致
Long dirtyTimestamp = instanceInfo.isDirtyWithTime();
if (dirtyTimestamp != null) {
// TODO 发起注册
discoveryClient.register();
// 设置 应用实例信息 数据一致
instanceInfo.unsetIsDirty(dirtyTimestamp);
}
} catch (Throwable t) {
logger.warn("There was a problem with the instance info replicator", t);
} finally {
// 提交任务,并设置该任务的 Future
Future next = scheduler.schedule(this, replicationIntervalSeconds, TimeUnit.SECONDS);
scheduledPeriodicRef.set(next);
}
}
```
而`InstancelnfoReplicator`类是在`DiscoveryClient`初始化过程中使用的, 其中有一个`initScheduledTasks()` 方法,该方法主要开启了 取服务注册列表的信息。如果需要向Eureka Server注册,则开启注册,同时开启定时任务Eureka Server服务续约。
```java
private void initScheduledTasks() {
// 获取服务列表,任务调度获取注册列表代码
if (clientConfig.shouldFetchRegistry()) {
// registry cache refresh timer
int registryFetchIntervalSeconds = clientConfig.getRegistryFetchIntervalSeconds();
int expBackOffBound = clientConfig.getCacheRefreshExecutorExponentialBackOffBound();
scheduler.schedule(
new TimedSupervisorTask(
"cacheRefresh",
scheduler,
cacheRefreshExecutor,
registryFetchIntervalSeconds,
TimeUnit.SECONDS,
expBackOffBound,
new CacheRefreshThread()
),
registryFetchIntervalSeconds, TimeUnit.SECONDS);
}
// 向Eureka Server注册服务
if (clientConfig.shouldRegisterWithEureka()) {
int renewalIntervalInSecs = instanceInfo.getLeaseInfo().getRenewalIntervalInSecs();
int expBackOffBound = clientConfig.getHeartbeatExecutorExponentialBackOffBound();
logger.info("Starting heartbeat executor: " + "renew interval is: {}", renewalIntervalInSecs);
// Heartbeat timer
// 心跳检测,并续约
scheduler.schedule(
new TimedSupervisorTask(
"heartbeat",
scheduler,
heartbeatExecutor,
renewalIntervalInSecs,
TimeUnit.SECONDS,
expBackOffBound,
new HeartbeatThread()
),
renewalIntervalInSecs, TimeUnit.SECONDS);
// InstanceInfo replicator
instanceInfoReplicator = new InstanceInfoReplicator(
this,
instanceInfo,
clientConfig.getInstanceInfoReplicationIntervalSeconds(),
2); // burstSize
statusChangeListener = new ApplicationInfoManager.StatusChangeListener() {
@Override
public String getId() {
return "statusChangeListener";
}
@Override
public void notify(StatusChangeEvent statusChangeEvent) {
if (InstanceStatus.DOWN == statusChangeEvent.getStatus() ||
InstanceStatus.DOWN == statusChangeEvent.getPreviousStatus()) {
// log at warn level if DOWN was involved
logger.warn("Saw local status change event {}", statusChangeEvent);
} else {
logger.info("Saw local status change event {}", statusChangeEvent);
}
// 更新客户端信息,并发送到服务端
instanceInfoReplicator.onDemandUpdate();
}
};
if (clientConfig.shouldOnDemandUpdateStatusChange()) {
applicationInfoManager.registerStatusChangeListener(statusChangeListener);
}
// 开启 应用实例信息复制器 TODO 并在指定延迟时间后执行一次注册
instanceInfoReplicator.start(clientConfig.getInitialInstanceInfoReplicationIntervalSeconds());
} else {
logger.info("Not registering with Eureka server per configuration");
}
}
```
#### 3.3.2 Eureka Server
再来跟踪 Eureka server端的代码,在Maven的 org.springframework.cloud:spring-cloud-netflix-eureka-server:2.1.0.RELEASE包下,在org.springframework.cloud.netflix.eureka.server会发现有一 个`EurekaServerBootstrap`的类,将监听`ServletContextEvent`事件,所以` EurekaServerBootstrap`类在程序启动时具有最先初始化的权利,初始化的时候将会调用如下方法:
```java
public void contextInitialized(ServletContextEvent event) {
try {
// 初始化 Eureka-Server 配置环境
initEurekaEnvironment();
// 初始化 Eureka-Server 上下文
initEurekaServerContext();
ServletContext sc = event.getServletContext();
sc.setAttribute(EurekaServerContext.class.getName(), serverContext);
} catch (Throwable e) {
logger.error("Cannot bootstrap eureka server :", e);
throw new RuntimeException("Cannot bootstrap eureka server :", e);
}
}
```
在`initEurekaServerContext()`中,会有创建`PeerAwareInstanceRegistry`(应用实例信息的注册表)实例,这个类就是保持客户端注册信息的地方,同时也会创建`PeerEurekaNodes`实例,保存注册中心集群的地方,用于后续将注册信息推送到同等节点时候使用。
```java
// 【2.2.5】创建 应用实例信息的注册表
PeerAwareInstanceRegistry registry;
// AWS 相关,跳过
if (isAws(applicationInfoManager.getInfo())) {
registry = new AwsInstanceRegistry(
eurekaServerConfig,
eurekaClient.getEurekaClientConfig(),
serverCodecs,
eurekaClient
);
awsBinder = new AwsBinderDelegate(eurekaServerConfig, eurekaClient.getEurekaClientConfig(), registry, applicationInfoManager);
awsBinder.start();
} else {
registry = new PeerAwareInstanceRegistryImpl(
eurekaServerConfig,
eurekaClient.getEurekaClientConfig(),
serverCodecs,
eurekaClient
);
}
// 【2.2.6】创建 Eureka-Server 集群节点集合
PeerEurekaNodes peerEurekaNodes = getPeerEurekaNodes(
registry,
eurekaServerConfig,
eurekaClient.getEurekaClientConfig(),
serverCodecs,
applicationInfoManager
);
```
通过代码跟踪发现,执行注册的是`com.netflix.eureka.registry.PeerAwareInstanceRegistryImpl#register`,代码如下:
```java
public void register(final InstanceInfo info, final boolean isReplication) {
// 租约过期时间
int leaseDuration = Lease.DEFAULT_DURATION_IN_SECS;
if (info.getLeaseInfo() != null && info.getLeaseInfo().getDurationInSecs() > 0) {
leaseDuration = info.getLeaseInfo().getDurationInSecs();
}
// 注册应用实例信息
super.register(info, leaseDuration, isReplication);
// Eureka-Server peer node 复制
replicateToPeers(Action.Register, info.getAppName(), info.getId(), info, null, isReplication);
}
```
这里会调用父类`register()`,也就是`com.netflix.eureka.registry.AbstractInstanceRegistry#register`,这个时候就可以知道注册列表信息是保存在一个Map中,在完成client注册后,再讲client推送到各个同等节点中去`replicateToPeers`。
使用方法调用方查看,会将代码追踪到`com.netflix.eureka.resources.ApplicationResource#addInstance`,这个接口是一个处理Http协议的Post请求方法,这里面会调用`PeerAwareInstanceRegistryImpl#register`
```java
@POST
@Consumes({"application/json", "application/xml"})
public Response addInstance(InstanceInfo info,
@HeaderParam(PeerEurekaNode.HEADER_REPLICATION) String isReplication) {
// 校验参数是否合法
logger.debug("Registering instance {} (replication={})", info.getId(), isReplication);
// validate that the instanceinfo contains all the necessary required fields
if (isBlank(info.getId())) {
return Response.status(400).entity("Missing instanceId").build();
} else if (isBlank(info.getHostName())) {
return Response.status(400).entity("Missing hostname").build();
} else if (isBlank(info.getIPAddr())) {
return Response.status(400).entity("Missing ip address").build();
} else if (isBlank(info.getAppName())) {
return Response.status(400).entity("Missing appName").build();
} else if (!appName.equals(info.getAppName())) {
return Response.status(400).entity("Mismatched appName, expecting " + appName + " but was " + info.getAppName()).build();
} else if (info.getDataCenterInfo() == null) {
return Response.status(400).entity("Missing dataCenterInfo").build();
} else if (info.getDataCenterInfo().getName() == null) {
return Response.status(400).entity("Missing dataCenterInfo Name").build();
}
// AWS 相关,跳过
// handle cases where clients may be registering with bad DataCenterInfo with missing data
DataCenterInfo dataCenterInfo = info.getDataCenterInfo();
if (dataCenterInfo instanceof UniqueIdentifier) {
String dataCenterInfoId = ((UniqueIdentifier) dataCenterInfo).getId();
if (isBlank(dataCenterInfoId)) {
boolean experimental = "true".equalsIgnoreCase(serverConfig.getExperimental("registration.validation.dataCenterInfoId"));
if (experimental) {
String entity = "DataCenterInfo of type " + dataCenterInfo.getClass() + " must contain a valid id";
return Response.status(400).entity(entity).build();
} else if (dataCenterInfo instanceof AmazonInfo) {
AmazonInfo amazonInfo = (AmazonInfo) dataCenterInfo;
String effectiveId = amazonInfo.get(AmazonInfo.MetaDataKey.instanceId);
if (effectiveId == null) {
amazonInfo.getMetadata().put(AmazonInfo.MetaDataKey.instanceId.getName(), info.getId());
}
} else {
logger.warn("Registering DataCenterInfo of type {} without an appropriate id", dataCenterInfo.getClass());
}
}
}
// 注册应用实例信息 @see com.netflix.eureka.registry.PeerAwareInstanceRegistryImpl.register
registry.register(info, "true".equals(isReplication));
// 返回 204 成功
// 204 to be backwards compatible
return Response.status(204).build();
}
```
### 3.4 服务续约
#### 3.4.1 Eureka Client
同样是在在`com.netflix.discovery`包下有`DiscoveryClient`类中,查看`DiscoveryClient#renew`方法
```java
boolean renew() {
EurekaHttpResponse httpResponse;
try {
httpResponse = eurekaTransport.registrationClient.sendHeartBeat(instanceInfo.getAppName(), instanceInfo.getId(), instanceInfo, null);
logger.debug("{} - Heartbeat status: {}", PREFIX + appPathIdentifier, httpResponse.getStatusCode());
if (httpResponse.getStatusCode() == 404) {
REREGISTER_COUNTER.increment();
logger.info("{} - Re-registering apps/{}", PREFIX + appPathIdentifier, instanceInfo.getAppName());
long timestamp = instanceInfo.setIsDirtyWithTime();
// 发起注册
boolean success = register();
if (success) {
instanceInfo.unsetIsDirty(timestamp);
}
return success;
}
return httpResponse.getStatusCode() == 200;
} catch (Throwable e) {
logger.error("{} - was unable to send heartbeat!", PREFIX + appPathIdentifier, e);
return false;
}
}
```
查看这个方法的调用,来至于`com.netflix.discovery.DiscoveryClient.HeartbeatThread`的`run`方法,这个是在DiscoveryClient初始化(initScheduledTasks)的时候使用的,用于创建心跳检测使用的定时器的时候,会启动这个线程,就会按照时间来启动任务:
```java
// TODO 心跳检测,并续约
scheduler.schedule(
//监督任务,在执行超时时调度子任务
new TimedSupervisorTask(
"heartbeat",
scheduler,
heartbeatExecutor,
renewalIntervalInSecs,
TimeUnit.SECONDS,
expBackOffBound,
new HeartbeatThread()
),
renewalIntervalInSecs, TimeUnit.SECONDS);
// HeartbeatThread.class
private class HeartbeatThread implements Runnable {
public void run() {
// 续约
if (renew()) {
lastSuccessfulHeartbeatTimestamp = System.currentTimeMillis();
}
}
}
```
#### 3.4.2 Eureka Server
同样是在`com.netflix.eureka.registry.PeerAwareInstanceRegistryImpl`中,方法为`renew`
```java
public boolean renew(final String appName, final String id, final boolean isReplication) {
// 续租
if (super.renew(appName, id, isReplication)) {
// Eureka-Server 复制
replicateToPeers(Action.Heartbeat, appName, id, null, null, isReplication);
return true;
}
return false;
}
```
继续向上跟踪方法调用方法,就会到`com.netflix.eureka.resources.InstanceResource#renewLease`,这是一个处理http协议的put请求,用于接收客户端发送的put请求
```java
@PUT
public Response renewLease(
@HeaderParam(PeerEurekaNode.HEADER_REPLICATION) String isReplication,
@QueryParam("overriddenstatus") String overriddenStatus,
@QueryParam("status") String status,
@QueryParam("lastDirtyTimestamp") String lastDirtyTimestamp) {
boolean isFromReplicaNode = "true".equals(isReplication);
// 续租
boolean isSuccess = registry.renew(app.getName(), id, isFromReplicaNode);
// 续租失败
// Not found in the registry, immediately ask for a register
if (!isSuccess) {
logger.warn("Not Found (Renew): {} - {}", app.getName(), id);
return Response.status(Status.NOT_FOUND).build();
}
// 比较 InstanceInfo 的 lastDirtyTimestamp 属性
// Check if we need to sync based on dirty time stamp, the client
// instance might have changed some value
Response response = null;
if (lastDirtyTimestamp != null && serverConfig.shouldSyncWhenTimestampDiffers()) {
response = this.validateDirtyTimestamp(Long.valueOf(lastDirtyTimestamp), isFromReplicaNode);
// Store the overridden status since the validation found out the node that replicates wins
if (response.getStatus() == Response.Status.NOT_FOUND.getStatusCode()
&& (overriddenStatus != null)
&& !(InstanceStatus.UNKNOWN.name().equals(overriddenStatus))
&& isFromReplicaNode) {
registry.storeOverriddenStatusIfRequired(app.getAppName(), id, InstanceStatus.valueOf(overriddenStatus));
}
} else { // 成功
response = Response.ok().build();
}
logger.debug("Found (Renew): {} - {}; reply status={}" + app.getName(), id, response.getStatus());
return response;
}
```
### 3.5 续约时间与剔除时间设置
续约时间:表示客户端多长时间发送一次请求到服务端,表示当前客户端依然可以使用
```yaml
eureka:
instance:
# 续约的时间间隔,默认为30s,不建议修改
lease-renewal-interval-in-seconds: 30
```
剔除时间: 表示服务单多久未接收到客户端发出的续约请求或者心跳检测,服务端将会把这个应用实例从可用实例剔除。
```yaml
eureka:
instance:
# 剔除多久未接受到心跳的实例的时间参数,不建议修改
lease-expiration-duration-in-seconds: 90
```
### 3.6 为什么Eureka Client获取服务实例这么慢
#### 3.6.1 Eureka Client注册延迟
从上面注册的代码中可以看出,注册使用的是如下的代码
```java
// 开启 应用实例信息复制器 TODO 并在指定延迟时间后执行一次注册
instanceInfoReplicator.start(clientConfig.getInitialInstanceInfoReplicationIntervalSeconds());
```
`InstanceInfoReplicator`的`start`方法中会传入一个时间参数,促使注册的流程延迟执行
```java
public void start(int initialDelayMs) {
if (started.compareAndSet(false, true)) {
// 设置 应用实例信息 数据不一致
instanceInfo.setIsDirty(); // for initial register
// 提交任务,并设置该任务的 Future
// 延迟initialDelayMs后,运行且仅仅运行一次InstanceInfoReplicator的run()
Future next = scheduler.schedule(this, initialDelayMs, TimeUnit.SECONDS);
scheduledPeriodicRef.set(next);
}
}
```
而这个时间参数是来自于`com.netflix.discovery.DiscoveryClient`创建的时候,使用的`EurekaClientConfig`中获取的,通过跟踪代码发现,这个方法来自于`com.netflix.discovery.DefaultEurekaClientConfig#getInitialInstanceInfoReplicationIntervalSeconds`,延迟了40s
```java
public int getInitialInstanceInfoReplicationIntervalSeconds() {
return configInstance.getIntProperty(
namespace + INITIAL_REGISTRATION_REPLICATION_DELAY_KEY, 40).get();
}
```
#### 3.6.2 Eureka Server 的响应缓存
Eureka Server 维护每 30 更新一次响应缓存,可通过更改配置`eureka.server.response-cache-update-interval-ms`来修改。所以即使是刚刚注册的实例,也不会立即出现在服务注册列表中。
#### 3.6.3 Eureka Client 缓存
Eureka Client 保留注册表信息的缓存。该缓存每30秒更新一次(如前所述).因此,Eureka Client刷新本地缓存并发现其他新注册的实例可能需要30 秒。
#### 3.6.4 LoadBalancer 缓存
Ribbon的负载平衡器从本地的 Eureka Client 获取服务注册列表信息。 Ribbon本身还维护了缓存,以避免每个请求都需要从 Eureka Client获取服务注册列表。此缓存每30秒刷新一次(可由 ribbon.ServerListRefreshlnterval设置),所以可能至少需要30秒的时间才能使用新注册的实例。
综上因素,一个新注册的实例,默认延迟 40 秒向服务注册中心注册,所以不能马上被Eureka Server 发现。另外,刚注册的 Eureka Client 不能立即被其他服务调用,原因是调用方由于各种缓存没有及时获取到最新的服务注册列表信息。
### 3.7 Eureka自我保护
当有一个新的 Eureka Server 出现时,它尝试从相邻 Peer节点获取所有服务实例注册表信息。如果从相邻 Peer 点获取信息时出现了故障 Eureka Server 会尝试其他的 Peer 节点。如果Eureka Server能够成功获取所有的服务实例信息,则根据配置信息设置服务续约的阀值。在任何时间,如果 Eureka Server接收到的服务续约低于为该值配置的百分比(默认为 15 分钟内低于 85% ),则服务器开启自我保护模式,即不再剔除注册列表的信息。
这样做的好处在于,如果是 Eureka Server 自身的网络问题而导致Eureka Client无法续约,Eureka Client 注册列表信息不再被删除,也就是Eureka Client 还可以被其他服务消费。
在默认情况下, Eureka Server 的自我保护模式是开启的,如果需要关闭,则在配置文件添加以下代码:
```yam
eureka:
server:
# 自我保护
enable-self-preservation: false
```
### 3.8 高可用注册中心
#### 3.8.1 两个集群
```yaml
# peer1
server:
# 端口
port: 8000
eureka:
instance:
hostname: peer1
client:
# 本身为注册中心,不需要去检索服务信息
register-with-eureka: false
# 本身为注册中心,是否需要在注册中心注册,默认true 集群设置为true
fetch-registry: true
# 注册地址
service-url:
# 默认访问地址
defaultZone: http://peer2:8001/eureka
spring:
application:
name: eureka-server
devtools:
restart:
enabled: true
additional-paths: src/main/java
```
```yaml
# peer2
server:
# 端口
port: 8000
eureka:
instance:
hostname: peer1
client:
# 本身为注册中心,不需要去检索服务信息
register-with-eureka: false
# 本身为注册中心,是否需要在注册中心注册,默认true 集群设置为true
fetch-registry: true
# 注册地址
service-url:
# 默认访问地址
defaultZone: http://peer1:8000/eureka
spring:
application:
name: eureka-server
```
#### 3.8.2 多个集群
##### *appliction.yml*
```yml
eureka:
client:
service-url:
# 默认访问地址
defaultZone: http://peer1:8000/eureka,http://peer2:8001/eureka,http://peer3:8002/eureka
```
##### *application-peerX.yml*
```yaml
server:
# 端口
port: 8000
eureka:
instance:
hostname: peerX
client:
# 本身为注册中心,不需要去检索服务信息
register-with-eureka: false
# 本身为注册中心,是否需要在注册中心注册,默认true 集群设置为true
fetch-registry: true
spring:
application:
name: eureka-server-peerX
```
修改上面的`peerX`到指定参数即可
## 四、[Ribbon](https://github.com/Netflix/ribbon) 负载均衡
Spring Cloud Ribbon是一个基于HTTP和TCP的客户端负载均衡工具,它基于Netflix Ribbon实现。通过Spring Cloud的封装,可以让我们轻松地将面向服务的REST模版请求自动转换成客户端负载均衡的服务调用。Spring Cloud Ribbon虽然只是一个工具类框架,它不像服务注册中心、配置中心、API网关那样需要独立部署,但是它几乎存在于每一个Spring Cloud构建的微服务和基础设施中。因为微服务间的调用,API网关的请求转发等内容,实际上都是通过Ribbon来实现的,包括后续的Feign,它也是基于Ribbon实现的工具。所以,对Spring Cloud Ribbon的理解和使用,对于我们使用Spring Cloud来构建微服务非常重要。
> A central concept in Ribbon is that of the named client. Each load balancer is part of an ensemble of components that work together to contact a remote server on demand, and the ensemble has a name that you give it as an application developer (e.g. using the `@FeignClient` annotation). Spring Cloud creates a new ensemble as an `ApplicationContext` on demand for each named client using `RibbonClientConfiguration`. This contains (amongst other things) an `ILoadBalancer`, a `RestClient`, and a `ServerListFilter`.
>
> Ribbon中的一个核心概念是命名客户机。每个负载均衡客户端都是组件集合的一部分,它们一起工作并且按需联系远程服务器,并且集成有一个应用程序开发人员给它的名称(例如使用@FeignClient注释)。Spring Cloud使用`RibbonClientConfiguration`为每个指定的客户机创建一个新的集成,作为`ApplicationContext`。其中包括一个`ILoadBalancer`、一个`RestClient`和一个`ServerListFilter`。
### 4.1 RestTemplate
`RestTemplate`是`Spring Resources`中一个访问 第三方RESTful API接口的网络请求框架。RestTemplate 的设计原则和其他Spring Template(例如 JdbcTemplate、JmsTemplate )类似,都是为执行复杂任务提供了具有默认行为的简单方法。
`RestTemplate`是用来消费`REST`服务的,所以`RestTemplate`主要方法都与REST的HTTP协议的一些方法紧密相连,例如HEAD、GET、POST、PUT、DELETE、OPTIONS 等方法,这些方法在`RestTemplate`类对应的方法为 `headForHeaders()`、 `getForObject()`、`postForObject()`、`put()`和`delete()`等。
测试使用代码:
```java
// 配置类
@Configuration
public class RestTemplateConfig {
@Bean
public RestTemplate restTemplate(ClientHttpRequestFactory factory){
return new RestTemplate(factory);
}
@Bean
public ClientHttpRequestFactory simpleClientHttpRequestFactory(){
SimpleClientHttpRequestFactory factory = new SimpleClientHttpRequestFactory();
factory.setConnectTimeout(15000);
factory.setReadTimeout(5000);
return factory;
}
}
//Controller
@Autowired
private RestTemplate restTemplate;
/**
* RestTemplate 请求
*/
@PostMapping(value = "/hello")
public Map hello(){
Map resultMap = new HashMap<>();
resultMap.put("data",restTemplate.getForObject("https://www.baidu.com",String.class));
resultMap.put("status", Constants.SUCCESS_STATUS);
return resultMap;
}
```
### 4.2 Ribbon
负载均衡是指将负载分摊到多个执行单元上,常见的负载均衡有两种方式。一种是**独立进程单元**,通过**负载均衡策略**,将**请求转发**到不同的执行单元上,例如**Ngnix** 。另一种是将**负载均衡逻辑以代码的形式**封装到服务消费者的**客户端**上,服务消费者客户端维护了一份服务提供的信息列表,有了信息列表,通过**负载均衡策略**将**请求分摊**给多个服务提供者,从而达到负载均衡的目的。
`Ribbon Netflix`公司开源的一个负载均衡的组件,它属上述的第二种方式,是将负载均衡逻辑封装在客户端中,并且运行在客户端的进程里。 `Ribbon`是一个经过了云端测试的IPC库,可以很好地控制 HTTP和TCP客户端的负载均衡行为。
在`Spring Cloud `构建的微服务系统中, `Ribbon `作为服务消费者的负载均衡器,有两种使用方式,一 种是和` RestTemplate`相结合,另一种是和`Feign`相结合。`Feign`已经默认集成了`Ribbon`。
Ribbon有很多子模块,但很多模块没有用于生产环境,目前 Netflix 公司用于生产环境的 Ribbon
子模块如下。
* `ribbon-loadbalance` :可以独立使用或与其他模块 起使用的负载均衡器 API
* `ribbon-eureka` :Ribbon结合Eureka客户端的API,为负载均衡器提供动态服务注册列表信息。
* `ribbon-core`: Ribbon的核心API
### 4.3 RestTemplate+Ribbon
#### 4.3.1 配置类
```java
@Configuration
public class RestTemplateConfig {
/**
* 实例化RestTemplate,注册bean
* 使用@LoadBalanced就会结合Ribbon进行负载均衡
* @return
*/
@Bean
@LoadBalanced
public RestTemplate initRestTemplate(){
return new RestTemplate();
}
}
```
#### 4.3.2 测试服务
```java
@Service
public class RibbonService {
@Autowired
private RestTemplate restTemplate;
/**
* 请求http://eureka-client/hi/{username}
* @param username
* @return
*/
public String hi(String username){
return restTemplate.getForObject("http://eureka-client/hi/"+username,String.class);
}
}
```
#### 4.3.3 控制层
```java
@RestController
public class RestClientController {
@Autowired
private RibbonService ribbonService;
@PostMapping(value = "/hi/{username}")
public Map hi(@PathVariable String username){
Map resultMap = new HashMap<>();
resultMap.put("data",ribbonService.hi(username));
resultMap.put("status", Constants.SUCCESS);
return resultMap;
}
@Autowired
private LoadBalancerClient loadBalancer;
/**
* 获取实例信息,从结果来看,将会是从每个客户端走一次
* @return
*/
@PostMapping(value = "testRibbon")
public String testRibbon(){
ServiceInstance instance = loadBalancer.choose("eureka-client");
return instance.getHost()+":"+instance.getPort();
}
}
```
> 上面的例子就是实现了负载均衡
### 4.4 LoadBalancerClient
在上面的工程的基础上,复制一份,修改application.yml文件为如下内容:
```yaml
server:
port: 8769
# 定义Ribbon客户端将访问的服务,服务的InstanceId是`stores`
stores:
ribbon:
listOfServers: example.com,google.com
# 不注册
ribbon:
eureka:
enabled: false
```
控制层代码:
```java
@RestController
public class RibbonController {
@Autowired
private LoadBalancerClient loadBalancer;
/**
* 这个方法可以知道:
* 在Ribbon 中的负载均衡客户端为LoadBalancerClient 。在Spring Cloud项目中,
* 负载均衡器 Ribbon 会默认从Eureka Client 的服务注册列表中获取服务的信息,并缓存。
* 根据缓存的服务注册列表信息,可以通过LoadBalancerClient来选择不同的服务实例,
* 从而实现负载均衡。如果禁止Ribbon Eureka获取注册列表信息,则需要自己去维护一份服
* 务注册列表信息。 根据自己维护服务注册列表的信息,Ribbon可以实现负载均衡。
* @return
*/
@PostMapping(value = "/testRibbon")
public String testRibbon(){
// 从配置文件中获取stores的服务端信息
ServiceInstance instance = loadBalancer.choose("stores");
return instance.getHost()+":"+instance.getPort();
}
}
```
结果:
```bash
example.com:80
google.com:80
```
结论:
在Ribbon中的负载均衡客户端为LoadBalancerClient 。在Spring Cloud项目中,负载均衡器 Ribbon 会默认从Eureka Client 的服务注册列表中获取服务的信息,并缓存。根据缓存的服务注册列表信息,可以通过LoadBalancerClient来选择不同的服务实例,从而实现负载均衡。如果禁止Ribbon Eureka获取注册列表信息,则需要自己去维护一份服务注册列表信息。 根据自己维护服务注册列表的信息,Ribbon可以实现负载均衡。
### 4.5 Ribbon 源码
#### 4.5.1 LoadBalancerClient
首先,跟踪`LoadBalancerClient`的源码,它是一个接口类,继承了`ServiceinstanceChooser`,它的实现类为 `RibbonLoadBalanceClient`,它们之间的关系如下:

在`LoadBalancerClient`中有三个方法,两个`execute`方法,均用来执行请求,一个`reconstructURI`方法,用于重构Url,代码如下:
```java
T execute(String serviceId, LoadBalancerRequest request) throws IOException;
T execute(String serviceId, ServiceInstance serviceInstance, LoadBalancerRequest request) throws IOException;
URI reconstructURI(ServiceInstance instance, URI original);
```
> LoadBalancerClient 是由`spring-cloud-netflix`提供的
`ServiceinstanceChooser`接口中只有一个方法用于根据serviceId获取ServiceInstance,就是通过服务名来选择服务实例,代码如下:
```java
public interface ServiceInstanceChooser {
ServiceInstance choose(String serviceId);
}
```
LoadBalancerClient的实现类为 RibbonLoadBalancerClient,RibbonLoadBalancerClient是一个非常重要的类。最终的负载均衡的请求由它来执行。下面是部分RibbonLoadBalancerClient的源码:
```java
// 重写父类choose方法
@Override
public ServiceInstance choose(String serviceId) {
// 获取Server实例
Server server = getServer(serviceId);
if (server == null) {
return null;
}
return new RibbonServer(serviceId, server, isSecure(server, serviceId),
serverIntrospector(serviceId).getMetadata(server));
}
protected Server getServer(String serviceId) {
return getServer(getLoadBalancer(serviceId));
}
protected Server getServer(ILoadBalancer loadBalancer) {
if (loadBalancer == null) {
return null;
}
// 使用ILoadBalancer选择服务实例
return loadBalancer.chooseServer("default"); // TODO: better handling of key
}
protected ILoadBalancer getLoadBalancer(String serviceId) {
return this.clientFactory.getLoadBalancer(serviceId);
}
```
从上面代码中可以看出,choose方法是用来选择具体的服务实例,该方法通过getServer()方法获取去获取`Server实例`,从上面的代码可以看出来,最终是交由**`ILoadBalancer`**类去选择实例。
`ILoadBalancer`归属于`ribbon-loadbalancer`的jar下面,并且是一个接口,接口具体定义的信息如下:
```java
public interface ILoadBalancer {
/**
* 添加一个服务列表
* 此API还可用于添加其他同一逻辑服务器(主机:端口)
*
* @param newServers new servers to add
*/
public void addServers(List newServers);
/**
* 根据key去获取Server,从负载均衡器中选择服务器
*/
public Server chooseServer(Object key);
/**
* 标记服务器关闭
*/
public void markServerDown(Server server);
/**
* 获取当前的服务器列表 不在使用
*/
@Deprecated
public List getServerList(boolean availableOnly);
/**
* 获取可用的Server集合
*/
public List getReachableServers();
/**
* 获取所有的服务器集合
*/
public List getAllServers();
}
```
`ILoadBalancer`的子类为:`BaseLoadBalancer`,`BaseLoadBalancer`的默认实现类是`DynamicServerListLoadBalancer`,类之间关系图如下:

#### 4.5.2 DynamicServerListLoadBalancer
[官方文档](https://cloud.spring.io/spring-cloud-static/spring-cloud-netflix/1.4.6.RELEASE/single/spring-cloud-netflix.html#_customizing_the_ribbon_client)中介绍,Spring Cloud Netflix 为Ribbon提供如下参数的默认值(`BeanType` beanName: `ClassName`)
- `IClientConfig` ribbonClientConfig: `DefaultClientConfigImpl`
- `IRule` ribbonRule: `ZoneAvoidanceRule`
- `IPing` ribbonPing: `DummyPing`
- `ServerList` ribbonServerList: `ConfigurationBasedServerList`
- `ServerListFilter` ribbonServerListFilter: `ZonePreferenceServerListFilter`
- `ILoadBalancer` ribbonLoadBalancer: `ZoneAwareLoadBalancer`
- `ServerListUpdater` ribbonServerListUpdater: `PollingServerListUpdater`
##### 4.5.2.1 IClientConfig
IClientConfig用于配置负载均衡的客户端,IClientConfig的默认实现类为DefaultClientConfiglmpl
##### 4.5.2.2 IRule
IRule用于配置负载均衡的策略,IRule 有三个方法,其中`choose()`是根据key来获取Server实例的, `setLoadBalancer()`和 `getLoadBalancer()`是用来设置和获取`ILoadBalancer`的,它的源码如下:
``` java
public interface IRule{
public Server choose(Object key);
public void setLoadBalancer(ILoadBalancer lb);
public ILoadBalancer getLoadBalancer();
}
```
IRule 有很多默认的实现类,这些实现类根据不同的算法和逻辑来处理负载均衡的策略。IRule 默认实现类有7种。在大多数情况下,这些默认的实现类是可以满足需求的,如果有特殊的谛求 可以自己实现。Rule 其实现类之间的关系如下图所示。

* **`IRule`**
这是所有负载均衡策略的父接口,里边的核心方法就是choose方法,用来选择一个服务实例。
* **`AbstractLoadBalancerRule`**
AbstractLoadBalancerRule是一个抽象类,里边主要定义了一个ILoadBalancer,就是我们上文所说的负载均衡器,负载均衡器的功能我们在上文已经说的很详细了,这里就不再赘述,这里定义它的目的主要是辅助负责均衡策略选取合适的服务端实例。
* **`RandomRule`**
看名字就知道,这种负载均衡策略就是**随机选择一个服务实例**,看源码我们知道,在RandomRule的无参构造方法中初始化了一个Random对象,然后在它重写的choose方法又调用了choose(ILoadBalancer lb, Object key)这个重载的choose方法,在这个重载的choose方法中,每次利用random对象生成一个不大于服务实例总数的随机数,并将该数作为下标所以获取一个服务实例。
* **`RoundRobinRule`**
`RoundRobinRule`这种负载均衡策略叫做**线性负载均衡策略**,或者说**轮询**,也就是我们在上文所说的BaseLoadBalancer负载均衡器中默认采用的负载均衡策略。这个类的choose(ILoadBalancer lb, Object key)函数整体逻辑是这样的:开启一个计数器count,在while循环中遍历服务清单,获取清单之前先通过incrementAndGetModulo方法获取一个下标,这个下标是一个不断自增长的数先加1然后和服务清单总数取模之后获取到的(所以这个下标从来不会越界),拿着下标再去服务清单列表中取服务,每次循环计数器都会加1,如果连续10次都没有取到服务,则会报一个警告No available alive servers after 10 tries from load balancer: XXXX。
* **`RetryRule`**
看名字就知道这种**负载均衡策略带有重试功能**。首先RetryRule中又定义了一个subRule,它的实现类是RoundRobinRule,然后在RetryRule的choose(ILoadBalancer lb, Object key)方法中,每次还是采用RoundRobinRule中的choose规则来选择一个服务实例,如果选到的实例正常就返回,如果选择的服务实例为null或者已经失效,则在失效时间deadline之前不断的进行重试(重试时获取服务的策略还是RoundRobinRule中定义的策略),如果超过了deadline还是没取到则会返回一个null。
* **`WeightedResponseTimeRule`**
WeightedResponseTimeRule是RoundRobinRule的一个子类,在WeightedResponseTimeRule中对RoundRobinRule的功能进行了扩展,WeightedResponseTimeRule中会根据每一个实例的运行情况来给计算出该实例的一个权重(**weight**),然后在挑选实例的时候则根据权重进行挑选,这样能够实现更优的实例调用。 WeightedResponseTimeRule中有一个名叫DynamicServerWeightTask的定时任务,默认情况下每隔30秒会计算一次各个服务实例的权重,权重的计算规则也很简单,如果一个服务的平均响应时间越短则权重越大,那么该服务实例被选中执行任务的概率也就越大。
* **`ClientConfigEnabledRoundRobinRule`**
ClientConfigEnabledRoundRobinRule选择策略的实现很简单,内部定义了RoundRobinRule,choose方法还是采用了RoundRobinRule的choose方法,所以它的选择策略和RoundRobinRule的选择策略一致,或者说**轮询**。
* **`BestAvailableRule`**
BestAvailableRule继承自ClientConfigEnabledRoundRobinRule,它在ClientConfigEnabledRoundRobinRule的基础上主要增加了根据loadBalancerStats中保存的服务实例的状态信息来过滤掉失效的服务实例的功能,然后顺便找出**并发请求最小**的服务实例来使用。然而loadBalancerStats有可能为null,如果loadBalancerStats为null,则BestAvailableRule将采用它的父类即ClientConfigEnabledRoundRobinRule的服务选取策略(线性轮询)。
* `PredicateBasedRule`
PredicateBasedRule是ClientConfigEnabledRoundRobinRule的一个子类,它先通过内部定义的一个过滤器过滤出一部分服务实例清单,然后再采用线性轮询的方式从过滤出来的结果中选取一个服务实例。
* **`ZoneAvoidanceRule`**
ZoneAvoidanceRule是PredicateBasedRule的一个实现类,只不过这里多一个过滤条件,ZoneAvoidanceRule中的过滤条件是以ZoneAvoidancePredicate(**Server Zone**)为主过滤条件和以AvailabilityPredicate为次过滤条件组成的一个叫做CompositePredicate的组合过滤条件,过滤成功之后,继续采用线性轮询的方式从过滤结果中选择一个出来。
##### 4.5.2.3 IPing
IPing 用于向server发送"ping",来判断server是否有响应,从而判断server是否可用,它有一个`isAlive()`方法,源代码如下:
```java
public interface IPing {
public boolean isAlive(Server server);
}
```
IPing类的实现类有`PingUrl`、`PingConstant`、`NoOpPing`、`DummyPing`和`NIWSDiscoveryPing`,各个之间的关系如下图:

* PingUrl:真实地去ping某个URL,判断其是否可用。
* PingConstant:固定返回某服务是否可用,默认返回true,即可用。
* NoOpPing:不去ping,直接返回true,即可用。
* DummyPing:直接返回true,并实现了initWithNiewsConfig()方法。
* NIWSDiscoveryPing:根据DiscoveryEnableServer的InstanceInfo的InstanceStatus去判断,如果为InstanceStatus.UP,则可用,否则不可用。
##### 4.5.2.4 ServerList
ServerList是定义获取所有server的注册列表信息的接口,源代码如下:
```java
public interface ServerList {
public List getInitialListOfServers();
public List getUpdatedListOfServers();
}
```
##### 4.5.2.5 ServerListFilter
ServerListFilter接口定义了可根据配置去过滤或者特性动态的获取符合条件的server列表的方法,代码如下:
```java
public interface ServerListFilter {
public List getFilteredListOfServers(List servers);
}
```
阅读`DynamicServerListLoadBalancer`的源码,`DynamicServerListLoadBalancer`的构造函数中有一个`initWithNiewsConfig()`方法。在该方法中经过一系列的初始化配置,最终执行了`restOfInit()`方法。DynamicServerListLoadBalancer的部分源码如下:
```java
public DynamicServerListLoadBalancer(IClientConfig clientConfig) {
initWithNiwsConfig(clientConfig);
}
@Override
public void initWithNiwsConfig(IClientConfig clientConfig) {
try {
// 代码省略
restOfInit(clientConfig);
} catch (Exception e) {
// 代码省略
}
}
void restOfInit(IClientConfig clientConfig) {
boolean primeConnection = this.isEnablePrimingConnections();
// 将其关闭以避免在BaseLoadBalancer.setServerList()中完成重复的异步启动
this.setEnablePrimingConnections(false);
enableAndInitLearnNewServersFeature();
// 用来获取所有的ServerList
updateListOfServers();
if (primeConnection && this.getPrimeConnections() != null) {
this.getPrimeConnections()
.primeConnections(getReachableServers());
}
this.setEnablePrimingConnections(primeConnection);
LOGGER.info("DynamicServerListLoadBalancer for client {} initialized: {}", clientConfig.getClientName(), this.toString());
}
```
进一步跟踪`updateListOfServers()`方法的源码,最终由`serverListImpl.getUpdatedListOfServers()`获取所有的服务列表,代码如下:
```java
public void updateListOfServers() {
List servers = new ArrayList();
if (serverListImpl != null) {
// 从serverList中获取server
servers = serverListImpl.getUpdatedListOfServers();
//。。。。
}
updateAllServerList(servers);
}
```
而`serverListImpl`是`ServerList`接口的具体实现类。跟踪源码,ServerList的实现类为`DiscoveryEnableNIEWSServerList`,这个类在ribbon-eureka.jar的com.netflix.niews.loadbalancer包下。其中,DiscoveryEnableNIEWSServerList有`getInitialListOfServers()`和`getUpdatedListOfServers()`的方法,具体代码如下:
```java
@Override
public List getInitialListOfServers(){
return obtainServersViaDiscovery();
}
@Override
public List getUpdatedListOfServers(){
return obtainServersViaDiscovery();
}
```
继续跟踪源码,`obtainServersViaDiscovery()`方法是根据`eurekaClientProvider.get()`方法来获取EurekaClient的,在根据EurekaClient来获取服务注册表列信息,代码如下:
```java
private List obtainServersViaDiscovery() {
List serverList = new ArrayList();
// 获取客户端
if (eurekaClientProvider == null || eurekaClientProvider.get() == null) {
logger.warn("EurekaClient has not been initialized yet, returning an empty list");
return new ArrayList();
}
EurekaClient eurekaClient = eurekaClientProvider.get();
if (vipAddresses!=null){
for (String vipAddress : vipAddresses.split(",")) {
// if targetRegion is null, it will be interpreted as the same region of client
// 如果targetRegion为null,它认为客户端在同一区域
List listOfInstanceInfo = eurekaClient.getInstancesByVipAddress(vipAddress, isSecure, targetRegion);
// 遍历
for (InstanceInfo ii : listOfInstanceInfo) {
if (ii.getStatus().equals(InstanceStatus.UP)) {
if(shouldUseOverridePort){
if(logger.isDebugEnabled()){
logger.debug("Overriding port on client name: " + clientName + " to " + overridePort);
}
// copy is necessary since the InstanceInfo builder just uses the original reference,
// and we don't want to corrupt the global eureka copy of the object which may be
// used by other clients in our system
// 客户端信息复制
InstanceInfo copy = new InstanceInfo(ii);
if(isSecure){
ii = new InstanceInfo.Builder(copy).setSecurePort(overridePort).build();
}else{
ii = new InstanceInfo.Builder(copy).setPort(overridePort).build();
}
}
DiscoveryEnabledServer des = new DiscoveryEnabledServer(ii, isSecure, shouldUseIpAddr);
des.setZone(DiscoveryClient.getZone(ii));
serverList.add(des);
}
}
if (serverList.size()>0 && prioritizeVipAddressBasedServers){
// 如果当前的vipAddress有服务器,我们不使用后续的基于vipAddress的服务器
break; // if the current vipAddress has servers, we dont use subsequent vipAddress based servers
}
}
}
return serverList;
}
```
其中,eurekaClientProvider的实现类是LegacyEurekaClientProvider,LegacyEurekaClientProvider是一个获取eurekaClient实例的类,其中代码如下:
```java
class LegacyEurekaClientProvider implements Provider {
private volatile EurekaClient eurekaClient;
@Override
public synchronized EurekaClient get() {
if (eurekaClient == null) {
eurekaClient = DiscoveryManager.getInstance().getDiscoveryClient();
}
return eurekaClient;
}
}
```
EurekaClient的实现类为DiscoveryClient,DiscoveryClient具有服务注册、获取服务注册列表等功能。由此可见,负载均衡是从Eureka Client获取服务列表信息的,并根据IRule的策略去路由,根据IPing去判断服务的可用性。
##### 4.5.2.6 何时获取服务列表
上面的操作遗留一个问题,负载均衡器没个多长时间从Eureka Client获取注册信息呢?在BaseLoadBalancer类的源码中,在BaseLoadBalancer的构造方法开启了一个PingTask任务,代码如下:
```java
public BaseLoadBalancer() {
this.name = DEFAULT_NAME;
this.ping = null;
setRule(DEFAULT_RULE);
//启动ping命令
setupPingTask();
lbStats = new LoadBalancerStats(DEFAULT_NAME);
}
```
在setupPingTask()的具体代码逻辑里,开启了ShutdownEnabledTimer的PingTask任务,在默认情况下,变量pingIntervalSeconds的值为10,即每10秒向Eureka Client发送一次心跳“ping”。
```java
void setupPingTask() {
if (canSkipPing()) {
return;
}
if (lbTimer != null) {
lbTimer.cancel();
}
lbTimer = new ShutdownEnabledTimer("NFLoadBalancer-PingTimer-" + name,
true);
// 每10s ping 一次
lbTimer.schedule(new PingTask(), 0, pingIntervalSeconds * 1000);
forceQuickPing();
}
```
PingTask源码:PingTask创建了一个Pinger对象,并执行了runPinger()方法。
```java
class PingTask extends TimerTask {
public void run() {
try {
new Pinger(pingStrategy).runPinger();
} catch (Exception e) {
logger.error("LoadBalancer [{}]: Error pinging", name, e);
}
}
}
```
Pinger源码:
```java
public void runPinger() throws Exception {
// 判断当前是否有运行的
if (!pingInProgress.compareAndSet(false, true)) {
return; // Ping in progress - nothing to do
}
Server[] allServers = null;
boolean[] results = null;
Lock allLock = null;
Lock upLock = null;
try {
/*
* 除非正在进行addServer操作,否则readLock应该是空闲的
*/
allLock = allServerLock.readLock();
allLock.lock();
allServers = allServerList.toArray(new Server[allServerList.size()]);
allLock.unlock();
int numCandidates = allServers.length;
// 获取服务的可用性
results = pingerStrategy.pingServers(ping, allServers);
// 设置一致与不一致的list,用于拉取信息
final List newUpList = new ArrayList();
final List changedServers = new ArrayList();
// 遍历当前存储所有的客户端,检查isAlive状态,分别放入新运行的、状态改变的两个List中
for (int i = 0; i < numCandidates; i++) {
boolean isAlive = results[i];
Server svr = allServers[i];
boolean oldIsAlive = svr.isAlive();
svr.setAlive(isAlive);
// 判断IsAlive
if (oldIsAlive != isAlive) {
changedServers.add(svr);
logger.debug("LoadBalancer [{}]: Server [{}] status changed to {}",
name, svr.getId(), (isAlive ? "ALIVE" : "DEAD"));
}
if (isAlive) {
newUpList.add(svr);
}
}
upLock = upServerLock.writeLock();
upLock.lock();
upServerList = newUpList;
upLock.unlock();
// isAlive不同的,则通知ServerStatusChangeListener服务注册
// 列表信息发生了改变,进行更新或者重新拉取
notifyServerStatusChangeListener(changedServers);
} finally {
pingInProgress.set(false);
}
}
}
```
查看Pinger的runPinger()方法,最终根据pingerStrategy.pingServers(ping, allServers)来获取服务的可用性,如果该返回结果与之前相同,则不向Eureka Client获取注册列表;如果不同,则通知ServerStatusChangeListener服务注册列表信息发生了改变,进行更新或者重新拉取。
由此可见,LoadBalancerClient是在初始化时向Eureka获取服务注册列表信息,并且每10秒向EurekaClient发送“ping”,来判断服务的可用性。如果服务的可用性发生了改变或者服务的数量和之前不一致,则更新或者重新拉取。LoadBalancerClient有了这些服务注册列表信息,就可以根据具体IRule的策略来进行负载均衡。
#### 4.5.3 RestTemplate如何实现负载均衡
上面的代码只是解释了Ribbon是如何进行负载均衡的,那么RestTemplate是怎么实现负载均衡的?相对来说,只是添加了一个`@LoadBalanced`的注解。
##### 4.5.3.1 @LoadBalanced 源码
```java
@Target({ ElementType.FIELD, ElementType.PARAMETER, ElementType.METHOD })
@Retention(RetentionPolicy.RUNTIME)
@Documented
@Inherited
@Qualifier
public @interface LoadBalanced {
}
```
##### 4.5.3.2 @LoadBalanced 的使用者
在`@LoadBalanced`源码处点击,即可查看到使用者,发现`LoadBalancerAutoConfiguration`类(`LoadBalancer`的自动配置类)使用到了该注解,`LoadBalancerAutoConfiguration`类的代码如下:
```java
@Configuration
@ConditionalOnClass(RestTemplate.class)
@ConditionalOnBean(LoadBalancerClient.class)
@EnableConfigurationProperties(LoadBalancerRetryProperties.class)
public class LoadBalancerAutoConfiguration {
// 维护了一个被@LoadBalanced修饰的RestTemplate对象的List
@LoadBalanced
@Autowired(required = false)
private List restTemplates = Collections.emptyList();
// 其他Bean初始化完成后,获取所有RestTemplateCustomizer的Bean
@Bean
public SmartInitializingSingleton loadBalancedRestTemplateInitializer(
final List customizers) {
return new SmartInitializingSingleton() {
// 单例初始化完成后
@Override
public void afterSingletonsInstantiated() {
// 处理RestTemplate
for (RestTemplate restTemplate : LoadBalancerAutoConfiguration.this.restTemplates) {
for (RestTemplateCustomizer customizer : customizers) {
// 给RestTemplate增加拦截器LoadBalancerInterceptor
// 代码在61行
customizer.customize(restTemplate);
}
}
}
};
}
@Autowired(required = false)
private List transformers = Collections.emptyList();
@Bean
@ConditionalOnMissingBean
public LoadBalancerRequestFactory loadBalancerRequestFactory(
LoadBalancerClient loadBalancerClient) {
return new LoadBalancerRequestFactory(loadBalancerClient, transformers);
}
// 不使用RetryTemplate 执行如下配置
@Configuration
@ConditionalOnMissingClass("org.springframework.retry.support.RetryTemplate")
static class LoadBalancerInterceptorConfig {
@Bean
public LoadBalancerInterceptor ribbonInterceptor(
LoadBalancerClient loadBalancerClient,
LoadBalancerRequestFactory requestFactory) {
return new LoadBalancerInterceptor(loadBalancerClient, requestFactory);
}
// RestTemplateCustomizer 注册的时候需要获取LoadBalancerInterceptor,拦截器
// 将拦截器通过RestTemplateCustomizer.customize()方法设置给RestTemplate
@Bean
@ConditionalOnMissingBean
public RestTemplateCustomizer restTemplateCustomizer(
final LoadBalancerInterceptor loadBalancerInterceptor) {
return new RestTemplateCustomizer() {
@Override
public void customize(RestTemplate restTemplate) {
List list = new ArrayList<>(
restTemplate.getInterceptors());
list.add(loadBalancerInterceptor);
// 为RestTemplate添加LoadBalancerInterceptor
restTemplate.setInterceptors(list);
}
};
}
}
// 使用RetryTemplate 执行如下配置
@Configuration
@ConditionalOnClass(RetryTemplate.class)
public static class RetryAutoConfiguration {
@Bean
public RetryTemplate retryTemplate() {
RetryTemplate template = new RetryTemplate();
template.setThrowLastExceptionOnExhausted(true);
return template;
}
@Bean
@ConditionalOnMissingBean
public LoadBalancedRetryPolicyFactory loadBalancedRetryPolicyFactory() {
return new LoadBalancedRetryPolicyFactory.NeverRetryFactory();
}
}
@Configuration
@ConditionalOnClass(RetryTemplate.class)
public static class RetryInterceptorAutoConfiguration {
@Bean
@ConditionalOnMissingBean
public RetryLoadBalancerInterceptor ribbonInterceptor(
LoadBalancerClient loadBalancerClient, LoadBalancerRetryProperties properties,
LoadBalancedRetryPolicyFactory lbRetryPolicyFactory,
LoadBalancerRequestFactory requestFactory) {
return new RetryLoadBalancerInterceptor(loadBalancerClient, properties,
lbRetryPolicyFactory, requestFactory);
}
@Bean
@ConditionalOnMissingBean
public RestTemplateCustomizer restTemplateCustomizer(
final RetryLoadBalancerInterceptor loadBalancerInterceptor) {
return new RestTemplateCustomizer() {
@Override
public void customize(RestTemplate restTemplate) {
List list = new ArrayList<>(
restTemplate.getInterceptors());
list.add(loadBalancerInterceptor);
restTemplate.setInterceptors(list);
}
};
}
}
}
```
从上面的代码可以看出,使用的是LoadBalancerInterceptor拦截器,进入这个拦截器,查看一下方法
```java
public class LoadBalancerInterceptor implements ClientHttpRequestInterceptor {
private LoadBalancerClient loadBalancer;
private LoadBalancerRequestFactory requestFactory;
public LoadBalancerInterceptor(LoadBalancerClient loadBalancer, LoadBalancerRequestFactory requestFactory) {
this.loadBalancer = loadBalancer;
this.requestFactory = requestFactory;
}
public LoadBalancerInterceptor(LoadBalancerClient loadBalancer) {
// for backwards compatibility
this(loadBalancer, new LoadBalancerRequestFactory(loadBalancer));
}
@Override
public ClientHttpResponse intercept(final HttpRequest request, final byte[] body,
final ClientHttpRequestExecution execution) throws IOException {
final URI originalUri = request.getURI();
String serviceName = originalUri.getHost();
Assert.state(serviceName != null, "Request URI does not contain a valid hostname: " + originalUri);
// 负载均衡
return this.loadBalancer.execute(serviceName, requestFactory.createRequest(request, body, execution));
}
}
```
RestTemplate的负载均衡是在LoadBalancerInterceptor中完成的,通过`loadBalancer.execute()`方法。
### 4.6总结
综上所述 Ribbon的负载均衡主要是通过`LoadBalancerClient`来实现的,而 `LoadBalancerClient`具体交给了`ILoadBalancer`来处理,默认使用`DynamicServerListLoadBalancer`,`ILoadBalancer`通过配置`IRule`和`IPing` ,向`EurekaClient`获取注册列表的信息,默认10秒向EurekaClient发送一次“ping ”, 进而检查是否需要更新服务的注册列表信息。最后 ,在得到服务注册列表信息后,`ILoadBalancer`根据`IRule`的策略进行负载均衡。
> 程序启动-->ILoadBalancer通过配置IRule`和`IPing` ,向`EurekaClient`获取注册列表的信息,并且默认10秒向EurekaClient发送一次“ping ”
>
> 请求-->LoadBalancerClient-->ILoadBalancer-->chooseServer()
而`RestTemplate` 加上`@LoadBalance`注解后,在远程调度时能够负载均衡,主要是维护了一个被`@LoadBalance` 注解的RestTemplate的列表,并给该列表中的RestTemplate对象添加了拦截器。在拦截器的方法中 ,将远程调度方法交给了`Ribbon`负载均衡器`LoadBalancerClient`去处理,从而达到了负载均衡的目的。
## 五、[Feign](https://github.com/OpenFeign/feign)客户端
### 5.1 Feign使用
#### 5.1.1 pom.xml
在eureka-client的基础上增加feign客户端信息
```xml
org.springframework.cloud
spring-cloud-starter-eureka
org.springframework.cloud
spring-cloud-starter-feign
org.springframework.boot
spring-boot-starter-aop
org.springframework.boot
spring-boot-actuator
org.springframework.boot
spring-boot-starter-web
org.springframework.boot
spring-boot-devtools
true
org.projectlombok
lombok
1.18.6
```
#### 5.1.2 FeignClientConfig配置
FeignClient访问配置
```java
@Configuration
public class FeignClientConfig {
/**
* Feign 在远程调用失败后会进行重试。
* @return Retryer
*/
@Bean
public Retryer feignRetryer(){
return new Retryer.Default(100,SECONDS.toMillis(1),5);
}
}
```
#### 5.1.3 EurekaFeignClient配置
FeignClient访问方法
```java
@FeignClient(value = Constants.DEFAULT_EUREKA_CLIENT_NAME,
configuration = FeignClientConfig.class)
public interface EurekaFeignClient {
/**
* feign请求
* @param username 用户名称
* @return
*/
@GetMapping(value = "/hi/{username}")
String sayHiFromFeignEurekaClient(@PathVariable(value="username") String username);
}
```
### 5.2@FeignClient源码
```java
@Target(ElementType.TYPE) // 表明注解的作用目标在接口上
@Retention(RetentionPolicy.RUNTIME)//注解会在class字节码文件中存在,在运行时可以通过反射获取到
@Documented //说明该注解将被包含在javadoc中
// 用于创建声明式API接口,该接口是RESTful风格的
// Feign 被设计成插拔式的,可以注入其他组件和Feign一起使用
// 最典型的是如果Ribbon可用,Feign会和Ribbon结合进行负载均衡。
public @interface FeignClient {
/**
* 具有可选协议前缀的服务的名称
* 是被调用的服务的 Serviceld
*/
@AliasFor("name")
String value() default "";
/**
* 带有可选协议前缀的服务标识。 {@link #value()value}的同义词。
* @deprecated use {@link #name() name} instead
*/
@Deprecated
String serviceId() default "";
/**
* 带有可选协议前缀的服务标识. {@link #value() value}的同义词。
* 是被调用的服务的 Serviceld
*/
@AliasFor("value")
String name() default "";
/**
* 设置feign client的@Qualifier值。
*/
String qualifier() default "";
/**
* 绝对URL或可解析的主机名(协议是可选的)
*/
String url() default "";
/**
* 是否应该解码404s而不是抛出FeignExceptions
* 404 是被解码,还是抛异常。
*/
boolean decode404() default false;
/**
* 指明 FeignClient 配置类,默认的配置类为FeignClientsConfiguration
* 这个类注入默认的Decoder、Encoder和Constract等配置的Bean
* feign client的自定义@Configuration。
* 可以包含构成客户端的部分的override @Bean定义,
* 例如
* {@link feign.codec.Decoder},{@link feign.codec.Encoder},
* {@link feign.Contract}。
* @see FeignClientsConfiguration 默认值
*
* @see FeignClientsConfiguration for the defaults
*/
Class[] configuration() default {};
/**
* 配置熔断器的处理类
* 指定Feign客户端界面的后备类。回退类必须实现由此批注注释的接口,并且是有效的spring bean。
*/
Class fallback() default void.class;
/**
* 为指定的Feign客户端界面定义回退工厂。
* fallback工厂必须生成实现由{@link FeignClient}注释的接口的回退类的实例。
* 后备工厂必须是有效的spring bean。
*
* @see feign.hystrix.FallbackFactory for details.
*/
Class fallbackFactory() default void.class;
/**
* 所有方法级映射都使用的路径前缀。可以与@RibbonClient一起使用。
*/
String path() default "";
/**
* 是否将feign proxy 标记为主bean。默认为true。
*/
boolean primary() default true;
}
```
### 5.3 FeignClient配置
#### 5.3.1 [FeignClient配置类源码](https://cloud.spring.io/spring-cloud-static/spring-cloud-netflix/1.3.6.RELEASE/single/spring-cloud-netflix.html#spring-cloud-feign-overriding-defaults)
> A central concept in Spring Cloud’s Feign support is that of the named client.
> Spring Cloud的Feign支持的核心概念是指定客户端的概念。
> Each feign client is part of an ensemble of components that work together to contact a remote server on demand,
> 每个客户端都是组件集合的一部分,它们一起工作并且按需联系远程服务器,
> and the ensemble has a name that you give it as an application developer using the `@FeignClient` annotation.
> 这样的集合都有一个名称,应用程序开发人员可以使用`@FeignClient`注解来提供名称。
> Spring Cloud creates a new ensemble as an `ApplicationContext` on demand for each named client using `FeignClientsConfiguration`.
> Spring Cloud 根据ApplicationContext需要为每个命名客户端创建一个基于`FeignClientsConfiguration`创建新的集合
> This contains (amongst other things) an `feign.Decoder`, a `feign.Encoder`, and a `feign.Contract`.
> 这些包含`feign.Decoder`、 `feign.Encoder`和 `feign.Contract`
`FeignClient`默认的配置类是`FeignClientsConfiguration`,这个类在`spring-cloud-netflix.core`的jar包下。打开这个类,可以发现这个类注入了很多`Feign`相关的配置`Bean`,包括`FeignRetryer`、`FeignLoggerFactory`和`FormattingConversionService`等。Spring Cloud Netiflix默认为如下的bean提供默认的注入Bean类型:
* `Decoder`feignDecoder :( `ResponseEntityDecoder`包装一个`SpringDecoder`)
* `Encoder` feignEncoder: `SpringEncoder`
* `Logger` feignLogger: `Slf4jLogger`
* `Contract` feignContract: `SpringMvcContract`
* `Feign.Builder` feignBuilder: `HystrixFeign.Builder`
* `Client`feignClient:如果启用了Ribbon,则为`LoadBalancerFeignClient`,否则使用默认的feignClient。
`FeignClientsConfiguration`的配置类部分代码如下,`@ConditionalOnMissingBean`注解表示,如果没有注入该类的 Bean 会默认注入一个 Bean
```java
@Bean
@ConditionalOnMissingBean
public Decoder feignDecoder() {
return new ResponseEntityDecoder(new SpringDecoder(this.messageConverters));
}
@Bean
@ConditionalOnMissingBean
public Encoder feignEncoder() {
return new SpringEncoder(this.messageConverters);
}
@Bean
@ConditionalOnMissingBean
public Contract feignContract(ConversionService feignConversionService) {
return new SpringMvcContract(this.parameterProcessors, feignConversionService);
}
```
#### 5.3.2 [重写配置](https://cloud.spring.io/spring-cloud-static/spring-cloud-netflix/1.3.6.RELEASE/single/spring-cloud-netflix.html#spring-cloud-feign-overriding-defaults)
重写`FeignClientsConfiguration`类中的Bean覆盖掉默认的配置Bean ,从而达到自定义配置的目的。例如Feign默认的配置在请求失败后,重试次数为`Retryer.NEVER_RETRY`,即不重试。现在希望在请求失败后能够重试,这时需要写个配置FeignConfig类,在该类中注`Retryer`的Bean覆盖掉默认的`Retryer`的Bean,并将FeignConfig类定为FeignClient配置类FeignConfig类。
```java
@Configuration
public class FeignClientConfig {
/**
* Feign 在远程调用失败后会进行重试。
* @return Retryer
*/
@Bean
public Retryer feignRetryer(){
return new Retryer.Default(100,SECONDS.toMillis(1),5);
}
}
```
通过覆盖了默认的`Retryer`的Bean更改了该`FeignClient`请求失败重试的策略,重试问隔为 100 毫秒,最大重试时间为1秒,重试次数为5次。
### 5.4 Feign源码
`Feign`是一个伪Java Http客户端,`Feign`不做任何的请求处理。`Feign`通过处理注解生成`Request`,从而实现简化`HTTP API`开发的目的,即开发人员可以使用注解的方式定制`Request API`模板,在发送`Http Request`请求之前,`feign`通过处理注解的方式替换掉`Request `模板中的参数,这种实现方式显得更为直接、可理解。
`@EnableFeignClients`源码
```java
@Retention(RetentionPolicy.RUNTIME)
@Target({ElementType.TYPE})
@Documented
@Import({FeignClientsRegistrar.class})
public @interface EnableFeignClients {
String[] value() default {};
String[] basePackages() default {};
Class[] basePackageClasses() default {};
Class[] defaultConfiguration() default {};
Class[] clients() default {};
}
```
从`@EnableFeignClients`源码中可以看出,使用这个注解的时候,会将`FeignClientsRegistrar`这个类注入到IOC容器中,查看`FeignClientsRegistrar`的源码,发现这个类是用来动态加载Bean的(`ImportBeanDefinitionRegistrar`),注册方法是`registerBeanDefinitions`,在这个方法中就会有FeignClient默认配置加载、FeignClient的扫描与注册到IOC。
```java
@Override
public void registerBeanDefinitions(AnnotationMetadata metadata,
BeanDefinitionRegistry registry) {
// 默认配置FeignClientsConfiguration
registerDefaultConfiguration(metadata, registry);
// 包扫描
registerFeignClients(metadata, registry);
}
```
程序启动时,首先在启动配置上检查是否有`@EnableFeignClients`注解,如果有该注解,则开启包扫描,扫描被`@FeignClient`注解接口。代码如下:
#### 5.4.1 默认配置FeignClientsConfiguration处理
```java
private void registerDefaultConfiguration(AnnotationMetadata metadata,
BeanDefinitionRegistry registry) {
// 获取使用EnableFeignClients注解的类
Map defaultAttrs = metadata
.getAnnotationAttributes(EnableFeignClients.class.getName(), true);
// 如果有该注解
if (defaultAttrs != null && defaultAttrs.containsKey("defaultConfiguration")) {
String name;
if (metadata.hasEnclosingClass()) {
name = "default." + metadata.getEnclosingClassName();
}else {
name = "default." + metadata.getClassName();
}
// 注册FeignClient默认的FeignConfig
registerClientConfiguration(registry, name,defaultAttrs.get("defaultConfiguration"));
}
}
```
#### 5.4.2 包扫描
程序启动后通过包扫描,当类有@FeignClient注解,将注解的信息取出,连同类名一起取出,赋给BeanDefinitionBuilder,然后根据BeanDefinitionBuilder得到beanDefinition,最后beanDefinition式注入到ioc容器中,下面是获取需要扫描那些包的代码:
```java
public void registerFeignClients(AnnotationMetadata metadata,
BeanDefinitionRegistry registry) {
// 获取Scanner
ClassPathScanningCandidateComponentProvider scanner = getScanner();
// 设置Loader
scanner.setResourceLoader(this.resourceLoader);
Set basePackages;
// 获取使用EnableFeignClients注解的类
Map attrs = metadata
.getAnnotationAttributes(EnableFeignClients.class.getName());
// 指定注解过滤器 过滤使用@FeignClient的类
AnnotationTypeFilter annotationTypeFilter = new AnnotationTypeFilter(
FeignClient.class);
final Class[] clients = attrs == null ? null
: (Class[]) attrs.get("clients");
// 无客户端的时候
if (clients == null || clients.length == 0) {
// 设置过滤器
scanner.addIncludeFilter(annotationTypeFilter);
// 指定基础包 getBasePackages处理数据
basePackages = getBasePackages(metadata);
}
else { // 有客户端的时候
final Set clientClasses = new HashSet<>();
basePackages = new HashSet<>();
for (Class clazz : clients) {
basePackages.add(ClassUtils.getPackageName(clazz));
clientClasses.add(clazz.getCanonicalName());
}
AbstractClassTestingTypeFilter filter = new AbstractClassTestingTypeFilter() {
@Override
protected boolean match(ClassMetadata metadata) {
String cleaned = metadata.getClassName().replaceAll("\\$", ".");
return clientClasses.contains(cleaned);
}
};
scanner.addIncludeFilter(
new AllTypeFilter(Arrays.asList(filter, annotationTypeFilter)));
}
// 遍历基础包
for (String basePackage : basePackages) {
Set candidateComponents = scanner
.findCandidateComponents(basePackage);
for (BeanDefinition candidateComponent : candidateComponents) {
if (candidateComponent instanceof AnnotatedBeanDefinition) {
// verify annotated class is an interface
AnnotatedBeanDefinition beanDefinition = (AnnotatedBeanDefinition) candidateComponent;
AnnotationMetadata annotationMetadata = beanDefinition.getMetadata();
Assert.isTrue(annotationMetadata.isInterface(),
"@FeignClient can only be specified on an interface");
Map attributes = annotationMetadata
.getAnnotationAttributes(
FeignClient.class.getCanonicalName());
String name = getClientName(attributes);
// 注册FeignClient对应的FeignConfig到IOC容器中
registerClientConfiguration(registry, name,
attributes.get("configuration"));
// 注册FeignClient到IOC容器中
registerFeignClient(registry, annotationMetadata, attributes);
}
}
}
}
```
#### 5.4.2 Feign Client 对应的FeignConfig注册
registerClientConfiguration方法 注册FeignClient对应的FeignConfig,注册到IOC容器中
```java
private void registerClientConfiguration(BeanDefinitionRegistry registry, Object name,
Object configuration) {
BeanDefinitionBuilder builder = BeanDefinitionBuilder
.genericBeanDefinition(FeignClientSpecification.class);
builder.addConstructorArgValue(name);
builder.addConstructorArgValue(configuration);
// 注册配置文件
registry.registerBeanDefinition(
name + "." + FeignClientSpecification.class.getSimpleName(),
builder.getBeanDefinition());
}
```
#### 5.4.3 FeignClient注册
registerFeignClient方法,将取出的BeanDefinitionRegistry赋给BeanDefinitionBuilder,然后根据BeanDefinitionBuilder得到beanDefinition,最后beanDefinition式注入到ioc容器中
```java
private void registerFeignClient(BeanDefinitionRegistry registry,
AnnotationMetadata annotationMetadata, Map attributes) {
String className = annotationMetadata.getClassName();
BeanDefinitionBuilder definition = BeanDefinitionBuilder
.genericBeanDefinition(FeignClientFactoryBean.class);
validate(attributes);
definition.addPropertyValue("url", getUrl(attributes));
definition.addPropertyValue("path", getPath(attributes));
String name = getName(attributes);
definition.addPropertyValue("name", name);
definition.addPropertyValue("type", className);
definition.addPropertyValue("decode404", attributes.get("decode404"));
definition.addPropertyValue("fallback", attributes.get("fallback"));
definition.addPropertyValue("fallbackFactory", attributes.get("fallbackFactory"));
definition.setAutowireMode(AbstractBeanDefinition.AUTOWIRE_BY_TYPE);
String alias = name + "FeignClient";
AbstractBeanDefinition beanDefinition = definition.getBeanDefinition();
boolean primary = (Boolean)attributes.get("primary"); // has a default, won't be null
beanDefinition.setPrimary(primary);
String qualifier = getQualifier(attributes);
if (StringUtils.hasText(qualifier)) {
alias = qualifier;
}
BeanDefinitionHolder holder = new BeanDefinitionHolder(beanDefinition, className,new String[] { alias });
//beanDefinition式注入到ioc容器中
BeanDefinitionReaderUtils.registerBeanDefinition(holder, registry);
}
```
#### 5.4.4 Feign Client使用
在Feign Client使用的过程存在以下两个线:
* Client(接口) - Feign(抽象类) - ReflectiveFeign(实现类)。
* InvocationHandlerFactory(接口) - SynchronousMethodHandler(实现类)
注入bean之后,通过jdk的代理,当请求Feign Client的方法时会被拦截,代码在`ReflectiveFeign`类,代码如下:
```java
public T newInstance(Target target) {
Map nameToHandler = targetToHandlersByName.apply(target);
Map methodToHandler = new LinkedHashMap();
List defaultMethodHandlers = new LinkedList();
for (Method method : target.type().getMethods()) {
if (method.getDeclaringClass() == Object.class) {
continue;
} else if(Util.isDefault(method)) {
DefaultMethodHandler handler = new DefaultMethodHandler(method);
defaultMethodHandlers.add(handler);
methodToHandler.put(method, handler);
} else {
methodToHandler.put(method, nameToHandler.get(Feign.configKey(target.type(), method)));
}
}
InvocationHandler handler = factory.create(target, methodToHandler);
T proxy = (T) Proxy.newProxyInstance(target.type().getClassLoader(), new Class[]{target.type()}, handler);
for(DefaultMethodHandler defaultMethodHandler : defaultMethodHandlers) {
defaultMethodHandler.bindTo(proxy);
}
return proxy;
}
```
#### 5.4.5 生成RequestTemplate
在SynchronousMethodHandler类进行拦截处理,当被FeignClient的方法被拦截会根据参数生成RequestTemplate对象,该对象就是http请求的模板,代码如下:
```java
@Override
public Object invoke(Object[] argv) throws Throwable {
RequestTemplate template = buildTemplateFromArgs.create(argv);
Retryer retryer = this.retryer.clone();
while (true) {
try {
return executeAndDecode(template);
} catch (RetryableException e) {
retryer.continueOrPropagate(e);
if (logLevel != Logger.Level.NONE) {
logger.logRetry(metadata.configKey(), logLevel);
}
continue;
}
}
}
```
#### 5.4.5 使用client请求获取响应
其中有个executeAndDecode()方法,该方法是通RequestTemplate生成Request请求对象,然后根据用HTTP client获取response。即通过Http Client通过Http请求来获取响应
```java
Object executeAndDecode(RequestTemplate template) throws Throwable {
Request request = targetRequest(template);
if (logLevel != Logger.Level.NONE) {
logger.logRequest(metadata.configKey(), logLevel, request);
}
Response response;
long start = System.nanoTime();
try {
// 获取响应
response = client.execute(request, options);
// ensure the request is set. TODO: remove in Feign 10
response.toBuilder().request(request).build();
} catch (IOException e) {
if (logLevel != Logger.Level.NONE) {
logger.logIOException(metadata.configKey(), logLevel, e, elapsedTime(start));
}
throw errorExecuting(request, e);
}
//... 省略代码
}
```
### 5.5 Feign 使用HttpClient和OkHttp
从上面的代码中可以看出,`Client`是最终发送`Request`和接收`Response`的,在Feign中`Client`是一个接口,它有一个默认实现:`Client.Default`。`Client.Default`是通过`HttpURLConnection`来实现网络请求的,Feign的`Client`接口还支持`HttpClient`和`OkHttp`来实现网络请求。
在Spring Cloud Netflix中,Feign的配置信息是来自于`FeignRibbonClientAutoConfiguration`,
```java
//存在ILoadBalancer、Feign 执行这个Bean
@ConditionalOnClass({ILoadBalancer.class, Feign.class})
@Configuration //配置类
@AutoConfigureBefore({FeignAutoConfiguration.class}) //在FeignAutoConfiguration之前
// 导入HttpClientFeignLoadBalancedConfiguration、OkHttpFeignLoadBalancedConfiguration和DefaultFeignLoadBalancedConfiguration三个配置类,分别对应HttpClient、OKHttpClient和FeignRibbonClient
@Import({HttpClientFeignLoadBalancedConfiguration.class, OkHttpFeignLoadBalancedConfiguration.class, DefaultFeignLoadBalancedConfiguration.class})
public class FeignRibbonClientAutoConfiguration {
public FeignRibbonClientAutoConfiguration() {
}
@Bean
@Primary
@ConditionalOnMissingClass({"org.springframework.retry.support.RetryTemplate"})
public CachingSpringLoadBalancerFactory cachingLBClientFactory(SpringClientFactory factory) {
return new CachingSpringLoadBalancerFactory(factory);
}
@Bean
@Primary
@ConditionalOnClass(
name = {"org.springframework.retry.support.RetryTemplate"}
)
public CachingSpringLoadBalancerFactory retryabeCachingLBClientFactory(SpringClientFactory factory, LoadBalancedRetryPolicyFactory retryPolicyFactory) {
return new CachingSpringLoadBalancerFactory(factory, retryPolicyFactory, true);
}
@Bean
@ConditionalOnMissingBean
public Options feignRequestOptions() {
return LoadBalancerFeignClient.DEFAULT_OPTIONS;
}
}
```
上面代码中@Import中导入了三个配置类,分别对应HttpClient、OKHttpClient和默认的FeignRibbonClient,根据`feign.XXX.enabled`的参数值进行配置,选择使用不同的客户端实现。
* `HttpClientFeignLoadBalancedConfiguration`
* pom.xml
```xml
com.netflix.feign
feign-core
RELEASE
```
* application.yml
```yaml
feign:
httpclient:
enabled: true
```
也可以不设置,配置类上面设置:
```java
@ConditionalOnClass(ApacheHttpClient.class) // 类路径下有ApacheHttpClient则创建
@ConditionalOnProperty(value = "feign.httpclient.enabled", matchIfMissing = true) // 属性值默认为true
```
* `OkHttpFeignLoadBalancedConfiguration`
* pom.xml
```xml
com.netflix.feign
feign-okhttp
8.18.0
```
* application.yml
```yml
feign:
okhttp:
enabled: true
```
也可以不设置,配置类上面设置:
```java
@ConditionalOnClass(OkHttpClient.class)// 类路径下有OkHttpClient则创建
@ConditionalOnProperty(value = "feign.okhttp.enabled", matchIfMissing = true)// 属性值默认为true
```
* `DefaultFeignLoadBalancedConfiguration`
* 默认值
### 5.6 Feign Client负载均衡
在`FeignRibbonClientAutoConfiguration`类中配置了Client的类型,最终注入到容器的中实现类`LoadBalancerFeignClient`,即负载均衡客户端。查看LoadBalancerFeignClient类中的execute方法:
```java
@Override
public Response execute(Request request, Request.Options options) throws IOException {
try {
URI asUri = URI.create(request.url());
String clientName = asUri.getHost();
URI uriWithoutHost = cleanUrl(request.url(), clientName);
FeignLoadBalancer.RibbonRequest ribbonRequest = new FeignLoadBalancer.RibbonRequest(
this.delegate, request, uriWithoutHost);
IClientConfig requestConfig = getClientConfig(options, clientName);
// executeWithLoadBalancer就是通过负载均衡的方式执行网络请求
return lbClient(clientName).executeWithLoadBalancer(ribbonRequest,
requestConfig).toResponse();
}
catch (ClientException e) {
IOException io = findIOException(e);
if (io != null) {
throw io;
}
throw new RuntimeException(e);
}
}
```
`executeWithLoadBalancer`
```java
public T executeWithLoadBalancer(final S request, final IClientConfig requestConfig) throws ClientException {
RequestSpecificRetryHandler handler = getRequestSpecificRetryHandler(request, requestConfig);
// 创建LoadBalancerCommand
LoadBalancerCommand command = LoadBalancerCommand.builder()
.withLoadBalancerContext(this)
.withRetryHandler(handler)
.withLoadBalancerURI(request.getUri())
.build();
try {
// 由load balancer选出server进行异步网络调用
return command.submit(
new ServerOperation() {
@Override
public Observable call(Server server) {
// 计算出最终请求的url 实现负载均衡
URI finalUri = reconstructURIWithServer(server, request.getUri());
S requestForServer = (S) request.replaceUri(finalUri);
try {
return Observable.just(AbstractLoadBalancerAwareClient.this.execute(requestForServer, requestConfig));
}
catch (Exception e) {
return Observable.error(e);
}
}
})
.toBlocking()
.single();
} catch (Exception e) {
Throwable t = e.getCause();
if (t instanceof ClientException) {
throw (ClientException) t;
} else {
throw new ClientException(e);
}
}
}
```
在command.submit方法中有一个selectServer()方法,就是选择服务进行负载均衡的方法:
```java
private Observable selectServer() {
return Observable.create(new OnSubscribe() {
@Override
public void call(Subscriber next) {
try {
// 获取服务端
Server server = loadBalancerContext.getServerFromLoadBalancer(loadBalancerURI, loadBalancerKey);
next.onNext(server);
next.onCompleted();
} catch (Exception e) {
next.onError(e);
}
}
});
}
```
由上述代码可知 最终负载均衡交给 loadBancerContext 来处理,就是Ribbon来处理。
### 5.7 总结
总到来说,Feign的源码实现的过程如下:
- 首先通过@EnableFeignCleints注解开启FeignCleint的功能。只有这个注解存在,才会在程序启动时开启对@FeignClien 注解的包扫描
- 根据Feign的规则实现接口,并加@FeignCleint注解
- 程序启动后,会进行包扫描,扫描所有的@FeignCleint的注解的类,并将这些信息注入到ioc容器中。
- 当接口的方法被调用,通过jdk的代理,来生成具体的RequesTemplate模板对象
- Client(接口) - Feign(抽象类) - ReflectiveFeign(实现类)。
- InvocationHandlerFactory(接口) - SynchronousMethodHandler(实现类)
- 根据RequesTemplate再生成Http请求的Request
- Request对象交给Client去处理,其中Client可以是HttpUrlConnection、HttpClient和Okhttp
- 最后Client被封装到LoadBalanceClient类,这个类结合类Ribbon做到了负载均衡。
## 六、[Hysterix 熔断器](https://github.com/Netflix/Hystrix)
> 参考文档可以查看`https://www.cnblogs.com/yepei/p/7169127.html`
>
> 官方文档查看` https://github.com/Netflix/Hystrix`
### 6.1 什么是**Hysterix**
在一个分布式系统里,服务与服务之间的依赖错综复杂,许多依赖不可避免的会调用失败,比如超时、异常等,导致于依赖他们服务出现远程调用的线程阻塞。如何能够保证在一个依赖出问题的情况下,不会导致整体服务失败,这个就是Hystrix需要做的事情。Hystrix提供了熔断、隔离、Fallback、cache、监控等功能,能够在一个、或多个依赖同时出现问题时保证系统依然可用。Hystrix是通过隔离服务的访问点阻止联动故障的,并提供了故障解决方案,从而提高了整个系统的弹性
### 6.2Hysterix干什么的
在复杂的分布式系统中,可能有几十个服务相互依赖,这些服务由于某些原因,例如机房的不可靠性、网络服务商的不可 ,导致某个服务不可用。如果系统不隔离该不可用的服务,可能导致整个系统不可用。
例如,对于依赖 30 个服务的应用程序,每个服务的正常运行时间为 99.99% ,对于单个服务来说, 99.99% 的可用是非常完完美的。
99.99的30次方 = 99.7%的可正常运行时间和 0.3% 的不可用时间,那么 10 亿次请求中有 3000000次失败,实际的情况可能比这更糟糕。
如果不设计整个系统的韧性,即使所有依赖关系表现良好,单个服务只有 0.01% 的不可用,由于整个系统的服务相互依赖,最终对整个系统的影响是非常大的。
在微服务系统中,一个用户请求可能需要调用几个服务才能完成。如下图所示,在所有的服务都处于可用状态时,一个用户请求需要调用A、P、H和I服务。

当某一个服务,例如**服务I**,出现网络延迟或者故障时,即使**服务A**可用,由于**I服务**的不可用,整个用户请求会处于阻塞状态,并等待服务I的响应.

当**服务I**阻塞时,大多数服务器的线程池就出现阻塞(BLOCK),影响整个线上服务的稳定性.如下图:

在高并发的情况下,单个服务的延迟会导致整个请求都处于延迟状态,可能在几秒钟就使整个服务处于线程负载饱和的状态。
某个服务的单个点的请求故障会导致用户的请求处于阻塞状态,最终的结果就是整个服务的线程资源消耗殆尽。由于服务的依赖性,会导致依赖于该故障服务的其他服务也处于线程阻塞状态,最终导致这些服务的线程资源消耗殆尽 直到不可用,从而导致整个问服务系统都不可用,即雪崩效应。
为了防止雪崩效应,因而产生了熔断器模型。 Hystrix 是在业界表现非常好的 个熔断器模型实现的开源组件,它是 Spring Cloud 组件不可缺少的 部分。
### 6.3 Hysterix设计原则
总的来说, Hystrix 的设计原则如下。
* 防止单个服务的故障耗尽整个服务的 Servlet 容器(例如 Tomcat )的线程资源。
* 快速失败机制,如果某个服务出现了故障,则调用该服务的请求快速失败,而不是线程等待。
* 提供回退( fallback )方案,在请求发生故障时,提供设定好的回退方案。
* 使用熔断机制,防止故障扩散到其他服务。
* 提供熔断器的监控组件 Hystrix Dashboard ,可以实时监控熔断器的状态
### 6.4 工作机制
首先,当服务的某个 API 接口的失败次数在一定时间内小于设定的阀值时,熔断器处于关闭状态,该 API接口正常提供服务 。当该API 接口处理请求的失败次数大于设定的阀值时, Hystrix 判定该 API 接口出现了故障,打开
熔断器,这时请求该 API 接口会执行快速失败的逻辑(即 fallback回退的逻辑),不执行业务逻辑,请求的线程不会处于阻塞状态。处于打开状态的熔断器,一段段时间后会处于半打开状态,并将一定数量的请求执行正常逻辑。剩余的请求会执行快速失败,若执行正常逻辑的请求失败了,则熔断器继续打开;若成功了 ,则将熔断器关闭。这样熔断器就具有了自我修复的能力。
#### 6.1Hystrix如何解决依赖隔离
1:Hystrix使用命令模式HystrixCommand(Command)包装依赖调用逻辑,每个命令在单独线程中/信号授权下执行。
2:可配置依赖调用超时时间,超时时间一般设为比99.5%平均时间略高即可.当调用超时时,直接返回或执行fallback逻辑。
3:为每个依赖提供一个小的线程池(或信号),如果线程池已满调用将被立即拒绝,默认不采用排队.加速失败判定时间。
4:依赖调用结果分:成功,失败(抛出异常),超时,线程拒绝,短路。 请求失败(异常,拒绝,超时,短路)时执行fallback(降级)逻辑。
5:提供熔断器组件,可以自动运行或手动调用,停止当前依赖一段时间(10秒),熔断器默认错误率阈值为50%,超过将自动运行。
6:提供近实时依赖的统计和监控
Hystrix依赖的隔离架构,如下图:

## 七、Zuul网关
Zuul作为路由网关组件,在微服务架构中有着非常重要的作用,主要体现在以下6个方面。
- Zuul Ribbon以及Eureka相结合,可以实现智能路由和负载均衡的功能, Zuul能够 将请求流量按某种策略分发到集群状态的多个服务实例。
- 网关将所有服务的API接口统一聚合,并统一对外暴露。外界系统调用API接口时, 都是由网关对外暴露的API 接口,外界系统不需要知道微服务系统中各服务相互调用的复杂性。微服务系统也保护了其内部微服务单元的 API 接口 防止其被外界直接调用,导致服务的敏感信息对外暴露。
- 网关服务可以做用户身份认证和权限认证,防止非法请求操作API接口,对服务器起到保护作用。
- 网关可以实现监控功能,实时日志输出,对请求进行记录。
- 网关可以用来实现流量监控 在高流量的情况下,对服务进行降级。
- API接口从内部服务分离出来,方便做测试。
### 7.1 Zuul架构图
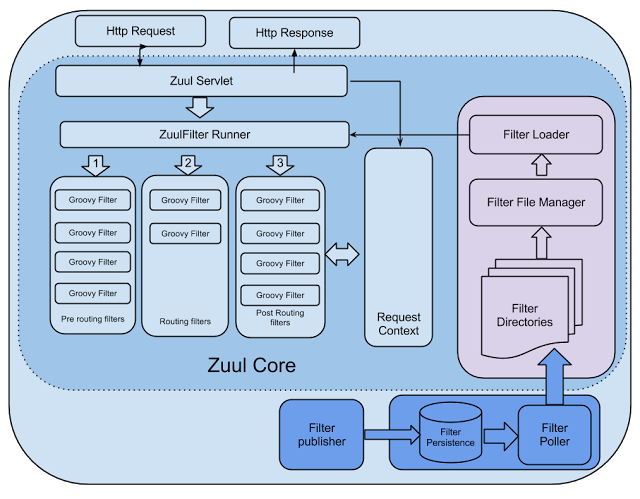
Zuul是通过Servlet来实现的,Zuul通过自定义的Zuu!Servlet(类似于 Spring MVC DispatcServlet)来对请求进行控制。 Zuul的核心是一些系列过滤器,可以在Http 请求的发起和响应返回期间执行一系列的过滤器。 Zuul种包括以下4种过滤器 :
- `PRE`过滤器:它是在请求路由到具体的服务之前执行的,这种类型的过滤器可以做安全验证,例如身份验证、 参数验证等。
- `ROUTING`过滤器 它用于将请求路由到具体的微服务 。在默认情况下,它使用`Http Client`进行网络请求。
- `POST`过滤器:它是在请求己被路由到微服务后执行的一般情况下,用作收集统计信息、指标,以及将响应传输到客户端
- `ERROR`过滤器:它是在其他过滤器发生错误时执行的
### 7.2 Zuul请求的生命周期
如图,该图详细描述了各种类型的过滤器的执行顺序。
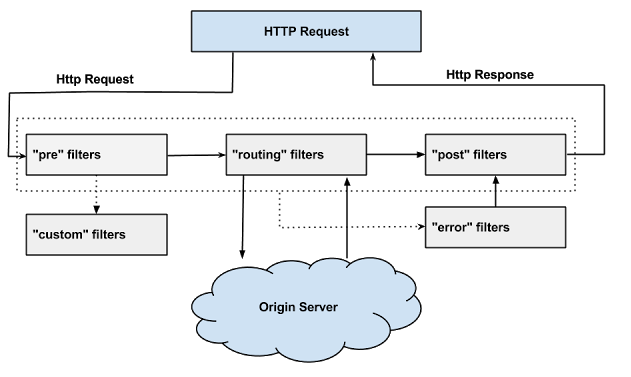
Zuul采取了动态读取、编译和运行这些过滤器。过滤器之间不能直接通信,而是通过RequestContext对象来共享数据,每个请求都会创建一个RequestContext对象。Zuul过滤器具有以下关键特性。
- Type (类型): Zuul 过滤器的类型,这个类型决定了过滤器在请求的哪个阶段起作用, 例如Pre、Post 阶段等。
- Execution Order(执行顺序):规定了过滤器的执行顺序, Order 的值越小,越先执行
- Criteria(标准): Filter执行所需的条件
- Action(行动): 如果符合执行条件,则执行action()即逻辑代码)
Zuul的核心是`ZuulServlet`,下面是service方法的代码:
```java
public class ZuulServlet extends HttpServlet {
// service方法
public void service(ServletRequest servletRequest, ServletResponse servletResponse) throws ServletException, IOException {
try {
this.init((HttpServletRequest)servletRequest, (HttpServletResponse)servletResponse);
RequestContext context = RequestContext.getCurrentContext();
context.setZuulEngineRan();
try {
// PRE过滤器
this.preRoute();
} catch (ZuulException var13) {
// ERROR过滤器
this.error(var13);
// POST过滤器
this.postRoute();
return;
}
try {
// ROUTING过滤器
this.route();
} catch (ZuulException var12) {
this.error(var12);
this.postRoute();
return;
}
try {
//POST过滤器
this.postRoute();
} catch (ZuulException var11) {
this.error(var11);
}
} catch (Throwable var14) {
this.error(new ZuulException(var14, 500, "UNHANDLED_EXCEPTION_" + var14.getClass().getName()));
} finally {
RequestContext.getCurrentContext().unset();
}
}
}
```
### 7.3 路由配置
```yaml
zuul:
routes:
# http://host:port/hiappi/
hiapi:
path: /hiapi/**
serviceId: eureka-client
# http://host:port/ribbonapi/
ribbonapi:
path: /ribbonapi/**
serviceId: eureka-ribbon
# http://host:port/feignapi/
feignapi:
path: /feignapi/**
serviceId: eureka-feign
```
在Zuul中在路由转发做了负载均衡,如果不需要做负载均衡,可以指定服务实例的URL,上面的路由配置修改为如下
```yaml
zuul:
routes:
# http://host:port/hiappi/
hiapi:
path: /hiapi/**
url: http://localhost:8762
```
一旦指定了URL,Zuul就不能做负载均衡,而是直接访问指定的URL,但是这种方法不是很可取,正常的修改方法是如下的
```yaml
zuul:
routes:
# http://host:port/hiappi/
hiapi:
path: /hiapi/**
serviceId: hiapi-v1
# Ribbon的负载均衡客户端不向Eureka Client获取服务注册信息
# TODO 但是需要自己维护一份注册列表,这个注册列表对应的服务名是`hiapi-v1`(名称可以自定义)
ribbon:
eureka:
enabled: false
# 自定义服务注册列表
hiapi-v1:
ribbon:
listOfServers: http://localhost:8762,http://localhost:8763
```
这样既可以实现自定义的服务端的负载均衡
### 7.4 版本号
如果想给每一个服务API接口家前缀,例如http://localhost:8500/v1/hiapi/hi?username=admin,即在所有的API接口上加上一个vl作为版本号。
这时需要用到`zuul.prefix`的配置
```yaml
zuul:
routes:
hiapi:
path: /hiapi/**
serviceId: eureka-client
ribbonapi:
path: /ribbonapi/**
serviceId: eureka-ribbon
feignapi:
path: /feignapi/**
serviceId: eureka-feign
# 版本号 访问的地址就是 http://localhost:8500/v1/hiapi/hi/admin
prefix: /v1
```
### 7.5 熔断器
Zuul作为Netflix组件,可以与Ribbon、Eureka、Hystrix等组件相结合,实现负载均衡、熔断器的功能。在默认情况下,Zuul和Ribbon结合实现了负载均衡的功能。
使用熔断器的话需要自行配置。
在Zuul实现熔断功能需要实现`ZuulFallbackProvider`(1.x)或者`FallbackProvider`(2.x)接口。实现该接口有两个方法,`getRoute()`方法,用于指定熔断功能应用于哪些路由的服务;
另外一个个方法`fallbackResponse()`为进入熔断功能时执行的逻辑。
```java
public interface FallbackProvider {
String getRoute();
ClientHttpResponse fallbackResponse(String route, Throwable cause);
}
```
#### 7.5.1 单服务熔断器
针对eureka-feign服务的熔断器,在eureka-feign请求服务出现故障的时候,进入熔断器,输出错误提示
```java
@Component
public class FeignApiHystrixFallbackProvider implements FallbackProvider {
@Override
public String getRoute() {
return "feignapi";
}
@Override
public ClientHttpResponse fallbackResponse(String route, Throwable cause) {
if (cause instanceof HystrixTimeoutException) {
return response(HttpStatus.GATEWAY_TIMEOUT);
} else {
return response(HttpStatus.INTERNAL_SERVER_ERROR);
}
}
private ClientHttpResponse response(final HttpStatus status) {
return new ClientHttpResponse() {
@Override
public HttpStatus getStatusCode() throws IOException {
return status;
}
@Override
public int getRawStatusCode() throws IOException {
return status.value();
}
@Override
public String getStatusText() throws IOException {
return status.getReasonPhrase();
}
@Override
public void close() {
}
@Override
public InputStream getBody() throws IOException {
return new ByteArrayInputStream("Feign Api fallback".getBytes());
}
@Override
public HttpHeaders getHeaders() {
HttpHeaders headers = new HttpHeaders();
headers.setContentType(MediaType.APPLICATION_JSON);
return headers;
}
};
}
}
```
修改`application.yml`
```yaml
#熔断机制超时
hystrix:
command:
# 与routes中对应,服务名称
feignapi:
excution:
timeout:
enabled: true
isolation:
thread:
timeout-in-milliseconds: 60000
# 配置失效时间
ribbon:
ReadTimeout: 60000
ConnectTimeout: 60000
```
#### 7.5.2 默认熔断器
```java
@Component
public class DefaultHystrixFallbackProvider implements FallbackProvider {
@Override
public String getRoute() {
return "*";
}
@Override
public ClientHttpResponse fallbackResponse(String route, Throwable cause) {
if (cause instanceof HystrixTimeoutException) {
return response(HttpStatus.GATEWAY_TIMEOUT);
} else {
return response(HttpStatus.INTERNAL_SERVER_ERROR);
}
}
private ClientHttpResponse response(final HttpStatus status) {
return new ClientHttpResponse() {
@Override
public HttpStatus getStatusCode() throws IOException {
return status;
}
@Override
public int getRawStatusCode() throws IOException {
return status.value();
}
@Override
public String getStatusText() throws IOException {
return status.getReasonPhrase();
}
@Override
public void close() {
}
@Override
public InputStream getBody() throws IOException {
Map resultMap = new HashMap<>(5);
resultMap.put("msg","Sorry, It's Error!");
resultMap.put("status", Constants.FAIL);
return new ByteArrayInputStream(JSON.toJSONString(resultMap).getBytes());
}
@Override
public HttpHeaders getHeaders() {
HttpHeaders headers = new HttpHeaders();
headers.setContentType(MediaType.APPLICATION_JSON);
return headers;
}
};
}
}
```
修改`application.yml`
```yaml
#熔断机制超时
hystrix:
command:
default:
excution:
timeout:
enabled: true
isolation:
thread:
timeout-in-milliseconds: 60000
# 配置失效时间
ribbon:
ReadTimeout: 60000
ConnectTimeout: 60000
```
#### 7.5.3 坑点
在访问服务的时候,如果服务不可访问,Zuul会报错,这个需要通过设置如下参数来修改
```yaml
zuul:
routes:
hiapi:
path: /hiapi/**
serviceId: eureka-client
ribbonapi:
path: /ribbonapi/**
serviceId: eureka-ribbon
feignapi:
path: /feignapi/**
serviceId: eureka-feign
# 版本号 访问的地址就是 http://localhost:8500/v1/hiapi/hi/admin
prefix: /v1
# TODO 报错解决 设置超时时间
host:
connect-timeout-millis: 60000
socket-timeout-millis: 60000
max-total-connections: 500
#熔断机制超时
hystrix:
command:
default:
excution:
timeout:
enabled: true
isolation:
thread:
timeout-in-milliseconds: 60000
# TODO 报错解决 配置失效时间
ribbon:
ReadTimeout: 60000
ConnectTimeout: 60000
```
### 7.6 过滤器
自定义过滤器,用于一些验证,比如token等,实现方法比较简单,只需要继承`ZuulFilter`即可,方法说明:
- `filterType` 过滤器的类型 PRE/POST/ROUTING/ERROR
- `filterOrder` 过滤顺序 值越小,越早执行该过滤器
- `shouldFilter` 过滤器是否执行过滤逻辑
- 如果为true,则执行run()方法
- 如果为 false ,则不执行run()方法
- `run()` 具体的过滤的逻辑
下面是一个TokenFilter,用于过滤Token
```java
@Component
public class TokenFilter extends ZuulFilter {
/**logger*/
private static final Logger logger = LoggerFactory.getLogger(TokenFilter.class);
/**
* filter Type
* 过滤器的类型
* @return PRE_TYPE
*/
@Override
public String filterType() {
return PRE_TYPE;
}
/**
* 过滤顺序
* 值越小,越早执行该过滤器
* @return
*/
@Override
public int filterOrder() {
return 0;
}
/**
* 过滤器是否执行过滤逻辑
* 如果为true,则执行run()方法;
* 如果为 false ,则不执行run()方法。
* @return
*/
@Override
public boolean shouldFilter() {
return true;
}
/**
* 具体的过滤的逻辑
* @return
* @throws ZuulException
*/
@Override
public Object run() throws ZuulException {
RequestContext ctx = RequestContext.getCurrentContext();
HttpServletRequest request = ctx.getRequest();
Object accessToken = request.getParameter(Constants.TOKEN_FLAG);
if(accessToken == null){
logger.warn("Token is empty");
ctx.setSendZuulResponse(false);
ctx.setResponseStatusCode(404);
try {
Map resultMap = new HashMap<>(5);
resultMap.put("msg","Token is empty!");
resultMap.put("status", Constants.FAIL);
ctx.getResponse().getWriter().write(JSON.toJSONString(resultMap));
} catch (IOException e) {
logger.error(e.getMessage());
}
return null;
}
logger.info("Validate Token is OK!");
return null;
}
}
```
### 7.7 Zuul 的常见使用方式
Zuul 是采用了类似于Spring MVC的DispatchServlet 来实现的,采用的是异步阻塞模型,所以性能比Ngnix差。由于Zuul和其他Netflix组件可以相互配合、无缝集成,Zuul 很容易就能够实现负载均衡、智能路由和熔断器等功能。在大多数情况下Zuul都是以集群的形式存在的。由于Zuul的横向扩展能力非常好,所以当负载过高时,可以通过添加实例来解决性瓶颈。
一种常见的使用方式是对不同的渠道使用不同的Zuul来进行路由,例如移动端共用一个Zuul网关实例,Web 端用另一个Zuul网关实例,其他的客户端用另外一个Zuul实例进行路由。这种不同的渠边用不同Zuul 实例的架构如图示。

另外一种种常见的集群是通过 Ngnix和Zuul相互结合来做负载均衡。暴露在最外面的是Ngnix从双热备进行 Keepalive, Ngnix 经过某种路由策略,将请求路由转发到 Zuul 集群上,最终将请求分发到具体的服务上。

## 八、Spring Cloud Config
分布式配置中心`Spring Cloud Config`,主要包含下面四个方面:
* `Config Server`从本地读取配置文件
* `Config Server`从远程`Git`仓库读取配置文件
* 搭建高可用`Config Server`集群
* 使用`Spring Cloud Bus`刷新配置
### 8.1 `Config Server`从本地读取配置文件
#### 8.1.1 `Config Server`
* `pom.xml`
```xml
org.springframework.cloud
spring-cloud-config-server
```
* `ConfigServerApplication` 启动类
```java
@SpringBootApplication
@EnableConfigServer
public class ConfigServerApplication {
public static void main(String[] args){
SpringApplication.run(ConfigServerApplication.class,args);
}
}
```
* `application.yml`
```yaml
server:
port: 8600
spring:
cloud:
config:
server:
从本地加载参数文件
native:
search-locations: classpath:/shared
profiles:
active: native
application:
name: config-server
```
* 在`src/main/resources`下面新建一个`shared`的文件夹,对应上面的参数`spring.cloud.config.server.native.search-locations`,然后创建一个`config-client-dev.yml`文件
`config-client-dev.yml`
```yaml
server:
port: 8100
foo: foo version 1.0.0
```
#### 8.1.2 `Config Client`
* `pom.xml`
```xml
org.springframework.cloud
spring-cloud-config-client
org.springframework.boot
spring-boot-starter-web
```
* `ConfigClientApplication`
```java
@SpringBootApplication
@RestController
public class ConfigClientApplication {
public static void main(String[] args){
SpringApplication.run(ConfigClientApplication.class,args);
}
@Value("${foo}")
private String foo;
@GetMapping(value = "hi")
public String foo(){
return foo;
}
}
```
* `bootstrap.yml`
```yaml
spring:
application:
# 服务名称
name: config-client
cloud:
config:
# 从url地址的Config Sever读取配置文件
uri: http://localhost:8600
# 如果没有读取没有成功,快速执行失败
fail-fast: false
# 指定配置文件为dev文件,
# 这个文件使用${spring.application.name}和${spring.profiles.active}构成文件名称,两者使用'-'连接
# 对于当前来说,这个对应于config server中的文件名称为config-client-dev.yml
profiles:
active: dev
```
### 8.2 `Config Server` 从远程Git仓库读取文件
#### 8.2.1 `Config Server`
* `application.yml`
```yaml
server:
port: 8600
spring:
cloud:
config:
server:
# 从本地加载参数文件
# native:
# search-locations: classpath:/shared
# profiles:
# active: native
# 从github获取
git:
uri: https://github.com/chensj881008/config.git
# 文件路径
search-paths: repos
username: chensj881008
password:
# 版本归属
label: master
application:
name: config-server
```
#### 8.2.2 `Config Client`
上面的信息不需要改变,启动项目,日志如下:
```bash
2019-04-27 17:15:27.652 INFO 16252 --- [)-192.168.222.1] c.c.c.ConfigServicePropertySourceLocator : Fetching config from server at : http://localhost:8600
2019-04-27 17:15:27.663 INFO 16252 --- [)-192.168.222.1] o.s.web.servlet.DispatcherServlet : Completed initialization in 13 ms
2019-04-27 17:15:30.062 INFO 16252 --- [)-192.168.222.1] c.c.c.ConfigServicePropertySourceLocator : Located environment: name=config-client, profiles=[dev], label=null, version=a2fa514d7ad9bdb28f41080e46731a771b266410, state=null
```
服务端日志如下:
```bash
2019-04-27 17:15:22.433 INFO 15112 --- [nio-8600-exec-1] o.s.c.c.s.e.NativeEnvironmentRepository : Adding property source: file:/C:/Users/chensj/AppData/Local/Temp/config-repo-6231340710909388449/repos/config-client-dev.yml
2019-04-27 17:15:30.058 INFO 15112 --- [nio-8600-exec-4] o.s.c.c.s.e.NativeEnvironmentRepository : Adding property source: file:/C:/Users/chensj/AppData/Local/Temp/config-repo-6231340710909388449/repos/config-client-dev.yml
```
出现下载配置文件的信息,即从Git上面获取配置文件
## 九、`Spring Cloud Sleuth`
微服务架构是一个分布式架构,它按业务划分服务单元,一个分布式系统往往有很多个服务单元。由于服务单元数量众多,业务的复杂性,如果出现了错误和异常,很难去定位。主要体现在,一个请求可能需要调用很多个服务,而内部服务的调用复杂性,决定了问题难以定位。所以微服务架构中,必须实现分布式链路追踪,去跟进一个请求到底有哪些服务参与,参与的顺序又是怎样的,从而达到每个请求的步骤清晰可见,出了问题,很快定位。
举个例子,在微服务系统中,一个来自用户的请求,请求先达到前端A(如前端界面),然后通过远程调用,达到系统的中间件B、C(如负载均衡、网关等),最后达到后端服务D、E,后端经过一系列的业务逻辑计算最后将数据返回给用户。对于这样一个请求,经历了这么多个服务,怎么样将它的请求过程的数据记录下来呢?这就需要用到服务链路追踪。
`Google`开源的`Dapper`链路追踪组件,并在2010年发表了论文《Dapper, a Large-Scale Distributed Systems Tracing Infrastructure》,这篇文章是业内实现链路追踪的标杆和理论基础,具有非常大的参考价值。
目前,链路追踪组件有`Google`的`Dapper`,`Twitter`的`Zipkin`,以及阿里的`Eagleeye` (鹰眼)等,它们都是非常优秀的链路追踪开源组件。
主要介绍如何在Spring Cloud Sleuth中集成Zipkin。在Spring Cloud Sleuth中集成Zipkin非常的简单,只需要引入相应的依赖和做相关的配置即可。
### 9.1 基本术语
Spring Cloud Sleuth采用的是Google的开源项目Dapper的专业术语。
- `Span`:基本工作单元,发送一个远程调度任务就会产生一个`Spa`n,`Span`是一个64位ID唯一标识的,`Trace`是用另一个64位ID唯一标识的,Span还有其他数据信息,比如摘要、时间戳事件、Span的ID、以及进度ID。
- `Trace`:一系列`Span`组成的一个树状结构。请求一个微服务系统的API接口,这个API接口,需要调用多个微服务,调用每个微服务都会产生一个新的`Span`,所有由这个请求产生的`Span`组成了这个`Trace`。
- `Annotation`:用来及时记录一个事件的,一些核心注解用来定义一个请求的开始和结束 。这些注解包括以下:
- `cs` - Client Sent:客户端发送一个请求,这个注解描述了这个Span的开始
- `sr` - Server Received:服务端获得请求并准备开始处理它,如果将其sr减去cs时间戳便可得到网络传输的时间。
- `ss` - Server Sent:(服务端发送响应)–该注解表明请求处理的完成(当请求返回客户端),如果ss的时间戳减去sr时间戳,就可以得到服务器请求的时间。
- `cr` - Client Received:(客户端接收响应)-此时Span的结束,如果cr的时间戳减去cs时间戳便可以得到整个请求所消耗的时间。
如果一个请求服务如下:

那么此时将Span和Trace在一个系统中使用Zipkin注解的过程图形化:

每个颜色的表明一个span(总计7个spans,从A到G),每个span有类似的信息
```bash
Trace Id = X
Span Id = D
Client Sent
```
此span表示span的Trance Id是X,Span Id是D,同时它发送一个Client Sent事件
spans 的parent/child关系图形化如下:

### 9.2 项目案例
项目构成分为四个部分:
* `cloud-eureka-server` `8000`
Eureka 服务注册中心
* `cloud-zipkin-server` `8700`
Eureka Client,Zipkin Server,链路追踪的服务中心,负责存储链路信息
* `cloud-user-service` `8800`
Eureka Client ,Zipkin Client
服务提供者,对外暴露API接口,也是一个链路追踪的客户端,负责产生链路数据,并上传给zipkin-server
* `cloud-gateway-service` `8900`
Eureka Client ,Zuul,Zipkin Client
服务网关,负责请求转换,同时也是一个链路追踪的客户端,负责产生链路数据,并上传给zipkin-server
#### 9.2.1 `cloud-eureka-server`
##### `pom.xml`
```xml
org.springframework.cloud
spring-cloud-starter-netflix-eureka-server
org.springframework.boot
spring-boot-devtools
true
org.springframework.boot
spring-boot-starter-test
test
```
##### `application.yml`
```yaml
server:
# 端口
port: 8000
eureka:
instance:
hostname: localhost
client:
# 本身为注册中心,不需要去检索服务信息
register-with-eureka: false
# 本身为注册中心,是否需要在注册中心注册,默认true 集群设置为true
fetch-registry: false
# 注册地址
service-url:
# 默认访问地址
defaultZone: http://${eureka.instance.hostname}:${server.port}/eureka
dashboard:
path: /eureka/server
spring:
application:
name: eureka-server
devtools:
restart:
enabled: true
additional-paths: src/main/java
```
##### `entry`
```java
@SpringBootApplication
@EnableEurekaServer
public class WinningEurekaServerApplication {
public static void main(String[] args) {
SpringApplication.run(WinningEurekaServerApplication.class, args);
}
}
```
#### 9.2.2 `cloud-zipkin-server`
> 从 Spring Cloud 2.1.x 开始,spring-cloud-starter-sleuth不在集成zipkin-server,注解`@EnableZipkinServer`将不能在使用,因此需要自行加入依赖`zipkin-server`和`zipkin-autoconfigure-ui`
##### `pom.xml`
```xml
org.springframework.cloud
spring-cloud-starter-netflix-eureka-client
io.zipkin.java
zipkin-server
${zipkin.version}
org.springframework.boot
spring-boot-starter-log4j2
io.zipkin.java
zipkin-autoconfigure-ui
${zipkin.version}
org.springframework.boot
spring-boot-starter-web
org.springframework.boot
spring-boot-starter-actuator
```
##### `application.yml`
```yaml
server:
port: 8700
eureka:
client:
service-url:
### 注册中心地址
defaultZone: http://localhost:8000/eureka
### 需要将服务注册到注册中心
register-with-eureka: true
### 检索服务信息
fetch-registry: true
# 注册区域,AWS使用
region: ch-east-1
healthcheck:
# 健康检查 开启 启用客户端运行状况检查可以修改server端运行状态
enabled: true
instance:
hostname: localhost
# 主页下面三个参数,是客户端发布给服务端
# 主界面
homePageUrl: https://${eureka.instance.hostname}:${server.port}/
# 服务名称(服务注册到eureka名称)--服务注册到注册中心的名称
spring:
application:
name: zipkin-server
devtools:
restart:
# 热部署生效
enabled: true
# 设置重启的目录
additional-paths: src/main/java
# 监控配置
management:
#server:
# 监控服务页面端口
#port: 8088
endpoints:
web:
# 默认监控前缀
# base-path: /monitor
exposure:
# 包含端点
include: "*"
# 单个端点设置
endpoint:
shutdown:
enabled: false
# 解决zipkin server UI报错问题
metrics:
web:
server:
auto-time-requests: false
info:
app:
encoding: UTF-8
java:
source: 1.8
target: 1.8
head: ${spring.application.name}
body: Welcome, this is ${spring.application.name} @ ${server.port}
```
##### `entry`
```java
@SpringBootApplication
@EnableEurekaClient
@EnableZipkinServer
public class ZipkinServerApplication {
public static void main(String[] args){
SpringApplication.run(ZipkinServerApplication.class,args);
}
}
```
#### 9.2.3 `cloud-user-service`
##### `pom.xml`
```xml
org.springframework.cloud
spring-cloud-starter-netflix-eureka-client
org.springframework.cloud
spring-cloud-starter-zipkin
org.springframework.boot
spring-boot-starter-web
org.springframework.boot
spring-boot-starter-actuator
```
##### `application.yml`
```yaml
server:
port: 8800
eureka:
client:
service-url:
### 注册中心地址
defaultZone: http://localhost:8000/eureka
### 需要将服务注册到注册中心
register-with-eureka: true
### 检索服务信息
fetch-registry: true
# 注册区域,AWS使用
region: ch-east-1
healthcheck:
# 健康检查 开启 启用客户端运行状况检查可以修改server端运行状态
enabled: true
instance:
hostname: localhost
# 主页下面三个参数,是客户端发布给服务端
# 主界面
homePageUrl: https://${eureka.instance.hostname}:${server.port}/
# 服务名称(服务注册到eureka名称)--服务注册到注册中心的名称
spring:
application:
name: user-service
devtools:
restart:
# 热部署生效
enabled: true
# 设置重启的目录
additional-paths: src/main/java
zipkin:
# zipkin server 地址
base-url: http://localhost:8700
sleuth:
sampler:
# 链路上传的概率
probability: 1.0
percentage: 1.0
# 监控配置
management:
#server:
# 监控服务页面端口
#port: 8088
endpoints:
web:
# 默认监控前缀
# base-path: /monitor
exposure:
# 包含端点
include: "*"
# 单个端点设置
endpoint:
shutdown:
enabled: false
info:
app:
encoding: UTF-8
java:
source: 1.8
target: 1.8
head: ${spring.application.name}
body: Welcome, this is ${spring.application.name} @ ${server.port}
```
##### `entry`
```java
@SpringBootApplication
@EnableEurekaClient
public class UserServiceApplication {
public static void main(String[] args){
SpringApplication.run(UserServiceApplication.class,args);
}
}
```
#### 9.2.4 `cloud-gateway-service`
##### `pom.xml`
```xml
org.springframework.cloud
spring-cloud-starter-netflix-eureka-client
org.springframework.cloud
spring-cloud-starter-zipkin
org.springframework.cloud
spring-cloud-starter-netflix-zuul
org.springframework.boot
spring-boot-starter-web
org.springframework.boot
spring-boot-starter-actuator
```
##### `application.yml`
```yaml
server:
port: 8900
eureka:
client:
service-url:
### 注册中心地址
defaultZone: http://localhost:8000/eureka
### 需要将服务注册到注册中心
register-with-eureka: true
### 检索服务信息
fetch-registry: true
# 注册区域,AWS使用
region: ch-east-1
healthcheck:
# 健康检查 开启 启用客户端运行状况检查可以修改server端运行状态
enabled: true
instance:
hostname: localhost
# 主页下面三个参数,是客户端发布给服务端
# 主界面
homePageUrl: https://${eureka.instance.hostname}:${server.port}/
# 服务名称(服务注册到eureka名称)--服务注册到注册中心的名称
spring:
application:
name: gateway-service
devtools:
restart:
# 热部署生效
enabled: true
# 设置重启的目录
additional-paths: src/main/java
zipkin:
# zipkin server 地址
base-url: http://localhost:8700
sleuth:
sampler:
# 链路上传的概率
probability: 1.0
percentage: 1.0
# 监控配置
management:
#server:
# 监控服务页面端口
#port: 8088
endpoints:
web:
# 默认监控前缀
# base-path: /monitor
exposure:
# 包含端点
include: "*"
# 单个端点设置
endpoint:
shutdown:
enabled: false
info:
app:
encoding: UTF-8
java:
source: 1.8
target: 1.8
head: ${spring.application.name}
body: Welcome, this is ${spring.application.name} @ ${server.port}
zuul:
routes:
hiapi:
path: /user-api/**
serviceId: user-service
# 设置超时时间
host:
connect-timeout-millis: 60000
socket-timeout-millis: 60000
max-total-connections: 500
# 配置失效时间
ribbon:
ReadTimeout: 60000
ConnectTimeout: 60000
```
##### `entry`
```java
@SpringBootApplication
@EnableEurekaClient
@EnableZuulProxy
public class GatewayServiceApplication {
public static void main(String[] args){
SpringApplication.run(GatewayServiceApplication.class,args);
}
}
```
#### 9.2.5 项目启动
* 按照`cloud-eureka-server`、`cloud-zipkin-server`、`cloud-user-service`、`cloud-gateway-service`分别启动项目。
* 在浏览器或者postman发送Get请求`localhost:8900/user-api/hi`,然后就可以在`http://localhost:8700/zipkin`中查看到数据

### 9.3 整合使用
#### 9.3.1 添加自定义数据
在gateway-service中添加过滤器继承`ZuulFilter`
```java
@Component
public class AuthTokenFilter extends ZuulFilter {
/** logger */
private static final Logger logger = LoggerFactory.getLogger(AuthTokenFilter.class);
@Autowired
private Tracer tracer;
@Override
public String filterType() {
return PRE_TYPE;
}
@Override
public int filterOrder() {
return 900;
}
@Override
public boolean shouldFilter() {
return true;
}
@Override
public Object run() throws ZuulException {
Span currentSpan = this.tracer.currentSpan();
// 向当前的span中添加tag
currentSpan.tag("operator","chensj");
// 输出 TraceId
logger.info(this.tracer.currentSpan().context().traceIdString());
return null;
}
}
```
#### 9.3.2 使用RabbitMQ传输链路数据
##### 9.3.2.1 工程
参见`winning-spring-sleuth-rabbit`
#### 9.3.3 使用MySQL存储链路数据
[参考文档](https://github.com/apache/incubator-zipkin/tree/master/zipkin-storage/mysql-v1)
暂不处理
#### 9.3.4 使用ElasticSearch存储链路数据
暂不处理
## 十、微服务监控
Spring Boot Admin用于管理和监控一个或者多个Spring Boot程序。Spring Boot Admin分为Server 端和 Client 端,Client端可以通过Http向Server端注册,也可以结合 Spring Cloud 的服务注册组件 Eureka 进行注册。Spring Boot Admin 提供了用 AngularJs 写的Ul界面,用于管理和监控。其中监控内容包括 Spring Boot 的监控组件Actuator的各个Http节点,也支持更高级的功能,包括Turbine、Jmx、Loglevel 等。
本章以案例的形式来讲解 Spring Boot Admin 主要包括以下的内容。
* 使用 Spring Boot Admin 监控 Spring Cloud 微服务
* Spring Boot Admin 集成Turbine,聚合监控微服务系统中熔断器的状况。
* Spring Boot Admin 集成Security安全登录界面。
[2.1.0官方文档](http://codecentric.github.io/spring-boot-admin/2.1.0/)
[最新版本官方文档](http://codecentric.github.io/spring-boot-admin/current/)
### 10.1 构建Admin Server