# vue3-echarts-demo
**Repository Path**: code_from_qh/vue3-echarts-demo
## Basic Information
- **Project Name**: vue3-echarts-demo
- **Description**: 在 vue3 中使用 echarts 的 demo
- **Primary Language**: JavaScript
- **License**: MIT
- **Default Branch**: master
- **Homepage**: None
- **GVP Project**: No
## Statistics
- **Stars**: 1
- **Forks**: 0
- **Created**: 2023-02-09
- **Last Updated**: 2024-07-24
## Categories & Tags
**Categories**: Uncategorized
**Tags**: None
## README
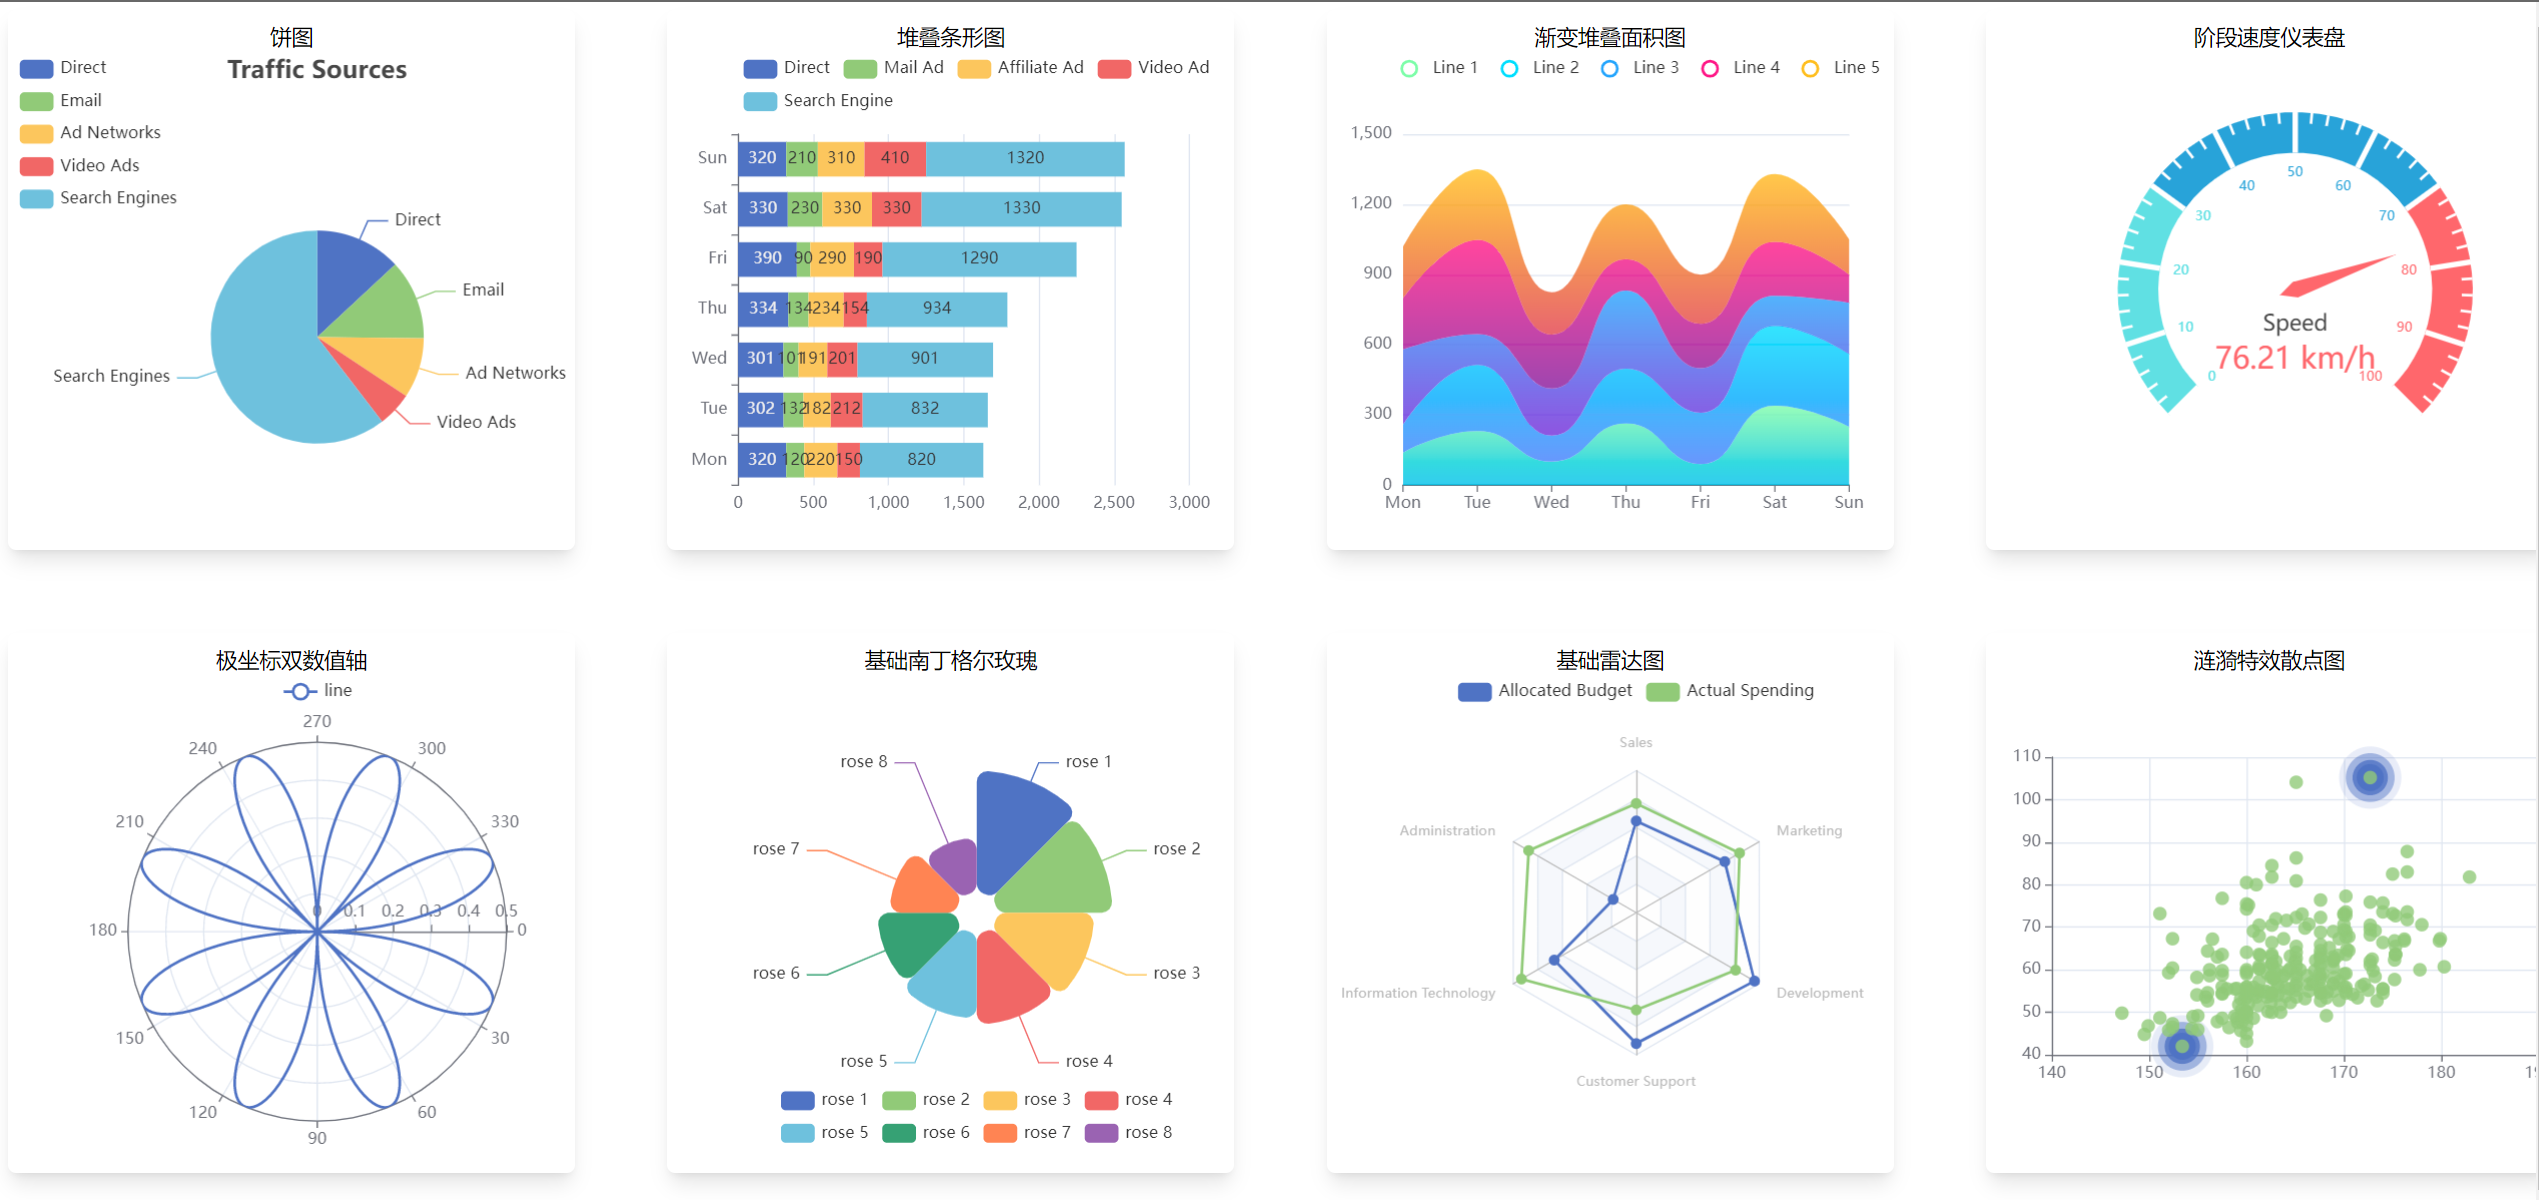
# Vue 3+ECharts Demo
一个 Vue 3+ECharts 的 Demo, 效果如下:
## [项目初始化](https://cn.vitejs.dev/guide/)
```bash
> npm create vite@latest
```
## 该项目主要用到的库
- echarts
- tailwindcss
- normalize.css
- vue-router
- NaiveUI
- VueX
安装方式如下:
1. 安装 echarts
```bash
> npm install echarts
```
2. [安装 tailwindcss](https://www.tailwindcss.cn/docs/guides/vue-3-vite)
```bash
npm install -D tailwindcss@latest postcss@latest autoprefixer@latest
npx tailwindcss init -p
```
创建 `index.css` 文件
```css
@tailwind base;
@tailwind components;
@tailwind utilities;
```
在 `main.js` 中进行引用
```bash
import { createApp } from 'vue'
import App from './App.vue'
import './index.css'
createApp(App).mount('#app')
```
3. [安装](`https://github.com/necolas/normalize.css`) `normalize.css`
```bash
> npm install --save normalize.css
```
4. [安装 `vue-router`](https://router.vuejs.org/zh/installation.html)
```bash
> npm install vue-router@4
```
## 组件中 Echarts 图表的使用
```Html
```
其中 `option` 数据可单独包存在一个 js 文件中,也可以直接插入到组件代码中,如下:
```html
```
## 增加了登录功能

输入用户名 admin 与密码 1234 将跳转至主界面
# Bug
- ~~edge 浏览器死活加载不出来,但是 Firefox 浏览器能 (终究是被我解决了)~~
- 登录功能东拼西凑勉强有效果,但是受限于个人能力,代码写的及其丑陋,并且存在严重的逻辑漏洞,需要在后面完善
# 2 月 15 日更新
1. home 界面重构,增加了退出登录按钮
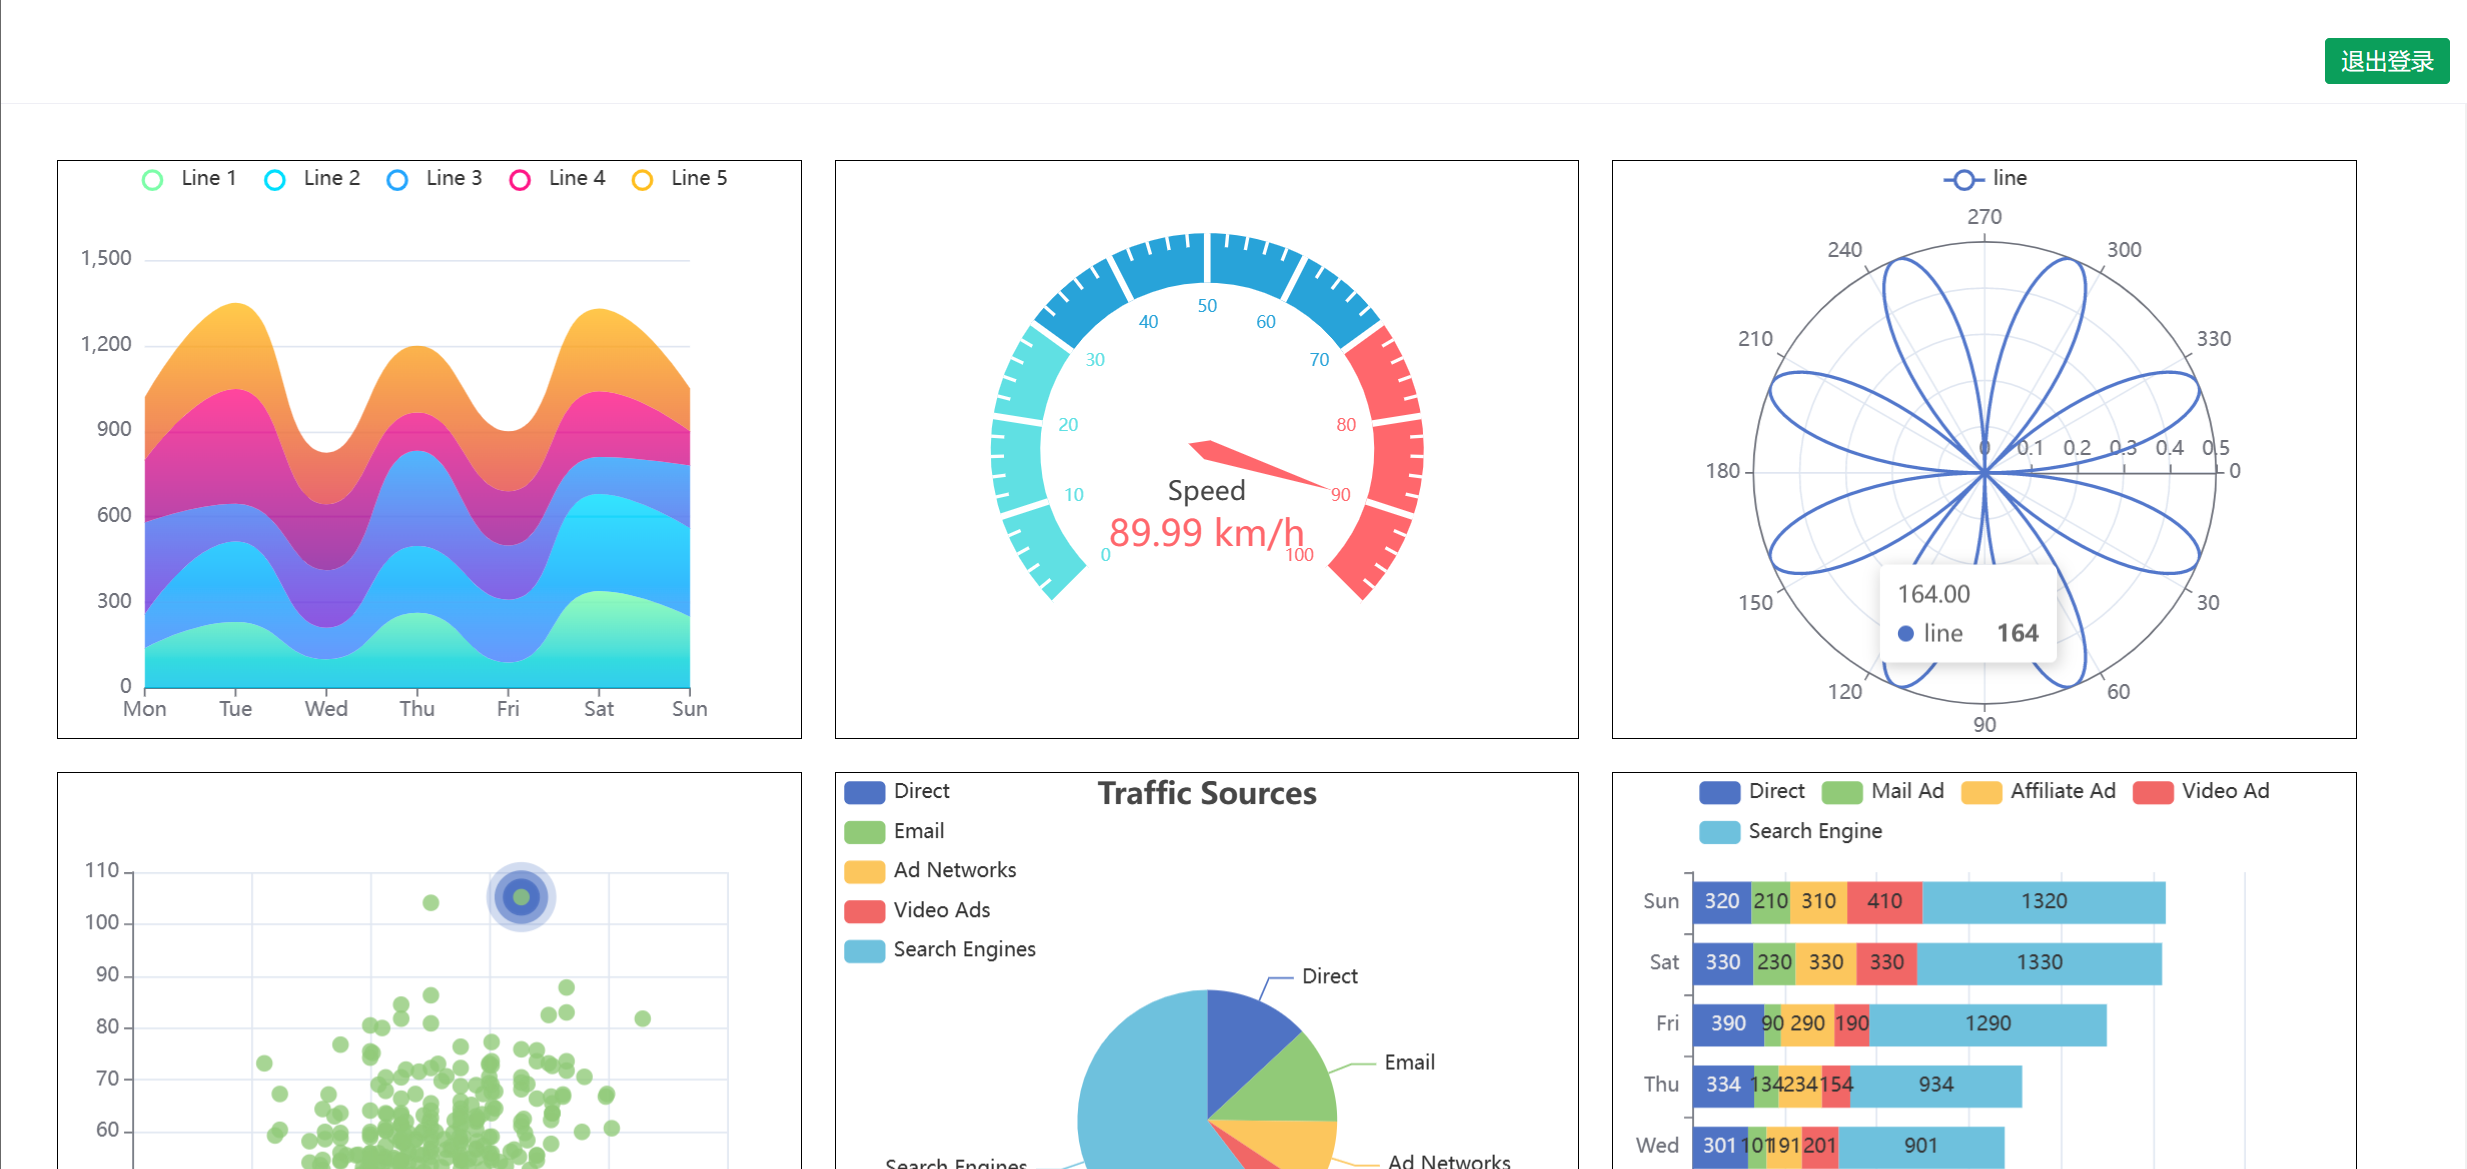
# 2 月 16 日更新
增加了 Side Menu,新的 demo 如下:
# 文件上传下载功能
## 前端代码
文件上传:
```html
上传文件
```
文件下载:
```javascript
function handleDownload(file) {
console.log(file.name);
downloadFile(file.name).then((res) => {
if (res.status == 200) {
// 文件下载功能
const blob = new Blob([res.data]);
const downloadElement = document.createElement("a");
const href = window.URL.createObjectURL(blob);
downloadElement.href = href;
downloadElement.download = file.name;
document.body.appendChild(downloadElement);
downloadElement.click();
document.body.removeChild(downloadElement);
window.URL.revokeObjectURL(href);
message.success(`下载成功:${file.name}`);
}
});
}
```
# 界面布局
# 消息弹窗&对话框
1. 修改 `App.vue`文件如以下格式:
```javascript
```
其中最终要的是在 代码中添加 `` 标签与 `` 标签
2. 添加完成之后就可以在任意界面中进行使用了,实例如下:
```javascript
警告
```
# Bug
- ~~上传带有中文文件名的文件会乱码~~
> ~~听说用 `decodeURI()` 可以解决~~
> 主要是后台的原因,修改 `mock/index.js`代码如下:
```javascript
let uploading = multer({
dest: "./mock/upload",
// 设定限制,每次最多上传1个文件,文件大小不超过1MB
limits: { fileSize: 10000000, files: 1 },
fileFilter(req, file, callback) {
// 解决中文名乱码的问题
// latin1 是一种编码格式
file.originalname = Buffer.from(file.originalname, "latin1").toString(
"utf8"
);
callback(null, true);
},
})
```
- 文件上传后页面中的文件列表在网页刷新后会消失
# 利用 Git 将项目 down 下来
> 当然也可以直接下载压缩包
1. 一台新的PC需要先安装 [Git](https://git-scm.com/download/win)
2. 将项目forck到你的账户下
3. 在 设置->安全设置 添加生成的 ssh 公钥
4. 将项目克隆下来 `git clone git@gitee.com:code_from_qh/vue3-echarts-demo.git`
5. 用如下命令配置 git 的用户名与邮箱
```bash
git config --global user.email "you@example.com"
git config --global user.name "Your Name"
```
4. 利用 Vscode 内置的 Source Control 功能暂存、提交与同步代码
# 如何将代码跑起来
1. 安装 [Node.js](https://nodejs.org/en)
2. 将项目下的 `package-lock.json`文件与`node_modules`文件夹删除(根目录下和/mock/目录下都有)
3. 在根目录下和/mock/目录下分别执行 `cnpm install`
4. 在 Terminal 中执行命令 `npm run dev`
> cnpm 的安装方式:`npm install cnpm -g --registry=https://registry.npm.taobao.org`