# SpringBoot-Redis作为二级缓存整合的基本Demo
**Repository Path**: fengzxia/spring-boot-redis-cache
## Basic Information
- **Project Name**: SpringBoot-Redis作为二级缓存整合的基本Demo
- **Description**: No description available
- **Primary Language**: Java
- **License**: Not specified
- **Default Branch**: master
- **Homepage**: None
- **GVP Project**: No
## Statistics
- **Stars**: 3
- **Forks**: 1
- **Created**: 2019-04-11
- **Last Updated**: 2023-07-13
## Categories & Tags
**Categories**: Uncategorized
**Tags**: None
## README
# SpringBoot+Redis作为二级缓存整合
## 一、redis简介
### 1、概述
Redis 是一个高性能的key-value数据库。 redis的出现,很大程度补偿了memcached这类key/value存储的不足,在部 分场合可以对关系数据库起到很好的补充作用。它提供了Java,C/C++,C#,PHP,JavaScript,Perl,Object-C,Python,Ruby,Erlang等客户端,使用很方便。
### 2、优点
1. 数据操作全在内存,读写性能强。
2. 数据结构丰富,支持string,hash,list,set及zset(sorted set)。
3. 支持主从复制,以及数据持久化等
## 二、redis的搭建
### 1、安装
按顺序执行如下命令:
```
wget http://download.redis.io/releases/redis-5.0.4.tar.gz
tar xzf redis-5.0.4.tar.gz
cd redis-5.0.4
make
make install
```
### 2、测试
开启服务
```
redis-server
```
启动客户机交互测试,默认6379端口,没有密码
```
redis-cli -p 6379
127.0.0.1:6379> set k1 k2
OK
127.0.0.1:6379> get k1
"k2"
127.0.0.1:6379>
```
## 三、基本环境配置
#### 1、pom依赖
```xml
1.8
UTF-8
2.0.0
org.springframework.boot
spring-boot-starter-cache
org.springframework.boot
spring-boot-starter-data-redis
org.springframework.boot
spring-boot-starter-thymeleaf
org.springframework.boot
spring-boot-starter-web
org.mybatis.spring.boot
mybatis-spring-boot-starter
${mybatis.version}
mysql
mysql-connector-java
runtime
org.springframework.boot
spring-boot-starter-test
test
org.projectlombok
lombok
```
#### 2、yml配置
```
server:
port: 80
spring:
http:
encoding:
charset: UTF-8
cache:
type: redis
redis:
host: 127.0.0.1
port: 9455
password: 123456
datasource:
driver-class-name: com.mysql.jdbc.Driver
username: root
password: root
url: jdbc:mysql://127.0.0.1:3306/redis-cache?useSSL=false
logging:
level:
com.lx: debug
```
#### 3、测试连接
```java
package com.lx;
import org.junit.Test;
import org.junit.runner.RunWith;
import org.springframework.beans.factory.annotation.Autowired;
import org.springframework.boot.test.context.SpringBootTest;
import org.springframework.data.redis.core.StringRedisTemplate;
import org.springframework.test.context.junit4.SpringRunner;
@RunWith(SpringRunner.class)
@SpringBootTest
public class RediscacheApplicationTest {
@Autowired
private StringRedisTemplate stringRedisTemplate;
@Test
public void contextLoads() {
stringRedisTemplate.opsForValue().set("k1", "v1");
System.out.println(stringRedisTemplate.opsForValue().get("k1"));
}
}
```
## 四、三个基本缓存注解
#### 1、@Cacheable
* `@Cacheable`可以标记在一个方法上,也可以标记在一个类上。当标记在一个方法上时表示该方法是支持缓存的,当标记在一个类上时则表示该类所有的方法都是支持缓存的。对于一个支持缓存的方法,Spring会在其被调用后将其返回值缓存起来,以保证下次利用同样的参数来执行该方法时可以直接从缓存中获取结果,而不需要再次执行该方法。
* 判断缓存中如果存在则直接获取,不存在则新增
#### 2、@CachePut
* `@CachePut`可以声明一个方法支持缓存功能。与`@Cacheable`不同的是使用`@CachePut`标注的方法在执行前不会去检查缓存中是否存在之前执行过的结果,而是每次都会执行该方法,并将执行结果以键值对的形式存入指定的缓存中。
* 不判断是否新增,每次都将查询到的数据存入缓存中
#### 3、@CacheEvict
* `@CacheEvict`是用来标注在需要清除缓存元素的方法或类上的。当标记在一个类上时表示其中所有的方法的执行都会触发缓存的清除操作。`@CacheEvict`可以指定的属性有`value、key、condition、allEntries和beforeInvocation`。
* 每次执行都会删除指定的缓存
#### 三者共有属性
* **value(cacheName)**
`@Cacheable、@CachePut`标注时表示生成的缓存的名称,`@CacheEvict`标注时表示将要清空的缓存的名称。
* **key**
在同一名称(类别)下的缓存,需要唯一的key值来标识唯一的缓存,如未指定则会使用默认策略生成的key。
* **condition**
表示缓存操作发生的条件。
#### @CacheEvict的allEntries和beforeInvocation属性
* **allEntries**
allEntries是boolean类型,表示是否需要清除同一名称的缓存中的所有元素。默认为false,表示不需要。当指定了allEntries为true时,Spring Cache将忽略指定的key,清除所有同一名称的缓存。
* **beforeInvocation**
清除操作默认是在对应方法成功执行之后触发的,即方法如果因为抛出异常而未能成功返回时也不会触发清除操作。使用beforeInvocation可以改变触发清除操作的时间,当我们指定该属性值为true时,Spring会在调用该方法之前清除缓存中的指定元素。
#### 实例
```java
@Cacheable(cacheNames = "User", key = "#userId")
@GetMapping("/testCacheable/{userId}")
public User testCacheable(@PathVariable("userId") Integer userId) {
//方法体
}
```
## 五、demo地址
> https://gitee.com/fengzxia/spring-boot-redis-cache
实体类等内容不再展示, 这里只展示使用缓存注解的controller代码
```java
package com.lx.controller;
import com.lx.dao.UserDao;
import com.lx.entity.User;
import org.springframework.beans.factory.annotation.Autowired;
import org.springframework.cache.annotation.CacheEvict;
import org.springframework.cache.annotation.CachePut;
import org.springframework.cache.annotation.Cacheable;
import org.springframework.web.bind.annotation.GetMapping;
import org.springframework.web.bind.annotation.PathVariable;
import org.springframework.web.bind.annotation.PostMapping;
import org.springframework.web.bind.annotation.RestController;
/**
* 用户操作
*
* @author 段誉
* @create 2019-04-11 9:52
*/
@RestController
public class UserController {
@Autowired
private UserDao userDao;
@PostMapping("user")
public String userAdd(User user) {
return userDao.userInsert(user) != 0 ? "success" : "fail";
}
/**
* @desc 测试CachePut注解
* 缓存名字为"User","userId"作为key
* @Author 段誉
* @Date 2019/4/11 9:56
* @method
*/
@Cacheable(cacheNames = "User", key = "#userId")
@GetMapping("/testCacheable/{userId}")
public User testCacheable(@PathVariable("userId") Integer userId) {
return userDao.userQuery(userId);
}
/**
* @desc 缓存名字为"User","userId"作为key
* @Author 段誉
* @Date 2019/4/11 9:56
* @method
*/
@CachePut(cacheNames = "User", key = "#userId")
@GetMapping("/testCachePut/{userId}")
public User testCachePut(@PathVariable("userId") Integer userId) {
return userDao.userQuery(userId);
}
/**
* @desc 测试CacheEvict注解清空指定用户缓存
* @Author 段誉
* @Date 2019/4/11 9:56
* @method
*/
@CacheEvict(cacheNames = "User", key = "#userId")
@GetMapping("/testCacheEvict/{userId}")
public String testCacheEvict(@PathVariable("userId") Integer userId) {
return "cache for " + userId + " has been flushed";
}
/**
* @desc 测试CacheEvict注解的allEntries属性清空所有用户缓存
* @Author 段誉
* @Date 2019/4/11 9:56
* @method
*/
@CacheEvict(cacheNames = "User", allEntries = true)
@GetMapping("/testAllEntries")
public String testAllEntries() {
return "All caches have been flushed";
}
}
```
* **需要在`Application.class`类上添加`@EnableCaching`注解后才能使配置的缓存生效**
## 六、CacheManager的定制
### 1、未定制前
当我们使用引入redis的starter时,容器中默认使用的是`RedisCacheManager`。它在操作redis时使用的是`RedisTemplate`,默认采用JDK的序列化机制,例如redis中查看用户的缓存:
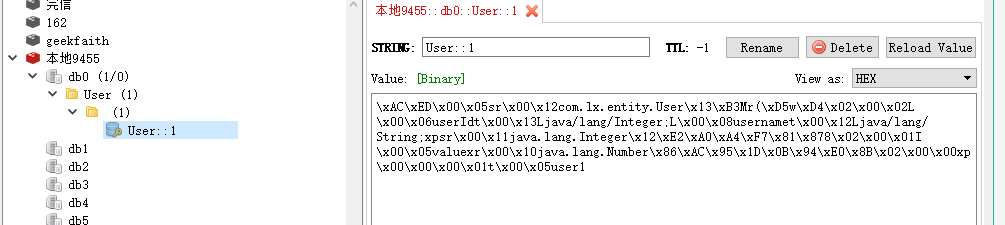
我们可以通过定制CacheManager改变采取的序列化机制。
### 2、进行定制
#### 配置类
```java
import org.springframework.context.annotation.Bean;
import org.springframework.context.annotation.Configuration;
import org.springframework.data.redis.cache.RedisCacheConfiguration;
import org.springframework.data.redis.cache.RedisCacheManager;
import org.springframework.data.redis.connection.RedisConnectionFactory;
import org.springframework.data.redis.serializer.GenericJackson2JsonRedisSerializer;
import org.springframework.data.redis.serializer.RedisSerializationContext;
@Configuration
public class RedisConfig {
/**
* @desc 序列化缓存定制
* @Author 段誉
* @Date 2019/4/11 13:01
* @method
*/
@Bean
public RedisCacheManager jsonCacheManager(RedisConnectionFactory factory) {
RedisCacheConfiguration config = RedisCacheConfiguration.defaultCacheConfig()
.serializeValuesWith(RedisSerializationContext.SerializationPair
.fromSerializer(new GenericJackson2JsonRedisSerializer()));
return RedisCacheManager.builder(factory)
.cacheDefaults(config)
.build();
}
}
```
缓存之后查看
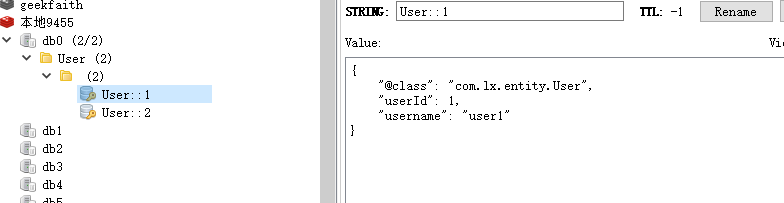
到此,已经完成Json的序列化。其他配置可根据`RedisCacheConfiguration`中的不同方法配置。
## 参考
> https://juejin.im/post/5c9e23e36fb9a05e58493c50?utm_source=gold_browser_extension