# Vue 3 + Typescript + Vite2 + antdv2
**Repository Path**: front-learn/Vue3TypescriptVite2Antdv2
## Basic Information
- **Project Name**: Vue 3 + Typescript + Vite2 + antdv2
- **Description**: Vue 3 + Typescript + Vite2 + antdv2 支持cdn,国际化
- **Primary Language**: JavaScript
- **License**: Not specified
- **Default Branch**: master
- **Homepage**: None
- **GVP Project**: No
## Statistics
- **Stars**: 0
- **Forks**: 1
- **Created**: 2021-12-26
- **Last Updated**: 2023-09-13
## Categories & Tags
**Categories**: Uncategorized
**Tags**: None
## README
# Vue 3 + Typescript + Vite2 + antdv2
### 为什么要用 vite?
> Vite,一个基于浏览器原生 ES imports 的开发服务器。利用浏览器去解析 imports,在服务器端按需编译返回,完全跳过了打包这个概念,服务器随起随用。同时不仅有 Vue 文件支持,还搞定了热更新,而且热更新的速度不会随着模块增多而变慢。针对生产环境则可以把同一份代码用 rollup 打包。虽然现在还比较粗糙,但这个方向我觉得是有潜力的,做得好可以彻底解决改一行代码等半天热更新的问题。
需要注意:
Vite 主要对应的场景是开发模式,原理是拦截浏览器发出的 ES imports 请求并做相应处理。(生产模式是用 rollup 打包)
Vite 在开发模式下不需要打包,只需要编译浏览器发出的 HTTP 请求对应的文件即可,所以热更新速度很快。
CommonJS 和 UMD 兼容性: 开发阶段中,Vite 的开发服务器将所有代码视为原生 ES 模块。因此,Vite 必须先将作为 CommonJS 或 UMD 发布的依赖项转换为 ESM。
生产模式下的打包不是 Vite 自身提供的,因此生产模式下如果你想要用 Webpack 打包也依然是可以的。从这个角度来说,Vite 可能更像是替代了 webpack-dev-server 的一个东西。
### 为什么要用 Vue3
1.性能优化
```
数据劫持方面的改变,由 ES5 的Object.defineProperty() 进行数据劫持,改变为ES6的 Proxy进行数据代理。(原因:由于proxy可以动态判断该数据是否为深层嵌套数据,而object.defineProperty()为遍历深层嵌套数据,两者在数据劫持,数据变更判断上有时间的巨大差异。)
打包策略,vue3支持了tree-shaking,排除任何未实际使用的代码,打包体积减小。降低了文件加载时间。
diff优化,vue3对静态节点进行提升,所有的静态节点在进行对比时不会被遍历。减少了进行节点对比所需的时间。
```
2.新增 Composition API(组合式 API)
```
1.解决了Vue2.x版本的options API不能解决的复用和可读性差的缺陷。
2.新增了一个setup()生命周期函数,会在组件创建之前就执行。用setup生命周期代替beforeCreate和created。
const {ref,reactive,onMountend,toRefs} = Vue
setup(props){
// 声明简单数据类型和复杂数据类型
// 只能通过.value的形式获取数据
const refValue = ref(null);
// 只能声明复杂数据类型
// 声明的数据类型不能解构
// 声明的数据类型是proxy对象
const reactiveValue = reactive({state:0});
// 生命周期的使用(on加生命周期名字)
onMountend(()=>{
// 在相应的生命周期内执行相应操作
})
// 该类型的数据不能解构,解构就会失去响应式特点
console.log(props);
// 该方法将proxy对象转化成ref变量
toRefs(props);
}
```
3.v-model 绑定提升
支持绑定多个 v-model 进行双向绑定。
4.TypeScript 支持
Vue3 完全由 TS 进行重写,对类型判断的定义和使用有很强的表现。
5.生命周期优化
```
Vue2 ~~~~~~~~~~~ vue3
beforeCreate -> setup()(新增)
created -> setup()(新增)
beforeMount -> onBeforeMount
mounted -> onMounted
beforeUpdate -> onBeforeUpdate
updated -> onUpdated
beforeDestroy -> onBeforeUnmount(改名)
destroyed -> onUnmounted(改名)
activated -> onActivated
deactivated -> onDeactivated
```
### 前置准备
1.浏览器 Chrome(最新版本最佳)
浏览器插件:Vue.js devtools(调试插件)
2.编辑器 VsCode
Vscode 插件:Vue Language Features (Volar)(提供语法高亮提示等功能),Vue 3 Snippets(vue3 快捷输入)
3.环境 Nodejs
### 构建脚手架
编写本文时,版本说明:
vite: "2.6.4";
vue: "3.2.16";
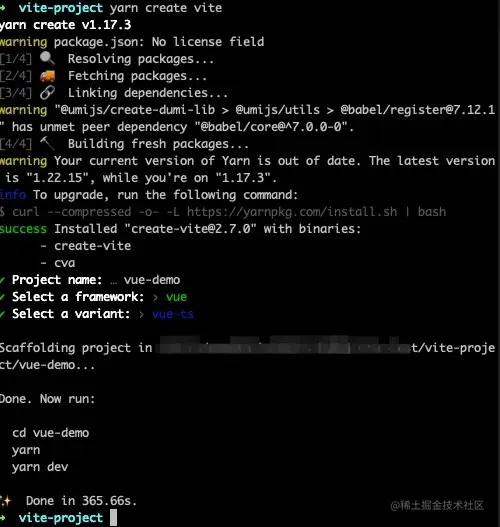
选对目录后,命令行输入,并回车:
```
yarn create vite
```
进入下载构建项目流程,根据图形化指令选择操作。
### vite.config.ts 配置
```
import { defineConfig } from 'vite'
import vue from '@vitejs/plugin-vue'
import path from 'path'
function resolve(dir) {
return path.join(__dirname, dir)
}
// https://vitejs.dev/config/
export default defineConfig({
plugins: [vue()],
resolve: {
alias: {
'@': resolve('src'),
},
},
//启动服务配置
server: {
port: 8000,
open: true,
https: false,
cors: false // 允许跨域
proxy: {
'/api': {
target: 'http://172.0.0.1:8089',
changeOrigin: true,
ws: true,
},
},
},
// 生产环境打包配置
//去除 console debugger
build: {
target: 'es2015',
minify: 'terser', // 是否进行压缩,boolean | 'terser' | 'esbuild',默认使用terser
manifest: false, // 是否产出maifest.json
sourcemap: false, // 是否产出soucemap.json
outDir: 'build', // 产出目录
terserOptions: {
compress: {
drop_console: true,
drop_debugger: true,
},
},
},
})
```
### 代码风格约束
#### Eslint 支持
```
yarn add eslint eslint-plugin-vue @typescript-eslint/eslint-plugin @typescript-eslint/parser --dev
```
这三个依赖的作用分别是:
eslint: ESLint 的核心代码;
eslint-plugin-vue:ESLint 关于检测 vue 代码规范的插件;
@typescript-eslint/parser:ESLint 的解析器,用于解析 typescript,从而检查和规范 Typescript 代码;
@typescript-eslint/eslint-plugin:这是一个 ESLint 插件,包含了各类定义好的检测 Typescript 代码的规范;
注意:
@typescript-eslint/parser 和@typescript-eslint/eslint-plugin 使用相同的版本号很重要;
配置 eslint 校验规则
项目下新建 .eslintrc.js
```
module.exports = {
root: true,
env: {
browser: true,
node: true,
es2021: true,
},
parser: "vue-eslint-parser",
extends: [
"eslint:recommended",
"plugin:vue/vue3-recommended",
"plugin:@typescript-eslint/recommended",
"plugin:prettier/recommended",
// eslint-config-prettier 的缩写
"prettier",
],
parserOptions: {
ecmaVersion: 12,
parser: "@typescript-eslint/parser",
sourceType: "module",
ecmaFeatures: {
jsx: true,
},
},
// eslint-plugin-vue @typescript-eslint/eslint-plugin eslint-plugin-prettier的缩写
plugins: ["vue", "@typescript-eslint", "prettier"],
rules: {
"@typescript-eslint/ban-ts-ignore": "off",
"@typescript-eslint/no-unused-vars": "off",
"@typescript-eslint/explicit-function-return-type": "off",
"@typescript-eslint/no-explicit-any": "off",
"@typescript-eslint/no-var-requires": "off",
"@typescript-eslint/no-empty-function": "off",
"@typescript-eslint/no-use-before-define": "off",
"@typescript-eslint/ban-ts-comment": "off",
"@typescript-eslint/ban-types": "off",
"@typescript-eslint/no-non-null-assertion": "off",
"@typescript-eslint/explicit-module-boundary-types": "off",
"no-var": "error",
"prettier/prettier": "error",
// 禁止出现console
"no-console": "warn",
// 禁用debugger
"no-debugger": "warn",
// 禁止出现重复的 case 标签
"no-duplicate-case": "warn",
// 禁止出现空语句块
"no-empty": "warn",
// 禁止不必要的括号
"no-extra-parens": "off",
// 禁止对 function 声明重新赋值
"no-func-assign": "warn",
// 禁止在 return、throw、continue 和 break 语句之后出现不可达代码
"no-unreachable": "warn",
// 强制所有控制语句使用一致的括号风格
curly: "warn",
// 要求 switch 语句中有 default 分支
"default-case": "warn",
// 强制尽可能地使用点号
"dot-notation": "warn",
// 要求使用 === 和 !==
eqeqeq: "warn",
// 禁止 if 语句中 return 语句之后有 else 块
"no-else-return": "warn",
// 禁止出现空函数
"no-empty-function": "warn",
// 禁用不必要的嵌套块
"no-lone-blocks": "warn",
// 禁止使用多个空格
"no-multi-spaces": "warn",
// 禁止多次声明同一变量
"no-redeclare": "warn",
// 禁止在 return 语句中使用赋值语句
"no-return-assign": "warn",
// 禁用不必要的 return await
"no-return-await": "warn",
// 禁止自我赋值
"no-self-assign": "warn",
// 禁止自身比较
"no-self-compare": "warn",
// 禁止不必要的 catch 子句
"no-useless-catch": "warn",
// 禁止多余的 return 语句
"no-useless-return": "warn",
// 禁止变量声明与外层作用域的变量同名
"no-shadow": "off",
// 允许delete变量
"no-delete-var": "off",
// 强制数组方括号中使用一致的空格
"array-bracket-spacing": "warn",
// 强制在代码块中使用一致的大括号风格
"brace-style": "warn",
// 强制使用骆驼拼写法命名约定
camelcase: "warn",
// 强制使用一致的缩进
indent: "off",
// 强制在 JSX 属性中一致地使用双引号或单引号
// 'jsx-quotes': 'warn',
// 强制可嵌套的块的最大深度4
"max-depth": "warn",
// 强制最大行数 300
// "max-lines": ["warn", { "max": 1200 }],
// 强制函数最大代码行数 50
// 'max-lines-per-function': ['warn', { max: 70 }],
// 强制函数块最多允许的的语句数量20
"max-statements": ["warn", 100],
// 强制回调函数最大嵌套深度
"max-nested-callbacks": ["warn", 3],
// 强制函数定义中最多允许的参数数量
"max-params": ["warn", 3],
// 强制每一行中所允许的最大语句数量
"max-statements-per-line": ["warn", { max: 1 }],
// 要求方法链中每个调用都有一个换行符
"newline-per-chained-call": ["warn", { ignoreChainWithDepth: 3 }],
// 禁止 if 作为唯一的语句出现在 else 语句中
"no-lonely-if": "warn",
// 禁止空格和 tab 的混合缩进
"no-mixed-spaces-and-tabs": "warn",
// 禁止出现多行空行
"no-multiple-empty-lines": "warn",
// 禁止出现;
semi: ["warn", "never"],
// 强制在块之前使用一致的空格
"space-before-blocks": "warn",
// 强制在 function的左括号之前使用一致的空格
// 'space-before-function-paren': ['warn', 'never'],
// 强制在圆括号内使用一致的空格
"space-in-parens": "warn",
// 要求操作符周围有空格
"space-infix-ops": "warn",
// 强制在一元操作符前后使用一致的空格
"space-unary-ops": "warn",
// 强制在注释中 // 或 /* 使用一致的空格
// "spaced-comment": "warn",
// 强制在 switch 的冒号左右有空格
"switch-colon-spacing": "warn",
// 强制箭头函数的箭头前后使用一致的空格
"arrow-spacing": "warn",
"no-var": "warn",
"prefer-const": "warn",
"prefer-rest-params": "warn",
"no-useless-escape": "warn",
"no-irregular-whitespace": "warn",
"no-prototype-builtins": "warn",
"no-fallthrough": "warn",
"no-extra-boolean-cast": "warn",
"no-case-declarations": "warn",
"no-async-promise-executor": "warn",
},
globals: {
defineProps: "readonly",
defineEmits: "readonly",
defineExpose: "readonly",
withDefaults: "readonly",
},
};
```
项目下新建 .eslintignore
```
# eslint 忽略检查 (根据项目需要自行添加)
**/*.js
"build"
"dist"
"public"
"node_modules"
```
#### 检查修复
虽然,现在编辑器已经给出错误提示和修复方案,但需要我们一个一个去点击修复,还是挺麻烦的。很简单,我们只需设置编辑器保存文件时自动执行 eslint --fix 命令进行代码风格修复。
VSCode 在 settings.json 设置文件中,增加以下代码:
```
"editor.codeActionsOnSave": {
"source.fixAll.eslint": true
}
```
#### prettier 支持
```
yarn add prettier eslint-plugin-prettier eslint-config-prettier -D
```
1.prettier:prettier 插件的核心代码
2.eslint-config-prettier:解决 ESLint 中的样式规范和 prettier 中样式规范的冲突,以 prettier 的样式规范为准,使 ESLint 中的样式规范自动失效;
3.eslint-plugin-prettier:将 prettier 作为 ESLint 规范来使用
最后形成优先级:Prettier 配置规则 > ESLint 配置规则。
关于 prettier ESLint 的配置,已经在前面部分的配置\***\*eslint\*\*** 校验规则,配置 .eslintrc.js 内容时已配置完成。
### 项目下新建 .prettierrc.js
配置 prettier 格式化规则:
```
{
"trailingComma": "es5",
"tabWidth": 2,
"jsxSingleQuote": true,
"jsxBracketSameLine": true,
"printWidth": 100,
"singleQuote": true,
"semi": false,
"overrides": [
{
"files": "*.json",
"options": {
"printWidth": 200
}
}
],
"arrowParens": "always"
}
```
#### 项目下新建 .prettierignore
```
# 忽略格式化文件 (根据项目需要自行添加)
node_modules
dist
```
#### 自动空格缩放保存不一致解决
vscode 编辑器开启自动保存时,会自动设置 tabsize,检查.prettierrc.js 下的"tabWidth": 2,是否和 vscode 设置的一致,不然可能会会有保存缩进空格不同步的情况。
MacOS 使用 Command + Sheft + P,windows 使用 Ctrl + Sheft + P 快捷键---> 搜索“settings.json”。保持 prettier 的缩进空格同编辑器设置的一致,设置如下:
```
"editor.tabSize": 2,
// vscode默认启用了根据文件类型自动设置tabsize的选项
"editor.detectIndentation": false,
```
#### package.json 配置
```
{
"script": {
"lint": "eslint src --fix --ext .ts,.tsx,.vue,.js,.jsx",
"prettier": "prettier --write ."
}
}
```
上面配置完成后,可以运行以下命令测试下代码检查个格式化效果:
```
// eslint 检查
yarn lint
// prettier 自动格式化
yarn prettier
```
#### 配置 husky + lint-staged
husky 是一个为 git 客户端增加 hook 的工具。我们可以在 pre-commit 中实现一些比如 lint 检查、单元测试、代码美化等操作。
lint-staged 它是对个人要提交的代码的一个规范和约束。
##### 前置条件:
确保在此之前安装并配置所有代码质量工具,如 Prettier 和 ESlint ;
使用 husky + lint-staged 助力团队编码规范,husky + lint-staged 安装推荐使用 mrm,它将根据 package.json 依赖项中的代码质量工具来安装和配置 husky 和 lint-staged。
##### 安装 mrm:
```
npm i mrm -D --registry=https://registry.npm.taobao.org
```
##### 安装 lint-staged:
mrm 安装 lint-staged 会自动把 husky 一起安装下来 。
```
npx mrm lint-staged
```
安装成功后会发现 package.json 中多了一下几个配置:
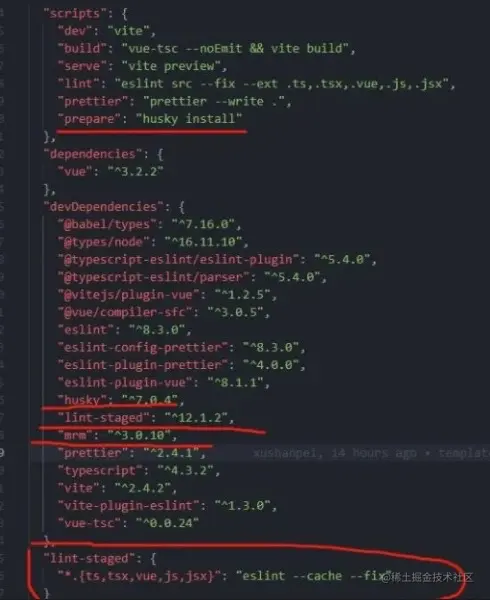
因为我们要结合 prettier 代码格式化,所有修改一下配置:
```
"husky": {
"hooks": {
"pre-commit": "lint-staged",
}
},
"lint-staged": {
"*.{ts,tsx,vue,js,jsx}": [
"yarn lint",
"prettier --write",
"git add"
]
}
```
###### Git Commit Message 提交规范配置
针对 git commit log 提交规范的问题,需要统一规范,如果我们提交的不符合指向的规范, 直接拒绝提交。
```
yarn add @commitlint/cli commitizen commitlint-config-cz cz-customizable -D
```
#### package.json 中配置:
```
"config": {
"commitizen": {
"path": "node_modules/cz-customizable"
}
},
// 结合 Husky
"husky": {
"hooks": {
...,
"commit-msg": "commitlint -e $GIT_PARAMS"
}
},
```
##### 配置规则
根目录.cz-config.js 中写入自定义的配置:
```
'use strict'
module.exports = {
types: [
{
value: '💪 WIP',
name: '进度: 工作进度',
},
{
value: '✨ feat',
name: '功能: 新功能',
},
{
value: '🐞 fix',
name: '修复: 修复bug',
},
{
value: '🛠 refactor',
name: '重构: 代码重构',
},
{
value: '📚 docs',
name: '文档: 只有文档变更',
},
{
value: '🏁 test',
name: '测试: 添加一个测试',
},
{
value: '🗯 chore',
name: '工具: 没有修改源代码,只是变更构建流程或辅助工具。',
},
{
value: '💅 style',
name: '样式: 空格,分号等格式修复。',
},
{
value: '⏪ revert',
name: '回滚: 代码回退。',
},
{
value: '🏎 perf',
name: '性能: 提升性能。',
},
{
value: '🏗 build',
name: '构建: 变更项目构建或外部依赖(例如scopes: webpack、gulp、npm等)',
},
{
value: '🕹 ci',
name:
'集成: 更改持续集成软件的配置文件和package中的scripts命令,例如scopes: Travis, Circle等',
},
],
scopes: [],
messages: {
type: '选择一种你的提交类型:',
scope: '选择一个scope (可选):',
// used if allowCustomScopes is true
customScope: 'Denote the SCOPE of this change:',
subject: '短说明:\n',
body: '长说明,使用"|"换行(可选):\n',
breaking: '非兼容性说明 (可选):\n',
footer: '关联关闭的issue,例如:#31, #34(可选):\n',
confirmCommit: '确定提交说明?',
},
footerPrefix: 'TAPD: ',
allowCustomScopes: true,
allowBreakingChanges: ['特性', '修复'],
skipQuestions: ['scope', 'body', 'footer'],
}
```
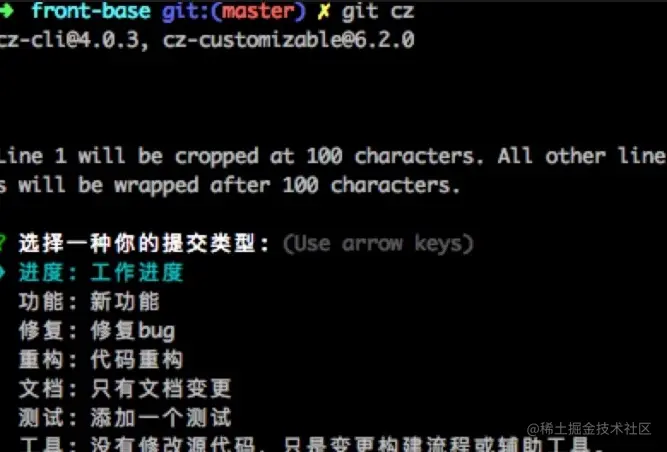
效果如下:
#### css 预加载配置
Vite 提供了对 .scss, .sass, .less, .styl 和 .stylus 文件的内置支持。但必须安装相应的预处理器依赖。
```
yarn add less less-loader sass sass-loader dart-sass -D
```
##### typeScript 的智能提示:
默认情况下,Vite 在 vite/client.d.ts 中为 import.meta.env 提供了类型定义。随着在 .env[mode] 文件中自定义了越来越多的环境变量,你可能想要在代码中获取这些以 VITE\_ 为前缀的用户自定义环境变量的 TypeScript 智能提示。
要想做到这一点,你可以在 src 目录下创建一个 env.d.ts 文件,接着按下面这样增加 ImportMetaEnv 的定义:
```
///
interface ImportMetaEnv {
readonly VITE_APP_TITLE: string
// 更多环境变量...
}
interface ImportMeta {
readonly env: ImportMetaEnv
}
```
#### VsCode 自定义代码片段
一些常用的业务代码,我们可以将其重构,利用 vscode,构建自定义代码片段,在项目根目录,创建.vscode 文件夹、project.code-snippets 文件,目录如.vscode/project.code-snippets。
在 project.code-snippets 文件内编写自定义代码片段。示例:
```
{
"components": {
"scope": "javascript, typescript, vue",
"prefix": "",
"body": [
"",
"",
"",
"",
"",
""
],
"description": "Default Component Code of Vue3 + Typescript + Setup"
},
}
```
使用的话,在.vue 文件中,写入,编辑器会自动联想,自定义代码片段。然后进行选择确定,自定义代码片段就写入.vue 文件中。