# springboot_shiro
**Repository Path**: godchin/springboot_shiro
## Basic Information
- **Project Name**: springboot_shiro
- **Description**: SpringBoot整合shiro
- **Primary Language**: Unknown
- **License**: Not specified
- **Default Branch**: master
- **Homepage**: None
- **GVP Project**: No
## Statistics
- **Stars**: 0
- **Forks**: 0
- **Created**: 2021-06-06
- **Last Updated**: 2021-06-06
## Categories & Tags
**Categories**: Uncategorized
**Tags**: None
## README
## Shiro 简介
- 官方介绍
Apache Shiro™ is a powerful and easy-to-use Java security framework that performs authentication, authorization, cryptography, and session management. With Shiro’s easy-to-understand API, you can quickly and easily secure any application – from the smallest mobile applications to the largest web and enterprise applications.
Apache Shiro™是一个强大且易于使用的 Java 安全框架,可执行身份验证、授权、加密和会话管理。凭借 Shiro 易于理解的 API,您可以快速轻松地保护任何应用程序 - 从最小的移动应用程序到最大的 Web 和企业应用程序。
## 引入依赖
```java
org.apache.shiro
shiro-spring
1.7.1
```
## 配置文件
- 配置UserRealm `主要是处理用户权限`
```
package com.itdfq.springboot_shrio.config;
import org.apache.shiro.authc.AuthenticationException;
import org.apache.shiro.authc.AuthenticationInfo;
import org.apache.shiro.authc.AuthenticationToken;
import org.apache.shiro.authz.AuthorizationInfo;
import org.apache.shiro.realm.AuthorizingRealm;
import org.apache.shiro.subject.PrincipalCollection;
/**
* @Author GocChin
* @Date 2021/6/6 15:29
* @Blog: itdfq.com
* @QQ: 909256107
* @Descript:
*/
public class UserRealm extends AuthorizingRealm {
//授权
@Override
protected AuthorizationInfo doGetAuthorizationInfo(PrincipalCollection principalCollection) {
System.out.println("执行了授权=》doGetAuthorizationInfo");
return null;
}
//认证
@Override
protected AuthenticationInfo doGetAuthenticationInfo(AuthenticationToken authenticationToken) throws AuthenticationException {
System.out.println("执行了认证》doGetAuthenticationInfo");
return null;
}
}
```
- 编写Config `主要处理请求`
```
package com.itdfq.springboot_shrio.config;
import org.apache.shiro.spring.web.ShiroFilterFactoryBean;
import org.apache.shiro.web.mgt.DefaultWebSecurityManager;
import org.springframework.beans.factory.annotation.Qualifier;
import org.springframework.context.annotation.Bean;
import org.springframework.context.annotation.Configuration;
import java.util.LinkedHashMap;
import java.util.Map;
/**
* @Author GocChin
* @Date 2021/6/6 15:28
* @Blog: itdfq.com
* @QQ: 909256107
* @Descript:
*/
@Configuration
public class ShiroConfig {
//ShiroFilterFacctoryBean 3
@Bean
public ShiroFilterFactoryBean getShiroFilterFactoryBean(@Qualifier("DefaultWebSecurityManager") DefaultWebSecurityManager manager){
ShiroFilterFactoryBean bean = new ShiroFilterFactoryBean();
//设置安全管理器
bean.setSecurityManager(manager);
return bean;
}
//DafaultWebSecurityManager 2
@Bean(name = "DefaultWebSecurityManager") //Qualifier 通过这个注解获取spring管理的 userRealm()方法
public DefaultWebSecurityManager getDefaultWebSecurityManager(@Qualifier("userRealm") UserRealm userRealm){
DefaultWebSecurityManager securityManager = new DefaultWebSecurityManager();
securityManager.setRealm(userRealm);
return securityManager;
}
//创建realm对象,需要自定义类 1
@Bean(name = "userRealm")
public UserRealm userRealm(){
return new UserRealm();
}
}
```
## 登录拦截
- 设置登录拦截,以及登录页面
```
@Bean
public ShiroFilterFactoryBean getShiroFilterFactoryBean(@Qualifier("DefaultWebSecurityManager") DefaultWebSecurityManager manager){
ShiroFilterFactoryBean bean = new ShiroFilterFactoryBean();
//设置安全管理器
bean.setSecurityManager(manager);
//添加shiro的内置过滤器
/**
* anon:无需认证就可以访问
* authc:必须认证才能用
* user:必须拥有记住我功能才能使用
* perms:拥有对某个资源的权限才能访问
* role:拥有某个角色权限才能访问
*/
Map filterMap = new LinkedHashMap<>();
// filterMap.put("/user/add","authc");
// filterMap.put("/user/update","authc");
// 上面两种写法等效于 可以采用通配符
filterMap.put("/user/*","authc");
bean.setFilterChainDefinitionMap(filterMap);
//如果没有权限
bean.setLoginUrl("/tologin");
return bean;
}
```
## 登录认证
- 创建登录页面
```JavaScript
```
- 登录方法
```
@RequestMapping("/login")
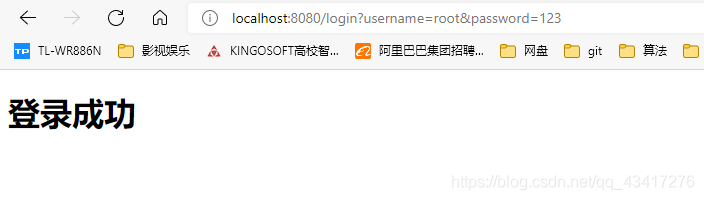
public String login(String username,String password,Model model){
//获取当前的用户
Subject subject = SecurityUtils.getSubject();
//封装用户的登录数据
UsernamePasswordToken token = new UsernamePasswordToken(username, password);
try {
subject.login(token); //执行登录方法 如果没有异常就说明登录成功
return "index";
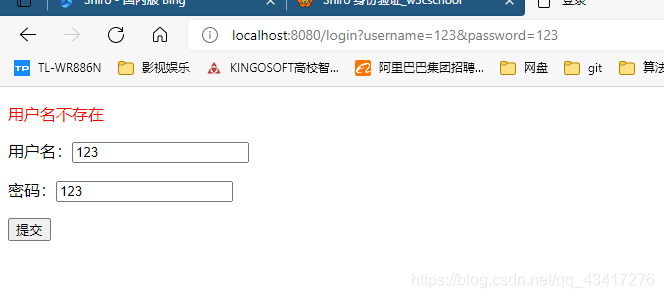
}catch (UnknownAccountException e){ //用户名不存在
model.addAttribute("msg","用户名不存在");
return "login";
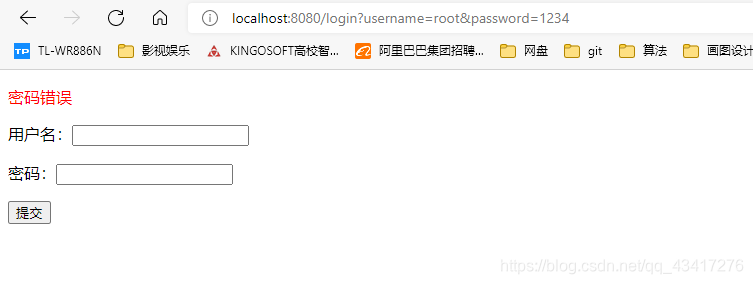
}catch (IncorrectCredentialsException e){//密码错误异常
model.addAttribute("msg","密码错误");
return "login";
}
}
```
- 官方举例的常见的异常类型
```
try {
currentUser.login( token );
//if no exception, that's it, we're done!
} catch ( UnknownAccountException uae ) { //用户名不存在
//username wasn't in the system, show them an error message?
} catch ( IncorrectCredentialsException ice ) { //密码错误
//password didn't match, try again?
} catch ( LockedAccountException lae ) { //账号被锁
//account for that username is locked - can't login. Show them a message?
}
... more types exceptions to check if you want ...
} catch ( AuthenticationException ae ) {
//unexpected condition - error?
}
```
- 登录认证,`这里采用假的用户名和密码进行测试`
```
//认证
@Override
protected AuthenticationInfo doGetAuthenticationInfo(AuthenticationToken token) throws AuthenticationException {
System.out.println("执行了认证》doGetAuthenticationInfo");
//获取当前的用户
Subject subject = SecurityUtils.getSubject();
//用户名,密码
String name = "root";
String password = "123";
UsernamePasswordToken userToken = (UsernamePasswordToken) token;
if (!userToken.getUsername().equals(name)){
return null; //抛出异常,UnknownAccountException 用户名不存在异常
}
//密码认证 shiro自己做
return new SimpleAuthenticationInfo("",password,"root");
}
```
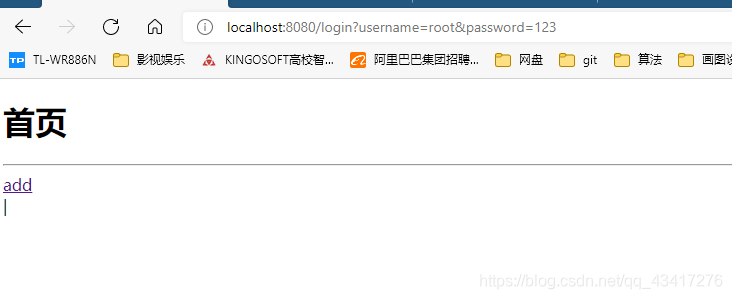
- 当输入用户名不存在时
- 测试用户名密码不正确
- 测试成功结果
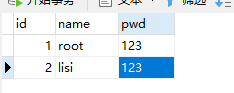
## 连接数据库进行操作
- 采用MybatisPlus对数据库进行查询
- 数据库表设置Users
- 修改认证方法
```
//认证
@Override
protected AuthenticationInfo doGetAuthenticationInfo(AuthenticationToken token) throws AuthenticationException {
System.out.println("执行了认证》doGetAuthenticationInfo");
//获取当前的用户
Subject subject = SecurityUtils.getSubject();
UsernamePasswordToken userToken = (UsernamePasswordToken) token;
//从数据库中查询用户名,密码
Users byUsername = usersService.findByUsername(userToken.getUsername());
if (byUsername==null){
return null; //抛出用户不存在异常
}
//密码认证 shiro自己做
return new SimpleAuthenticationInfo("",byUsername.getPwd(),"root");
}
```
## 注销登录
```
@RequestMapping("/logout")
public String logout(){
//获取当前的用户
Subject subject = SecurityUtils.getSubject();
// 设置退出登录
subject.logout();
return "login";
}
```
## 权限操作
- 给数据库表添加权限字段
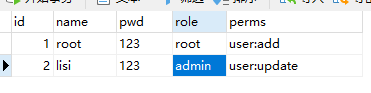
- 设置页面权限
```
//授权 ,没有权限会跳转到位置页面
filterMap.put("/user/add","perms[user:add]");
filterMap.put("/user/update","perms[user:update]");
```
**注意这里的设置权限的代码需要放在设置拦截之前才有效**
- 从数据库中查询用户权限,赋予权限
```
//授权
@Override
protected AuthorizationInfo doGetAuthorizationInfo(PrincipalCollection principalCollection) {
System.out.println("执行了授权=》doGetAuthorizationInfo");
SimpleAuthorizationInfo info = new SimpleAuthorizationInfo();
//获取当前登录用户
Subject subject = SecurityUtils.getSubject();
Users currentUser = (Users) subject.getPrincipal();//拿到User对象
//从数据库中获取当前的权限,然后赋予当前用户的权限
info.addStringPermission(currentUser.getPerms());
return info;
}
```
- 演示
[video(video-ojR2qGmz-1622977070277)(type-bilibili)(url-https://player.bilibili.com/player.html?aid=973483603)(image-https://ss.csdn.net/p?http://i1.hdslb.com/bfs/archive/1a4f7ee1e155c87ce249ff6f6982278160a880d1.jpg)(title-shiro权限演示)]
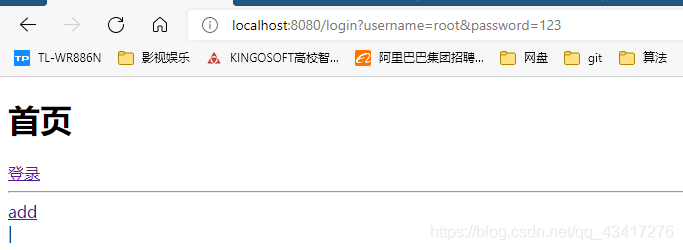
## shiro与thymeleaf整合
- 实现目标
实现root用户登录之后只能看到add按钮
lisi用户登录之后只能看见update按钮
- 导包
```
com.github.theborakompanioni
thymeleaf-extras-shiro
2.0.0
```
- 在ShiroConfig中加入新配置
```
//整合ShiroDialect:用于整合Thymeleaf和shiro
@Bean
public ShiroDialect getShiroDialect(){
return new ShiroDialect();
}
```
- 在html中引入命名空间
```
```
- html代码
```
首页
登录
|
```
- 结果
### 登陆之后隐藏登录按钮
- 第一种方法使用shiro标签
```
```
- 第二种方法设置session
```
//获取登录对象
Subject subject = SecurityUtils.getSubject();
Session session = subject.getSession();
session.setAttribute("loginUser",byUsername);
```
前端页面
```
```
- 显示效果