# uLipSync嘴型同步
**Repository Path**: guoyangpeng/MetaHuman
## Basic Information
- **Project Name**: uLipSync嘴型同步
- **Description**: uLipSync嘴型同步
- **Primary Language**: Unknown
- **License**: MIT
- **Default Branch**: main
- **Homepage**: None
- **GVP Project**: No
## Statistics
- **Stars**: 0
- **Forks**: 0
- **Created**: 2025-07-30
- **Last Updated**: 2026-06-26
## Categories & Tags
**Categories**: Uncategorized
**Tags**: None
## README
uLipSync
========
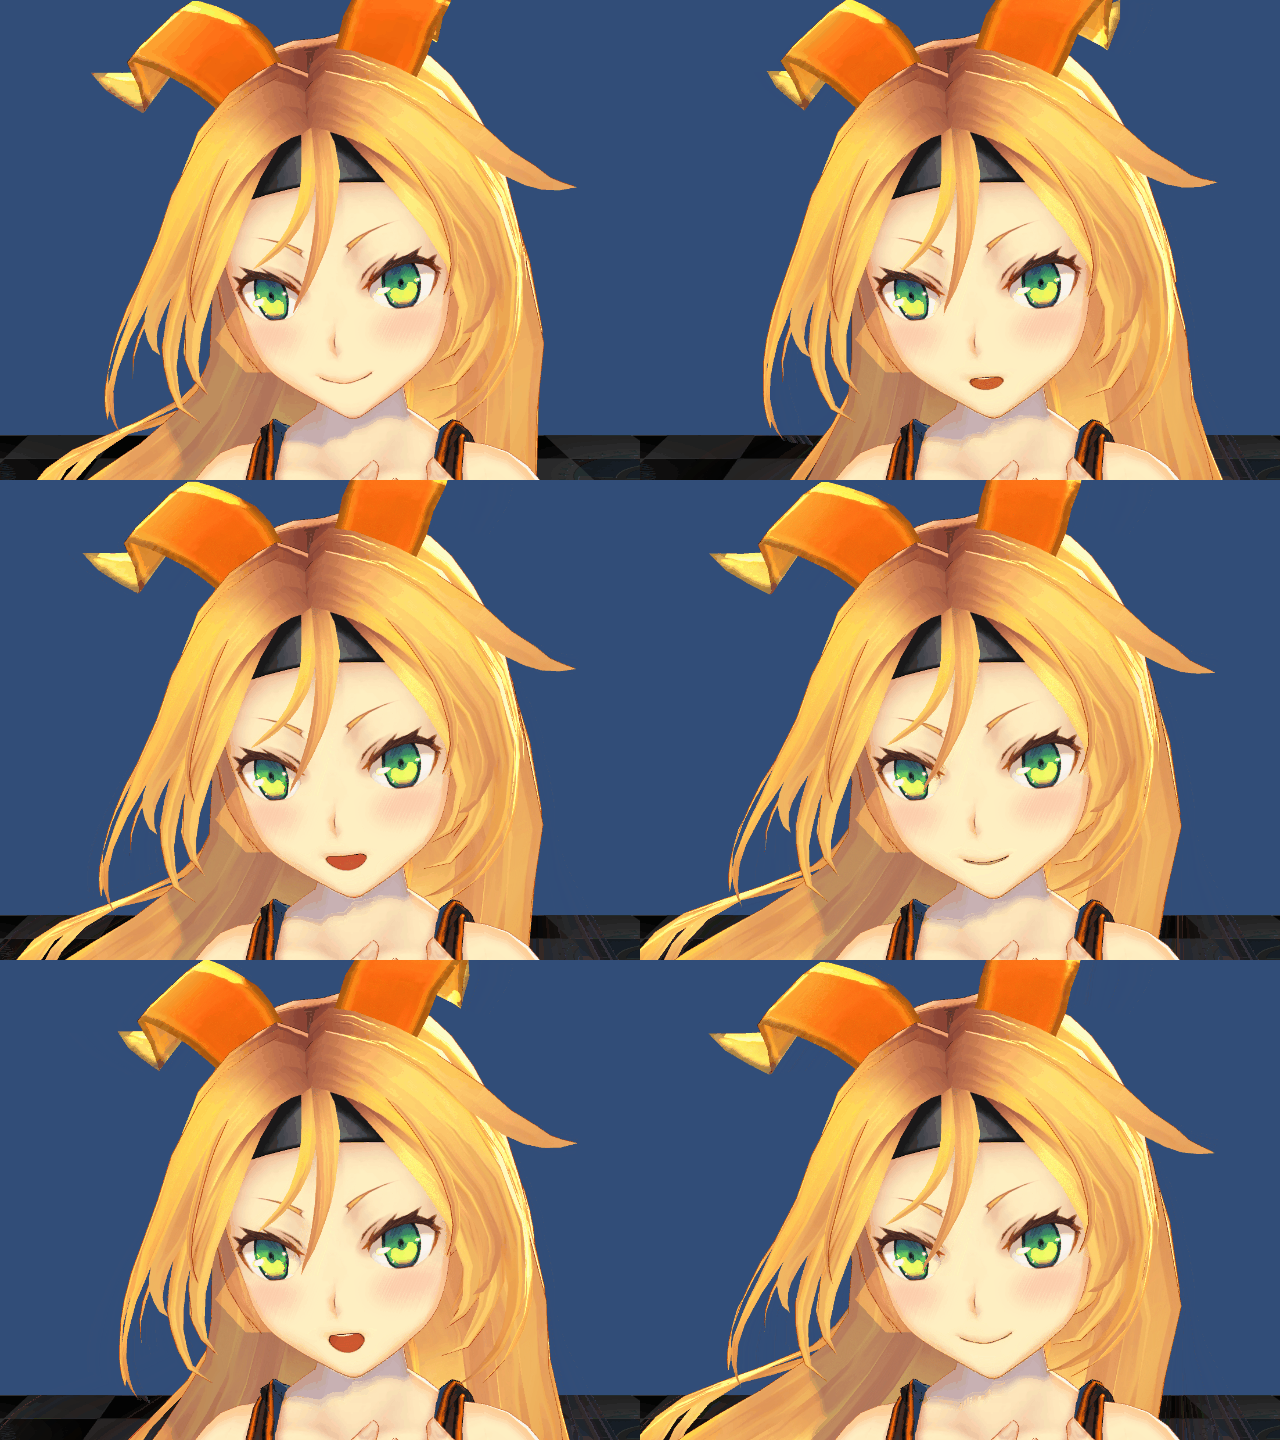
**uLipSync** is an asset for lip-syncing in Unity. It has the following features:
- Utilizes **Job System** and **Burst Compiler** to run faster on any OS without using native plugins.
- Can be calibrated to create a per-character **profile**.
- Both **runtime** analysis and **pre-bake** processing are available.
- Pre-bake processing can be integrated with **Timeline**.
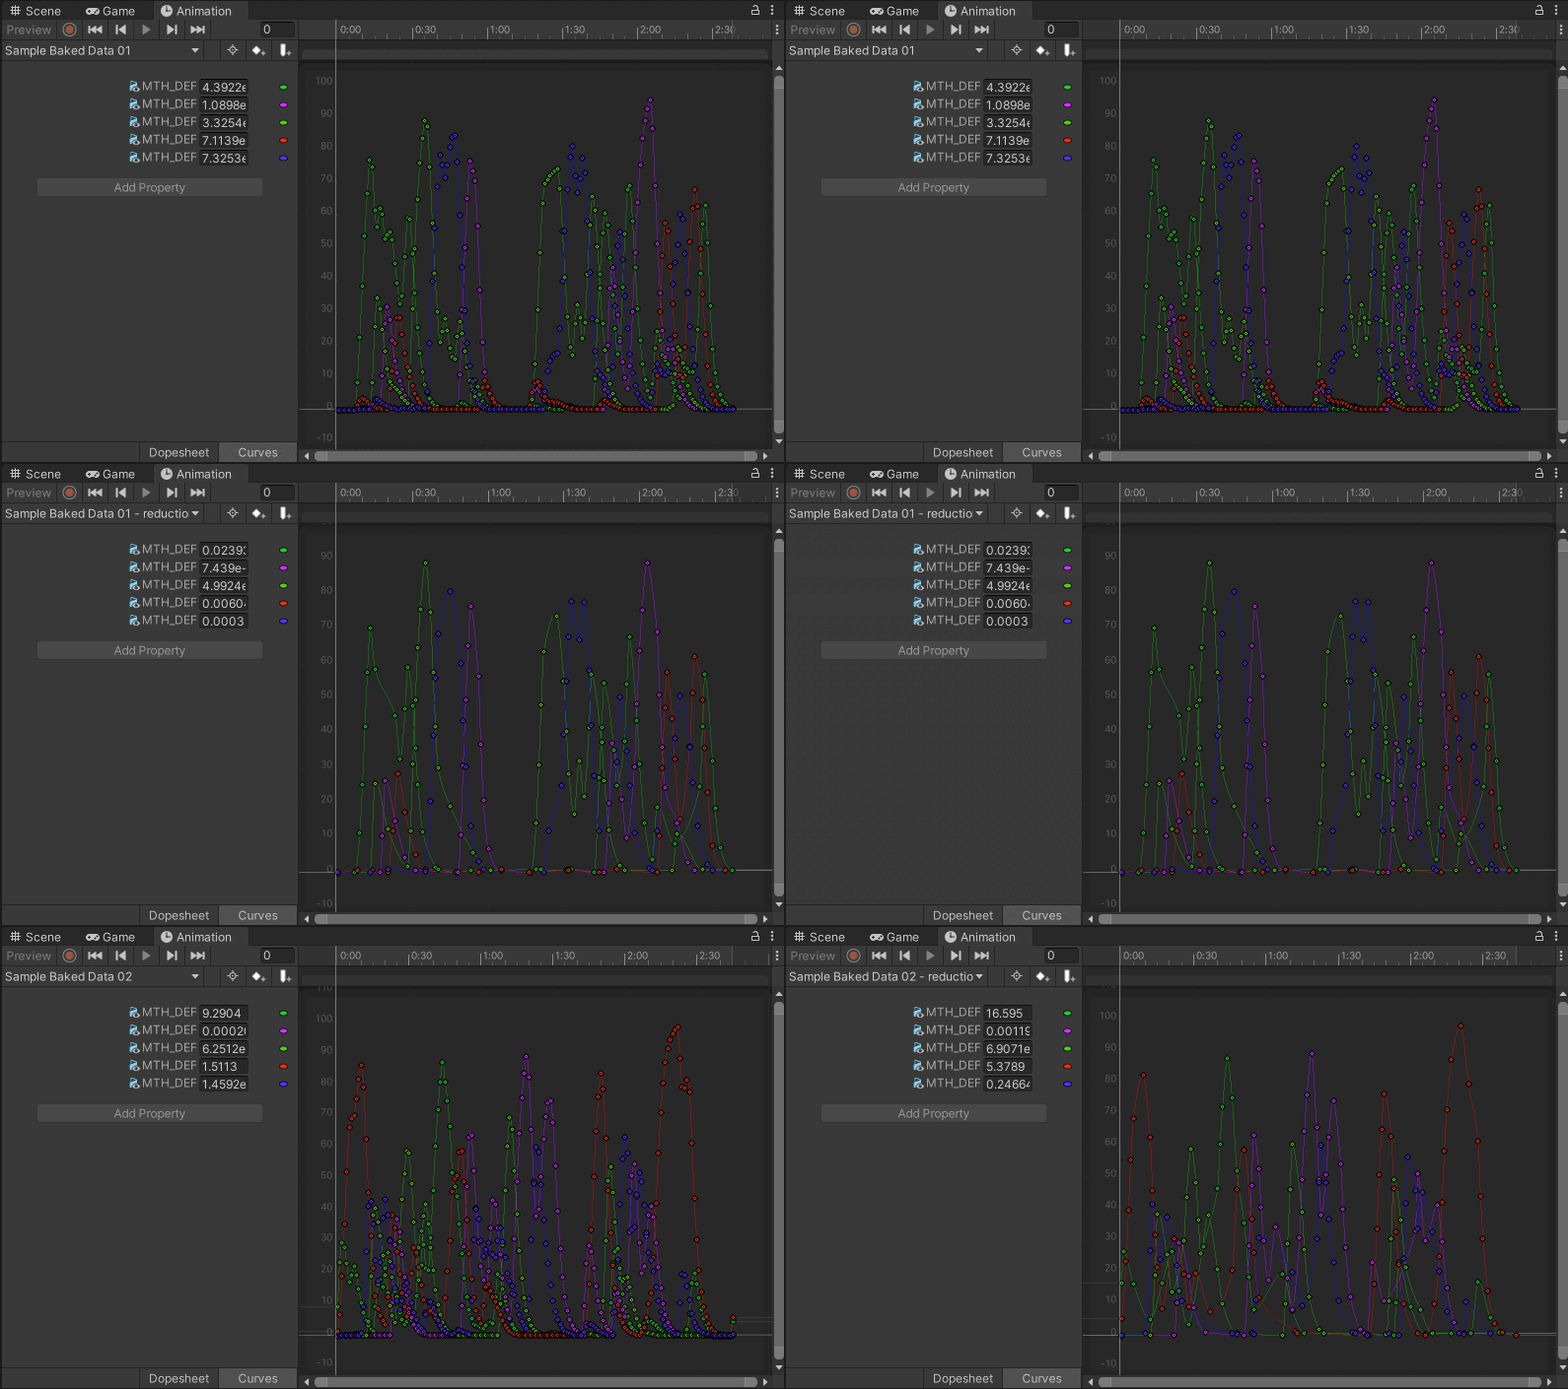
- Pre-bake data can be converted to **AnimationClip**
Features
--------
### LipSync
 ### Profile
 ### Real-time Analysis
 ### Mic Input
 ### Pre-Bake
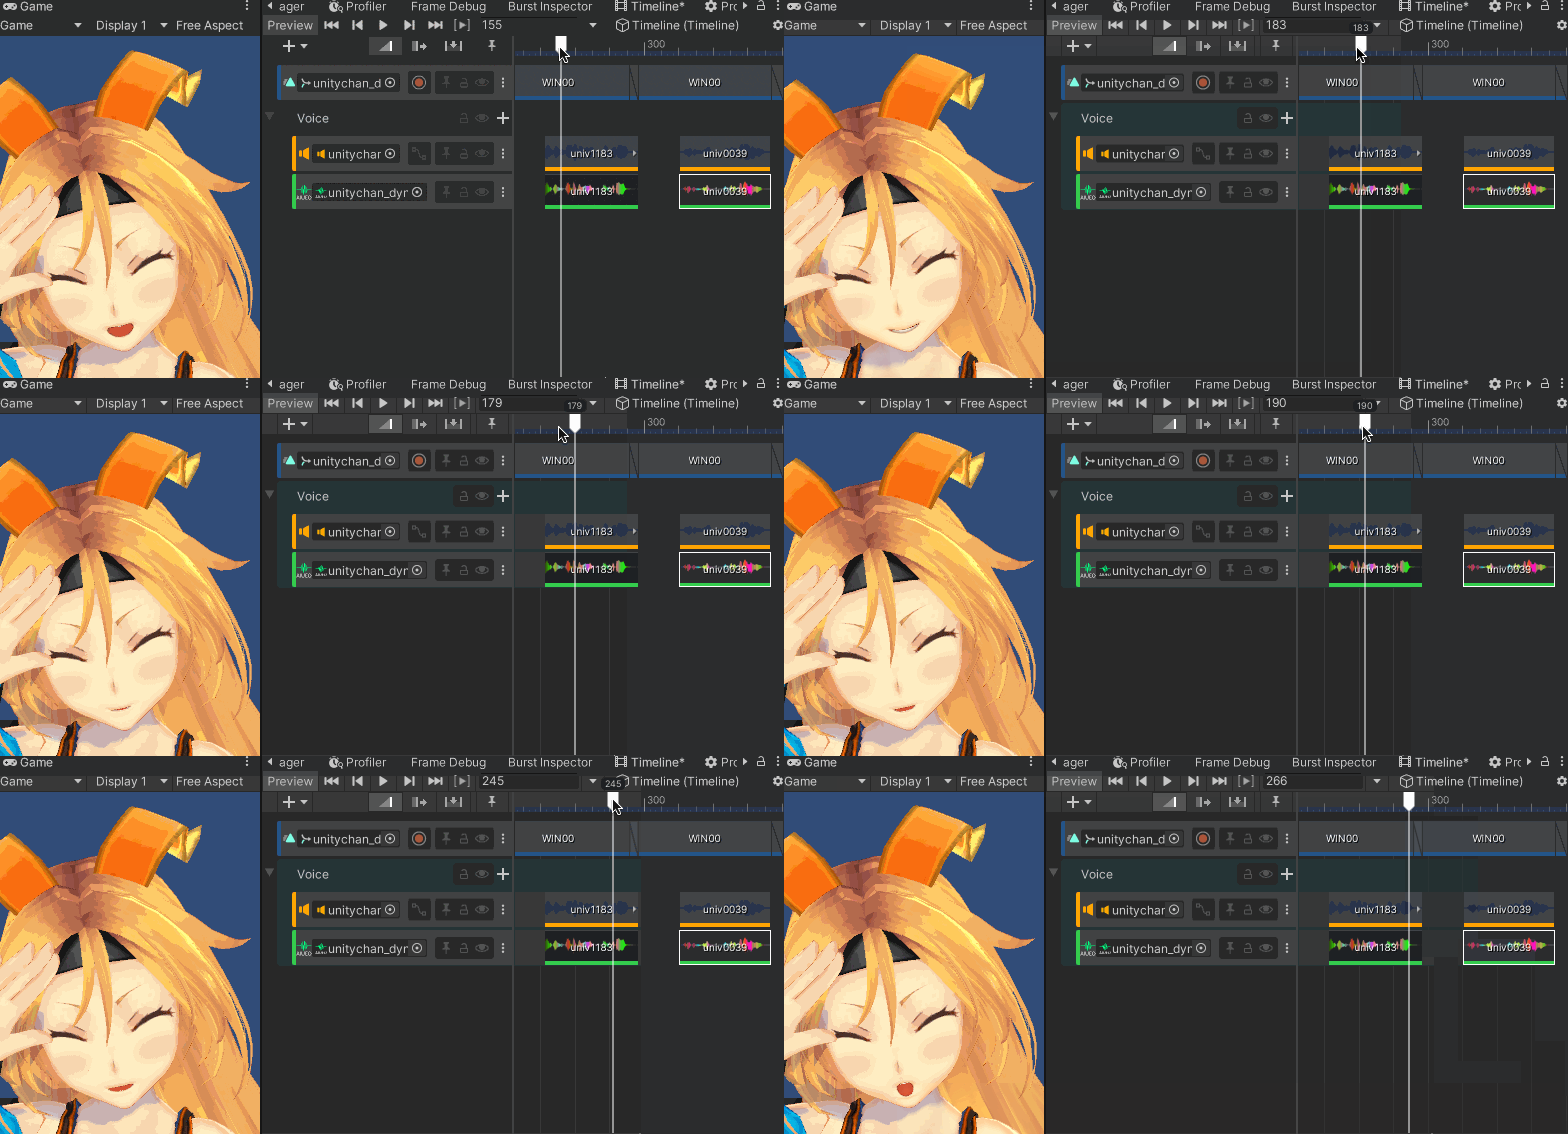
 ### Timeline
 ### AnimationClip
 ### Texture Change
 ### VRM Support
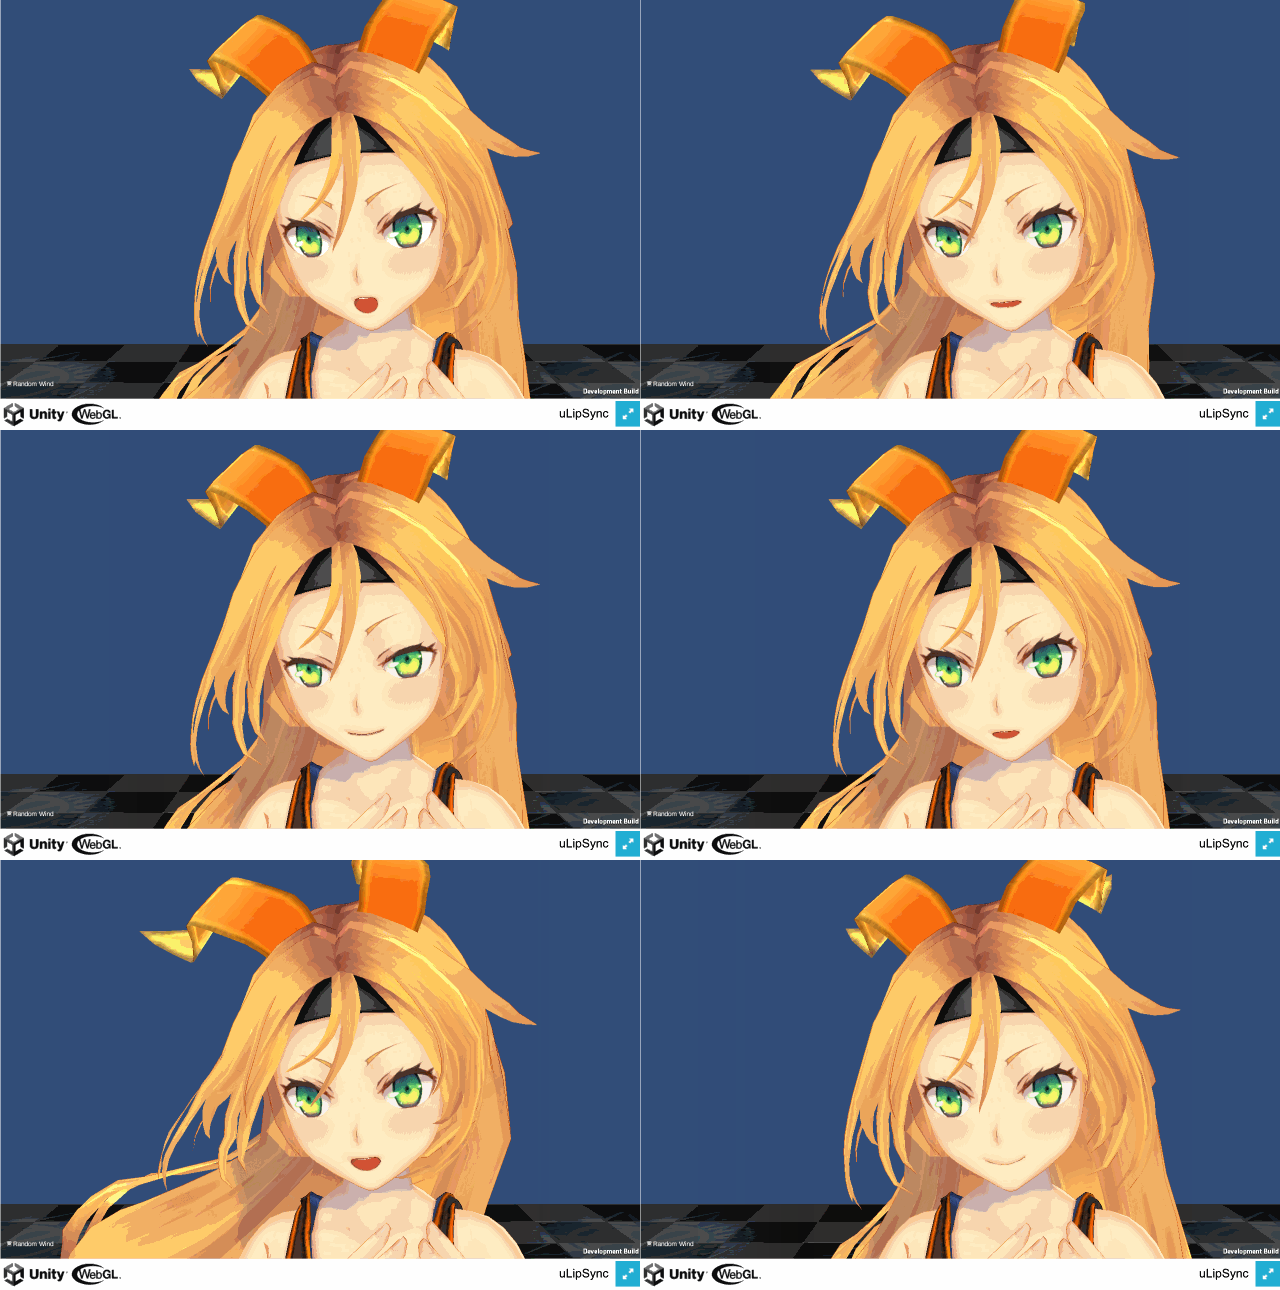
 ### WebGL Support
 Install
-------
- Unity Package
- Download the latest .unitypackage from [Release page](https://github.com/hecomi/uLipSync/releases).
- Import `Unity.Burst` and `Unity.Mathematics` from Package Manager.
- Git URL (UPM)
- Add `https://github.com/hecomi/uLipSync.git#upm` to Package Manager.
- Scoped Registry (UPM)
- Add a scoped registry to your project.
- URL: `https://registry.npmjs.com`
- Scope: `com.hecomi`
- Install uLipSync in Package Manager.
- If you can't find uLipSync in the list, please try entering `com.hecomi.ulipsync` directly.
How to Use
----------
### Mechanism
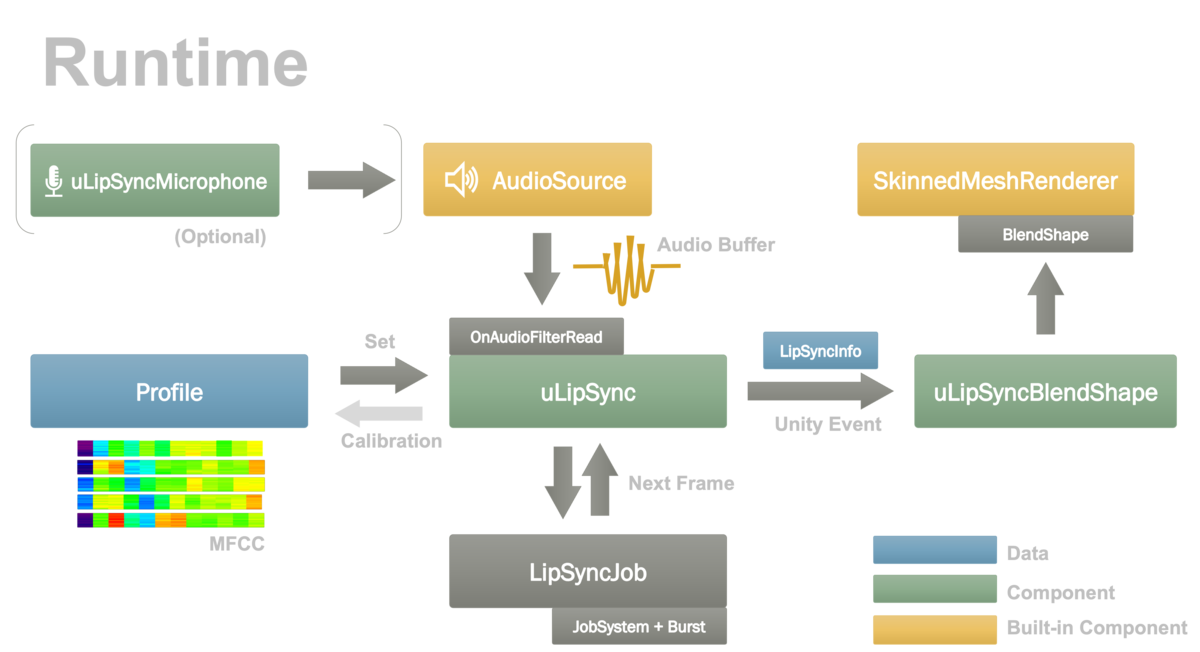
When a sound is played by `AudioSource`, a buffer of the sound comes into the `OnAudioFilterRead()` method of a component attached to the same GameObject. We can modify this buffer to apply sound effects like reverb, but at the same time since we know what kind of waveform is being played, we can also analyze it to calculate Mel-Frequency Cepstrum Coefficients (MFCC), which represent the characteristics of the human vocal tract. In other words, if the calculation is done well, you can get parameters that sound like "ah" if the current waveform being played is "a", and parameters that sound like "e" if the current waveform is "e" (in addition to vowels, consonants like "s" can also be analyzed). By comparing these parameters with the pre-registered parameters for each of the "aieou" phonemes, we can calculate the similarity between each phoneme and the current sound, and use this information to adjust the blend shape of the `SkinnedMeshRenderer` for accurate lip-syncing. If you feed the input from the microphone into `AudioSource`, you can also lipsync to your current voice.
The component that performs this analysis is `uLipSync`, the data that contains phoneme parameters is `Profile`, and the component that moves the blendshape is `uLipSyncBlendShape`. We also have a `uLipSyncMicrophone` asset that plays the audio from the microphone. Here's an illustration of what it looks like.
Install
-------
- Unity Package
- Download the latest .unitypackage from [Release page](https://github.com/hecomi/uLipSync/releases).
- Import `Unity.Burst` and `Unity.Mathematics` from Package Manager.
- Git URL (UPM)
- Add `https://github.com/hecomi/uLipSync.git#upm` to Package Manager.
- Scoped Registry (UPM)
- Add a scoped registry to your project.
- URL: `https://registry.npmjs.com`
- Scope: `com.hecomi`
- Install uLipSync in Package Manager.
- If you can't find uLipSync in the list, please try entering `com.hecomi.ulipsync` directly.
How to Use
----------
### Mechanism
When a sound is played by `AudioSource`, a buffer of the sound comes into the `OnAudioFilterRead()` method of a component attached to the same GameObject. We can modify this buffer to apply sound effects like reverb, but at the same time since we know what kind of waveform is being played, we can also analyze it to calculate Mel-Frequency Cepstrum Coefficients (MFCC), which represent the characteristics of the human vocal tract. In other words, if the calculation is done well, you can get parameters that sound like "ah" if the current waveform being played is "a", and parameters that sound like "e" if the current waveform is "e" (in addition to vowels, consonants like "s" can also be analyzed). By comparing these parameters with the pre-registered parameters for each of the "aieou" phonemes, we can calculate the similarity between each phoneme and the current sound, and use this information to adjust the blend shape of the `SkinnedMeshRenderer` for accurate lip-syncing. If you feed the input from the microphone into `AudioSource`, you can also lipsync to your current voice.
The component that performs this analysis is `uLipSync`, the data that contains phoneme parameters is `Profile`, and the component that moves the blendshape is `uLipSyncBlendShape`. We also have a `uLipSyncMicrophone` asset that plays the audio from the microphone. Here's an illustration of what it looks like.
 ### Setup
Let's set up using Unity-chan. The sample scene is *Samples / 01. Play AudioClip / 01-1. Play Audio Clip*. If you installed this from UPM, please import *Samples / 00. Common sample* (which contains Unity's assets).
After placing Unity-chan, add the `AudioSource` component to any game object where a sound will be played and set an `AudioClip` to it to play a Unity-chan's voice.
### Setup
Let's set up using Unity-chan. The sample scene is *Samples / 01. Play AudioClip / 01-1. Play Audio Clip*. If you installed this from UPM, please import *Samples / 00. Common sample* (which contains Unity's assets).
After placing Unity-chan, add the `AudioSource` component to any game object where a sound will be played and set an `AudioClip` to it to play a Unity-chan's voice.
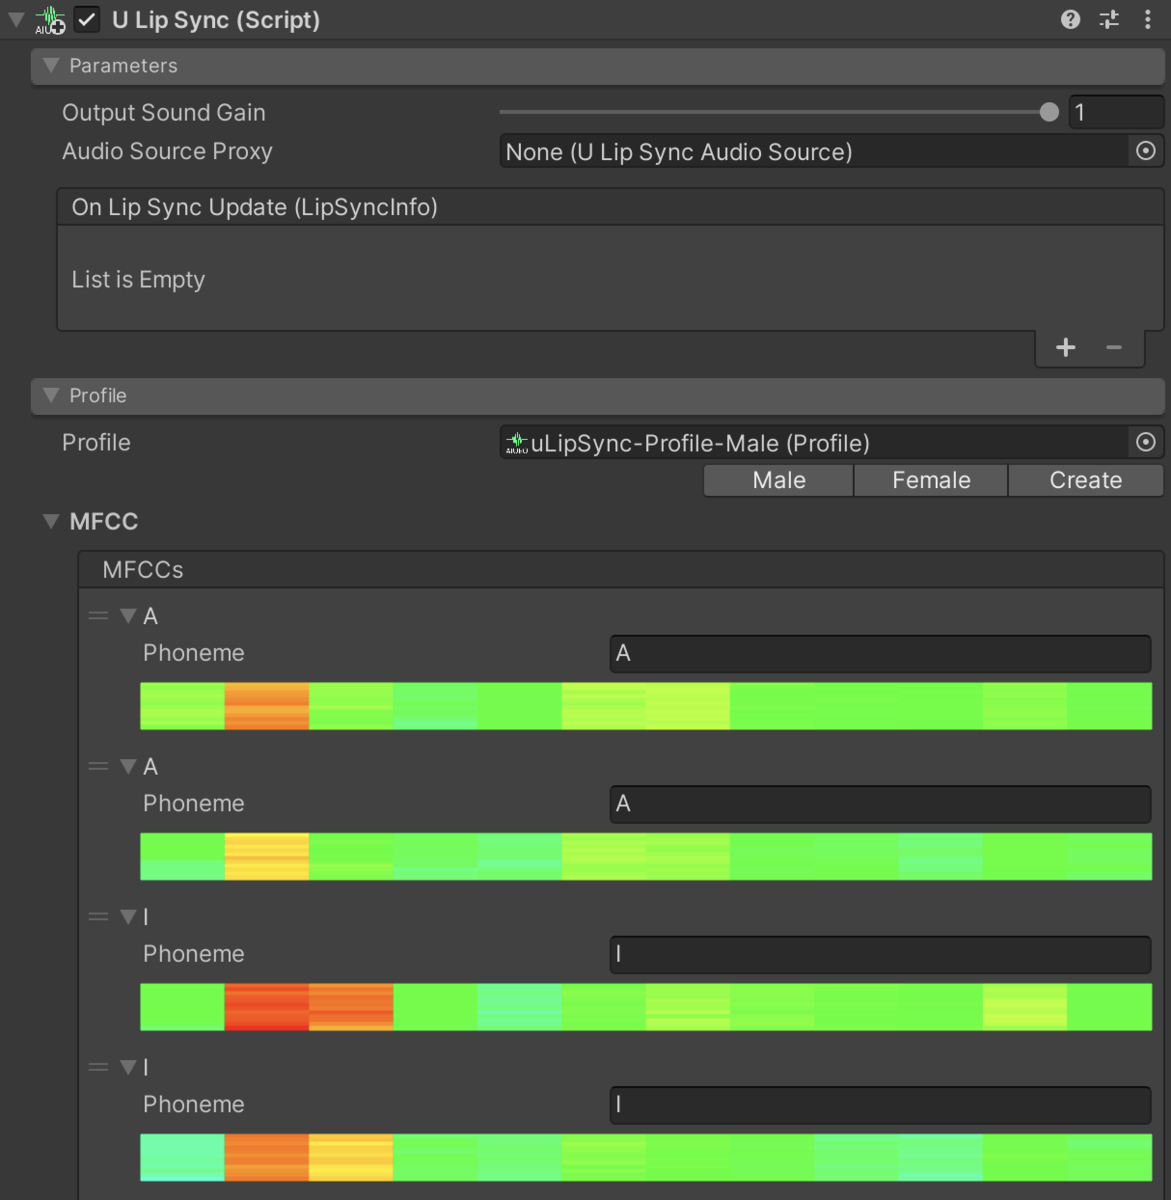
 First, add a `uLipSync` component to the same GameObject. For now, select `uLipSync-Profile-UnityChan` from the list and assign it to the *Profile* slot of the component (if you assign something different, such as Male, it will not lip sync properly).
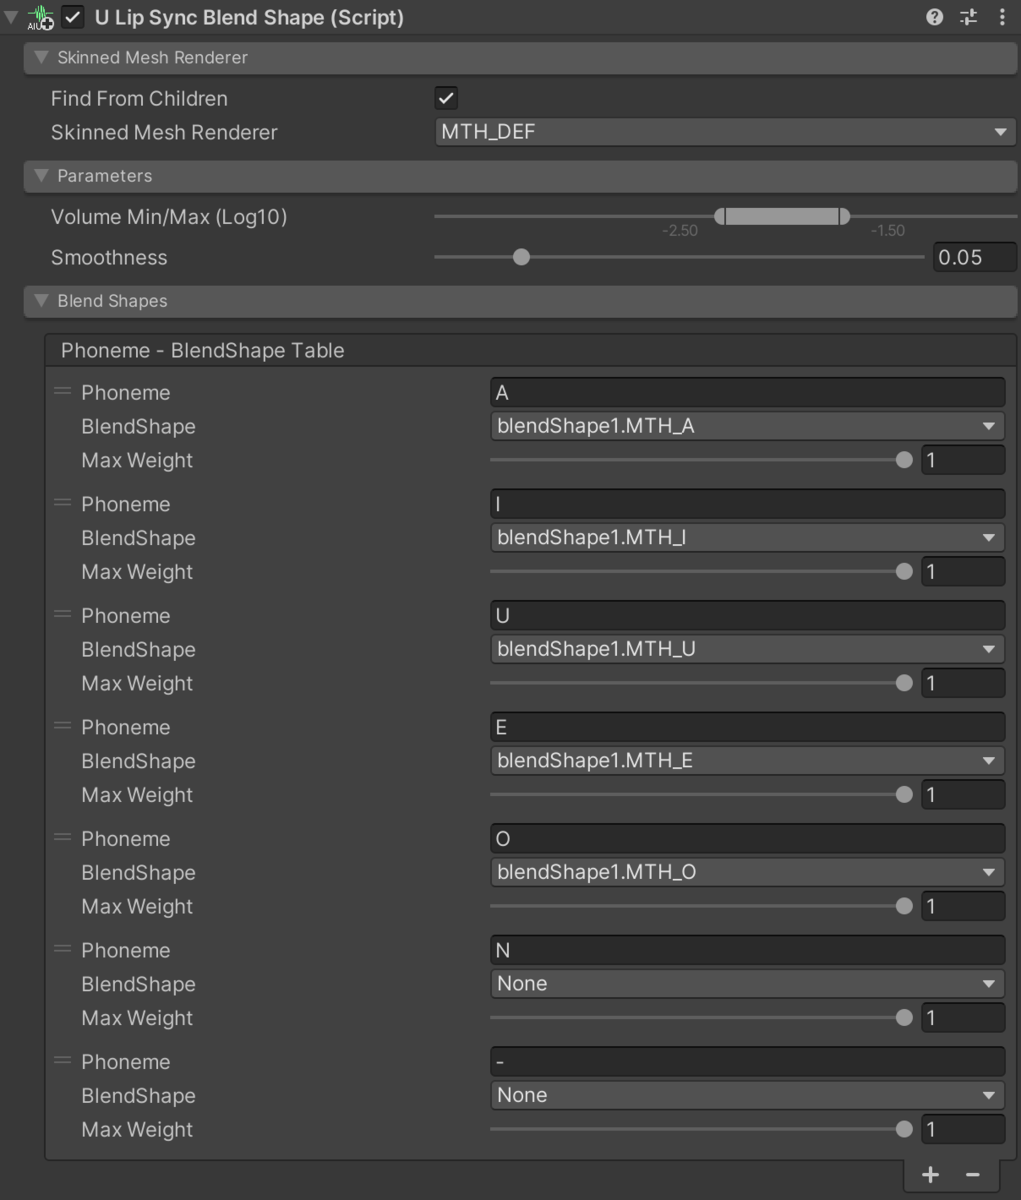
 Next, set up the blendshape to receive the results of the analysis and move them. Add `uLipSyncBlendShape` to the root of Unity-chan's `SkinnedMeshRenderer`. Select the target blendshape, `MTH_DEF`, and go to *Blend Shapes > Phoneme - BlendShape Table* and add 7 items, A, I, U, E, O, N, and -, by pushing the + button ("-" is for noise). Then select the blendshape corresponding to each phoneme, as shown in the following image.
 Finally, to connect the two, in the `uLipSync` component, go to *Parameters > On Lip Sync Updated (LipSyncInfo)* and press + to add an event, then drag and drop the game object (or component) with the `uLipSyncBlendShape` component where it says *None (Object)*. Find `uLipSyncBlendShape` in the pull-down list and select `OnLipSyncUpdate` in it.
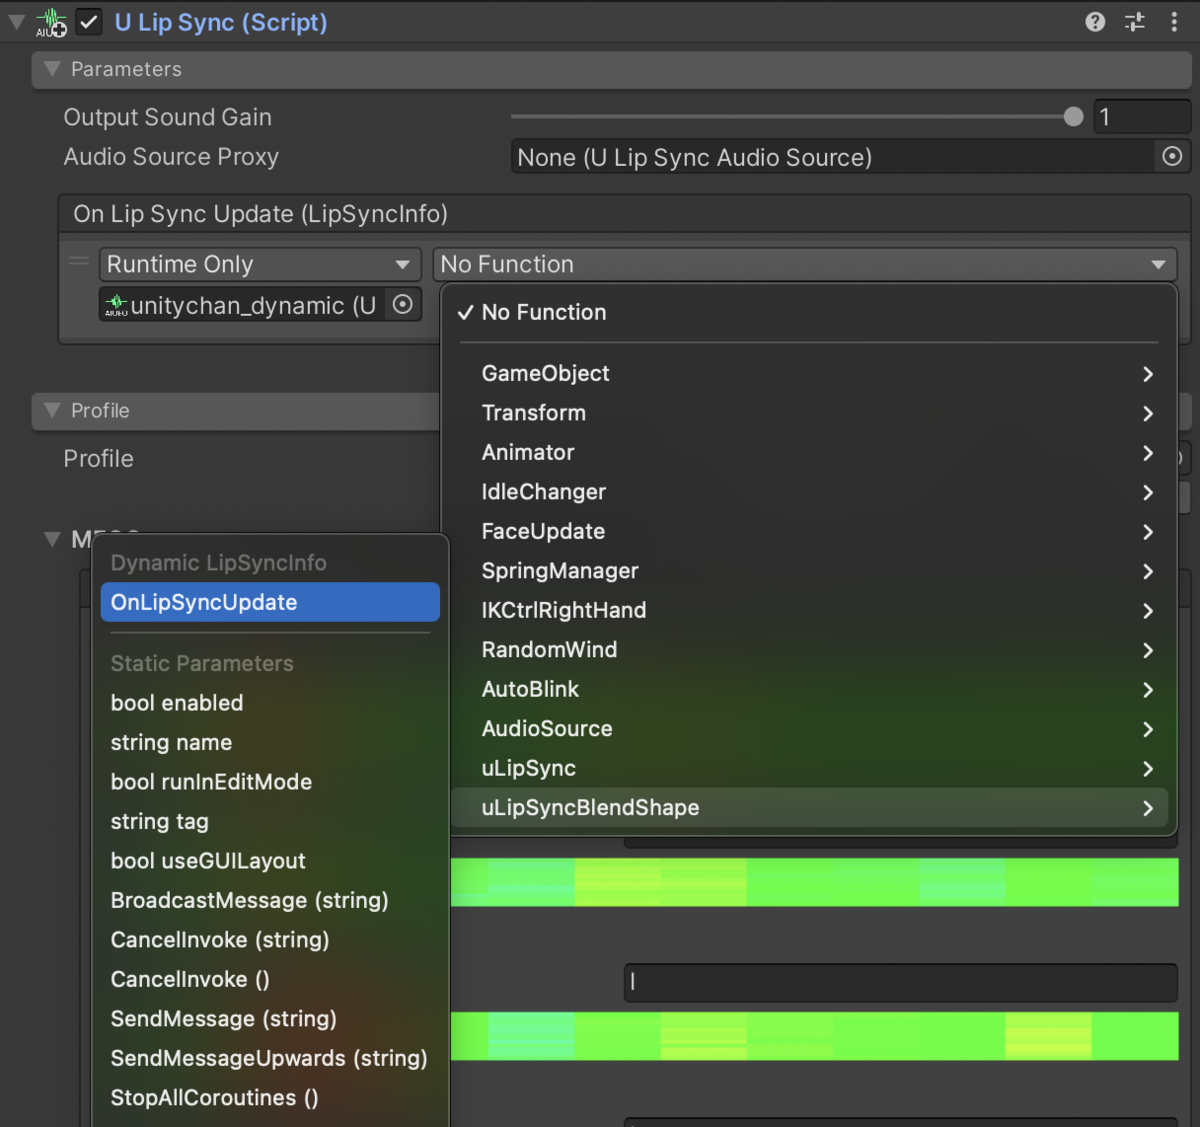 Now when you run the game, Unity-chan will move her mouth as she speaks.
### Adjust lipsync
The range of the volume to be recognized and the response speed of the mouth can be set in the *Parameters* of the `uLipSyncBlendShape` component.
Now when you run the game, Unity-chan will move her mouth as she speaks.
### Adjust lipsync
The range of the volume to be recognized and the response speed of the mouth can be set in the *Parameters* of the `uLipSyncBlendShape` component.
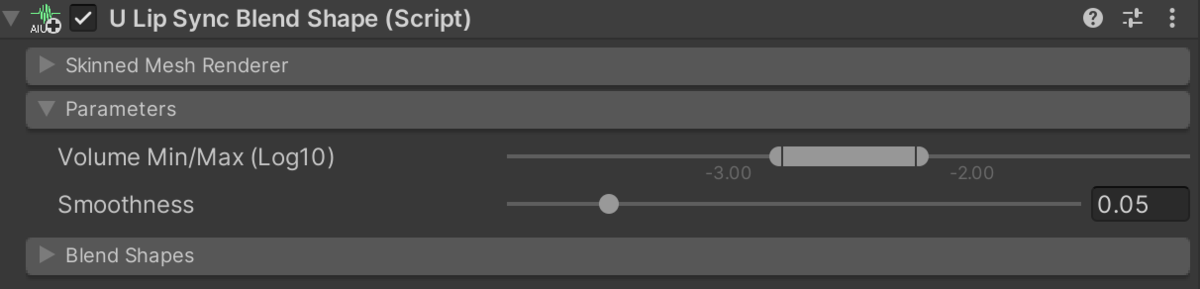 - Volume Min/Max (Log10)
- Set the minimum and maximum volume (closed / most open) to be recognized (Log10, so 0.1 is -1, 0.01 is -2).
- Smoothness
- The response speed of the mouth.
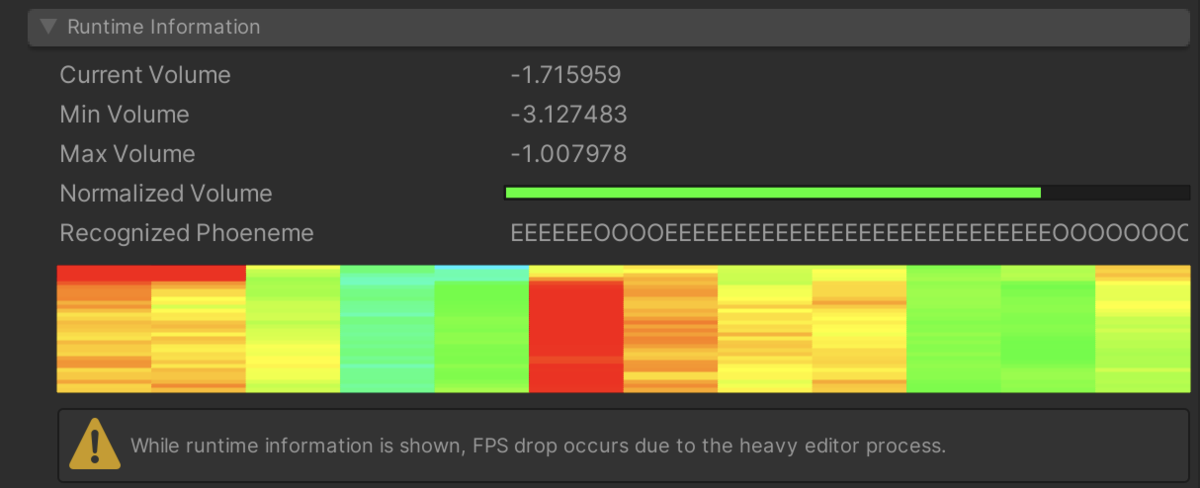
As for the volume, you can see the information about the current, maximum, and minimum volume in the *Runtime Information* of the `uLipSync` component, so try to set it based on this information.
### AudioSource Position
In some cases, you may want to attach the `AudioSource` to the mouth position and `uLipSync` to another GameObject. In this case, it may be a bit troublesome, but you can add a component called `uLipSyncAudioSource` to the same GameObject as the `AudioSource`, and set it in *uLipSync Parameters > Audio Source Proxy*. *Samples / 03. AudioSource Proxy* is a sample scene.
- Volume Min/Max (Log10)
- Set the minimum and maximum volume (closed / most open) to be recognized (Log10, so 0.1 is -1, 0.01 is -2).
- Smoothness
- The response speed of the mouth.
As for the volume, you can see the information about the current, maximum, and minimum volume in the *Runtime Information* of the `uLipSync` component, so try to set it based on this information.
### AudioSource Position
In some cases, you may want to attach the `AudioSource` to the mouth position and `uLipSync` to another GameObject. In this case, it may be a bit troublesome, but you can add a component called `uLipSyncAudioSource` to the same GameObject as the `AudioSource`, and set it in *uLipSync Parameters > Audio Source Proxy*. *Samples / 03. AudioSource Proxy* is a sample scene.
 ### Microphone
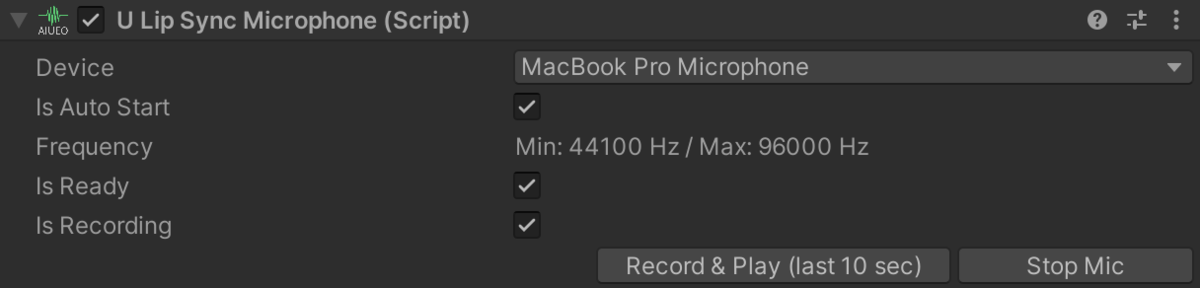
If you want to use a microphone as an input, add `uLipSyncMicrophone` to the same GameObject as `uLipSync`. This component will generate an `AudioSource` with the microphone input as a clip. The sample scene is *Samples / 02-1. Mic Input*.
### Microphone
If you want to use a microphone as an input, add `uLipSyncMicrophone` to the same GameObject as `uLipSync`. This component will generate an `AudioSource` with the microphone input as a clip. The sample scene is *Samples / 02-1. Mic Input*.
 Select the device to be used for input from *Device*, and if *Is Auto Start* is checked, it will start automatically. To start and stop microphone input, press the *Stop Mic* / *Start Mic* button in the UI as shown below at runtime.
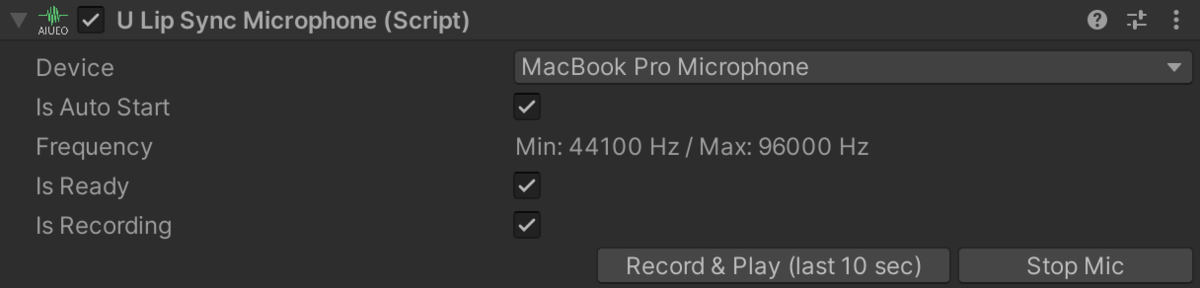 If you want to control it from a script, use `uLipSync.MicUtil.GetDeviceList()` to identify the microphone to be used, and pass its `MicDevice.index` to the `index` of this component. Then call `StartRecord()` to start it or `StopRecord()` to stop it.
Note that the microphone input will be played back in Unity a little later than your own speech. If you want to use a voice captured by another software for broadcasting, set *Parameters > Output Sound Gain* to 0 in the `uLipSync` component. If the volume of the `AudioSource` is set to 0, the data passed to `OnAudioFilterRead()` will be silent and cannot be analyzed.
In the `uLipSync` component, go to *Profile > Profile* and select a profile from the list (Male for male, Female for female, etc.) and run it. However, since the profile is not personalized, the accuracy of the default profile may not be good. Next, we will see how to create a calibration data that matches your own voice.
Calibration
-----------
So far we have used the sample `Profile` data, but in this section, let's see how to create data adjusted for other voices (voice actors' data or your own voice).
### Create Profile
Clicking the *Profile > Profile > Create* button in the `uLipSync` component will create the data in the root of the Assets directory and set it to the component. You can also create it from the *Project* window by right-clicking > *uLipSync > Profile*.
If you want to control it from a script, use `uLipSync.MicUtil.GetDeviceList()` to identify the microphone to be used, and pass its `MicDevice.index` to the `index` of this component. Then call `StartRecord()` to start it or `StopRecord()` to stop it.
Note that the microphone input will be played back in Unity a little later than your own speech. If you want to use a voice captured by another software for broadcasting, set *Parameters > Output Sound Gain* to 0 in the `uLipSync` component. If the volume of the `AudioSource` is set to 0, the data passed to `OnAudioFilterRead()` will be silent and cannot be analyzed.
In the `uLipSync` component, go to *Profile > Profile* and select a profile from the list (Male for male, Female for female, etc.) and run it. However, since the profile is not personalized, the accuracy of the default profile may not be good. Next, we will see how to create a calibration data that matches your own voice.
Calibration
-----------
So far we have used the sample `Profile` data, but in this section, let's see how to create data adjusted for other voices (voice actors' data or your own voice).
### Create Profile
Clicking the *Profile > Profile > Create* button in the `uLipSync` component will create the data in the root of the Assets directory and set it to the component. You can also create it from the *Project* window by right-clicking > *uLipSync > Profile*.
 Next, register the phonemes you want to be recognized in *Profile > MFCC > MFCCs*. Basically, AIUEO is fine, but it is recommended to add a phoneme for breath ("-" or other appropriate character) to prevent the breath input. You can use any alphabet, hiragana, katakana, etc. as long as the characters you register match the `uLipSyncBlendShape`.
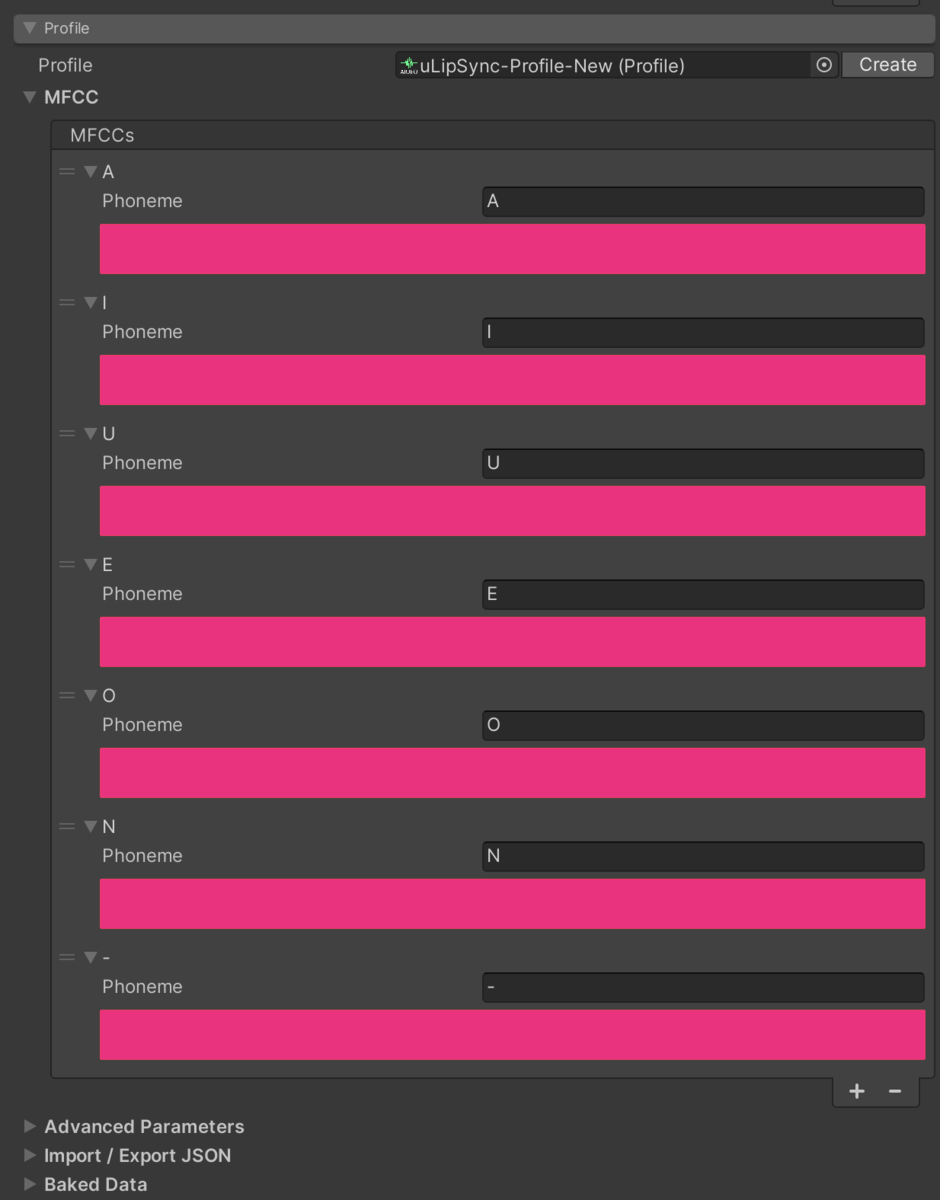 Next, we will calibrate each of the phonemes we have created.
### Calibration using Mic Input
The first way is to use a microphone. `uLipSyncMicrophone` should be added to the object. Calibration will be done at runtime, so start the game to analyze the input. Press and hold the *Calib* button to the right of each phoneme while speaking the sound of each phoneme into the microphone, such as "AAAAA" for A, "IIIIII" for I, and so on. If it's noise, don't say anything or blow on it.
Next, we will calibrate each of the phonemes we have created.
### Calibration using Mic Input
The first way is to use a microphone. `uLipSyncMicrophone` should be added to the object. Calibration will be done at runtime, so start the game to analyze the input. Press and hold the *Calib* button to the right of each phoneme while speaking the sound of each phoneme into the microphone, such as "AAAAA" for A, "IIIIII" for I, and so on. If it's noise, don't say anything or blow on it.
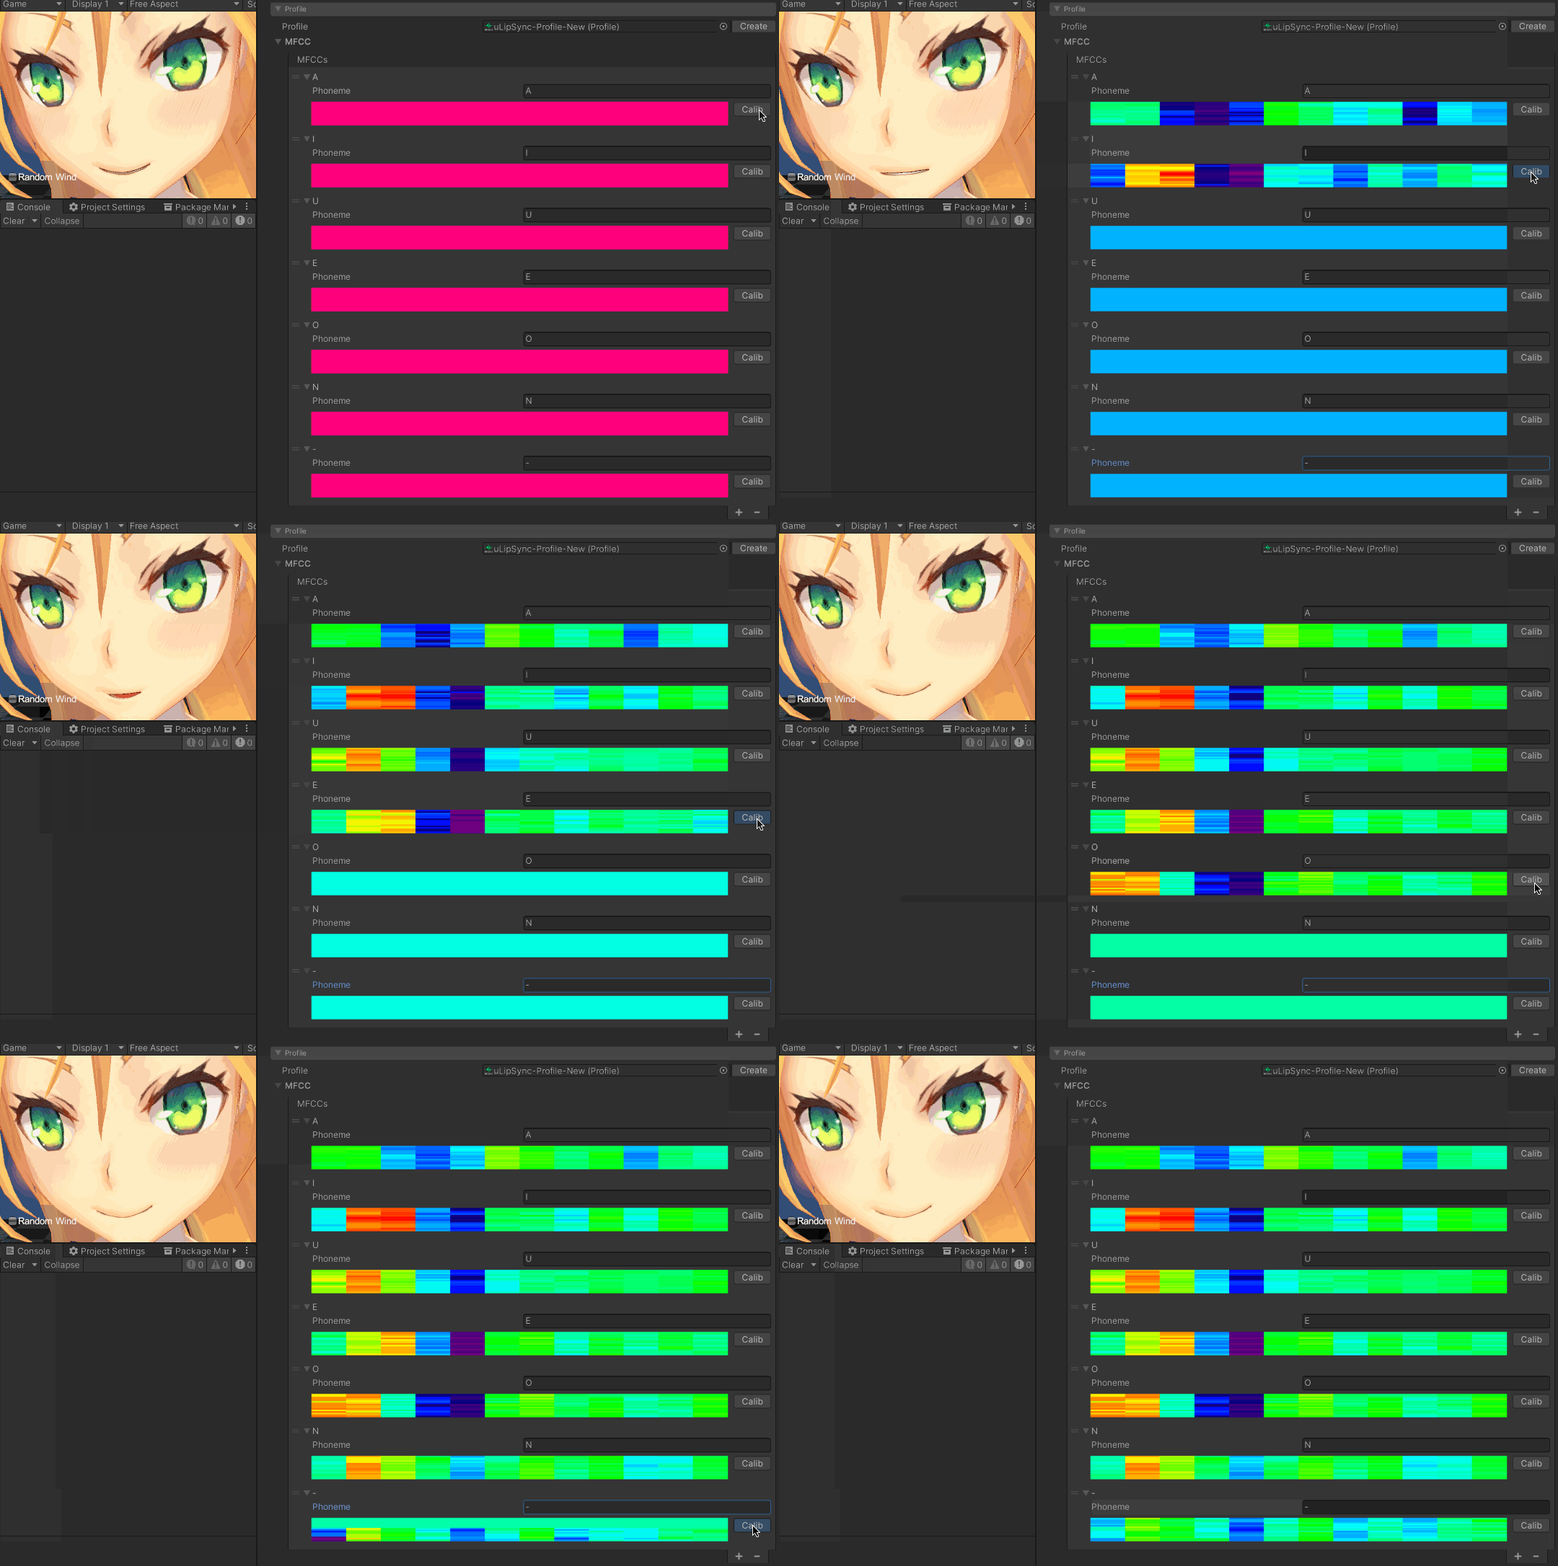 If you set `uLipSyncBlendShape` beforehand, it is interesting to see how the mouths gradually match.
If you have a slightly different way of speaking, for example, between your natural voice and your back voice, you can register multiple phonemes of the same name in the `Profile`, and adjust them accordingly.
If you set `uLipSyncBlendShape` beforehand, it is interesting to see how the mouths gradually match.
If you have a slightly different way of speaking, for example, between your natural voice and your back voice, you can register multiple phonemes of the same name in the `Profile`, and adjust them accordingly.
 ### Calibration using AudioClip
Next is the calibration method using audio data. If there is a voice that says "aaaaaaa" or "iiiiiii", please play it in a loop and press the *Calib* button as well. However, in most cases, there is no such audio, so we want to achieve calibration by trimming the "aaa"-like or "iii"-like part of the existing audio and playing it back. A useful component for this is `uLipSyncCalibrationAudioPlayer`. This is a component that loops the audio waveform while slightly cross-fading the part you want to play.
### Calibration using AudioClip
Next is the calibration method using audio data. If there is a voice that says "aaaaaaa" or "iiiiiii", please play it in a loop and press the *Calib* button as well. However, in most cases, there is no such audio, so we want to achieve calibration by trimming the "aaa"-like or "iii"-like part of the existing audio and playing it back. A useful component for this is `uLipSyncCalibrationAudioPlayer`. This is a component that loops the audio waveform while slightly cross-fading the part you want to play.
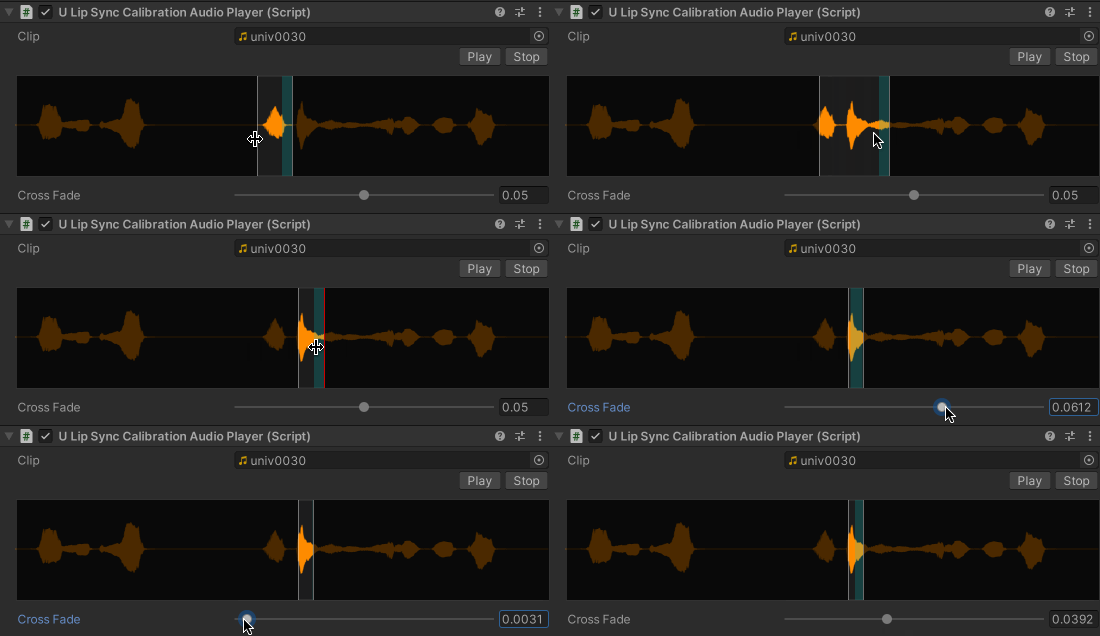 Select the part that seems to say "aaaaa" by dragging the boundary, and then press the *Calib* button for each phoneme to register the MFCC to the `Profile`.
### Calibration Tips
When calibrating, you should pay attention to the following points.
- Perform calibration with mic in an environment with as little noise as possible.
- Make sure that the registered MFCCs are as constant as possible.
- After calibration, check several times and re-calibrate phonemes that don't work, or register additional phonemes.
- You can register multiple phonemes of the same name, so if they don't match when you change the voice tone, try registering more of them
- If the phonemes don't match, check if you have the wrong phoneme.
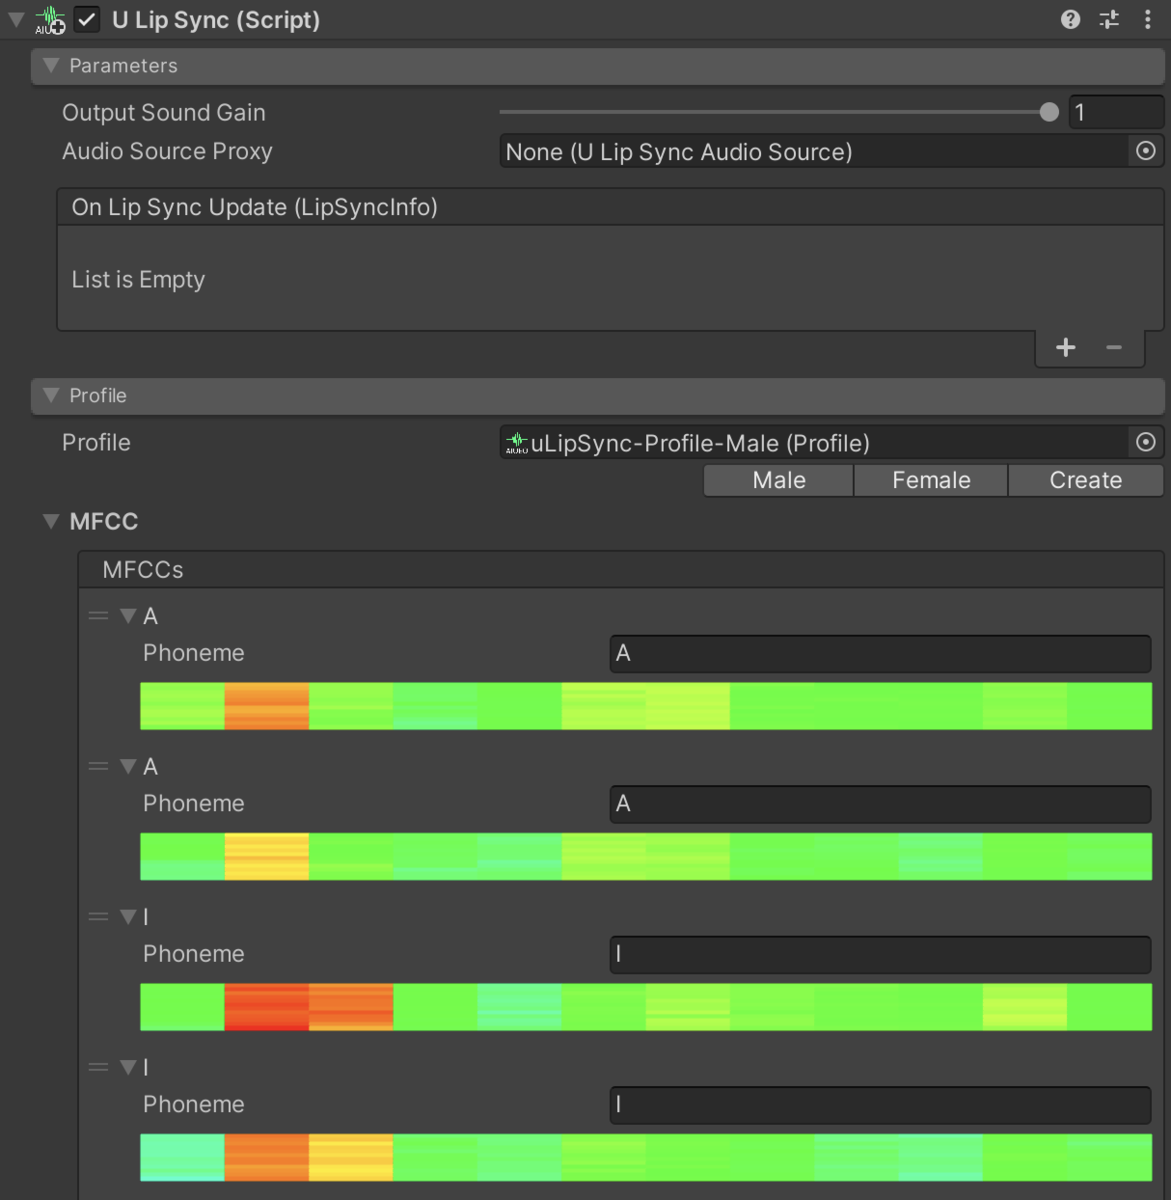
- If there is a phoneme with the same name but completely different color pattern in MFCC, it may be wrong (same phoneme should have similar pattern).
- Collapse the *Runtime Information* when checking after calibration.
- The editor is redrawn every frame, so the frame rate may fall below 60.
Pre-Bake
---------
So far, we have looked at runtime processing. Now we will look at the production of data through pre-calculation.
### Mechanism
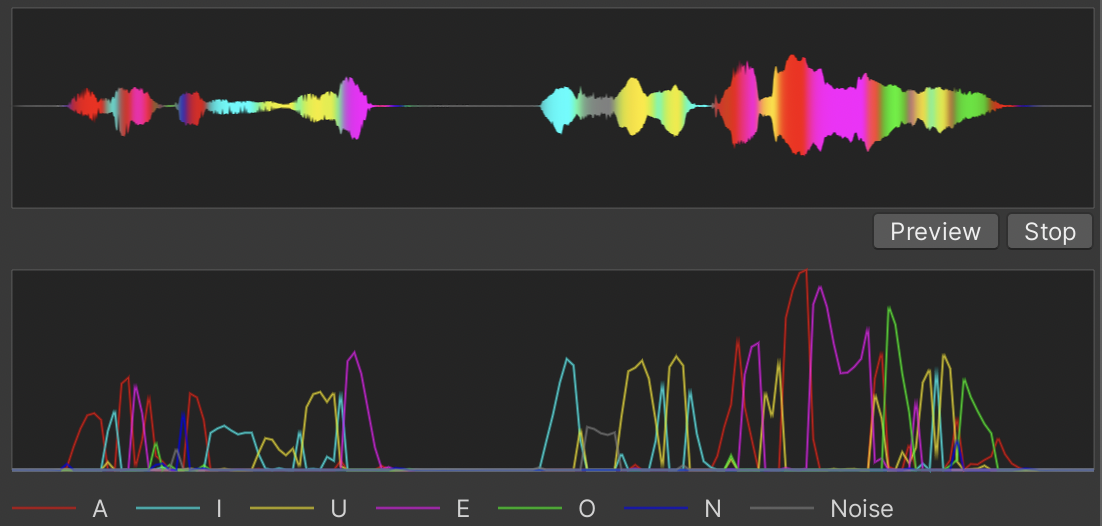
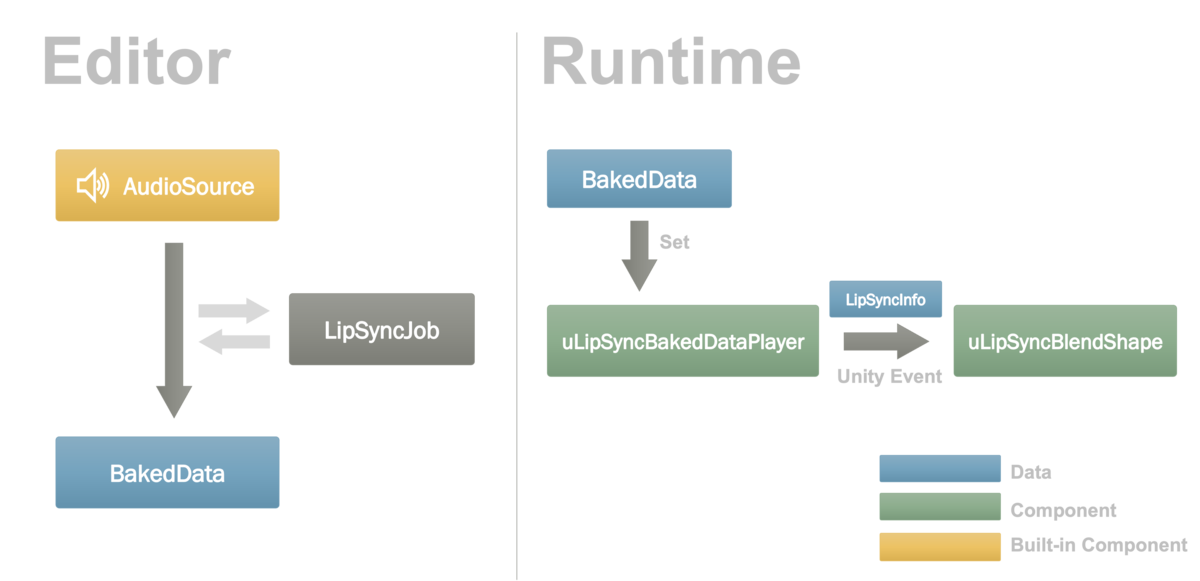
If you have audio data, you can calculate in advance what kind of analysis results you will receive each frame, so we will bake it into a `ScriptableObject` called `BakedData`. At runtime, instead of using `uLipSync` to analyze the data at runtime, we will use a component named `uLipSyncBakedDataPlayer` to play the data. This component can notify the result of the analysis with an event just like `uLipSync`, so you can register `uLipSyncBlendShape` to realize lipsync. This flow is illustrated in the following figure.
Select the part that seems to say "aaaaa" by dragging the boundary, and then press the *Calib* button for each phoneme to register the MFCC to the `Profile`.
### Calibration Tips
When calibrating, you should pay attention to the following points.
- Perform calibration with mic in an environment with as little noise as possible.
- Make sure that the registered MFCCs are as constant as possible.
- After calibration, check several times and re-calibrate phonemes that don't work, or register additional phonemes.
- You can register multiple phonemes of the same name, so if they don't match when you change the voice tone, try registering more of them
- If the phonemes don't match, check if you have the wrong phoneme.
- If there is a phoneme with the same name but completely different color pattern in MFCC, it may be wrong (same phoneme should have similar pattern).
- Collapse the *Runtime Information* when checking after calibration.
- The editor is redrawn every frame, so the frame rate may fall below 60.
Pre-Bake
---------
So far, we have looked at runtime processing. Now we will look at the production of data through pre-calculation.
### Mechanism
If you have audio data, you can calculate in advance what kind of analysis results you will receive each frame, so we will bake it into a `ScriptableObject` called `BakedData`. At runtime, instead of using `uLipSync` to analyze the data at runtime, we will use a component named `uLipSyncBakedDataPlayer` to play the data. This component can notify the result of the analysis with an event just like `uLipSync`, so you can register `uLipSyncBlendShape` to realize lipsync. This flow is illustrated in the following figure.
 ### Setup
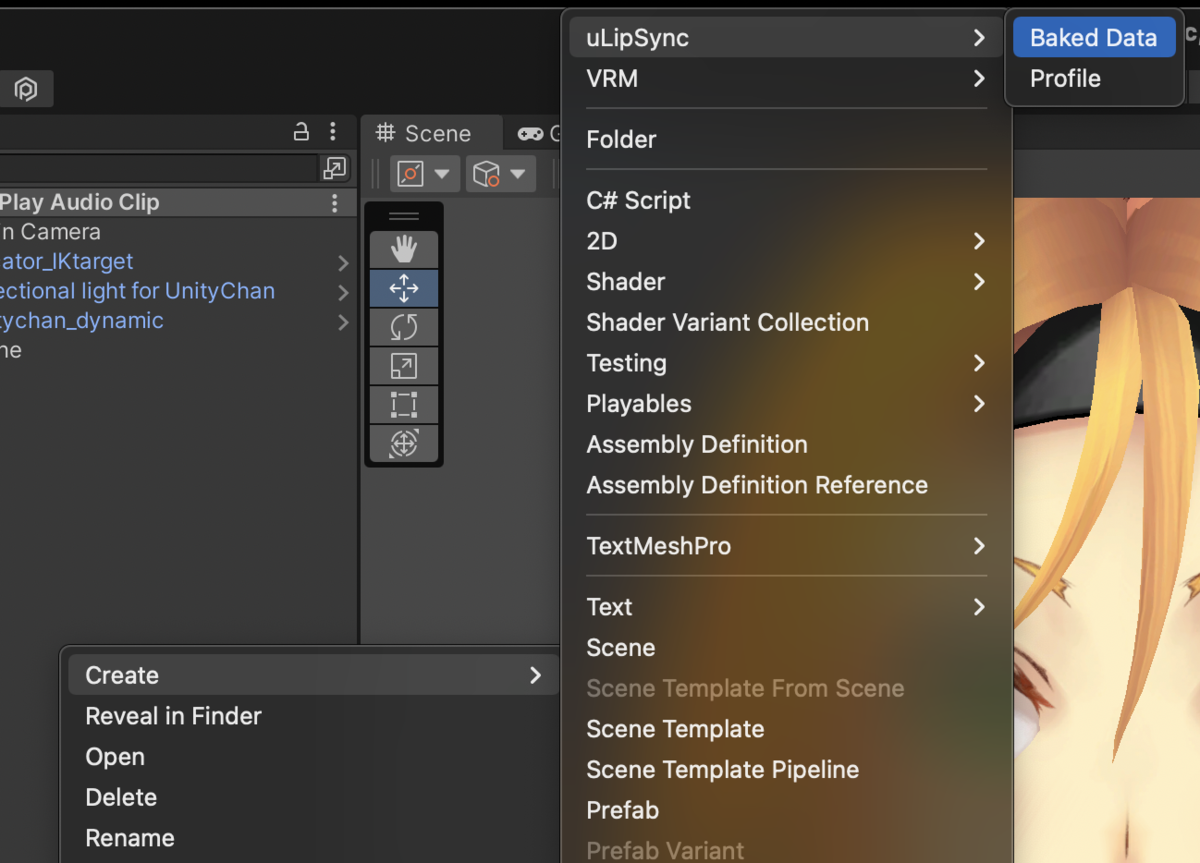
The sample scene is *Samples / 05. Bake*. You can create a `BakedData` from the *Project* window by going to *Create > uLipSync > BakedData*.
### Setup
The sample scene is *Samples / 05. Bake*. You can create a `BakedData` from the *Project* window by going to *Create > uLipSync > BakedData*.
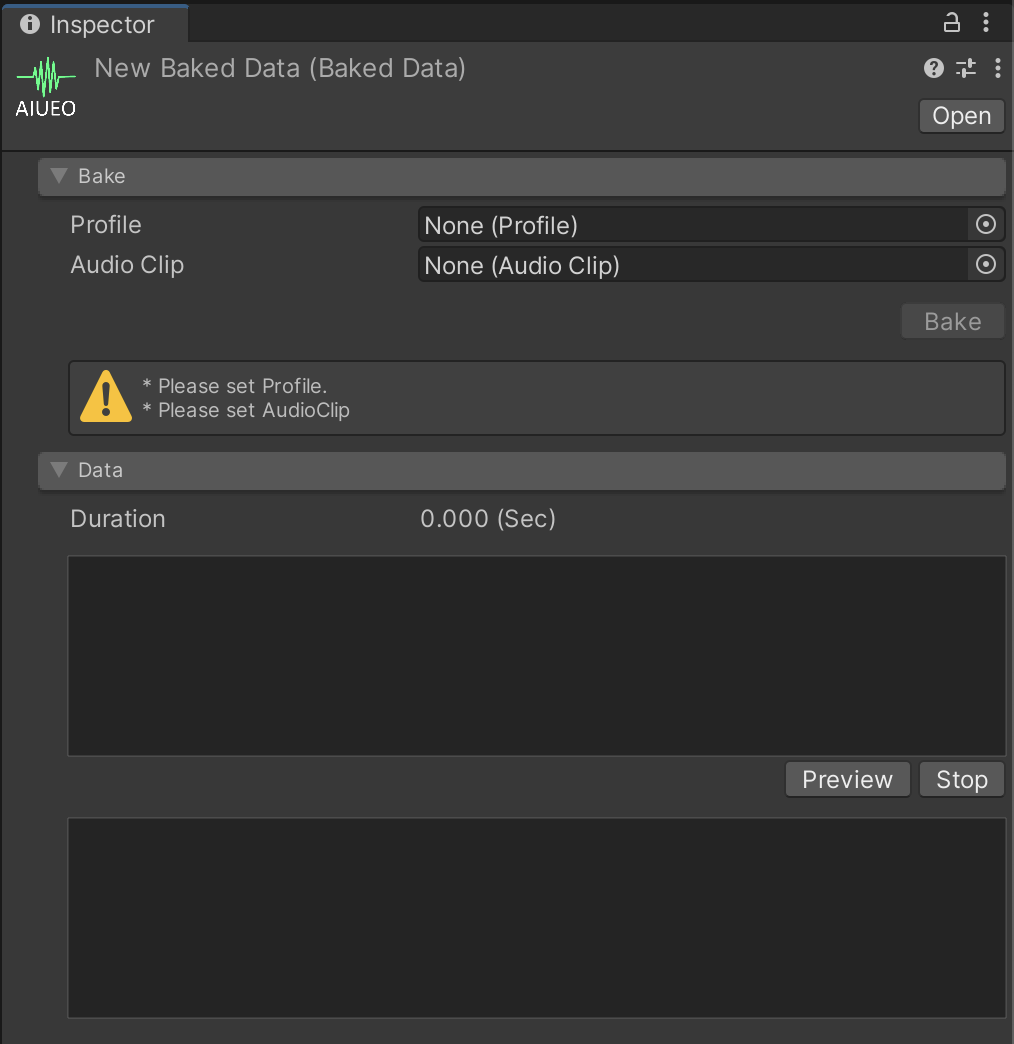 Here, specify the calibrated `Profile` and an `AudioClip`, then click the *Bake* button to analyze the data and complete the data.
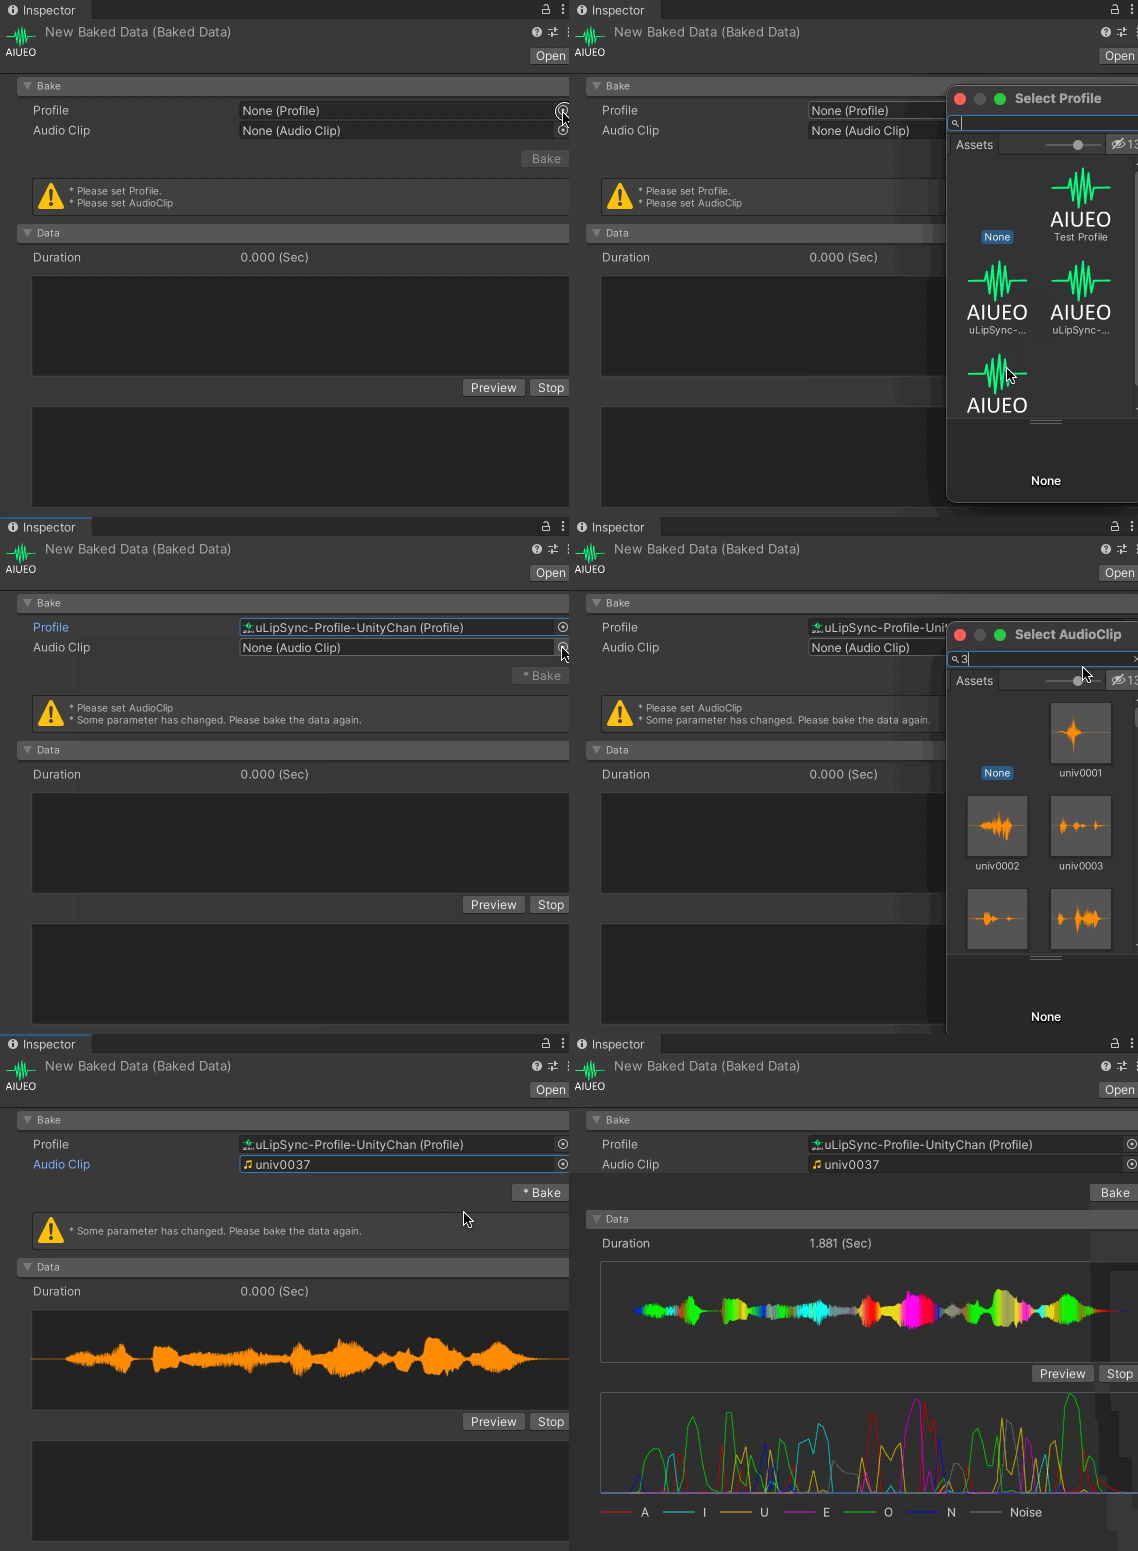 If it works well, the data will look like the following.
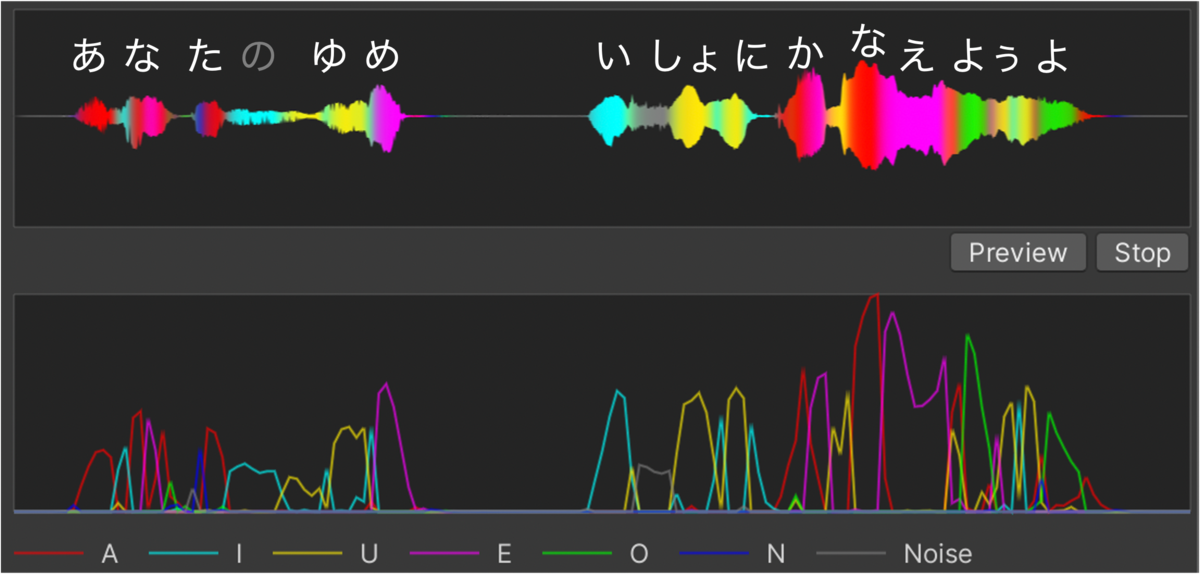 Set this data to the `uLipSyncBakedDataPlayer`.
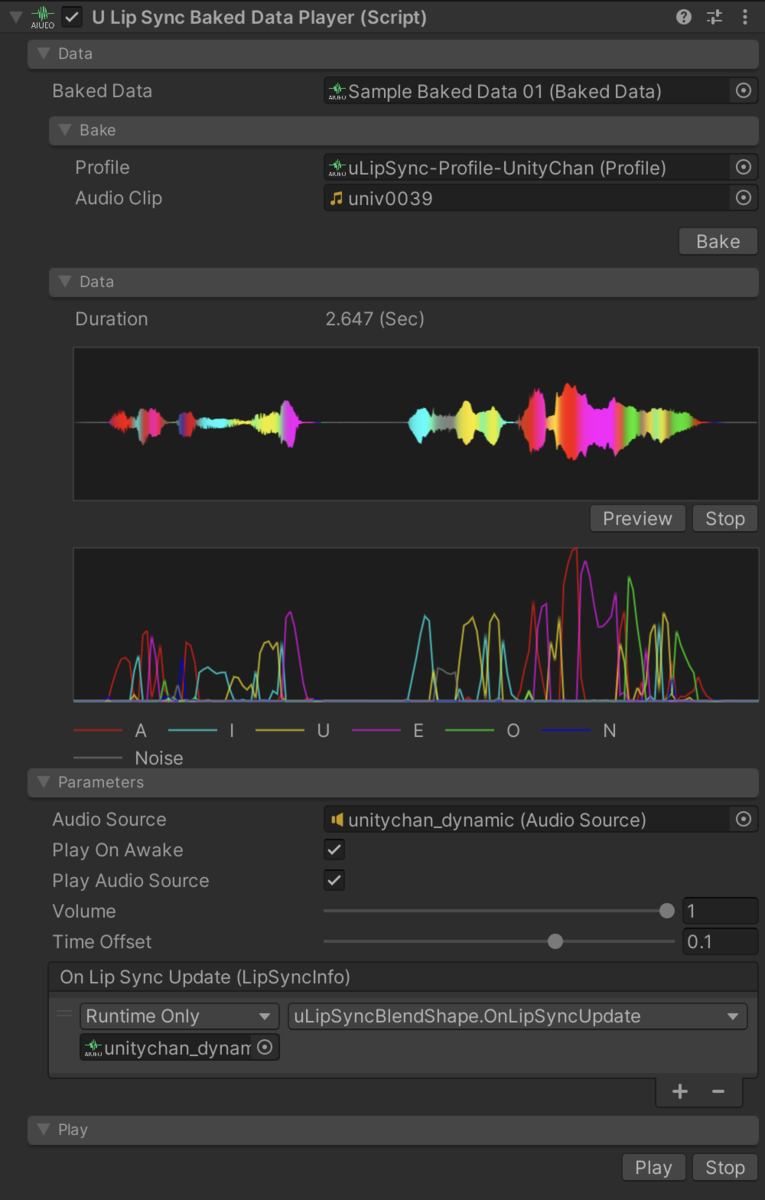 Now you are ready to play. If you want to check it again in the editor, press the *Play* button, or if you want to play it from another script, just call `Play()`.
### Parameters
By adjusting the *Time Offset* slider, you can modify the timing of the lipsync. With runtime analysis, it is not possible to adjust the opening of the mouth before the voice, but with pre-calculation, it is possible to open the mouth a little earlier, so it can be adjusted to look more natural.
### Batch conversion (1)
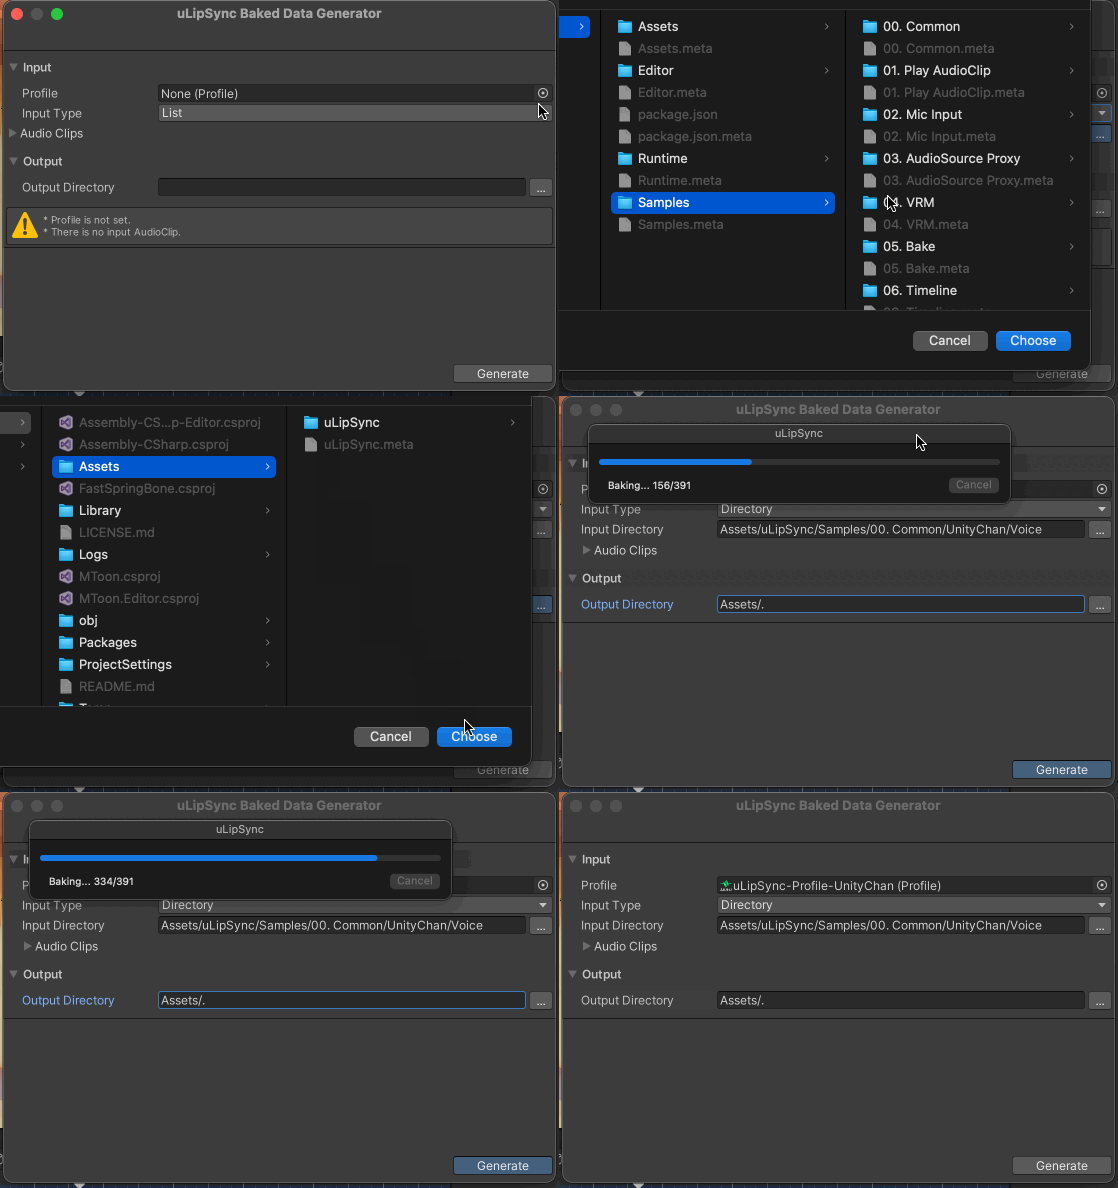
In some cases, you may want to convert all the character voice `AudioClip`s to `BakedData` at once. In this case, please use *Window > uLipSync > Baked Data Generator*.
Select the *Profile* you want to use for batch conversion, and then select the target *AudioClips*. If the *Input Type* is *List*, register the *AudioClips* directly (dragging and dropping multiple selections from the *Project* window is easy). If the *Input Type* is *List*, register the AudioClip directly (dragging and dropping multiple selections from the *Project* window is easy). If the Input Type is *Directory*, a file dialog will open where you can specify a directory, and it will automatically list the *AudioClips* under that directory.
Click the Generate button to start the conversion.
Now you are ready to play. If you want to check it again in the editor, press the *Play* button, or if you want to play it from another script, just call `Play()`.
### Parameters
By adjusting the *Time Offset* slider, you can modify the timing of the lipsync. With runtime analysis, it is not possible to adjust the opening of the mouth before the voice, but with pre-calculation, it is possible to open the mouth a little earlier, so it can be adjusted to look more natural.
### Batch conversion (1)
In some cases, you may want to convert all the character voice `AudioClip`s to `BakedData` at once. In this case, please use *Window > uLipSync > Baked Data Generator*.
Select the *Profile* you want to use for batch conversion, and then select the target *AudioClips*. If the *Input Type* is *List*, register the *AudioClips* directly (dragging and dropping multiple selections from the *Project* window is easy). If the *Input Type* is *List*, register the AudioClip directly (dragging and dropping multiple selections from the *Project* window is easy). If the Input Type is *Directory*, a file dialog will open where you can specify a directory, and it will automatically list the *AudioClips* under that directory.
Click the Generate button to start the conversion.
 ### Batch conversion (2)
When you have already created data, you may want to review the calibration and change the profile. In this case, there is a *Reconvert* button in the *Baked Data* tab of each `Profile`, which converts all the data using the `Profile`.
### Batch conversion (2)
When you have already created data, you may want to review the calibration and change the profile. In this case, there is a *Reconvert* button in the *Baked Data* tab of each `Profile`, which converts all the data using the `Profile`.
 Timeline
--------
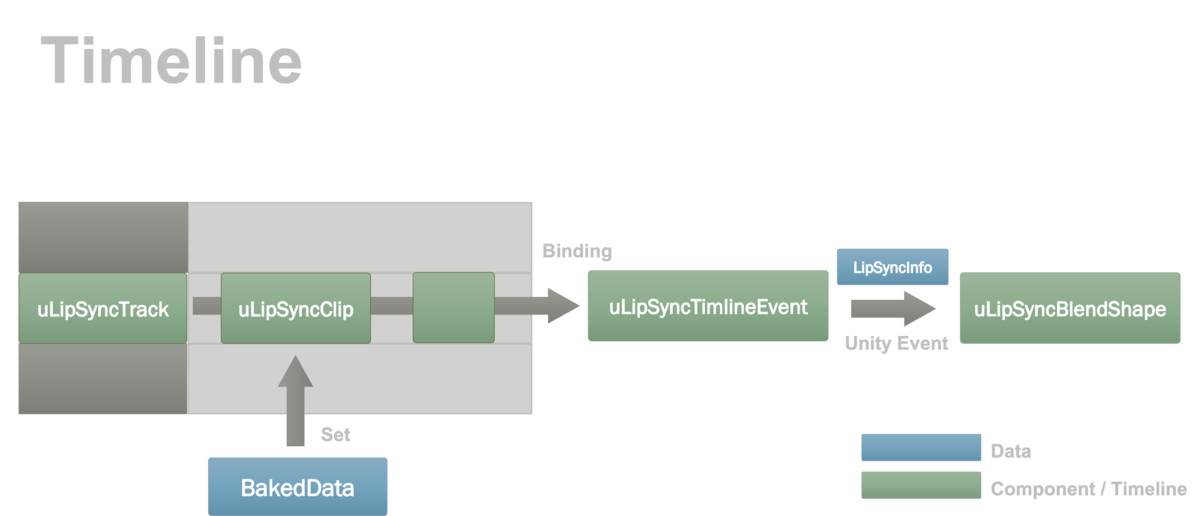
You can add special tracks and clips for uLipSync in *Timeline*. We then need to bind which objects will be moved using the data from the Timeline. To do this, a component named `uLipSyncTimelineEvent` that receives playback information and notifies `uLipSyncBlendShape` is introduced. The flow is illustrated below.
Timeline
--------
You can add special tracks and clips for uLipSync in *Timeline*. We then need to bind which objects will be moved using the data from the Timeline. To do this, a component named `uLipSyncTimelineEvent` that receives playback information and notifies `uLipSyncBlendShape` is introduced. The flow is illustrated below.
 ### Setup
Right-click in the track area in the Timeline and add a dedicated track from *uLipSync.Timeline > uLipSync Track*. Then right-click in the clip area and add a clip from *Add From Baked Data*. You can also drag and drop `BakedData` directly onto this area.
### Setup
Right-click in the track area in the Timeline and add a dedicated track from *uLipSync.Timeline > uLipSync Track*. Then right-click in the clip area and add a clip from *Add From Baked Data*. You can also drag and drop `BakedData` directly onto this area.
 When you select a clip, you will see the following UI in the *Inspector*, where you can replace the `BakedData`.
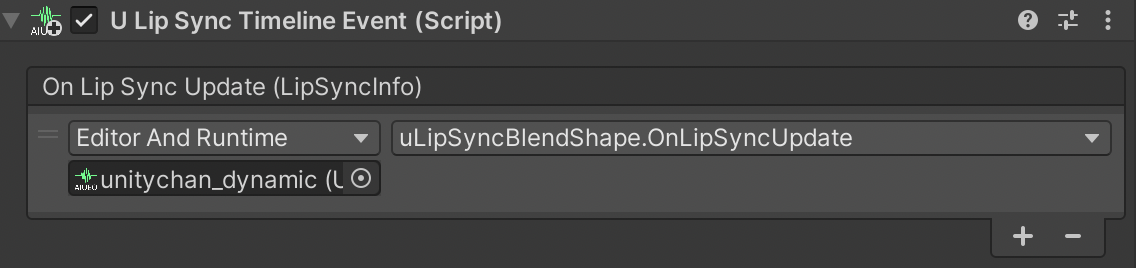
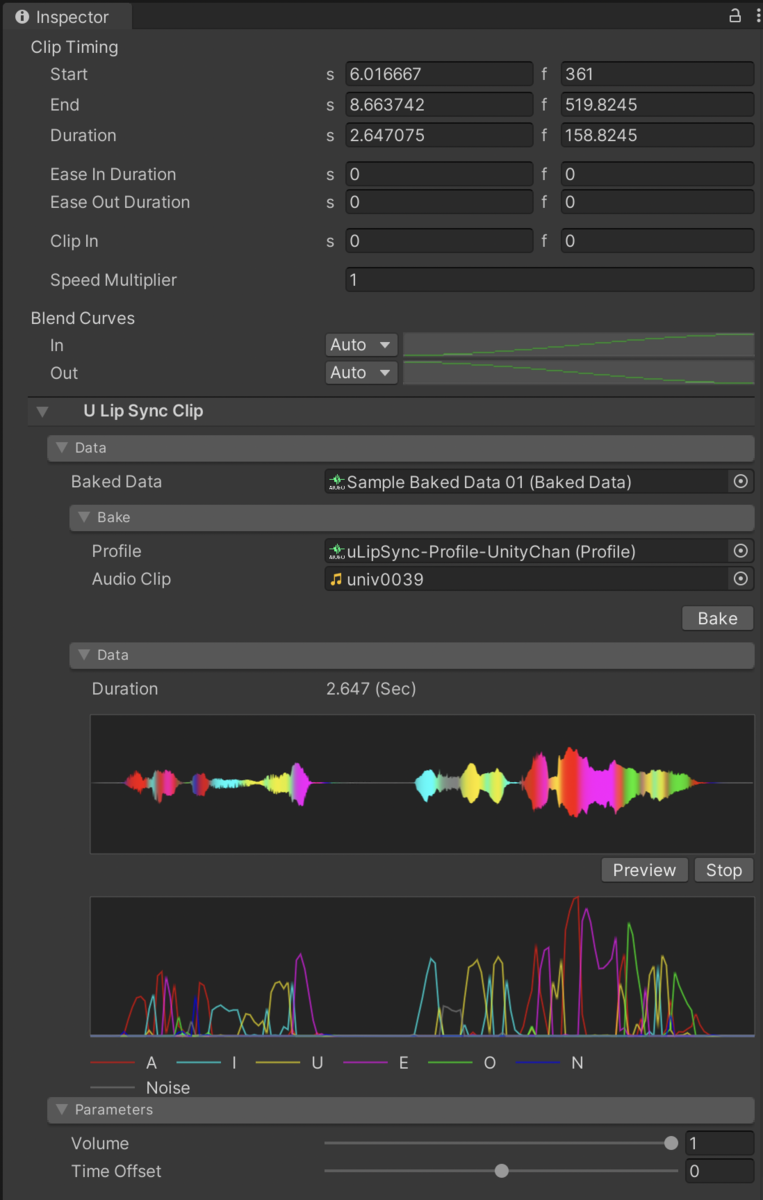 Next, add a `uLipSyncTimelineEvent` to some game object, and then add the binding so that lipsync can be played. At this time, register the `uLipSyncBlendShape` in the *On Lip Sync Update (LipSyncInfo)*.
 Then click on the game object with the `PlayableDirector` and drag and drop the game object into the slot for binding on the `uLipSyncTrack` in the *Timeline* window.
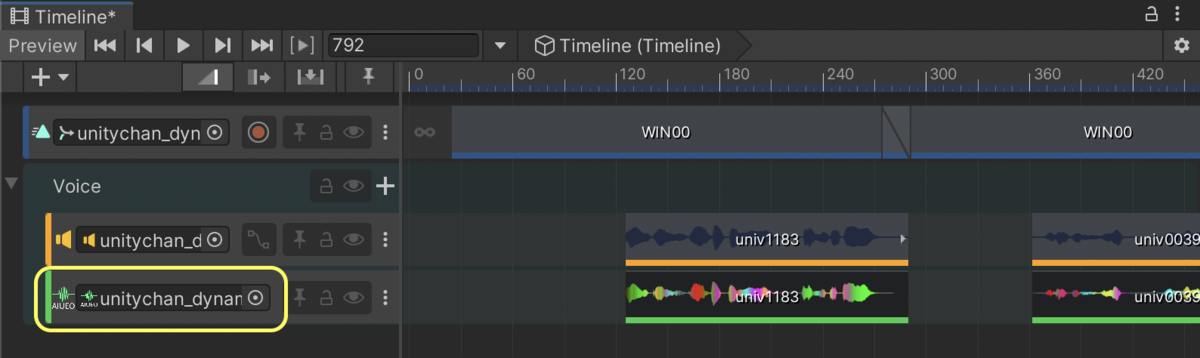 Now the lipsync information will be sent to `uLipSyncTimelineEvent`, and the connection to `uLipSyncBlendShape` is established. Playback can also be done during editing, so you can adjust it with the animation and sound.
### Timeline Setup Helper
*Window > uLipSync > Timeline Setup Helper*
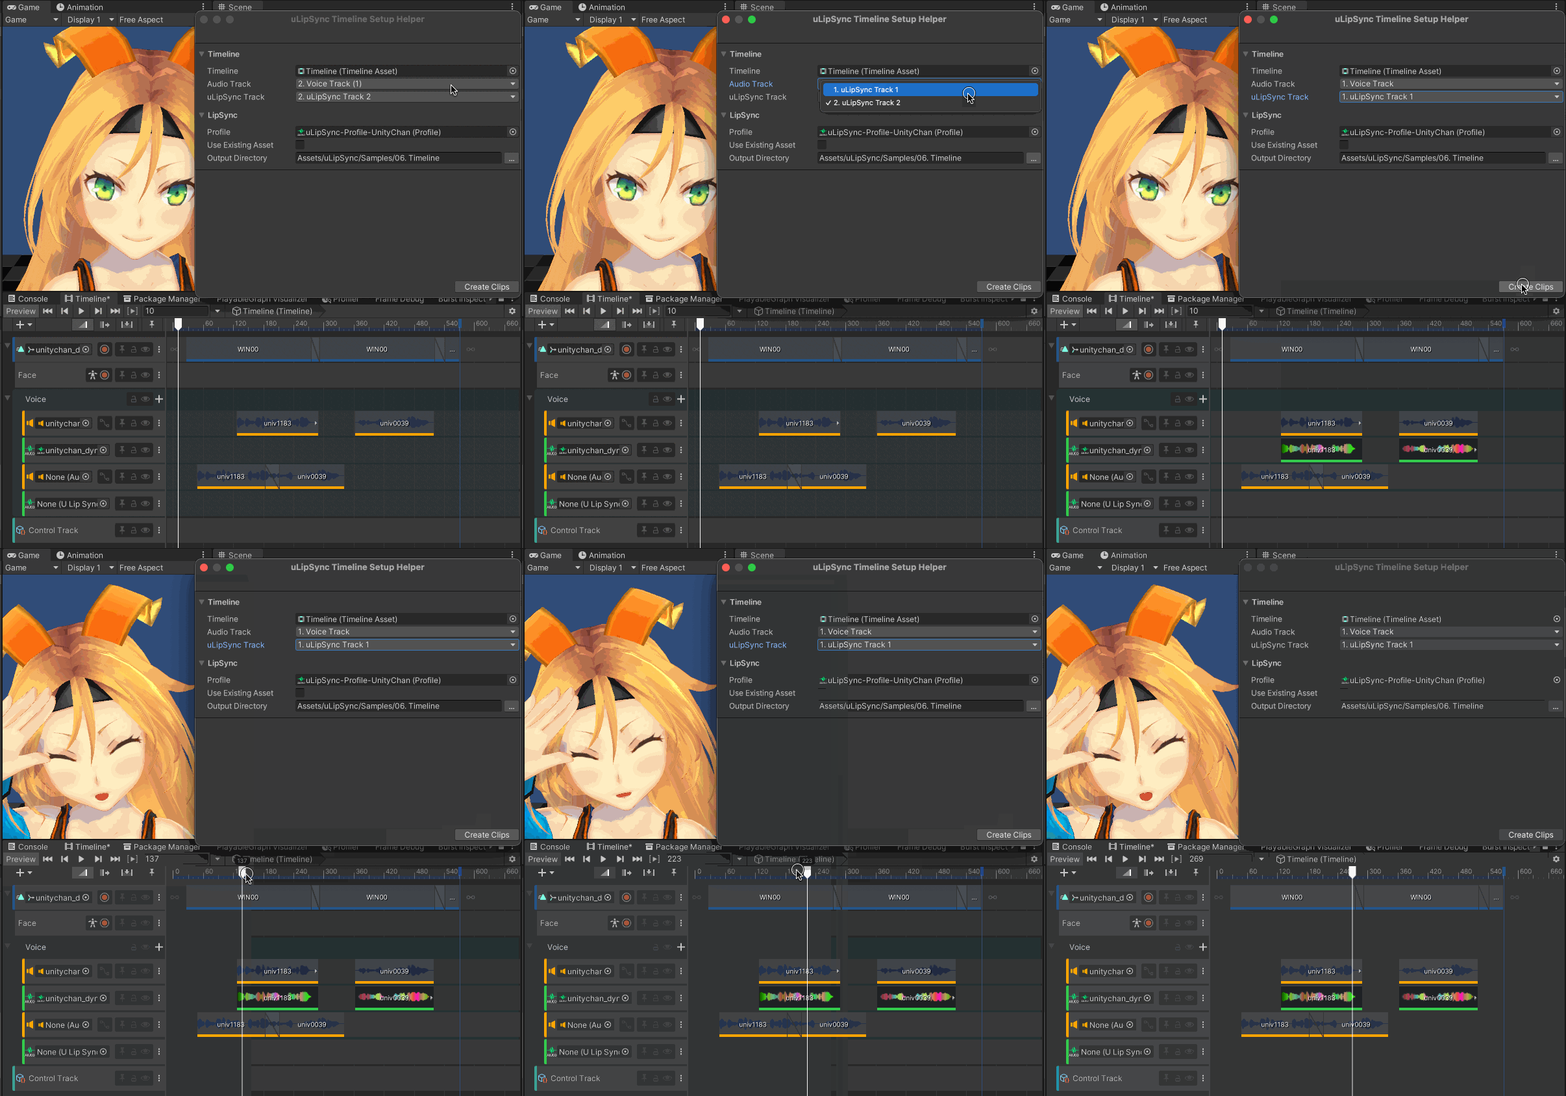
This tool automatically creates `BakedData` corresponding to clips registered in **AudioTrack** and registers them in **uLipSync Track**.
Now the lipsync information will be sent to `uLipSyncTimelineEvent`, and the connection to `uLipSyncBlendShape` is established. Playback can also be done during editing, so you can adjust it with the animation and sound.
### Timeline Setup Helper
*Window > uLipSync > Timeline Setup Helper*
This tool automatically creates `BakedData` corresponding to clips registered in **AudioTrack** and registers them in **uLipSync Track**.
 Animation Bake
--------------
You can also convert `BakedData`, which is pre-calculated lip-sync data, into an `AnimationClip`. Saving it as an animation makes it easy to combine it with other animations, to integrate it into your existing workflow, and to adjust it later by moving the keys. The sample scene is *Samples / 07. Animation Bake*.
### Setup
Select *Window > uLipSync > Animation Clip Generator* to open the *uLipSync Animation Clip Generator* window.
Animation Bake
--------------
You can also convert `BakedData`, which is pre-calculated lip-sync data, into an `AnimationClip`. Saving it as an animation makes it easy to combine it with other animations, to integrate it into your existing workflow, and to adjust it later by moving the keys. The sample scene is *Samples / 07. Animation Bake*.
### Setup
Select *Window > uLipSync > Animation Clip Generator* to open the *uLipSync Animation Clip Generator* window.
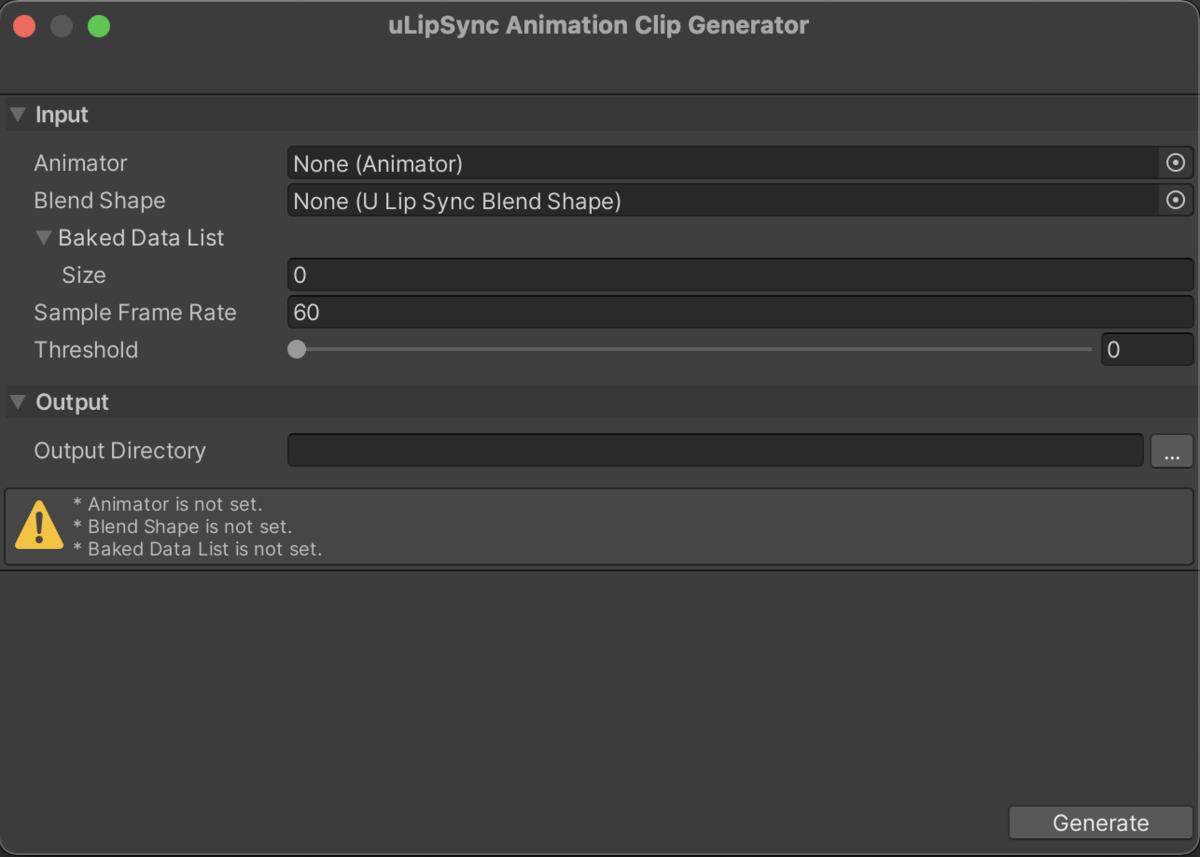 To run the animation bake, you need to open the scene where you have set up a `uLipSyncBlendShape` component. Then, please set the components in the scene to the fields in this window.
- Animator
- Select an `Animator` component in the scene.
- An `AnimationClip` will be created in a hierarchical structure starting from this Animator.
- Blend Shape
- Select a `uLipSyncBlendShape` component that exists in the scene.
- Baked Data List
- Select the BakedData assets that you want to convert into `AnimationClip`s.
- Sample Frame Rate
- Specify the sampling rate (fps) at which you want to add the keys.
- Threshold
- The keys will be added only when the weight changes by this value.
- The maximum value of the weight is 100, so 10 means when the weight changes by 10%.
- Output Directory
- Specify the directory to output the baked animation clip.
- If the directory is empty, create it under *Assets* (root).
The following image is an example setup.
To run the animation bake, you need to open the scene where you have set up a `uLipSyncBlendShape` component. Then, please set the components in the scene to the fields in this window.
- Animator
- Select an `Animator` component in the scene.
- An `AnimationClip` will be created in a hierarchical structure starting from this Animator.
- Blend Shape
- Select a `uLipSyncBlendShape` component that exists in the scene.
- Baked Data List
- Select the BakedData assets that you want to convert into `AnimationClip`s.
- Sample Frame Rate
- Specify the sampling rate (fps) at which you want to add the keys.
- Threshold
- The keys will be added only when the weight changes by this value.
- The maximum value of the weight is 100, so 10 means when the weight changes by 10%.
- Output Directory
- Specify the directory to output the baked animation clip.
- If the directory is empty, create it under *Assets* (root).
The following image is an example setup.
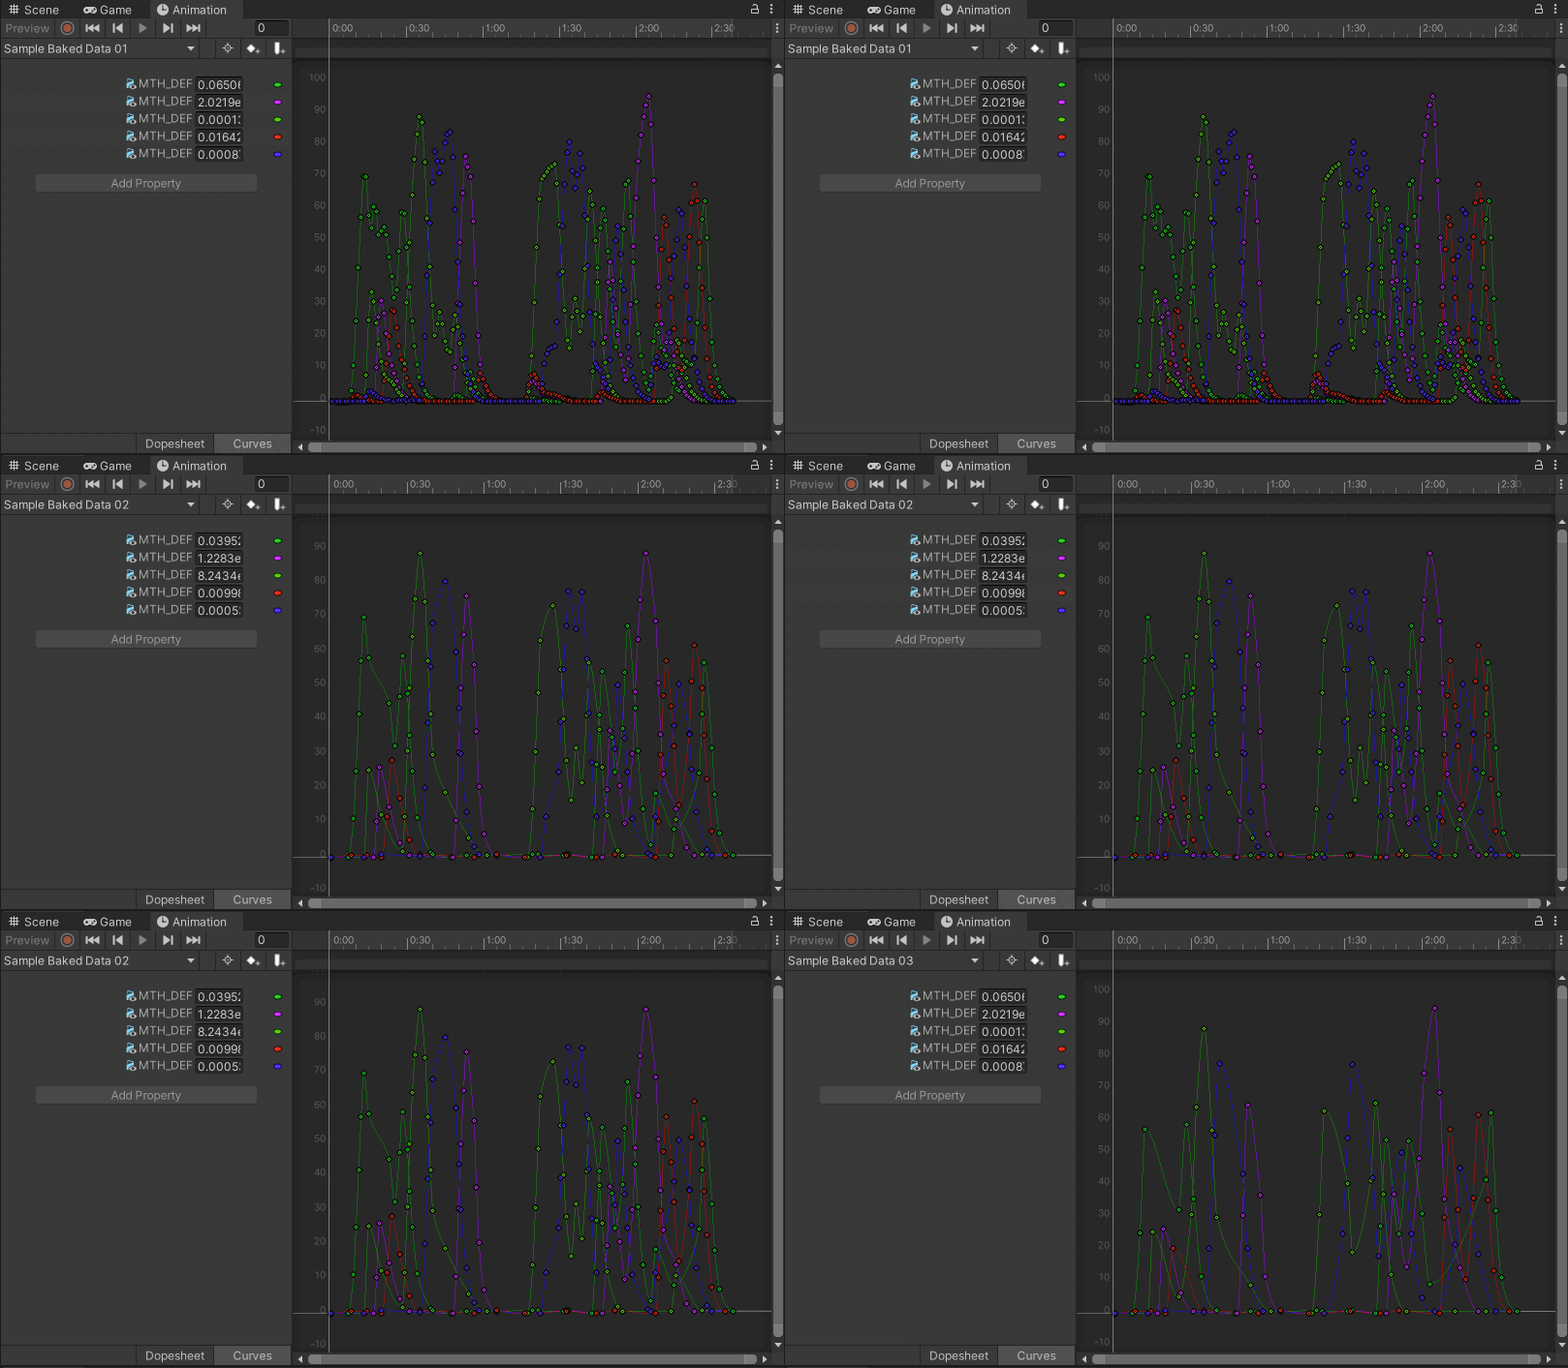
 Varying *Threshold* from 0, 10, and 20, you'll get the following.
 Texture
-------
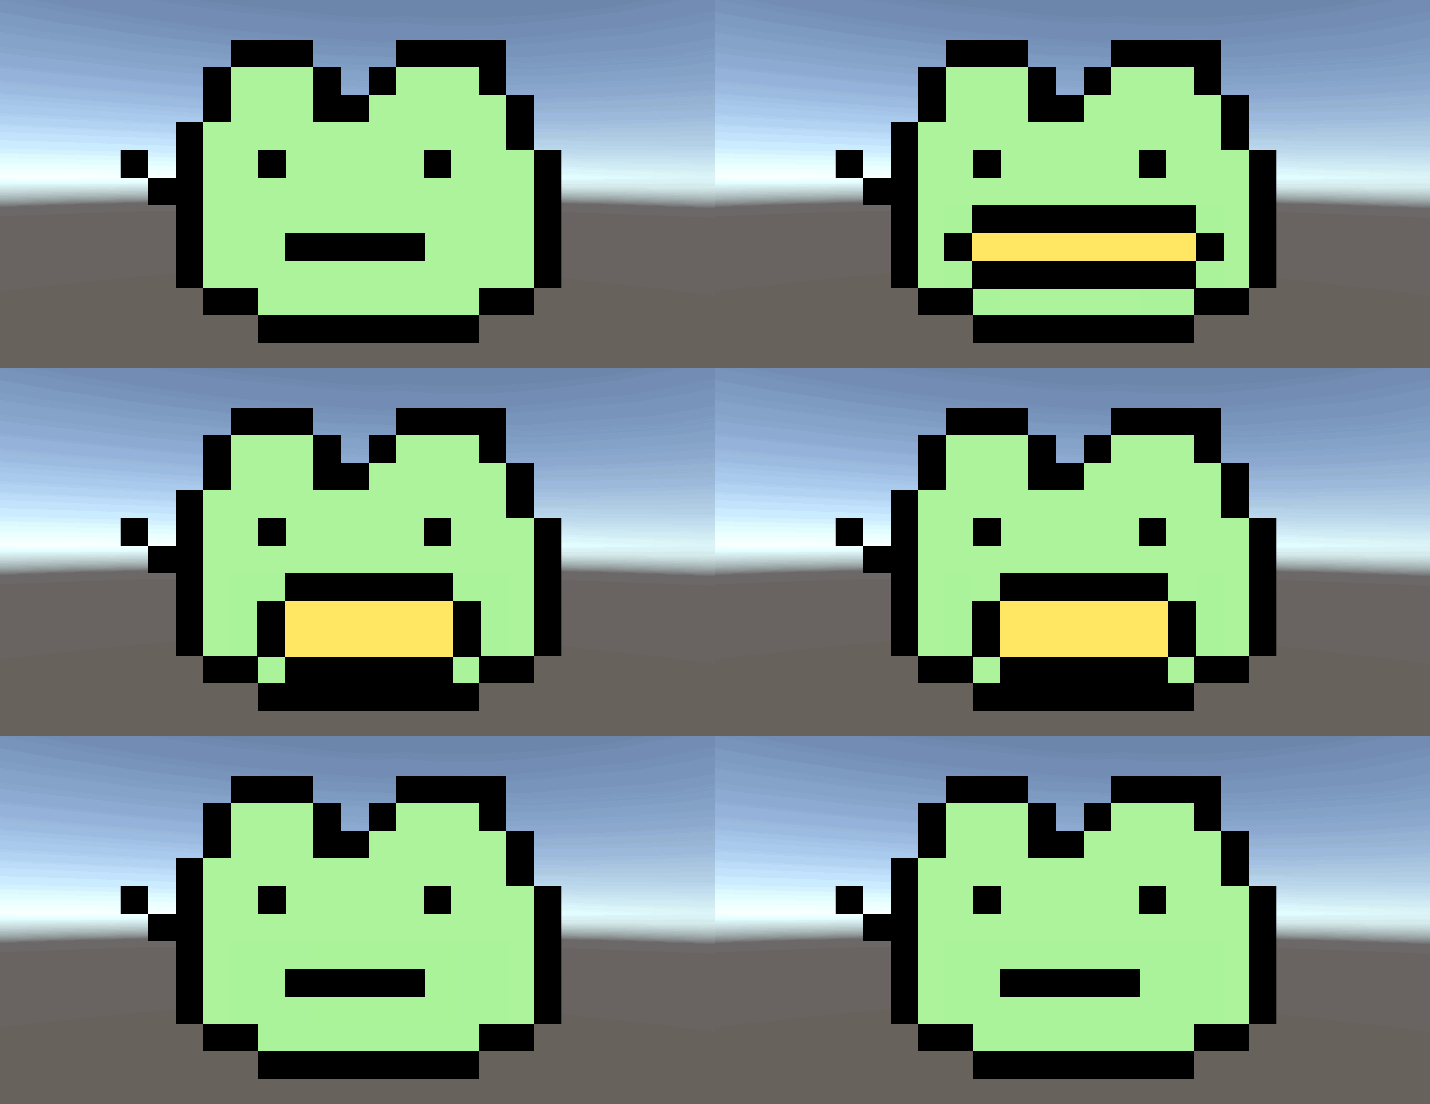
`uLipSyncTexture` allows you to change textures and UVs according to the recognized phonemes. *Samples / 08. Texture* is a sample scene.
Texture
-------
`uLipSyncTexture` allows you to change textures and UVs according to the recognized phonemes. *Samples / 08. Texture* is a sample scene.
 - Renderer
- Specify the `Renderer` of the material you want to update.
- Parameters
- Min Volume
- The minimum volume value (log10) to update.
- Min Duration
- This is the minimum time to keep the mouth in the same texture / uv.
- Textures
- Here you can select the textures you want to assign
- Phoneme
- Enter the phoneme registered in the `Profile` (e.g. "A", "I").
- An empty string ("") will be treated as if there is no audio input.
- Texture
- Specify the texture to be changed.
- If not specified, the initial texture set in the material will be used.
- UV Scale
- UV Scale. For tiled textures, specify this value.
- UV Offset
- UV offset. For tiled textures, specify this value.
Animator
--------
`uLipSyncAnimator` can be used to lip-sync using `AnimatorController`. Create a Layer with an Avatar Mask applied only to the mouth as shown below, and setup a Blend Tree to make each mouth shape move by parameters.
- Renderer
- Specify the `Renderer` of the material you want to update.
- Parameters
- Min Volume
- The minimum volume value (log10) to update.
- Min Duration
- This is the minimum time to keep the mouth in the same texture / uv.
- Textures
- Here you can select the textures you want to assign
- Phoneme
- Enter the phoneme registered in the `Profile` (e.g. "A", "I").
- An empty string ("") will be treated as if there is no audio input.
- Texture
- Specify the texture to be changed.
- If not specified, the initial texture set in the material will be used.
- UV Scale
- UV Scale. For tiled textures, specify this value.
- UV Offset
- UV offset. For tiled textures, specify this value.
Animator
--------
`uLipSyncAnimator` can be used to lip-sync using `AnimatorController`. Create a Layer with an Avatar Mask applied only to the mouth as shown below, and setup a Blend Tree to make each mouth shape move by parameters.
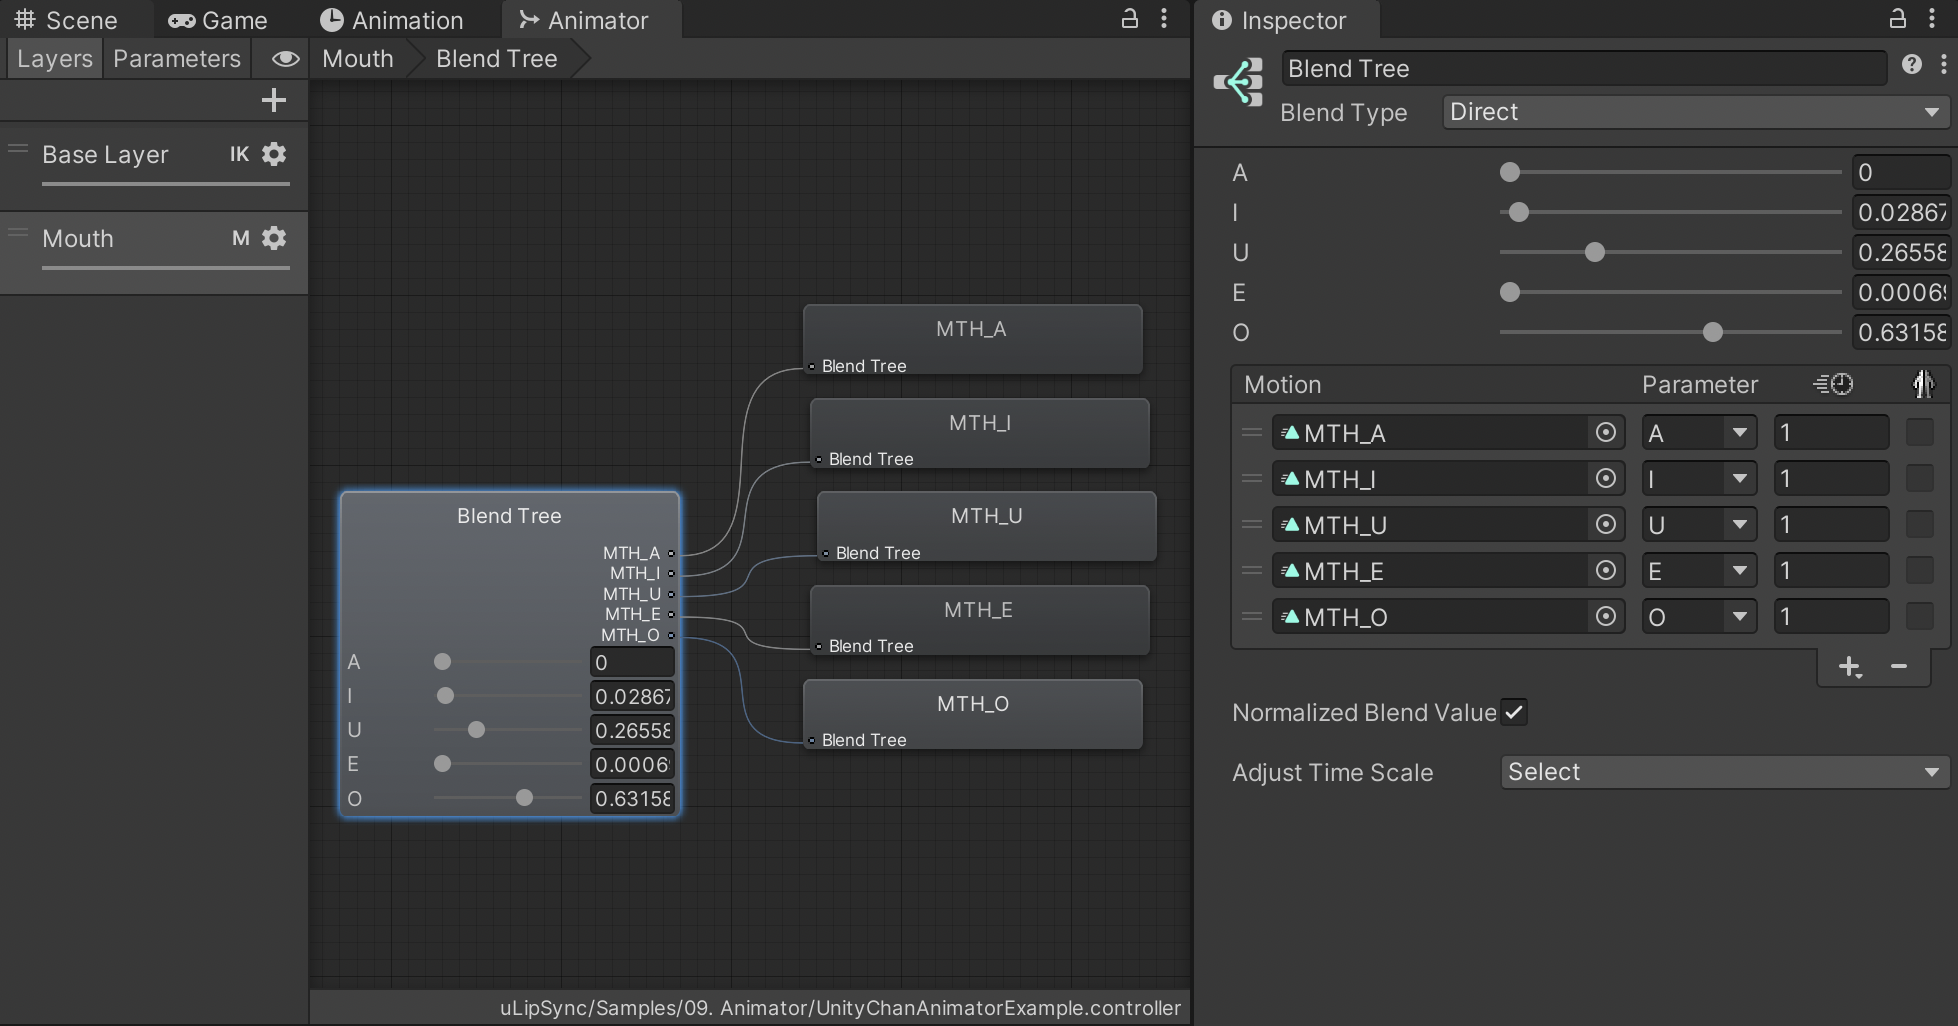 Then set the phonemes and the corresponding AnimatorController parameters to `uLipSyncAnimator` as follows.
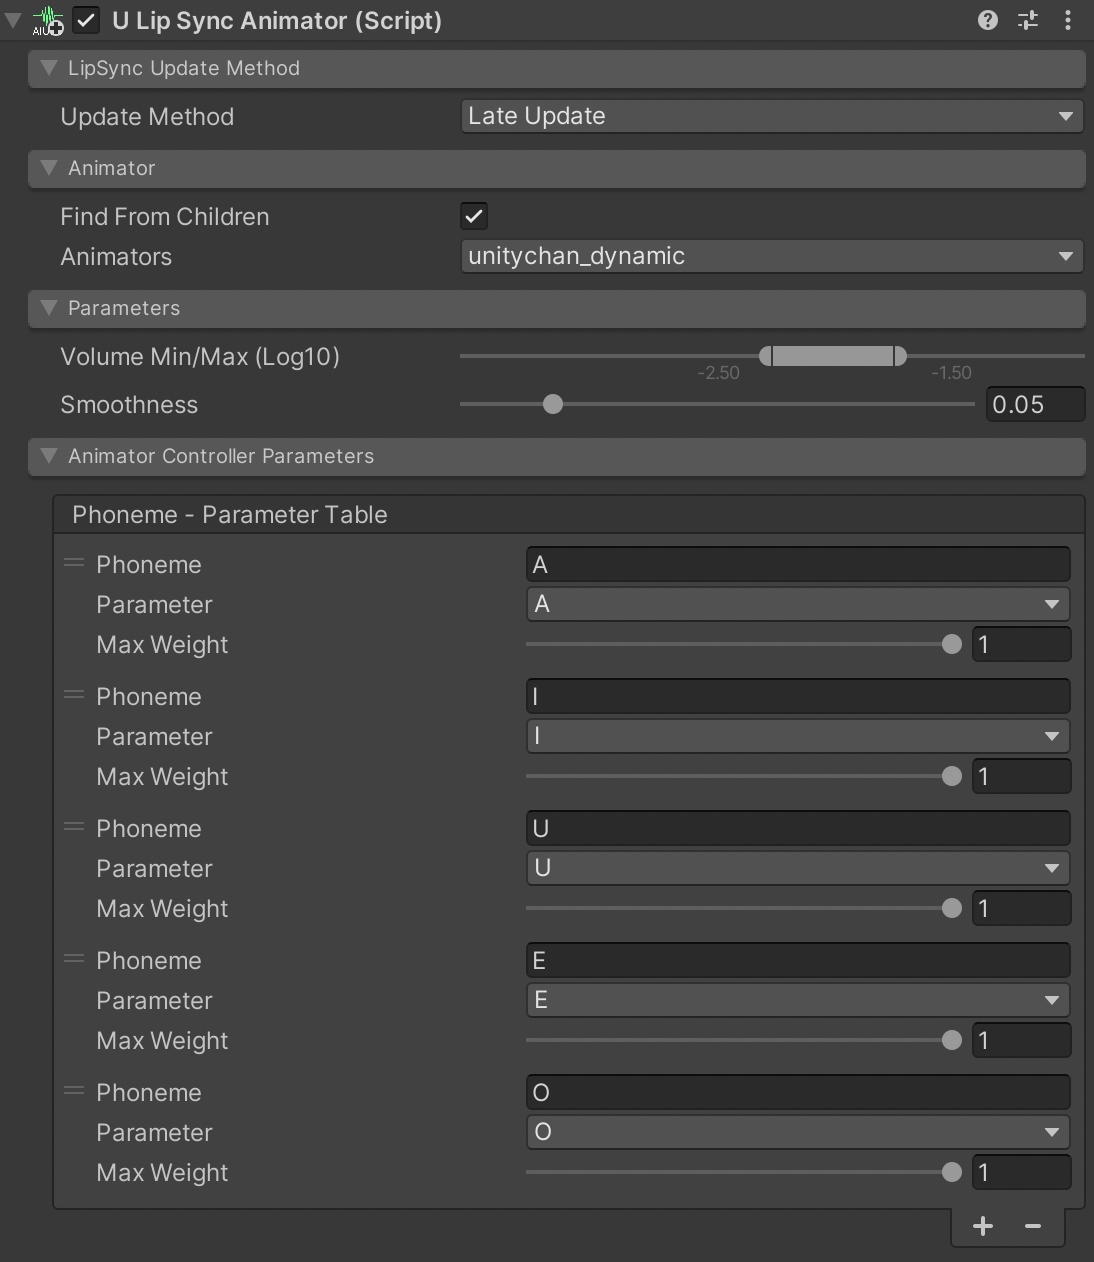 The sample scene is *Samples / 09. Animator*.
VRM Support
-----------
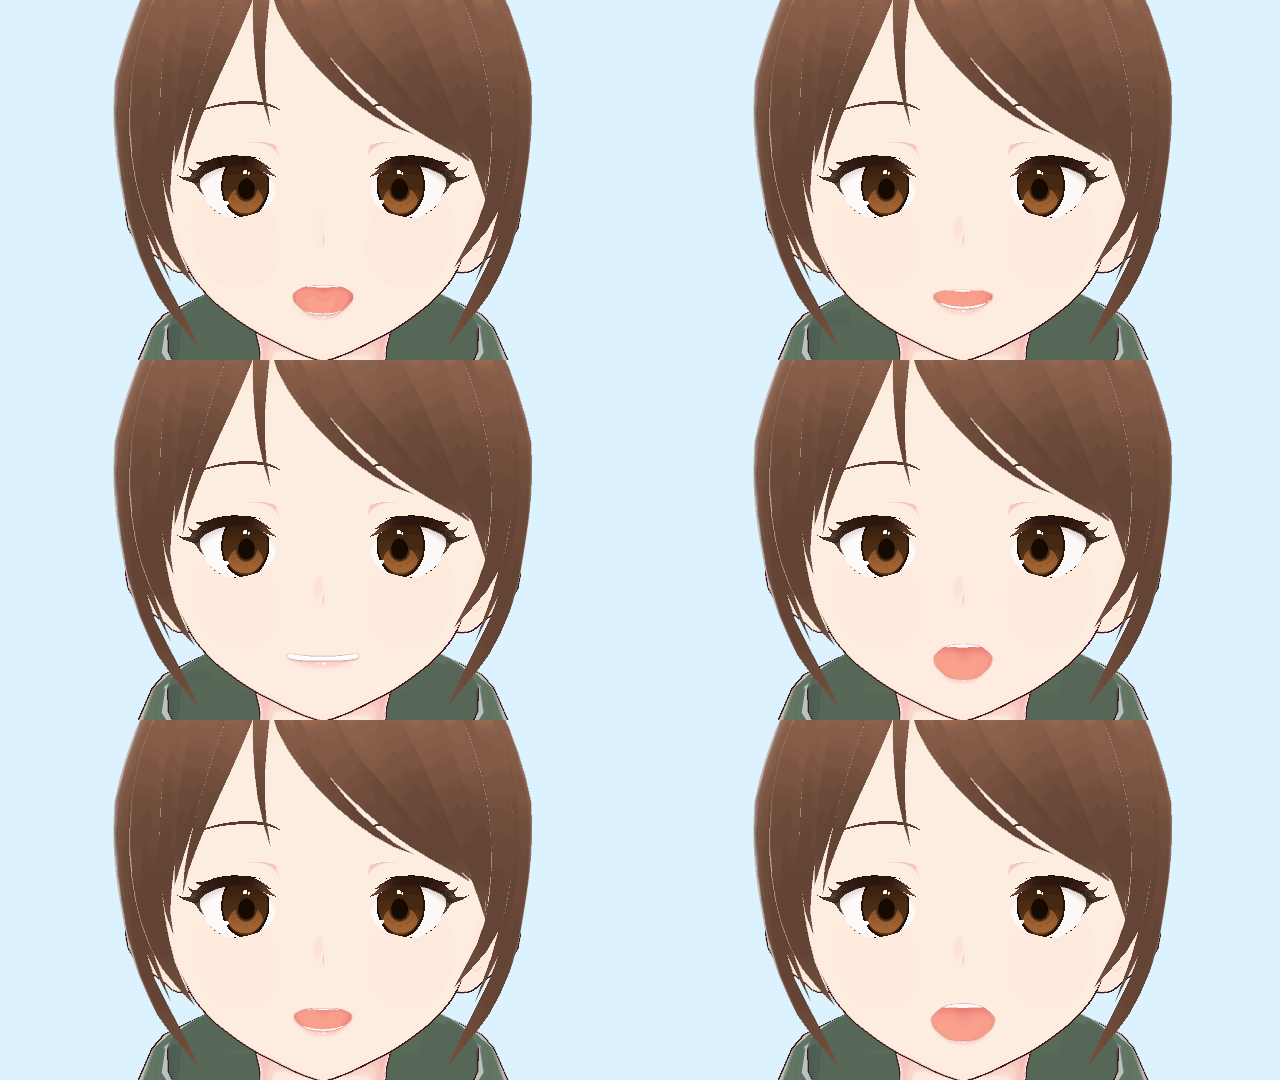
[VRM](https://vrm-consortium.org) is a platform-independent file format designed for the use with 3D characters and avatars. In VRM 0.X, blendshapes are controlled through `VRMBlendShapeProxy`, while in version 1.0, blendshapes are abstracted into *Expression* and controlled via `VRM10ObjectExpression`.
- https://virtualcast.jp/wiki/vrm/setting/blendshap
- https://vrm.dev/en/univrm1/vrm1_tutorial/expression
### VRM 0.X
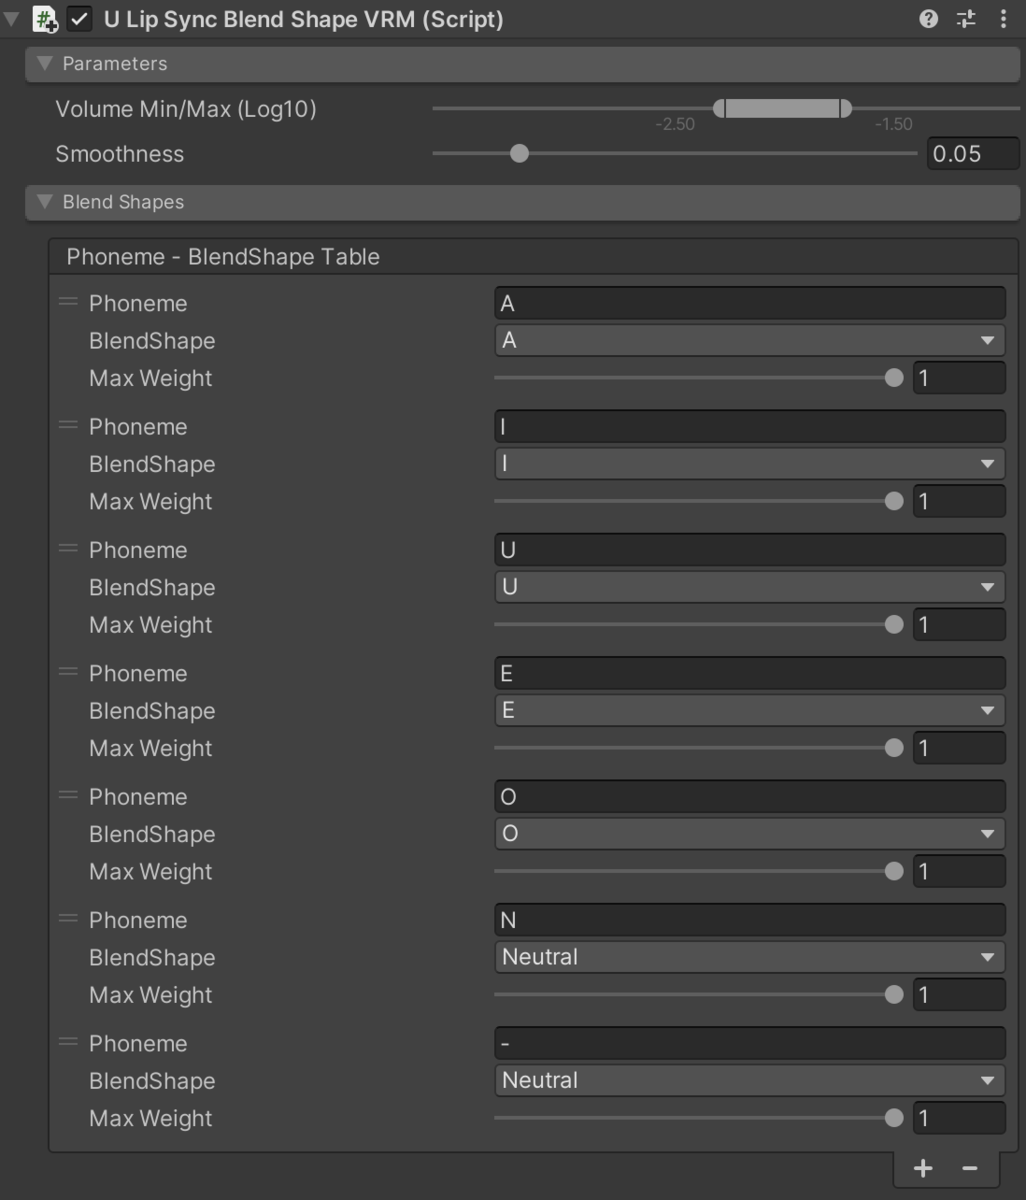
With `uLipSyncBlendShape`, the blendshapes in the `SkinnedMeshRenderer` was controlled directly, but there is a modified component named `uLipSyncBlendShapeVRM` that controls `VRMBlendShapeProxy` instead.
The sample scene is *Samples / 09. Animator*.
VRM Support
-----------
[VRM](https://vrm-consortium.org) is a platform-independent file format designed for the use with 3D characters and avatars. In VRM 0.X, blendshapes are controlled through `VRMBlendShapeProxy`, while in version 1.0, blendshapes are abstracted into *Expression* and controlled via `VRM10ObjectExpression`.
- https://virtualcast.jp/wiki/vrm/setting/blendshap
- https://vrm.dev/en/univrm1/vrm1_tutorial/expression
### VRM 0.X
With `uLipSyncBlendShape`, the blendshapes in the `SkinnedMeshRenderer` was controlled directly, but there is a modified component named `uLipSyncBlendShapeVRM` that controls `VRMBlendShapeProxy` instead.
 ### VRM 1.0
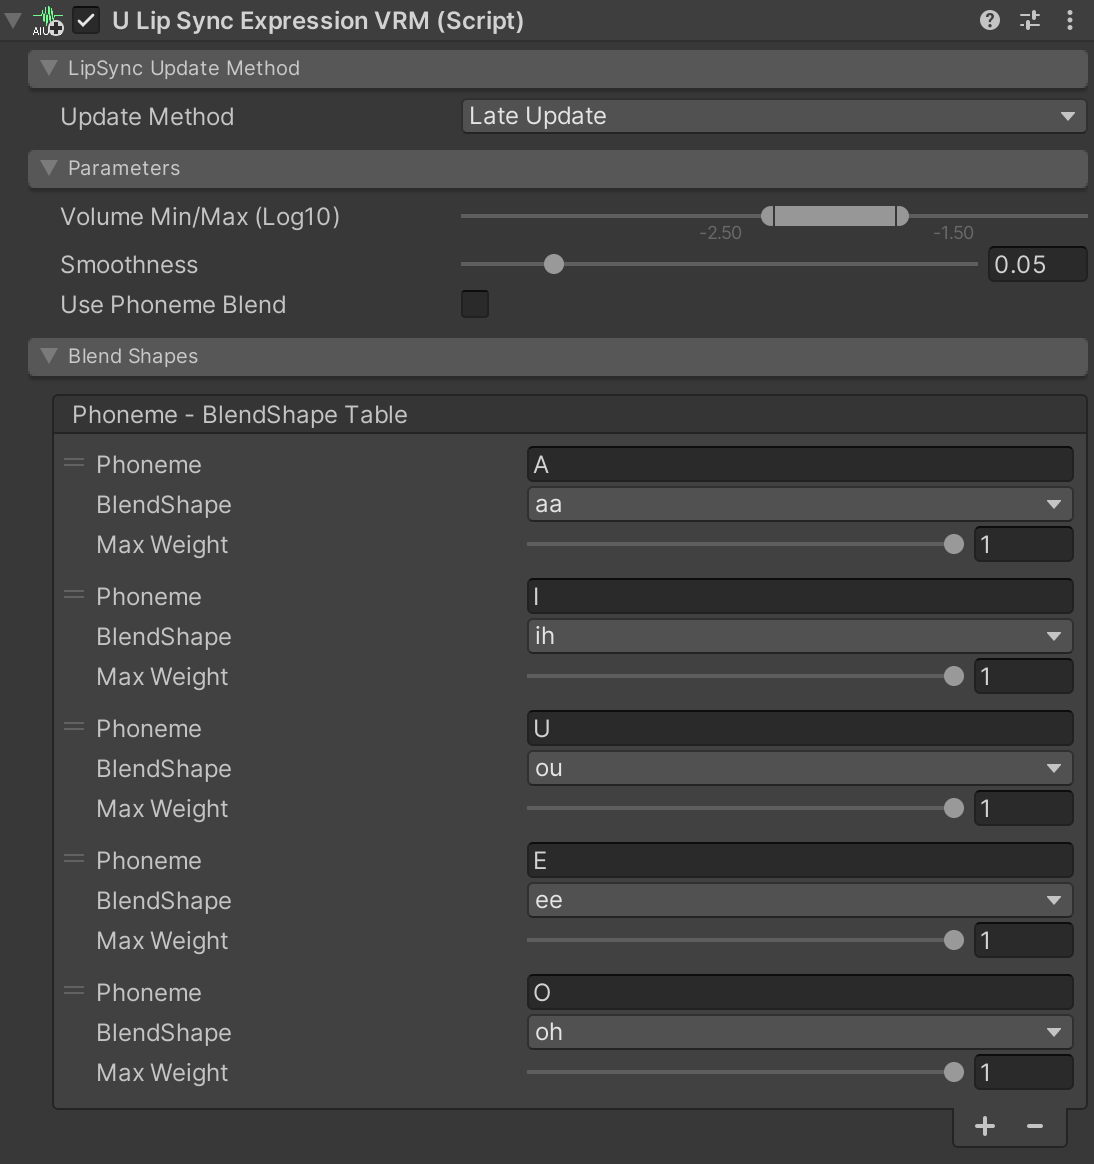
By using `uLipSyncExpressionVRM`, you can control `VRM10ObjectExpression`.
### VRM 1.0
By using `uLipSyncExpressionVRM`, you can control `VRM10ObjectExpression`.
 ### Sample
For more details, please refer to *Samples / VRM*. In this sample, `uLipSyncExpressionVRM` is used for the setup of VRM 1.0.
### Scripting Define Symbols
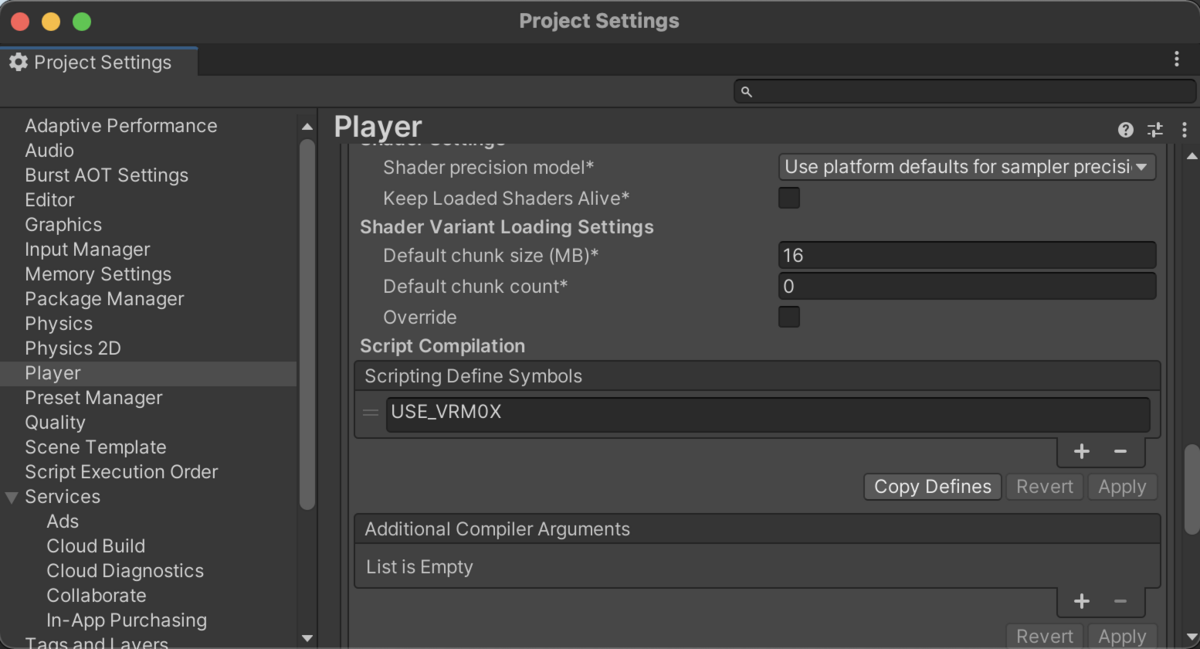
When installing the VRM package from a .unitypackage, you need to manually add *Scripting Define Symbols*. For VRM 0.X, add `USE_VRM0X`, and for VRM 1.0, add `USE_VRM10`. If you add the package via the Package Manager, these symbols are added automatically.
### Sample
For more details, please refer to *Samples / VRM*. In this sample, `uLipSyncExpressionVRM` is used for the setup of VRM 1.0.
### Scripting Define Symbols
When installing the VRM package from a .unitypackage, you need to manually add *Scripting Define Symbols*. For VRM 0.X, add `USE_VRM0X`, and for VRM 1.0, add `USE_VRM10`. If you add the package via the Package Manager, these symbols are added automatically.
 Runtime Setup
-------------
If you generate a model dynamically, you need to set up and connect `uLipSync` and `uLipSyncBlendShape` by yourself. A sample for doing this is included as *10. Runtime Setup*. You will dynamically attach these components to the target object and set them up as follows:
```cs
[System.Serializable]
public class PhonemeBlendShapeInfo
{
public string phoneme;
public string blendShape;
}
public GameObject target;
public uLipSync.Profile profile;
public string skinnedMeshRendererName = "MTH_DEF";
public List phonemeBlendShapeTable = new List();
uLipSync.uLipSync _lipsync;
uLipSync.uLipSyncBlendShape _blendShape;
void Start()
{
// Setting up uLipSyncBlendShape
var targetTform = uLipSync.Util.FindChildRecursively(target.transform, skinnedMeshRendererName);
var smr = targetTform.GetComponent();
_blendShape = target.AddComponent();
_blendShape.skinnedMeshRenderer = smr;
foreach (var info in phonemeBlendShapeTable)
{
_blendShape.AddBlendShape(info.phoneme, info.blendShape);
}
// Setting up uLipSync and connecting it with uLipSyncBlendShape
_lipsync = target.AddComponent();
_lipsync.profile = profile;
_lipsync.onLipSyncUpdate.AddListener(_blendShape.OnLipSyncUpdate);
}
```
Then attach this component to some GameObject and prepare the necessary information in advance and create a Prefab or something. The sample includes a setup for regular `SkinnedMeshRenderer` and a setup for VRM 1.0.
UI
--
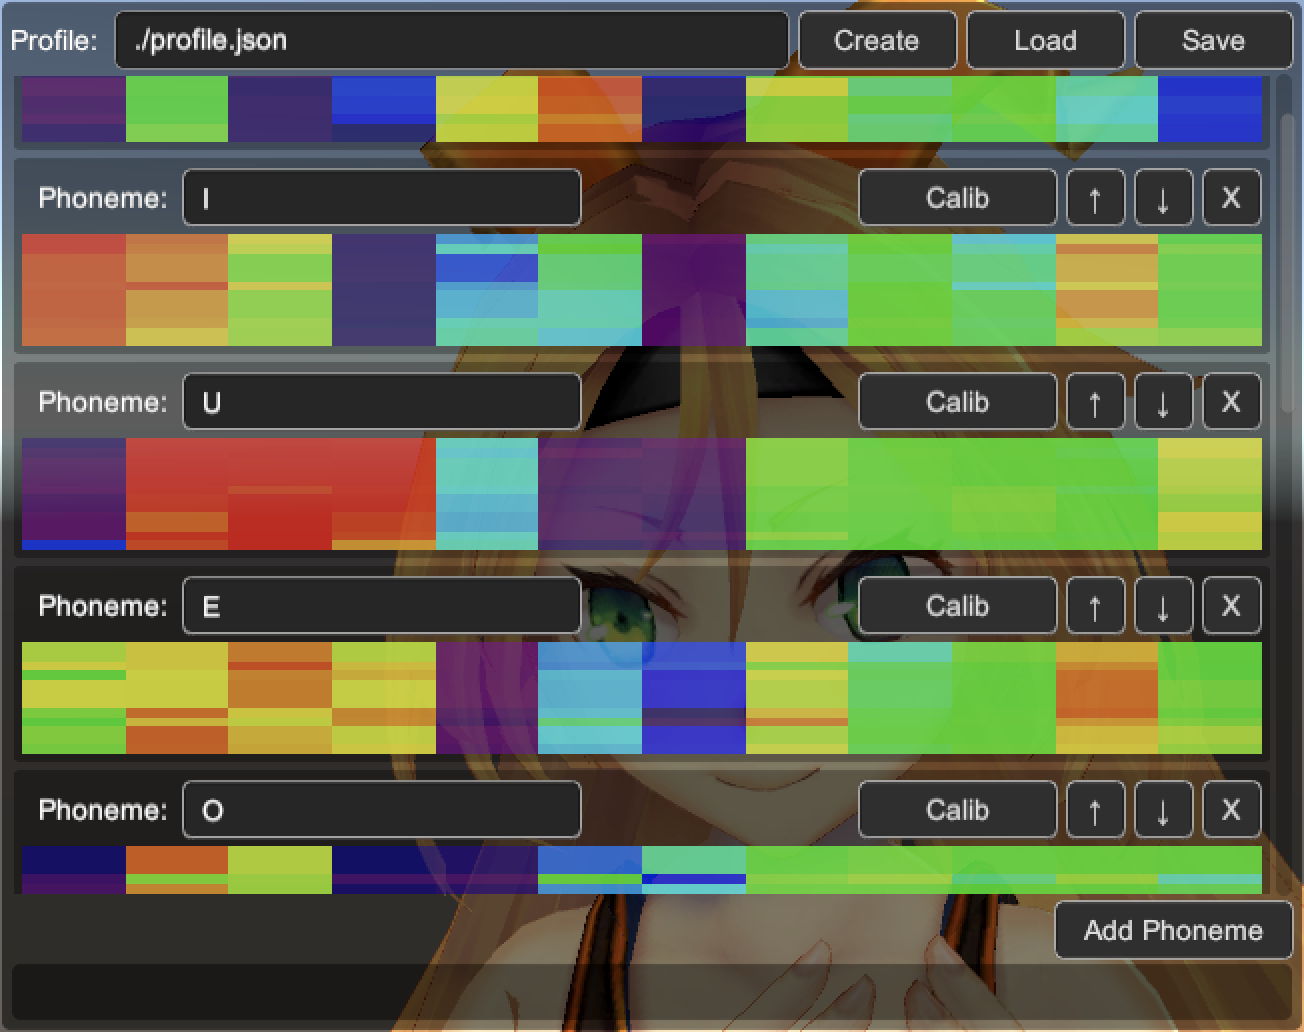
When you want to create, load, save a `Profile` at runtime, or add phonemes and perform their calibration, you will need a UI. A simple example of this is added as *11. UI*. By modifying this, you can create your own custom UI.
Runtime Setup
-------------
If you generate a model dynamically, you need to set up and connect `uLipSync` and `uLipSyncBlendShape` by yourself. A sample for doing this is included as *10. Runtime Setup*. You will dynamically attach these components to the target object and set them up as follows:
```cs
[System.Serializable]
public class PhonemeBlendShapeInfo
{
public string phoneme;
public string blendShape;
}
public GameObject target;
public uLipSync.Profile profile;
public string skinnedMeshRendererName = "MTH_DEF";
public List phonemeBlendShapeTable = new List();
uLipSync.uLipSync _lipsync;
uLipSync.uLipSyncBlendShape _blendShape;
void Start()
{
// Setting up uLipSyncBlendShape
var targetTform = uLipSync.Util.FindChildRecursively(target.transform, skinnedMeshRendererName);
var smr = targetTform.GetComponent();
_blendShape = target.AddComponent();
_blendShape.skinnedMeshRenderer = smr;
foreach (var info in phonemeBlendShapeTable)
{
_blendShape.AddBlendShape(info.phoneme, info.blendShape);
}
// Setting up uLipSync and connecting it with uLipSyncBlendShape
_lipsync = target.AddComponent();
_lipsync.profile = profile;
_lipsync.onLipSyncUpdate.AddListener(_blendShape.OnLipSyncUpdate);
}
```
Then attach this component to some GameObject and prepare the necessary information in advance and create a Prefab or something. The sample includes a setup for regular `SkinnedMeshRenderer` and a setup for VRM 1.0.
UI
--
When you want to create, load, save a `Profile` at runtime, or add phonemes and perform their calibration, you will need a UI. A simple example of this is added as *11. UI*. By modifying this, you can create your own custom UI.
 Tips
-----
### Custom Event
`uLipSyncBlendShape` is for 3D models, and `uLipSyncTexture` is for 2D textures. But if you want to do something different, you can write your own component to support them. Prepare a component that provides a function to receive `uLipSync.LipSyncInfo` and register it to *OnLipSyncUpdate(LipSyncInfo)* of `uLipSync` or `uLipSyncBakedDataPlayer`.
Tips
-----
### Custom Event
`uLipSyncBlendShape` is for 3D models, and `uLipSyncTexture` is for 2D textures. But if you want to do something different, you can write your own component to support them. Prepare a component that provides a function to receive `uLipSync.LipSyncInfo` and register it to *OnLipSyncUpdate(LipSyncInfo)* of `uLipSync` or `uLipSyncBakedDataPlayer`.
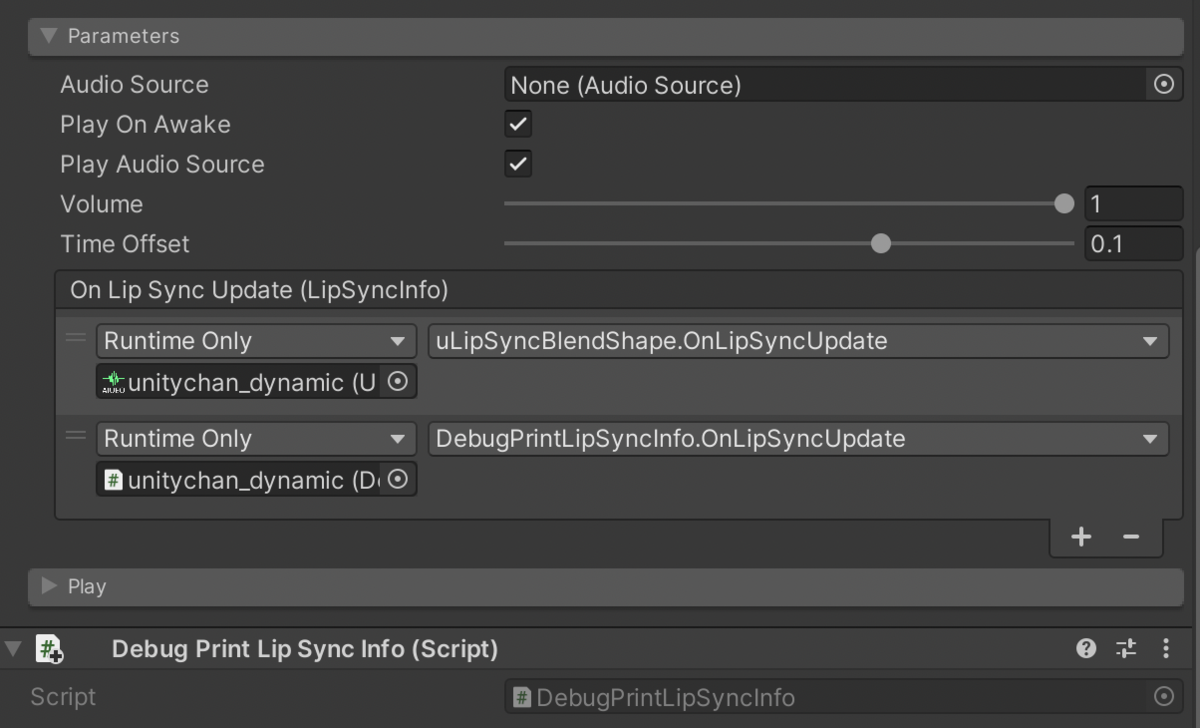 For example, the following is an example of a simple script that outputs the result of recognition to `Debug.Log()`.
```cs
using UnityEngine;
using uLipSync;
public class DebugPrintLipSyncInfo : MonoBehaviour
{
public void OnLipSyncUpdate(LipSyncInfo info)
{
if (!isActiveAndEnabled) return;
if (info.volume < Mathf.Epsilon) return;
Debug.LogFormat($"PHONEME: {info.phoneme}, VOL: {info.volume} ");
}
}
```
`LipSyncInfo` is a structure that has members like the following.
```cs
public struct LipSyncInfo
{
public string phoneme; // Main phoneme
public float volume; // Normalized volume (0 ~ 1)
public float rawVolume; // Raw volume
public Dictionary phonemeRatios; // Table that contains the pair of the phoneme and its ratio
}
```
### Import to / Export from JSON
There is a function to save and load the profile to/from JSON. From the editor, specify the JSON you want to save or load from the *Import / Export JSON* tab, and click the *Import* or *Export* button.
For example, the following is an example of a simple script that outputs the result of recognition to `Debug.Log()`.
```cs
using UnityEngine;
using uLipSync;
public class DebugPrintLipSyncInfo : MonoBehaviour
{
public void OnLipSyncUpdate(LipSyncInfo info)
{
if (!isActiveAndEnabled) return;
if (info.volume < Mathf.Epsilon) return;
Debug.LogFormat($"PHONEME: {info.phoneme}, VOL: {info.volume} ");
}
}
```
`LipSyncInfo` is a structure that has members like the following.
```cs
public struct LipSyncInfo
{
public string phoneme; // Main phoneme
public float volume; // Normalized volume (0 ~ 1)
public float rawVolume; // Raw volume
public Dictionary phonemeRatios; // Table that contains the pair of the phoneme and its ratio
}
```
### Import to / Export from JSON
There is a function to save and load the profile to/from JSON. From the editor, specify the JSON you want to save or load from the *Import / Export JSON* tab, and click the *Import* or *Export* button.
 If you want to do it in code, you can use the following code.
```cs
var lipSync = GetComponent();
var profile = lipSync.profile;
// Export
profile.Export(path);
// Import
profile.Import(path);
```
### Calibration at Runtime
If you want to perform calibration at runtime, you can do it by making a request to `uLipSync` with `uLipSync.RequestCalibration(int index)` as follows. The MFCC calculated from the currently playing sound will be set to the specified phoneme.
```cs
lipSync = GetComponent();
for (int i = 0; i < lipSync.profile.mfccs.Count; ++i)
{
var key = (KeyCode)((int)(KeyCode.Alpha1) + i);
if (Input.GetKey(key)) lipSync.RequestCalibration(i);
}
```
Please refer to *CalibrationByKeyboardInput.cs* to see how it actually works. Also, it is better to save and restore the profile as JSON after building the app because the changes to `ScriptableObject` can not be saved.
### Update Method
If you want to do it in code, you can use the following code.
```cs
var lipSync = GetComponent();
var profile = lipSync.profile;
// Export
profile.Export(path);
// Import
profile.Import(path);
```
### Calibration at Runtime
If you want to perform calibration at runtime, you can do it by making a request to `uLipSync` with `uLipSync.RequestCalibration(int index)` as follows. The MFCC calculated from the currently playing sound will be set to the specified phoneme.
```cs
lipSync = GetComponent();
for (int i = 0; i < lipSync.profile.mfccs.Count; ++i)
{
var key = (KeyCode)((int)(KeyCode.Alpha1) + i);
if (Input.GetKey(key)) lipSync.RequestCalibration(i);
}
```
Please refer to *CalibrationByKeyboardInput.cs* to see how it actually works. Also, it is better to save and restore the profile as JSON after building the app because the changes to `ScriptableObject` can not be saved.
### Update Method
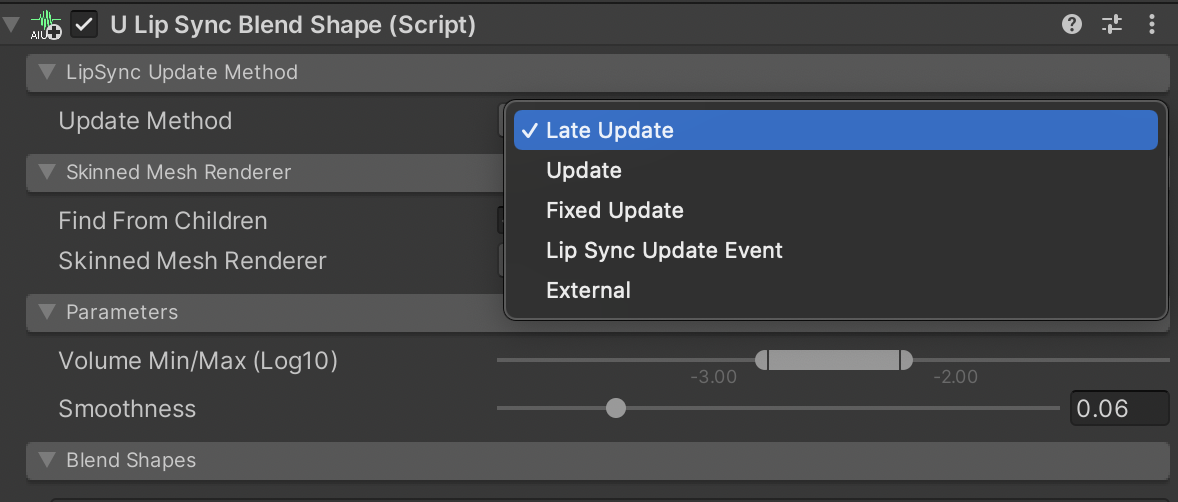 *Update Method* can be used to adjust the timing of updating blendshapes with `uLipSyncBlendShape`. The description of each parameter is as follows.
| Method | Timing |
| ------ | ------ |
| LateUpdate | LateUpdate (default) |
| Update | Update |
| FixedUpdate | FixedUpdate |
| LipSyncUpdateEvent | Immediately after receiving `LipSyncUpdateEvent` |
| External | Update from an external script (`ApplyBlendShapes()`) |
### WebGL
When setting WebGL as the target platform, a small UI addition occurs.
*Update Method* can be used to adjust the timing of updating blendshapes with `uLipSyncBlendShape`. The description of each parameter is as follows.
| Method | Timing |
| ------ | ------ |
| LateUpdate | LateUpdate (default) |
| Update | Update |
| FixedUpdate | FixedUpdate |
| LipSyncUpdateEvent | Immediately after receiving `LipSyncUpdateEvent` |
| External | Update from an external script (`ApplyBlendShapes()`) |
### WebGL
When setting WebGL as the target platform, a small UI addition occurs.
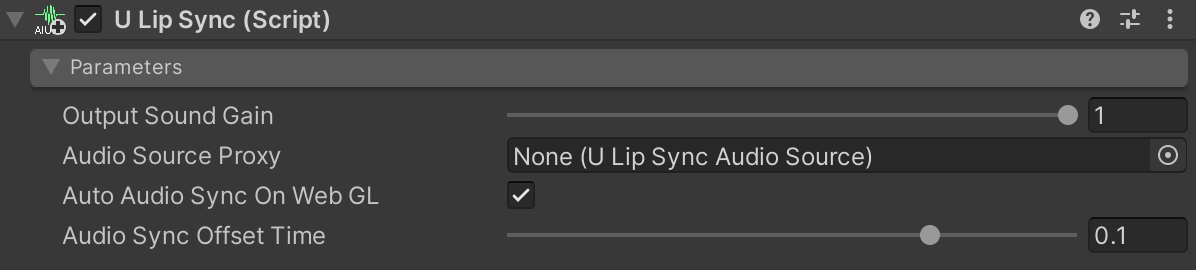 In WebGL, due to the Autoplay Policy, audio will not play unless there is an interaction with the page content (such as a click). However, as Unity is still playing the sound internally, this results in a desynchronization of audio that was supposed to be playing from the start. Enabling *Auto Audio Sync On Web GL* will correct this discrepancy when user interaction occurs.
*Audio Sync Offset Time* can be used to adjust the timing of lip-sync delays. Internally, since `OnAudioFilterRead()` is not available in WebGL, `AudioClip.GetData()` is used instead. This approach leverages the ability to slightly adjust the position of the buffer being retrieved.
Currently, Unity does not support JobSystem and Burst for WebGL, which means the performance is not optimal. For cases where real-time analysis is not critical, pre-baking the data is recommended.
### Mac Build
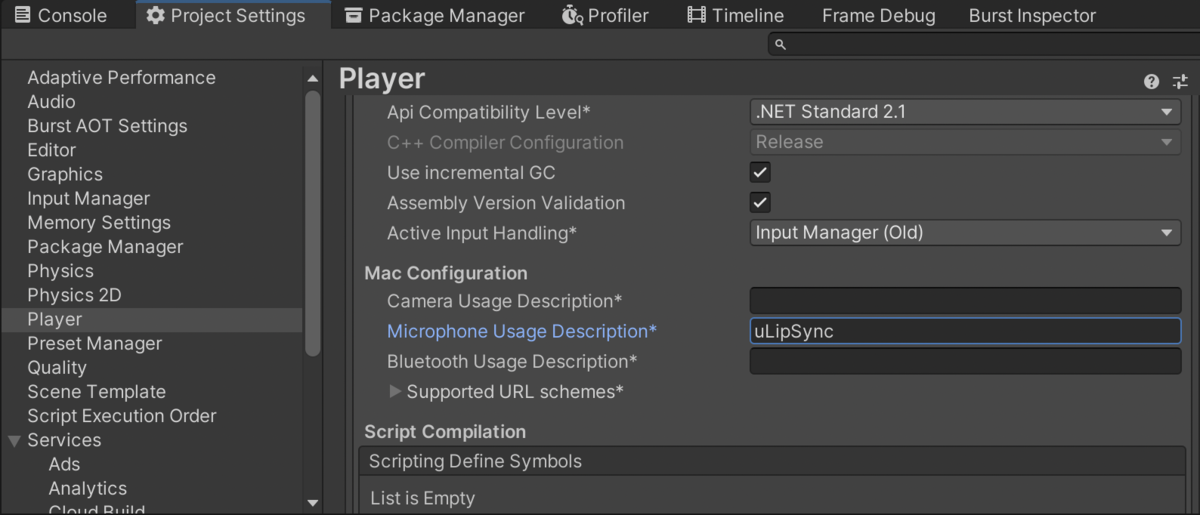
When building on a Mac, you may encounter the following error.
> Building Library/Bee/artifacts/MacStandalonePlayerBuildProgram/Features/uLipSync.Runtime-FeaturesChecked.txt failed with output: Failed because this command failed to write the following output files: Library/Bee/artifacts/MacStandalonePlayerBuildProgram/Features/uLipSync.Runtime-FeaturesChecked.txt
This may be related to the microphone access code, which can be fixed by writing something in *Project Settings > Player's Other Settings > Mac Configuration > Microphone Usage Description*.
In WebGL, due to the Autoplay Policy, audio will not play unless there is an interaction with the page content (such as a click). However, as Unity is still playing the sound internally, this results in a desynchronization of audio that was supposed to be playing from the start. Enabling *Auto Audio Sync On Web GL* will correct this discrepancy when user interaction occurs.
*Audio Sync Offset Time* can be used to adjust the timing of lip-sync delays. Internally, since `OnAudioFilterRead()` is not available in WebGL, `AudioClip.GetData()` is used instead. This approach leverages the ability to slightly adjust the position of the buffer being retrieved.
Currently, Unity does not support JobSystem and Burst for WebGL, which means the performance is not optimal. For cases where real-time analysis is not critical, pre-baking the data is recommended.
### Mac Build
When building on a Mac, you may encounter the following error.
> Building Library/Bee/artifacts/MacStandalonePlayerBuildProgram/Features/uLipSync.Runtime-FeaturesChecked.txt failed with output: Failed because this command failed to write the following output files: Library/Bee/artifacts/MacStandalonePlayerBuildProgram/Features/uLipSync.Runtime-FeaturesChecked.txt
This may be related to the microphone access code, which can be fixed by writing something in *Project Settings > Player's Other Settings > Mac Configuration > Microphone Usage Description*.
 Transition from v2 to v3
------------------------
From v3.0.0, the values of MFCC have been corrected to more accurate values. As a result, if you are transitioning from v2 to v3, you will need to recalibrate and create a new `Profile`.
3rd-Party License
------------------
### Unity-chan
Examples include Unity-chan assets.
© Unity Technologies Japan/UCL
Transition from v2 to v3
------------------------
From v3.0.0, the values of MFCC have been corrected to more accurate values. As a result, if you are transitioning from v2 to v3, you will need to recalibrate and create a new `Profile`.
3rd-Party License
------------------
### Unity-chan
Examples include Unity-chan assets.
© Unity Technologies Japan/UCL