# LGSideMenuController
**Repository Path**: iamzjm/LGSideMenuController
## Basic Information
- **Project Name**: LGSideMenuController
- **Description**: No description available
- **Primary Language**: Objective-C
- **License**: MIT
- **Default Branch**: master
- **Homepage**: None
- **GVP Project**: No
## Statistics
- **Stars**: 0
- **Forks**: 0
- **Created**: 2025-08-22
- **Last Updated**: 2025-08-22
## Categories & Tags
**Categories**: Uncategorized
**Tags**: None
## README
# LGSideMenuController
iOS view controller which manages left and right side views.
[](https://github.com/Friend-LGA/LGSideMenuController)
[](https://swift.org/package-manager)
[](http://cocoadocs.org/docsets/LGSideMenuController)
[](https://github.com/Friend-LGA/LGSideMenuController)
[](https://raw.githubusercontent.com/Friend-LGA/LGSideMenuController/master/LICENSE)
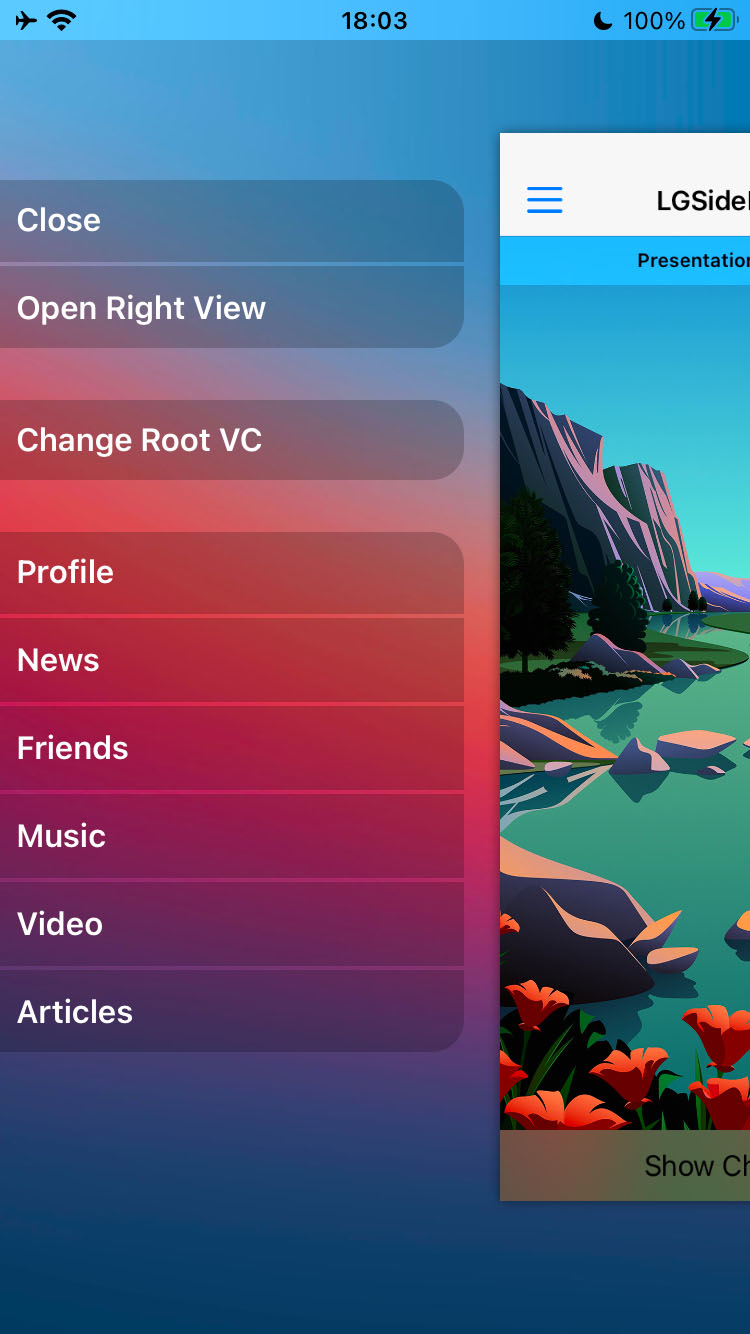
# Preview
Presentation Style: Scale From Big
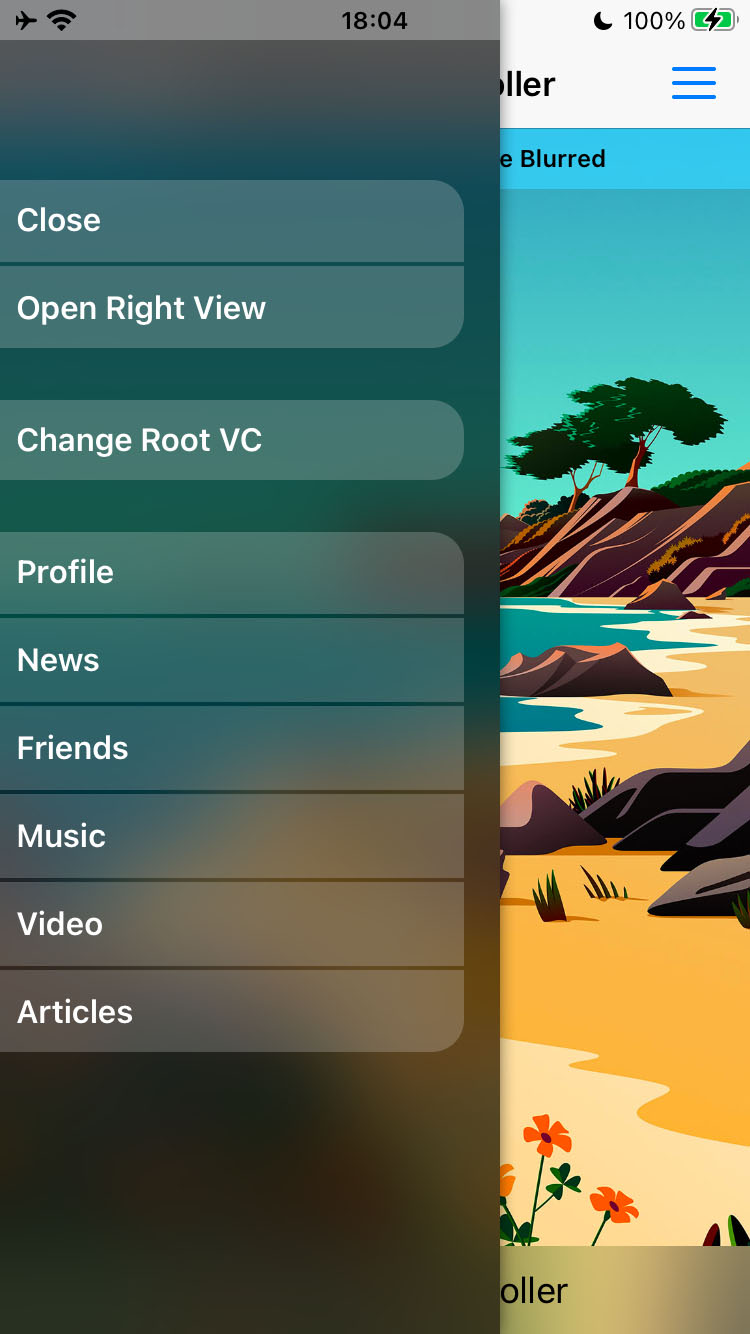
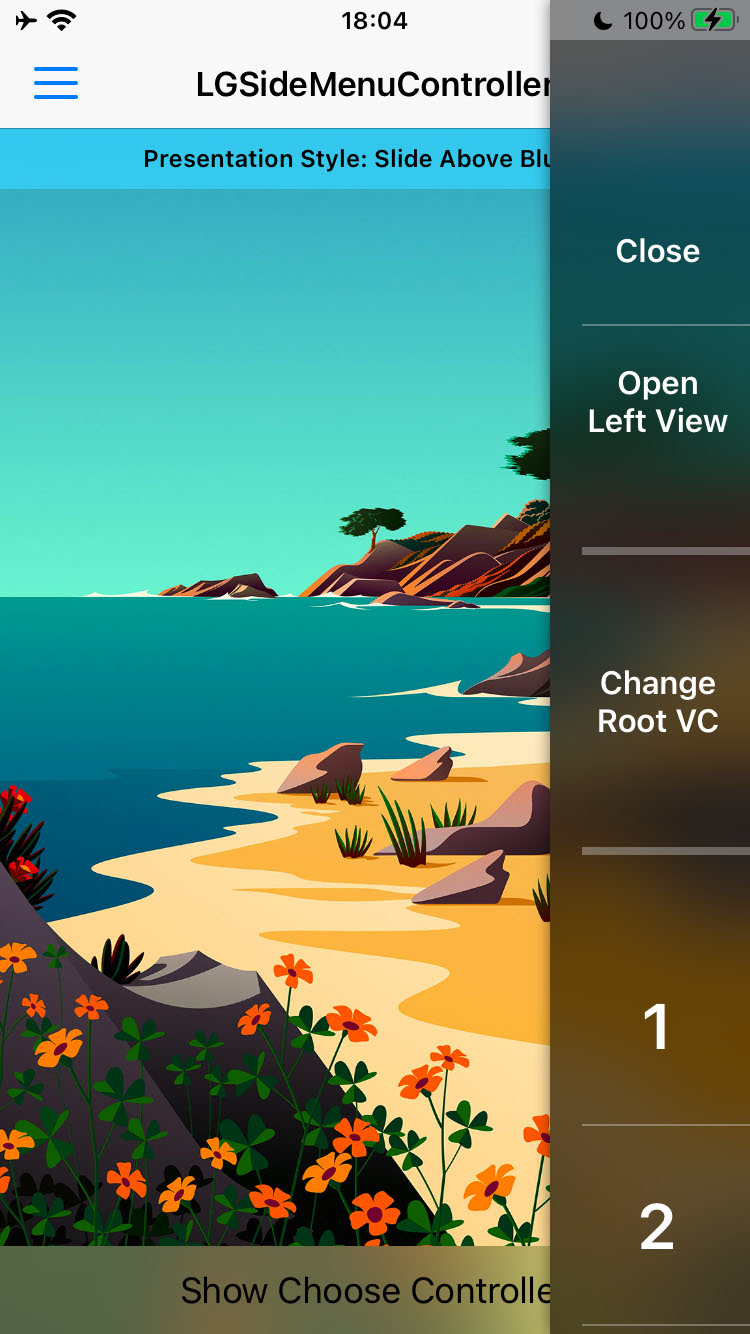
 Presentation Style: Slide Above Blurred
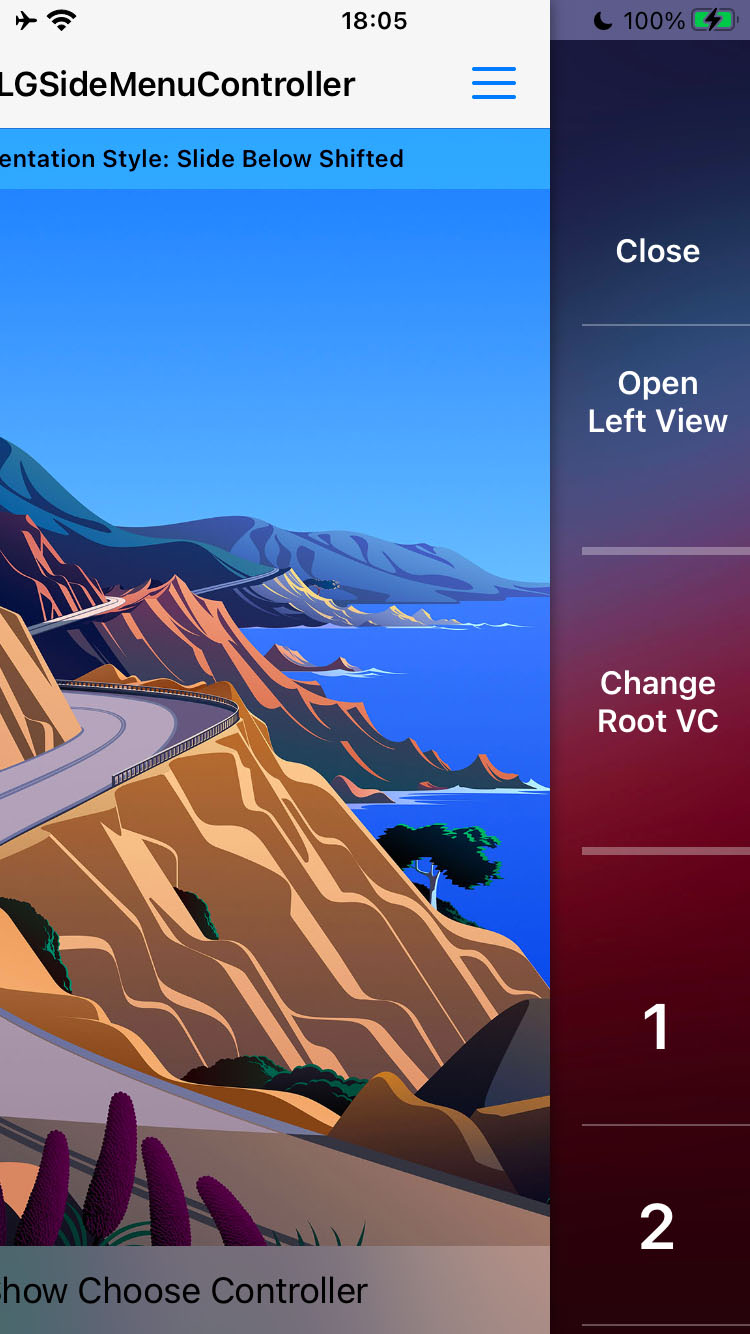
 Presentation Style: Slide Below Shifted


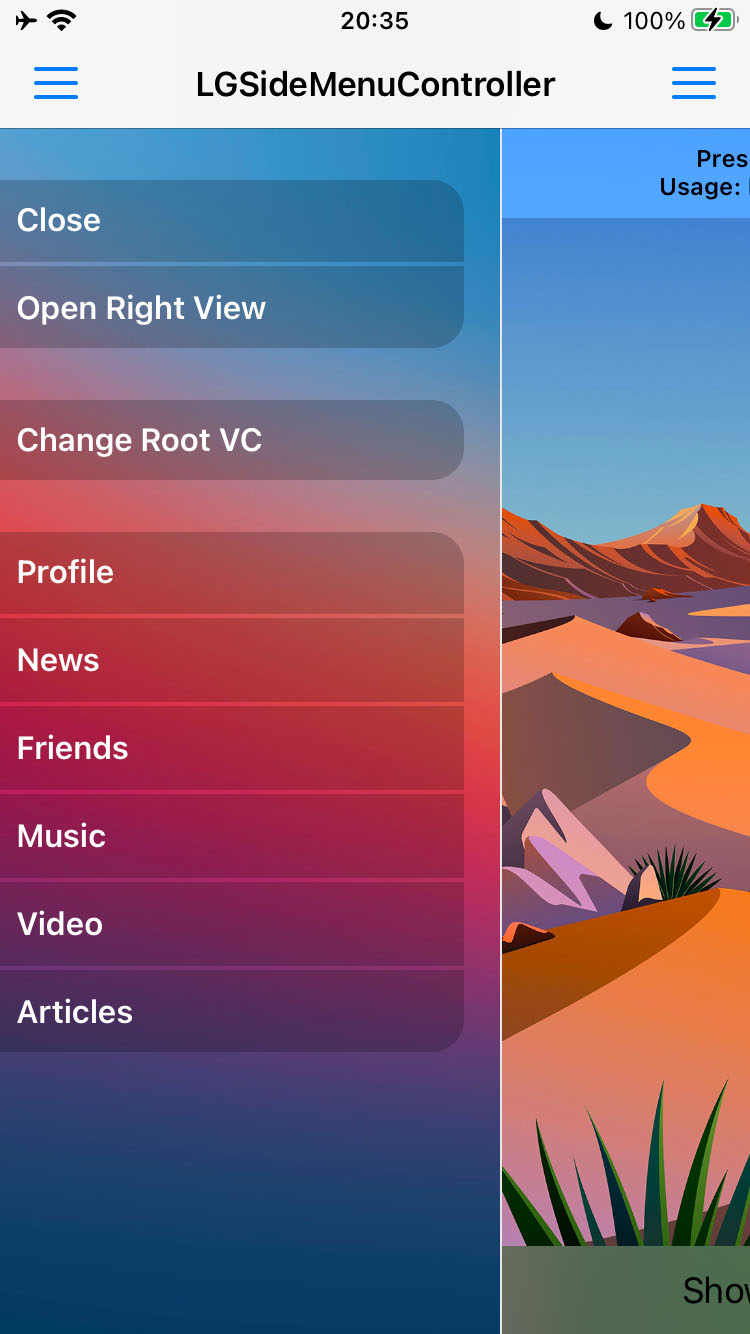
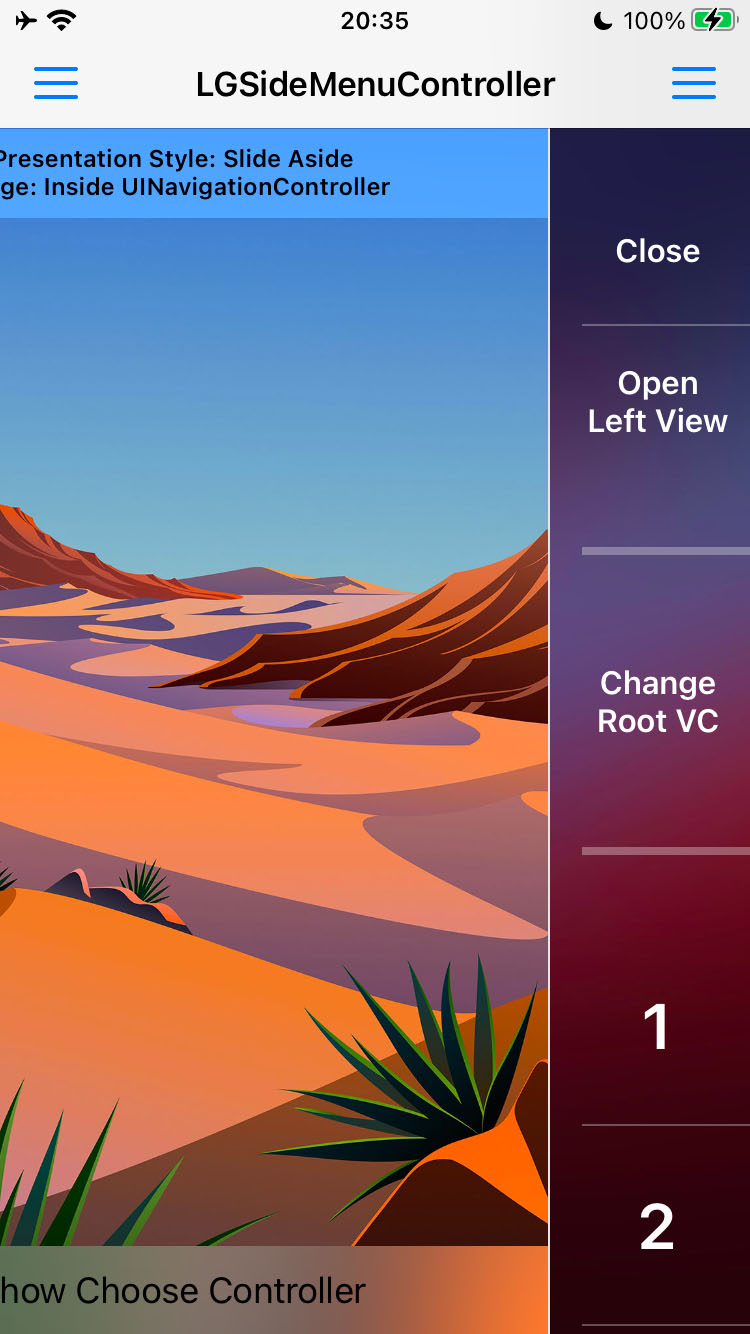
 Presentation Style: Slide Aside + Usage: Inside UINavigationController

 Other presentation styles and examples of usage you can try in included [demo projects](https://github.com/Friend-LGA/LGSideMenuController/tree/master/Demo).
Also you can make your very own style, as they are highly customizable.
# Installation
| LGSideMenuController Version | Min iOS Version | Language |
|------------------------------|-----------------|-------------|
| 1.0.0 - 1.0.10 | 6.0 | Objective-C |
| 1.1.0 - 2.2.0 | 8.0 | Objective-C |
| 2.3.0 | 9.0 | Objective-C |
| 3.0.0 | 9.0 | Swift |
## With Source Code
1. [Download repository](https://github.com/Friend-LGA/LGSideMenuController/archive/master.zip)
2. Add [LGSideMenuController directory](https://github.com/Friend-LGA/LGSideMenuController/blob/master/LGSideMenuController/) to your project
3. Enjoy!
## With Swift Package Manager
Starting with Xcode 9.0 you can use built-in swift package manager, follow [apple documentation](https://developer.apple.com/documentation/swift_packages).
First supported version is `2.3.0`.
## With CocoaPods
CocoaPods is a dependency manager for Objective-C, which automates and simplifies the process of using 3rd-party libraries in your projects. To install with CocoaPods, follow the "Get Started" section on [CocoaPods](https://cocoapods.org/).
### Podfile
```ruby
platform :ios, '9.0'
use_frameworks!
pod 'LGSideMenuController'
```
Then import framework where you need to use the library:
```swift
import LGSideMenuController
```
## With Carthage
Carthage is a lightweight dependency manager for Swift and Objective-C. It leverages CocoaTouch modules and is less invasive than CocoaPods. To install with carthage, follow instructions on [Carthage](https://github.com/Carthage/Carthage/).
### Cartfile
```ruby
github "Friend-LGA/LGSideMenuController"
```
Then import framework where you need to use the library:
```swift
import LGSideMenuController
```
# Usage
`LGSideMenuController` is inherited from `UIViewController`, so you can use it the same way as any other `UIViewController`.
First, you need to provide basic view controllers or views, which will be used to show root, left and right views.
- `rootViewController` or `rootView`.
This view controller or view will be used as the root view.
- `leftViewController` or `leftView`.
This view controller or view will be used as the left side view.
- `rightViewController` or `rightView`.
This view controller or view will be used as the right side view.
```swift
// You don't have to assign both: left and right side views.
// Just one is enough, but you can use both if you want.
// UIViewController() and UIView() here are just as an example.
// Use any UIViewController or UIView to assign, as you wish.
let sideMenuController =
LGSideMenuController(rootViewController: UIViewController(),
leftViewController: UIViewController(),
rightViewController: UIViewController())
// ===== OR =====
let sideMenuController =
LGSideMenuController(rootView: UIView(),
leftView: UIView(),
rightView: UIView())
// ===== OR =====
let sideMenuController = LGSideMenuController()
sideMenuController.rootViewController = UIViewController()
sideMenuController.leftViewController = UIViewController()
sideMenuController.rightViewController = UIViewController()
// ===== OR =====
let sideMenuController = LGSideMenuController()
sideMenuController.rootView = UIView()
sideMenuController.leftView = UIView()
sideMenuController.rightView = UIView()
```
Second, you probably want to choose presentation style, there are a few:
- `scaleFromBig`.
Side view is located below the root view and when appearing is changing its scale from large to normal.
Root view also is going to be minimized and moved aside.
- `scaleFromLittle`.
Side view is located below the root view and when appearing is changing its scale from small to normal.
Root view also is going to be minimized and moved aside.
- `slideAbove`.
Side view is located above the root view and when appearing is sliding from a side.
Root view is staying still.
- `slideAboveBlurred`.
Side view is located above the root view and when appearing is sliding from a side.
Root view is staying still.
Side view has blurred background.
- `slideBelow`.
Side view is located below the root view.
Root view is going to be moved aside.
- `slideBelowShifted`.
Side view is located below the root view.
Root view is going to be moved aside.
Also content of the side view has extra shifting.
- `slideAside`.
Side view is located at the same level as root view and when appearing is sliding from a side.
Root view is going to be moved together with the side view.
```swift
sideMenuController.leftViewPresentationStyle = .slideAboveBlurred
sideMenuController.rightViewPresentationStyle = .slideBelowShifted
```
Third, you might want to change width of your side view.
By default it's calculated as smallest side of the screen minus `44.0`, then compare it to `320.0` and choose smallest number.
Like so: `min(min(UIScreen.main.bounds.width, UIScreen.main.bounds.height) - 44.0, 320.0)`.
```swift
sideMenuController.leftViewWidth = 250.0
sideMenuController.rightViewWidth = 100.0
```
To show/hide side views just use any of these and similar methods:
```swift
// ===== LEFT =====
/// Shows left side view.
func showLeftView()
/// Hides left side view.
func hideLeftView()
/// Toggle (shows/hides) left side view.
func toggleLeftView()
// ===== RIGHT =====
/// Shows right side view.
func showRightView()
/// Hides right side view.
func hideRightView()
/// Toggle (shows/hides) right side view.
func toggleRightView()
```
# Quick Example
You don't have to create both: left and right side views. Just one is enough, but you can use both if you want.
We create them here just as an example.
## Without Storyboard
1. Create root view controller (for example `UINavigationController`).
2. Create left view controller (for example `UITableViewController`).
3. Create right view controller (for example `UITableViewController`).
4. Create instance of LGSideMenuController with these controllers.
5. Configure.
```swift
// Simple AppDelegate.swift
// Just as an example. Don't take it as a strict approach.
import UIKit
import LGSideMenuController
@main
class AppDelegate: UIResponder, UIApplicationDelegate {
var window: UIWindow?
func application(_ application: UIApplication, didFinishLaunchingWithOptions launchOptions: [UIApplication.LaunchOptionsKey: Any]?) -> Bool {
// 1. Create root view controller.
// Here it is just simple `UINavigationController`.
// Read apple documentation and google to create one:
// https://developer.apple.com/documentation/uikit/uinavigationcontroller
// https://google.com/search?q=uinavigationcontroller+example
let rootNavigationController = UINavigationController(rootViewController: UIViewController())
// 2. Create left and right view controllers.
// Here it is just simple `UITableViewController`.
// Read apple documentation and google to create one:
// https://developer.apple.com/documentation/uikit/uitableviewcontroller
// https://google.com/search?q=uitableviewcontroller+example
let leftViewController = UITableViewController()
let rightViewController = UITableViewController()
// 3. Create instance of LGSideMenuController with above controllers as root and left.
let sideMenuController = LGSideMenuController(rootViewController: rootNavigationController,
leftViewController: leftViewController,
rightViewController: rightViewController)
// 4. Set presentation style by your taste if you don't like the default one.
sideMenuController.leftViewPresentationStyle = .slideAboveBlurred
sideMenuController.rightViewPresentationStyle = .slideBelowShifted
// 5. Set width for the left view if you don't like the default one.
sideMenuController.leftViewWidth = 250.0
sideMenuController.rightViewWidth = 100.0
// 6. Make it `rootViewController` for your window.
self.window = UIWindow(frame: UIScreen.main.bounds)
self.window!.rootViewController = sideMenuController
self.window!.makeKeyAndVisible()
// 7. Done!
return true
}
}
```
For deeper examples check [NonStoryboard Demo Project](https://github.com/Friend-LGA/LGSideMenuController/tree/master/Demo/NonStoryboard).
## With Storyboard
1. Create instance of `LGSideMenuController` as initial view controller for your `Storyboard`.
2. Create root view controller (for example `UINavigationController`).
3. Create left view controller (for example `UITableViewController`).
4. Create right view controller (for example `UITableViewController`).
5. Now you need to connect them all using segues of class `LGSideMenuSegue` with identifiers: `root`, `left` and `right`.
Other presentation styles and examples of usage you can try in included [demo projects](https://github.com/Friend-LGA/LGSideMenuController/tree/master/Demo).
Also you can make your very own style, as they are highly customizable.
# Installation
| LGSideMenuController Version | Min iOS Version | Language |
|------------------------------|-----------------|-------------|
| 1.0.0 - 1.0.10 | 6.0 | Objective-C |
| 1.1.0 - 2.2.0 | 8.0 | Objective-C |
| 2.3.0 | 9.0 | Objective-C |
| 3.0.0 | 9.0 | Swift |
## With Source Code
1. [Download repository](https://github.com/Friend-LGA/LGSideMenuController/archive/master.zip)
2. Add [LGSideMenuController directory](https://github.com/Friend-LGA/LGSideMenuController/blob/master/LGSideMenuController/) to your project
3. Enjoy!
## With Swift Package Manager
Starting with Xcode 9.0 you can use built-in swift package manager, follow [apple documentation](https://developer.apple.com/documentation/swift_packages).
First supported version is `2.3.0`.
## With CocoaPods
CocoaPods is a dependency manager for Objective-C, which automates and simplifies the process of using 3rd-party libraries in your projects. To install with CocoaPods, follow the "Get Started" section on [CocoaPods](https://cocoapods.org/).
### Podfile
```ruby
platform :ios, '9.0'
use_frameworks!
pod 'LGSideMenuController'
```
Then import framework where you need to use the library:
```swift
import LGSideMenuController
```
## With Carthage
Carthage is a lightweight dependency manager for Swift and Objective-C. It leverages CocoaTouch modules and is less invasive than CocoaPods. To install with carthage, follow instructions on [Carthage](https://github.com/Carthage/Carthage/).
### Cartfile
```ruby
github "Friend-LGA/LGSideMenuController"
```
Then import framework where you need to use the library:
```swift
import LGSideMenuController
```
# Usage
`LGSideMenuController` is inherited from `UIViewController`, so you can use it the same way as any other `UIViewController`.
First, you need to provide basic view controllers or views, which will be used to show root, left and right views.
- `rootViewController` or `rootView`.
This view controller or view will be used as the root view.
- `leftViewController` or `leftView`.
This view controller or view will be used as the left side view.
- `rightViewController` or `rightView`.
This view controller or view will be used as the right side view.
```swift
// You don't have to assign both: left and right side views.
// Just one is enough, but you can use both if you want.
// UIViewController() and UIView() here are just as an example.
// Use any UIViewController or UIView to assign, as you wish.
let sideMenuController =
LGSideMenuController(rootViewController: UIViewController(),
leftViewController: UIViewController(),
rightViewController: UIViewController())
// ===== OR =====
let sideMenuController =
LGSideMenuController(rootView: UIView(),
leftView: UIView(),
rightView: UIView())
// ===== OR =====
let sideMenuController = LGSideMenuController()
sideMenuController.rootViewController = UIViewController()
sideMenuController.leftViewController = UIViewController()
sideMenuController.rightViewController = UIViewController()
// ===== OR =====
let sideMenuController = LGSideMenuController()
sideMenuController.rootView = UIView()
sideMenuController.leftView = UIView()
sideMenuController.rightView = UIView()
```
Second, you probably want to choose presentation style, there are a few:
- `scaleFromBig`.
Side view is located below the root view and when appearing is changing its scale from large to normal.
Root view also is going to be minimized and moved aside.
- `scaleFromLittle`.
Side view is located below the root view and when appearing is changing its scale from small to normal.
Root view also is going to be minimized and moved aside.
- `slideAbove`.
Side view is located above the root view and when appearing is sliding from a side.
Root view is staying still.
- `slideAboveBlurred`.
Side view is located above the root view and when appearing is sliding from a side.
Root view is staying still.
Side view has blurred background.
- `slideBelow`.
Side view is located below the root view.
Root view is going to be moved aside.
- `slideBelowShifted`.
Side view is located below the root view.
Root view is going to be moved aside.
Also content of the side view has extra shifting.
- `slideAside`.
Side view is located at the same level as root view and when appearing is sliding from a side.
Root view is going to be moved together with the side view.
```swift
sideMenuController.leftViewPresentationStyle = .slideAboveBlurred
sideMenuController.rightViewPresentationStyle = .slideBelowShifted
```
Third, you might want to change width of your side view.
By default it's calculated as smallest side of the screen minus `44.0`, then compare it to `320.0` and choose smallest number.
Like so: `min(min(UIScreen.main.bounds.width, UIScreen.main.bounds.height) - 44.0, 320.0)`.
```swift
sideMenuController.leftViewWidth = 250.0
sideMenuController.rightViewWidth = 100.0
```
To show/hide side views just use any of these and similar methods:
```swift
// ===== LEFT =====
/// Shows left side view.
func showLeftView()
/// Hides left side view.
func hideLeftView()
/// Toggle (shows/hides) left side view.
func toggleLeftView()
// ===== RIGHT =====
/// Shows right side view.
func showRightView()
/// Hides right side view.
func hideRightView()
/// Toggle (shows/hides) right side view.
func toggleRightView()
```
# Quick Example
You don't have to create both: left and right side views. Just one is enough, but you can use both if you want.
We create them here just as an example.
## Without Storyboard
1. Create root view controller (for example `UINavigationController`).
2. Create left view controller (for example `UITableViewController`).
3. Create right view controller (for example `UITableViewController`).
4. Create instance of LGSideMenuController with these controllers.
5. Configure.
```swift
// Simple AppDelegate.swift
// Just as an example. Don't take it as a strict approach.
import UIKit
import LGSideMenuController
@main
class AppDelegate: UIResponder, UIApplicationDelegate {
var window: UIWindow?
func application(_ application: UIApplication, didFinishLaunchingWithOptions launchOptions: [UIApplication.LaunchOptionsKey: Any]?) -> Bool {
// 1. Create root view controller.
// Here it is just simple `UINavigationController`.
// Read apple documentation and google to create one:
// https://developer.apple.com/documentation/uikit/uinavigationcontroller
// https://google.com/search?q=uinavigationcontroller+example
let rootNavigationController = UINavigationController(rootViewController: UIViewController())
// 2. Create left and right view controllers.
// Here it is just simple `UITableViewController`.
// Read apple documentation and google to create one:
// https://developer.apple.com/documentation/uikit/uitableviewcontroller
// https://google.com/search?q=uitableviewcontroller+example
let leftViewController = UITableViewController()
let rightViewController = UITableViewController()
// 3. Create instance of LGSideMenuController with above controllers as root and left.
let sideMenuController = LGSideMenuController(rootViewController: rootNavigationController,
leftViewController: leftViewController,
rightViewController: rightViewController)
// 4. Set presentation style by your taste if you don't like the default one.
sideMenuController.leftViewPresentationStyle = .slideAboveBlurred
sideMenuController.rightViewPresentationStyle = .slideBelowShifted
// 5. Set width for the left view if you don't like the default one.
sideMenuController.leftViewWidth = 250.0
sideMenuController.rightViewWidth = 100.0
// 6. Make it `rootViewController` for your window.
self.window = UIWindow(frame: UIScreen.main.bounds)
self.window!.rootViewController = sideMenuController
self.window!.makeKeyAndVisible()
// 7. Done!
return true
}
}
```
For deeper examples check [NonStoryboard Demo Project](https://github.com/Friend-LGA/LGSideMenuController/tree/master/Demo/NonStoryboard).
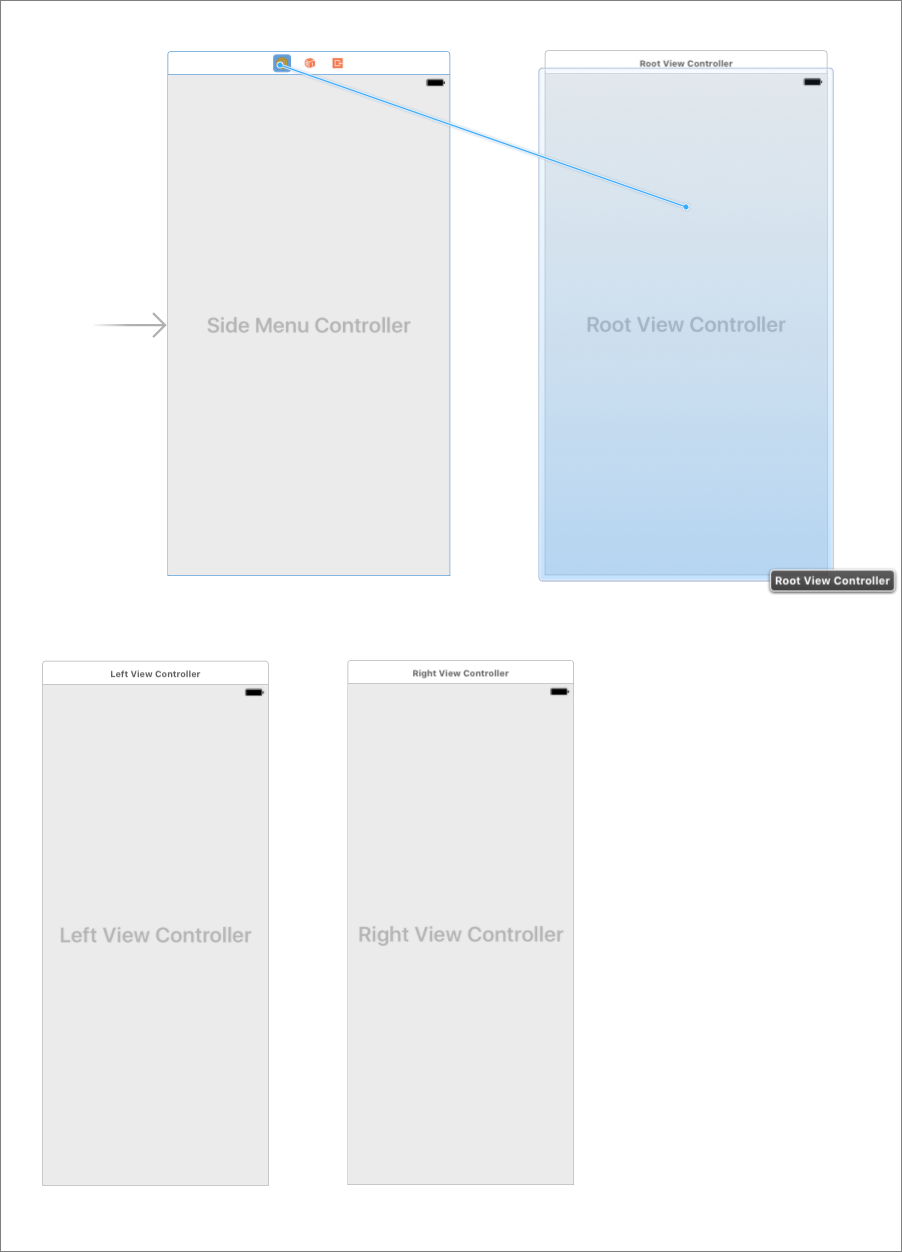
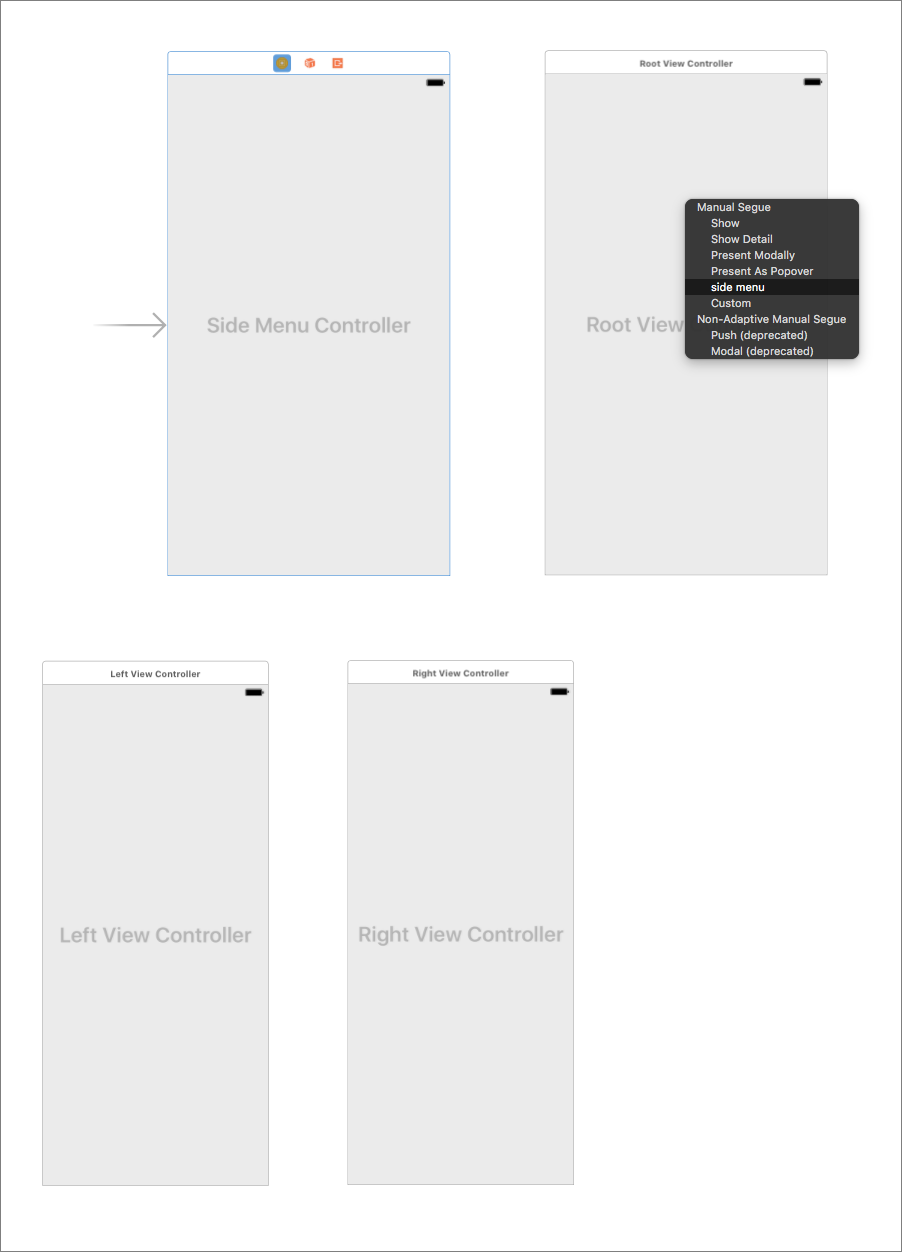
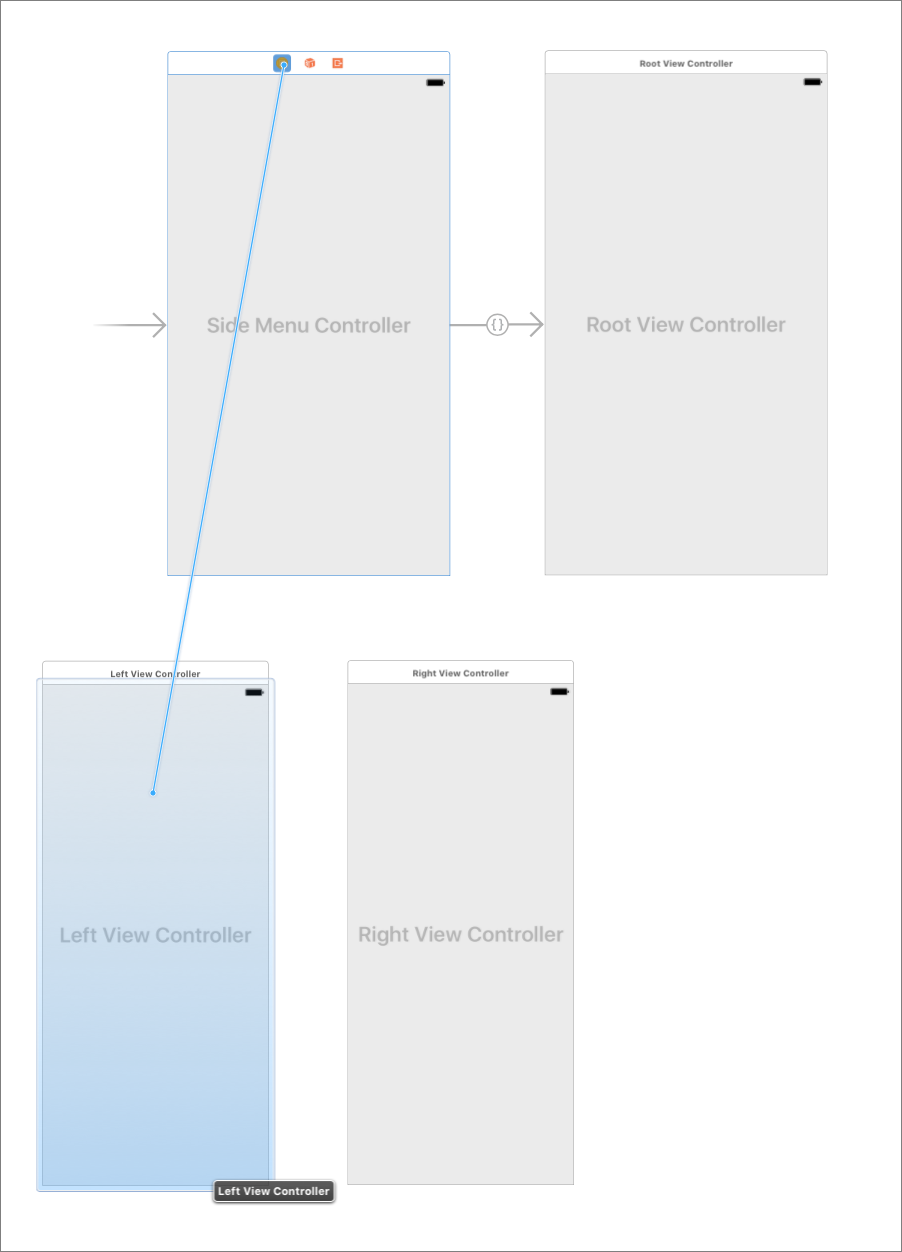
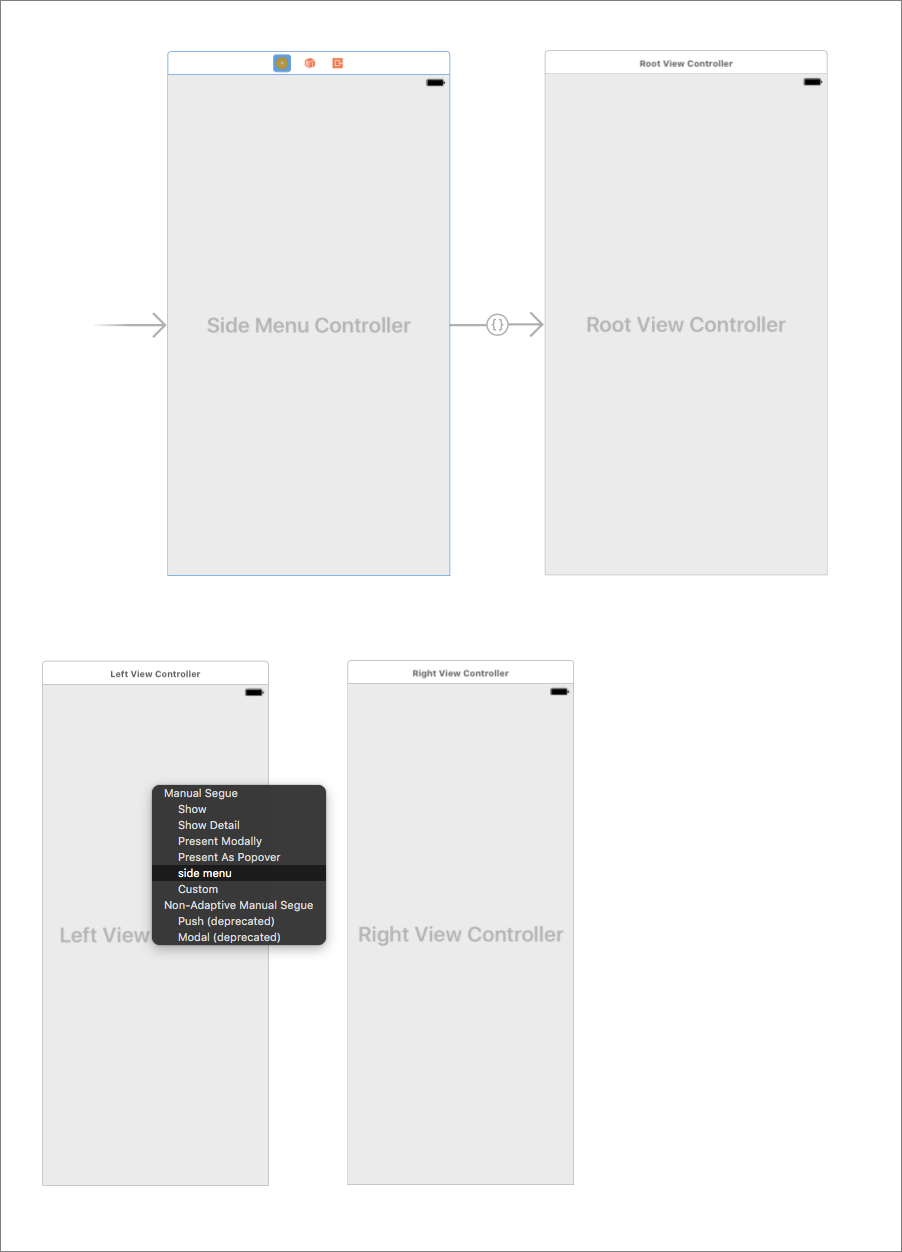
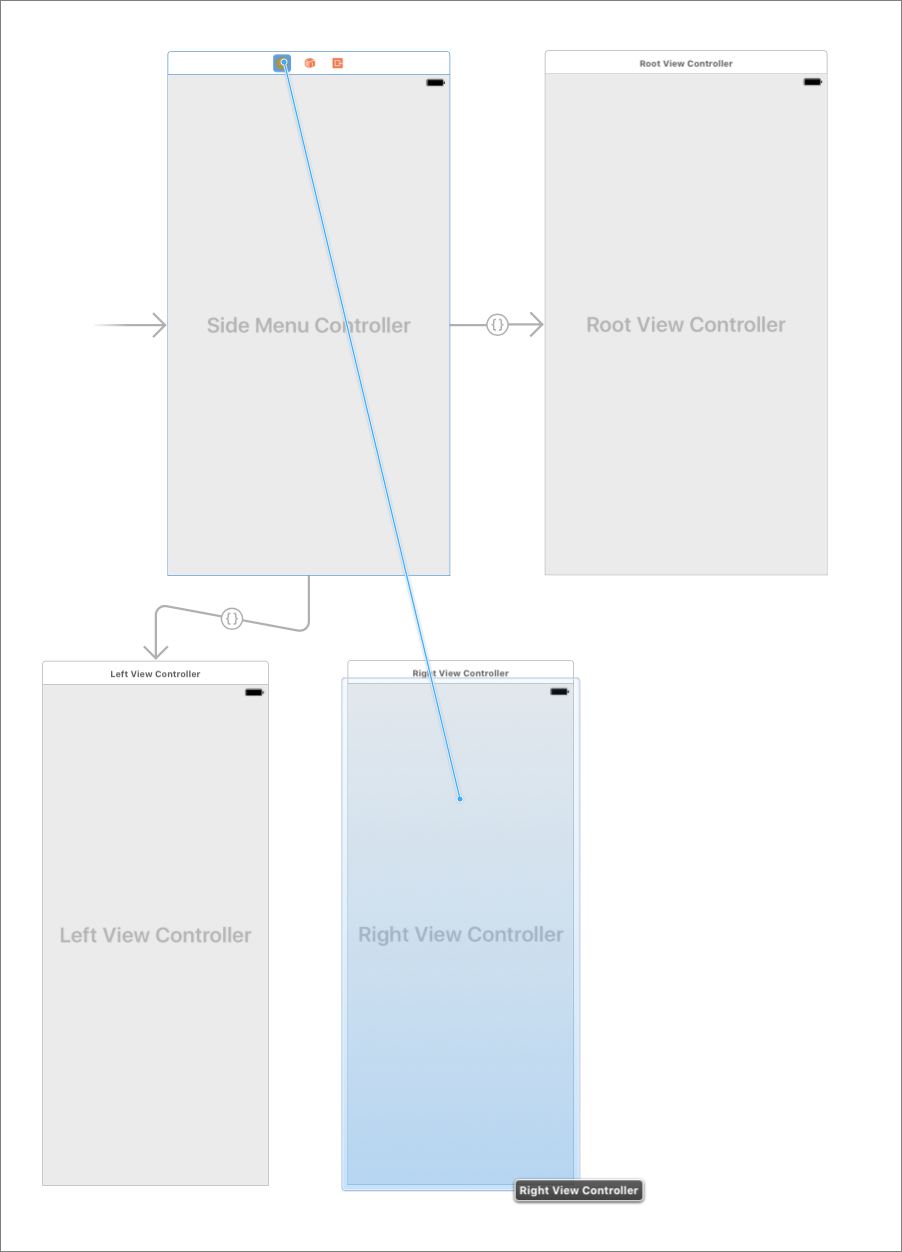
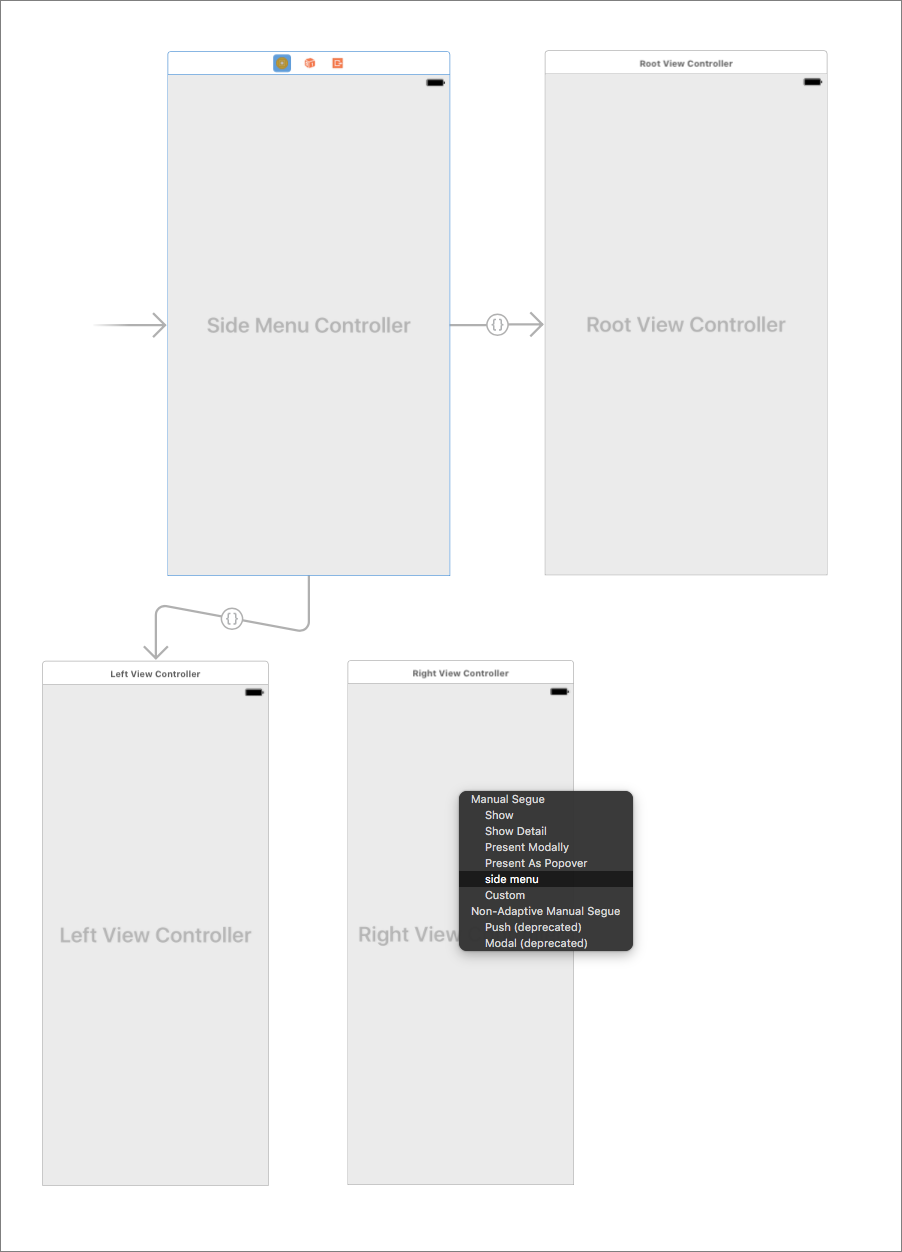
## With Storyboard
1. Create instance of `LGSideMenuController` as initial view controller for your `Storyboard`.
2. Create root view controller (for example `UINavigationController`).
3. Create left view controller (for example `UITableViewController`).
4. Create right view controller (for example `UITableViewController`).
5. Now you need to connect them all using segues of class `LGSideMenuSegue` with identifiers: `root`, `left` and `right`.


 6. You can change `leftViewWidth`, `rightViewWidth` and most of the other properties inside `LGSideMenuController`'s attributes inspector.
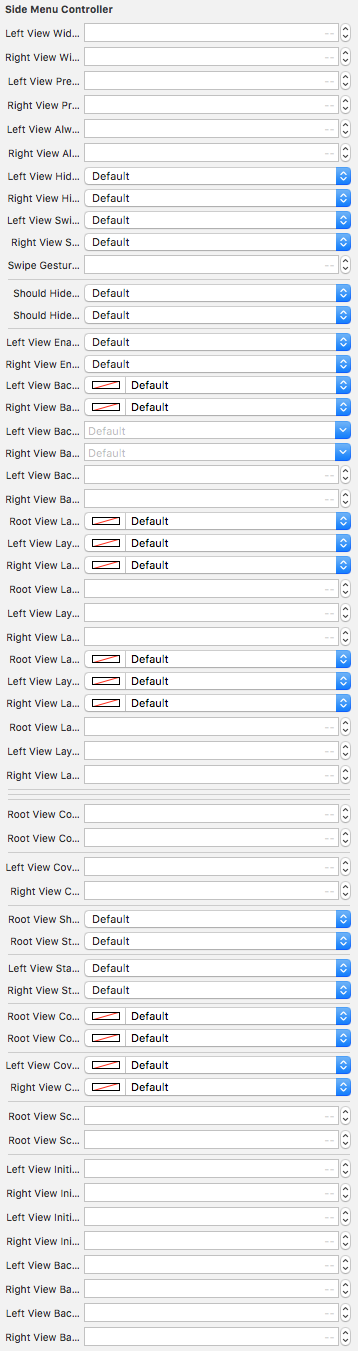 7. `enum` properties are not yet supported (by apple) inside Xcode builder, so to change `leftViewPresentationStyle` and `rightViewPresentationStyle` you will need to do it programmatically. For this you will need to create counterpart for your `LGSideMenuController` and change these values inside. This is done by creating `LGSideMenuController` subclass and assigning this class to your view controller inside `Storyboard`'s custom class section.
```swift
// SideMenuController.swift
import UIKit
import LGSideMenuController
class SideMenuController: LGSideMenuController {
// `viewDidLoad` probably the best place to assign them.
// But if necessary you can do it in other places as well.
override func viewDidLoad() {
super.viewDidLoad()
leftViewPresentationStyle = .slideAboveBlurred
rightViewPresentationStyle = .slideBelowShifted
}
}
```
For deeper examples check [Storyboard Demo Project](https://github.com/Friend-LGA/LGSideMenuController/tree/master/Demo/Storyboard).
# Wiki
If you still have questions, please take a look at the [wiki](https://github.com/Friend-LGA/LGSideMenuController/wiki).
# More
For more details see [files itself](https://github.com/Friend-LGA/LGSideMenuController/tree/master/LGSideMenuController) and try Xcode [demo projects](https://github.com/Friend-LGA/LGSideMenuController/tree/master/Demo):
* [Without Storyboard](https://github.com/Friend-LGA/LGSideMenuController/tree/master/Demo/NonStoryboard)
* [With Storyboard](https://github.com/Friend-LGA/LGSideMenuController/tree/master/Demo/Storyboard)
# Frameworks
If you like LGSideMenuController, check out my other useful libraries:
* [LGAlertView](https://github.com/Friend-LGA/LGAlertView)
Customizable implementation of UIAlertViewController, UIAlertView and UIActionSheet. All in one. You can customize every detail. Make AlertView of your dream! :)
* [LGPlusButtonsView](https://github.com/Friend-LGA/LGPlusButtonsView)
Customizable iOS implementation of Floating Action Button (Google Plus Button, fab).
# License
LGSideMenuController is released under the MIT license. See [LICENSE](https://raw.githubusercontent.com/Friend-LGA/LGSideMenuController/master/LICENSE) for details.
7. `enum` properties are not yet supported (by apple) inside Xcode builder, so to change `leftViewPresentationStyle` and `rightViewPresentationStyle` you will need to do it programmatically. For this you will need to create counterpart for your `LGSideMenuController` and change these values inside. This is done by creating `LGSideMenuController` subclass and assigning this class to your view controller inside `Storyboard`'s custom class section.
```swift
// SideMenuController.swift
import UIKit
import LGSideMenuController
class SideMenuController: LGSideMenuController {
// `viewDidLoad` probably the best place to assign them.
// But if necessary you can do it in other places as well.
override func viewDidLoad() {
super.viewDidLoad()
leftViewPresentationStyle = .slideAboveBlurred
rightViewPresentationStyle = .slideBelowShifted
}
}
```
For deeper examples check [Storyboard Demo Project](https://github.com/Friend-LGA/LGSideMenuController/tree/master/Demo/Storyboard).
# Wiki
If you still have questions, please take a look at the [wiki](https://github.com/Friend-LGA/LGSideMenuController/wiki).
# More
For more details see [files itself](https://github.com/Friend-LGA/LGSideMenuController/tree/master/LGSideMenuController) and try Xcode [demo projects](https://github.com/Friend-LGA/LGSideMenuController/tree/master/Demo):
* [Without Storyboard](https://github.com/Friend-LGA/LGSideMenuController/tree/master/Demo/NonStoryboard)
* [With Storyboard](https://github.com/Friend-LGA/LGSideMenuController/tree/master/Demo/Storyboard)
# Frameworks
If you like LGSideMenuController, check out my other useful libraries:
* [LGAlertView](https://github.com/Friend-LGA/LGAlertView)
Customizable implementation of UIAlertViewController, UIAlertView and UIActionSheet. All in one. You can customize every detail. Make AlertView of your dream! :)
* [LGPlusButtonsView](https://github.com/Friend-LGA/LGPlusButtonsView)
Customizable iOS implementation of Floating Action Button (Google Plus Button, fab).
# License
LGSideMenuController is released under the MIT license. See [LICENSE](https://raw.githubusercontent.com/Friend-LGA/LGSideMenuController/master/LICENSE) for details.