# FE-IoRT
**Repository Path**: idkook/FE-IoRT
## Basic Information
- **Project Name**: FE-IoRT
- **Description**: No description available
- **Primary Language**: Unknown
- **License**: Not specified
- **Default Branch**: master
- **Homepage**: None
- **GVP Project**: No
## Statistics
- **Stars**: 0
- **Forks**: 0
- **Created**: 2023-12-15
- **Last Updated**: 2023-12-15
## Categories & Tags
**Categories**: Uncategorized
**Tags**: None
## README
# :robot: Blazor Robotics IoT Dashboard
[](https://dev.azure.com/amirashrafizham7/IoT%20RaspberryPI/_build/latest?definitionId=5&branchName=master)
[](https://sonarcloud.io/summary/new_code?id=amirashrafizham_FE-IoRT)


## :thought_balloon: About
This is a Blazor WebAssembly dashboard project and has the following features :
- Remotely maneuvre a robot through a web browser [Feb 2022 Release]
- Retrieve and monitor IoT sensor data displayed on the dashboard [Feb 2022 Release]
- Camera video streaming in real-time [Apr 2022 Release]

## :film_strip: Demo
Controlling the rover from a mobile device

Real-time camera stream from a tablet
 ### Features to be added in future release
1. **Robot Control Panel module**
- SignalR and BackgroundService to enable real-time IoT sensor monitoring (Temperature, Humidity, Pressure)
- Ultrasonic sensor chart to detect collision
- Robot speed sensor chart to monitor the rover's speed
- Battery status chart to monitor the leftover battery on the RaspberryPi
2. **Weather Station module**
- Line chart to monitor sensor trends for T-10 seconds
3. **DevSecOps**
- Perform Static Code Analysis with SonarCloud :white_check_mark:
- Perform unit testing with XUnit
- Integrate unit testing into CI Pipeline and generate code coverage

## :hammer_and_wrench: Tech Stack
| Technology | Remarks |
|---------------------|--------------------------------------------------------------------------------------------------|
| Blazor WebAssembly | Front End SPA framework to build the dashboard |
| RaspberryPi | Server to host the Web and to host the Azure DevOps agent for CICD |
| Docker | Containerization platform to package the front-end codes |
| Azure DevOps | Continuous Integration/Continuous Deployment platform |
| Nginx | Web server to host Dashboard for client-side serving |
| Pi-Top Robotics Kit | Hardware to maneuver the robot by Pi-Top - Pi-Top OS is used to integrate with the peripherals |
| SenseHat | Hardware to capture IoT sensor data

## :fireworks: Installation
### Hardware
The following hardware is required prior to installing the software
1. RaspberryPi 4B+
2. Pi-Top Robotics Kit
3. SenseHat
### Software
1. Install Docker engine on the RaspberryPi
2. Install .NET 5 / .NET 6 on the RaspberryPi
3. Download the docker image : `amirashrafizham/fe-iort`
4. Run the following docker command : `sudo docker run --privileged -p 5005:80 --name fe-iort --detach --restart unless-stopped amirashrafizham/fe-iort`

## :computer: Code Structure
### Components
##### **Robot Control Panel - Component to manoeuvre the robot**

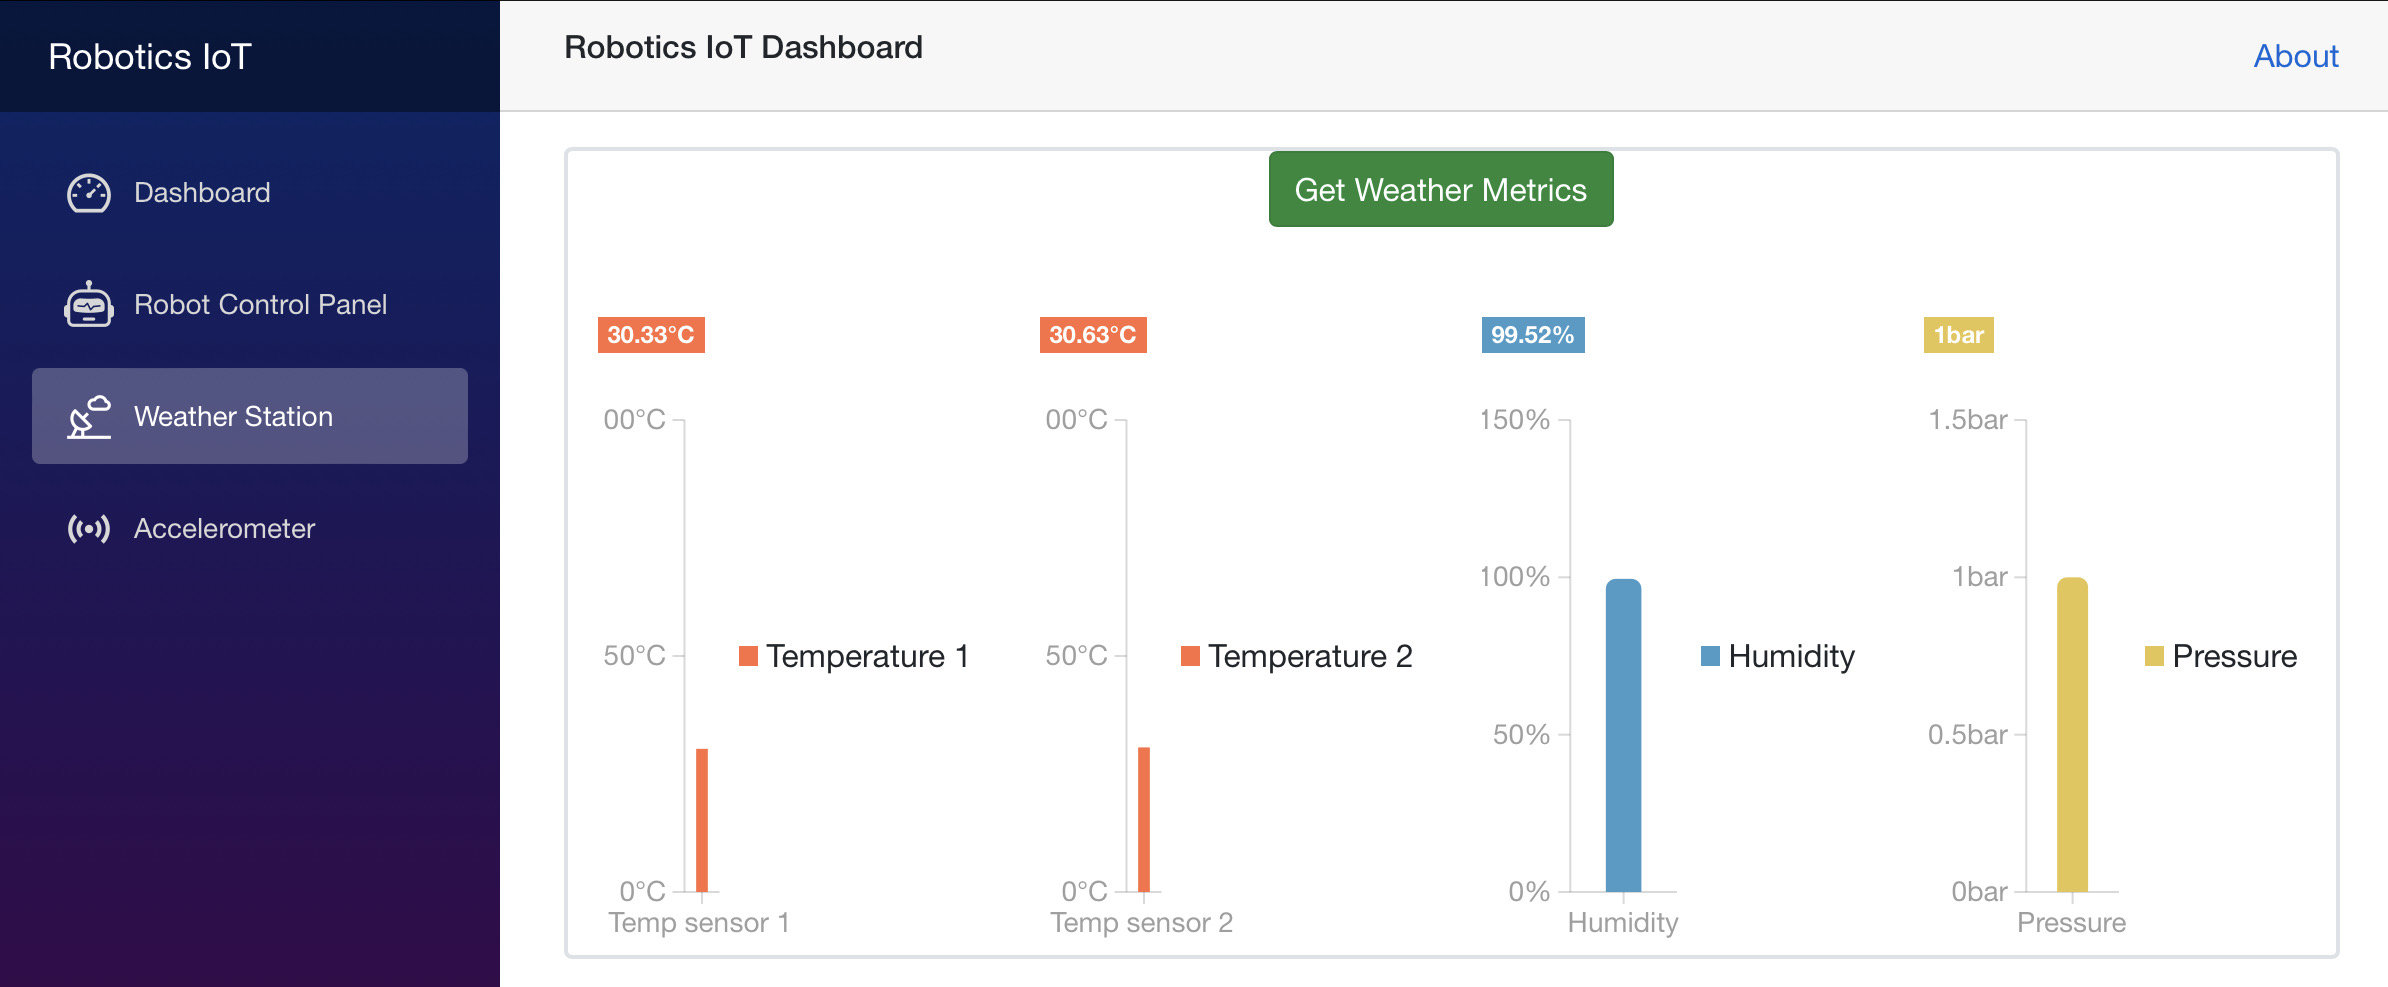
##### **Weather Station - Component to display weather station**
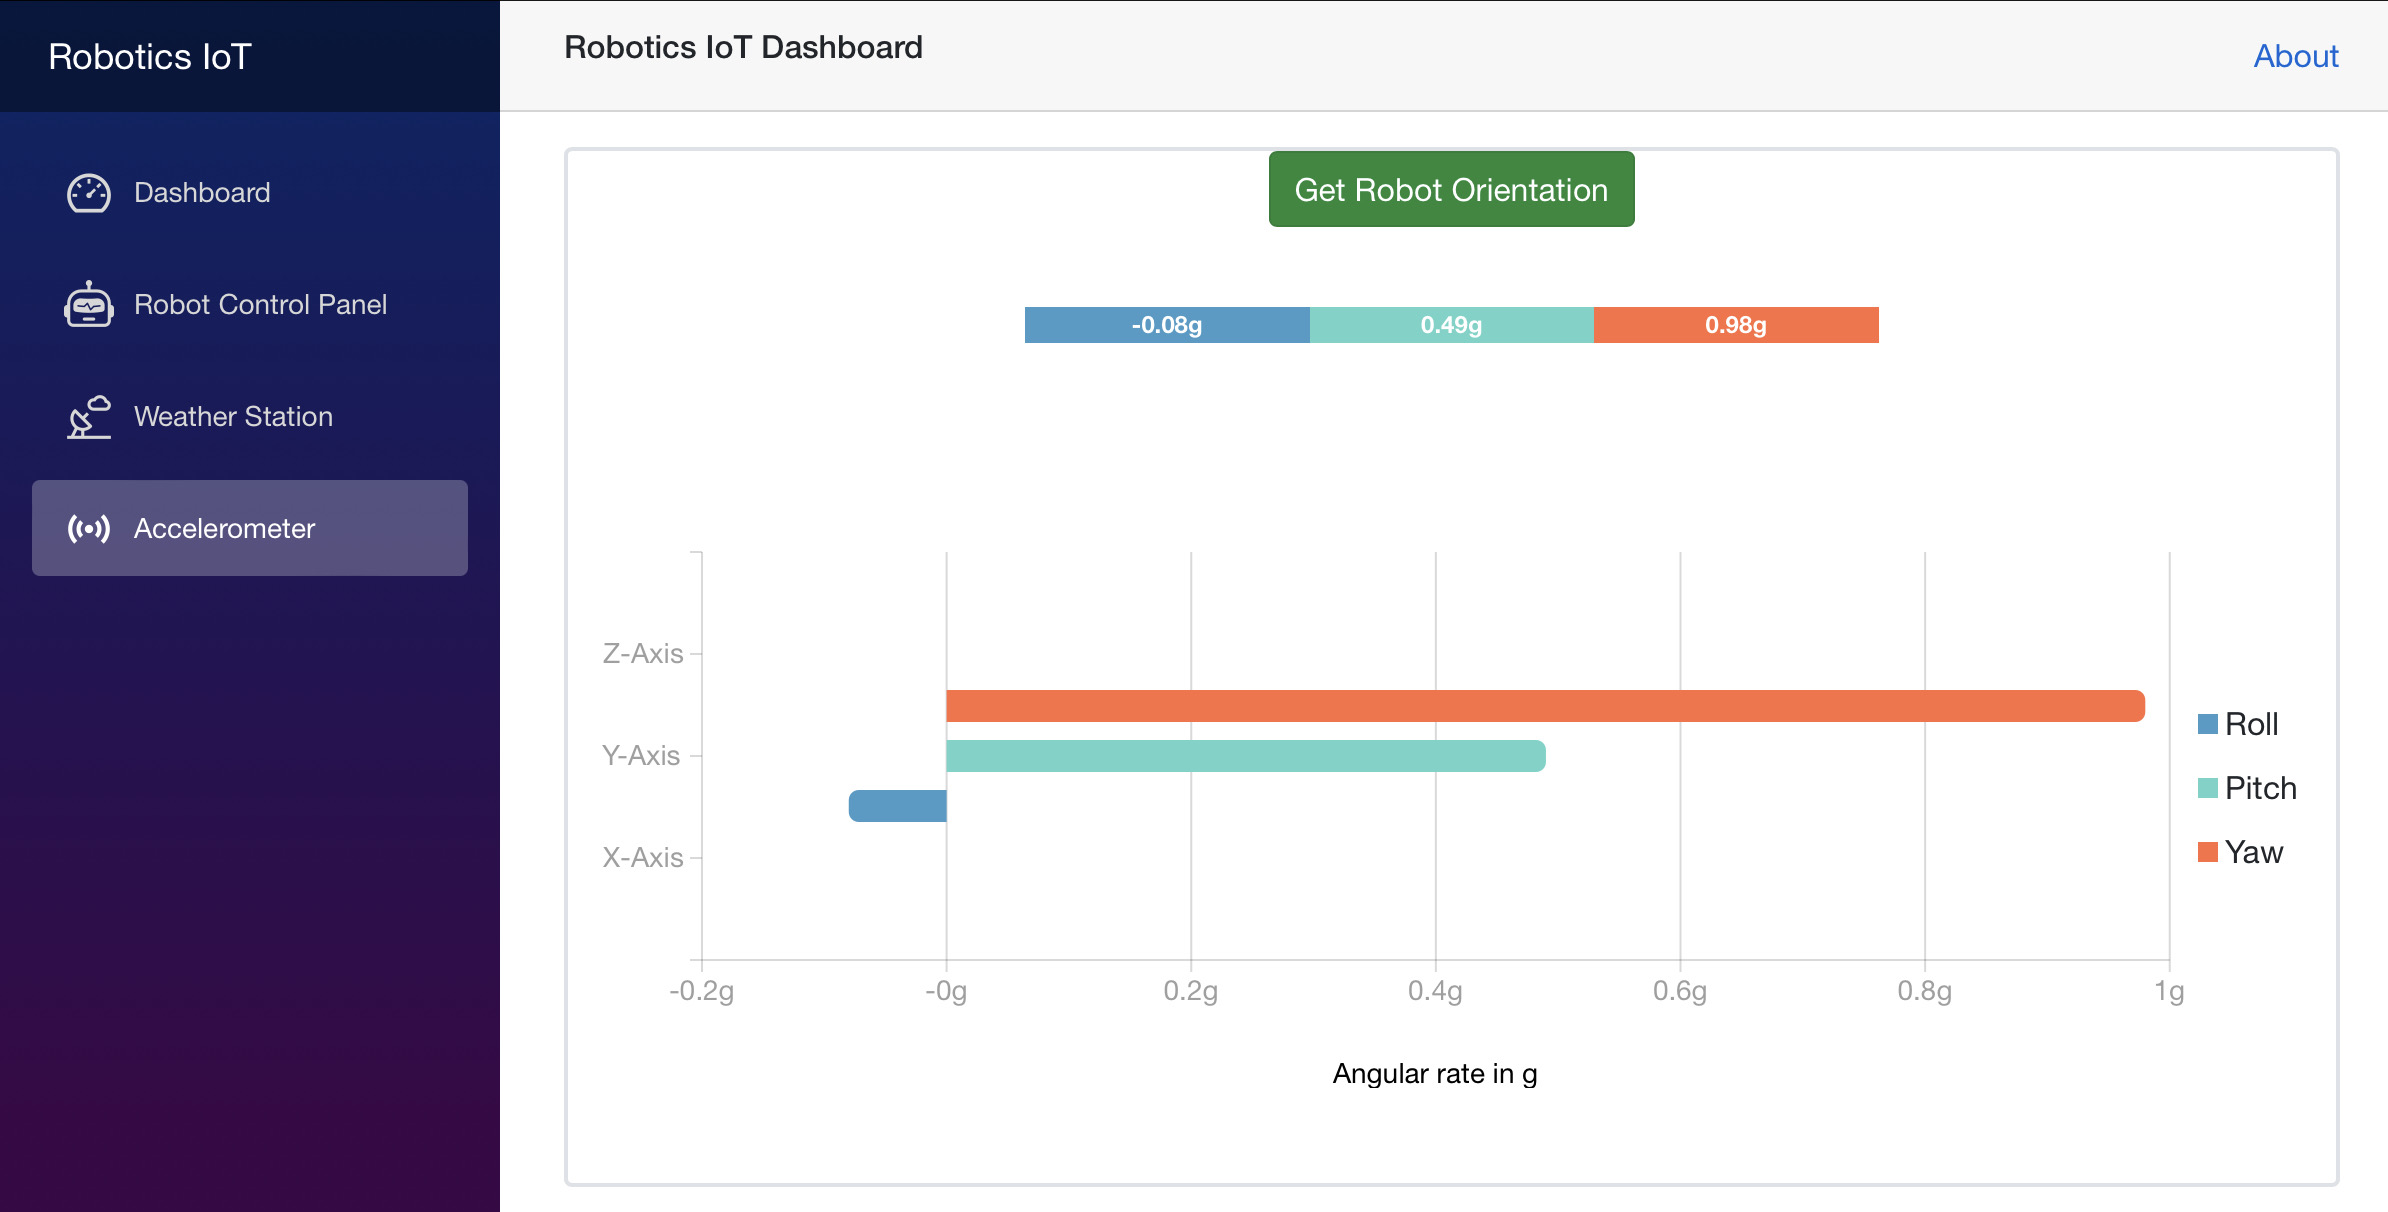
##### **Accelerometer - Component to display accelerometer**
### Libraries
1. Radzen Blazor library

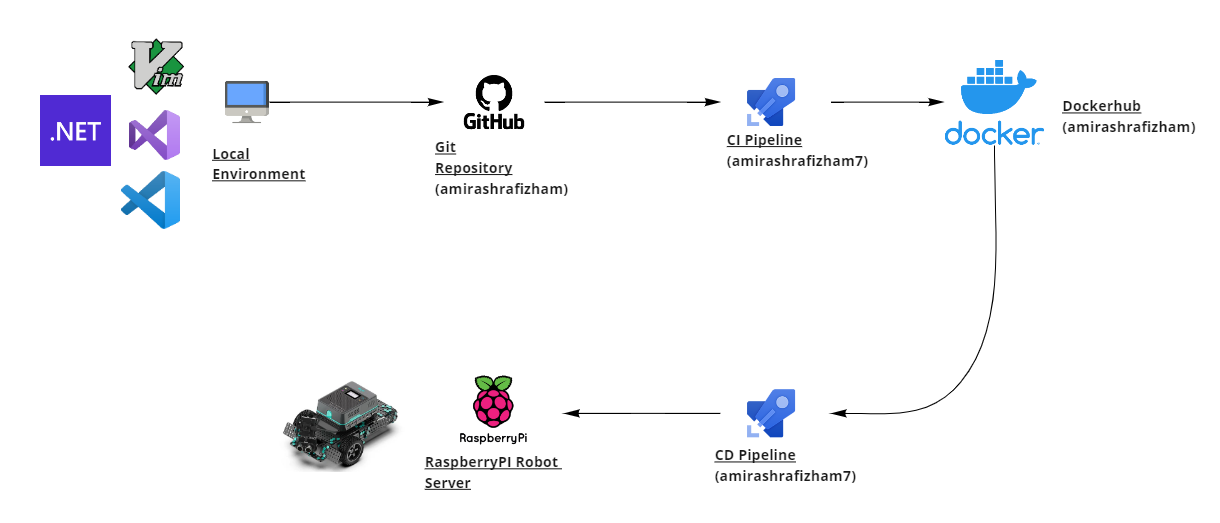
## :rocket: CICD
Due to the limitation of the 32-bit Pi-Top OS as of Apr 2022, the project will be built using .NET 6 on local machine and configured to .NET 5 on the server. These are the steps to build and release the code to the RaspberryPi Server
1. From local machine, push the latest code update to Github
2. Azure Pipelines will automatically trigger the CI pipeline
3. The CI pipeline will download `.csproj` and `Dockerfile.dev` hosted on Azure DevOps secure file. These files are configured for .NET5
4. Overwrite `.csproj` and store `Dockerfile.dev` from `$(Agent.TempDirectory)` to `$(Build.Repository.LocalPath)`
5. Build and containerize the code using Dockerfile.dev. The Dockerfile has the following main commands
- `dotnet restore`
- `dotnet publish`
- Copy all files into Nginx runtime
6. Push to Dockerhub for backup
7. Azure Pipelines will then automatically trigger the CD pipeline with the following main commands
- `docker stop` old image
- `docker remove` old image
- `docker run` new image with privileged access, detached mode, restart-unless-stop and point to port 5005
- `docker remove` images on the server with `` label

## :artificial_satellite: Connectivity
To connect to the dashboard, ensure the client device and the RaspberryPi are within the same wi-fi network. Next point the IP address of the RaspberryPi with port 5005 on the web browser

To connect to the dashboard without any wi-fi network, use an Ethernet cable connection to prevent network latency as the download size of .NET 5 Blazor Wasm is large. To access the dashboard, simply plug the ethernet cable to the client device and point the hostname of the RaspberryPi with port 5005 on the web browser


### Features to be added in future release
1. **Robot Control Panel module**
- SignalR and BackgroundService to enable real-time IoT sensor monitoring (Temperature, Humidity, Pressure)
- Ultrasonic sensor chart to detect collision
- Robot speed sensor chart to monitor the rover's speed
- Battery status chart to monitor the leftover battery on the RaspberryPi
2. **Weather Station module**
- Line chart to monitor sensor trends for T-10 seconds
3. **DevSecOps**
- Perform Static Code Analysis with SonarCloud :white_check_mark:
- Perform unit testing with XUnit
- Integrate unit testing into CI Pipeline and generate code coverage

## :hammer_and_wrench: Tech Stack
| Technology | Remarks |
|---------------------|--------------------------------------------------------------------------------------------------|
| Blazor WebAssembly | Front End SPA framework to build the dashboard |
| RaspberryPi | Server to host the Web and to host the Azure DevOps agent for CICD |
| Docker | Containerization platform to package the front-end codes |
| Azure DevOps | Continuous Integration/Continuous Deployment platform |
| Nginx | Web server to host Dashboard for client-side serving |
| Pi-Top Robotics Kit | Hardware to maneuver the robot by Pi-Top - Pi-Top OS is used to integrate with the peripherals |
| SenseHat | Hardware to capture IoT sensor data

## :fireworks: Installation
### Hardware
The following hardware is required prior to installing the software
1. RaspberryPi 4B+
2. Pi-Top Robotics Kit
3. SenseHat
### Software
1. Install Docker engine on the RaspberryPi
2. Install .NET 5 / .NET 6 on the RaspberryPi
3. Download the docker image : `amirashrafizham/fe-iort`
4. Run the following docker command : `sudo docker run --privileged -p 5005:80 --name fe-iort --detach --restart unless-stopped amirashrafizham/fe-iort`

## :computer: Code Structure
### Components
##### **Robot Control Panel - Component to manoeuvre the robot**

##### **Weather Station - Component to display weather station**

##### **Accelerometer - Component to display accelerometer**

### Libraries
1. Radzen Blazor library

## :rocket: CICD
Due to the limitation of the 32-bit Pi-Top OS as of Apr 2022, the project will be built using .NET 6 on local machine and configured to .NET 5 on the server. These are the steps to build and release the code to the RaspberryPi Server
1. From local machine, push the latest code update to Github
2. Azure Pipelines will automatically trigger the CI pipeline
3. The CI pipeline will download `.csproj` and `Dockerfile.dev` hosted on Azure DevOps secure file. These files are configured for .NET5
4. Overwrite `.csproj` and store `Dockerfile.dev` from `$(Agent.TempDirectory)` to `$(Build.Repository.LocalPath)`
5. Build and containerize the code using Dockerfile.dev. The Dockerfile has the following main commands
- `dotnet restore`
- `dotnet publish`
- Copy all files into Nginx runtime
6. Push to Dockerhub for backup
7. Azure Pipelines will then automatically trigger the CD pipeline with the following main commands
- `docker stop` old image
- `docker remove` old image
- `docker run` new image with privileged access, detached mode, restart-unless-stop and point to port 5005
- `docker remove` images on the server with `` label


## :artificial_satellite: Connectivity
To connect to the dashboard, ensure the client device and the RaspberryPi are within the same wi-fi network. Next point the IP address of the RaspberryPi with port 5005 on the web browser

To connect to the dashboard without any wi-fi network, use an Ethernet cable connection to prevent network latency as the download size of .NET 5 Blazor Wasm is large. To access the dashboard, simply plug the ethernet cable to the client device and point the hostname of the RaspberryPi with port 5005 on the web browser

