# inkscape-centerline-trace
**Repository Path**: jmxhyz/inkscape-centerline-trace
## Basic Information
- **Project Name**: inkscape-centerline-trace
- **Description**: A bitmap vectorizer that can trace along the centerline of a stroke. The builtin inkscape 'trace bitmap' can only trace edges, thus resulting in double lines for most basic use cases. It uses 'autotrace -centerline' and an optimal threshold to vectorize a pixel image.
- **Primary Language**: Python
- **License**: GPL-2.0
- **Default Branch**: master
- **Homepage**: None
- **GVP Project**: No
## Statistics
- **Stars**: 0
- **Forks**: 0
- **Created**: 2020-03-29
- **Last Updated**: 2021-09-25
## Categories & Tags
**Categories**: Uncategorized
**Tags**: None
## README
inkscape-centerline-trace
=========================
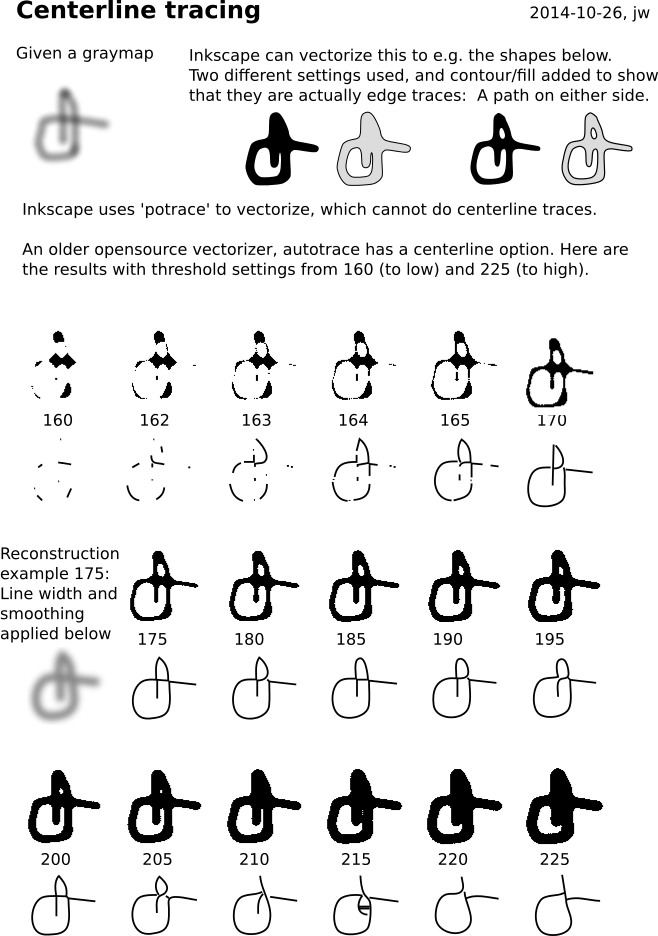
A bitmap vectorizer that can trace along the centerline of a stroke. The builtin inkscape 'trace bitmap' can only trace edges, thus resulting in double lines for most basic use cases.
Download Source code and Debian/Ubuntu package
Written with python-Pillow.
It uses 'autotrace -centerline' and an optimal threshold to vectorize a pixel image.
See centerline-tracing.svg for an illustration of the idea.
In inkscape it shows up under Extensions -> Images -> Centerline Trace ...
 Installation hints
------------------
* **Install the extension (all operating systems)**
* the extension requires the installation of autotrace and python-pil (see below)
* download the [zip file](https://github.com/fablabnbg/inkscape-centerline-trace/archive/master.zip) of [inkscape-centerline-trace](https://github.com/fablabnbg/inkscape-centerline-trace) and unpack it
* copy the files centerline-trace.inx, centerline-trace.py to your Inkscape User extensions folder (see Edit > Preferences > System: System info: User extensions)
* **Install autotrace / python-pil**
* **Windows**
* Instructions for Inkscape 0.92.2 and higher:
* Install autotrace win64-setup.zip version 0.40.0 or later from e.g. https://github.com/jnweiger/autotrace/releases
Make sure the installation path is C:\Program Files (x86)\AutoTrace -- this application searches there.
- Older version: [autotrace binary](https://github.com/scottvr/autotrace-win64-binaries/raw/master/bin/autotrace.exe) from [autotrace-win64-binaries github repo](https://github.com/scottvr/autotrace-win64-binaries))
Copy the downloaded autotrace.exe to Inkscape's User extensions folder, that should also work.
* Instructions for Inkscape 0.92: https://inkscape.org/en/gallery/item/10567/centerline_NIH0Rhk.pdf
* **MacOS**
* Install autotrace MacOS.zip version 0.40.0 or later from e.g. https://github.com/jnweiger/autotrace/releases
* open a command line shell to install the python-PIL module:
+ `sudo easy_install install pip`
+ `sudo pip install pillow`
* open a command line shell to install the inkscape extension:
+ `cd ~/.config/inkscape/extensions`
+ `curl https://raw.githubusercontent.com/fablabnbg/inkscape-centerline-trace/master/centerline-trace.py -o centerline-trace.py`
+ `curl https://raw.githubusercontent.com/fablabnbg/inkscape-centerline-trace/master/centerline-trace.inx -o centerline-trace.inx`
* Please report success in the github issues. As of 2018-08-31, MacOS Support is back, but highly experimental.
* **GNU/Linux**
* Install the autotrace DEB package version 0.40.0 or later from e.g. https://github.com/jnweiger/autotrace/releases
* if you do not have pillow/pil installed, the extension will output an error message prompting you to install it. On Ubuntu and derivatives, run `sudo apt-get install python-pil` to install.
Algorithm
---------
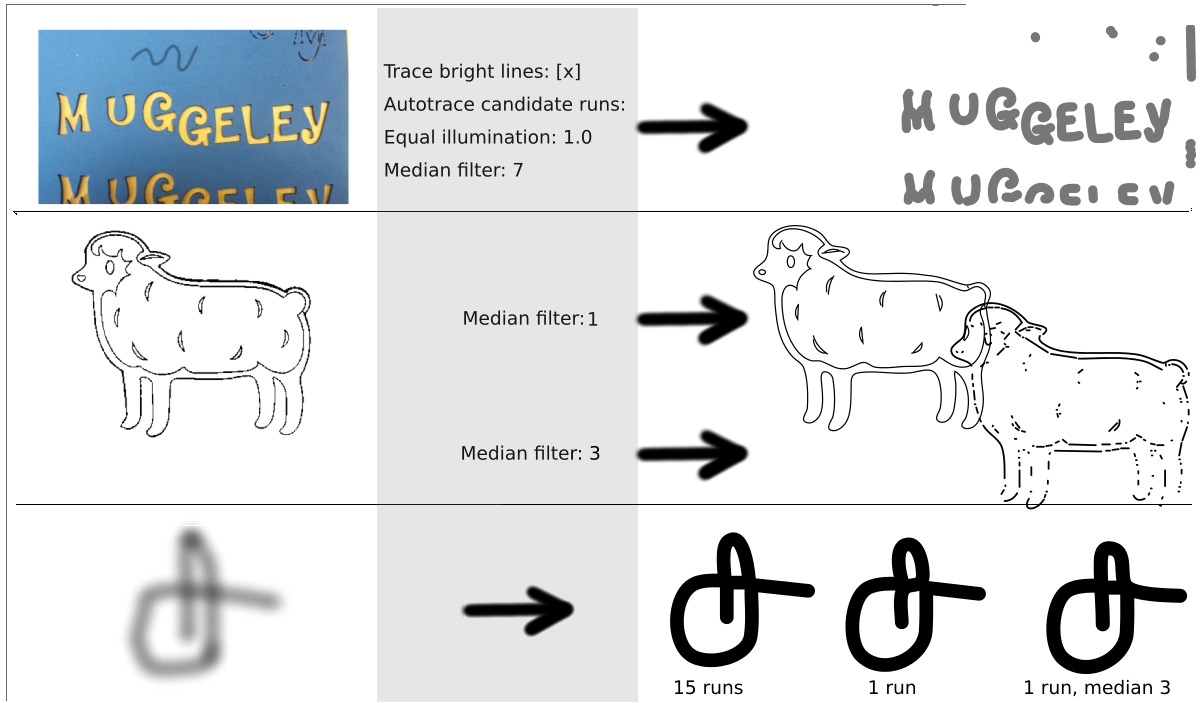
The input image is converted to a graymap and histogram normalized with PIL.ImageOps.autocontrast.
Optional preprocessing: equal illumination, median denoise filter.
Autotrace needs a bi-level bitmap. In order to find the
best threshold value, we can run autotrace at multiple thresholds
and evaluate the result candidates.
We count the number of line segments produced and
measure the total path length drawn.
The svg that has the longest path but the least number of
segments is returned.
Installation hints
------------------
* **Install the extension (all operating systems)**
* the extension requires the installation of autotrace and python-pil (see below)
* download the [zip file](https://github.com/fablabnbg/inkscape-centerline-trace/archive/master.zip) of [inkscape-centerline-trace](https://github.com/fablabnbg/inkscape-centerline-trace) and unpack it
* copy the files centerline-trace.inx, centerline-trace.py to your Inkscape User extensions folder (see Edit > Preferences > System: System info: User extensions)
* **Install autotrace / python-pil**
* **Windows**
* Instructions for Inkscape 0.92.2 and higher:
* Install autotrace win64-setup.zip version 0.40.0 or later from e.g. https://github.com/jnweiger/autotrace/releases
Make sure the installation path is C:\Program Files (x86)\AutoTrace -- this application searches there.
- Older version: [autotrace binary](https://github.com/scottvr/autotrace-win64-binaries/raw/master/bin/autotrace.exe) from [autotrace-win64-binaries github repo](https://github.com/scottvr/autotrace-win64-binaries))
Copy the downloaded autotrace.exe to Inkscape's User extensions folder, that should also work.
* Instructions for Inkscape 0.92: https://inkscape.org/en/gallery/item/10567/centerline_NIH0Rhk.pdf
* **MacOS**
* Install autotrace MacOS.zip version 0.40.0 or later from e.g. https://github.com/jnweiger/autotrace/releases
* open a command line shell to install the python-PIL module:
+ `sudo easy_install install pip`
+ `sudo pip install pillow`
* open a command line shell to install the inkscape extension:
+ `cd ~/.config/inkscape/extensions`
+ `curl https://raw.githubusercontent.com/fablabnbg/inkscape-centerline-trace/master/centerline-trace.py -o centerline-trace.py`
+ `curl https://raw.githubusercontent.com/fablabnbg/inkscape-centerline-trace/master/centerline-trace.inx -o centerline-trace.inx`
* Please report success in the github issues. As of 2018-08-31, MacOS Support is back, but highly experimental.
* **GNU/Linux**
* Install the autotrace DEB package version 0.40.0 or later from e.g. https://github.com/jnweiger/autotrace/releases
* if you do not have pillow/pil installed, the extension will output an error message prompting you to install it. On Ubuntu and derivatives, run `sudo apt-get install python-pil` to install.
Algorithm
---------
The input image is converted to a graymap and histogram normalized with PIL.ImageOps.autocontrast.
Optional preprocessing: equal illumination, median denoise filter.
Autotrace needs a bi-level bitmap. In order to find the
best threshold value, we can run autotrace at multiple thresholds
and evaluate the result candidates.
We count the number of line segments produced and
measure the total path length drawn.
The svg that has the longest path but the least number of
segments is returned.