# vue3-template
**Repository Path**: liaoyia/vue3-template
## Basic Information
- **Project Name**: vue3-template
- **Description**: 这是基于vue3 + JavaScript 搭建的模板,集成tailwindcss + element Plus,配置了stylelint + eslint代码检查,自动导入插件,etup语法糖添加组件名字,在vue中使用ref 生命周期以及vueuse无需导入。
- **Primary Language**: JavaScript
- **License**: MulanPSL-2.0
- **Default Branch**: master
- **Homepage**: None
- **GVP Project**: No
## Statistics
- **Stars**: 1
- **Forks**: 0
- **Created**: 2022-12-21
- **Last Updated**: 2025-02-26
## Categories & Tags
**Categories**: Uncategorized
**Tags**: None
## README
# Vue3 Template
* 基础: vue3 vite pnpm
* 代码检查 : eslint(airbnb-base规范) stylelint
* css开发: postcss sass tailwindCss hooks工具: vuesue
* 插件:
* unplugin-auto-import 自动导入
* unplugin-vue-components 自动导入组件
* vite-plugin-remove-console 生产环境移除console
* vite-plugin-svg-icons svg图标使用
* vite-plugin-vue-setup-extend setup语法糖添加组件名字
* rollup-plugin-visualizer 生产打包可视化报告
* 功能:
* 区分环境
* 代码分块
## 使用 pnpm
> [https://pnpm.io/zh/installation](https://pnpm.io/zh/installation)
**pnpm 优势**
1. pnpm依赖包将被存放在一个统一的位置;
2. 支持monorepo 单一仓库, 当前项目只能使用当前项目的包, 不可使用其依赖依赖的包 ;
3. 硬链接 :安装包时启用硬链接,多个文件夹平等的共享同一个存储单元 (就算删除其中一个,仍可通过其他文件夹访问)
4. 软链接: 其他文件或目录的引用
5. mklink /H new source
6. 跨磁盘会报警告,`cross-device link not permitted`
:::warning
如果包储存的位置与安装位置不在同一个盘,那么包已下载的包将会被复制,而不是被链接,如果你在C盘执行了 `pnpm install `,则pnpm存储必须在C盘,如果pnpm存储在其他盘,所需要的包将会被复制到项目位置而不是链接形式,这样严重扼制了pnpm存储和性能优势。
:::
```powershell
npm install -g pnpm
config get registry
pnpm set registry https://registry.npm.taobao.org
# https://registry.npmjs.org/
pnpm config set store-dir E:/.pnpm-store# 修改默认仓库地址
pnpm store path # 获取包仓库地址(pnpm的仓库不能跨磁盘)
pnpm store prune # 从store中删除当前未被(硬连接)引用的包来释放store的空间
```
与 npm 的差异
> [参考链接: 功能比较](https://pnpm.io/zh/feature-comparison)。
| npm命令 | pnpm等价命令 |
| --- | --- |
| npm install | pnpm install 安装全部依赖 |
| npm install 包名 | pnpm add (-D) 包名 |
| npm uninstall 包名 | pnpm remove 包名 |
| npm run 脚本 | pnpm 脚本 |
## vite 功能特性
使用vite 创建一个 vue3项目:
```css
pnpm create vite vue3-template --template vue
cd vue3-template
pnpm install
pnpm run dev
```
> 参考 [vite 官网](https://cn.vitejs.dev/guide/#scaffolding-your-first-vite-project)
### 依赖构建
:::warning
依赖预构建,全代码抛弃 **require**
:::
```powershell
/*
依赖预构建 全代码抛弃require
1. vite将CommonJS或UMD发布的依赖项转换为 ESM 的语法规范 (esbuild实现), 放到node_modules/.vite/deps
2. 路径问题 , 强制 Vite 重新构建依赖,你可以用 --force 命令行选项启动开发服务器
3. 网络多包传输时, Vite 将有许多内部模块的ESM依赖关系转换为单个或几个模块, 只需要一个HTTP请求
4. @type import('vite').UserConfig 类型注释
*/
```
### 环境变量/全局常量
```shell
/*
环境变量/dotenv 定义常量define
1. mode 通过 --mode 指定
2. 在js中 使用 import.meta.env.VITE_xxx 使用环境变量
3. define: { NUM: JSON.stringify(1) }
*/
```
#### 情景配置
在项目根目录新建 config 文件夹,并新建 build.js 和 dev.js 文件
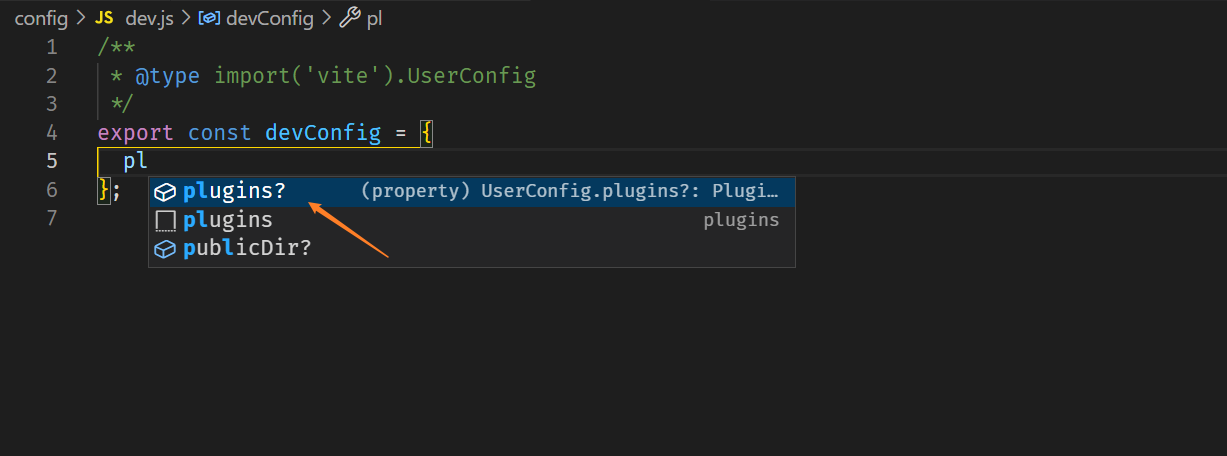
dev.js
```css
/**
* @type import('vite').UserConfig
*/
export const devConfig = {
pl
};
```
build.js
```css
/**
* @type import('vite').UserConfig
*/
export const buildConfig = {
};
```
上面我们在这两个文件头部都写了 @type import('vite').UserConfig , 这是vite提供的类型注释,方便代码提示:
新建 index.js 文件
```css
import { devConfig } from './dev';
import { buildConfig } from './build';
export const envResolver = {
development: () => {
console.log('---development---');
return devConfig;
},
production: () => {
console.log('---production---');
return buildConfig;
}
};
```
> 参考链接 [vite 情景配置](https://cn.vitejs.dev/config/#conditional-config)
在 vite.config.js 使用刚刚配置的环境变量
```css
import { defineConfig } from 'vite';
import vue from '@vitejs/plugin-vue';
import { envResolver } from './config/index.js';
// https://vitejs.dev/config/
export default defineConfig(({ mode }) =>
Object.assign(envResolver[mode](), {
base: '/',
server: {},
build: {},
plugins: [vue()]
})
);
```
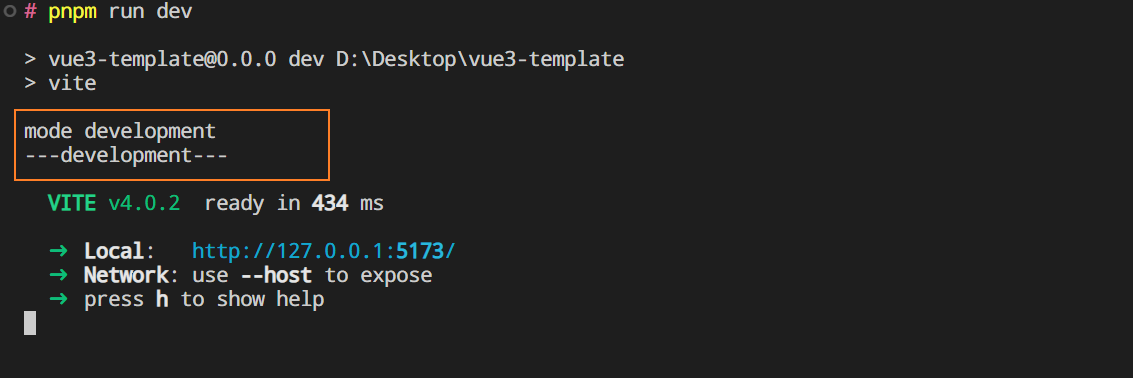
上面中的 mode 的值就是我们所处的环境,我们可以输出一下看看:
```css
import { defineConfig } from 'vite';
import vue from '@vitejs/plugin-vue';
import { envResolver } from './config/index.js';
// https://vitejs.dev/config/
export default defineConfig(({ mode }) => {
console.log('mode', mode);
return Object.assign(envResolver[mode](), {
base: '/',
server: {},
build: {},
plugins: [vue()]
});
});
```
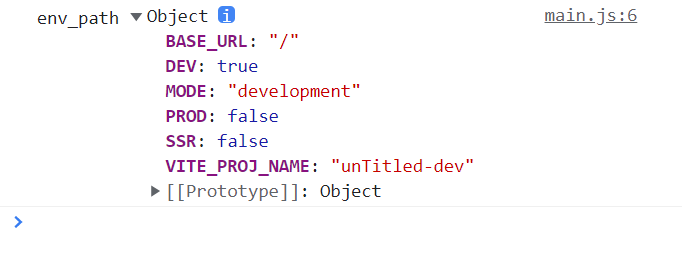
#### 配置环境变量
在刚刚创建的config文件夹新建 env 文件夹,并新建 .env.development 和 .env.production 文件
```css
// .env.development 文件写入
VITE_PROJ_NAME = 'unTitled-dev'
// .env.production 文件写入
VITE_PROJ_NAME = 'unTitled-prod'
```
环境变量默认是在项目根目录的,为了让其生效,我们要在 vite.config.js 添加 `envDir`配置
```css
import { resolve } from 'path';
envDir: resolve(__dirname,'config/env'),
```
在 main.js 打印一下:
```css
console.log('env_path', import.meta.env);
```
### 路径别名
在 vite.config.js 配置路径别名
```shell
// 配置路径别名
resolve: {
alias: {
'@': resolve(__dirname, 'src')
}
},
```
在根目录创建jsconfig.json.用@符号代替src的位置
```shell
{
"compilerOptions": {
"baseUrl": "./",
"paths": {
"@/*": ["src/*"],
"components/*": ["src/components/*"],
"assets/*": ["src/assets/*"]
},
"allowSyntheticDefaultImports": true
},
// 注意,你配置的src的别名不能在下面的node_modules以及dist打包文件夹里面使用
"exclude": ["node_modules", "dist"]
}
```
### SCSS
:::warning
弃用** **::v-deep,使用 **:deep()**
:::
```css
:deep(.el-progress__text) {
}
/*
!default //降低scss变量优先级
!global // 表示就用此值
map.deep-merge https://www.sasscss.com/documentation/modules/map
*/
```
### 修改源码无效问题
:::warning
有时候我们修改了vite源代码后,即使是重新运行项目,还是不会出现我们修改后的效果,因为vite默认存在缓存。
:::
解决办法,在 package.json 添加运行命令:
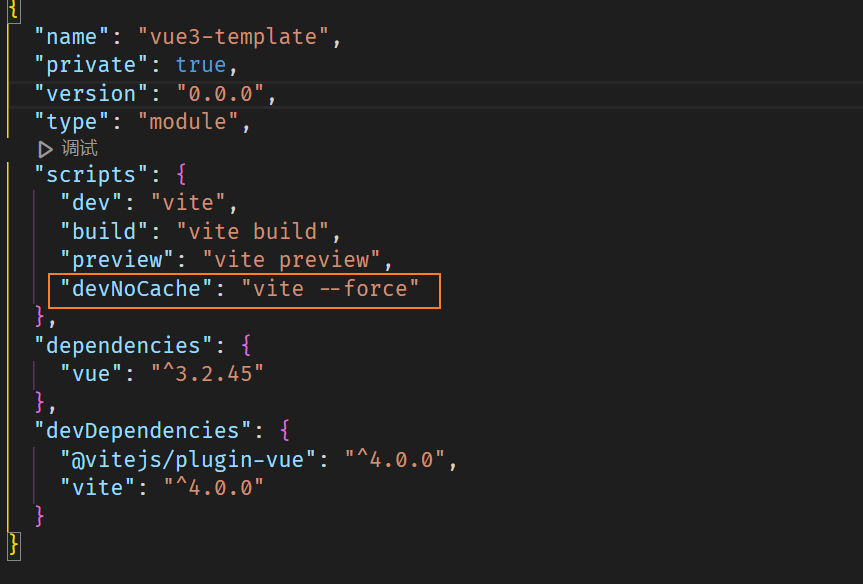
执行:
```shell
# --force 刷新.vite缓存
pnpm run devNoCache
```
## 语法检测
### 集成eslint
安装依赖:
:::info
这里我们使用继承的方式来使用eslint的基本规范(用的比较舒服一点),然后遵循eslint-plugin-vue和 vite-plugin-eslint中的eslint规范。
:::
```powershell
# 继承 校验import vue
pnpm add -D eslint eslint-config-airbnb-base eslint-plugin-import eslint-plugin-vue vite-plugin-eslint
```
初始化eslint:
先全局安装一下eslint ` npm i -g eslint`,然后执行:`eslint --init `
使用 vite-plugin-eslint 插件:
```powershell
# vite-plugin-eslint可在控制台打印错误信息 注册插件
import eslint from 'vite-plugin-eslint';
eslint({ cache: false })
```
## 集成 Tailwindcss 和 **postcss**
#### 安装 postcss
```javascript
pnpm add -D autoprefixer postcss
```
在根目录新建 `postcss.config.js` 文件:
```javascript
export default {
plugins: {
// 'postcss-import': {},
'postcss-pxtorem': {
rootValue: 37.5,
propList: ['*']
}
// 'tailwindcss/nesting': 'postcss-nesting'
// 'tailwindcss': {},
'autoprefixer': {}
}
}
```
测试一下效果, 在index.scss中写入下面css样式 :
```javascript
::placeholder {
color: red;
}
```
main.js打印一下
```javascript
import style from '@/styles/index.scss';
console.log('style', style);
```

#### 安装 Tailwindcss
```javascript
pnpm add -D @tailwindcss/line-clamp postcss-nesting tailwindcss postcss-import
```
## Svg组件自动生成和导入
```javascript
// 1. 安装插接件
pnpm add -D vite-plugin-svg-icons
// 2. 在vite.config.js 使用
import { createSvgIconsPlugin } from 'vite-plugin-svg-icons';
createSvgIconsPlugin({
iconDirs: [resolve(process.cwd(), 'src/icons/svg')],
symbolId: 'icon-[dir]-[name]',
svgoOptions: false
})
// 3. 在main.js 注册全局组件
import 'virtual:svg-icons-register';
import svgIcon from '@/icons/svg-icon.vue';
app.component('svg-icon', svgIcon);
```
## 自动导入组件
安装依赖
- `vite-plugin-vue-setup-extend` 在 setup 中给组件定义别名 (setup语法加 name)
- `unplugin-auto-import` 自动导入插件
- `unplugin-vue-components` 导入vue组件插件
安装使用:
```javascript
// 1. 安装插件
pnpm add -D unplugin-auto-import unplugin-vue-components vite-plugin-vue-setup-extend
// 安装 element-plus 组件库
pnpm add element-plus
// 安装 vueuse 函数库
pnpm add @vueuse/core
# https://www.npmjs.com/package/unplugin-auto-import
// 2. 使用
import Components from 'unplugin-vue-components/vite'
Components({
// 指定自动导入的组件位置,默认是 src/components
dirs: ['src/components'],
resolvers: [
// 自动导入 Element Plus 组件
ElementPlusResolver()
],
// 配置文件生成位置,默认是根目录 /components.d.ts
dts: 'config/type/components.d.ts',
deep: true
}),
import AutoImport from 'unplugin-auto-import/vite';
AutoImport({
// 自动导入 Vue 相关函数,如:ref, reactive, toRef 等
imports: ['vue', '@vueuse/core'],
resolvers: [
// 自动导入 Element Plus 相关函数,如:ElMessage, ElMessageBox...
ElementPlusResolver()
],
// 配置文件生成位置,默认是根目录 /auto-imports.d.ts
dts: 'config/type/auto-imports.d.ts'
}),
```
但会出现一个问题,不导入 vue,eslint报错,找不到相关 api,这时候我们需要配置eslint生成一个文件:
```javascript
AutoImport({
// 自动导入 Vue 相关函数,如:ref, reactive, toRef 等
imports: ['vue', '@vueuse/core'],
eslintrc: {
// 默认false, true启用。false生成一次就可以,避免每次工程启动都生成
enabled: true,
// 不导入ref, reactive vueUse时,vscode会报错, 让eslint生成 json文件
filepath: './.eslintrc-auto-import.json', // 生成json文件
globalsPropValue: true
},
resolvers: [ ElementPlusResolver() ],
// 配置文件生成位置,默认是根目录 /auto-imports.d.ts
dts: 'config/type/auto-imports.d.ts'
}),
```
在 .eslintrc.cjs 文件里配置继承 .eslintrc-auto-import.json 文件:
```javascript
// .eslintrc.js
extends: [
'plugin:vue/vue3-essential',
'airbnb-base',
// 继承 .eslintrc-auto-import.json 规避找不到 ref vueuse函数
'.eslintrc-auto-import.json'
],
```
#### 注册全局变量
```javascript
app.config.globalProperties.$version = app.version;
app.config.globalProperties.$stati = (url) => new URL(`../assets/${url}`, import.meta.url).href
```
验证效果:
```javascript
点击弹出提示框
改变姓名
姓名:{{ user.name }}
年龄:{{ user.age }}
{{ name }}
useMouse 获取鼠标: {{ x }} -- {{ y }}
![]() ```
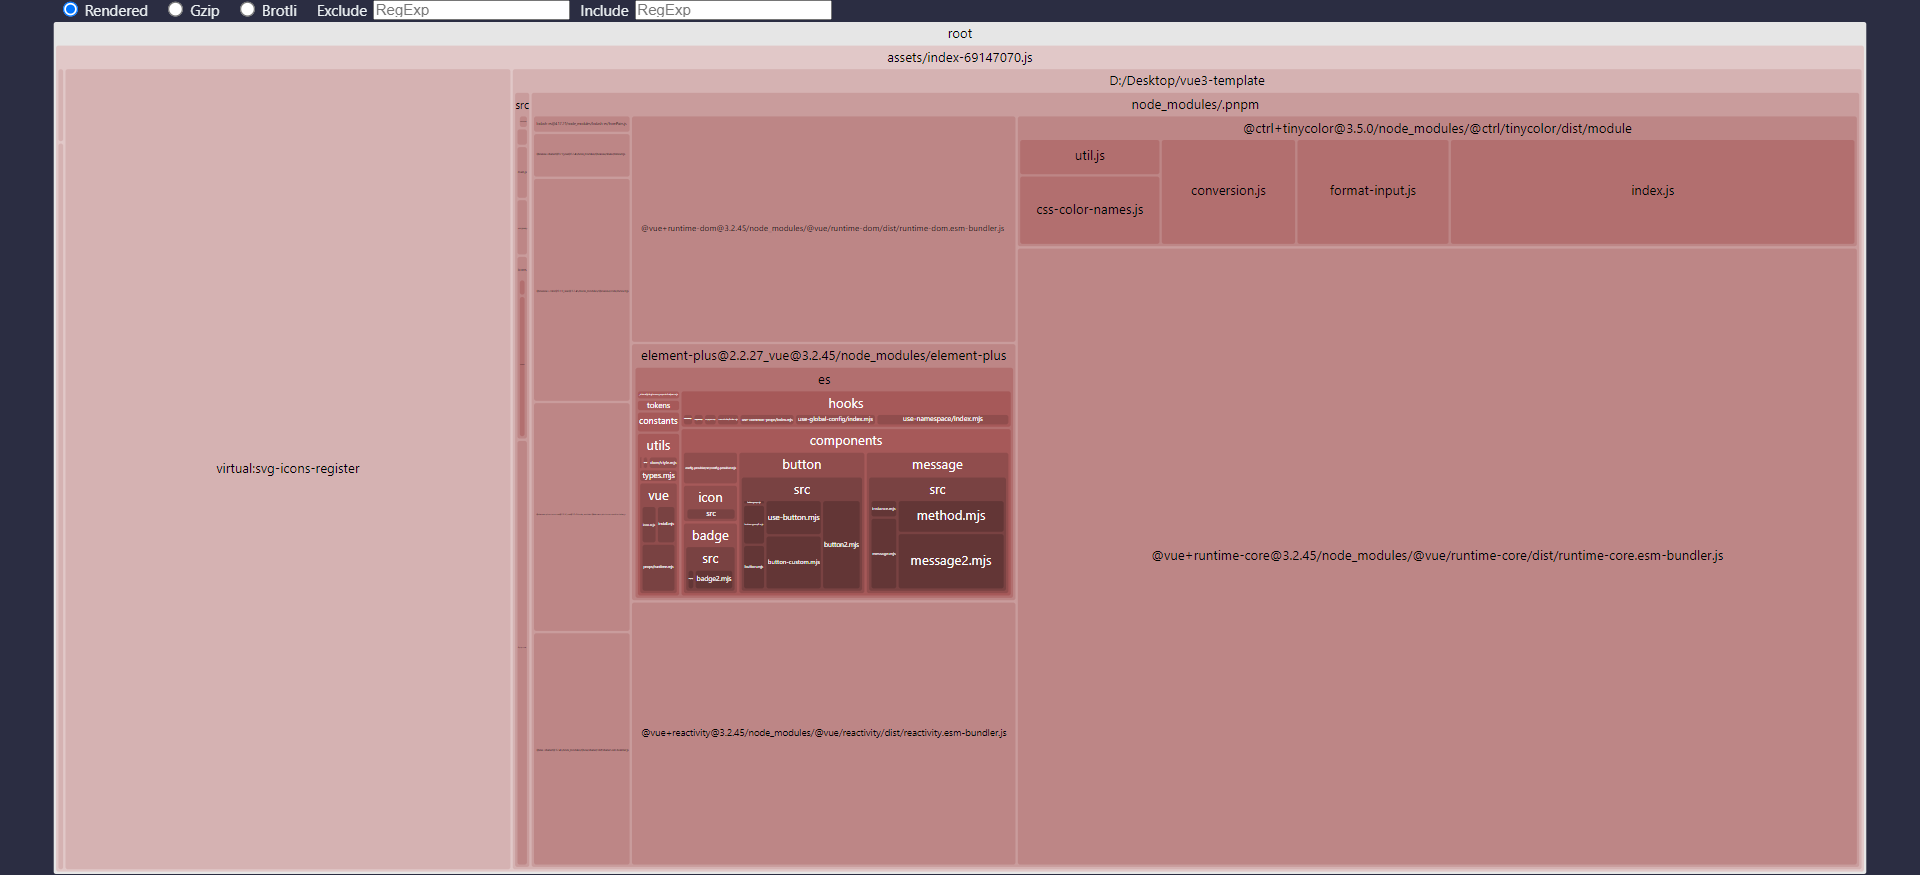
## 打包时生成报告
```javascript
pnpm add -D rollup-plugin-visualizer
```
注册插件:
```javascript
import { visualizer } from 'rollup-plugin-visualizer';
visualizer({
open: mode === 'production',
gzipSize: true,
brotliSize: true,
filename: resolve(process.cwd(), 'dist/report.html'),
}),
```
运行 `pnpm run build `
## 生产环境删除 console.log()
安装插件:
```javascript
// 安装插件
pnpm add -D vite-plugin-remove-console
// 注册插件
// 配置{external: ["src/assets/iconfont/iconfont.js"] } 对某文件 console 不剔除
removeConsole({
external: ['src/main.js']
}),
```
## 分包打包优化
> 只有打包体积过大的时候,我们才需要做分包打包优化,如果包体积小的话,分包打包反而会影响性能。
我们试着在src/lib文件夹下新建 myUtils1.js 、myUtils2.js、myUtils3.js 文件夹
```javascript
// myUtils1.js
export const clog1 = () =>{
onsole.log('output=> test1')
console.log('output=> test1')
}
// myUtils2.js
export const clog2 = () =>{
onsole.log('output=> test2')
console.log('output=> test2')
}
// myUtils3.js
export const clog3 = () =>{
onsole.log('output=> test3')
console.log('output=> test3')
}
```
此时我们可以在之前配置自动导入插件里添加目录导入这几个月文件:
```javascript
AutoImport({
// ...
dirs: ['src/utils'], // 配置自动导入的目录(比如导入一些自己写的插件或者工具)
eslintrc: {
// 默认false, true启用。false生成一次就可以,避免每次工程启动都生成
enabled: true,
// 不导入ref, reactive vueUse时,vscode会报错, 让eslint生成 json文件
filepath: './.eslintrc-auto-import.json', // 生成json文件
globalsPropValue: true
},
// ...
}),
```
在vue文件中 :我们就可以直接使用这些方法:
```javascript
```
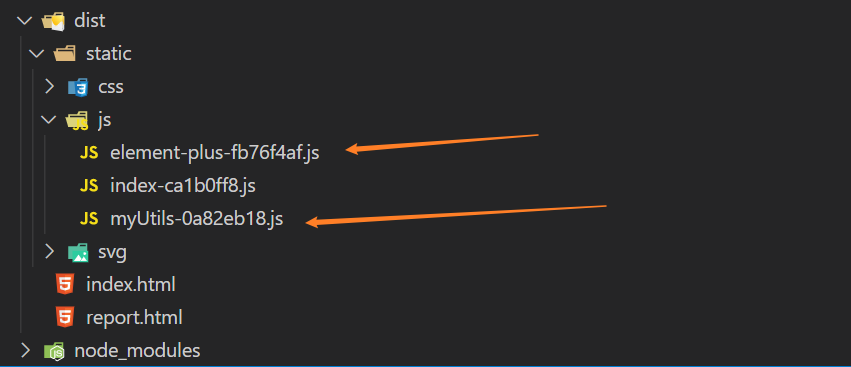
我们尝试一下把 element-plus 和 刚刚自动导入的myUtils* 文件分包打包 (打包生成单独的js文件:
```javascript
// 分开打包
const splitDependencies = ['element-plus','myUtils'];
// 打包优化
build: {
// 设置最终构建的浏览器兼容目标
target: 'es2015',
// 构建后是否生成 source map 文件
sourcemap: false,
// chunk 大小警告的限制(以 kb为单位)
chunkSizeWarningLimit: 2048,
// 启用/禁用 gzip 压缩大小报告
reportCompressedSize: false,
rollupOptions: {
// 输出文件命名
output: {
chunkFileNames: 'static/js/[name]-[hash].js',
entryFileNames: 'static/js/[name]-[hash].js',
assetFileNames: 'static/[ext]/[name]-[hash].[ext]',
manualChunks(id) {
// 这个id就是打包的文件路径
console.log('id >>>> ', id);
// 创建一个vendor包含所有依赖项的块node_modules
for (const dependency of splitDependencies) {
if (id.includes(dependency)) {
console.log('output=> id', id);
return dependency;
}
}
}
}
}
},
```
## 其他依赖
```javascript
# 给setup语法加 name
pnpm add -D vite-plugin-vue-setup-extend
# 清除console
pnpm add -D vite-plugin-remove-console
# 打包显示进度条 https://blog.csdn.net/gongjin2012/article/details/125333102
pnpm add -D vite-plugin-progress
# 打包报告
pnpm add -D rollup-plugin-visualizer
# gzip压缩
pnpm add -D vite-plugin-compression
#兼容IE
pnpm add -D @vitejs/plugin-legacy
// import legacy from '@vitejs/plugin-legacy';
// legacy({
// targets: ['ie >= 11'],
// additionalLegacyPolyfills: ['regenerator-runtime/runtime']
// })
# hooks api
pnpm add @vueuse/core
# VueI18n
pnpm add vue-i18n #必须安装 前置依赖
pnpm add -D @intlify/vite-plugin-vue-i18n
// 默认仅支持 组合式api
VueI18n({ include: [resolve(__dirname, '../locales/**')],})
// use
import { createI18n } from 'vue-i18n';
import messages from '@intlify/vite-plugin-vue-i18n/messages';
const i18n = createI18n({
locale: 'en',
fallbackLocale: 'en',
messages,
});
// 使用 locale可改变其值与文件名相等
const { locale, t } = useI18n();
# mock 数据
pnpm add -D vite-plugin-mock
#swiper https://www.swiper.com.cn
pnpm add swiper # :watchOverflow="false"单页面生效
# 全屏混动
pnpm add vue-fullpage.js
# 美化基本html
pnpm add animate.css hover.css normalize.css
cnpm install --save axios@0.18.1 #请求发送
cnpm install --save vue-router@3.0.6 #路由
cnpm install --save-dev plop@2.3.0 #代码生成
cnpm install --save nprogress@0.2.0 #进度条
cnpm install --save path-to-regexp@2.4.0 # 匹配路由路径表达式工
cnpm install --save video.js
cnpm install --save js-cookie
cnpm install file-saver --save #文件保存
cnpm install --save jszip #压缩
cnpm install --save xlsx #excel
```
## 强制代码提交规范
### 使用prettierrc格式化代码
在vscode下载prettier插件 :

在根目录新增 ` .prettierrc` 文件:
```
{
"semi": false,
"singleQuote": true,
"trailingComma": "none",
"tabWidth": 2
}
```
设置默认格式化工具:
打来项目中任意vue文件或者js文件右键,点击 `使用...格式化工具`在弹出的选择列表选择 `配置默认格式化工具`,选择prettier

为了防止冲突,我们在.eslintrc.cjs 添加规则:
```
// “关闭”或0-关闭规则
// “警告”或1-将规则作为警告(不会影响退出代码)
// “错误”或2-将规则作为错误打开(退出代码为1 触发)
module.exports = {
//...
rules: {
//...
// 解决eslint与prettier冲突
indent: 0, // 强制使用一致的缩进
'space-before-function-paren': 0 // 方法名和括号之间需要有一格空格
}
}
```
### git代码提交规范
1.全局安装commitizen和在项目中安装cz-customizable
```
npm install -g commitizen
pnpm add cz-customizable -D
```
2.在根目录下新建 .cz-config.cjs 文件并写入配置 之后就可以用 git cz 来代替 git commit
```
module.exports = {
// 可选类型
types: [
{ value: 'feat', name: 'feat: 新功能' },
{ value: 'fix', name: 'fix: 修复' },
{ value: 'docs', name: 'docs: 文档变更' },
{ value: 'style', name: 'style: 代码格式(不影响代码运行的变动)' },
{
value: 'refactor',
name: 'refactor: 重构(既不是增加feature,也不是修复bug)'
},
{ value: 'perf', name: 'perf: 性能优化' },
{ value: 'test', name: 'test: 增加测试' },
{ value: 'chore', name: 'chore: 构建过程或辅助工具的变动' },
{ value: 'revert', name: 'revert: 回退' },
{ value: 'build', name: 'build: 打包' }
],
// 消息步骤
messages: {
type: '请选择提交类型:',
customScope: '请输入修改范围(可选):',
subject: '请简要描述提交(必填):',
body: '请输入详细描述(可选):',
footer: '请输入要关闭的issue(可选):',
confirmCommit: '确认使用以上信息提交?(y/n/e/h)'
},
// 跳过问题
skipQuestions: ['body', 'footer'],
// subject文字长度默认是72
subjectLimit: 72
}
```
3.在package.json中进行新增
```
"config": {
"commitizen": {
"path": "node_modules/cz-customizable"
},
// 指定 .cz-config.cjs 文件路径
"cz-customizable": {
"config": ".cz-config.cjs"
}
}
```
运行一下git cz 试试:

### 使用husky进行强制git代码提交规范
```
# 安装 commitlint 校验插件
npm install --save-dev @commitlint/config-conventional@12.1.4 @commitlint/cli@12.1.4
pnpm add -D @commitlint/config-conventional @commitlint/cli
# 安装 husky 强制性使用规范
npm install husky@7.0.1 --save-dev
npm install husky -D
# 初始化 husky
npx husky install
```
此时我们可以看见根目录多了一个.husky文件:

导入commitlint配置文件:
在根目录新增 `commitlint.config.cjs` 文件并写入:
```
module.exports = {
// 继承的规则
extends: ['@commitlint/config-conventional'],
// 定义规则类型
rules: {
// type 类型定义,表示 git 提交的 type 必须在以下类型范围内
'type-enum': [
2,
'always',
[
'feat', // 新功能 feature
'fix', // 修复 bug
'docs', // 文档注释
'style', // 代码格式(不影响代码运行的变动)
'refactor', // 重构(既不增加新功能,也不是修复bug)
'perf', // 性能优化
'test', // 增加测试
'chore', // 构建过程或辅助工具的变动
'revert', // 回退
'build' // 打包
]
],
// subject 大小写不做校验
'subject-case': [0]
}
}
```
5.在package.json中新增指令
```
"prepare": "husky install"
```

6.执行命令
```
pnpm run prepare
```
7.执行命令
```
# 生成 husky commit时的配置文件
npx husky add .husky/commit-msg
```
8.把husky和commitlint进行关联, 在刚刚新增husky配置文件里写入
```
npx --no-install commitlint --edit
```

测试一下,强制提交规范成功:

### 强制提交时代码格式化
既然安装了husky,为了更好的开发体验,husky也支持在推送代码时强制代码格式化
1.我们先来执行命令创建配置文件
```
npx husky add .husky/pre-commit
```
2.同样的生成的文件中写入下面命令
```
npx lint-staged
```
8.把package.json文件的lint-staged修改为
```
"lint-staged": {
"src/**/*.{js,vue}": [ //src目录下所有的js和vue文件
"eslint --fix", // 自动修复
"git add" // 自动提交时修复
]
}
```
```
## 打包时生成报告
```javascript
pnpm add -D rollup-plugin-visualizer
```
注册插件:
```javascript
import { visualizer } from 'rollup-plugin-visualizer';
visualizer({
open: mode === 'production',
gzipSize: true,
brotliSize: true,
filename: resolve(process.cwd(), 'dist/report.html'),
}),
```
运行 `pnpm run build `

## 生产环境删除 console.log()
安装插件:
```javascript
// 安装插件
pnpm add -D vite-plugin-remove-console
// 注册插件
// 配置{external: ["src/assets/iconfont/iconfont.js"] } 对某文件 console 不剔除
removeConsole({
external: ['src/main.js']
}),
```
## 分包打包优化
> 只有打包体积过大的时候,我们才需要做分包打包优化,如果包体积小的话,分包打包反而会影响性能。
我们试着在src/lib文件夹下新建 myUtils1.js 、myUtils2.js、myUtils3.js 文件夹
```javascript
// myUtils1.js
export const clog1 = () =>{
onsole.log('output=> test1')
console.log('output=> test1')
}
// myUtils2.js
export const clog2 = () =>{
onsole.log('output=> test2')
console.log('output=> test2')
}
// myUtils3.js
export const clog3 = () =>{
onsole.log('output=> test3')
console.log('output=> test3')
}
```
此时我们可以在之前配置自动导入插件里添加目录导入这几个月文件:
```javascript
AutoImport({
// ...
dirs: ['src/utils'], // 配置自动导入的目录(比如导入一些自己写的插件或者工具)
eslintrc: {
// 默认false, true启用。false生成一次就可以,避免每次工程启动都生成
enabled: true,
// 不导入ref, reactive vueUse时,vscode会报错, 让eslint生成 json文件
filepath: './.eslintrc-auto-import.json', // 生成json文件
globalsPropValue: true
},
// ...
}),
```
在vue文件中 :我们就可以直接使用这些方法:
```javascript
```
我们尝试一下把 element-plus 和 刚刚自动导入的myUtils* 文件分包打包 (打包生成单独的js文件:
```javascript
// 分开打包
const splitDependencies = ['element-plus','myUtils'];
// 打包优化
build: {
// 设置最终构建的浏览器兼容目标
target: 'es2015',
// 构建后是否生成 source map 文件
sourcemap: false,
// chunk 大小警告的限制(以 kb为单位)
chunkSizeWarningLimit: 2048,
// 启用/禁用 gzip 压缩大小报告
reportCompressedSize: false,
rollupOptions: {
// 输出文件命名
output: {
chunkFileNames: 'static/js/[name]-[hash].js',
entryFileNames: 'static/js/[name]-[hash].js',
assetFileNames: 'static/[ext]/[name]-[hash].[ext]',
manualChunks(id) {
// 这个id就是打包的文件路径
console.log('id >>>> ', id);
// 创建一个vendor包含所有依赖项的块node_modules
for (const dependency of splitDependencies) {
if (id.includes(dependency)) {
console.log('output=> id', id);
return dependency;
}
}
}
}
}
},
```

## 其他依赖
```javascript
# 给setup语法加 name
pnpm add -D vite-plugin-vue-setup-extend
# 清除console
pnpm add -D vite-plugin-remove-console
# 打包显示进度条 https://blog.csdn.net/gongjin2012/article/details/125333102
pnpm add -D vite-plugin-progress
# 打包报告
pnpm add -D rollup-plugin-visualizer
# gzip压缩
pnpm add -D vite-plugin-compression
#兼容IE
pnpm add -D @vitejs/plugin-legacy
// import legacy from '@vitejs/plugin-legacy';
// legacy({
// targets: ['ie >= 11'],
// additionalLegacyPolyfills: ['regenerator-runtime/runtime']
// })
# hooks api
pnpm add @vueuse/core
# VueI18n
pnpm add vue-i18n #必须安装 前置依赖
pnpm add -D @intlify/vite-plugin-vue-i18n
// 默认仅支持 组合式api
VueI18n({ include: [resolve(__dirname, '../locales/**')],})
// use
import { createI18n } from 'vue-i18n';
import messages from '@intlify/vite-plugin-vue-i18n/messages';
const i18n = createI18n({
locale: 'en',
fallbackLocale: 'en',
messages,
});
// 使用 locale可改变其值与文件名相等
const { locale, t } = useI18n();
# mock 数据
pnpm add -D vite-plugin-mock
#swiper https://www.swiper.com.cn
pnpm add swiper # :watchOverflow="false"单页面生效
# 全屏混动
pnpm add vue-fullpage.js
# 美化基本html
pnpm add animate.css hover.css normalize.css
cnpm install --save axios@0.18.1 #请求发送
cnpm install --save vue-router@3.0.6 #路由
cnpm install --save-dev plop@2.3.0 #代码生成
cnpm install --save nprogress@0.2.0 #进度条
cnpm install --save path-to-regexp@2.4.0 # 匹配路由路径表达式工
cnpm install --save video.js
cnpm install --save js-cookie
cnpm install file-saver --save #文件保存
cnpm install --save jszip #压缩
cnpm install --save xlsx #excel
```
## 强制代码提交规范
### 使用prettierrc格式化代码
在vscode下载prettier插件 :

在根目录新增 ` .prettierrc` 文件:
```
{
"semi": false,
"singleQuote": true,
"trailingComma": "none",
"tabWidth": 2
}
```
设置默认格式化工具:
打来项目中任意vue文件或者js文件右键,点击 `使用...格式化工具`在弹出的选择列表选择 `配置默认格式化工具`,选择prettier

为了防止冲突,我们在.eslintrc.cjs 添加规则:
```
// “关闭”或0-关闭规则
// “警告”或1-将规则作为警告(不会影响退出代码)
// “错误”或2-将规则作为错误打开(退出代码为1 触发)
module.exports = {
//...
rules: {
//...
// 解决eslint与prettier冲突
indent: 0, // 强制使用一致的缩进
'space-before-function-paren': 0 // 方法名和括号之间需要有一格空格
}
}
```
### git代码提交规范
1.全局安装commitizen和在项目中安装cz-customizable
```
npm install -g commitizen
pnpm add cz-customizable -D
```
2.在根目录下新建 .cz-config.cjs 文件并写入配置 之后就可以用 git cz 来代替 git commit
```
module.exports = {
// 可选类型
types: [
{ value: 'feat', name: 'feat: 新功能' },
{ value: 'fix', name: 'fix: 修复' },
{ value: 'docs', name: 'docs: 文档变更' },
{ value: 'style', name: 'style: 代码格式(不影响代码运行的变动)' },
{
value: 'refactor',
name: 'refactor: 重构(既不是增加feature,也不是修复bug)'
},
{ value: 'perf', name: 'perf: 性能优化' },
{ value: 'test', name: 'test: 增加测试' },
{ value: 'chore', name: 'chore: 构建过程或辅助工具的变动' },
{ value: 'revert', name: 'revert: 回退' },
{ value: 'build', name: 'build: 打包' }
],
// 消息步骤
messages: {
type: '请选择提交类型:',
customScope: '请输入修改范围(可选):',
subject: '请简要描述提交(必填):',
body: '请输入详细描述(可选):',
footer: '请输入要关闭的issue(可选):',
confirmCommit: '确认使用以上信息提交?(y/n/e/h)'
},
// 跳过问题
skipQuestions: ['body', 'footer'],
// subject文字长度默认是72
subjectLimit: 72
}
```
3.在package.json中进行新增
```
"config": {
"commitizen": {
"path": "node_modules/cz-customizable"
},
// 指定 .cz-config.cjs 文件路径
"cz-customizable": {
"config": ".cz-config.cjs"
}
}
```
运行一下git cz 试试:

### 使用husky进行强制git代码提交规范
```
# 安装 commitlint 校验插件
npm install --save-dev @commitlint/config-conventional@12.1.4 @commitlint/cli@12.1.4
pnpm add -D @commitlint/config-conventional @commitlint/cli
# 安装 husky 强制性使用规范
npm install husky@7.0.1 --save-dev
npm install husky -D
# 初始化 husky
npx husky install
```
此时我们可以看见根目录多了一个.husky文件:

导入commitlint配置文件:
在根目录新增 `commitlint.config.cjs` 文件并写入:
```
module.exports = {
// 继承的规则
extends: ['@commitlint/config-conventional'],
// 定义规则类型
rules: {
// type 类型定义,表示 git 提交的 type 必须在以下类型范围内
'type-enum': [
2,
'always',
[
'feat', // 新功能 feature
'fix', // 修复 bug
'docs', // 文档注释
'style', // 代码格式(不影响代码运行的变动)
'refactor', // 重构(既不增加新功能,也不是修复bug)
'perf', // 性能优化
'test', // 增加测试
'chore', // 构建过程或辅助工具的变动
'revert', // 回退
'build' // 打包
]
],
// subject 大小写不做校验
'subject-case': [0]
}
}
```
5.在package.json中新增指令
```
"prepare": "husky install"
```

6.执行命令
```
pnpm run prepare
```
7.执行命令
```
# 生成 husky commit时的配置文件
npx husky add .husky/commit-msg
```
8.把husky和commitlint进行关联, 在刚刚新增husky配置文件里写入
```
npx --no-install commitlint --edit
```

测试一下,强制提交规范成功:

### 强制提交时代码格式化
既然安装了husky,为了更好的开发体验,husky也支持在推送代码时强制代码格式化
1.我们先来执行命令创建配置文件
```
npx husky add .husky/pre-commit
```
2.同样的生成的文件中写入下面命令
```
npx lint-staged
```
8.把package.json文件的lint-staged修改为
```
"lint-staged": {
"src/**/*.{js,vue}": [ //src目录下所有的js和vue文件
"eslint --fix", // 自动修复
"git add" // 自动提交时修复
]
}
```