# quna
**Repository Path**: lihann/quna
## Basic Information
- **Project Name**: quna
- **Description**: 按照教程用vue发开模仿去哪网
- **Primary Language**: JavaScript
- **License**: Not specified
- **Default Branch**: master
- **Homepage**: None
- **GVP Project**: No
## Statistics
- **Stars**: 0
- **Forks**: 0
- **Created**: 2019-11-11
- **Last Updated**: 2020-12-19
## Categories & Tags
**Categories**: Uncategorized
**Tags**: None
## README
[TOC]
# vue 创建项目详解
## 1.安装vue-cli
`vue install -g vue-cli`
## 2.创建项目
`vue init webpack 自定义name`
```
? Project name (mall)
? Project name mall
? Project description (A Vue.js project)
? Project description A Vue.js project
? Author (Mr_Lih <542356155@qq.com>)
? Author Mr_Lih <542356155@qq.com>
? Vue build (Use arrow keys)
? Vue build standalone
? Install vue-router? (Y/n) y
? Install vue-router? Yes
? Use ESLint to lint your code? (Y/n) Y
? Use ESLint to lint your code? Yes
? Pick an ESLint preset (Use arrow keys)
? Pick an ESLint preset Standard
? Set up unit tests (Y/n) n
? Set up unit tests No
? Setup e2e tests with Nightwatch? (Y/n) n
? Setup e2e tests with Nightwatch? No
? Should we run `npm install` for you after the project has been created? (recom
? Should we run `npm install` for you after the project has been created? (recom
mended) npm
```
## 3.进入刚创建的项目中 运行服务
`cd name`
`npm run dev`
## 非父子组件传值
在项目中创建一个 bus.js
````js
import Vue from 'Vue'
export default new Vue
````
第二步:在两个需要通信的两个组件中分别引入这个bus.js
` import Bus from '这里是你引入bus.js的路径' // Bus可自由更换喜欢的名字 `
第三步:传递数据的组件里通过vue实例方法$emit发送事件名称和需要传递的数据。(发送数据组件)
` Bus.$emit('click',data) // 这个click是一个自定义的事件名称,data就是你要传递的数据。 `
第四步:被传递数据的组件内通过vue实例方法$on监听到事件和接受到数据。(接收数据的组件)这里通常挂载监听在vue生命周期created和mounted当中的一个,具体使用场景需要具体的分析,这里不说这个。
```js
Bus.$on('click',target => {
console.log(target) // 注意:发送和监听的事件名称必须一致,target就是获取的数据,可以不写target。只要你喜欢叫什么都可以(当然了,这一定要符合形参变量的命名规范)
})
```
通过以上的四步其实就已经实现了最简单的eventbus的实际应用了。
但是到这儿后,一定要注意一个最容易忽视,又必然不能忘记的东西,那就是**清除事件总线eventBus**.
不手动清除,它是一直会存在的,这样的话,有个问题就是反复进入到接受数据的组件内操作获取数据,原本只执行一次的获取的操作将会有多次操作。如上我所举的例子,只是打印多次传过来的数据。但你想想,实际开发中是不会这么简单的打印这个数据到控制台,本来只会触发并只执行一次,现在变成了多次,这个问题就非常严重了,你们各种脑补具体的项目开发场景吧。
第五步:在vue生命周期beforeDestroy或者destroyed中用vue实例的$off方法清除eventBus
```
beforeDestroy(){
bus.$off('click')
}
```
### 各文件的作用
> 根目录
>
> 1.package.json 各种依赖包配置
>
> 2.package-lock.json 确定安装的第三方包的版本
>
> 3.index.html 首页的模板文件
>
> 4.gitignore 上传git 配置
>
> 5.eslintrc.js 对代码检查的配置
>
> 6.eslintignore 配置那些文件不被检查
>
> 7.editorconfig 对编辑器的配置
> static 目录
>
> 存放一些静态资源:图片,图标,json数据等
> **src 目录**
>
> **整个项目的源代码**
>
> **1.main.js 整个项目的入口文件**
>
> **2.app.vue 最原始的根组件**
>
> **router 目录**
>
> > **index.js 项目的路由**
>
> **components 目录**
>
> > **项目使用的小组件**
>
> **assets 目录**
>
> > **图片类资源**
> config 目录
>
> 项目配置文件
>
> 1.index.js 基础的配置文件
>
> 2.dev.env.js 开发环境的配置文件
>
> 3.prod.env.js 线上环境配置文件
> build 目录
>
> webpack 打包配置文件
******
限制用户放大缩小页面 mete标签
``
## 正式开始开发

> 安装 stylus `npm install stylus -s` `npm install stylus-loader -s`
>
> 实现组件化,在src/home目录下创建components目录来存放组件
## 1.头部组件
在src/home/components 创建header.vue 并在home.vue中 import 引入:
> home.vue中:
>
> ```
>
>
>
> home
>
>
>
>
> ```
>
> 成功引用组件
src/assets 创建styl文件 向里写入 变量
定义变量 $bgColor = #00bcd4
引入刚创建的styl文件
` @import '~@/assets/name.styl'` @代表src目录
定义自定义符号 打开 build/webpack.base.conf.js
## 2. 轮播组件
安装 awesome-swiper ` npm install vue-awesome-swiper@2.6.7 --save`
在入口文件中 main.js 添加
```
import VueAwesomeSwiper from 'vue-awesome-swiper'
// require styles
import 'swiper/dist/css/swiper.css'
Vue.use(VueAwesomeSwiper, /* { default global options } */)
```
在src/home/components 创建swiper.vue 并在swiper.vue中 import 引入
> swiper.vue
>
> ```vue
>
>
>
>
>
> ![]() >
>
>
>
>
>
>
>
>
```
```stylus
.star
overflow hidden
width 80px
height auto
position absolute
.top,.down
font-size 14px
display inline
overflow hidden
.top
color #f60
z-index 2
position absolute
.down
color #ccc
z-index 1
```

## img的src为空则不显示
```css
img[src = ""],img:not([src])
opacity:0
display:none
```
## 安装axios
` npm install axios --save`
在home.vue中引入axios
` import axios from 'axios'`
把api文件放到static目录下 因为只有static目录能被外部访问
```vue
methods: {
getData () {
axios.get('/static/index.json').then(this.getDataSucc)
},
getDataSucc (res) {
console.log(res)
}
},
mounted () {
this.getData()
}
```
在开发模式中(dev)利用转发机制 将 /static/index.json 转成/api/index.json:
config/index.js
```vue
proxyTable: {
'/api': {
target: 'http://localhost:8080',
pathRewrite: {
'^/api': '/static'
}
}
}
```
axios 向子组件传递数据
```vue
methods: {
getData () {
axios.get('/api/index.json').then(this.getDataSucc)
},
getDataSucc (res) {
res = res.data
if (res.ret && res.data) {
const data = res.data
this.city = data.city
this.swiperList = data.swiperList
this.hotUrl = data.hotUrl
this.iconsUrl = data.iconsUrl
this.likeUrl = data.likeUrl
this.qunaUrl = data.qunaUrl
}
}
},
mounted () {
this.getData()
}
```
子组件props接受数据
```
props: {
data: Array
}
```
## 配置路由
router/index.js 添加
` import 组件名字 from '@/pages/city/city'` 引入组件
```vue
{
path: '/city',
name: 'city',
component: 组件名字
}
```
## 用 better-scroll 实现原生APP拖拽效果
` npm install better-scroll -s`
在需要用的页面引入
` import Bscroll from 'better-scroll'`
```
mounted () {
this.scroll = new Bscroll(this.$refs.wrapper)/* 在最外层定义 ref="wrapper" */
}
```
最外层css定义
```css
position absolute
top: 72px;
bottom: 0;right: 0;left: 0;
overflow hidden
```
需要dom结构如下
```html
```
## Vue滚动到DOM
` this.scroll.scrollToElement(this.$refs[this.world][0], 500)`
## vue2.0的移动端的touch事件
touch的开始事件是@touchstart,
移动过程是@touchmove,
结束事件是@touchend
## vuex 实现 首页城市页 城市数据共享
安装vuex
` npm install vuex --save`
在main.js引入 代码很多 分离出来
在vue中使用插件 Vue.use(Vuex)
在src目录下创建 store文件夹 在里面创建index.js 写入:
```js
import Vue from 'vue'
import Vuex from 'vuex'
Vue.use(Vuex)//使用插件
export default new Vuex.Store({//创建公用仓库
state: {//全局公用数据
city: '北京'
}
})
```
然后再main.js中引入公用仓库
` import store from './store/index.js'`
```js
new Vue({
el: '#app',
router,
store,// 引入store
components: { App },
template: ''
})
```
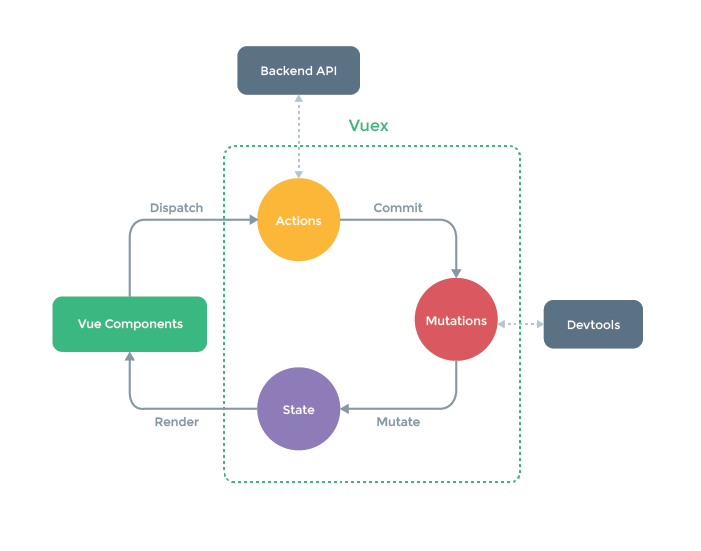
**这时候就创建了虚线部分的store 公共仓库**
可以在dom使用仓库中的数据
` {{this.$store.state}}`
**修改公共仓库中的数据**
使用Dispatch方法
` this.$store.dispatch('change', city)`
需要接受dispatch传来的值,在刚创建的store仓库的index.js中写入:
```js
export default new Vuex.Store({// 创建公用仓库
state: {// 全局公用数据
city: '北京'
},
actions: {
changeCity (ctx, city) {// 接受dispatch传来的值
console.log(city)
}
}
})
```
按流程 创建mutations 使用commit方法
```js
export default new Vuex.Store({// 创建公用仓库
state: {// 全局公用数据
city: '北京'
},
actions: {
changeCity (ctx, city) {
ctx.commit('cCity', city)
}
},
mutations: {
cCity (state, city) {
state.city = city// 修改state中的city
}
}
})
```
如果组件没有批量操作,很简单的话 可以直接调用commit方法 可以省去dispatch方法
` this.$store.commit('cCity', city)`
```
export default new Vuex.Store({// 创建公用仓库
state: {// 全局公用数据
city: '北京'
},
mutations: {
cCity (state, city) {
state.city = city// 修改state中的city
}
}
})
```
## vue router 编程式跳转
` this.$router.push('/')` 跳到主页
## 缓存 localStorage
想本地缓存写入 ` localStorage.name = any`
```js
export default new Vuex.Store({// 创建公用仓库
state: {// 全局公用数据
city: localStorage.city || '北京'
},
mutations: {
cCity (state, city) {
state.city = city
localStorage.city = city
}
}
})
```
**try catch 解决不兼容** 最终代码
```js
import Vue from 'vue'
import Vuex from 'vuex'
Vue.use(Vuex)// 使用插件
let defaultCity = '石家庄'
try {
if (localStorage.city) {
defaultCity = localStorage.city
}
} catch (e) {}
export default new Vuex.Store({// 创建公用仓库
state: {// 全局公用数据
city: localStorage.city || defaultCity
},
mutations: {
cCity (state, city) {
state.city = city
try {
if (localStorage.city) {
localStorage.city = city
}
} catch (e) {}
}
}
})
```
**最后 把state 和 mutations 单独写个js分离出来**
**在store目录中创建state.js和mutations.js文件**
state.js:
```js
let defaultCity = '石家庄'
try {
if (localStorage.city) {
defaultCity = localStorage.city
}
} catch (e) {}
export default {
city: defaultCity
}
```
mutations.js :
```js
export default {
cCity (state, city) {
state.city = city
try {
if (localStorage.city) {
localStorage.city = city
}
} catch (e) {}
}
}
```
**将` this.$store.state.city`简写 ` this.dCity`**
```js
```
```
this.$store.commit('cCity', city)
```
可以简写成
```js
import { mapMutations } from 'vuex'
methods: {
chooseCity (city) {
//this.$store.commit('cCity', city)可以简写
this.cCity(city)
this.$router.push('/')
},
...mapMutations(['cCity'])
},
```
## keep-alive 性能优化
切换路由的时候 防止多次请求
app.vue中
给包裹标签
如果某个组件不想用缓存 加 exclude="组件名字"
**当使用keep-alive标签的时候 会多一个activated(){}生命周期函数**
首次进入页面 mounted 和 activated 都会执行
切换页面时 deactivated 函数会执行
当加上 keep-alive 标签之后 跳转回来的时候 只有activated会执行
```js
activated () {
if (this.lastCity !== this.city) {
this.lastCity = this.city
this.getData()
}
}
```
## swiper一开始隐藏 再次显示 出BUG 解决
observerParents: true
observer: true
# 动态axios请求
` axios.get('api/detail.json?id=' + this.$route.params.id).then(getDetailDataSucc(e))`
## 如果想通过IP也可以访问
在webpack.json文件:
` "dev": "webpack-dev-server --inline --progress --config build/webpack.dev.conf.js",`
加上 --host 0.0.0.0
`"dev": "webpack-dev-server --inline --host 0.0.0.0 --progress --config build/webpack.dev.conf.js",`
## touchstart事件 页面一起滚动
在@touchstart后面加 .prevent
@touchstart.prevent 阻止默认事件
**有的手机不支持prevent** 需要安装**bable-polyfill**
在main.js中引入
` import bable-polyfill`
## 打包上线
` npm run build` 打包生成dist文件目录
如果dist不是放到根目录 , 需要修改config/index.js:
```
build:{
assetsPublicPath: '/projec'
}
```