# D-FINE
**Repository Path**: minttang/D-FINE
## Basic Information
- **Project Name**: D-FINE
- **Description**: No description available
- **Primary Language**: Unknown
- **License**: Apache-2.0
- **Default Branch**: master
- **Homepage**: None
- **GVP Project**: No
## Statistics
- **Stars**: 0
- **Forks**: 0
- **Created**: 2024-12-07
- **Last Updated**: 2025-06-14
## Categories & Tags
**Categories**: Uncategorized
**Tags**: None
## README
[English](README.md) | 简体中文 | [日本語](README_ja.md) | [English Blog](src/zoo/dfine/blog.md) | [中文博客](src/zoo/dfine/blog_cn.md)
D-FINE: Redefine Regression Task of DETRs as Fine‑grained Distribution Refinement


📄 这是该文章的官方实现:
D-FINE: Redefine Regression Task of DETRs as Fine-grained Distribution Refinement
彭岩松,李和倍,吴沛熹,张越一,孙晓艳,吴枫
中国科学技术大学

如果你喜欢 D-FINE,请给我们一个 ⭐!你的支持激励我们不断前进!

D-FINE 是一个强大的实时目标检测器,将 DETR 中的边界框回归任务重新定义为了细粒度的分布优化(FDR),并引入全局最优的定位自蒸馏(GO-LSD),在不增加额外推理和训练成本的情况下,实现了卓越的性能。
视频
我们分别使用 D-FINE 和 YOLO11 对 [YouTube](https://www.youtube.com/watch?v=CfhEWj9sd9A) 上的一段复杂街景视频进行了目标检测。尽管存在逆光、虚化模糊和密集遮挡等不利因素,D-FINE-X 依然成功检测出几乎所有目标,包括背包、自行车和信号灯等难以察觉的小目标,其置信度、以及模糊边缘的定位准确度明显高于 YOLO11x。
https://github.com/user-attachments/assets/e5933d8e-3c8a-400e-870b-4e452f5321d9
## 🚀 Updates
- [x] **\[2024.10.18\]** 发布 D-FINE 系列。
- [x] **\[2024.10.25\]** 添加了自定义数据集微调配置文件 ([#7](https://github.com/Peterande/D-FINE/issues/7))。
- [x] **\[2024.10.30\]** 更新 D-FINE-L (E25) 预训练模型,性能提升了 2.0%。
- [x] **\[2024.11.07\]** 发布 **D-FINE-N**, 在 COCO 上达到 42.8% APval @ 472 FPST4!
## 模型库
### COCO
| 模型 | 数据集 | APval | 参数量 | 时延 (ms) | GFLOPs | 配置 | 权重 | 日志 |
| :---: | :---: | :---: | :---: | :---: | :---: | :---: | :---: | :---: |
**D‑FINE‑N** | COCO | **42.8** | 4M | 2.12ms | 7 | [yml](./configs/dfine/dfine_hgnetv2_n_coco.yml) | [42.8](https://github.com/Peterande/storage/releases/download/dfinev1.0/dfine_n_coco.pth) | [url](https://raw.githubusercontent.com/Peterande/storage/refs/heads/master/logs/coco/dfine_n_coco_log.txt)
**D‑FINE‑S** | COCO | **48.5** | 10M | 3.49ms | 25 | [yml](./configs/dfine/dfine_hgnetv2_s_coco.yml) | [48.5](https://github.com/Peterande/storage/releases/download/dfinev1.0/dfine_s_coco.pth) | [url](https://raw.githubusercontent.com/Peterande/storage/refs/heads/master/logs/coco/dfine_s_coco_log.txt)
**D‑FINE‑M** | COCO | **52.3** | 19M | 5.62ms | 57 | [yml](./configs/dfine/dfine_hgnetv2_m_coco.yml) | [52.3](https://github.com/Peterande/storage/releases/download/dfinev1.0/dfine_m_coco.pth) | [url](https://raw.githubusercontent.com/Peterande/storage/refs/heads/master/logs/coco/dfine_m_coco_log.txt)
**D‑FINE‑L** | COCO | **54.0** | 31M | 8.07ms | 91 | [yml](./configs/dfine/dfine_hgnetv2_l_coco.yml) | [54.0](https://github.com/Peterande/storage/releases/download/dfinev1.0/dfine_l_coco.pth) | [url](https://raw.githubusercontent.com/Peterande/storage/refs/heads/master/logs/coco/dfine_l_coco_log.txt)
**D‑FINE‑X** | COCO | **55.8** | 62M | 12.89ms | 202 | [yml](./configs/dfine/dfine_hgnetv2_x_coco.yml) | [55.8](https://github.com/Peterande/storage/releases/download/dfinev1.0/dfine_x_coco.pth) | [url](https://raw.githubusercontent.com/Peterande/storage/refs/heads/master/logs/coco/dfine_x_coco_log.txt)
### Objects365+COCO
| 模型 | 数据集 | APval | 参数量 | 时延 (ms) | GFLOPs | 配置 | 权重 | 日志 |
| :---: | :---: | :---: | :---: | :---: | :---: | :---: | :---: | :---: |
**D‑FINE‑S** | Objects365+COCO | **50.7** | 10M | 3.49ms | 25 | [yml](./configs/dfine/objects365/dfine_hgnetv2_s_obj2coco.yml) | [50.7](https://github.com/Peterande/storage/releases/download/dfinev1.0/dfine_s_obj2coco.pth) | [url](https://raw.githubusercontent.com/Peterande/storage/refs/heads/master/logs/obj2coco/dfine_s_obj2coco_log.txt)
**D‑FINE‑M** | Objects365+COCO | **55.1** | 19M | 5.62ms | 57 | [yml](./configs/dfine/objects365/dfine_hgnetv2_m_obj2coco.yml) | [55.1](https://github.com/Peterande/storage/releases/download/dfinev1.0/dfine_m_obj2coco.pth) | [url](https://raw.githubusercontent.com/Peterande/storage/refs/heads/master/logs/obj2coco/dfine_m_obj2coco_log.txt)
**D‑FINE‑L** | Objects365+COCO | **57.3** | 31M | 8.07ms | 91 | [yml](./configs/dfine/objects365/dfine_hgnetv2_l_obj2coco.yml) | [57.3](https://github.com/Peterande/storage/releases/download/dfinev1.0/dfine_l_obj2coco_e25.pth) | [url](https://raw.githubusercontent.com/Peterande/storage/refs/heads/master/logs/obj2coco/dfine_l_obj2coco_log_e25.txt)
**D‑FINE‑X** | Objects365+COCO | **59.3** | 62M | 12.89ms | 202 | [yml](./configs/dfine/objects365/dfine_hgnetv2_x_obj2coco.yml) | [59.3](https://github.com/Peterande/storage/releases/download/dfinev1.0/dfine_x_obj2coco.pth) | [url](https://raw.githubusercontent.com/Peterande/storage/refs/heads/master/logs/obj2coco/dfine_x_obj2coco_log.txt)
**我们强烈推荐您使用 Objects365 预训练模型进行微调:**
⚠️ 重要提醒:通常这种预训练模型对复杂场景的理解非常有用。如果您的类别非常简单,请注意,这可能会导致过拟合和次优性能。
🔥 Objects365 预训练模型(泛化性最好)
| 模型 | 数据集 | APval | AP5000 | 参数量 | 时延 (ms) | GFLOPs | 配置 | 权重 | 日志 |
| :---: | :---: | :---: | :---: | :---: | :---: | :---: | :---: | :---: | :---: |
**D‑FINE‑S** | Objects365 | **31.0** | **30.5** | 10M | 3.49ms | 25 | [yml](./configs/dfine/objects365/dfine_hgnetv2_s_obj365.yml) | [30.5](https://github.com/Peterande/storage/releases/download/dfinev1.0/dfine_s_obj365.pth) | [url](https://raw.githubusercontent.com/Peterande/storage/refs/heads/master/logs/obj365/dfine_s_obj365_log.txt)
**D‑FINE‑M** | Objects365 | **38.6** | **37.4** | 19M | 5.62ms | 57 | [yml](./configs/dfine/objects365/dfine_hgnetv2_m_obj365.yml) | [37.4](https://github.com/Peterande/storage/releases/download/dfinev1.0/dfine_m_obj365.pth) | [url](https://raw.githubusercontent.com/Peterande/storage/refs/heads/master/logs/obj365/dfine_m_obj365_log.txt)
**D‑FINE‑L** | Objects365 | - | **40.6** | 31M | 8.07ms | 91 | [yml](./configs/dfine/objects365/dfine_hgnetv2_l_obj365.yml) | [40.6](https://github.com/Peterande/storage/releases/download/dfinev1.0/dfine_l_obj365.pth) | [url](https://raw.githubusercontent.com/Peterande/storage/refs/heads/master/logs/obj365/dfine_l_obj365_log.txt)
**D‑FINE‑L (E25)** | Objects365 | **44.7** | **42.6** | 31M | 8.07ms | 91 | [yml](./configs/dfine/objects365/dfine_hgnetv2_l_obj365.yml) | [42.6](https://github.com/Peterande/storage/releases/download/dfinev1.0/dfine_l_obj365_e25.pth) | [url](https://raw.githubusercontent.com/Peterande/storage/refs/heads/master/logs/obj365/dfine_l_obj365_log_e25.txt)
**D‑FINE‑X** | Objects365 | **49.5** | **46.5** | 62M | 12.89ms | 202 | [yml](./configs/dfine/objects365/dfine_hgnetv2_x_obj365.yml) | [46.5](https://github.com/Peterande/storage/releases/download/dfinev1.0/dfine_x_obj365.pth) | [url](https://raw.githubusercontent.com/Peterande/storage/refs/heads/master/logs/obj365/dfine_x_obj365_log.txt)
- **E25**: 重新训练,并将训练延长至 25 个 epoch。
- **APval** 是在 *Objects365* 完整的验证集上进行评估的。
- **AP5000** 是在 *Objects365* 验证集的前5000个样本上评估的。
**注意:**
- **APval** 是在 *MSCOCO val2017* 数据集上评估的。
- **时延** 是在单张 T4 GPU 上以 $batch\\_size = 1$, $fp16$, 和 $TensorRT==10.4.0$ 评估的。
- **Objects365+COCO** 表示使用在 *Objects365* 上预训练的权重在 *COCO* 上微调的模型。
## 快速开始
### 设置
```shell
conda create -n dfine python=3.11.9
conda activate dfine
pip install -r requirements.txt
```
### 数据集准备
COCO2017 数据集
1. 从 [OpenDataLab](https://opendatalab.com/OpenDataLab/COCO_2017) 或者 [COCO](https://cocodataset.org/#download) 下载 COCO2017。
1.修改 [coco_detection.yml](./configs/dataset/coco_detection.yml) 中的路径。
```yaml
train_dataloader:
img_folder: /data/COCO2017/train2017/
ann_file: /data/COCO2017/annotations/instances_train2017.json
val_dataloader:
img_folder: /data/COCO2017/val2017/
ann_file: /data/COCO2017/annotations/instances_val2017.json
```
Objects365 数据集
1. 从 [OpenDataLab](https://opendatalab.com/OpenDataLab/Objects365) 下载 Objects365。
2. 设置数据集的基础目录:
```shell
export BASE_DIR=/data/Objects365/data
```
3. 解压并整理目录结构如下:
```shell
${BASE_DIR}/train
├── images
│ ├── v1
│ │ ├── patch0
│ │ │ ├── 000000000.jpg
│ │ │ ├── 000000001.jpg
│ │ │ └── ... (more images)
│ ├── v2
│ │ ├── patchx
│ │ │ ├── 000000000.jpg
│ │ │ ├── 000000001.jpg
│ │ │ └── ... (more images)
├── zhiyuan_objv2_train.json
```
```shell
${BASE_DIR}/val
├── images
│ ├── v1
│ │ ├── patch0
│ │ │ ├── 000000000.jpg
│ │ │ └── ... (more images)
│ ├── v2
│ │ ├── patchx
│ │ │ ├── 000000000.jpg
│ │ │ └── ... (more images)
├── zhiyuan_objv2_val.json
```
4. 创建一个新目录来存储验证集中的图像:
```shell
mkdir -p ${BASE_DIR}/train/images_from_val
```
5. 将 val 目录中的 v1 和 v2 文件夹复制到 train/images_from_val 目录中
```shell
cp -r ${BASE_DIR}/val/images/v1 ${BASE_DIR}/train/images_from_val/
cp -r ${BASE_DIR}/val/images/v2 ${BASE_DIR}/train/images_from_val/
```
6. 运行 remap_obj365.py 将验证集中的部分样本合并到训练集中。具体来说,该脚本将索引在 5000 到 800000 之间的样本从验证集移动到训练集。
```shell
python tools/remap_obj365.py --base_dir ${BASE_DIR}
```
7. 运行 resize_obj365.py 脚本,将数据集中任何最大边长超过 640 像素的图像进行大小调整。使用步骤 5 中生成的更新后的 JSON 文件处理样本数据。
```shell
python tools/resize_obj365.py --base_dir ${BASE_DIR}
```
8. 修改 [obj365_detection.yml](./configs/dataset/obj365_detection.yml) 中的路径。
```yaml
train_dataloader:
img_folder: /data/Objects365/data/train
ann_file: /data/Objects365/data/train/new_zhiyuan_objv2_train_resized.json
val_dataloader:
img_folder: /data/Objects365/data/val/
ann_file: /data/Objects365/data/val/new_zhiyuan_objv2_val_resized.json
```
CrowdHuman
在此下载 COCO 格式的数据集:[链接](https://aistudio.baidu.com/datasetdetail/231455)
自定义数据集
要在你的自定义数据集上训练,你需要将其组织为 COCO 格式。请按照以下步骤准备你的数据集:
1. **将 `remap_mscoco_category` 设置为 `False`:**
这可以防止类别 ID 自动映射以匹配 MSCOCO 类别。
```yaml
remap_mscoco_category: False
```
2. **组织图像:**
按以下结构组织你的数据集目录:
```shell
dataset/
├── images/
│ ├── train/
│ │ ├── image1.jpg
│ │ ├── image2.jpg
│ │ └── ...
│ ├── val/
│ │ ├── image1.jpg
│ │ ├── image2.jpg
│ │ └── ...
└── annotations/
├── instances_train.json
├── instances_val.json
└── ...
```
- **`images/train/`**: 包含所有训练图像。
- **`images/val/`**: 包含所有验证图像。
- **`annotations/`**: 包含 COCO 格式的注释文件。
3. **将注释转换为 COCO 格式:**
如果你的注释尚未为 COCO 格式,你需要进行转换。你可以参考以下 Python 脚本或使用现有工具:
```python
import json
def convert_to_coco(input_annotations, output_annotations):
# Implement conversion logic here
pass
if __name__ == "__main__":
convert_to_coco('path/to/your_annotations.json', 'dataset/annotations/instances_train.json')
```
4. **更新配置文件:**
修改你的 [custom_detection.yml](./configs/dataset/custom_detection.yml)。
```yaml
task: detection
evaluator:
type: CocoEvaluator
iou_types: ['bbox', ]
num_classes: 777 # your dataset classes
remap_mscoco_category: False
train_dataloader:
type: DataLoader
dataset:
type: CocoDetection
img_folder: /data/yourdataset/train
ann_file: /data/yourdataset/train/train.json
return_masks: False
transforms:
type: Compose
ops: ~
shuffle: True
num_workers: 4
drop_last: True
collate_fn:
type: BatchImageCollateFunction
val_dataloader:
type: DataLoader
dataset:
type: CocoDetection
img_folder: /data/yourdataset/val
ann_file: /data/yourdataset/val/ann.json
return_masks: False
transforms:
type: Compose
ops: ~
shuffle: False
num_workers: 4
drop_last: False
collate_fn:
type: BatchImageCollateFunction
```
## 使用方法
COCO2017
1. 设置模型
```shell
export model=l # n s m l x
```
2. 训练
```shell
CUDA_VISIBLE_DEVICES=0,1,2,3 torchrun --master_port=7777 --nproc_per_node=4 train.py -c configs/dfine/dfine_hgnetv2_${model}_coco.yml --use-amp --seed=0
```
3. 测试
```shell
CUDA_VISIBLE_DEVICES=0,1,2,3 torchrun --master_port=7777 --nproc_per_node=4 train.py -c configs/dfine/dfine_hgnetv2_${model}_coco.yml --test-only -r model.pth
```
4. 微调
```shell
CUDA_VISIBLE_DEVICES=0,1,2,3 torchrun --master_port=7777 --nproc_per_node=4 train.py -c configs/dfine/dfine_hgnetv2_${model}_coco.yml --use-amp --seed=0 -t model.pth
```
在 Objects365 上训练,在COCO2017上微调
1. 设置模型
```shell
export model=l # n s m l x
```
2. 在 Objects365 上训练
```shell
CUDA_VISIBLE_DEVICES=0,1,2,3 torchrun --master_port=7777 --nproc_per_node=4 train.py -c configs/dfine/objects365/dfine_hgnetv2_${model}_obj365.yml --use-amp --seed=0
```
3. 在 COCO2017 上微调
```shell
CUDA_VISIBLE_DEVICES=0,1,2,3 torchrun --master_port=7777 --nproc_per_node=4 train.py -c configs/dfine/objects365/dfine_hgnetv2_${model}_obj2coco.yml --use-amp --seed=0 -t model.pth
```
4. 测试
```shell
CUDA_VISIBLE_DEVICES=0,1,2,3 torchrun --master_port=7777 --nproc_per_node=4 train.py -c configs/dfine/dfine_hgnetv2_${model}_coco.yml --test-only -r model.pth
```
自定义数据集
1. 设置模型
```shell
export model=l # n s m l x
```
2. 在自定义数据集上训练
```shell
CUDA_VISIBLE_DEVICES=0,1,2,3 torchrun --master_port=7777 --nproc_per_node=4 train.py -c configs/dfine/custom/dfine_hgnetv2_${model}_custom.yml --use-amp --seed=0
```
3. 测试
```shell
CUDA_VISIBLE_DEVICES=0,1,2,3 torchrun --master_port=7777 --nproc_per_node=4 train.py -c configs/dfine/custom/dfine_hgnetv2_${model}_custom.yml --test-only -r model.pth
```
4. 在自定义数据集上微调
```shell
CUDA_VISIBLE_DEVICES=0,1,2,3 torchrun --master_port=7777 --nproc_per_node=4 train.py -c configs/dfine/custom/objects365/dfine_hgnetv2_${model}_obj2custom.yml --use-amp --seed=0 -t model.pth
```
5. **[可选项]** 修改类映射:
在使用 Objects365 预训练权重训练自定义数据集时,示例中假设自定义数据集仅有 `'Person'` 和 `'Car'` 类,您可以将其替换为数据集中对应的任何类别。为了加快收敛,可以在 `src/solver/_solver.py` 中修改 `self.obj365_ids`,如下所示:
```python
self.obj365_ids = [0, 5] # Person, Cars
```
Objects365 类及其对应 ID 的完整列表:
https://github.com/Peterande/D-FINE/blob/352a94ece291e26e1957df81277bef00fe88a8e3/src/solver/_solver.py#L330
新的训练启动命令:
```shell
CUDA_VISIBLE_DEVICES=0,1,2,3 torchrun --master_port=7777 --nproc_per_node=4 train.py -c configs/dfine/custom/dfine_hgnetv2_${model}_custom.yml --use-amp --seed=0 -t model.pth
```
如果您不想修改类映射,预训练的 Objects365 权重依然可以不做任何更改直接使用。修改类映射是可选的,但针对特定任务可能会加快收敛速度。
自定义批次大小
例如,如果你想在训练 D-FINE-L 时将 COCO2017 的总批次大小增加一倍,请按照以下步骤操作:
1. **修改你的 [dataloader.yml](./configs/dfine/include/dataloader.yml)**,增加 `total_batch_size`:
```yaml
train_dataloader:
total_batch_size: 64 # 原来是 32,现在增加了一倍
```
2. **修改你的 [dfine_hgnetv2_l_coco.yml](./configs/dfine/dfine_hgnetv2_l_coco.yml)**。
```yaml
optimizer:
type: AdamW
params:
-
params: '^(?=.*backbone)(?!.*norm|bn).*$'
lr: 0.000025 # 翻倍,线性缩放原则
-
params: '^(?=.*(?:encoder|decoder))(?=.*(?:norm|bn)).*$'
weight_decay: 0.
lr: 0.0005 # 翻倍,线性缩放原则
betas: [0.9, 0.999]
weight_decay: 0.0001 # 需要网格搜索找到最优值
ema: # 添加 EMA 设置
decay: 0.9998 # 根据 1 - (1 - decay) * 2 调整
warmups: 500 # 减半
lr_warmup_scheduler:
warmup_duration: 250 # 减半
```
自定义输入尺寸
如果你想在 COCO2017 上使用 **D-FINE-L** 进行 320x320 尺寸的图片训练,按照以下步骤操作:
1. **修改你的 [dataloader.yml](./configs/dfine/include/dataloader.yml)**:
```yaml
train_dataloader:
dataset:
transforms:
ops:
- {type: Resize, size: [320, 320], }
collate_fn:
base_size: 320
dataset:
transforms:
ops:
- {type: Resize, size: [320, 320], }
```
2. **修改你的 [dfine_hgnetv2.yml](./configs/dfine/include/dfine_hgnetv2.yml)**:
```yaml
eval_spatial_size: [320, 320]
```
## 工具
部署
1. 设置
```shell
pip install onnx onnxsim onnxruntime
export model=l # n s m l x
```
2. 导出 onnx
```shell
python tools/export_onnx.py --check -c configs/dfine/dfine_hgnetv2_${model}_coco.yml -r model.pth
```
3. 导出 [tensorrt](https://docs.nvidia.com/deeplearning/tensorrt/install-guide/index.html)
```shell
trtexec --onnx="model.onnx" --saveEngine="model.engine" --fp16
```
推理(可视化)
1. 设置
```shell
pip install -r tools/inference/requirements.txt
export model=l # n s m l x
```
2. 推理 (onnxruntime / tensorrt / torch)
目前支持对图像和视频的推理。
```shell
python tools/inference/onnx_inf.py --onnx model.onnx --input image.jpg # video.mp4
python tools/inference/trt_inf.py --trt model.engine --input image.jpg
python tools/inference/torch_inf.py -c configs/dfine/dfine_hgnetv2_${model}_coco.yml -r model.pth --input image.jpg --device cuda:0
```
基准测试
1. 设置
```shell
pip install -r tools/benchmark/requirements.txt
export model=l # n s m l x
```
2. 模型 FLOPs、MACs、参数量
```shell
python tools/benchmark/get_info.py -c configs/dfine/dfine_hgnetv2_${model}_coco.yml
```
2. TensorRT 延迟
```shell
python tools/benchmark/trt_benchmark.py --COCO_dir path/to/COCO2017 --engine_dir model.engine
```
Voxel51 Fiftyone 可视化
1. 设置
```shell
pip install fiftyone
export model=l # n s m l x
```
4. Voxel51 Fiftyone 可视化 ([fiftyone](https://github.com/voxel51/fiftyone))
```shell
python tools/visualization/fiftyone_vis.py -c configs/dfine/dfine_hgnetv2_${model}_coco.yml -r model.pth
```
其他
1. 自动恢复(Auto Resume)训练
```shell
bash reference/safe_training.sh
```
2. 模型权重转换
```shell
python reference/convert_weight.py model.pth
```
## 图表与可视化
FDR 和 GO-LSD
D-FINE与FDR概览。概率分布作为更细粒度的中间表征,通过解码器层以残差方式进行迭代优化。应用非均匀加权函数以实现更精细的定位。

GO-LSD流程概览。通过DDF损失函数和解耦加权策略将最终层分布中的定位知识蒸馏到前面的层中。

分布可视化
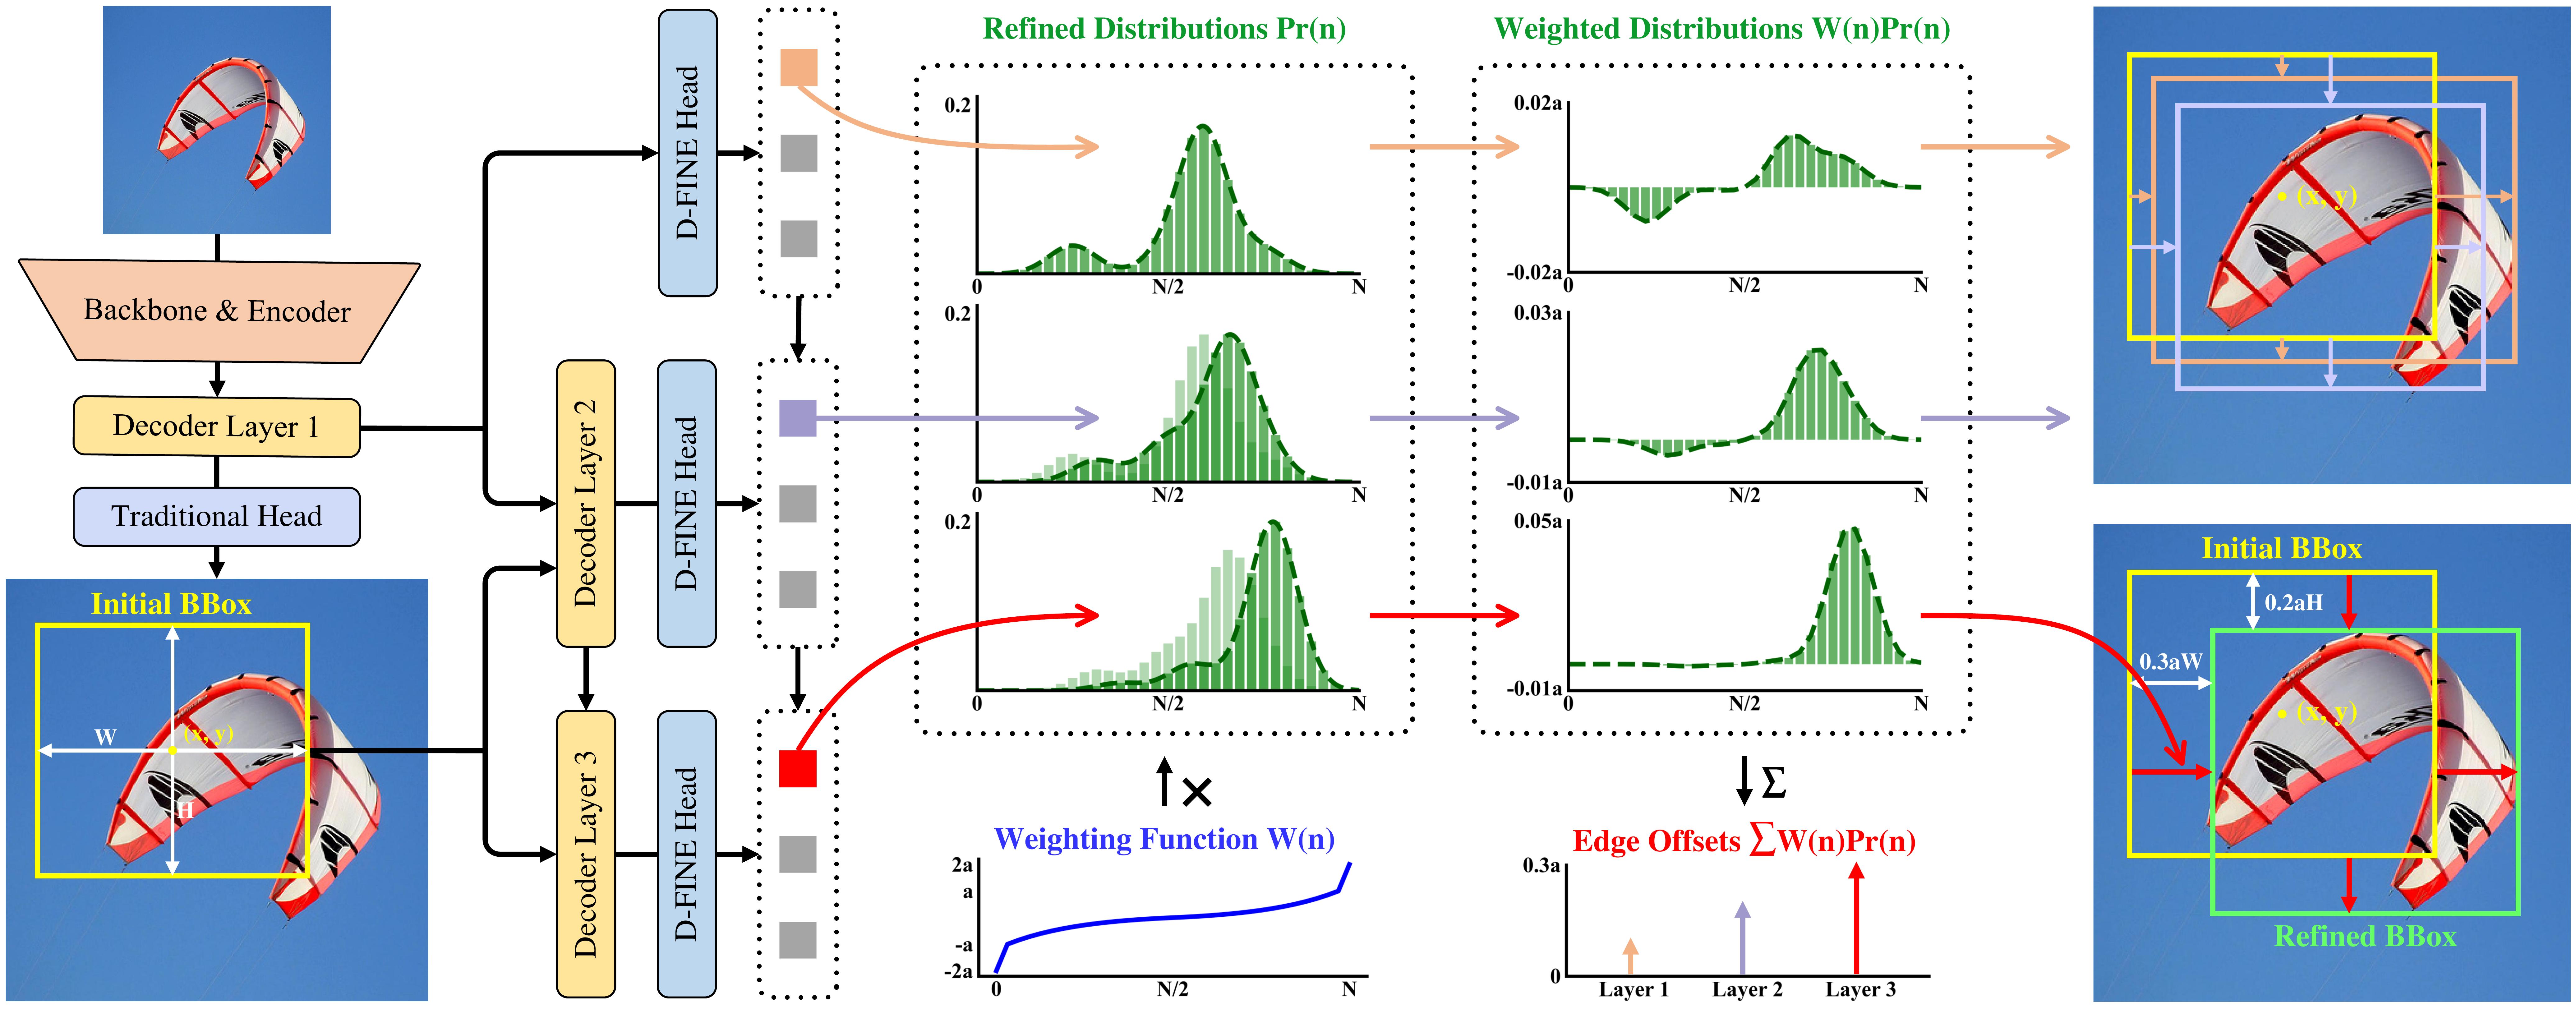
FDR在检测场景中的可视化,包括初始和优化后的边界框,以及未加权和加权的分布图。

困难场景
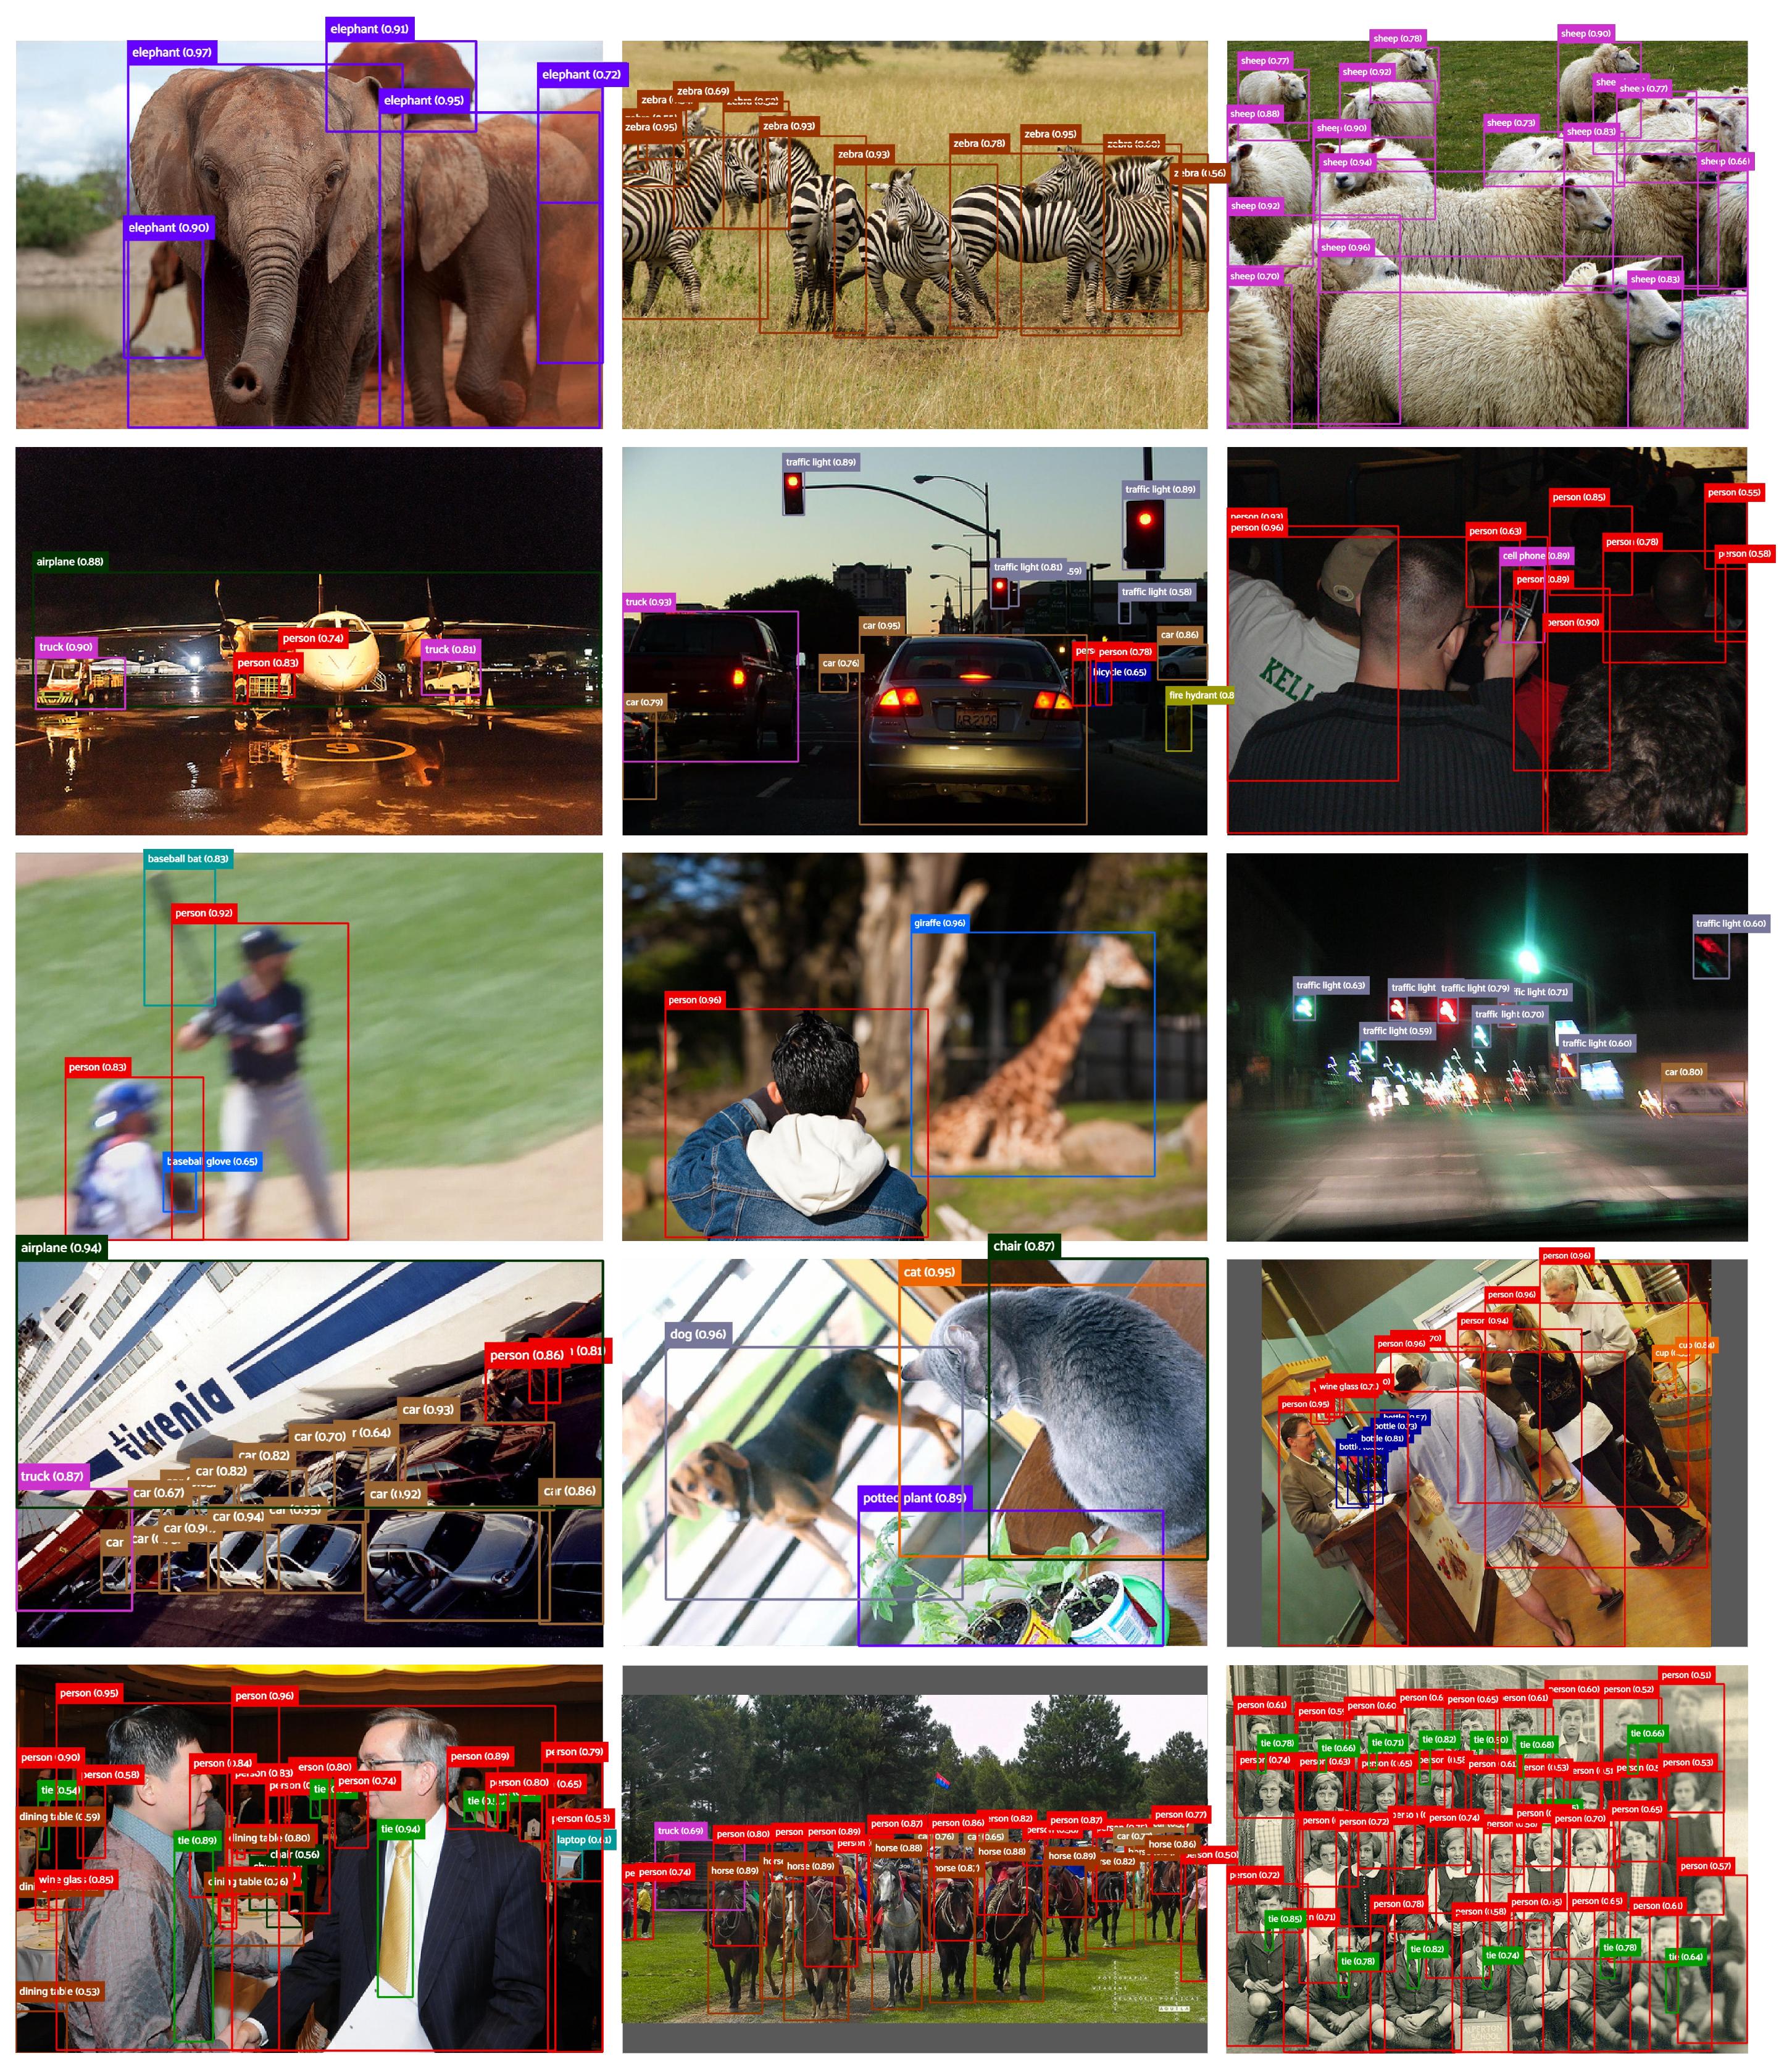
以下可视化展示了D-FINE在各种复杂检测场景中的预测结果。这些场景包括遮挡、低光条件、运动模糊、景深效果和密集场景。尽管面临这些挑战,D-FINE依然能够生成准确的定位结果。

## 引用
如果你在工作中使用了 `D-FINE` 或其方法,请引用以下 BibTeX 条目:
bibtex
```latex
@misc{peng2024dfine,
title={D-FINE: Redefine Regression Task in DETRs as Fine-grained Distribution Refinement},
author={Yansong Peng and Hebei Li and Peixi Wu and Yueyi Zhang and Xiaoyan Sun and Feng Wu},
year={2024},
eprint={2410.13842},
archivePrefix={arXiv},
primaryClass={cs.CV}
}
```
## 致谢
我们的工作基于 [RT-DETR](https://github.com/lyuwenyu/RT-DETR)。
感谢 [RT-DETR](https://github.com/lyuwenyu/RT-DETR), [GFocal](https://github.com/implus/GFocal), [LD](https://github.com/HikariTJU/LD), 和 [YOLOv9](https://github.com/WongKinYiu/yolov9) 的启发。
✨ 欢迎贡献并在有任何问题时联系我! ✨ 


