## Why?
@dwyl we have a _few_ projects on GitHub ...
We want to _instantly see_ the _popularity_
of _each_ of our repos
to know what people are finding _useful_ and help us
decide where we need to be investing our time.
While GitHub has a _basic_
"[traffic](https://github.com/blog/1672-introducing-github-traffic-analytics)"
[tab](https://github.com/dwyl/start-here/graphs/traffic)
which displays page view stats, GitHub only records the data
for the [_past 14 days_](https://github.com/dwyl/hits/issues/49)
and then it gets reset.
The data is not relayed to the "owner" in "***real time***"
and you would need to use the API and "poll" for data ...
_Manually_ checking who has viewed a
project is _exceptionally_ tedious when you have
more than a _handful_ of projects.
### Why Phoenix (Elixir + PostgreSQL/Ecto)?
We wrote our MVP in `Node.js`, see:
https://github.com/dwyl/hits-nodejs
That worked quite well to test the idea while writing minimal code.
We decided to re-write in `Elixir`/`Phoenix` because we want
the reliability and fault tolerance of `Erlang`,
built-in application monitoring
([`supervisor`](https://erlang.org/doc/man/supervisor.html))
and metrics ([`telemetry`](https://github.com/beam-telemetry/telemetry))
and the built-in support for _highly_ scalable WebSockets
that will allow us to build an _awesome_ real-time UX!
For more on "Why Elixir?" see:
https://github.com/dwyl/learn-elixir/issues/102
## What?
A _simple & easy_ way to see how many people
have _viewed_ your GitHub Repository.
There are already *many* "badges" that people use in their repos.
See: [github.com/dwyl/**repo-badges**](https://github.com/dwyl/repo-badges)
But we haven't seen one that gives a "***hit counter***"
of the number of times a GitHub page has been viewed ...
So, in today's mini project we're going to _create_ a _basic **Web Counter**_.
https://en.wikipedia.org/wiki/Web_counter
The counter is incremented only when the user agent or the ip addres is different.
When testing the counter you can open a new browser to see the badge changed.
#### A Fully Working Production Phoenix App _And_ Step-by-Step Tutorial?
Yes, that's right!
Not only is this a fully functioning web app
that is serving _millions_ of requests per day
in production _right_ now,
it's also a step-by-step example/tutorial
showing you _exactly_
how it's implemented.
## How?
> If you simply want to display a "hit count badge"
in your project's GitHub page, visit:
https://hits.dwyl.com
to get the Markdown!
### _Run_ the App on `localhost`
To _run_ the app on your localhost follow these easy steps:
#### 0. Ensure your `localhost` has Node.js & Phoenix installed
see: [before you start](https://github.com/dwyl/phoenix-chat-example#0-pre-requisites-before-you-start)
#### 1. Clone/Download the Code
```
git clone https://github.com/dwyl/hits.git && cd hits
```
#### 2. Install the Dependencies
Install elixir/node dependencies
and setup Webpack static asset compilation (_with hot reloading_):
```
mix deps.get
cd assets && npm install
node node_modules/webpack/bin/webpack.js --mode development && cd ..
```
#### 3. Create the database
```
mix ecto.create && mix ecto.migrate
```
### 4. Run the App
```
mix phx.server
```
That's it!
Visit: http://localhost:4000/ (_in your web browser_)
Or visit _any_ endpoint that includes `.svg` in the url,
e.g: http://localhost:4000/yourname/project.svg

Refresh the page a few times and watch the count go up!

> note: the "Zoom" in chrome to 500% for _effect_.
Now, take your time to peruse the code in `/test` and `/lib`,
and _ask_ any questions by opening GitHub Issues:
https://github.com/dwyl/hits/issues
### Run the Tests
To run the tests on your localhost,
execute the following command in your terminal:
```elixir
mix test
```
To run the tests with coverage,
run the following command
in your terminal:
```elixir
MIX_ENV=test mix cover
```
If you want to view the coverage in a web browser:
```elixir
mix coveralls.html && open cover/excoveralls.html
```
# _Implementation_
This is a step-by-step guide
to _building_ the Hits App
from scratch
in Phoenix.
### Assumptions / Prerequisites
+ [x] `Elixir` & `Phoenix` installed.
see: [**_before_ you start**](https://github.com/dwyl/phoenix-chat-example#0-pre-requisites-before-you-start)
+ [x] Basic knowledge/understanding of `Elixir` syntax:
https://github.com/dwyl/learn-elixir#how
+ [x] Basic understanding of `Phoenix`:
https://github.com/dwyl/learn-phoenix-framework
+ [x] Basic PostgreSQL knowledge:
[github.com/dwyl/**learn-postgresql**](https://github.com/dwyl/learn-postgresql)
+ [x] Test Driven Development (TDD):
[github.com/dwyl/**learn-tdd**](https://github.com/dwyl/learn-tdd)
## Create New Phoenix App
```sh
mix phx.new hits
```
When prompted to install the dependencies:
```sh
Fetch and install dependencies? [Yn]
```
Type `Y` and the `Enter` key to install.
You should see something like this in your terminal:
```sh
* running mix deps.get
* running cd assets && npm install && node node_modules/webpack/bin/webpack.js --mode development
* running mix deps.compile
We are almost there! The following steps are missing:
$ cd hits
Then configure your database in config/dev.exs and run:
$ mix ecto.create
Start your Phoenix app with:
$ mix phx.server
You can also run your app inside IEx (Interactive Elixir) as:
$ iex -S mix phx.server
```
Follow the instructions (run the following commands)
to create the PostgreSQL database for the app:
```sh
cd hits
mix ecto.create
```
You should see the following in your terminal:
```sh
Compiling 13 files (.ex)
Generated hits app
The database for Hits.Repo has already been created
```
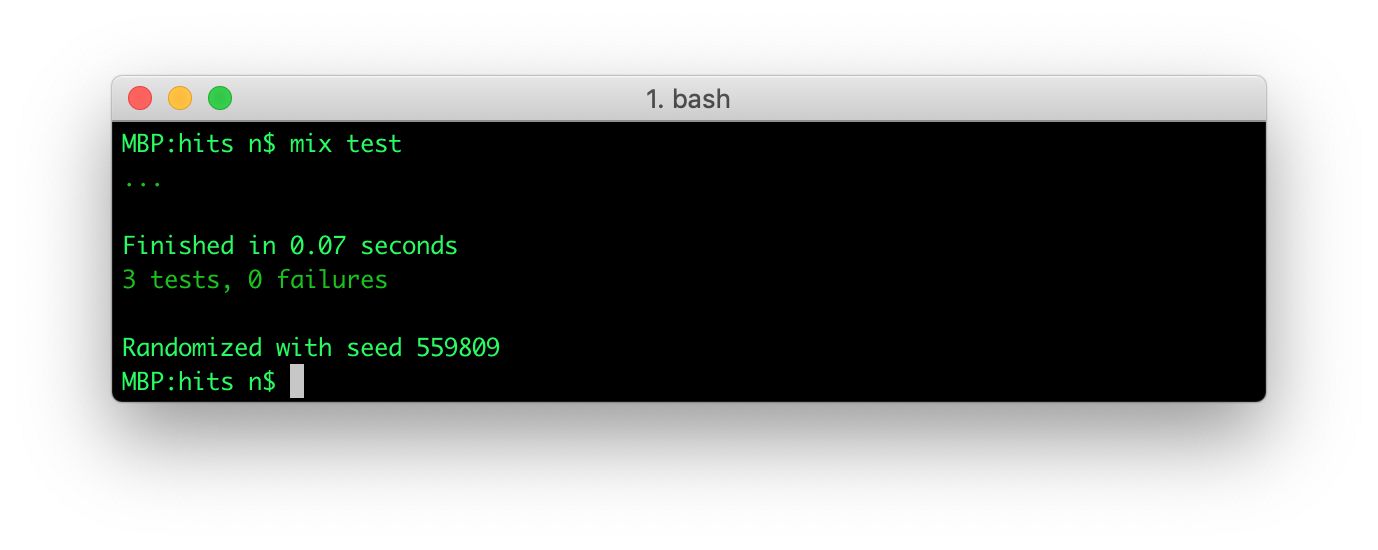
Run the default tests to confirm everything is working:
```sh
mix test
```
You should see the following output
```sh
Generated hits app
...
Finished in 0.03 seconds
3 tests, 0 failures
Randomized with seed 98214
```
Start the Phoenix server:
```sh
mix phx.server
```
That spits out a bunch of data about Webpack compilation:
```sh
[info] Running HitsWeb.Endpoint with cowboy 2.6.3 at 0.0.0.0:4000 (http)
[info] Access HitsWeb.Endpoint at http://localhost:4000
Webpack is watching the files…
Hash: 1fc94cc9b786e491ad40
Version: webpack 4.4.0
Time: 609ms
Built at: 05/05/2019 08:58:46
Asset Size Chunks Chunk Names
../css/app.css 10.6 KiB ./js/app.js [emitted] ./js/app.js
app.js 7.26 KiB ./js/app.js [emitted] ./js/app.js
../favicon.ico 1.23 KiB [emitted]
../robots.txt 202 bytes [emitted]
../images/phoenix.png 13.6 KiB [emitted]
[0] multi ./js/app.js 28 bytes {./js/app.js} [built]
[../deps/phoenix_html/priv/static/phoenix_html.js] 2.21 KiB {./js/app.js} [built]
[./css/app.css] 39 bytes {./js/app.js} [built]
[./js/app.js] 493 bytes {./js/app.js} [built]
+ 2 hidden modules
Child mini-css-extract-plugin node_modules/css-loader/dist/cjs.js!css/app.css:
[./node_modules/css-loader/dist/cjs.js!./css/app.css] 284 bytes {mini-css-extract-plugin} [built]
[./node_modules/css-loader/dist/cjs.js!./css/phoenix.css] 10.9 KiB {mini-css-extract-plugin} [built]
+ 1 hidden module
```
Visit the app in your web browser to confirm it's all working:
http://localhost:4000

The default Phoenix App home page
should be familiar to you
if you followed our Chat example/tutorial
[github.com/dwyl/**phoenix-chat-example**](https://github.com/dwyl/phoenix-chat-example)
## Create the _Static_ Home Page
In order to help people understand what Hits is
and how they can add a counter badge to their project,
we have a simple (_static_) home page.
In the interest of doing a "feature parity" migration
from the Node.js MVP to the Phoenix version,
we are just copying over the
[`index.html`](https://github.com/dwyl/hits/blob/0a44edd692b5b765c20c85ed4057a50bbd872507/lib/index.html)
at this stage; we can/will enhance it later.
Phoenix has the concept of a Layout template
which allows us to put all layout related
code in a single file and
then each subsequent page of content
does not have to worry about static (CSS/JS) assets
and metadata.
Open the file
`/lib/hits_web/templates/layout/app.html.eex`
in your text editor. It should look like this:
```html
Hits · Phoenix Framework
"/>
" alt="Phoenix Framework Logo"/>
<%= get_flash(@conn, :info) %>
<%= get_flash(@conn, :error) %>
<%= render @view_module, @view_template, assigns %>
```
Let's remove the cruft and keep only the essential layout html:
```html
Hits
<%= render @view_module, @view_template, assigns %>
```
We removed the link to `app.css`
and a couple of elements
as we don't need them;
we can always add them back later,
that's the beauty of version control,
nothing is ever "lost".
If you refresh the page you should see the following:

Don't panic, this is _expected_!
We just removed `app.css` in the layout template
and Phoenix does not have/use any Tachyons classes
so no styling is present.
We'll fix it in the next step.
Open the homepage template file in your editor:
`lib/hits_web/templates/page/index.html.eex`
You should see something like this:
```html
<%= gettext "Welcome to %{name}!", name: "Phoenix" %>
A productive web framework that does not compromise speed or maintainability.
```
Notice how the page template only has the HTML code
relevant to rendering _this_ page.
Let's replace the code in the file
with the markup relevant to the Hits homepage:
```html
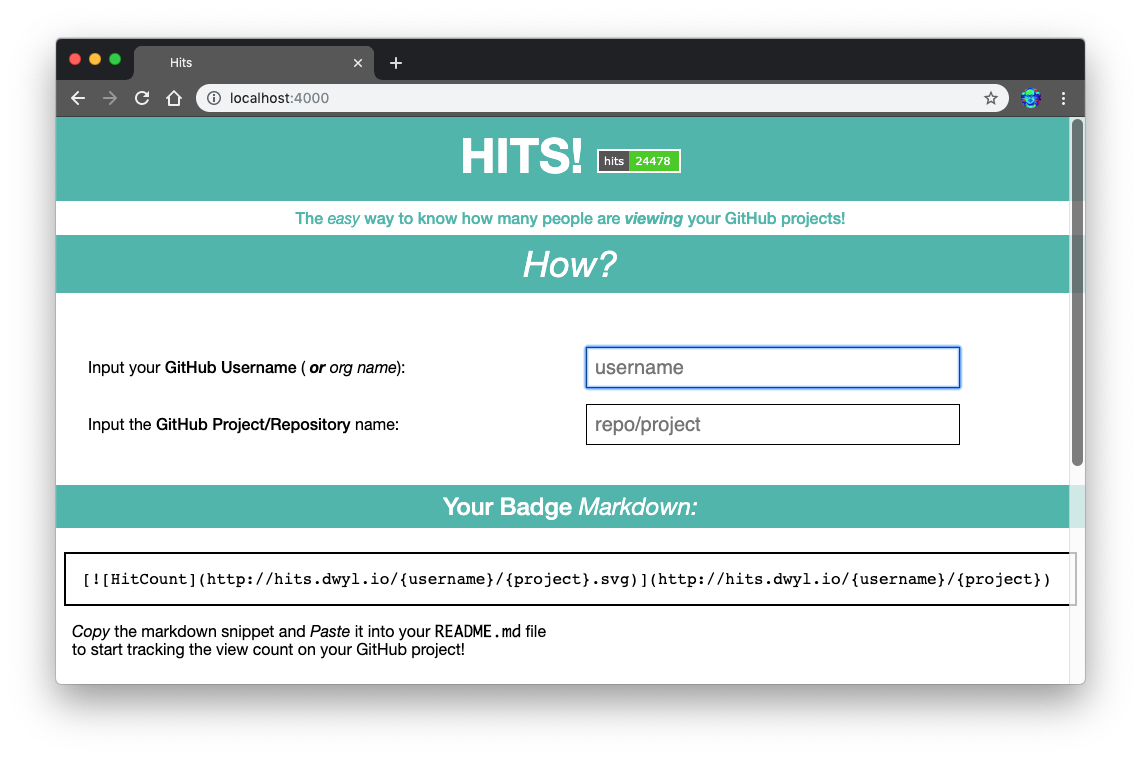
Hits!
The easy way to know how many people are
viewing your GitHub projects!
Using the above markdown as a template, Replace the {username} with your GitHub username Replace the {repo} with the repo name.
Copy the markdown snippet and Paste it into your
README.md file
to start tracking the view count on your GitHub project!
Recently Viewed Projects (tracked by Hits)
Dummy Child Node for insertBefore to work
```
> _**Note**: we are using Tachyons (Functional) CSS
for styling the page,
if you haven't yet learned about Tachyons,
we recommend reading_:
[github.com/dwyl/**learn-tachyons**](https://github.com/dwyl/learn-tachyons)
This is a fairly simple homepage.
The only _interesting_ part are the Tachyons styles
which are fairly straightforward.
Finally we need to update
`assets/js/app.js`
to add the code to render a badge
when people input their `username` and `repo` name.
Open the `assets/js/app.js` which should look like this:
```js
// We need to import the CSS so that webpack will load it.
// The MiniCssExtractPlugin is used to separate it out into
// its own CSS file.
import css from "../css/app.css"
// webpack automatically bundles all modules in your
// entry points. Those entry points can be configured
// in "webpack.config.js".
//
// Import dependencies
//
import "phoenix_html"
// Import local files
//
// Local files can be imported directly using relative paths, for example:
// import socket from "./socket"
```
Add the following lines to the end:
```js
// Markdown Template
var mt = document.getElementById('badge').innerHTML;
function generate_markdown () {
var user = document.getElementById("username").value || '{username}';
var repo = document.getElementById("repo").value || '{project}';
var style = document.getElementById("styles").value || '{style}';
// console.log('user: ', user, 'repo: ', repo);
user = user.replace(/[.*+?^$<>()|[\]\\]/g, ''); // trim and escape
repo = repo.replace(/[.*+?^$<>()|[\]\\]/g, '');
return mt.replace(/{username}/g, user).replace(/{repo}/g, repo).replace(/{style}/g, style);
}
function display_badge_markdown () {
var md = generate_markdown()
var pre = document.getElementById("badge").innerHTML = md;
}
setTimeout(function () {
var how = document.getElementById("how");
// show form if JS available (progressive enhancement)
if(how) {
document.getElementById("how").classList.remove('dn');
document.getElementById("nojs").classList.add('dn');
display_badge_markdown(); // render initial markdown template
var get = document.getElementsByTagName('input');
for (var i = 0; i < get.length; i++) {
get[i].addEventListener('keyup', display_badge_markdown, false);
get[i].addEventListener('keyup', display_badge_markdown, false);
}
// changing markdown preview whenever an option is selected
document.getElementById("styles").onchange = function(e) {
display_badge_markdown()
}
}
}, 500);
```
Run the Phoenix server to see the static page:
```
mix phx.server
```
Now visit the route in your web browser:
http://localhost:4000

Now that the static homepage is working,
we can move on to the _interesting_ part of the Hits Application!
> As always, if you have questions or got stuck at any point,
please open an issue and we will help!
https://github.com/dwyl/hits/issues
### _Fix_ The Failing Test
Before moving on to building the app,
let's make sure that the default tests are passing ...
```
mix test
```

The reason for this failing test is pretty clear,
the page no longer contains the words "Welcome to Phoenix!".
Open the file `test/hits_web/controllers/page_controller_test.exs`
and update the assertion text.
From:
```elixir
test "GET /", %{conn: conn} do
conn = get(conn, "/")
assert html_response(conn, 200) =~ "Welcome to Phoenix!"
end
```
To:
```elixir
test "GET /", %{conn: conn} do
conn = get(conn, "/")
assert html_response(conn, 200) =~ "Hits!"
end
```
Re-run the test:
```sh
mix test
```
The test should now pass
and we can crack on with creating the schemas!
## Create The Database for Storing Data
As is typical of most Phoenix applications,
we will be using a PostgreSQL database for storing data.
In your terminal, run the create script:
```sh
mix ecto.create
```
In your terminal you should see:
```sh
Compiling 2 files (.ex)
The database for Hits.Repo has been created
```
This tells you the PostgreSQL database **`hits_dev`** was successfully created.
### Note on Database Normalization
In designing the Hits App database,
we decided to normalize
the database tables for efficient storage
because we wanted to make the storage of an individual hit
as minimal as possible.
This means we have 4 schemas/tables to ensure there is no duplicate data
and each bit of data is only stored _once_.
We could have stored all the data in a _single_ table
and on the surface this is appealing
because it would only require one insert
query and no "joins" when selecting/counting hits.
But the initial benefit of a single table
would be considerably outweighed
by the wasted space of duplicate data.
This is not the time or place
to dive into the merits
of database normalization and denormalisation.
We will have a chance to explore it later
when we need to optimise query performance.
For now we are focussing on building the App
with a database normalized to the third normal form (3NF)
because it achieves a good balance of
eliminating data duplication thus maximising storage efficiency
while still having adequate query performance.
You won't need to understand any of these concepts
to follow along with building the Hits app.
But if you are curious about any of these words, read the following pages:
+ https://en.wikipedia.org/wiki/Database_normalization
+ https://en.wikipedia.org/wiki/Denormalization
+ https://en.wikipedia.org/wiki/Third_normal_form
### Create the 4 Schemas
+ users - for simplicity sake we are assuming that
all repositories belong to a "user" and not an organisation.
+ repositories - the projects on GitHub
+ useragents - the web browsers viewing the project pages
+ hits - the record of each "hit" (page view).
```sh
mix phx.gen.schema User users name:string
mix phx.gen.schema Repository repositories name:string user_id:references:users
mix phx.gen.schema Useragent useragents name:string ip:string
mix phx.gen.schema Hit hits repo_id:references:repositories useragent_id:references:useragents
```
In your terminal,
you will see a suggestion in the terminal output similar to this:
Before we can run the database migration, we must create the database.
Now we can run the scripts to create the database tables:
```
mix ecto.migrate
```
In your terminal, you should see:
```sh
Compiling 17 files (.ex)
Generated hits app
[info] == Running 20190515211749 Hits.Repo.Migrations.CreateUsers.change/0 forward
[info] create table users
[info] == Migrated 20190515211749 in 0.0s
[info] == Running 20190515211755 Hits.Repo.Migrations.CreateRepositories.change/0 forward
[info] create table repositories
[info] create index repositories_user_id_index
[info] == Migrated 20190515211755 in 0.0s
[info] == Running 20190515211804 Hits.Repo.Migrations.CreateUseragents.change/0 forward
[info] create table useragents
[info] == Migrated 20190515211804 in 0.0s
[info] == Running 20190515211819 Hits.Repo.Migrations.CreateHits.change/0 forward
[info] create table hits
[info] create index hits_repo_id_index
[info] create index hits_useragent_id_index
[info] == Migrated 20190515211819 in 0.0s
```
> _**Note**: the dates of your migration files will differ from these.
The 14 digit number corresponds to the date and time
in the format **`YYYYMMDDHHMMSS`**.
This is helpful for knowing when the database schemas/fields
were created or updated._
To make sure users, useragents and repositories are unique,
three more migrations are created to add `unique_index`:
For users we want the name to be unique
```elixir
def change do
create unique_index(:users, [:name])
end
```
For useragents, we want the name and the ip address unique
```elixir
def change do
create unique_index(:useragents, [:name, :ip])
end
```
Finally for repositories we want the name and the relation to the user to be
unique
```elixir
def change do
create unique_index(:repositories, [:name, :user_id])
end
```
These unique indexes insure that no duplicates are created at the database level.
We can now use the `upsert` Ecto/Postgres feature to only create new items
or updating the existing items.
For example with useragent:
```elixir
Repo.insert!(changeset,
on_conflict: [set: [ip: changeset.changes.ip, name: changeset.changes.name]],
conflict_target: [:ip, :name]
)
```
- `conflict_target`: Define which fields to check for existing entry
- `on_conflict`: Define what to do when there is a conflict. In our case
we update the ip and name values.
#### View the Entity Relationship (ER) Diagram
Now that the Postgres database tables have been created,
you can fire up your database client
(_e.g: DBeaver in this case_)
and view the Entity Relationship (ER) Diagram:
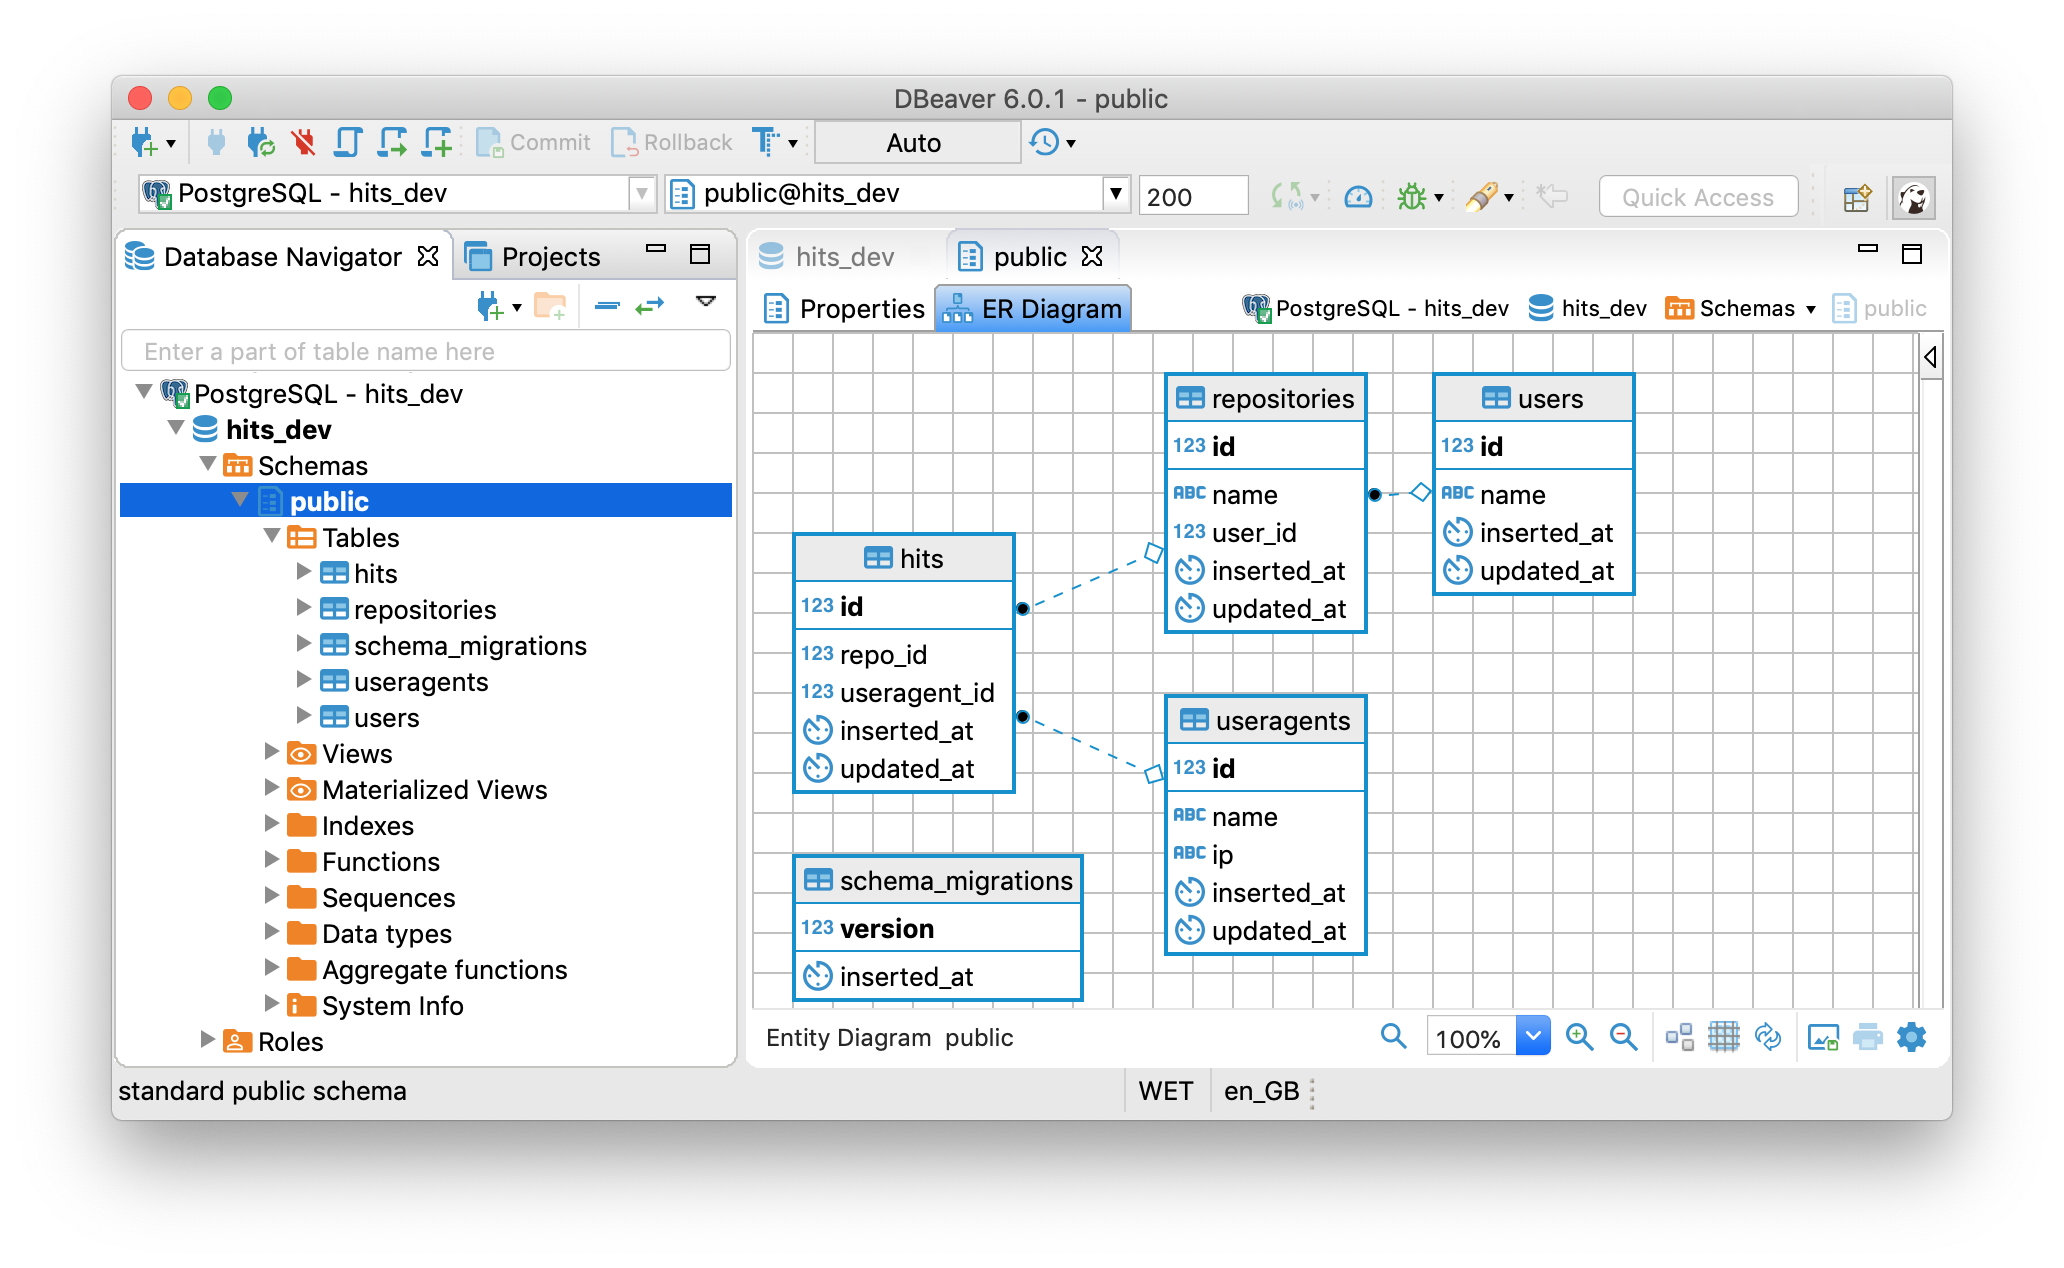
This us shows us the four tables we created above
and how they are related (_with foreign keys_).
It also shows us that there is `schema_migrations` table,
which is _unrelated_ to the tables we created for our app,
but contains the log of the schema migrations that have been run
and when they were applied to the database:

The keen observer will note that the migration table data:
```sh
version |inserted_at |
--------------|-------------------|
20190515211749|2019-05-15 21:18:38|
20190515211755|2019-05-15 21:18:38|
20190515211804|2019-05-15 21:18:38|
20190515211819|2019-05-15 21:18:38|
```
The version column corresponds to the date timestamps
in the migration file names:
priv/repo/migrations/**20190515211749**_create_users.exs
priv/repo/migrations/**20190515211755**_create_repositories.exs
priv/repo/migrations/**20190515211804**_create_useragents.exs
priv/repo/migrations/**20190515211819**_create_hits.exs
### _Run_ the Tests
Once you have created the schemas and run the resulting migrations,
it's time to run the tests!
```sh
mix test
```
Everything should still pass because `phx.gen.schema`
does not create any new tests
and our previous tests are unaffected.
## SVG Badge Template
We created the SVG badge template for our MVP
[`template.svg`](https://github.com/dwyl/hits-nodejs/blob/master/lib/template.svg)
and it still serves our needs
so there's no need to change it.
Create a new file `lib/hits_web/templates/hit/badge_flat_square.svg`
and paste the following SVG code in it:
```svg
```
The comments are there for beginner-friendliness,
they are stripped out before sending the badge to the client
to conserve bandwidth.
# Alternative Badge Formats 🌈
Several people have requested
an alternative badge format.
Rather than spend a lot of time
customizing the badges ourselves,
we are going to use
[shields.io/endpoint](https://shields.io/endpoint)
that allows full badge customization.
## Adding `JSON` Content Negotiation
First thing we need to do
is add the ability to return `JSON`
instead of `SVG`.
In `HTTP` this is referred to as
Content Negotiation:
[wikipedia.org/wiki/Content_negotiation](https://en.wikipedia.org/wiki/Content_negotiation)
### Installing `params` and `content`
We are using
[`params`](https://github.com/vic/params)
to validate the query parameters
and
[`content`](https://github.com/dwyl/content)
to add content negotiation on our endpoints.
Let's install these
by adding them to the `deps`
section `mix.exs`:
```elixir
defp deps do
[
# For content negotiation
{:content, "~> 1.3.0"},
# Query param schema validation
{:params, "~> 2.0"},
]
end
```
### Defining Validation Schema
The schema **must be compatible with `shield.io`**.
We make use of a `schema validator`
so we know that the parameters
passed by the users are valid.
The possible values of each field
were determined according to
[shields.io/endpoint](https://shields.io/endpoint)
The valid parameters are:
```elixir
defparams schema_validator %{
user!: :string,
repository!: :string,
style: [
field: Ecto.Enum,
values: [
plastic: "plastic",
flat: "flat",
flatSquare: "flat-square",
forTheBadge: "for-the-badge",
social: "social"
],
default: :flat
],
color: [field: :string, default: "lightgrey"],
show: [field: :string, default: nil],
}
```
By default, each badge is `lightgrey`
and has a `flat` style.
This `defparams` defintion is in the
`/lib/hits_web/controllers/hit_controller.ex`
file.
### Content negotiation
Luckily, the `content` package
makes it relatively easy to differentiate
`HTTP` and `JSON` requests.
The way we implement different behaviours
for `JSON` requests is made through
the following template:
```elixir
if Content.get_accept_header(conn) =~ "json" do
# return json
else
# render page
end
```
You will notice this behaviour in
[`lib/hits_web/controllers/hit_controller.ex`](https://github.com/dwyl/hits/blob/37d3a91022f4aad25558f4c6f3e2bd01c933d63a/lib/hits_web/controllers/hit_controller.ex#L50-L54)
After correct setup,
the returned JSON object
depends on the parameters the user defines.
```elixir
def render_json(conn, count, params) do
json_response = %{
"schemaVersion" => "1",
"label" => "hits",
"style" => params.style,
"message" => count,
"color" => params.color
}
json(conn, json_response)
end
```
This function effectively makes it so
the endpoint *returns* a `JSON` object
following Shields.io schema convention
which can later be used in
[shields.io/endpoint](https://shields.io/endpoint)
### Expected `JSON` response
If you run `mix phx.server`
and open a separate terminal session,
paste the following `cURL` command and run:
```sh
curl -H "Accept: application/json" http://localhost:4000/user/repo\?color=blue
```
The output will be the following.
```sh
{"color":"blue","label":"hits","message":6,"schemaVersion":"1","style":"flat"}%
```
You can easily check the `JSON` in a web browser too.
Simply open Firefox and visit the URL:
http://localhost:4000/user/repo.json?color=blue

And if you replace the `.json` in the URL with `.svg`
you will see the badge as expected:
http://localhost:4000/user/repo.svg

The **same endpoint** is used
for both `HTTP` requests
and also outputs a `JSON` object.
Now for the fun part!!
## Using Shields to Create _Any_ Style of Button!
```md
https://img.shields.io/endpoint?url=https://hits.dwyl.com/dwyl/hits.json?style=flat-square&show=unique?color=orange
```
Fully customizable:


Plenty of logos to chose from at:
https://simpleicons.org
# tl;dr

> But seriously, if you want a step-by-step tutorial,
leave a comment on: https://github.com/dwyl/hits/issues/74
## Add Channel
If you are new to Phoenix Channels, please recap:
https://github.com/dwyl/phoenix-chat-example
In your terminal, run the following command:
```sh
mix phx.gen.channel Hit
```
You should see the following output:
```
* creating lib/hits_web/channels/hit_channel.ex
* creating test/hits_web/channels/hit_channel_test.exs
Add the channel to your `lib/hits_web/channels/user_socket.ex` handler, for example:
channel "hit:lobby", HitsWeb.HitChannel
```
> If you want to see the code required
to render the hits on the homepage in realtime,
please see: https://github.com/dwyl/hits/pull/80/files
## Research & Background Reading
If you found this repository useful, please ⭐️ it so we (and others) know you liked it!
We found the following links/articles/posts _useful_
when learning how to build this mini-project:
+ Plug Docs: https://hexdocs.pm/plug/readme.html (_the official Plug docs_)
+ Plug Conn (_connection struct specific_) Docs:
https://hexdocs.pm/plug/Plug.Conn.html
(_the are feature-complete but no practical/usage examples!_)
+ Understanding Plug (Phoenix Blog): https://hexdocs.pm/phoenix/plug.html
+ Elixir School Plug:
https://elixirschool.com/en/lessons/specifics/plug/
+ Getting started with Plug in Elixir:
https://www.brianstorti.com/getting-started-with-plug-elixir
(_has a good/simple example of "Plug.Builder"_)
+ Elixir Plug unveiled:
https://medium.com/@kansi/elixir-plug-unveiled-bf354e364641
+ Building a web framework from scratch in Elixir:
https://codewords.recurse.com/issues/five/building-a-web-framework-from-scratch-in-elixir
+ Testing Plugs: https://robots.thoughtbot.com/testing-elixir-plugs
+ How to broadcast a message from a Phoenix Controller to a Channel?
https://stackoverflow.com/questions/33960207/how-to-broadcast-a-message-from-a-phoenix-controller-to-a-channel
