# learn-flutter
**Repository Path**: mirrors_dwyl/learn-flutter
## Basic Information
- **Project Name**: learn-flutter
- **Description**: 🦋 Learn how to use Flutter to Build Cross-platform Native Mobile Apps
- **Primary Language**: Unknown
- **License**: GPL-2.0
- **Default Branch**: main
- **Homepage**: None
- **GVP Project**: No
## Statistics
- **Stars**: 0
- **Forks**: 0
- **Created**: 2020-08-08
- **Last Updated**: 2026-05-30
## Categories & Tags
**Categories**: Uncategorized
**Tags**: None
## README

Learn the **`Flutter`** basics to get up-and-running **fast**
and build **awesome cross-platform applications**!
- [What? 💡](#what-)
- [Why? 🤷](#why-)
- [Who? 👤](#who-)
- [Mac Focussed? 🍏](#mac-focussed-)
- ["_`iOS` users `spend` more than `double` on `subscriptions` compared to `Android` users_"](#ios-users-spend-more-than-double-on-subscriptions-compared-to-android-users)
- [Install ⬇️](#install-️)
- [Mac: Homebrew 🍺](#mac-homebrew-)
- [_Manual_ Install](#manual-install)
- [Installing Flutter SDK](#installing-flutter-sdk)
- [Install `XCode`](#install-xcode)
- [Install Android Studio](#install-android-studio)
- [Install Virtual `Android` Device](#install-virtual-android-device)
- [Installing `Cocoapods`](#installing-cocoapods)
- [Adding plugins to Android Studio](#adding-plugins-to-android-studio)
- [Checking everything](#checking-everything)
- [Windows?](#windows)
- [_Before_ You Start: Run The `Demo App`!](#before-you-start-run-the-demo-app)
- [Running on an emulator](#running-on-an-emulator)
- [Running on a real device](#running-on-a-real-device)
- [Android](#android)
- [iOS](#ios)
- [Troubleshooting possible errors](#troubleshooting-possible-errors)
- [`"No valid code signing certificates were found"`](#no-valid-code-signing-certificates-were-found)
- [`"Unable to verify app. An internet connection is required to verify the trust of the developer ... This app will not be available until verified."`](#unable-to-verify-app-an-internet-connection-is-required-to-verify-the-trust-of-the-developer--this-app-will-not-be-available-until-verified)
- [`"“iproxy” cannot be opened because the developer cannot be verified"`](#iproxy-cannot-be-opened-because-the-developer-cannot-be-verified)
- [Core Principles 🐣](#core-principles-)
- [Widgets](#widgets)
- [Stateless widgets](#stateless-widgets)
- [Stateful widgets](#stateful-widgets)
- [Layout](#layout)
- [Assets](#assets)
- [Navigation and routing](#navigation-and-routing)
- [Networking](#networking)
- [Local databases](#local-databases)
- [SQLite](#sqlite)
- [1. Add the dependencies](#1-add-the-dependencies)
- [2. Define a Model](#2-define-a-model)
- [3. Open connection to the database](#3-open-connection-to-the-database)
- [4. Creating table](#4-creating-table)
- [5. CRUD operations](#5-crud-operations)
- [`ObjectBox`](#objectbox)
- [State management](#state-management)
- [Dependency injection](#dependency-injection)
- [Testing 🧪](#testing-)
- [Unit testing](#unit-testing)
- [Mock testing](#mock-testing)
- [Integration testing](#integration-testing)
- [A few remarks on `Flutter Web`](#a-few-remarks-on-flutter-web)
- [Adding a splash screen](#adding-a-splash-screen)
- [Decreasing loading time](#decreasing-loading-time)
- [App demo 📱](#app-demo-)
- [0. Setting up a new project](#0-setting-up-a-new-project)
- [1. Project structure](#1-project-structure)
- [2. Creating a list of todos](#2-creating-a-list-of-todos)
- [3. Adding interactivity](#3-adding-interactivity)
- [4. Adding navigation](#4-adding-navigation)
- [5. Finishing touches](#5-finishing-touches)
- [6. Testing!](#6-testing)
- [6.1 Unit testing](#61-unit-testing)
- [6.2 Widget testing](#62-widget-testing)
- [6.3 Test coverage](#63-test-coverage)
- [Deployment 📦](#deployment-)
- [i18n 🌍](#i18n-)
- [Final remarks 👋](#final-remarks-)
# What? 💡
**`Flutter`** is an open-source framework created by Google
for creating multi-platform, high-performance applications
from a single codebase. It makes it easier for you to build
user interfaces that works both on web and mobile devices.
**`Flutter`** uses
[`Dart`](https://github.com/dwyl/learn-dart),
a general-purpose programming language created by **Google**.
If you come from an object-oriented programming language
like `Java`, `C#`,
`Go` or `Javascript/Typescript`,
you will feel right at home.
# Why? 🤷
1. **`Flutter`** can be used to build
**cross platform _native_ applications**
(Android, iOS, Desktop and Web)
using the **_same_ codebase**.
This significantly simplifies
maintenance costs and dev headache
when deploying for Android or iOS devices, Desktop, Web and even
[Cars!](https://pub.dev/packages/flutter_carplay)
2. The `Dart` programming language used in `Flutter`
is object oriented and familiar to most developers.
`Flutter` benefits immensely by leveraging `Dart`.
Being a language optimized for UI and compiling to ARM
& x64 machine code for mobile, desktop and backend,
it offers amazing performance benchmarks.
3. **Development times** are **_significantly_ faster**
than other cross-platform frameworks
thanks to stateful hot-reloading
and excellent virtual device support.
If we close the application,
when we open it again
we can continue from where we stopped.
4. `Flutter` has a **_complete_ design system**
with a library of **Material UI widgets**
included which speeds up the
development process.
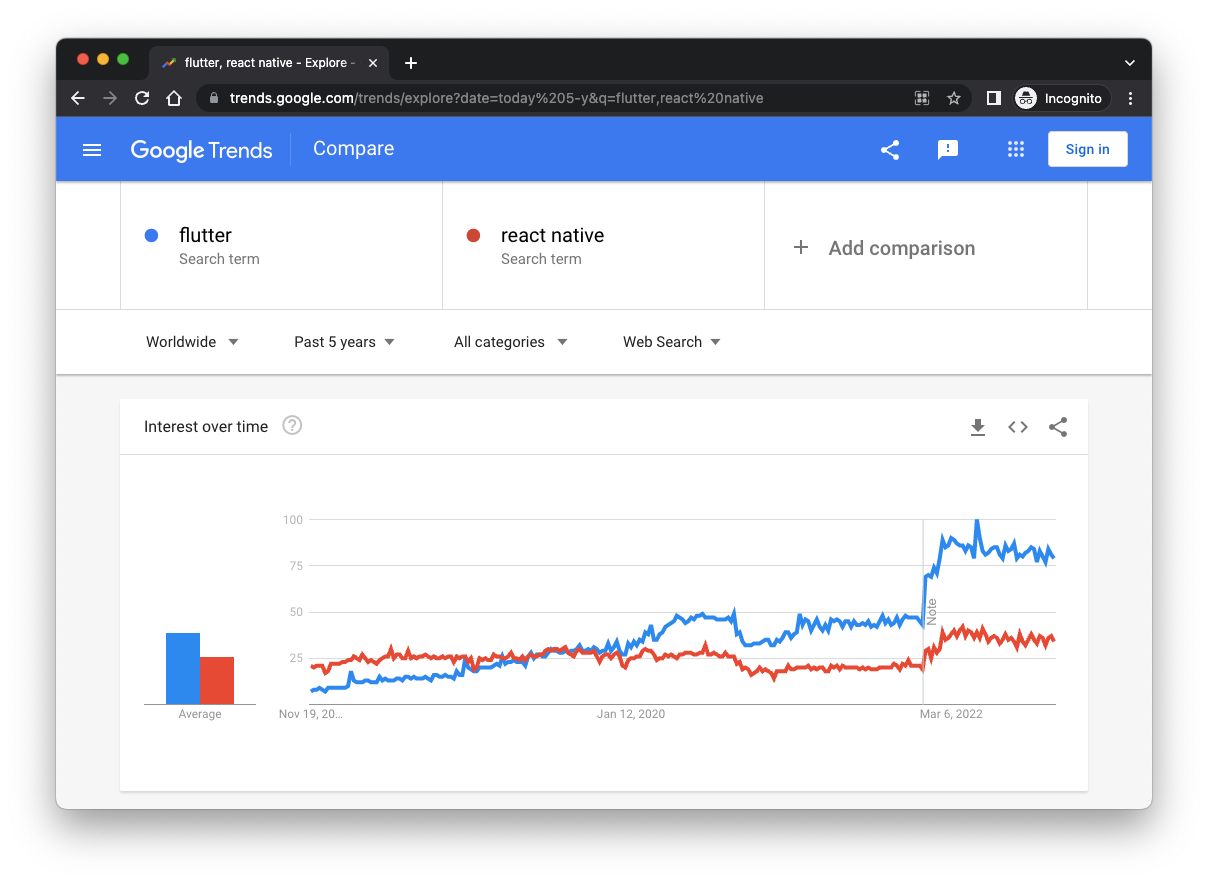
5. `Flutter` is the fastest-growing mobile development platform
and is wildly used in production worldwide.
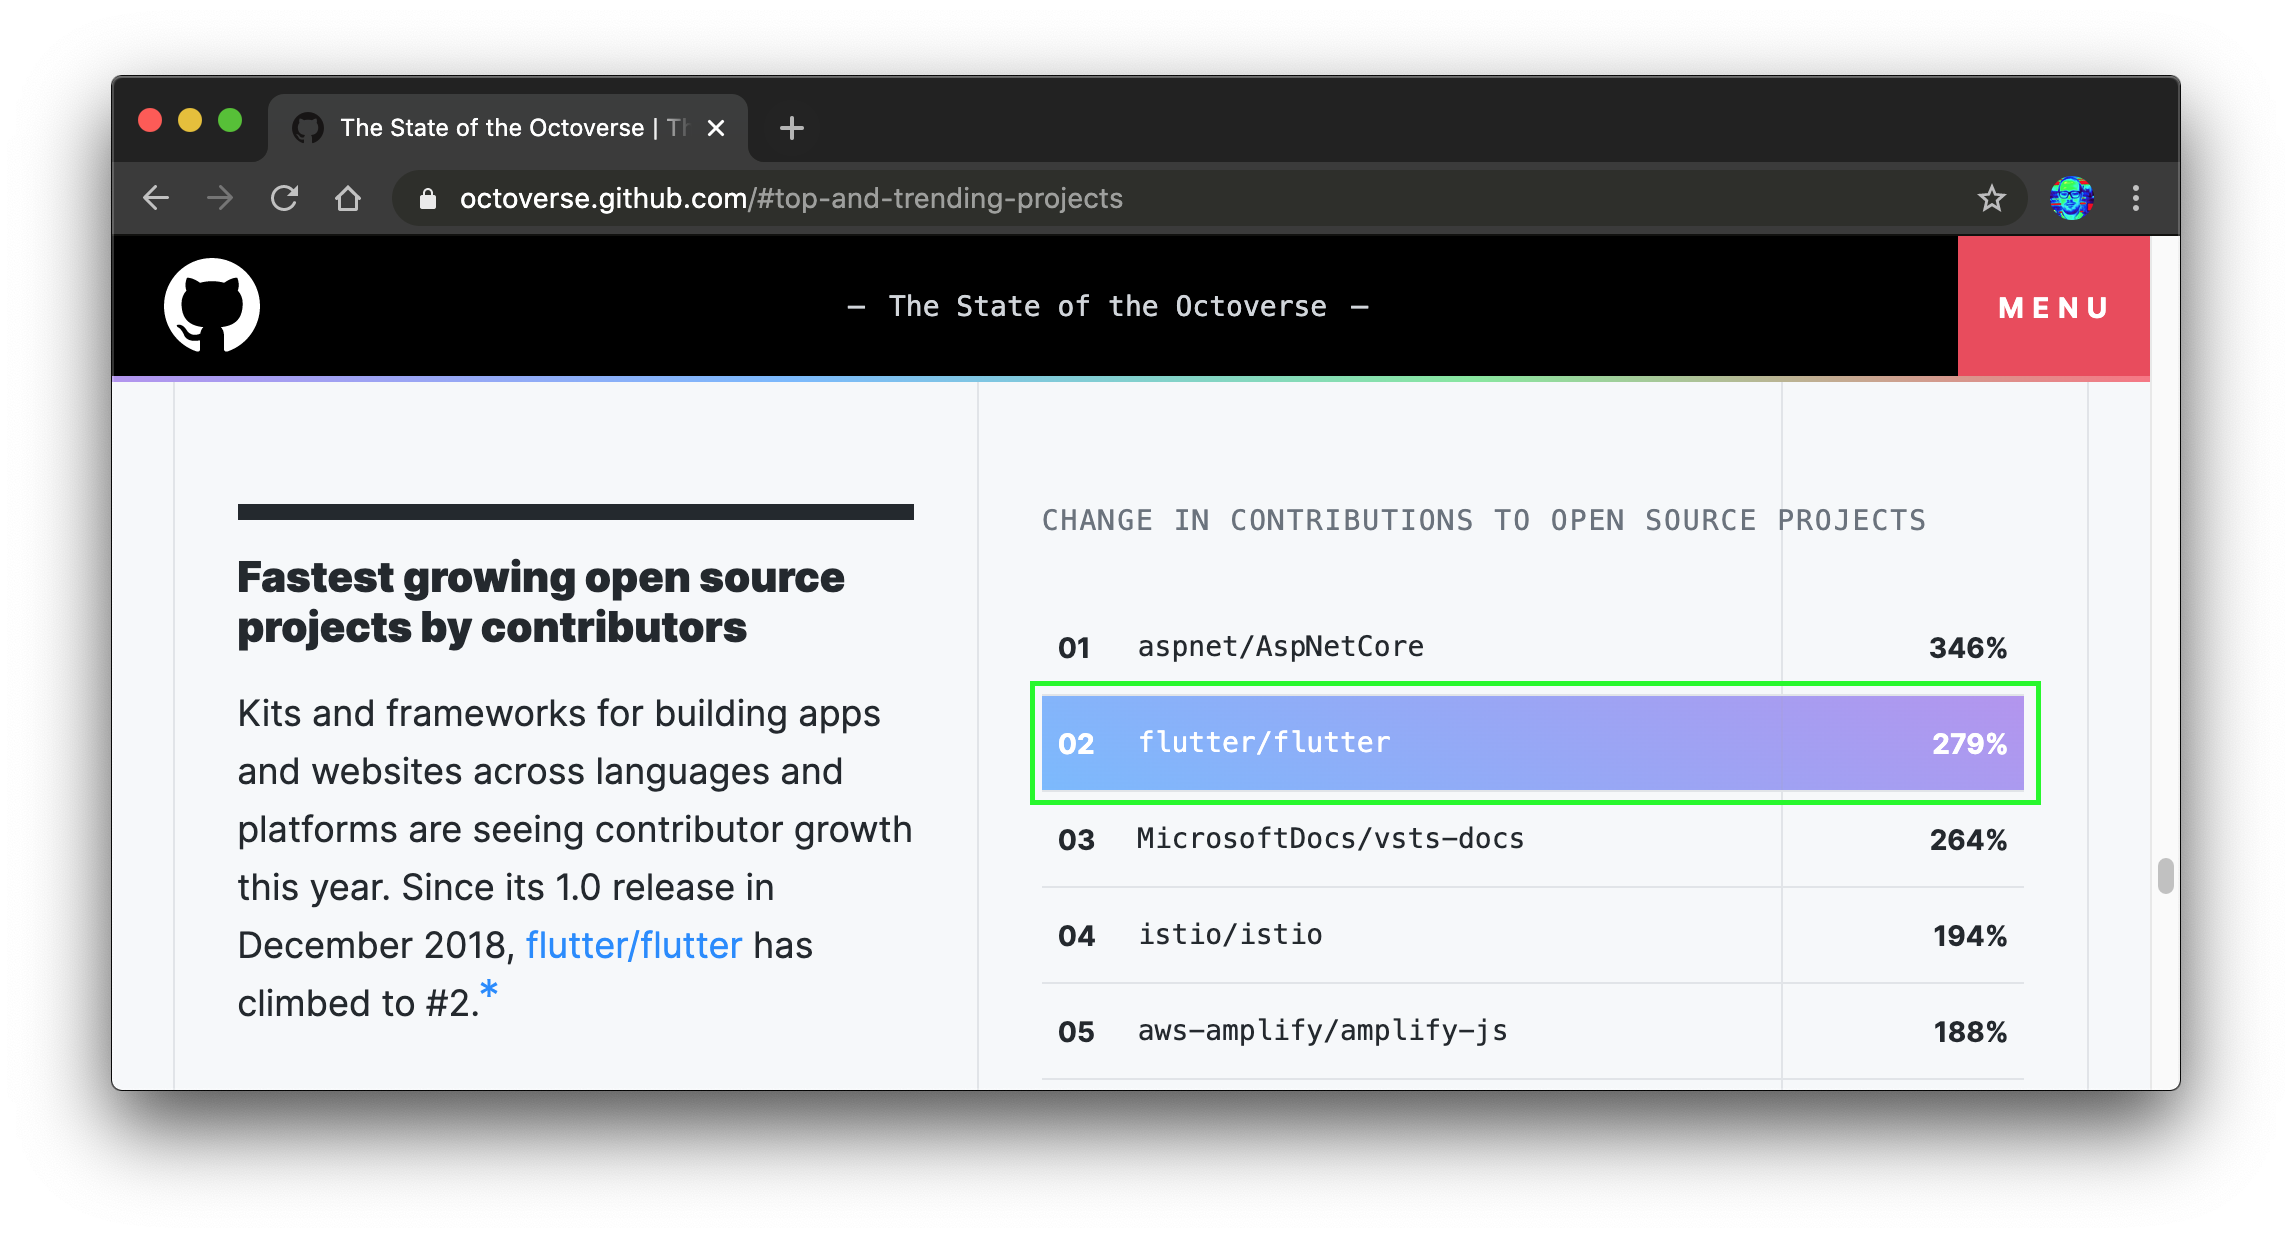
`Flutter` overtook React Native 2020 in Google searches,
further showcasing the growing trend of `Flutter`:
https://trends.google.com/trends/explore?date=today%205-y&q=flutter,react%20native
# Who? 👤
This repo is useful for anyone
that is interested in mobile and web app development.
For anyone that hasn't yet touched `Flutter`,
it's a *great* place to start to get your computer
ready for `Flutter` development, understand the
**main concepts** and *guide* you to then create
your very first `Flutter` app.
## Mac Focussed? 🍏
While the _installation_ steps below
include Mac-specific steps like `Homebrew` and `XCode`,
this guide can still _easily_ be followed by people
using Linux or Windows as their OS.
The _reason_ we use **`Mac`** is simple:
it's the _only_ way to ship apps for **`iOS`**.
Like it or not, **`iPhone`** now has a
**`50%` Market Share in the US**:
[visualcapitalist.com/iphone-majority-us-smartphones](https://www.visualcapitalist.com/iphone-majority-us-smartphones/)

In Europe, **`iPhone`** ownership/use correlates strongly to wealth of the nation;
[Monaco](https://en.wikipedia.org/wiki/Monaco#Economy)
and
[Norway](https://en.wikipedia.org/wiki/Norway#Economy)
the two countries with the highest GDP/Capita top the table
with
[**`69.91%`**](https://www.reddit.com/r/MapPorn/comments/xx4gp6/percentage_of_iphone_users_in_europe/)
and
[**`68.89%`**](https://gs.statcounter.com/os-market-share/mobile/norway)
respectively.
[mezha.media/en/2022/10/10/percentage-of-iphone-users-in-different-european-countries](https://mezha.media/en/2022/10/10/percentage-of-iphone-users-in-different-european-countries/)

Worldwide **`iPhone`** has a **`~30%` Market Share**:
[gs.statcounter.com/os-market-share/mobile/worldwide](https://gs.statcounter.com/os-market-share/mobile/worldwide)
Mostly because there are _many_ cheap Android devices
that have flooded the market.
But by _far_ the most important fact/stat to pay attention
from an Native Mobile App development perspective is:
### "_`iOS` users `spend` more than `double` on `subscriptions` compared to `Android` users_"
[phonearena.com/news/app-store-users-spend-more-than-double-google-play-users-subscriptions_id138692](https://www.phonearena.com/news/app-store-users-spend-more-than-double-google-play-users-subscriptions_id138692)
So ... if you're building a
[**`SaaS` product**](https://github.com/dwyl/product-roadmap#why-are-we-building-an-app),
you should focus _most_ of your effort
on perfecting the UI/UX on **`iPhone`**.
This is _why_ we use **`Mac`** computers
for our **`Flutter`** dev work.
So we can run **`XCode`**
and test on **`iOS`** devices
and pay our bills.
We would _much_ rather use
a fully Open Source Hardware/Software platform.
e.g:
[Framework](https://github.com/dwyl/hq/issues/565);
We _love_ their
[Mission](https://frame.work/about)!
> Note: We also _love_ that Apple focusses on Privacy.
So while we don't like the vendor lock-in
and often absurd over-pricing
of the Apple ecosystem,
we _definitely_ prefer it
to sharing _all_ our data
with a Google
the way you are forced to with Android. 😢
Yes, there are
Google-free privacy focussed versions
of Android, e.g:
[makeuseof.com/tag/using-android-without-google](https://www.makeuseof.com/tag/using-android-without-google/)
but have you tried _using_ them in _practice_?
If you have, please share your experience! 🙏
# Install ⬇️
## Mac: Homebrew 🍺
The easiest way to install **`Flutter`**
on a Mac is using **`Homebrew`**:
[brew.sh](https://brew.sh)
After you've installed `brew`,
you can install **`Flutter`**
with the command:
```sh
brew install --cask flutter
```
You should see something similar to:
```sh
==> Downloading https://storage.googleapis.com/releases/stable/macos/flutter
#################################################################### 100.0%
==> Installing Cask flutter
==> Linking Binary 'dart' to '/opt/homebrew/bin/dart'
==> Linking Binary 'flutter' to '/opt/homebrew/bin/flutter'
🍺 flutter was successfully installed!
```
## _Manual_ Install
Installing Flutter might seem like a daunting task.
But do not worry, we'll help you get your local environment
running in no time! Since we are targeting web and mobile,
there are a few tools and SDKs we ought to install first.
These steps will be oriented to Mac/Unix devices but you should
be able to follow if you have a Windows device. If you're ever stuck,
don't be shy!
Please reach out to us and
[open an issue](https://github.com/dwyl/learn-flutter/issues),
we'll get back to you as fast as we can!
## Installing Flutter SDK
Head over to https://docs.flutter.dev/get-started/install,
select your operating system and follow the instructions.
In our case, we're going to download the SDK for
our Mac. After downloading the SDK, you should extract
the `.zip` contents to a wanted location
(in our case, we extracted the folder to our `Home` - `cd ~`).
Now, we ought to update our `PATH` variable so we can access
the binary we just downloaded to our command line. Open your terminal and:
```sh
cd $HOME
nano .zshrc
```
And add `export PATH="$PATH:`pwd`/flutter/bin"` pointing
to the location where you extracted the folder.
Now, if you restart the terminal and type `flutter doctor`,
you should be able to run the command with no problems.
`flutter doctor` checks your environment and displays a report to the
terminal window. It checks it all the necessary tools for development
for all devices are correctly installed. Let's do just that.
## Install `XCode`
If you don't already have **`XCode`** installed,
open your **`AppStore`**, search for `"XCode"`
and press `Install`. It's that easy.
 ### Install Android Studio
Now targeting for Android devices, we need to install Android SDK and toolkits.
For this, we are going to install Android Studio and work from there.
Head over to https://developer.android.com/studio and download.
After downloading, run the installer and select `Default settings` and let
the installer do its magic. After this, you should be prompted with the following window.
### Install Android Studio
Now targeting for Android devices, we need to install Android SDK and toolkits.
For this, we are going to install Android Studio and work from there.
Head over to https://developer.android.com/studio and download.
After downloading, run the installer and select `Default settings` and let
the installer do its magic. After this, you should be prompted with the following window.
 Click on the `More actions` dropdown and click on `SDK Manager`.
You should be prompted with this window:
 After installing with default settings, you probably already have
an Android SDK installed. If that's the case, follow through
to `SDK Tools` and check on `Android SDK Command-line Tools`.
After installing with default settings, you probably already have
an Android SDK installed. If that's the case, follow through
to `SDK Tools` and check on `Android SDK Command-line Tools`.
 And then click `Finish`. This will install the command line tools.
After installing, copy the `Android SDK Location` in the window.
Open a terminal window and type the following to add the SDK path
to the `Path` env variable.
```sh
cd $HOME
nano .zshrc
```
and then add the SDK path you just copied, and save the file
`export ANDROID_HOME=PATH_YOU_JUST_COPIED`
Restart your terminal again and type `flutter doctor --android-licenses`.
This will prompt you to accept the Android licenses. Just type `y` as you read
through them to accept.
#### Install Virtual `Android` Device
The `Android` simulator works on _any/all_ platforms.
With `Android Studio` App open,
find the "Device Manager" icon in the top right:

In the **Device Manager** side-panel,
click on the **`Create device`**:

Select a recent model of `Android` device,
e.g: `Pixel 6` and click **`Next`**:

Accept the default/suggested `API` version and click **`Next`**:

Accept all the defaults and click **`Finish`** to complete your virtual device setup:

Your Device Manager should now list the `Pixel 6` virtual device:

With that in place you can run the demo app below!
And then click `Finish`. This will install the command line tools.
After installing, copy the `Android SDK Location` in the window.
Open a terminal window and type the following to add the SDK path
to the `Path` env variable.
```sh
cd $HOME
nano .zshrc
```
and then add the SDK path you just copied, and save the file
`export ANDROID_HOME=PATH_YOU_JUST_COPIED`
Restart your terminal again and type `flutter doctor --android-licenses`.
This will prompt you to accept the Android licenses. Just type `y` as you read
through them to accept.
#### Install Virtual `Android` Device
The `Android` simulator works on _any/all_ platforms.
With `Android Studio` App open,
find the "Device Manager" icon in the top right:

In the **Device Manager** side-panel,
click on the **`Create device`**:

Select a recent model of `Android` device,
e.g: `Pixel 6` and click **`Next`**:

Accept the default/suggested `API` version and click **`Next`**:

Accept all the defaults and click **`Finish`** to complete your virtual device setup:

Your Device Manager should now list the `Pixel 6` virtual device:

With that in place you can run the demo app below!
> **Note**: if you get stuck on this step,
> a good + quick _video_ tutorial
> for adding simulator devices
in `Android Studio`
is:
[youtu.be/QjgmTiD8prA](https://www.youtube.com/watch?v=QjgmTiD8prA "Add Simulator Device to Android Studio 4 minute tutorial")
[4 mins]
## Installing `Cocoapods`
If you run `flutter doctor` again, you should see we are almost done.
You might see a text saying `CocoaPods not installed`. Let's fix that.
Install [Homebrew](https://brew.sh/) and run `brew install cocoapods`.
And you should be all sorted!
## Adding plugins to Android Studio
If you happen to use Android Studio when developing,
adding the Flutter plugin will help you tremendously.
Just open Android Studio, click on `Plugins`,
search for "Flutter" and click `Install`.
 You are asked to "Restart the IDE". Do so and ta-da :tada:, you are done!
## Checking everything
If you run `flutter doctor`, you should have everything in the green.
You are asked to "Restart the IDE". Do so and ta-da :tada:, you are done!
## Checking everything
If you run `flutter doctor`, you should have everything in the green.
 Congratulations, give yourself a pat on the back, you are **all ready**!
## Windows?
We don't use `Flutter` on `Windows` but plenty of people do.
See:
https://docs.flutter.dev/get-started/install/windows

Extract the file and place the folder in directory `C:`.
It's probably best to create a folder in the directory like this.

This is the console that comes with the Flutter folder
you just downloaded. You can see the devices connected or
even create a project through here.

In order to access Flutter commands through the terminal,
instead of having to open this console, we need to update
our environment variables.
You need to go to the bin folder of the extracted
`.zip` you downloaded and pasted on the `C:` drive
and copy the path.
Then, go to the computer properties, then go to advanced system settings.

Click on environment variables,
go to edit path and paste the path to the extracted
Flutter folder.


As you can see, if you open a new Windows terminal
(also known as `windows prompt`) and
run the `flutter` command, this should prop up.

The rest of the steps should be straight forward.
Just follow the ones on the `Mac` device.
Installing `Android Studio` is the exact same procedure.
If you get stuck `Google` is your friend.
😄
# _Before_ You Start: Run The `Demo App`!
_Before_ you start learning,
yes _before_,
try and run the `demo_app`.
Ensure you have everything installed
from the previous steps.
Then follow these instructions:
In your terminal window,
clone this repo to your computer:
```sh
git clone git@github.com:dwyl/learn-flutter.git
```
Change into the `demo_app` directory:
```sh
cd learn-flutter/demo_app
```
Install the necessary dependencies:
```sh
flutter pub get
```
## Running on an emulator
If you are interested in running the app
on an emulator through VSCode,
you can find more details in the
[0. Setting up a new project](#0-setting-up-a-new-project)
section.
## Running on a real device
If you are interested in running the app
on your Android or iOS device,
you should follow these instructions.
### Android
Running the app on an Android device is quite easy.
You first need to [enable developer options](https://developer.android.com/studio/debug/dev-options)
and USB debugging on your device.
You can tap your `device build number` several times
and the "Developer Options" option will come up.
Now it's just a matter of enabling `USB debugging` as well,
and you should be sorted.
After this, you just plug your phone
to your computer with a USB cable.
You can check if the device is properly connected
by running:
```sh
flutter devices
```
And you should be able to see the connected phone.

If you are using Visual Studio,
you can choose the device
in the bottom bar
and pick your phone.
To run,
simply press `F5` or `Run > Start debugging`
and the build process will commence,
and the app will be running on your phone!
> If this is your first time running on an Android device/emulator,
> it might take some time so Gradle downloads all the needed dependencies,
> binaries and respective SDKs to build the app to be run on the app.
> Just make sure you have a solid internet connection.
> **Do not** interrupt the the building process on the first setup.
> This will result in a corrupted `.gradle` file
> and you need to clean up to get the app working again.
> If this happens to you,
> check the [`learn-flutter`](https://github.com/dwyl/flutter-counter-example/tree/update-info#running-on-a-real-device-) repo
> in the `Running on a real device` section to fix this issue.
### iOS
The process is a wee more complicated
because you need an **Apple ID**
to sign up for a [`Developer Account`](https://developer.apple.com/programs/enroll/)
(you also can only build and run the app if you have a Mac computer).
After this having your Developer Account,
open `XCode` and sign in with your ID
(inside `Preferences > Accounts`).

Inside `Manager Certificates`,
click on the "+" sign and
select `iOS Development`.

After this,
plug the device to your computer.
Find the device in the dropdown (`Window > Organizer`).
Below the team pop-up menu,
click on `Fix Issue`
and then on `XCode` click the `Run` button.
In subsequent runs,
you can deploy with VSCode
or any other IDE.
This certificate setup is only needed on the first time with XCode.
#### Troubleshooting possible errors
If you try to run the app through VSCode
with the real iOS device connected,
you might run into errors before you get it working.
Even if you run `flutter clean` and run `flutter build ios`,
you may *still* get some errors.
Let's go through possible scenarios and how to solve them 😊.
##### `"No valid code signing certificates were found"`
You may get the following output on your terminal:
```
No valid code signing certificates were found
You can connect to your Apple Developer account by signing in with your Apple ID
in Xcode and create an iOS Development Certificate as well as a Provisioning
Profile for your project by:
1- Open the Flutter project's Xcode target with
open ios/Runner.xcworkspace
2- Select the 'Runner' project in the navigator then the 'Runner' target
in the project settings
3- Make sure a 'Development Team' is selected.
- For Xcode 10, look under General > Signing > Team.
- For Xcode 11 and newer, look under Signing & Capabilities > Team.
You may need to:
- Log in with your Apple ID in Xcode first
- Ensure you have a valid unique Bundle ID
- Register your device with your Apple Developer Account
- Let Xcode automatically provision a profile for your app
4- Build or run your project again
5- Trust your newly created Development Certificate on your iOS device
via Settings > General > Device Management > [your new certificate] > Trust
For more information, please visit:
https://developer.apple.com/library/content/documentation/IDEs/Conceptual/
AppDistributionGuide/MaintainingCertificates/MaintainingCertificates.html
Or run on an iOS simulator without code signing
════════════════════════════════════════════════════════════════════════════════
No development certificates available to code sign app for device deployment
```
To resolve this, we just need to follow the instructions!
- open `/{ProjectName}/ios/Runner.xcworkspace` with XCode.
- click on the `Runner` project on the left side pane.
- go to `Signing & Capabilities`.
- set the `Team` to your personal Apple ID account.
- change the `Bundle Identifier` to something valid.
- press `Try Again` button so XCode creates a valid signing.
Congratulations, give yourself a pat on the back, you are **all ready**!
## Windows?
We don't use `Flutter` on `Windows` but plenty of people do.
See:
https://docs.flutter.dev/get-started/install/windows

Extract the file and place the folder in directory `C:`.
It's probably best to create a folder in the directory like this.

This is the console that comes with the Flutter folder
you just downloaded. You can see the devices connected or
even create a project through here.

In order to access Flutter commands through the terminal,
instead of having to open this console, we need to update
our environment variables.
You need to go to the bin folder of the extracted
`.zip` you downloaded and pasted on the `C:` drive
and copy the path.
Then, go to the computer properties, then go to advanced system settings.

Click on environment variables,
go to edit path and paste the path to the extracted
Flutter folder.


As you can see, if you open a new Windows terminal
(also known as `windows prompt`) and
run the `flutter` command, this should prop up.

The rest of the steps should be straight forward.
Just follow the ones on the `Mac` device.
Installing `Android Studio` is the exact same procedure.
If you get stuck `Google` is your friend.
😄
# _Before_ You Start: Run The `Demo App`!
_Before_ you start learning,
yes _before_,
try and run the `demo_app`.
Ensure you have everything installed
from the previous steps.
Then follow these instructions:
In your terminal window,
clone this repo to your computer:
```sh
git clone git@github.com:dwyl/learn-flutter.git
```
Change into the `demo_app` directory:
```sh
cd learn-flutter/demo_app
```
Install the necessary dependencies:
```sh
flutter pub get
```
## Running on an emulator
If you are interested in running the app
on an emulator through VSCode,
you can find more details in the
[0. Setting up a new project](#0-setting-up-a-new-project)
section.
## Running on a real device
If you are interested in running the app
on your Android or iOS device,
you should follow these instructions.
### Android
Running the app on an Android device is quite easy.
You first need to [enable developer options](https://developer.android.com/studio/debug/dev-options)
and USB debugging on your device.
You can tap your `device build number` several times
and the "Developer Options" option will come up.
Now it's just a matter of enabling `USB debugging` as well,
and you should be sorted.
After this, you just plug your phone
to your computer with a USB cable.
You can check if the device is properly connected
by running:
```sh
flutter devices
```
And you should be able to see the connected phone.

If you are using Visual Studio,
you can choose the device
in the bottom bar
and pick your phone.
To run,
simply press `F5` or `Run > Start debugging`
and the build process will commence,
and the app will be running on your phone!
> If this is your first time running on an Android device/emulator,
> it might take some time so Gradle downloads all the needed dependencies,
> binaries and respective SDKs to build the app to be run on the app.
> Just make sure you have a solid internet connection.
> **Do not** interrupt the the building process on the first setup.
> This will result in a corrupted `.gradle` file
> and you need to clean up to get the app working again.
> If this happens to you,
> check the [`learn-flutter`](https://github.com/dwyl/flutter-counter-example/tree/update-info#running-on-a-real-device-) repo
> in the `Running on a real device` section to fix this issue.
### iOS
The process is a wee more complicated
because you need an **Apple ID**
to sign up for a [`Developer Account`](https://developer.apple.com/programs/enroll/)
(you also can only build and run the app if you have a Mac computer).
After this having your Developer Account,
open `XCode` and sign in with your ID
(inside `Preferences > Accounts`).

Inside `Manager Certificates`,
click on the "+" sign and
select `iOS Development`.

After this,
plug the device to your computer.
Find the device in the dropdown (`Window > Organizer`).
Below the team pop-up menu,
click on `Fix Issue`
and then on `XCode` click the `Run` button.
In subsequent runs,
you can deploy with VSCode
or any other IDE.
This certificate setup is only needed on the first time with XCode.
#### Troubleshooting possible errors
If you try to run the app through VSCode
with the real iOS device connected,
you might run into errors before you get it working.
Even if you run `flutter clean` and run `flutter build ios`,
you may *still* get some errors.
Let's go through possible scenarios and how to solve them 😊.
##### `"No valid code signing certificates were found"`
You may get the following output on your terminal:
```
No valid code signing certificates were found
You can connect to your Apple Developer account by signing in with your Apple ID
in Xcode and create an iOS Development Certificate as well as a Provisioning
Profile for your project by:
1- Open the Flutter project's Xcode target with
open ios/Runner.xcworkspace
2- Select the 'Runner' project in the navigator then the 'Runner' target
in the project settings
3- Make sure a 'Development Team' is selected.
- For Xcode 10, look under General > Signing > Team.
- For Xcode 11 and newer, look under Signing & Capabilities > Team.
You may need to:
- Log in with your Apple ID in Xcode first
- Ensure you have a valid unique Bundle ID
- Register your device with your Apple Developer Account
- Let Xcode automatically provision a profile for your app
4- Build or run your project again
5- Trust your newly created Development Certificate on your iOS device
via Settings > General > Device Management > [your new certificate] > Trust
For more information, please visit:
https://developer.apple.com/library/content/documentation/IDEs/Conceptual/
AppDistributionGuide/MaintainingCertificates/MaintainingCertificates.html
Or run on an iOS simulator without code signing
════════════════════════════════════════════════════════════════════════════════
No development certificates available to code sign app for device deployment
```
To resolve this, we just need to follow the instructions!
- open `/{ProjectName}/ios/Runner.xcworkspace` with XCode.
- click on the `Runner` project on the left side pane.
- go to `Signing & Capabilities`.
- set the `Team` to your personal Apple ID account.
- change the `Bundle Identifier` to something valid.
- press `Try Again` button so XCode creates a valid signing.
 > [!NOTE]
>
> `Flutter` apps usually have an ID of `com.example.app`,
> which is not valid by default when running on iOS devices.
> Simply change it to something else and it should work!
> (`com.iamanawesometurtle.app` works, for example)
##### `"Unable to verify app. An internet connection is required to verify the trust of the developer ... This app will not be available until verified."`
Even if XCode properly signs your app,
you might not be able to get it to run on your iPhone.
This is because **the device doesn't trust you as a developer**.
To debug iOS `Flutter` apps,
you need to turn on `Developer Mode` on your iPhone.
You can do that under `Settings > Privacy & Security > Developer Mode`.
> [!NOTE]
>
> `Flutter` apps usually have an ID of `com.example.app`,
> which is not valid by default when running on iOS devices.
> Simply change it to something else and it should work!
> (`com.iamanawesometurtle.app` works, for example)
##### `"Unable to verify app. An internet connection is required to verify the trust of the developer ... This app will not be available until verified."`
Even if XCode properly signs your app,
you might not be able to get it to run on your iPhone.
This is because **the device doesn't trust you as a developer**.
To debug iOS `Flutter` apps,
you need to turn on `Developer Mode` on your iPhone.
You can do that under `Settings > Privacy & Security > Developer Mode`.
 Now you need your iPhone to *trust you*.
To do this,
go to `Settings > General > Device Management`
and click on your developer profile.
After that, click on `Trust YOUR_NAME`.
All of your apps will be trusted by your iPhone 🥳.
Now you need your iPhone to *trust you*.
To do this,
go to `Settings > General > Device Management`
and click on your developer profile.
After that, click on `Trust YOUR_NAME`.
All of your apps will be trusted by your iPhone 🥳.

 ##### `"“iproxy” cannot be opened because the developer cannot be verified"`
Even after all of the above steps,
you may *still* get the following error pop up on your computer.
##### `"“iproxy” cannot be opened because the developer cannot be verified"`
Even after all of the above steps,
you may *still* get the following error pop up on your computer.
 Luckily, this has a rather simple solution!
As per https://stackoverflow.com/questions/71359062/iproxy-cannot-be-opened-because-the-developer-cannot-be-verified,
you really only need to open your terminal,
navigate to the location of the `Flutter SDK`
(which is usually in `~/flutter`),
and run a command!
```sh
cd FLUTTER SDK DIRECTORY/flutter/bin/cache/artifacts/usbmuxd
sudo xattr -d com.apple.quarantine iproxy
```
And you're done!
You can optionally go to your Mac's
`Settings > Privacy & Security`,
scroll down to the `Secutiry` section
and click on the `Open Anyway` button
that appears by a text stating
`"iproxy" was blocked from opening because it is not from an identified developer`.
Luckily, this has a rather simple solution!
As per https://stackoverflow.com/questions/71359062/iproxy-cannot-be-opened-because-the-developer-cannot-be-verified,
you really only need to open your terminal,
navigate to the location of the `Flutter SDK`
(which is usually in `~/flutter`),
and run a command!
```sh
cd FLUTTER SDK DIRECTORY/flutter/bin/cache/artifacts/usbmuxd
sudo xattr -d com.apple.quarantine iproxy
```
And you're done!
You can optionally go to your Mac's
`Settings > Privacy & Security`,
scroll down to the `Secutiry` section
and click on the `Open Anyway` button
that appears by a text stating
`"iproxy" was blocked from opening because it is not from an identified developer`.
 And you're done!
You should be able to run your application on a real iOS device now!
🥳
# Core Principles 🐣
If you have had experience in mobile development prior to `Flutter`,
you will find the learning curve quite manageable,
as `Flutter` foundations are built upon a few principles
that are present in both.
Let's take a look at these.
If you want an in-depth guide and learn every aspect of Flutter,
check the official documentation -> https://flutter.dev/learn
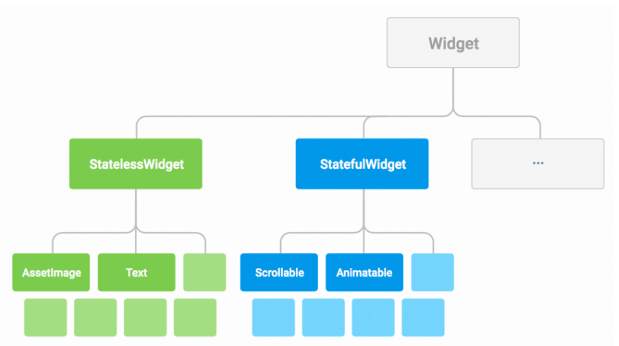
## Widgets
In `Flutter` _everything_ is a **`Widget`**.
A `Widget` is a **UI building block**
you can use to assemble your app.
You will build your UI out of `Widgets`.
They essentially describe
what *the view should look like*
given their current `state`.
If the `state` changes,
the `Widget` rebuilds
and checks the diff
to determine the minimal changes
to transition from `state` `t0` to `t1`.
In the following `GIF`
the sample counter app
contains a total of **6 `Widgets`**:
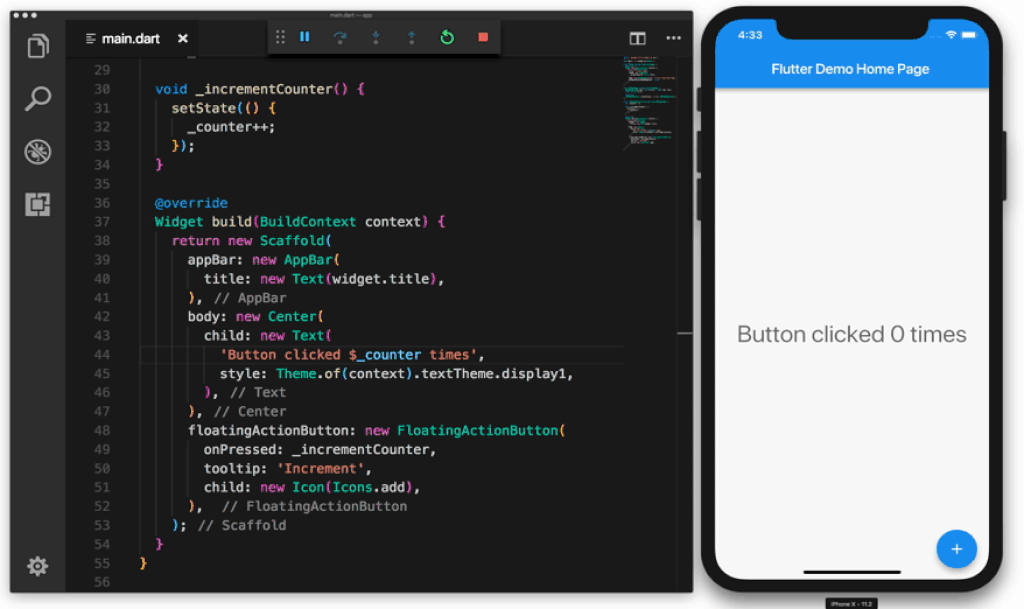
Image attribution: https://uxplanet.org/why-you-should-use-google-flutter-42f2c6ba036c
1. The **container** widget `Scaffold` starting
on line 38 groups all other widgets in the layout.
2. The ***`appBar`*** widget displays the text "Flutter Demo Home Page"
3. The ***`body`*** contains a **child** widget which in turn has **Text** and a **$_counter** placeholder.
4. The ***`floatingActionButton`*** is the button that gets clicked,
it contains a **child** which is the icon.
Examples of Widgets include
dialog windows, buttons, icons, menus, scroll bars and cards.
You can use one of the many built-in Material UI widgets
or create your own from scratch.
A widget can be defined as:
- Physical elements of an application (buttons, menus or bars)
- Visual elements such as colors
- Layout and positioning of elements on the screen using a grid system
Widgets are assembled in declarative hierarchy
which allows us to easily organize
the layout of our App as a series of nested widgets.
Screens are composed of several small widgets that have only one job.
Groups of widgets are assembled together to build a functional application.
For example, a Container widget contains other widgets
that have functions like layout, placement and size.
A basic screen layout is controlled by combining
a container and other smaller widgets as their children.
This was seen in the gif above. The `Scaffhold` widget
warps three widgets.
Remember, Widgets aren't necessarily visual elements within the application.
In the gif above, the second child `body` widget also uses
a widget named `Center` that, as the name implies, centers
its children within the screen. It's *controlling* the
aspects of their child and displaying them centered.
There are several other widgets that have a similar behaviour,
such as padding, alignment, row, columns, and grids.
### Stateless widgets
Widgets are not all stateless. Stateless widgets never change.
They receive arguments from their parent, store them in `final` member variables
(`final` is analogous to a `const`ant variable). When a widget is asked
to `build()`. it uses these stored values and renders.
Here's what a stateless widget looks like:
```dart
class MyAppBar extends StatelessWidget {
const MyAppBar({required this.title, super.key});
// Fields in a Widget subclass are always marked "final".
final Widget title;
@override
Widget build(BuildContext context) {
return Container(
height: 56.0, // in logical pixels
padding: const EdgeInsets.symmetric(horizontal: 8.0),
decoration: BoxDecoration(color: Colors.blue[500]),
// Row is a horizontal, linear layout.
child: Row(
children: [
const IconButton(
icon: Icon(Icons.menu),
tooltip: 'Navigation menu',
onPressed: null, // null disables the button
),
// Expanded expands its child
// to fill the available space.
Expanded(
child: title,
),
const IconButton(
icon: Icon(Icons.search),
tooltip: 'Search',
onPressed: null,
),
],
),
);
}
}
```
We notice straight away the widget is a subclass of
[`StatelessWidget`](https://api.flutter.dev/flutter/widgets/StatelessWidget-class.html).
All widgets have a `Key key` (`super.key`)
as an optional parameter in their constructor.
The `key` is used by the **`Flutter` engine**
at the step of recognizing which widget
in a list has changed.
It's more useful when you have a list of widgets
*of the same type*
that can potentially be removed or inserted.
This `MyAppBar` widget takes as argument a `title`.
This effectively becomes the `field` of the widget,
and is used in the `Expanded` children widget.
Additionally, since this is a widget (more specifically,
a subclass of `Stateless Widget`), we have to
implement the `build()` function.
This is what is rendered.
This widget could be used in a container
and be one of its children
like so:
```dart
MyAppBar(
title: Text(
'Example title',
),
),
```
Simple enough, right?
Here the `MyAppBar` is the parent widget,
`title` is a property
and `Text` is the child widget.
### Stateful widgets
While stateless widgets are static (never change),
**stateful widgets** are dynamic.
For example: they change appearance or behavior
according to events triggered by user interaction
or when it receives data.
For example `Checkbox`, `Slider`, `Textfield`
are examples of
[`StatefulWidget`](https://api.flutter.dev/flutter/widgets/StatefulWidget-class.html).
A widget's state is stored in a `State` object.
Therefore, we _separate_ the widget's state from its appearance.
Whenever the state changes,
the `State` object calls `setState()`,
thus rerendering the widget.
Let's see some code!
```dart
import 'package:flutter/material.dart';
class Counter extends StatefulWidget {
// Counter is the Stateful Widget, different from the appearance.
// It holds the state configuration and values
// provided by the parent and used by the build method
// of the State (no values are provided in this instance)
// Fields in a Widget subclass are always marked
const Counter({super.key});
@override
State createState() => _CounterState();
}
class _CounterState extends State {
int _counter = 0;
void _increment() {
setState(() {
// This call to setState tells the Flutter framework
// that something has changed in this State, which
// causes it to rerun the build method below so that
// the display can reflect the updated values. If you
// change _counter without calling setState(), then
// the build method won't be called again, and so
// nothing would appear to happen.
_counter++;
});
}
@override
Widget build(BuildContext context) {
// This method is rerun every time setState is called,
// for instance, as done by the _increment method above.
// The Flutter framework has been optimized to make
// rerunning build methods fast, so that you can just
// rebuild anything that needs updating rather than
// having to individually changes instances of widgets.
return Row(
mainAxisAlignment: MainAxisAlignment.center,
children: [
ElevatedButton(
onPressed: _increment,
child: const Text('Increment'),
),
const SizedBox(width: 16),
Text('Count: $_counter'),
],
);
}
}
void main() {
runApp(
const MaterialApp(
home: Scaffold(
body: Center(
child: Counter(),
),
),
),
);
}
```
Let's unpack the code above.
The `StatefulWidget` and `State` are separate objects.
The former (being the first one)
declares its state by using the `State` object.
The `State` object is declared right after, initializing an `int _counter` at `0`.
It declares an `_increment()` function that calls `setState()`
(indicating the state is going to be changed) and increments the `_counter` variable.
As with any widget, the `build()` method
makes use of the `_counter` variable
to display the number of times the button is pressed.
Everytime it is pressed,
the `_increment()` function is called,
effectively changing the state and incrementing it.
## Layout
As we've already stated,
the core of `Flutter` are widgets.
In fact, almost everything is a widget - even layout models.
The things you see are widgets.
But things that you *don't see* are also widgets.
We mentioned this before but we'll understand it better now.
For any web or mobile app development,
we need to create layouts to organize our components in and
make it look _shiny_ ✨ and _good-looking_ 🎨.
This example is taken from the official docs:
https://docs.flutter.dev/development/ui/layout#lay-out-a-widget
Layout | Layout with padding and delimited borders
:-------------------------:|:-------------------------:
 | 
So, you may ask,
**how many widgets are there in this menu**?
Great question!
And you're done!
You should be able to run your application on a real iOS device now!
🥳
# Core Principles 🐣
If you have had experience in mobile development prior to `Flutter`,
you will find the learning curve quite manageable,
as `Flutter` foundations are built upon a few principles
that are present in both.
Let's take a look at these.
If you want an in-depth guide and learn every aspect of Flutter,
check the official documentation -> https://flutter.dev/learn
## Widgets
In `Flutter` _everything_ is a **`Widget`**.
A `Widget` is a **UI building block**
you can use to assemble your app.
You will build your UI out of `Widgets`.
They essentially describe
what *the view should look like*
given their current `state`.
If the `state` changes,
the `Widget` rebuilds
and checks the diff
to determine the minimal changes
to transition from `state` `t0` to `t1`.
In the following `GIF`
the sample counter app
contains a total of **6 `Widgets`**:

Image attribution: https://uxplanet.org/why-you-should-use-google-flutter-42f2c6ba036c
1. The **container** widget `Scaffold` starting
on line 38 groups all other widgets in the layout.
2. The ***`appBar`*** widget displays the text "Flutter Demo Home Page"
3. The ***`body`*** contains a **child** widget which in turn has **Text** and a **$_counter** placeholder.
4. The ***`floatingActionButton`*** is the button that gets clicked,
it contains a **child** which is the icon.
Examples of Widgets include
dialog windows, buttons, icons, menus, scroll bars and cards.
You can use one of the many built-in Material UI widgets
or create your own from scratch.
A widget can be defined as:
- Physical elements of an application (buttons, menus or bars)
- Visual elements such as colors
- Layout and positioning of elements on the screen using a grid system
Widgets are assembled in declarative hierarchy
which allows us to easily organize
the layout of our App as a series of nested widgets.

Screens are composed of several small widgets that have only one job.
Groups of widgets are assembled together to build a functional application.
For example, a Container widget contains other widgets
that have functions like layout, placement and size.
A basic screen layout is controlled by combining
a container and other smaller widgets as their children.
This was seen in the gif above. The `Scaffhold` widget
warps three widgets.
Remember, Widgets aren't necessarily visual elements within the application.
In the gif above, the second child `body` widget also uses
a widget named `Center` that, as the name implies, centers
its children within the screen. It's *controlling* the
aspects of their child and displaying them centered.
There are several other widgets that have a similar behaviour,
such as padding, alignment, row, columns, and grids.
### Stateless widgets
Widgets are not all stateless. Stateless widgets never change.
They receive arguments from their parent, store them in `final` member variables
(`final` is analogous to a `const`ant variable). When a widget is asked
to `build()`. it uses these stored values and renders.
Here's what a stateless widget looks like:
```dart
class MyAppBar extends StatelessWidget {
const MyAppBar({required this.title, super.key});
// Fields in a Widget subclass are always marked "final".
final Widget title;
@override
Widget build(BuildContext context) {
return Container(
height: 56.0, // in logical pixels
padding: const EdgeInsets.symmetric(horizontal: 8.0),
decoration: BoxDecoration(color: Colors.blue[500]),
// Row is a horizontal, linear layout.
child: Row(
children: [
const IconButton(
icon: Icon(Icons.menu),
tooltip: 'Navigation menu',
onPressed: null, // null disables the button
),
// Expanded expands its child
// to fill the available space.
Expanded(
child: title,
),
const IconButton(
icon: Icon(Icons.search),
tooltip: 'Search',
onPressed: null,
),
],
),
);
}
}
```
We notice straight away the widget is a subclass of
[`StatelessWidget`](https://api.flutter.dev/flutter/widgets/StatelessWidget-class.html).
All widgets have a `Key key` (`super.key`)
as an optional parameter in their constructor.
The `key` is used by the **`Flutter` engine**
at the step of recognizing which widget
in a list has changed.
It's more useful when you have a list of widgets
*of the same type*
that can potentially be removed or inserted.
This `MyAppBar` widget takes as argument a `title`.
This effectively becomes the `field` of the widget,
and is used in the `Expanded` children widget.
Additionally, since this is a widget (more specifically,
a subclass of `Stateless Widget`), we have to
implement the `build()` function.
This is what is rendered.
This widget could be used in a container
and be one of its children
like so:
```dart
MyAppBar(
title: Text(
'Example title',
),
),
```
Simple enough, right?
Here the `MyAppBar` is the parent widget,
`title` is a property
and `Text` is the child widget.
### Stateful widgets
While stateless widgets are static (never change),
**stateful widgets** are dynamic.
For example: they change appearance or behavior
according to events triggered by user interaction
or when it receives data.
For example `Checkbox`, `Slider`, `Textfield`
are examples of
[`StatefulWidget`](https://api.flutter.dev/flutter/widgets/StatefulWidget-class.html).
A widget's state is stored in a `State` object.
Therefore, we _separate_ the widget's state from its appearance.
Whenever the state changes,
the `State` object calls `setState()`,
thus rerendering the widget.
Let's see some code!
```dart
import 'package:flutter/material.dart';
class Counter extends StatefulWidget {
// Counter is the Stateful Widget, different from the appearance.
// It holds the state configuration and values
// provided by the parent and used by the build method
// of the State (no values are provided in this instance)
// Fields in a Widget subclass are always marked
const Counter({super.key});
@override
State createState() => _CounterState();
}
class _CounterState extends State {
int _counter = 0;
void _increment() {
setState(() {
// This call to setState tells the Flutter framework
// that something has changed in this State, which
// causes it to rerun the build method below so that
// the display can reflect the updated values. If you
// change _counter without calling setState(), then
// the build method won't be called again, and so
// nothing would appear to happen.
_counter++;
});
}
@override
Widget build(BuildContext context) {
// This method is rerun every time setState is called,
// for instance, as done by the _increment method above.
// The Flutter framework has been optimized to make
// rerunning build methods fast, so that you can just
// rebuild anything that needs updating rather than
// having to individually changes instances of widgets.
return Row(
mainAxisAlignment: MainAxisAlignment.center,
children: [
ElevatedButton(
onPressed: _increment,
child: const Text('Increment'),
),
const SizedBox(width: 16),
Text('Count: $_counter'),
],
);
}
}
void main() {
runApp(
const MaterialApp(
home: Scaffold(
body: Center(
child: Counter(),
),
),
),
);
}
```
Let's unpack the code above.
The `StatefulWidget` and `State` are separate objects.
The former (being the first one)
declares its state by using the `State` object.
The `State` object is declared right after, initializing an `int _counter` at `0`.
It declares an `_increment()` function that calls `setState()`
(indicating the state is going to be changed) and increments the `_counter` variable.
As with any widget, the `build()` method
makes use of the `_counter` variable
to display the number of times the button is pressed.
Everytime it is pressed,
the `_increment()` function is called,
effectively changing the state and incrementing it.
## Layout
As we've already stated,
the core of `Flutter` are widgets.
In fact, almost everything is a widget - even layout models.
The things you see are widgets.

But things that you *don't see* are also widgets.
We mentioned this before but we'll understand it better now.
For any web or mobile app development,
we need to create layouts to organize our components in and
make it look _shiny_ ✨ and _good-looking_ 🎨.
This example is taken from the official docs:
https://docs.flutter.dev/development/ui/layout#lay-out-a-widget
Layout | Layout with padding and delimited borders
:-------------------------:|:-------------------------:
 | 
So, you may ask,
**how many widgets are there in this menu**?
Great question!
There are visible widgets but also widgets that
*help us* lay out the items correctly, center them and space
them evenly to make it look good.
Here's how the widget tree looks like for this menu:
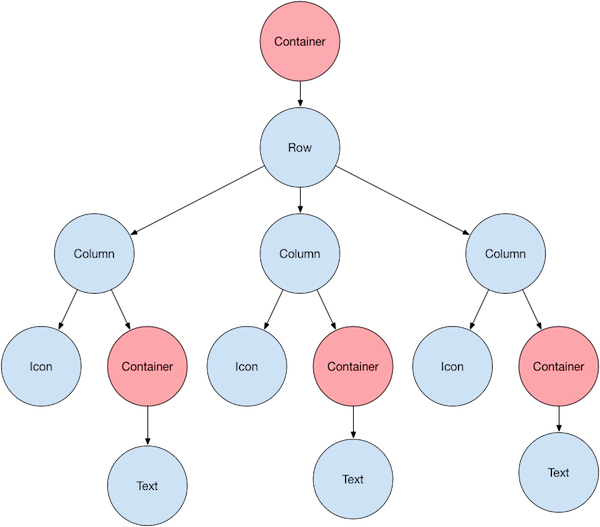
The **pink nodes** are **containers**.
They are **_not_ visible**
but help us **customize** its **child widget**
by adding
`padding`, `margin`, `border`, `background color`, etc...
Let's see a code example of an invisible widget that will
center a block of `text` in the middle of the screen:
```dart
class MyApp extends StatelessWidget {
const MyApp({super.key});
@override
Widget build(BuildContext context) {
return Container(
decoration: const BoxDecoration(color: Colors.white),
child: const Center(
child: Text(
'Hello World',
textDirection: TextDirection.ltr,
style: TextStyle(
fontSize: 32,
color: Colors.black87,
),
),
),
);
}
}
```
The `Center` widget centers all its children inside of it.
`Center` is *invisible* but is a widget nonetheless.
This yields the following result:
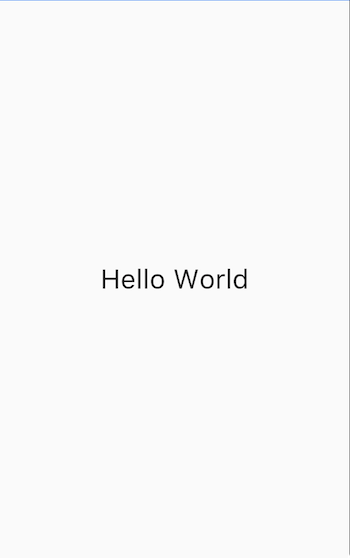
See? Isn't it so simple? 🎉
You can create _any_ Layout you wish just
by encapsulating widgets
and ordering them accordingly.
## Assets
Sometimes we need images and assets to be displayed in our App.
Common resources are:
image files,
static data (`JSON` files),
videos, buttons and icons.
In Flutter, we use a `pubspec.yaml` file
(often located at the root of the project) to
require assets in the app.
```yaml
flutter:
assets:
- directory/
- assets/my_icon.png
```
> There's a nuanced behavior when loading assets.
> If you have two files ` .../graphics/background.png` and
> `.../graphics/dark/background.png` and the `pubspec.yaml` file
> contains the following:
> ```yaml
> flutter:
> assets:
> - graphics/background.png
> ```
> Both are imported and included in the asset bundle.
> One is considered the **main asset** and the other
> a **variant**.
> This behavior is useful for images of different resolutions.
There are two ways of accessing the loaded access.
Each `Flutter` app has a `RootBundle`
for easy access to the main asset bundle.
You can import directly
using the `rootBundle` global static.
However, inside a widget context,
it's recommended to obtain the asset bundle
for the widget `BuildContext` using the
[`DefaultAssetBundle`](https://api.flutter.dev/flutter/widgets/DefaultAssetBundle-class.html).
This approach allows the parent widget to substitute a different
asset bundle at runtime, which is useful for localization
or testing purposes.
Here's a code example for the `rootBundle` approach:
```dart
import 'package:flutter/services.dart' show rootBundle;
Future loadAsset() async {
return await rootBundle.loadString('assets/config.json');
}
```
Here's a code example
for the recommended approach
inside a widget:
```dart
String data = await DefaultAssetBundle.of(context).loadString("assets/data.json");
final jsonResult = jsonDecode(data); //latest Dart
```
## Navigation and routing
Most web and mobile apps aren't just a single page/screen.
The person using the App
needs to navigate between screens to
perform several distinct actions,
be it checking the details of a product
or shopping cart.
`Flutter` provides a `Navigator` widget
to display screens as a stack,
using the native transition animations of the target device.
Navigating between screens necessitates the route's
`BuildContext` (which can be accessed through the widget)
and is made by calling methods like
`push()`
and
`pop()`.
Here's code showcasing navigating between two routes:
```dart
import 'package:flutter/material.dart';
void main() {
runApp(const MaterialApp(
title: 'Navigation Basics',
home: FirstRoute(),
));
}
class FirstRoute extends StatelessWidget {
const FirstRoute({super.key});
@override
Widget build(BuildContext context) {
return Scaffold(
appBar: AppBar(
title: const Text('First Route'),
),
body: Center(
child: ElevatedButton(
child: const Text('Open route'),
onPressed: () {
Navigator.push(
context,
MaterialPageRoute(builder: (context) => const SecondRoute()),
);
},
),
),
);
}
}
class SecondRoute extends StatelessWidget {
const SecondRoute({super.key});
@override
Widget build(BuildContext context) {
return Scaffold(
appBar: AppBar(
title: const Text('Second Route'),
),
body: Center(
child: ElevatedButton(
onPressed: () {
Navigator.pop(context);
},
child: const Text('Go back!'),
),
),
);
}
}
```
This basic code example showcases two routes,
each one containing only a single button.
Tapping the one on the first route
will navigate to the second route.
Clicking on the button of the second route
will return the user to the first route.
We are using the `Navigator.push()` and `Navigator.pop()`
functions to achieve this, by passing the context of
the widget.
Additionally, we are leveraging `MaterialPageRoute` to
transition between routes using a platform-specific animation
according to the [Material Design guidelines](https://m3.material.io/).
Here's how it should look!

If your application has
advanced navigation and routing requirements
(which is often the case with web apps
that use direct links to each screen,
or an app with multiple `Navigator` widgets),
consider using a routing package like
[`go_router`](https://pub.dev/packages/go_router).
This package allows parsing the route path
and configure the `Navigator`
whenever an app receives, a deep link.
## Networking
For most apps, fetching data from the Internet is a _must_.
Luckily, fetching data from the Internet is a breeze.
Let's do it!
Firstly, we need to add the
[`http`](https://pub.dev/packages/http)
package to the dependencies section
in the `pubspec.yaml` file.
This file can be found at the root of your project.
Add the package to the dependency list and import it:
```yaml
dependencies:
http: 0.13.5
```
Then in your project file
add the following `import` statement
to _use_ the package:
```dart
import 'package:http/http.dart' as http;
```
We also need to change the
`AndroidManifest.xml` file
to add Internet permission on Android devices.
This file can be found in the
`/android/app/src/main`
on newly created projects.
Add the following line:
```xml
```
Now, to make a network request,
use code similar to the following:
```dart
Future fetchAlbum() {
return http.get(Uri.parse('https://jsonplaceholder.typicode.com/todos/1'));
}
```
Calling `http.get()` returns a
[`Future`](https://github.com/dwyl/learn-dart#asynchronous-events)
that contains a `Response`.
`Future` is a class to work with asynchronous operations.
It represents a potential value that will occur in the future.
While `http.Response` has our data,
it's much more useful to translate it
to a logical class
that has all the **fields** of the data
we expect to receive from the **REST API**.
We can convert `http.Response` to a `Todo` class,
representing a "todo item".
Let's create that class!
```dart
class Todo {
final int id;
final String title;
final bool completed
const Todo({
required this.id,
required this.title,
required this.completed
});
factory Todo.fromJson(Map json) {
return Todo(
id: json['id'],
title: json['title'],
completed: json['completed'],
);
}
}
```
We can create a function
that makes the `http request`
and, if it is ***successful***,
tries to parse the data
and create a `Todo` object
or raise an an error
if the `http request` is
***unsuccessful***.
```dart
Future fetchTodos() async {
final response = await http
.get(Uri.parse('https://jsonplaceholder.typicode.com/todos/1'));
if (response.statusCode == 200) {
// If the server did return a 200 OK response,
// then parse the JSON.
return Todo.fromJson(jsonDecode(response.body));
} else {
// If the server did not return a 200 OK response,
// then throw an exception.
throw Exception('Failed to load todos');
}
}
```
How would we call this inside a widget?
We could do this inside `initState()`!
It is called exactly one time and never again!
Do **not** put an API call in the `build()` method
(unless you know what you are doing).
This method is called every time a render occurs,
which is quite often!
```dart
class _MyAppState extends State {
late Future futureTodo;
@override
void initState() {
super.initState();
futureTodo = fetchTodo();
}
// ···
}
```
Finally, to display the data,
we use the `FutureBuilder` widget.
As the name implies,
it's a widget that handles async data operations.
```dart
FutureBuilder(
future: futureTodo,
builder: (context, snapshot) {
if (snapshot.hasData) {
return Text(snapshot.data!.title);
} else if (snapshot.hasError) {
return Text('${snapshot.error}');
}
// By default, show a loading spinner.
return const CircularProgressIndicator();
},
)
```
The `future` parameter
relates to object we want to work with.
In this case, it is a parsed `Todo` object.
The `builder` function tells `Flutter`
what needs to be rendered,
depending on the current state of `Future`,
which can be *loading*, *success* or *error*.
Depending on the result of the operation, we
either show the error, the data or a loading animation
while we wait for the http request to fulfill.
Isn't it easy? 🤓
## Local databases
Sometimes, we need to persist and query
large amounts of data on the local device.
In these cases we use database
instead of a local file or key-value store.
In this walkthrough,
we present two alternatives:
`SQLite` and `ObjectBox`.
### SQLite
SQLite is one of the most popular methods for storing data locally.
For this demo, we will use the package
[`sqflite`](https://pub.dev/packages/sqflite).
Sqflite is one of the most used and updated packages
to connect to SQLite databases in Flutter.
#### 1. Add the dependencies
To work with SQLite databases, we need
to import two dependencies.
We'll use `sqflite` to interact with the `SQLite` database,
and
[`path`](https://pub.dev/packages/path)
to define the location
for storing the database on disk.
```dart
dependencies:
flutter:
sdk: flutter
sqflite:
path:
```
And import the packages in the file you are working in.
```dart
import 'dart:async';
import 'package:flutter/widgets.dart';
import 'package:path/path.dart';
import 'package:sqflite/sqflite.dart';
```
#### 2. Define a Model
Let's take a look at the data we are going to store.
Let's define a class for the table we are going to create
in SQLite.
```dart
class Item {
final int id;
final String text;
final bool completed;
const Item({
required this.id,
required this.text,
required this.completed,
});
// Convert an Item into a Map. The keys must correspond to the names of the
// columns in the database.
Map toMap() {
return {
'id': id,
'text': text,
'completed': completed,
};
}
// Implement toString to make it easier to see information about
// each item when using the print statement.
@override
String toString() {
return 'Item{id: $id, text: $text, completed: $completed}';
}
}
```
#### 3. Open connection to the database
To open a connection to the SQLite database,
we are going to define the path to the database file
using `path`
**and**
open the database with `sqflite`.
```dart
WidgetsFlutterBinding.ensureInitialized();
// Open the database and store the reference.
final database = openDatabase(
// Set the path to the database. Note: Using the `join` function from the
// `path` package is best practice to ensure the path is correctly
// constructed for each platform.
join(await getDatabasesPath(), 'item_database.db'),
);
```
#### 4. Creating table
To create the table to store our items, we must first
verify the number of columns and type refer
exactly to the ones we defined in the class.
After this, it's just a matter of running the appropriate
`SQL` expression to create the table.
```dart
final database = openDatabase(
join(await getDatabasesPath(), 'item_database.db'),
// When the database is first created, create a table to store items.
onCreate: (db, version) {
// Run the CREATE TABLE statement on the database.
return db.execute(
'CREATE TABLE items(id INTEGER PRIMARY KEY, text TEXT, completed INTEGER)',
);
},
// Set the version. This executes the onCreate function and provides a
// path to perform database upgrades and downgrades.
version: 1,
);
```
#### 5. CRUD operations
Now that we have a database created, alongside the
table, to create, update, list and insert Items is
quite easy! Check the following piece of code.
```dart
Future crudOperations(Item item) async {
// Get a reference to the database
final db = await database;
// Insert an Item into the table.
await db.insert('items', item.toMap())
// Retrieve list of items
// and convert the List into a List- .
final List> maps = await db.query('items');
Item[] items = List.generate(maps.length, (i) {
return Item(
id: maps[i]['id'],
name: maps[i]['text'],
age: maps[i]['completed'],
);
});
// Update the given Item.
await db.update(
'items',
item.toMap(),
// Ensure that the Item has a matching id.
where: 'id = ?',
// Pass the Item's id as a whereArg to prevent SQL injection.
whereArgs: [item.id],
);
// Remove the Item from the database.
await db.delete(
'items',
// Use a `where` clause to delete a specific item.
where: 'id = ?',
// Pass the Item's id as a whereArg to prevent SQL injection.
whereArgs: [id],
);
}
```
And there you have it! Here is a quick rundown of the
process of creating a database, a table and
applying CRUD operations on it. You can leverage
this database to hold large amounts of data locally
(up to a limit, of course) instead of relying
on common files.
### `ObjectBox`
There are alternatives to `SQLite`,
such as Hive and `ObjectBox`.
In this section, we are going to just reference
`ObjectBox` so the user knows there isn't one single
database option.
`ObjectBox` provides a NoSQL database that uses a
pure Dart API, so there is no need to learn
and write SQL expressions. There are performance
advantages to using this library. Make sure
to read the [package docs](https://github.com/objectbox/objectbox-dart#flutter-database-for-fast-dart-object-persistence-)
to find out if this option is best for you.
Here is how basic setup and CRUD
operations would work using `ObjectBox`.
```dart
// Annotate a Dart class to create a box
@Entity()
class Person {
@Id()
int id;
String name;
Person({this.id = 0, required this.name});
}
// Put a new object into the box
var person = Person(name: "Joe Green");
final id = box.put(person);
// Get the object back from the box
person = box.get(id)!;
// Update the object
person.name = "Joe Black";
box.put(person);
// Query for objects
final query = (box.query(Person_.name.equal("Joe Black"))
..order(Person_.name)).build();
final people = query.find();
query.close();
// Remove the object from the box
box.remove(person.id);
```
## State management
We have previously mentioned state within a widget.
In stateful widgets, the state and how/when it changes
determines how many times the widget is rendered.
State that can be neatly contained in a single widget
is referred as "local state" or **ephemeral state**.
Other parts of the widget tree seldom need to access this kind of state.
However, there is state that is *not ephemeral*
and usually is needed across many widgets of the app.
This shared state is usually called **application state**.
Examples of these are user preferences or a shopping cart
in an e-commerce app.
Consider the following gif, taken directly
from the `Flutter` docs
-> https://docs.flutter.dev/development/data-and-backend/state-mgmt/intro
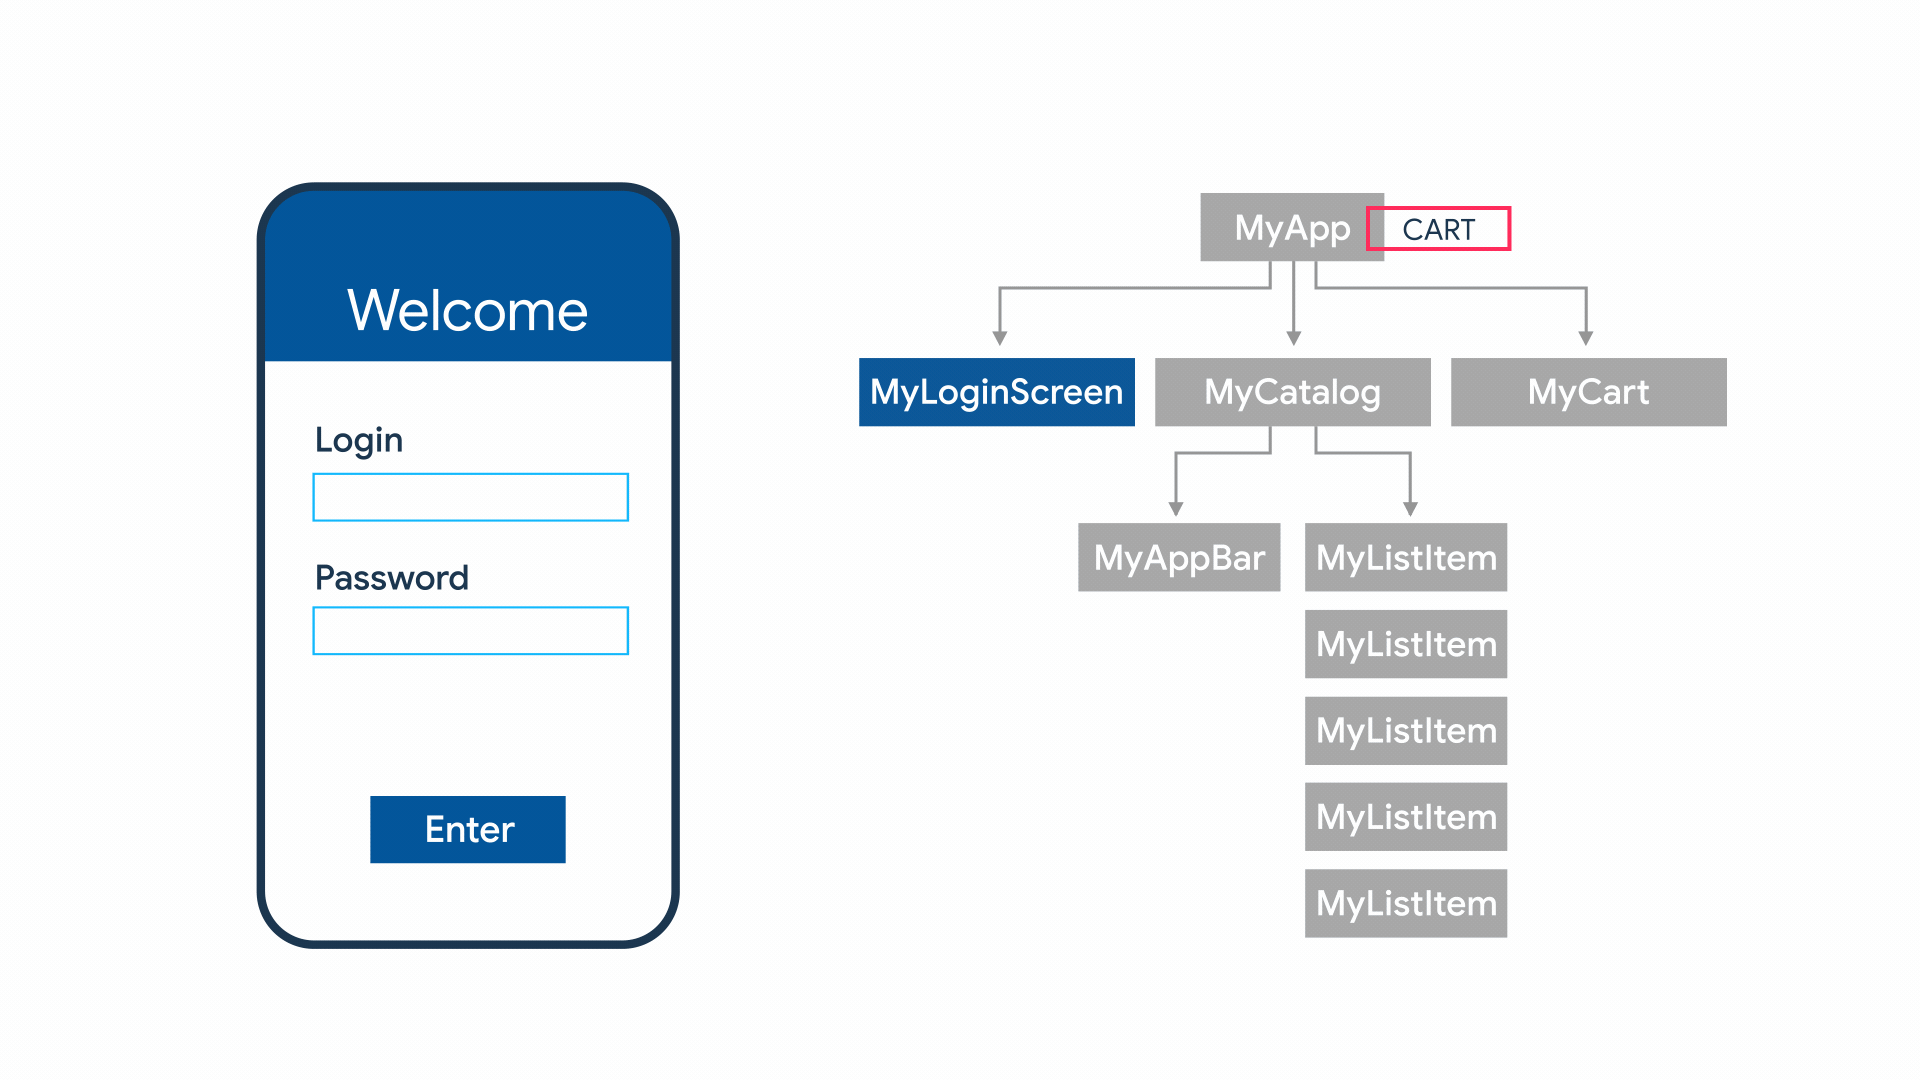
Each widget in the widget tree might have its own
local state but there's a piece of *application state*
(i.e. shared state) in the form of a cart.
This cart is accessible from any widget of the app -
in this case, the `MyCart` widget uses it to list what
item was added to it.
There are [many approaches to state management](https://docs.flutter.dev/development/data-and-backend/state-mgmt/options),
so it's up to you to decide which options are best
suited for your use case. Many people recommend
[`Provider`](https://pub.dev/packages/provider) or
[`Riverpod`](https://riverpod.dev/).
[Bloc](https://bloclibrary.dev/#/) is also an increasingly
popular alternative which forces the logic and the UI
to be implemented separately.
State management and which alternative is best
is a [big point of contention](https://www.reddit.com/r/FlutterDev/comments/w4osgi/for_you_what_is_the_best_state_management_with/)
between developers. There is no bad option, just choose whichever
you think it's best.
We shall not delve too much into state management as
shared app state is not a beginner-friendly topic
to learn and is often very opinionated. As long
as you understood *what it is*, it's awesome! :tada:
### Dependency injection
You might be wondering what dependency injection
has to do with the aforementioned state management libraries.
You'll see why this effects how the code is structure and
how it effects testing.
> "[Dependency injection](https://en.wikipedia.org/wiki/Dependency_injection)
> is a design pattern
> in which an object or function
> receives other objects or functions that it depends on."
Let's write an example of dependency injection in Flutter
in its simplest form.
```dart
class LoginService {
Api api;
// Inject the API through the constructor
LoginService(this.api)
}
class Api {}
```
Here, the `LoginService` receives the `Api` object
in the constructor, something it depends on.
This is no problem if the `LoginService` is one or
two levels deep from a widget it uses it.
However, it does become a problem when it's
ten levels deep.
```sh
Widget 1 -> Widget 2 -> Widget 3 -> Widget 4
```
Let's consider we have a `Widget X`, that returns a list of albums.
If `Widget 4` needed these list of albums, it would need `Widget X`.
To do this, `Widget X` would need to be passed on
from `Widget 1` all the way to `Widget 4` so `Widget 4` could
use it. This is not sustainable and it can become nightmarish.
Instead of using a [singleton](https://en.wikipedia.org/wiki/Singleton_pattern)
which can often lead to unexpected behaviour and
harder to test codebase, we need to use *dependency injection*.
But in cases of deeply nested widgets, using packages like
[`get_it`](https://pub.dev/packages/get_it) or
[`Riverpod`](https://riverpod.dev/) or
[`Provider`](https://pub.dev/packages/provider)
are the way to go, as they give us much better
control over our dependencies without any of the
drawbacks of creating our own singletons with `Singleton.instance`,
allowing us to inject dependencies and accessin values
in deeply nested widgets without chaining dependencies
along the widget tree.
This is also useful for mocking objects in testing.
If you are interested in how you would
implement these, we highly recommend taking a look
at this video -> https://www.youtube.com/watch?v=vBT-FhgMaWM&ab_channel=FilledStacks .
It's a 10 minute video that explains this topic in
simple terms and shows implementation examples using
`get_it` and `Provider`. Great stuff!
# Testing 🧪
As in all programming languages, frameworks or platforms,
the secret to a successful application is to test it _extensively_.
Implementing tests is not only advantageous to catch bugs
but also avoid regression when implementing new features.
> To learn more about an example of using TDD:
> https://github.com/dwyl/flutter-counter-example
> If you are interested in a more thorough introduction
> to testing and debugging in various IDEs with Flutter, please
> take a look at the [official docs](https://docs.flutter.dev/testing/debugging)
## Unit testing
Unit testing are handy to verify the behaviour
of a single function/method/class.
Let's add some unit tests in Flutter, shall we?
Firstly, we ought to import the [`test`](https://pub.dev/packages/test)
which offers the core functionality for writing tests in Dart.
```dart
dev_dependencies:
test: 1.22.0
```
And now, let's create a simple class and a referring test
file to test it. Create two files so you have the following
folder structure.
```
counter_app/
lib/
counter.dart
test/
counter_test.dart
```
In `counter.dart`, add the following piece of code.
```dart
class Counter {
int value = 0;
void increment() => value++;
void decrement() => value--;
}
```
In `counter_test.dart`, add the following:
```dart
// Import the test package and Counter class
import 'package:counter_app/counter.dart';
import 'package:test/test.dart';
void main() {
group('Counter', () {
test('value should start at 0', () {
expect(Counter().value, 0);
});
test('value should be incremented', () {
final counter = Counter();
counter.increment();
expect(counter.value, 1);
});
test('value should be decremented', () {
final counter = Counter();
counter.decrement();
expect(counter.value, -1);
});
});
}
```
We can group tests using the `group()` function. In each
`test()` we use the `expect()` function to compare
expected assertions.
You can type the following command to run the tests
we just created:
```sh
flutter test test/counter_test.dart
```
### Mock testing
Sometimes functions fetch data from web services or databases.
When we are unit testing these, it is inconvenient to do so
because calling external dependencies may slow down
the execution time. Needless to say, this external dependency
may sometimes be down, amongst other scenarios.
In these situations, it is useful to **mock**
these dependencies. In Flutter, the *de facto* way of
mocking classes and objects is using the
[`mockito`](https://pub.dev/packages/mockito)
package.
In this small section, we are going to add
this dependency, create a function to test
and mock a test file with a mock `http.Client`.
Firstly, add the `mockito` package to the `pubspec.yaml`
file, along with the `flutter_test` dependency
(will provide core testing functionalities) and the
`http` package for HTTP requests.
Do take note that each test dependency will be
added to the `dev_dependencies` section of the file.
```dart
dependencies:
http: 0.13.5
dev_dependencies:
flutter_test:
sdk: flutter
mockito: 5.3.2
build_runner: 2.3.2
```
Now let's create a function to test.
This function will fetch data from the internet.
```dart
Future fetchAlbum(http.Client client) async {
final response = await client
.get(Uri.parse('https://jsonplaceholder.typicode.com/albums/1'));
if (response.statusCode == 200) {
// If the server did return a 200 OK response,
// then parse the JSON.
return Album.fromJson(jsonDecode(response.body));
} else {
// If the server did not return a 200 OK response,
// then throw an exception.
throw Exception('Failed to load album');
}
}
```
You might have noticed the `http.Client` is provided
to the argument. This makes it so that the client
that fetches data changes according to any situation.
In Flutter, we can provide an `http.IOClient`.
For testing, we can pass a mock `http.Client`.
In a test file, we will add an an annotation to the main function
to generate a `MockClient` class with `mockito`.
According to the argument passed to the annotation,
the generated `MockClient` class will implement it.
When generating, the mocks will be located in a file
named `XX_test.mocks.dart`. We will import this file to use them.
For now, create a test file where we will add tests.
```dart
import 'package:http/http.dart' as http;
import 'package:mocking/main.dart';
import 'package:mockito/annotations.dart';
// Generate a MockClient using the Mockito package.
// Create new instances of this class in each test.
@GenerateMocks([http.Client])
void main() {
}
```
Now run `flutter pub run build_runner build`.
This command will generate the mocks in `XX_test.mocks.dart`.
Now we can use these mocks in our tests!
Let's add two: one for a successful request and
another for a failing one, and catch the raised exception.
```dart
import 'package:flutter_test/flutter_test.dart';
import 'package:http/http.dart' as http;
import 'package:mocking/main.dart';
import 'package:mockito/annotations.dart';
import 'package:mockito/mockito.dart';
import 'fetch_album_test.mocks.dart';
// Generate a MockClient using the Mockito package.
// Create new instances of this class in each test.
@GenerateMocks([http.Client])
void main() {
group('fetchAlbum', () {
test('returns an Album if the http call completes successfully', () async {
final client = MockClient();
// Use Mockito to return a successful response when it calls the
// provided http.Client.
when(client
.get(Uri.parse('https://jsonplaceholder.typicode.com/albums/1')))
.thenAnswer((_) async =>
http.Response('{"userId": 1, "id": 2, "title": "mock"}', 200));
expect(await fetchAlbum(client), isA());
});
test('throws an exception if the http call completes with an error', () {
final client = MockClient();
// Use Mockito to return an unsuccessful response when it calls the
// provided http.Client.
when(client
.get(Uri.parse('https://jsonplaceholder.typicode.com/albums/1')))
.thenAnswer((_) async => http.Response('Not Found', 404));
expect(fetchAlbum(client), throwsException);
});
});
}
```
In these tests, we are **importing** the generated mocks
(`fetch_album_test.mocks.dart`).
Plus, we create the `MockClient()`, define the behaviour
we expect the mock to do, and then pass it to the function,
effectively asserting its output.
We can run the tests and see if they fail or not
by running
```sh
flutter test test/fetch_album_test.dart
```
Congratulations! You just mocked a `http.Client` object
and properly tested a function that used an external dependency.
`mockito` has many other features.
You can read about them
[in their documentation](https://pub.dev/packages/mockito).
## Integration testing
While unit testing is useful for testing individual
classes, functions or widgets, they don't
test how all of these *work together*, as a whole.
These tasks are captured and tested
with **integration tests**.
> There is a concept in Flutter that is **widget testing**.
> Widget testing tests a single widget while
> integration testing can test a complete app or large parts of it.
> Integration testing will require *a device* or *emulator*.
> So it should be used sparingly and to capture behaviours
> that were missed by unit testing and widget testing.
>
> Implementation-wise, widget testing uses the
> `testWidget` function, much like integration tests. So they can be similar.
We can luckily leverage the SDK's
[`integration_test`](https://github.com/flutter/flutter/tree/main/packages/integration_test)
package to do this.
Let's start by creating a super simple app.
This app will just have a button and a counter
displaying the number of time the button was clicked.
But, before that, let's add the needed dependencies.
We'll be adding the `integration_test` and `flutter_test`
packages to the `dev_dependencies` section of `pubspec.yaml`.
```yaml
dev_dependencies:
integration_test:
sdk: flutter
flutter_test:
sdk: flutter
```
Now, let's create our app. In `lib/app.dart`,
let's use the following piece of code.
```dart
import 'package:flutter/material.dart';
void main() => runApp(const MyApp());
class MyApp extends StatelessWidget {
const MyApp({super.key});
@override
Widget build(BuildContext context) {
return const MaterialApp(
title: 'Counter App',
home: MyHomePage(title: 'Counter App Home Page'),
);
}
}
class MyHomePage extends StatefulWidget {
const MyHomePage({super.key, required this.title});
final String title;
@override
State createState() => _MyHomePageState();
}
class _MyHomePageState extends State {
int _counter = 0;
void _incrementCounter() {
setState(() {
_counter++;
});
}
@override
Widget build(BuildContext context) {
return Scaffold(
appBar: AppBar(
title: Text(widget.title),
),
body: Center(
child: Column(
mainAxisAlignment: MainAxisAlignment.center,
children: [
const Text(
'You have pushed the button this many times:',
),
Text(
'$_counter',
// Provide a Key to this specific Text widget. This allows
// identifying the widget from inside the test suite,
// and reading the text.
key: const Key('counter'),
style: Theme.of(context).textTheme.headline4,
),
],
),
),
floatingActionButton: FloatingActionButton(
// Provide a Key to this button. This allows finding this
// specific button inside the test suite, and tapping it.
key: const Key('increment'),
onPressed: _incrementCounter,
tooltip: 'Increment',
child: const Icon(Icons.add),
),
);
}
}
```
Now, inside `integration_test/app_test.dart`, we are
going to test the action of clicking and checking
if the counter is incremented. For this, we will
initialize a singleton service `IntegrationTestWidgetsFlutterBinding`,
which executes the tests on a physical device and
leverage the `WidgetTester` class to interact
with the widgets.
```dart
import 'package:flutter_test/flutter_test.dart';
import 'package:integration_test/integration_test.dart';
import 'package:counter_app/main.dart' as app;
void main() {
IntegrationTestWidgetsFlutterBinding.ensureInitialized();
group('end-to-end test', () {
testWidgets('tap on the floating action button, verify counter',
(tester) async {
app.main();
await tester.pumpAndSettle();
// Verify the counter starts at 0.
expect(find.text('0'), findsOneWidget);
// Finds the floating action button to tap on.
final Finder fab = find.byTooltip('Increment');
// Emulate a tap on the floating action button.
await tester.tap(fab);
// Trigger a frame.
await tester.pumpAndSettle();
// Verify the counter increments by 1.
expect(find.text('1'), findsOneWidget);
});
});
}
```
Running these on mobile devices is the same
process as before - just run `flutter test integration_test`.
However, if you were to run these on a web browser,
you'd need to download [`ChromeDriver`](https://chromedriver.chromium.org/downloads),
create a file in `test_driver/integration_test.dart` with
```dart
import 'package:integration_test/integration_test_driver.dart';
Future main() => integrationDriver();
```
and open two terminal windows.
In the first one, we launch `chromedriver` with
```sh
chromedriver --port=4444
```
and in the other, from the root of the project, run flutter
with the drive file path we just created and
targetting the test file we want to test, like so:
```dart
flutter drive \
--driver=test_driver/integration_test.dart \
--target=integration_test/app_test.dart \
-d chrome
```
And you're done! Congratulations, you just
unit *and* integration tested your application.
Awesome work! :tada:
# A few remarks on `Flutter Web`
`Flutter` is **awesome** for mobile applications
and can be used to create *web apps*.
However, if you need a website where
[SEO](https://developers.google.com/search/docs/fundamentals/seo-starter-guide#:~:text=SEO%20%2D%20Search%20engine%20optimization%3A%20the,our%20presence%20on%20the%20web.)
is critical, `Flutter` is probably not the best option.
It is quite known that
`Flutter` load times are worse
when compared with websites that were developed with
the good ol' `HTML` + `CSS` + `JS` combo.
See https://github.com/flutter/flutter/issues/76009.
If you were to run `Lighthouse`
or [`PageSpeed`](https://pagespeed.web.dev/)
on your deployed `Flutter` website,
you'd find that the metrics are not all that great. 😕
However,
you can certaintly make them
**much better** by following a few strategies.
## Adding a splash screen
Adding a splash screen will make it so
there's less time until there's *something* on the screen.
This metric can affect SEO and performance scores
when running `Lighthouse` or `PageSpeed`.
To know more about this subject,
please visit
https://github.com/dwyl/flutter-phoenix-channels-demo#6-bonus-points-adding-splash-screen.
## Decreasing loading time
Depending on the size of your `Flutter` project,
when building the final bundle for release,
the size of the `Javascript` and asset files
can definitely be a factor to consider
regarding the time to load the site.
This, of course, has repercussions
regarding SEO placement
and metrics yielded by tools that measure website quality
like [`Lighthouse`](https://chrome.google.com/webstore/detail/lighthouse/blipmdconlkpinefehnmjammfjpmpbjk?hl=en).
Although it is generally not recommended to tinker with output files
if you're beginner,
we have created a small document that will you guide you through
speeding up your load times on `Flutter` web
by downloading asset resources in parallel.
This will decrease your loading time,
even if it's a tiny bit. 😊
# App demo 📱
We've learnt a lot about basic Flutter principles. There is no
better way of learning them by creating an app and applying them!
In this section, we'll walk you through to creating an
application that fetches information from a rest API,
lists them and allows the user to choose his favourites.
Let's get cracking!
## 0. Setting up a new project
In this walkthrough we are going to use `Visual Studio Code`.
We will assume you have this IDE installed,
as well as the
`Flutter` and `Dart` extensions installed.
If not, do so.
 After restarting Visual Studio Code, let's create a new project!
Click on `View > Command Palette`, type `Flutter` and click on
`Flutter: New Project`. It will ask you for a name of the new project
- just type something like 'demo_app' - and then click `Enter` and your
project should start setting up!
Let's run our newly created app.
On the bottom menu of Visual Studio Code, click on the device button
and you are shown a menu asking you to choose a device you want to run
the app from. I'll be going with iPhone 14 Pro Max.
Bottom menu | After clicking, you are prompted with this menu
:-------------------------:|:-------------------------:
 | 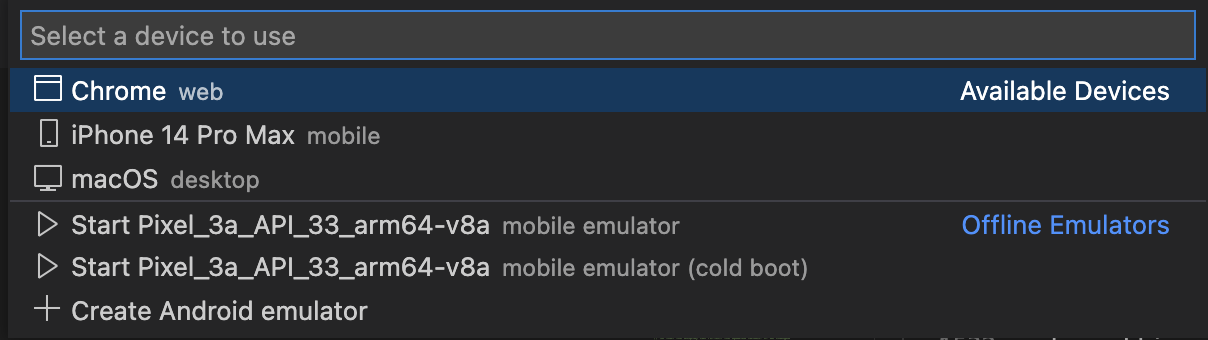
After setting up the device, the emulator should be shown.
After that, in Visual Studio Code, click on `Run > Start debugging`.
The build process will start and, after it is finished,
the app will start on the newly created emulator.
You should now see an "Hello World" app running.
Awesome! :tada:
After restarting Visual Studio Code, let's create a new project!
Click on `View > Command Palette`, type `Flutter` and click on
`Flutter: New Project`. It will ask you for a name of the new project
- just type something like 'demo_app' - and then click `Enter` and your
project should start setting up!
Let's run our newly created app.
On the bottom menu of Visual Studio Code, click on the device button
and you are shown a menu asking you to choose a device you want to run
the app from. I'll be going with iPhone 14 Pro Max.
Bottom menu | After clicking, you are prompted with this menu
:-------------------------:|:-------------------------:
 | 
After setting up the device, the emulator should be shown.
After that, in Visual Studio Code, click on `Run > Start debugging`.
The build process will start and, after it is finished,
the app will start on the newly created emulator.
You should now see an "Hello World" app running.
Awesome! :tada:
 ## 1. Project structure
We could implement a really simple project structure for this demo.
But, just for learning purposes, let's implement a structure that is
divided into four layers:
- [**presentation**](https://codewithandrea.com/articles/flutter-presentation-layer/):
consisting of widgets, states (either local or shared) and controllers.
- [**application**](https://codewithandrea.com/articles/flutter-app-architecture-application-layer/):
in this layer we will have *services*, which will fetch data from the *data layer*.
- [**domain layer**](https://codewithandrea.com/articles/flutter-app-architecture-domain-model/):
where we define domain classes for the business logic.
- [**data**](https://codewithandrea.com/articles/flutter-repository-pattern/):
our data sources and repositories. We will interact with APIs here.
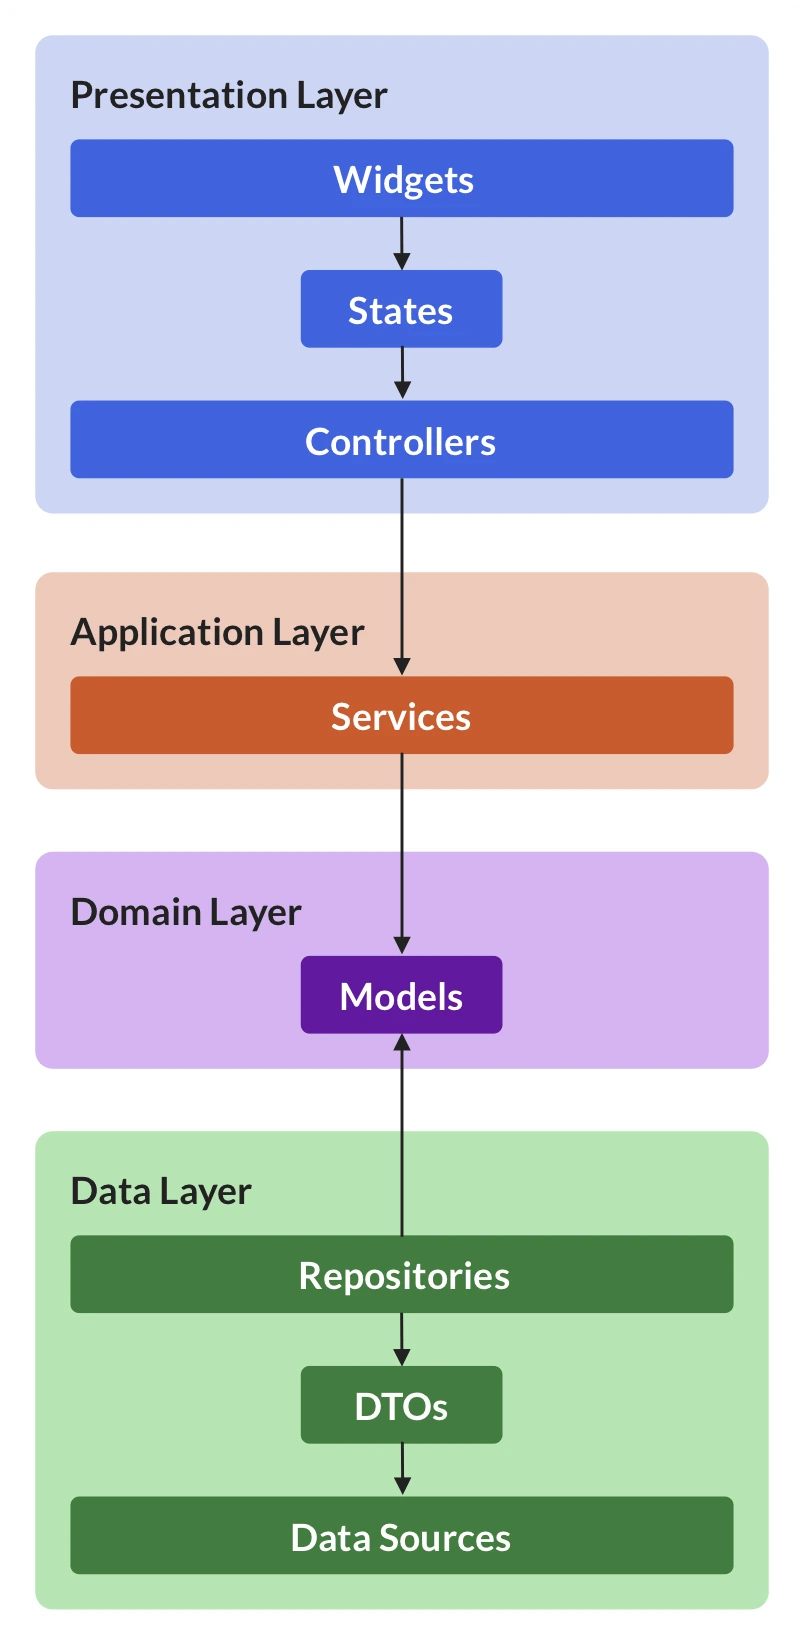
> This structure borrows many concepts from
[DDD (Domain-driven-design)](https://en.wikipedia.org/wiki/Domain-driven_design),
where the codebase is modeled and implemented according
to domain logic and concepts.
We will simplify these four layers because it is a small project.
But if you were to work in a corporate environmnent, you would be dealing
with various APIs, data sources and a large amount of models.
This structure makes it much easier to maintain code at a larger scale.
Although we might be breaking the [YAGNI](https://en.wikipedia.org/wiki/You_aren%27t_gonna_need_it)
principle here, this is just to show how to structure your code
in a maintainable manner.
Let's start! Firstly create the following folder structure.
```
lib
- models
todo.dart
- repository
todoRepository.dart
- services
todoService.dart
main.dart
```
In the `lib/models/todo.dart` file, add the following piece of code.
```dart
class Todo {
final int userId;
final int id;
final String title;
final bool completed;
const Todo({
required this.userId,
required this.id,
required this.title,
required this.completed,
});
factory Todo.fromJson(Map json) {
return Todo(
userId: json['userId'],
id: json['id'],
title: json['title'],
completed: json['completed'],
);
}
}
```
This should be nothing new to you. We declared
each member field and added a function that
parses a JSON object to the class.
Next up, let's head to the repository file. Firstly,
run `flutter pub add http`
to install the `http` package,
as we are going to need it to fetch data from a third-party API.
After that, let's create the `lib/repository/todoRepository.dart` file.
```dart
import 'dart:convert';
import 'package:demo_app/models/todo.dart';
import 'package:http/http.dart' as http;
abstract class TodoRepository {
Future> getTodos();
}
class HTTPTodoRepository implements TodoRepository {
@override
Future> getTodos() async {
final response =
await http.get(Uri.parse("https://jsonplaceholder.typicode.com/todos"));
if (response.statusCode == 200) {
Iterable l = json.decode(response.body);
List todos =
List.from(l.map((model) => Todo.fromJson(model)));
return todos;
} else {
throw Exception('Failed to load Todo\'s.');
}
}
}
```
Here, we are creating an `abstract` class, which will serve
as an interface for creating the `HTTPTodoRepository` class.
The class, since implements the `TodoRepository` abstract class,
will have to implement the `getTodos()` function.
In this function, we will call an API which returns an array of todos.
In case the call is successful, we parse each decoded json object
and convert it to a `Todo` object.
Now let's go and implement the `lib/services/todoService.dart` file.
```dart
import 'package:demo_app/models/todo.dart';
import 'package:demo_app/repository/todoRepository.dart';
class TodoService {
late final TodoRepository todoRepository;
TodoService() {
todoRepository = HTTPTodoRepository();
}
Future> getTodos() => todoRepository.getTodos();
}
```
In this class, we initialize it by creating a `TodoRepository`.
We use this field member in the `getTodos()` function,
which in turn, calls the `TodoRepository's` function to fetch
the todos list.
You might be asking yourself: "Well, mate, that's a lot of work
for just a simple fetching function, isn't it?".
Well, in this case, you'd be right. But we're just learning a
maintainable way of structuring our code.
This service might (and *is*, in this case) redudant.
But imagine if we have widgets that necessitate objects
that stem from various data sources.
It will be *the service's just* to fetch whatever data is needed
from each repository, compile it and give it to the widget.
Let's continue. In the `main.dart` file, let's fetch the todo list
and show the first one, just to check that everything works.
Import the service and the models.
```dart
import 'package:demo_app/models/todo.dart';
import 'services/todoService.dart';
```
and then change the `_MyHomePageState` class, like so.
```dart
class _MyHomePageState extends State {
late Future> futureTodosList;
@override
void initState() {
super.initState();
futureTodosList = TodoService().getTodos();
}
@override
Widget build(BuildContext context) {
// This method is rerun every time setState is called, for instance as done
// by the _incrementCounter method above.
//
// The Flutter framework has been optimized to make rerunning build methods
// fast, so that you can just rebuild anything that needs updating rather
// than having to individually change instances of widgets.
return Scaffold(
appBar: AppBar(
// Here we take the value from the MyHomePage object that was created by
// the App.build method, and use it to set our appbar title.
title: Text(widget.title),
),
body: Center(
// Center is a layout widget. It takes a single child and positions it
// in the middle of the parent.
child: FutureBuilder>(
future: futureTodosList,
builder: (context, snapshot) {
if (snapshot.hasData) {
return Text(snapshot.data![0].title);
} else if (snapshot.hasError) {
return Text('${snapshot.error}');
}
// By default, show a loading spinner.
return const CircularProgressIndicator();
},
),
),
)
;
}
}
```
If you re-run the app, you should see something like this.
It is displaying the first todo title from the fetched list.
We used the `FutureBuilder` class to indicate
that the data residing within will come at a later stage -
the todo list. If the data comes, we show the first todo title.
And we did all this in a `StatefulWidget`, with the `State`.
In the `_MyHomePageState` class, we declared that a
`Future` todos list is expected and fetched it in the
`initState()` method - it only runs one time, which is exactly what we want.
Hurray, we just set up all the data we need!
Now it's just about making it pretty :sparkles:.
## 1. Project structure
We could implement a really simple project structure for this demo.
But, just for learning purposes, let's implement a structure that is
divided into four layers:
- [**presentation**](https://codewithandrea.com/articles/flutter-presentation-layer/):
consisting of widgets, states (either local or shared) and controllers.
- [**application**](https://codewithandrea.com/articles/flutter-app-architecture-application-layer/):
in this layer we will have *services*, which will fetch data from the *data layer*.
- [**domain layer**](https://codewithandrea.com/articles/flutter-app-architecture-domain-model/):
where we define domain classes for the business logic.
- [**data**](https://codewithandrea.com/articles/flutter-repository-pattern/):
our data sources and repositories. We will interact with APIs here.

> This structure borrows many concepts from
[DDD (Domain-driven-design)](https://en.wikipedia.org/wiki/Domain-driven_design),
where the codebase is modeled and implemented according
to domain logic and concepts.
We will simplify these four layers because it is a small project.
But if you were to work in a corporate environmnent, you would be dealing
with various APIs, data sources and a large amount of models.
This structure makes it much easier to maintain code at a larger scale.
Although we might be breaking the [YAGNI](https://en.wikipedia.org/wiki/You_aren%27t_gonna_need_it)
principle here, this is just to show how to structure your code
in a maintainable manner.
Let's start! Firstly create the following folder structure.
```
lib
- models
todo.dart
- repository
todoRepository.dart
- services
todoService.dart
main.dart
```
In the `lib/models/todo.dart` file, add the following piece of code.
```dart
class Todo {
final int userId;
final int id;
final String title;
final bool completed;
const Todo({
required this.userId,
required this.id,
required this.title,
required this.completed,
});
factory Todo.fromJson(Map json) {
return Todo(
userId: json['userId'],
id: json['id'],
title: json['title'],
completed: json['completed'],
);
}
}
```
This should be nothing new to you. We declared
each member field and added a function that
parses a JSON object to the class.
Next up, let's head to the repository file. Firstly,
run `flutter pub add http`
to install the `http` package,
as we are going to need it to fetch data from a third-party API.
After that, let's create the `lib/repository/todoRepository.dart` file.
```dart
import 'dart:convert';
import 'package:demo_app/models/todo.dart';
import 'package:http/http.dart' as http;
abstract class TodoRepository {
Future> getTodos();
}
class HTTPTodoRepository implements TodoRepository {
@override
Future> getTodos() async {
final response =
await http.get(Uri.parse("https://jsonplaceholder.typicode.com/todos"));
if (response.statusCode == 200) {
Iterable l = json.decode(response.body);
List todos =
List.from(l.map((model) => Todo.fromJson(model)));
return todos;
} else {
throw Exception('Failed to load Todo\'s.');
}
}
}
```
Here, we are creating an `abstract` class, which will serve
as an interface for creating the `HTTPTodoRepository` class.
The class, since implements the `TodoRepository` abstract class,
will have to implement the `getTodos()` function.
In this function, we will call an API which returns an array of todos.
In case the call is successful, we parse each decoded json object
and convert it to a `Todo` object.
Now let's go and implement the `lib/services/todoService.dart` file.
```dart
import 'package:demo_app/models/todo.dart';
import 'package:demo_app/repository/todoRepository.dart';
class TodoService {
late final TodoRepository todoRepository;
TodoService() {
todoRepository = HTTPTodoRepository();
}
Future> getTodos() => todoRepository.getTodos();
}
```
In this class, we initialize it by creating a `TodoRepository`.
We use this field member in the `getTodos()` function,
which in turn, calls the `TodoRepository's` function to fetch
the todos list.
You might be asking yourself: "Well, mate, that's a lot of work
for just a simple fetching function, isn't it?".
Well, in this case, you'd be right. But we're just learning a
maintainable way of structuring our code.
This service might (and *is*, in this case) redudant.
But imagine if we have widgets that necessitate objects
that stem from various data sources.
It will be *the service's just* to fetch whatever data is needed
from each repository, compile it and give it to the widget.
Let's continue. In the `main.dart` file, let's fetch the todo list
and show the first one, just to check that everything works.
Import the service and the models.
```dart
import 'package:demo_app/models/todo.dart';
import 'services/todoService.dart';
```
and then change the `_MyHomePageState` class, like so.
```dart
class _MyHomePageState extends State {
late Future> futureTodosList;
@override
void initState() {
super.initState();
futureTodosList = TodoService().getTodos();
}
@override
Widget build(BuildContext context) {
// This method is rerun every time setState is called, for instance as done
// by the _incrementCounter method above.
//
// The Flutter framework has been optimized to make rerunning build methods
// fast, so that you can just rebuild anything that needs updating rather
// than having to individually change instances of widgets.
return Scaffold(
appBar: AppBar(
// Here we take the value from the MyHomePage object that was created by
// the App.build method, and use it to set our appbar title.
title: Text(widget.title),
),
body: Center(
// Center is a layout widget. It takes a single child and positions it
// in the middle of the parent.
child: FutureBuilder>(
future: futureTodosList,
builder: (context, snapshot) {
if (snapshot.hasData) {
return Text(snapshot.data![0].title);
} else if (snapshot.hasError) {
return Text('${snapshot.error}');
}
// By default, show a loading spinner.
return const CircularProgressIndicator();
},
),
),
)
;
}
}
```
If you re-run the app, you should see something like this.
It is displaying the first todo title from the fetched list.
We used the `FutureBuilder` class to indicate
that the data residing within will come at a later stage -
the todo list. If the data comes, we show the first todo title.
And we did all this in a `StatefulWidget`, with the `State`.
In the `_MyHomePageState` class, we declared that a
`Future` todos list is expected and fetched it in the
`initState()` method - it only runs one time, which is exactly what we want.
Hurray, we just set up all the data we need!
Now it's just about making it pretty :sparkles:.
 ## 2. Creating a list of todos
Let's create a new widget to encapsulate our todo list.
In Visual Studio Code, at the end of the `main.dart` file,
click `Enter` a few times and type `stful`.
The IDE will ask if we want to create a Stateful or Stateless widget.
Since we already get the information on the `HomePage` `Stateful Widget`,
we will pass it down to a `Stateless Widget` we are going to now create.
Name your new `Stateless Widget` "`TodoList`".
Check the following code and use it.
```dart
class TodoList extends StatelessWidget {
const TodoList({required this.todoList, super.key});
final List todoList;
@override
Widget build(BuildContext context) {
return ListView.builder(
itemCount: todoList.length,
padding: const EdgeInsets.all(16.0),
itemBuilder: (context, i) {
if (i.isOdd) return const Divider();
final index = i ~/ 2;
return ListTile(
title: Text(
todoList[index].title,
style: const TextStyle(fontSize: 18),
),
);
},
);
}
}
```
This new stateless widget receives a `todoList` as argument.
This widget will return a `ListView` widget, which has a `itemBuilder`
property that will render a list of items.
In the `itemCount` property, we will tell how many items we want
the list to show. In this case, we want the length of the todo list.
In the `padding` property, we will add an
[`EdgeInsets.all()`](https://api.flutter.dev/flutter/painting/EdgeInsets-class.html)
spacing. This will add a spacing of `16.0` on all directions (up, right, left, down).
In the `itemBuilder` property, we get access to the `context` and `index`
of the rendered component. We are adding a `Divider` in between
every item. So, the `i` value *includes* the `Divider` components as well.
Therefore, to correctly fetch the index of the item in the list,
we will use the ListView index and use the
[`~/`](https://api.flutter.dev/flutter/dart-core/double/operator_truncate_divide.html)
operator. This will yield integer part of a division.
For example, `1 2 3 4 5` will be `0 1 1 2 2`.
Now, let's use this new widget and change the `_MyHomePageState`,
more specifically the `FutureBuilder.builder` return value.
```dart
if (snapshot.hasData) {
return TodoList(todoList: snapshot.data!);
} else if (snapshot.hasError) {
return Text('${snapshot.error}');
}
```
You should now be able to scroll the list, like so!
## 2. Creating a list of todos
Let's create a new widget to encapsulate our todo list.
In Visual Studio Code, at the end of the `main.dart` file,
click `Enter` a few times and type `stful`.
The IDE will ask if we want to create a Stateful or Stateless widget.
Since we already get the information on the `HomePage` `Stateful Widget`,
we will pass it down to a `Stateless Widget` we are going to now create.
Name your new `Stateless Widget` "`TodoList`".
Check the following code and use it.
```dart
class TodoList extends StatelessWidget {
const TodoList({required this.todoList, super.key});
final List todoList;
@override
Widget build(BuildContext context) {
return ListView.builder(
itemCount: todoList.length,
padding: const EdgeInsets.all(16.0),
itemBuilder: (context, i) {
if (i.isOdd) return const Divider();
final index = i ~/ 2;
return ListTile(
title: Text(
todoList[index].title,
style: const TextStyle(fontSize: 18),
),
);
},
);
}
}
```
This new stateless widget receives a `todoList` as argument.
This widget will return a `ListView` widget, which has a `itemBuilder`
property that will render a list of items.
In the `itemCount` property, we will tell how many items we want
the list to show. In this case, we want the length of the todo list.
In the `padding` property, we will add an
[`EdgeInsets.all()`](https://api.flutter.dev/flutter/painting/EdgeInsets-class.html)
spacing. This will add a spacing of `16.0` on all directions (up, right, left, down).
In the `itemBuilder` property, we get access to the `context` and `index`
of the rendered component. We are adding a `Divider` in between
every item. So, the `i` value *includes* the `Divider` components as well.
Therefore, to correctly fetch the index of the item in the list,
we will use the ListView index and use the
[`~/`](https://api.flutter.dev/flutter/dart-core/double/operator_truncate_divide.html)
operator. This will yield integer part of a division.
For example, `1 2 3 4 5` will be `0 1 1 2 2`.
Now, let's use this new widget and change the `_MyHomePageState`,
more specifically the `FutureBuilder.builder` return value.
```dart
if (snapshot.hasData) {
return TodoList(todoList: snapshot.data!);
} else if (snapshot.hasError) {
return Text('${snapshot.error}');
}
```
You should now be able to scroll the list, like so!
 ## 3. Adding interactivity
We want to be able to click on a todo item and
mark it as "completed". To do this, we ought to add
interactivity to our `TodoList`.
To do this, we got to convert our stateless widget
into a *stateful widget*.
Doing this is fairly simple with Visual Studio Code.
Simply double-click on `TodoList`, a yellow lightbulb
will appear to the left side. Simply click it and
click in `Convert to Stateful Widget`.
## 3. Adding interactivity
We want to be able to click on a todo item and
mark it as "completed". To do this, we ought to add
interactivity to our `TodoList`.
To do this, we got to convert our stateless widget
into a *stateful widget*.
Doing this is fairly simple with Visual Studio Code.
Simply double-click on `TodoList`, a yellow lightbulb
will appear to the left side. Simply click it and
click in `Convert to Stateful Widget`.
 This will effectively create a new `State` to the
widget and add it. You should now have the following code:
```dart
class TodoList extends StatefulWidget {
const TodoList({required this.todoList, super.key});
final List todoList;
@override
State createState() => _TodoListState();
}
class _TodoListState extends State {
@override
Widget build(BuildContext context) {
return ListView.builder(
itemCount: widget.todoList.length,
padding: const EdgeInsets.all(16.0),
itemBuilder: (context, i) {
if (i.isOdd) return const Divider();
final index = i ~/ 2;
return ListTile(
title: Text(
widget.todoList[index].title,
style: const TextStyle(fontSize: 18),
),
);
},
);
}
}
```
You now have the `TodoList` and `_TodoListState`,
which refers to the state of the former. Notice it
is preceded with an underscore. This enforces privacy
and is best practice for `State` objects and private fields.
Let's change the widget to look like the following:
```dart
class TodoList extends StatefulWidget {
const TodoList({required this.todoList, super.key});
final List todoList;
@override
State createState() => _TodoListState();
}
class _TodoListState extends State {
final Set _doneList = {};
@override
Widget build(BuildContext context) {
return ListView.builder(
itemCount: widget.todoList.length,
padding: const EdgeInsets.all(16.0),
itemBuilder: (context, i) {
final index = i ~/ 2;
final todoObj = widget.todoList[index];
if (i.isOdd) return const Divider();
final completed = todoObj.completed || _doneList.contains(todoObj);
return ListTile(
title: Text(
todoObj.title,
style: TextStyle(
fontSize: 18,
decoration: completed
? TextDecoration.lineThrough
: TextDecoration.none),
),
onTap: (() {
setState(() {
if (completed) {
_doneList.remove(todoObj);
} else {
_doneList.add(todoObj);
}
});
}),
);
},
);
}
}
```
Let's break it down. The `State` object (`_TodoListState`)
now has a `_doneList` set. This set
(a set is like a list but guarantees each object is unique)
, as the underscore symbol entails, is private.
This list will hold *the list of todos marked as **done***.
Inside the `ListView.builder()` widget, we have changed
the `itemBuilder`. We have added the following line:
```dart
final completed = _doneList.contains(todoObj);
```
We are checking the item is in the `_doneList` set.
If so, we will add a strikethrough effect on the text to symbolize this.
```dart
title: Text(
todoObj.title,
style: TextStyle(
fontSize: 18,
decoration: completed
? TextDecoration.lineThrough
: TextDecoration.none),
),
```
Now, the only thing that is left is to mark a todo item
as *complete* or *incomplete* by tapping it.
Inside the `ListTile`, we add an `onTap` property,
which is called everytime the list item is tapped,
and change the state accordingly.
If the item is completed, we mark it as incomplete, and vice-versa.
```dart
onTap: (() {
setState(() {
if (completed) {
_doneList.remove(todoObj);
} else {
_doneList.add(todoObj);
}
});
}),
```
Now, if you open your app, you can scroll and check items
and set them as `done` and reverse that action. Great job!
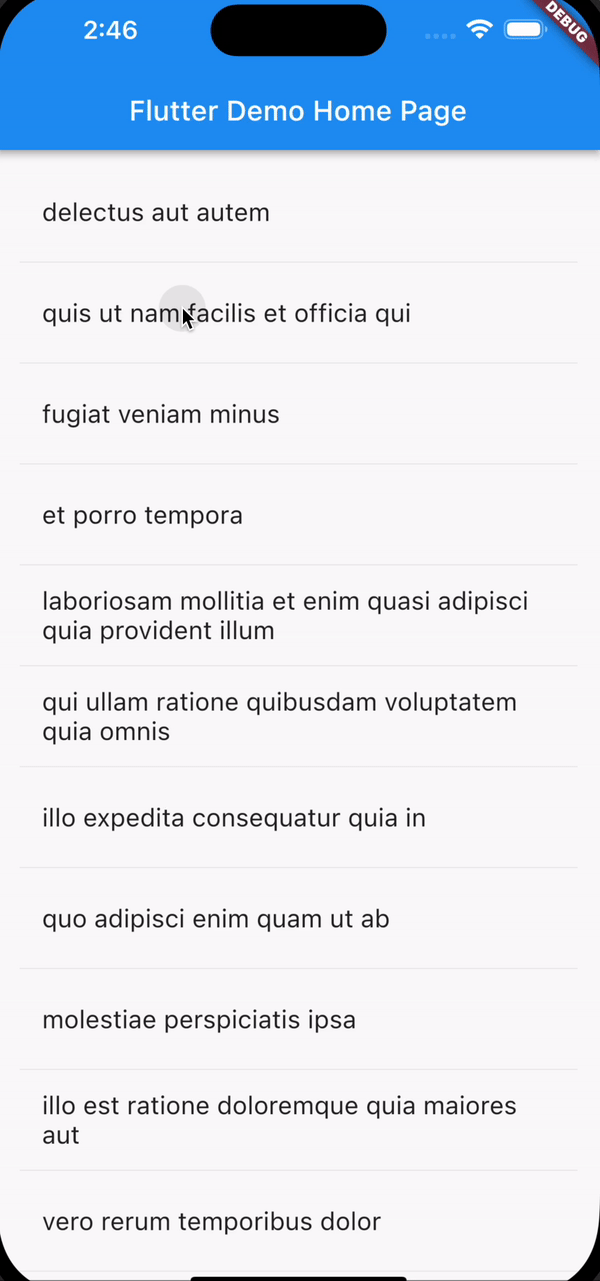
## 4. Adding navigation
We have added a stateful widget and are keeping track of what
todos are marked as `completed` or not. It would be great to
actually have a page where we see this list of completed items.
Currently, our widget tree looks like this.
`MyApp`
-> `MyHomePage` (which has the `todoList` as local state)
-> `TodoList` (which has the `doneList` as local state).
We need to merge `MyHomePage` and `TodoList` into a single
widget with having the `todoList` and `doneList` to be able to
add navigation. Mergint these two in one will lead to a new
`TodoList` widget, that will look like this.
```dart
class TodoList extends StatefulWidget {
const TodoList({super.key});
@override
State createState() => _TodoListState();
}
class _TodoListState extends State {
late Future> futureTodosList;
final Set _doneList = {};
@override
void initState() {
super.initState();
futureTodosList = TodoService().getTodos();
}
@override
Widget build(BuildContext context) {
return Scaffold(
appBar: AppBar(
title: const Text('todo item list'),
),
body: FutureBuilder>(
future: futureTodosList,
builder: (context, snapshot) {
if (snapshot.hasData) {
final todolist = snapshot.data!;
return ListView.builder(
itemCount: todolist.length,
padding: const EdgeInsets.all(16.0),
itemBuilder: (context, i) {
final index = i ~/ 2;
final todoObj = todolist[index];
if (i.isOdd) return const Divider();
final completed = _doneList.contains(todoObj);
return ListTile(
title: Text(
todoObj.title,
style: TextStyle(
fontSize: 18,
decoration: completed
? TextDecoration.lineThrough
: TextDecoration.none),
),
onTap: (() {
setState(() {
if (completed) {
_doneList.remove(todoObj);
} else {
_doneList.add(todoObj);
}
});
}),
);
},
);
} else if (snapshot.hasError) {
return Text('${snapshot.error}');
}
// By default, show a loading spinner.
return const CircularProgressIndicator();
},
));
}
}
```
Nothing was fundamentally changed.
We wrapped the `TodoList` with the same widgets of
the `MyHomePage` widget. We also changed the `AppBar.title`
to `Text('todo item list')`.
We now also need to change the `MyApp` to call this
newly edited widget.
```dart
class MyApp extends StatelessWidget {
const MyApp({super.key});
@override
Widget build(BuildContext context) {
return const MaterialApp( // MODIFY with const
title: 'FlutterDemo',
home: TodoList(), // REMOVE Scaffold
);
}
}
```
If you run the application, it looks the same as before.
The only difference now is that we have all the state in the same widget
(`TodoList`).
Inside the `_TodoListState` widget state class, let's add a button in the app bar
to navigate to the new page.
```dart
@override
Widget build(BuildContext context) {
return Scaffold(
appBar: AppBar(
title: const Text('todo item list'),
actions: [
IconButton(
icon: const Icon(Icons.list),
onPressed: _pushCompleted,
tooltip: 'completed todo list',
),
],
),
```
Let's implement the `_pushCompleted` function, that is executed
everytime the icon button is clicked on the appbar.
We want to navigate to the page that shows the completed todo items.
Add the following function in `_TodoListState`.
```dart
void _pushCompleted() {
Navigator.of(context).push(
MaterialPageRoute(
builder: (context) {
final tiles = _doneList.map(
(todo) {
return ListTile(
title: Text(
todo.title,
style: const TextStyle(fontSize: 18),
),
);
},
);
final divided = tiles.isNotEmpty
? ListTile.divideTiles(
context: context,
tiles: tiles,
).toList()
: [];
return Scaffold(
appBar: AppBar(
title: const Text('completed todo list'),
),
body: ListView(children: divided),
);
},
),
);
}
```
Let's break this down. We use the `Navigator` to push a new screen to
the stack. We pass the widget's `context` and then use the `push()` function
to add the screen to the stack.
In this case, we are pushing a `MaterialPageRoute`, inside the `builder`
property, we return a `Scaffold` object with an `appBar` and a `body`.
Inside this `body`, we are rendering a `ListView` with each todo item
inside the `_doneList` set.
Since we are using `MaterialPageRoute` and `Scaffold`, the back button is automatically added
to the `appbar`, making it possible to *pop* the screen and go back to the
screen showing the todo list.
If we rerun our app, we can now navigate between pages. Hurray! :tada:

## 5. Finishing touches
We can quickly custmize the theme of the app, and it's title.
Let's change the colors and give our fancy app a new title.
```dart
@override
Widget build(BuildContext context) {
return MaterialApp(
title: 'Todo App',
theme: ThemeData(
appBarTheme: const AppBarTheme(
backgroundColor: Colors.black,
foregroundColor: Colors.white,
)
),
home: const TodoList(),
);
}
```
Your app should look like this, now!
You can choose the colors you like. Go creative! :tada:
This will effectively create a new `State` to the
widget and add it. You should now have the following code:
```dart
class TodoList extends StatefulWidget {
const TodoList({required this.todoList, super.key});
final List todoList;
@override
State createState() => _TodoListState();
}
class _TodoListState extends State {
@override
Widget build(BuildContext context) {
return ListView.builder(
itemCount: widget.todoList.length,
padding: const EdgeInsets.all(16.0),
itemBuilder: (context, i) {
if (i.isOdd) return const Divider();
final index = i ~/ 2;
return ListTile(
title: Text(
widget.todoList[index].title,
style: const TextStyle(fontSize: 18),
),
);
},
);
}
}
```
You now have the `TodoList` and `_TodoListState`,
which refers to the state of the former. Notice it
is preceded with an underscore. This enforces privacy
and is best practice for `State` objects and private fields.
Let's change the widget to look like the following:
```dart
class TodoList extends StatefulWidget {
const TodoList({required this.todoList, super.key});
final List todoList;
@override
State createState() => _TodoListState();
}
class _TodoListState extends State {
final Set _doneList = {};
@override
Widget build(BuildContext context) {
return ListView.builder(
itemCount: widget.todoList.length,
padding: const EdgeInsets.all(16.0),
itemBuilder: (context, i) {
final index = i ~/ 2;
final todoObj = widget.todoList[index];
if (i.isOdd) return const Divider();
final completed = todoObj.completed || _doneList.contains(todoObj);
return ListTile(
title: Text(
todoObj.title,
style: TextStyle(
fontSize: 18,
decoration: completed
? TextDecoration.lineThrough
: TextDecoration.none),
),
onTap: (() {
setState(() {
if (completed) {
_doneList.remove(todoObj);
} else {
_doneList.add(todoObj);
}
});
}),
);
},
);
}
}
```
Let's break it down. The `State` object (`_TodoListState`)
now has a `_doneList` set. This set
(a set is like a list but guarantees each object is unique)
, as the underscore symbol entails, is private.
This list will hold *the list of todos marked as **done***.
Inside the `ListView.builder()` widget, we have changed
the `itemBuilder`. We have added the following line:
```dart
final completed = _doneList.contains(todoObj);
```
We are checking the item is in the `_doneList` set.
If so, we will add a strikethrough effect on the text to symbolize this.
```dart
title: Text(
todoObj.title,
style: TextStyle(
fontSize: 18,
decoration: completed
? TextDecoration.lineThrough
: TextDecoration.none),
),
```
Now, the only thing that is left is to mark a todo item
as *complete* or *incomplete* by tapping it.
Inside the `ListTile`, we add an `onTap` property,
which is called everytime the list item is tapped,
and change the state accordingly.
If the item is completed, we mark it as incomplete, and vice-versa.
```dart
onTap: (() {
setState(() {
if (completed) {
_doneList.remove(todoObj);
} else {
_doneList.add(todoObj);
}
});
}),
```
Now, if you open your app, you can scroll and check items
and set them as `done` and reverse that action. Great job!

## 4. Adding navigation
We have added a stateful widget and are keeping track of what
todos are marked as `completed` or not. It would be great to
actually have a page where we see this list of completed items.
Currently, our widget tree looks like this.
`MyApp`
-> `MyHomePage` (which has the `todoList` as local state)
-> `TodoList` (which has the `doneList` as local state).
We need to merge `MyHomePage` and `TodoList` into a single
widget with having the `todoList` and `doneList` to be able to
add navigation. Mergint these two in one will lead to a new
`TodoList` widget, that will look like this.
```dart
class TodoList extends StatefulWidget {
const TodoList({super.key});
@override
State createState() => _TodoListState();
}
class _TodoListState extends State {
late Future> futureTodosList;
final Set _doneList = {};
@override
void initState() {
super.initState();
futureTodosList = TodoService().getTodos();
}
@override
Widget build(BuildContext context) {
return Scaffold(
appBar: AppBar(
title: const Text('todo item list'),
),
body: FutureBuilder>(
future: futureTodosList,
builder: (context, snapshot) {
if (snapshot.hasData) {
final todolist = snapshot.data!;
return ListView.builder(
itemCount: todolist.length,
padding: const EdgeInsets.all(16.0),
itemBuilder: (context, i) {
final index = i ~/ 2;
final todoObj = todolist[index];
if (i.isOdd) return const Divider();
final completed = _doneList.contains(todoObj);
return ListTile(
title: Text(
todoObj.title,
style: TextStyle(
fontSize: 18,
decoration: completed
? TextDecoration.lineThrough
: TextDecoration.none),
),
onTap: (() {
setState(() {
if (completed) {
_doneList.remove(todoObj);
} else {
_doneList.add(todoObj);
}
});
}),
);
},
);
} else if (snapshot.hasError) {
return Text('${snapshot.error}');
}
// By default, show a loading spinner.
return const CircularProgressIndicator();
},
));
}
}
```
Nothing was fundamentally changed.
We wrapped the `TodoList` with the same widgets of
the `MyHomePage` widget. We also changed the `AppBar.title`
to `Text('todo item list')`.
We now also need to change the `MyApp` to call this
newly edited widget.
```dart
class MyApp extends StatelessWidget {
const MyApp({super.key});
@override
Widget build(BuildContext context) {
return const MaterialApp( // MODIFY with const
title: 'FlutterDemo',
home: TodoList(), // REMOVE Scaffold
);
}
}
```
If you run the application, it looks the same as before.
The only difference now is that we have all the state in the same widget
(`TodoList`).
Inside the `_TodoListState` widget state class, let's add a button in the app bar
to navigate to the new page.
```dart
@override
Widget build(BuildContext context) {
return Scaffold(
appBar: AppBar(
title: const Text('todo item list'),
actions: [
IconButton(
icon: const Icon(Icons.list),
onPressed: _pushCompleted,
tooltip: 'completed todo list',
),
],
),
```
Let's implement the `_pushCompleted` function, that is executed
everytime the icon button is clicked on the appbar.
We want to navigate to the page that shows the completed todo items.
Add the following function in `_TodoListState`.
```dart
void _pushCompleted() {
Navigator.of(context).push(
MaterialPageRoute(
builder: (context) {
final tiles = _doneList.map(
(todo) {
return ListTile(
title: Text(
todo.title,
style: const TextStyle(fontSize: 18),
),
);
},
);
final divided = tiles.isNotEmpty
? ListTile.divideTiles(
context: context,
tiles: tiles,
).toList()
: [];
return Scaffold(
appBar: AppBar(
title: const Text('completed todo list'),
),
body: ListView(children: divided),
);
},
),
);
}
```
Let's break this down. We use the `Navigator` to push a new screen to
the stack. We pass the widget's `context` and then use the `push()` function
to add the screen to the stack.
In this case, we are pushing a `MaterialPageRoute`, inside the `builder`
property, we return a `Scaffold` object with an `appBar` and a `body`.
Inside this `body`, we are rendering a `ListView` with each todo item
inside the `_doneList` set.
Since we are using `MaterialPageRoute` and `Scaffold`, the back button is automatically added
to the `appbar`, making it possible to *pop* the screen and go back to the
screen showing the todo list.
If we rerun our app, we can now navigate between pages. Hurray! :tada:

## 5. Finishing touches
We can quickly custmize the theme of the app, and it's title.
Let's change the colors and give our fancy app a new title.
```dart
@override
Widget build(BuildContext context) {
return MaterialApp(
title: 'Todo App',
theme: ThemeData(
appBarTheme: const AppBarTheme(
backgroundColor: Colors.black,
foregroundColor: Colors.white,
)
),
home: const TodoList(),
);
}
```
Your app should look like this, now!
You can choose the colors you like. Go creative! :tada:
 ## 6. Testing!
We have our app running. In fact, we should
have used a [TDD](https://github.com/dwyl/learn-tdd)
approach to get our app running.
The reason we didn't do this is to show you how some
code needs to be laid out to be *testable*.
As you previously seen, mocking objects in Flutter
works through **dependency injection**.
That is, these are functions receive the dependencies that
they depend on through, for example, their constructor.
For simplicity sake, we are not going to be using
any libraries like `get_it` or `Riverpod` to do
deeply nested dependency injection.
In our demo app, we only have two levels deep,
so mocking and testing is very simple.
Let's start testing!
### 6.1 Unit testing
Let's start unit testing our `TodoRepository`
and `TodoService`. As it stands, both of these files
are not "testable". We ought to find a way to
mock the `http` requests. How do we do that?
Exactly. *Dependency injection*.
But first, we need to add the dependencies
in `pubspec.yaml`.
In the `dev_dependencies` section,
add the following two lines of code.
```yaml
mockito: 5.3.2
build_runner: 2.3.2
```
And run `flutter pub get`.
This will download the newly added dependencies.
Now let's start testing!
Change `lib/repository/todoRepository.dart`
so it looks like the following.
```dart
import 'package:http/http.dart' show Client;
class HTTPTodoRepository implements TodoRepository {
Client client = Client();
@override
Future> getTodos() async {
final response = await client
.get(Uri.parse("https://jsonplaceholder.typicode.com/todos"));
if (response.statusCode == 200) {
Iterable l = json.decode(response.body);
List todos =
List.from(l.map((model) => Todo.fromJson(model)));
return todos;
} else {
throw Exception('Failed to load Todo\'s.');
}
}
}
```
Now, on to testing. Create a directory in `test/unit`
and add a new file `todoRepository_test.dart`.
```dart
import 'package:http/http.dart' as http;
import 'package:mockito/annotations.dart';
import 'package:flutter_test/flutter_test.dart';
import 'package:mockito/mockito.dart';
@GenerateMocks([http.Client])
void main() {
}
```
We are going to use `mockito`'s `@GenerateMocks` annotation
to generate a mock object for the `http.Client`,
which is used inside the function.
We could do it manually but since we can get it generated
to ourselves automatically, let's do it.
Run the following command.
```sh
flutter pub run build_runner build --delete-conflicting-outputs
```
This will generate a `todoRepository_test.mocks.dart` file
with the generated mocks.
Import the file in the `todoRepository_test.dart` file and
let's create our first tests!
```dart
import 'todoRepository_test.mocks.dart';
@GenerateMocks([http.Client])
void main() {
test('Checks if a Todo array is yielded and has the expected length',
() async {
final client = MockClient();
final repo = HTTPTodoRepository();
// Use Mockito to return a successful response when it calls the
// provided http.Client.
when(client.get(Uri.parse('https://jsonplaceholder.typicode.com/todos')))
.thenAnswer((_) async => http.Response(
'[{"userId": 1, "id": 2, "title": "mock", "completed": true}]',
200));
repo.client = client;
expect(await repo.getTodos().then((value) => value.length), equals(1));
});
test('throws an exception if the http call completes with an error', () {
final client = MockClient();
final repo = HTTPTodoRepository();
// Use Mockito to return an unsuccessful response when it calls the
// provided http.Client.
when(client.get(Uri.parse('https://jsonplaceholder.typicode.com/todos')))
.thenAnswer((_) async => http.Response('Not Found', 404));
repo.client = client;
expect(repo.getTodos(), throwsException);
});
}
```
Let's break down how we are testing the repository.
We are creating a `final client = MockClient()` using
the generated `MockClient` from the `todoRepository_test.mocks.dart`
file. We are specifying that this client
will return an array with a single todo item.
Using this new `MockClient`, we replace the class `client`
with the `MockClient` and run the test.
The same procedure is done, except an exception
is expected to rise.
Let's do the same process for the `TodoService.dart` file.
We need to change it, like so.
```dart
import 'package:demo_app/models/todo.dart';
import 'package:demo_app/repository/todoRepository.dart';
class TodoService {
TodoRepository todoRepository = HTTPTodoRepository();
Future> getTodos() => todoRepository.getTodos();
}
```
Create a new `todoService_test.dart` and add
the following lines of code.
```dart
import 'package:http/http.dart' as http;
import 'package:mockito/annotations.dart';
import 'package:flutter_test/flutter_test.dart';
import 'package:mockito/mockito.dart';
@GenerateMocks([http.Client])
void main() {
}
```
Run the following command.
```sh
flutter pub run build_runner build --delete-conflicting-outputs
```
This will generate a `todoService_test.mocks.dart` file
with the generated mocks. Similarly, we will use this
file for the tests in the same fashion as before.
In `todoService_test.dart`, add the following code.
```dart
import 'todoService_test.mocks.dart';
// Generate a MockClient using the Mockito package.
// Create new instances of this class in each test.
@GenerateMocks([http.Client])
void main() {
test(
'Checks if a Todo array is returned from the service and has the expected length',
() async {
final client = MockClient();
final repo = HTTPTodoRepository();
// Use Mockito to return a successful response when it calls the
// provided http.Client.
when(client.get(Uri.parse('https://jsonplaceholder.typicode.com/todos')))
.thenAnswer((_) async => http.Response(
'[{"userId": 1, "id": 2, "title": "mock", "completed": true}]',
200));
repo.client = client;
final service = TodoService();
service.todoRepository = repo;
expect(await service.getTodos().then((value) => value.length), equals(1));
});
test('throws an exception if the http call completes with an error', () {
final client = MockClient();
final repo = HTTPTodoRepository();
// Use Mockito to return an unsuccessful response when it calls the
// provided http.Client.
when(client.get(Uri.parse('https://jsonplaceholder.typicode.com/todos')))
.thenAnswer((_) async => http.Response('Not Found', 404));
repo.client = client;
final service = TodoService();
service.todoRepository = repo;
expect(service.getTodos(), throwsException);
});
}
```
This is the same process as before.
We have all the unit tests we want.
Let's run the following command.
```sh
flutter test --coverage
```
This will run the four tests.
They should all pass.
All that's left is testing the widgets.
Let's do it!
### 6.2 Widget testing
To test our widgets, we need to pass
the `TodoService` so we can mock it in our tests.
Normally we would use a Provider to do this but this
is a simple app, so there is no need to add complexity
and third-party libraries.
Let's do these changes. Head over to `lib/main.dart`
and change the `TodoList` class like so.
```dart
class TodoList extends StatefulWidget {
final TodoService todoService;
const TodoList({super.key, required this.todoService});
@override
State createState() => _TodoListState();
}
```
Now, we need to change the `MyApp` class to pass
a `TodoService` instance to `TodoList`.
It should look like this, now.
```dart
class MyApp extends StatelessWidget {
const MyApp({super.key});
@override
Widget build(BuildContext context) {
return MaterialApp(
title: 'Todo App',
theme: ThemeData(
appBarTheme: const AppBarTheme(
backgroundColor: Colors.black,
foregroundColor: Colors.white,
)),
home: TodoList(todoService: TodoService()),
);
}
}
```
Now we can test these widgets!
Create a new directory `test/widget` and
create a file named `widget_test.dart`.
```dart
import 'package:flutter/material.dart';
import 'package:flutter_test/flutter_test.dart';
import 'package:mockito/mockito.dart';
import 'package:mockito/annotations.dart';
import 'package:demo_app/main.dart';
@GenerateMocks([TodoService])
void main() {
}
```
Run the following command.
```sh
flutter pub run build_runner build --delete-conflicting-outputs
```
This will generate a `widget_test.mocks.dart` file
with the generated mocks for `TodoService`.
Now we are ready to test our first widget!
Add the following test inside `main()`.
```dart
import 'widget_test.mocks.dart';
@GenerateMocks([TodoService])
void main() {
testWidgets('Check if appbar renders', (WidgetTester tester) async {
// Build our app and trigger a frame.
await tester.pumpWidget(const MyApp());
// Verify that the appbar renders
expect(find.text('todo item list'), findsOneWidget);
});
}
```
We use the `testWidgets` function to test the widget.
In turn, we get a `tester` object which allows us
to perform actions. We initialize and create the
widget by using `await test.pumpWidget(const MyApp())`.
We then check if the app bar is rendered.
To do this, we use the `find` class to find
the widget by text and check if it was built in the widget tree.
We then use a `Matcher` to make the assertion.
In this case, we check if we `findOneWidget`.
If we run `flutter test --coverage`, we will see this test should pass.
Let's now add a test to check if the list is rendered
with a list of todos. Add the following test.
```dart
testWidgets('Check if item list is rendered', (WidgetTester tester) async {
final TodoService mockService = MockTodoService();
when(mockService.getTodos()).thenAnswer((_) async =>
[const Todo(userId: 1, id: 1, title: 'mocktitle', completed: true)]);
Widget testWidget = MediaQuery(
data: const MediaQueryData(),
child: MaterialApp(home: TodoList(todoService: mockService)));
await tester.pumpWidget(testWidget);
await tester.pump(const Duration(milliseconds: 100));
// Expect the mocked todo item to be displayed
expect(find.text('mocktitle'), findsOneWidget);
});
```
In this test, we are instantiating a `MockTodoService`,
specifying the return value of the `getTodos()`
and then using it when creating a `TodoList` widget.
We can't create `TodoList` by itself because
it necessitates to be a child of `MaterialApp`.
Hence why we use `MediaQuery` with `MaterialApp` which in turn
creates a `TodoList` widget that we want to test.
With `tester.pumpWidget()`, we instantiate the
widget. This won't suffice, though.
The widget needs to render any animations and
run `initState` to fetch the todos item.
For this, we add `await tester.pump()` with a specified duration.
This schedules a frame and triggers a rebuild of the widget,
running the clock by that amount.
We only need `100 ms` in our case.
After this, we assert if the rendered list
contains a todo item with a title "mocktitle".
Let's add another test.
```dart
testWidgets('Navigating to the todo list directly and find empty widget array',
(WidgetTester tester) async {
final TodoService mockService = MockTodoService();
when(mockService.getTodos()).thenAnswer((_) async => [
const Todo(userId: 1, id: 1, title: 'mocktitle', completed: true),
const Todo(userId: 1, id: 2, title: 'mocktitle2', completed: true),
]);
Widget testWidget = MediaQuery(
data: const MediaQueryData(),
child: MaterialApp(home: TodoList(todoService: mockService)));
await tester.pumpWidget(testWidget);
await tester.pump(const Duration(milliseconds: 100));
// Navigating away
await tester.tap(find.byIcon((Icons.list)));
await tester.pumpAndSettle();
// Expect the todo list page to be shown
expect(find.text('completed todo list'), findsOneWidget);
});
```
In this test, we are rendering the `TodoList`,
tapping on a todo item (thus marking it as `complete`)
and then navigating to the done todo item list.
For this, we use `tester.tap(find.byIcon((Icons.list)))`
to find the button and tap it.
We then use `tester.pumpAndSettle()`, which essentially
waits for all the animations to complete.
After this, we check if the done list screen is rendered
in the widget tree.
We can keep adding tests to cover the rest of
the scenarios. Copy the following code and replace
your existing tests to cover all edge cases.
Your `main` function should now look like this.
```dart
@GenerateMocks([TodoService])
void main() {
testWidgets('Check if appbar renders', (WidgetTester tester) async {
// Build our app and trigger a frame.
await tester.pumpWidget(const MyApp());
// Verify that the appbar renders
expect(find.text('todo item list'), findsOneWidget);
});
testWidgets('Check if item list is rendered', (WidgetTester tester) async {
final TodoService mockService = MockTodoService();
when(mockService.getTodos()).thenAnswer((_) async =>
[const Todo(userId: 1, id: 1, title: 'mocktitle', completed: true)]);
Widget testWidget = MediaQuery(
data: const MediaQueryData(),
child: MaterialApp(home: TodoList(todoService: mockService)));
await tester.pumpWidget(testWidget);
await tester.pump(const Duration(milliseconds: 100));
// Expect the mocked todo item to be displayed
expect(find.text('mocktitle'), findsOneWidget);
});
testWidgets('Error should be displayed if the server returns error',
(WidgetTester tester) async {
final TodoService mockService = MockTodoService();
when(mockService.getTodos())
.thenAnswer((_) async => throw Exception('Error getting todos.'));
Widget testWidget = MediaQuery(
data: const MediaQueryData(),
child: MaterialApp(home: TodoList(todoService: mockService)));
await tester.pumpWidget(testWidget);
await tester.pump(const Duration(milliseconds: 100));
// Expect the mocked todo item to be displayed
expect(find.text('Exception: Error getting todos.'), findsOneWidget);
});
testWidgets('Tapping on a todo item and navigating to the done list page.',
(WidgetTester tester) async {
final TodoService mockService = MockTodoService();
when(mockService.getTodos()).thenAnswer((_) async => [
const Todo(userId: 1, id: 1, title: 'mocktitle', completed: true),
const Todo(userId: 1, id: 2, title: 'mocktitle2', completed: true),
]);
Widget testWidget = MediaQuery(
data: const MediaQueryData(),
child: MaterialApp(home: TodoList(todoService: mockService)));
await tester.pumpWidget(testWidget);
await tester.pump(const Duration(milliseconds: 100));
// Tapping on a todo
await tester.tap(find.text('mocktitle'));
await tester.pumpAndSettle();
// Navigating away
await tester.tap(find.byIcon((Icons.list)));
await tester.pumpAndSettle();
// Expect the todo list page to be shown
expect(find.text('completed todo list'), findsOneWidget);
expect(find.text('todo item list'), findsNothing);
});
testWidgets('Navigating to the todo list directly and find empty widget array',
(WidgetTester tester) async {
final TodoService mockService = MockTodoService();
when(mockService.getTodos()).thenAnswer((_) async => [
const Todo(userId: 1, id: 1, title: 'mocktitle', completed: true),
const Todo(userId: 1, id: 2, title: 'mocktitle2', completed: true),
]);
Widget testWidget = MediaQuery(
data: const MediaQueryData(),
child: MaterialApp(home: TodoList(todoService: mockService)));
await tester.pumpWidget(testWidget);
await tester.pump(const Duration(milliseconds: 100));
// Navigating away
await tester.tap(find.byIcon((Icons.list)));
await tester.pumpAndSettle();
// Expect the todo list page to be shown
expect(find.text('completed todo list'), findsOneWidget);
});
testWidgets('Marking todo as done and then as undone',
(WidgetTester tester) async {
final TodoService mockService = MockTodoService();
when(mockService.getTodos()).thenAnswer((_) async => [
const Todo(userId: 1, id: 1, title: 'mocktitle', completed: true),
const Todo(userId: 1, id: 2, title: 'mocktitle2', completed: true),
]);
Widget testWidget = MediaQuery(
data: const MediaQueryData(),
child: MaterialApp(home: TodoList(todoService: mockService)));
await tester.pumpWidget(testWidget);
await tester.pump(const Duration(milliseconds: 100));
// Tap and untap
await tester.tap(find.text('mocktitle'));
await tester.pumpAndSettle();
await tester.tap(find.text('mocktitle'));
await tester.pumpAndSettle();
// Expect the todo list page to be shown
expect(find.text('mocktitle'), findsOneWidget);
});
testWidgets('Testing main mount',
(WidgetTester tester) async {
final TodoService mockService = MockTodoService();
when(mockService.getTodos()).thenAnswer((_) async => [
const Todo(userId: 1, id: 1, title: 'mocktitle', completed: true),
const Todo(userId: 1, id: 2, title: 'mocktitle2', completed: true),
]);
Widget testWidget = MediaQuery(
data: const MediaQueryData(),
child: MaterialApp(home: TodoList(todoService: mockService)));
await tester.pumpWidget(testWidget);
await tester.pump(const Duration(milliseconds: 100));
// Tap and untap
await tester.tap(find.text('mocktitle'));
await tester.pumpAndSettle();
await tester.tap(find.text('mocktitle'));
await tester.pumpAndSettle();
// Expect the todo list page to be shown
expect(find.text('mocktitle'), findsOneWidget);
});
}
```
The final changes we ought to do is in the `main.dart` file.
We can't directly test the `main()` function that
runs the application.
So, in order to get a real coverage report,
add the following lines around the function.
This way, when testing, the compiler skips this function,
as it is not needed to be tested.
```dart
// coverage:ignore-start
void main() {
runApp(const MyApp());
}
// coverage:ignore-end
```
### 6.3 Test coverage
To get the test coverage, we are going to simply run
three commands. However, firstly, if you are on MacOS,
you need to install `lcov`. For this, run the following command
to install it in your computer.
```sh
brew install lcov
```
Now, to get the coverage, run the following commands.
```sh
# Generate `coverage/lcov.info` file
flutter test --coverage
# Generate HTML report
genhtml coverage/lcov.info -o coverage/html
# Open the report
open coverage/html/index.html
```
The generated HTML will create files inside
the `coverage/` folder. Add it to your
`.gitignore` file.
Your browser should have opened a window,
like so.
## 6. Testing!
We have our app running. In fact, we should
have used a [TDD](https://github.com/dwyl/learn-tdd)
approach to get our app running.
The reason we didn't do this is to show you how some
code needs to be laid out to be *testable*.
As you previously seen, mocking objects in Flutter
works through **dependency injection**.
That is, these are functions receive the dependencies that
they depend on through, for example, their constructor.
For simplicity sake, we are not going to be using
any libraries like `get_it` or `Riverpod` to do
deeply nested dependency injection.
In our demo app, we only have two levels deep,
so mocking and testing is very simple.
Let's start testing!
### 6.1 Unit testing
Let's start unit testing our `TodoRepository`
and `TodoService`. As it stands, both of these files
are not "testable". We ought to find a way to
mock the `http` requests. How do we do that?
Exactly. *Dependency injection*.
But first, we need to add the dependencies
in `pubspec.yaml`.
In the `dev_dependencies` section,
add the following two lines of code.
```yaml
mockito: 5.3.2
build_runner: 2.3.2
```
And run `flutter pub get`.
This will download the newly added dependencies.
Now let's start testing!
Change `lib/repository/todoRepository.dart`
so it looks like the following.
```dart
import 'package:http/http.dart' show Client;
class HTTPTodoRepository implements TodoRepository {
Client client = Client();
@override
Future> getTodos() async {
final response = await client
.get(Uri.parse("https://jsonplaceholder.typicode.com/todos"));
if (response.statusCode == 200) {
Iterable l = json.decode(response.body);
List todos =
List.from(l.map((model) => Todo.fromJson(model)));
return todos;
} else {
throw Exception('Failed to load Todo\'s.');
}
}
}
```
Now, on to testing. Create a directory in `test/unit`
and add a new file `todoRepository_test.dart`.
```dart
import 'package:http/http.dart' as http;
import 'package:mockito/annotations.dart';
import 'package:flutter_test/flutter_test.dart';
import 'package:mockito/mockito.dart';
@GenerateMocks([http.Client])
void main() {
}
```
We are going to use `mockito`'s `@GenerateMocks` annotation
to generate a mock object for the `http.Client`,
which is used inside the function.
We could do it manually but since we can get it generated
to ourselves automatically, let's do it.
Run the following command.
```sh
flutter pub run build_runner build --delete-conflicting-outputs
```
This will generate a `todoRepository_test.mocks.dart` file
with the generated mocks.
Import the file in the `todoRepository_test.dart` file and
let's create our first tests!
```dart
import 'todoRepository_test.mocks.dart';
@GenerateMocks([http.Client])
void main() {
test('Checks if a Todo array is yielded and has the expected length',
() async {
final client = MockClient();
final repo = HTTPTodoRepository();
// Use Mockito to return a successful response when it calls the
// provided http.Client.
when(client.get(Uri.parse('https://jsonplaceholder.typicode.com/todos')))
.thenAnswer((_) async => http.Response(
'[{"userId": 1, "id": 2, "title": "mock", "completed": true}]',
200));
repo.client = client;
expect(await repo.getTodos().then((value) => value.length), equals(1));
});
test('throws an exception if the http call completes with an error', () {
final client = MockClient();
final repo = HTTPTodoRepository();
// Use Mockito to return an unsuccessful response when it calls the
// provided http.Client.
when(client.get(Uri.parse('https://jsonplaceholder.typicode.com/todos')))
.thenAnswer((_) async => http.Response('Not Found', 404));
repo.client = client;
expect(repo.getTodos(), throwsException);
});
}
```
Let's break down how we are testing the repository.
We are creating a `final client = MockClient()` using
the generated `MockClient` from the `todoRepository_test.mocks.dart`
file. We are specifying that this client
will return an array with a single todo item.
Using this new `MockClient`, we replace the class `client`
with the `MockClient` and run the test.
The same procedure is done, except an exception
is expected to rise.
Let's do the same process for the `TodoService.dart` file.
We need to change it, like so.
```dart
import 'package:demo_app/models/todo.dart';
import 'package:demo_app/repository/todoRepository.dart';
class TodoService {
TodoRepository todoRepository = HTTPTodoRepository();
Future> getTodos() => todoRepository.getTodos();
}
```
Create a new `todoService_test.dart` and add
the following lines of code.
```dart
import 'package:http/http.dart' as http;
import 'package:mockito/annotations.dart';
import 'package:flutter_test/flutter_test.dart';
import 'package:mockito/mockito.dart';
@GenerateMocks([http.Client])
void main() {
}
```
Run the following command.
```sh
flutter pub run build_runner build --delete-conflicting-outputs
```
This will generate a `todoService_test.mocks.dart` file
with the generated mocks. Similarly, we will use this
file for the tests in the same fashion as before.
In `todoService_test.dart`, add the following code.
```dart
import 'todoService_test.mocks.dart';
// Generate a MockClient using the Mockito package.
// Create new instances of this class in each test.
@GenerateMocks([http.Client])
void main() {
test(
'Checks if a Todo array is returned from the service and has the expected length',
() async {
final client = MockClient();
final repo = HTTPTodoRepository();
// Use Mockito to return a successful response when it calls the
// provided http.Client.
when(client.get(Uri.parse('https://jsonplaceholder.typicode.com/todos')))
.thenAnswer((_) async => http.Response(
'[{"userId": 1, "id": 2, "title": "mock", "completed": true}]',
200));
repo.client = client;
final service = TodoService();
service.todoRepository = repo;
expect(await service.getTodos().then((value) => value.length), equals(1));
});
test('throws an exception if the http call completes with an error', () {
final client = MockClient();
final repo = HTTPTodoRepository();
// Use Mockito to return an unsuccessful response when it calls the
// provided http.Client.
when(client.get(Uri.parse('https://jsonplaceholder.typicode.com/todos')))
.thenAnswer((_) async => http.Response('Not Found', 404));
repo.client = client;
final service = TodoService();
service.todoRepository = repo;
expect(service.getTodos(), throwsException);
});
}
```
This is the same process as before.
We have all the unit tests we want.
Let's run the following command.
```sh
flutter test --coverage
```
This will run the four tests.
They should all pass.
All that's left is testing the widgets.
Let's do it!
### 6.2 Widget testing
To test our widgets, we need to pass
the `TodoService` so we can mock it in our tests.
Normally we would use a Provider to do this but this
is a simple app, so there is no need to add complexity
and third-party libraries.
Let's do these changes. Head over to `lib/main.dart`
and change the `TodoList` class like so.
```dart
class TodoList extends StatefulWidget {
final TodoService todoService;
const TodoList({super.key, required this.todoService});
@override
State createState() => _TodoListState();
}
```
Now, we need to change the `MyApp` class to pass
a `TodoService` instance to `TodoList`.
It should look like this, now.
```dart
class MyApp extends StatelessWidget {
const MyApp({super.key});
@override
Widget build(BuildContext context) {
return MaterialApp(
title: 'Todo App',
theme: ThemeData(
appBarTheme: const AppBarTheme(
backgroundColor: Colors.black,
foregroundColor: Colors.white,
)),
home: TodoList(todoService: TodoService()),
);
}
}
```
Now we can test these widgets!
Create a new directory `test/widget` and
create a file named `widget_test.dart`.
```dart
import 'package:flutter/material.dart';
import 'package:flutter_test/flutter_test.dart';
import 'package:mockito/mockito.dart';
import 'package:mockito/annotations.dart';
import 'package:demo_app/main.dart';
@GenerateMocks([TodoService])
void main() {
}
```
Run the following command.
```sh
flutter pub run build_runner build --delete-conflicting-outputs
```
This will generate a `widget_test.mocks.dart` file
with the generated mocks for `TodoService`.
Now we are ready to test our first widget!
Add the following test inside `main()`.
```dart
import 'widget_test.mocks.dart';
@GenerateMocks([TodoService])
void main() {
testWidgets('Check if appbar renders', (WidgetTester tester) async {
// Build our app and trigger a frame.
await tester.pumpWidget(const MyApp());
// Verify that the appbar renders
expect(find.text('todo item list'), findsOneWidget);
});
}
```
We use the `testWidgets` function to test the widget.
In turn, we get a `tester` object which allows us
to perform actions. We initialize and create the
widget by using `await test.pumpWidget(const MyApp())`.
We then check if the app bar is rendered.
To do this, we use the `find` class to find
the widget by text and check if it was built in the widget tree.
We then use a `Matcher` to make the assertion.
In this case, we check if we `findOneWidget`.
If we run `flutter test --coverage`, we will see this test should pass.
Let's now add a test to check if the list is rendered
with a list of todos. Add the following test.
```dart
testWidgets('Check if item list is rendered', (WidgetTester tester) async {
final TodoService mockService = MockTodoService();
when(mockService.getTodos()).thenAnswer((_) async =>
[const Todo(userId: 1, id: 1, title: 'mocktitle', completed: true)]);
Widget testWidget = MediaQuery(
data: const MediaQueryData(),
child: MaterialApp(home: TodoList(todoService: mockService)));
await tester.pumpWidget(testWidget);
await tester.pump(const Duration(milliseconds: 100));
// Expect the mocked todo item to be displayed
expect(find.text('mocktitle'), findsOneWidget);
});
```
In this test, we are instantiating a `MockTodoService`,
specifying the return value of the `getTodos()`
and then using it when creating a `TodoList` widget.
We can't create `TodoList` by itself because
it necessitates to be a child of `MaterialApp`.
Hence why we use `MediaQuery` with `MaterialApp` which in turn
creates a `TodoList` widget that we want to test.
With `tester.pumpWidget()`, we instantiate the
widget. This won't suffice, though.
The widget needs to render any animations and
run `initState` to fetch the todos item.
For this, we add `await tester.pump()` with a specified duration.
This schedules a frame and triggers a rebuild of the widget,
running the clock by that amount.
We only need `100 ms` in our case.
After this, we assert if the rendered list
contains a todo item with a title "mocktitle".
Let's add another test.
```dart
testWidgets('Navigating to the todo list directly and find empty widget array',
(WidgetTester tester) async {
final TodoService mockService = MockTodoService();
when(mockService.getTodos()).thenAnswer((_) async => [
const Todo(userId: 1, id: 1, title: 'mocktitle', completed: true),
const Todo(userId: 1, id: 2, title: 'mocktitle2', completed: true),
]);
Widget testWidget = MediaQuery(
data: const MediaQueryData(),
child: MaterialApp(home: TodoList(todoService: mockService)));
await tester.pumpWidget(testWidget);
await tester.pump(const Duration(milliseconds: 100));
// Navigating away
await tester.tap(find.byIcon((Icons.list)));
await tester.pumpAndSettle();
// Expect the todo list page to be shown
expect(find.text('completed todo list'), findsOneWidget);
});
```
In this test, we are rendering the `TodoList`,
tapping on a todo item (thus marking it as `complete`)
and then navigating to the done todo item list.
For this, we use `tester.tap(find.byIcon((Icons.list)))`
to find the button and tap it.
We then use `tester.pumpAndSettle()`, which essentially
waits for all the animations to complete.
After this, we check if the done list screen is rendered
in the widget tree.
We can keep adding tests to cover the rest of
the scenarios. Copy the following code and replace
your existing tests to cover all edge cases.
Your `main` function should now look like this.
```dart
@GenerateMocks([TodoService])
void main() {
testWidgets('Check if appbar renders', (WidgetTester tester) async {
// Build our app and trigger a frame.
await tester.pumpWidget(const MyApp());
// Verify that the appbar renders
expect(find.text('todo item list'), findsOneWidget);
});
testWidgets('Check if item list is rendered', (WidgetTester tester) async {
final TodoService mockService = MockTodoService();
when(mockService.getTodos()).thenAnswer((_) async =>
[const Todo(userId: 1, id: 1, title: 'mocktitle', completed: true)]);
Widget testWidget = MediaQuery(
data: const MediaQueryData(),
child: MaterialApp(home: TodoList(todoService: mockService)));
await tester.pumpWidget(testWidget);
await tester.pump(const Duration(milliseconds: 100));
// Expect the mocked todo item to be displayed
expect(find.text('mocktitle'), findsOneWidget);
});
testWidgets('Error should be displayed if the server returns error',
(WidgetTester tester) async {
final TodoService mockService = MockTodoService();
when(mockService.getTodos())
.thenAnswer((_) async => throw Exception('Error getting todos.'));
Widget testWidget = MediaQuery(
data: const MediaQueryData(),
child: MaterialApp(home: TodoList(todoService: mockService)));
await tester.pumpWidget(testWidget);
await tester.pump(const Duration(milliseconds: 100));
// Expect the mocked todo item to be displayed
expect(find.text('Exception: Error getting todos.'), findsOneWidget);
});
testWidgets('Tapping on a todo item and navigating to the done list page.',
(WidgetTester tester) async {
final TodoService mockService = MockTodoService();
when(mockService.getTodos()).thenAnswer((_) async => [
const Todo(userId: 1, id: 1, title: 'mocktitle', completed: true),
const Todo(userId: 1, id: 2, title: 'mocktitle2', completed: true),
]);
Widget testWidget = MediaQuery(
data: const MediaQueryData(),
child: MaterialApp(home: TodoList(todoService: mockService)));
await tester.pumpWidget(testWidget);
await tester.pump(const Duration(milliseconds: 100));
// Tapping on a todo
await tester.tap(find.text('mocktitle'));
await tester.pumpAndSettle();
// Navigating away
await tester.tap(find.byIcon((Icons.list)));
await tester.pumpAndSettle();
// Expect the todo list page to be shown
expect(find.text('completed todo list'), findsOneWidget);
expect(find.text('todo item list'), findsNothing);
});
testWidgets('Navigating to the todo list directly and find empty widget array',
(WidgetTester tester) async {
final TodoService mockService = MockTodoService();
when(mockService.getTodos()).thenAnswer((_) async => [
const Todo(userId: 1, id: 1, title: 'mocktitle', completed: true),
const Todo(userId: 1, id: 2, title: 'mocktitle2', completed: true),
]);
Widget testWidget = MediaQuery(
data: const MediaQueryData(),
child: MaterialApp(home: TodoList(todoService: mockService)));
await tester.pumpWidget(testWidget);
await tester.pump(const Duration(milliseconds: 100));
// Navigating away
await tester.tap(find.byIcon((Icons.list)));
await tester.pumpAndSettle();
// Expect the todo list page to be shown
expect(find.text('completed todo list'), findsOneWidget);
});
testWidgets('Marking todo as done and then as undone',
(WidgetTester tester) async {
final TodoService mockService = MockTodoService();
when(mockService.getTodos()).thenAnswer((_) async => [
const Todo(userId: 1, id: 1, title: 'mocktitle', completed: true),
const Todo(userId: 1, id: 2, title: 'mocktitle2', completed: true),
]);
Widget testWidget = MediaQuery(
data: const MediaQueryData(),
child: MaterialApp(home: TodoList(todoService: mockService)));
await tester.pumpWidget(testWidget);
await tester.pump(const Duration(milliseconds: 100));
// Tap and untap
await tester.tap(find.text('mocktitle'));
await tester.pumpAndSettle();
await tester.tap(find.text('mocktitle'));
await tester.pumpAndSettle();
// Expect the todo list page to be shown
expect(find.text('mocktitle'), findsOneWidget);
});
testWidgets('Testing main mount',
(WidgetTester tester) async {
final TodoService mockService = MockTodoService();
when(mockService.getTodos()).thenAnswer((_) async => [
const Todo(userId: 1, id: 1, title: 'mocktitle', completed: true),
const Todo(userId: 1, id: 2, title: 'mocktitle2', completed: true),
]);
Widget testWidget = MediaQuery(
data: const MediaQueryData(),
child: MaterialApp(home: TodoList(todoService: mockService)));
await tester.pumpWidget(testWidget);
await tester.pump(const Duration(milliseconds: 100));
// Tap and untap
await tester.tap(find.text('mocktitle'));
await tester.pumpAndSettle();
await tester.tap(find.text('mocktitle'));
await tester.pumpAndSettle();
// Expect the todo list page to be shown
expect(find.text('mocktitle'), findsOneWidget);
});
}
```
The final changes we ought to do is in the `main.dart` file.
We can't directly test the `main()` function that
runs the application.
So, in order to get a real coverage report,
add the following lines around the function.
This way, when testing, the compiler skips this function,
as it is not needed to be tested.
```dart
// coverage:ignore-start
void main() {
runApp(const MyApp());
}
// coverage:ignore-end
```
### 6.3 Test coverage
To get the test coverage, we are going to simply run
three commands. However, firstly, if you are on MacOS,
you need to install `lcov`. For this, run the following command
to install it in your computer.
```sh
brew install lcov
```
Now, to get the coverage, run the following commands.
```sh
# Generate `coverage/lcov.info` file
flutter test --coverage
# Generate HTML report
genhtml coverage/lcov.info -o coverage/html
# Open the report
open coverage/html/index.html
```
The generated HTML will create files inside
the `coverage/` folder. Add it to your
`.gitignore` file.
Your browser should have opened a window,
like so.
 Congratulations, you now have a fully tested
application! Awesome job! :tada:
# Deployment 📦
We've now created an app
and have it fully tested.
You might have tested the app
in an emulator or on your own device.
However, this is a *development version* of the app,
that is meant to be used for *debugging*.
If we want to create a **production release**,
we ought to run the following command:
```sh
flutter build
```
If you run `flutter build`,
you will be prompted with
*options to choose from*,
namely the **target platform**.
```sh
Available subcommands:
aar Build a repository containing an AAR and a POM file.
apk Build an Android APK file from your app.
appbundle Build an Android App Bundle file from your app.
bundle Build the Flutter assets directory from your app.
ios Build an iOS application bundle (macOS host only).
ios-framework Produces .xcframeworks for a Flutter project and its plugins for integration into existing, plain iOS Xcode projects.
ipa Build an iOS archive bundle and IPA for distribution (macOS host only).
macos Build a macOS desktop application.
macos-framework Produces .xcframeworks for a Flutter project and its plugins for integration into existing, plain macOS Xcode projects.
web Build a web application bundle.
Run "flutter help" to see global options.
```
By running this command,
a **release bundle** is created,
which can later be deployed to the preferred platform.
We've created a guide
in [`guides/deployment.md`](./guides/deployment.md)
that you can check
to create a *release bundle for the web*
and deploy it,
so everyone can see!
# i18n 🌍
It's fine if you build your `Flutter` apps in English
and for the [1.5 billion](https://www.statista.com/statistics/266808/the-most-spoken-languages-worldwide/)
people who speak it.
However, you'd be leaving out the other `6.2 billion` who don't, i.e. **85%** of the world.
So how would you go about supporting more languages into your app?
We've tackled this issue in https://github.com/dwyl/flutter-navigation-menu-demo#6-adding-i18n-to-our-app.
We *highly recommend* you giving it a read
if you want to learn more about how to
["internationalize"](https://en.wikipedia.org/wiki/Internationalization_and_localization) your app!
# Final remarks 👋
In this document (if you actually read it all the way through 😉),
you went from 0 to hero with Flutter. You learnt important
principles and you *applied* them to create your own app in just
around 20 minutes! Give yourself a pat on the back! :tada:
If you wish to learn a bit more, take a look
at this repo's `guides` folder to
learn about [logging in with Firebase](./guides/login-firebase-tutorial.md)
or [webviews in Flutter](./guides/webview-tutorial.md).
If you want to see more fully tested projects, check these out!
- [flutter-todo-list-tutorial](https://github.com/dwyl/flutter-todo-list-tutorial)
- [flutter-counter-example](https://github.com/dwyl/flutter-counter-example)
Congratulations, you now have a fully tested
application! Awesome job! :tada:
# Deployment 📦
We've now created an app
and have it fully tested.
You might have tested the app
in an emulator or on your own device.
However, this is a *development version* of the app,
that is meant to be used for *debugging*.
If we want to create a **production release**,
we ought to run the following command:
```sh
flutter build
```
If you run `flutter build`,
you will be prompted with
*options to choose from*,
namely the **target platform**.
```sh
Available subcommands:
aar Build a repository containing an AAR and a POM file.
apk Build an Android APK file from your app.
appbundle Build an Android App Bundle file from your app.
bundle Build the Flutter assets directory from your app.
ios Build an iOS application bundle (macOS host only).
ios-framework Produces .xcframeworks for a Flutter project and its plugins for integration into existing, plain iOS Xcode projects.
ipa Build an iOS archive bundle and IPA for distribution (macOS host only).
macos Build a macOS desktop application.
macos-framework Produces .xcframeworks for a Flutter project and its plugins for integration into existing, plain macOS Xcode projects.
web Build a web application bundle.
Run "flutter help" to see global options.
```
By running this command,
a **release bundle** is created,
which can later be deployed to the preferred platform.
We've created a guide
in [`guides/deployment.md`](./guides/deployment.md)
that you can check
to create a *release bundle for the web*
and deploy it,
so everyone can see!
# i18n 🌍
It's fine if you build your `Flutter` apps in English
and for the [1.5 billion](https://www.statista.com/statistics/266808/the-most-spoken-languages-worldwide/)
people who speak it.
However, you'd be leaving out the other `6.2 billion` who don't, i.e. **85%** of the world.
So how would you go about supporting more languages into your app?
We've tackled this issue in https://github.com/dwyl/flutter-navigation-menu-demo#6-adding-i18n-to-our-app.
We *highly recommend* you giving it a read
if you want to learn more about how to
["internationalize"](https://en.wikipedia.org/wiki/Internationalization_and_localization) your app!
# Final remarks 👋
In this document (if you actually read it all the way through 😉),
you went from 0 to hero with Flutter. You learnt important
principles and you *applied* them to create your own app in just
around 20 minutes! Give yourself a pat on the back! :tada:
If you wish to learn a bit more, take a look
at this repo's `guides` folder to
learn about [logging in with Firebase](./guides/login-firebase-tutorial.md)
or [webviews in Flutter](./guides/webview-tutorial.md).
If you want to see more fully tested projects, check these out!
- [flutter-todo-list-tutorial](https://github.com/dwyl/flutter-todo-list-tutorial)
- [flutter-counter-example](https://github.com/dwyl/flutter-counter-example)