# MongoDB_Atlas_integration_with_Microsoft_Power_Apps_and_Power_Automate
**Repository Path**: mirrors_mongodb-partners/MongoDB_Atlas_integration_with_Microsoft_Power_Apps_and_Power_Automate
## Basic Information
- **Project Name**: MongoDB_Atlas_integration_with_Microsoft_Power_Apps_and_Power_Automate
- **Description**: Integration of MongoDB Atlas with Microsoft Power Apps and Power Automate in building a Customer Onboarding Application for a Bank
- **Primary Language**: Unknown
- **License**: Not specified
- **Default Branch**: main
- **Homepage**: None
- **GVP Project**: No
## Statistics
- **Stars**: 0
- **Forks**: 0
- **Created**: 2022-10-24
- **Last Updated**: 2025-11-15
## Categories & Tags
**Categories**: Uncategorized
**Tags**: None
## README
# MongoDB Atlas + Microsoft PowerApps/PowerAutomate
## Description
#### This use-case shows how easily a front end for the Customer Onboarding can be developed using Power Apps and the back end process of validating the uploaded proofs can be automated and triggered in real-time using Power Automate and this entire application can seamlessly integrate with MongoDB Atlas which stores the details entered by user on the front-end and also stores the results of the validation.
#### Below diagram depicts the workflow and the components involved in the solution:
 #### 1: User enters the details and submits the Onboarding Form .
#### 2: Entered information is inserted into MongoDB collection and Proof document uploaded in the form is stored in Azure Blob Storage and this will trigger a Power Automate Workflow.
#### 3: Power Automate workflow will scan the uploaded proof document
#### 4: Scanned document is validated with the details present in the MongoDB collection.
#### 5: Validation status is emailed to the user (Yes/No).
#### 6: MongoDB document is updated with the validation status.
## Prerequisites
#### 1: Spin up a MongoDB Atlas cluster [Click here](https://account.mongodb.com/account/login)
#### 2: Azure subscription to store the files uploaded in Blob storage [Click here](https://azure.microsoft.com/en-in/free/)
#### 3: Power Apps/Power Automate License [Click here](https://powerapps.microsoft.com/en-us/pricing/)
## Below are the High level steps followed for the setup:
#### 1: [MongoDB Cluster Setup](#mongodb-cluster-setup)
#### 2: [Create a Blob Storage](#create-a-blob-storage)
#### 3: [Connect to MongoDB Custom connector](#connect-to-mongodb-custom-connector)
#### 4: [Build Power Apps Onboarding form](#build-power-apps-onboarding-form)
#### 5: [Build Power Automate Flow](#build-power-automate-flow)
# Setup
## MongoDB cluster Setup
### A: Configure Atlas Environment
- Log-on to Atlas account.
- In the project's Security tab, choose to add a new user called main_user, for this user select Add Default Privileges and in the Default Privileges section add the roles readWriteAnyDatabase.
- Create a Sandbox Cluster in a cloud provider region of your choice with default settings. Name the cluster as Sandbox for this setup as it will be used later in PowerApps/PowerAutomate code.
- In the Security tab, add a new IP Whitelist for your laptop's current IP address
### B: Enable the Data API in Atlas
- In the left-hand Deployment menu, click to navigate to Data API.
- Slide the Data API Enabled toggle to ON for the cluster you're using for this PoV. Select Enable when prompted and wait for the deployment to complete:
#### 1: User enters the details and submits the Onboarding Form .
#### 2: Entered information is inserted into MongoDB collection and Proof document uploaded in the form is stored in Azure Blob Storage and this will trigger a Power Automate Workflow.
#### 3: Power Automate workflow will scan the uploaded proof document
#### 4: Scanned document is validated with the details present in the MongoDB collection.
#### 5: Validation status is emailed to the user (Yes/No).
#### 6: MongoDB document is updated with the validation status.
## Prerequisites
#### 1: Spin up a MongoDB Atlas cluster [Click here](https://account.mongodb.com/account/login)
#### 2: Azure subscription to store the files uploaded in Blob storage [Click here](https://azure.microsoft.com/en-in/free/)
#### 3: Power Apps/Power Automate License [Click here](https://powerapps.microsoft.com/en-us/pricing/)
## Below are the High level steps followed for the setup:
#### 1: [MongoDB Cluster Setup](#mongodb-cluster-setup)
#### 2: [Create a Blob Storage](#create-a-blob-storage)
#### 3: [Connect to MongoDB Custom connector](#connect-to-mongodb-custom-connector)
#### 4: [Build Power Apps Onboarding form](#build-power-apps-onboarding-form)
#### 5: [Build Power Automate Flow](#build-power-automate-flow)
# Setup
## MongoDB cluster Setup
### A: Configure Atlas Environment
- Log-on to Atlas account.
- In the project's Security tab, choose to add a new user called main_user, for this user select Add Default Privileges and in the Default Privileges section add the roles readWriteAnyDatabase.
- Create a Sandbox Cluster in a cloud provider region of your choice with default settings. Name the cluster as Sandbox for this setup as it will be used later in PowerApps/PowerAutomate code.
- In the Security tab, add a new IP Whitelist for your laptop's current IP address
### B: Enable the Data API in Atlas
- In the left-hand Deployment menu, click to navigate to Data API.
- Slide the Data API Enabled toggle to ON for the cluster you're using for this PoV. Select Enable when prompted and wait for the deployment to complete:
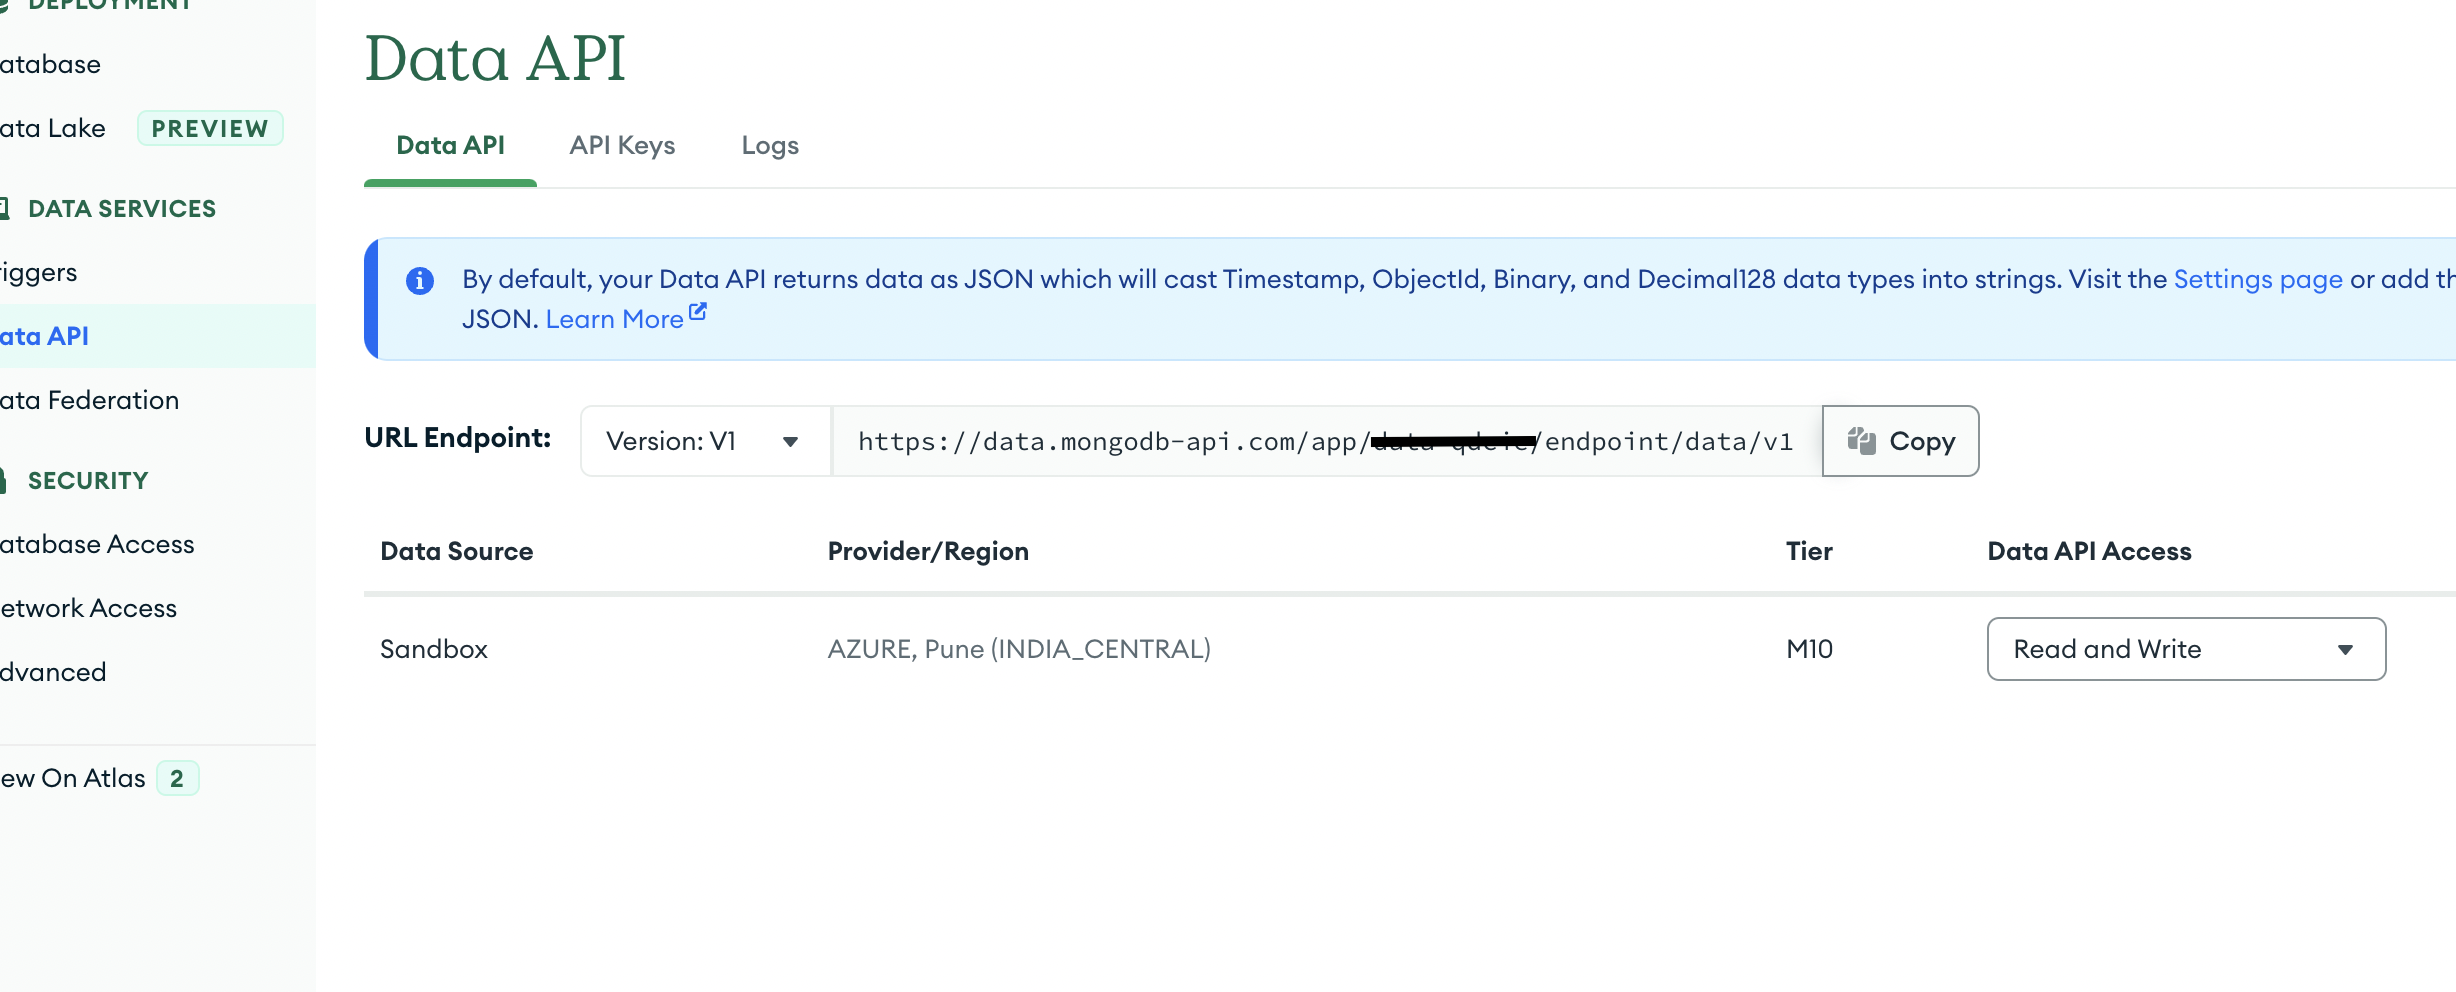 - Copy your Data API App ID from the URL Endpoint as you will need it for Postman. In the above screenshot, the masked part is my App ID.
### C: Generate an API key
- Switch to the API Keys tab and click Generate API Key.
- Give your API key an appropriate name then click the Generate API Key button.
- Copy the private API Key for use and safekeeping that is displayed once generated.
### Note: This is the only time you can retrieve the full private key.
## Create a Blob Storage
- You can follow the steps provided in [Microsoft Link](https://learn.microsoft.com/en-us/azure/storage/common/storage-account-create?tabs=azure-portal).
- Create 2 containers "documents" and "filestoprocess"
- documents -> When the user clicks on Upload and uploads a file, it is stored here. This does not trigger the Power Automate Flow
- filestoprocess -> When the user clicks on Submit, file is copied from documents to filestoprocess container and this in-turn will trigger the Power Automate Flow
## Connect to MongoDB Custom connector
- Login to Power Apps.
- Follow below 3 steps from screenshot to use the MongoDB Custom connector.
- Copy your Data API App ID from the URL Endpoint as you will need it for Postman. In the above screenshot, the masked part is my App ID.
### C: Generate an API key
- Switch to the API Keys tab and click Generate API Key.
- Give your API key an appropriate name then click the Generate API Key button.
- Copy the private API Key for use and safekeeping that is displayed once generated.
### Note: This is the only time you can retrieve the full private key.
## Create a Blob Storage
- You can follow the steps provided in [Microsoft Link](https://learn.microsoft.com/en-us/azure/storage/common/storage-account-create?tabs=azure-portal).
- Create 2 containers "documents" and "filestoprocess"
- documents -> When the user clicks on Upload and uploads a file, it is stored here. This does not trigger the Power Automate Flow
- filestoprocess -> When the user clicks on Submit, file is copied from documents to filestoprocess container and this in-turn will trigger the Power Automate Flow
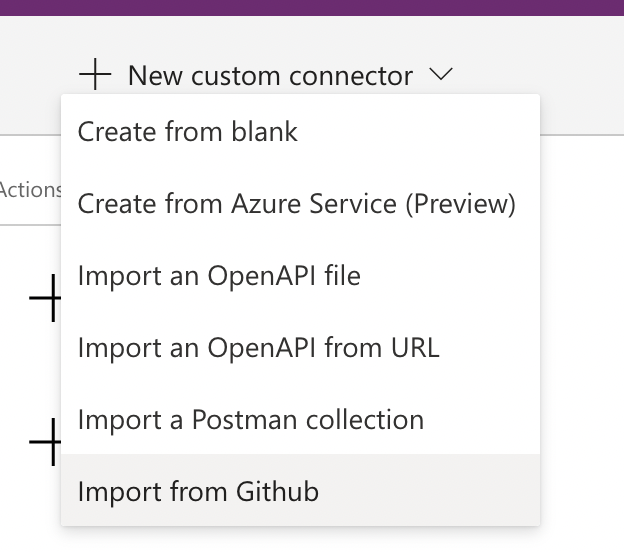
## Connect to MongoDB Custom connector
- Login to Power Apps.
- Follow below 3 steps from screenshot to use the MongoDB Custom connector.

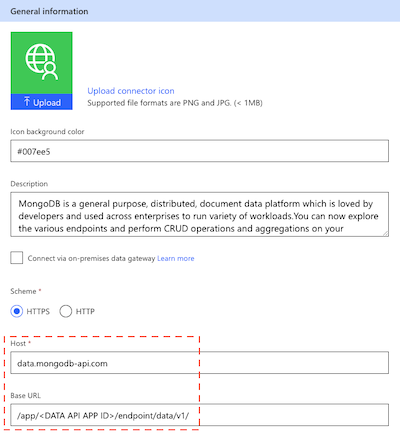
 - Change the name of the connector as per your choice
- Check the “Host” in the “General” tab. It should be the first part of the URL endpoint (after https:// and before the next “/”) of the Data API set in [Enable the Data API in Atlas](#b-enable-the-data-api-in-atlas). If its not “data.mongodb-api.com”, then change the Host with the first part of the URl endpoint. Update the “Base url” with the remaining part of the URL endpoint.
- Toggle the “Swagger Editor” button which will show the swagger code for the connector. Replace the swagger file content with the MongoDBDataAPI.swagger.
- Update the connector.
- Go to Test Tab → New Connection. Enter the private API Key created in [Generate an API key](#c-generate-an-api-key) step.
- Change the name of the connector as per your choice
- Check the “Host” in the “General” tab. It should be the first part of the URL endpoint (after https:// and before the next “/”) of the Data API set in [Enable the Data API in Atlas](#b-enable-the-data-api-in-atlas). If its not “data.mongodb-api.com”, then change the Host with the first part of the URl endpoint. Update the “Base url” with the remaining part of the URL endpoint.

- Toggle the “Swagger Editor” button which will show the swagger code for the connector. Replace the swagger file content with the MongoDBDataAPI.swagger.
- Update the connector.
- Go to Test Tab → New Connection. Enter the private API Key created in [Generate an API key](#c-generate-an-api-key) step.
 - This connection created will show up in the Dataverse→Connections in the Left Panel of Power Apps portal.
## Build Power Apps Onboarding form
- Go to Apps in the left panel or Power Apps Portal.
- Create a new Canvas app. Give a name, choose Tablet Mode.
- This connection created will show up in the Dataverse→Connections in the Left Panel of Power Apps portal.
## Build Power Apps Onboarding form
- Go to Apps in the left panel or Power Apps Portal.
- Create a new Canvas app. Give a name, choose Tablet Mode.
 - ## Add data source
- ### Blob Storage
- Type Blob Storage → Add a connection. Enter the Azure storage account Name and Azure storage account Access Key(Get it from the Azure Portal where the storage container is created). Click Connect.
- ## Add data source
- ### Blob Storage
- Type Blob Storage → Add a connection. Enter the Azure storage account Name and Azure storage account Access Key(Get it from the Azure Portal where the storage container is created). Click Connect.
 - ### MongoDB DataAPI
- Type MongoDB and you will see the connection you created with the Custom Connector.
- ## Create the Forms
- We need 7 screens
### 1. Welcome Screen:
User can Open a New Application or choose to Open an Existing Application saved earlier by providing the Application Number.
- ### MongoDB DataAPI
- Type MongoDB and you will see the connection you created with the Custom Connector.
- ## Create the Forms
- We need 7 screens
### 1. Welcome Screen:
User can Open a New Application or choose to Open an Existing Application saved earlier by providing the Application Number.
 - Create 2 Buttons by clicking on Insert-> Input-> Button.
- Click on the Button:
- Change the name in the Text Property for both the buttons.
- Choose the OnSelect property of "Open New Application" and add this function:
Set(ApplNo,Text(RandBetween(1,9999)));
Navigate('New Form',ScreenTransition.Fade,{ApplnoNew:ApplNo});
- Choose the OnSelect property of "Retrieve Existing Application" and add this function:
Navigate(GetApplicationNumber,ScreenTransition.Fade);
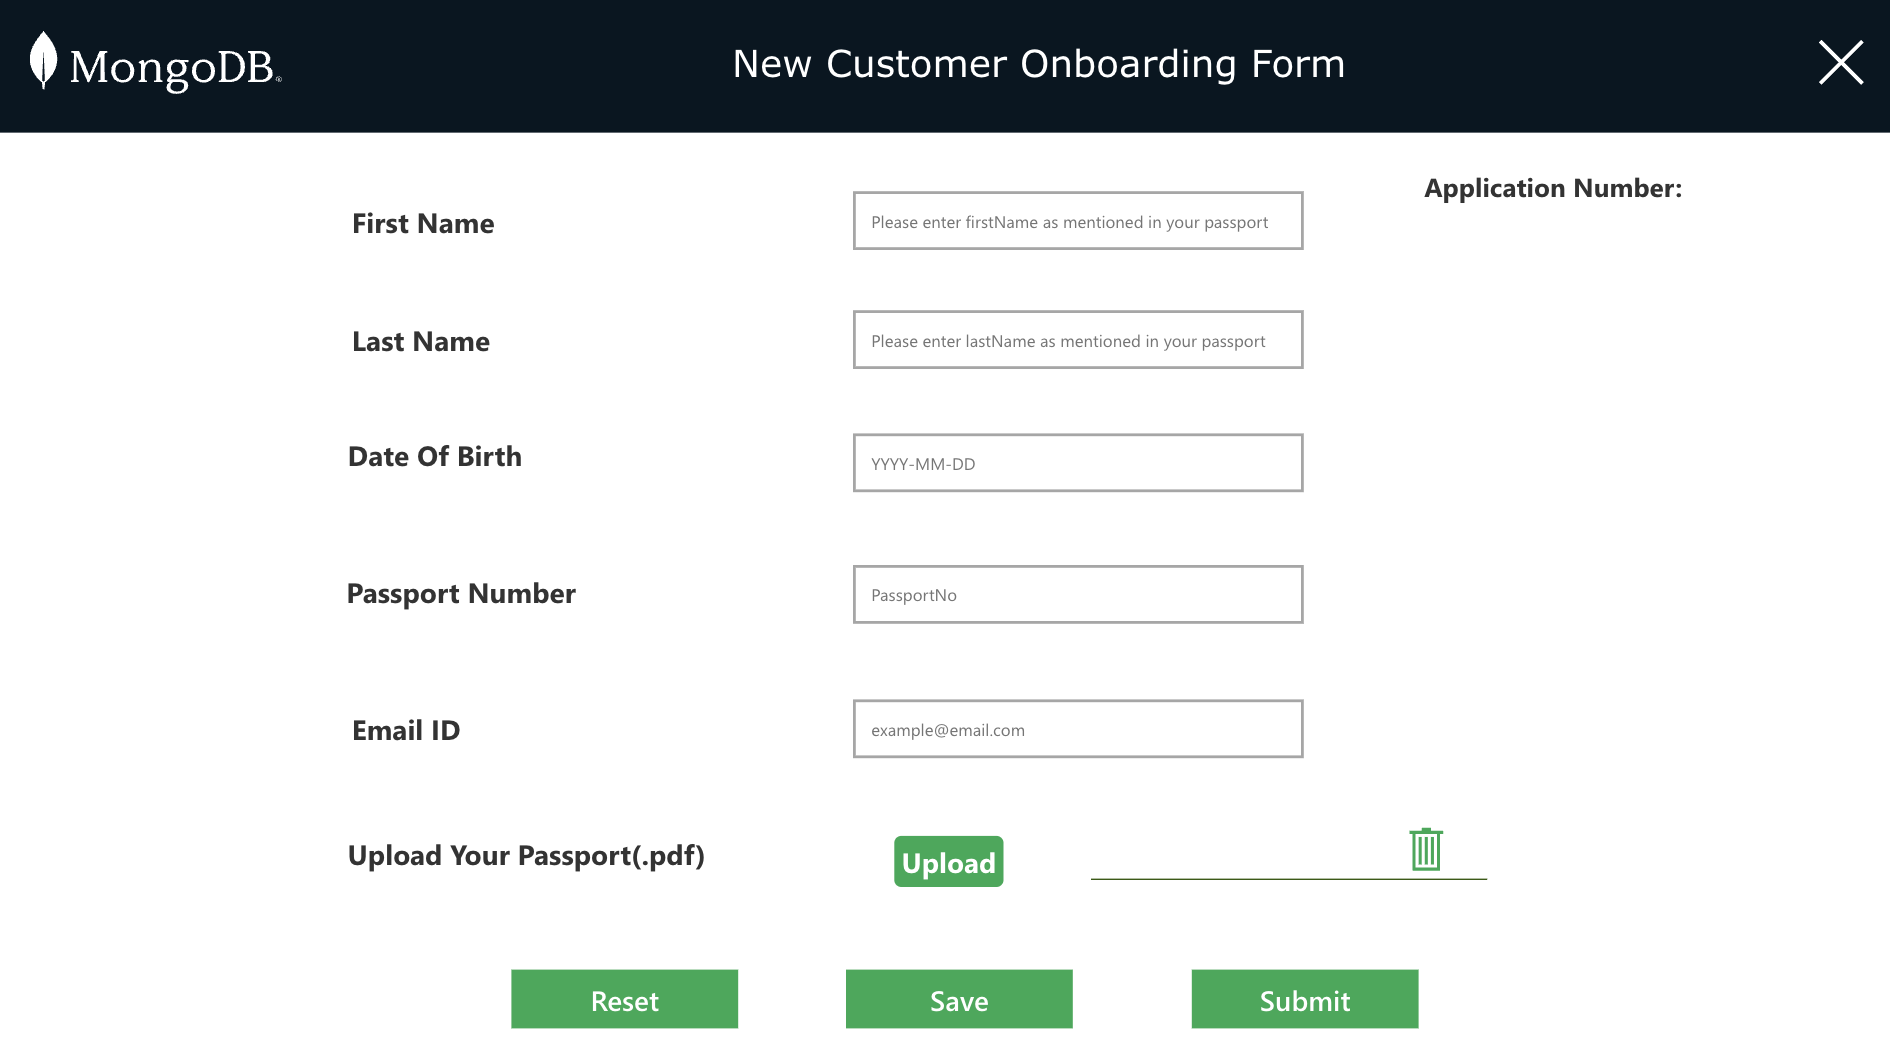
### 2. New Application:
Clicking on New Application takes us to the below form to fill all the details.
- Create 2 Buttons by clicking on Insert-> Input-> Button.
- Click on the Button:
- Change the name in the Text Property for both the buttons.
- Choose the OnSelect property of "Open New Application" and add this function:
Set(ApplNo,Text(RandBetween(1,9999)));
Navigate('New Form',ScreenTransition.Fade,{ApplnoNew:ApplNo});
- Choose the OnSelect property of "Retrieve Existing Application" and add this function:
Navigate(GetApplicationNumber,ScreenTransition.Fade);
### 2. New Application:
Clicking on New Application takes us to the below form to fill all the details.
 - Create a New Screen.
- Heading and labels on the left.
- Click on Insert → Label and key in the name.
- Input boxes on the right,
- Click on Insert → Text → Text Input.
- Click on the first Text Input box, go to properties and add “Please enter firstName as mentioned in your passport” in the Hint text property. Similarly add Hint text to each of the Text Inputs.
- For the Application Number, we need to show the random number generated in the Welcome Page. So add a label set the Text as "ApplnoNew"(which is the variable we are passing from the Welcome Screen)
- Rename the Labels,TextInputs and Buttons as shown in the below screenshot. This will be easier to identify the fields for the actions/functions we write for Buttons.
- Create a New Screen.
- Heading and labels on the left.
- Click on Insert → Label and key in the name.
- Input boxes on the right,
- Click on Insert → Text → Text Input.
- Click on the first Text Input box, go to properties and add “Please enter firstName as mentioned in your passport” in the Hint text property. Similarly add Hint text to each of the Text Inputs.
- For the Application Number, we need to show the random number generated in the Welcome Page. So add a label set the Text as "ApplnoNew"(which is the variable we are passing from the Welcome Screen)
- Rename the Labels,TextInputs and Buttons as shown in the below screenshot. This will be easier to identify the fields for the actions/functions we write for Buttons.
 - ### Upload Button:
- Click on Insert → Media → Add Picture. Edit the text to “Upload”.
- Click on the Media Button created→ choose OnSelect Option → Add this function:
Set(varAzureFile,AzureBlobStorage.CreateFile("documents",
Concatenate(Passport.Text,".pdf"),Upload.Media));
Collect(collectTemp,{FN:Upload.FileName,FID:varAzureFile.Id});
- Filestoprocess → Folder name in Blob Storage
- Concatenate(Passport.Text,".pdf") → File name( I chose it to be the Passport number entered by the user in the TextInput we created earlier)
- Upload.Media → For Uploading the file.
- ### Add a gallery to show the uploaded file:
- Click on Gallery and select vertical
- Choose the CollectTemp as the datasource(CollectTemp is the collection created during the Upload).
- For the title of the Gallery. Select Text and set it to
ThisItem.FN
- Add the delete button from Insert-> Icons. Click on the Button created→ choose OnSelect Option → Add this function:
Remove(collectTemp,ThisItem);
AzureBlobStorage.DeleteFile(ThisItem.FID);
Reset(Upload);
- ### Upload Button:
- Click on Insert → Media → Add Picture. Edit the text to “Upload”.
- Click on the Media Button created→ choose OnSelect Option → Add this function:
Set(varAzureFile,AzureBlobStorage.CreateFile("documents",
Concatenate(Passport.Text,".pdf"),Upload.Media));
Collect(collectTemp,{FN:Upload.FileName,FID:varAzureFile.Id});
- Filestoprocess → Folder name in Blob Storage
- Concatenate(Passport.Text,".pdf") → File name( I chose it to be the Passport number entered by the user in the TextInput we created earlier)
- Upload.Media → For Uploading the file.
- ### Add a gallery to show the uploaded file:
- Click on Gallery and select vertical
- Choose the CollectTemp as the datasource(CollectTemp is the collection created during the Upload).
- For the title of the Gallery. Select Text and set it to
ThisItem.FN
- Add the delete button from Insert-> Icons. Click on the Button created→ choose OnSelect Option → Add this function:
Remove(collectTemp,ThisItem);
AzureBlobStorage.DeleteFile(ThisItem.FID);
Reset(Upload);
 - ### Save Button:
- Click on Insert → Button. Edit the text to “Save”.
- Click on the Button created→ choose OnSelect Option → Add this function:
If(IsBlank(Passport.Text),Set(popup_passport,true),
MongoDB.InsertDocument("Sandbox","XYZBank","onboarding",{document:
{firstname:Upper(Fname.Text),lastname:Upper(Lname.Text),DateOfBirth:DOB.Text,
passportNumber:Passport.Text,_id:Passport.Text,
emailId:email.Text,applicationNumber:ApplNoLabel}});
Navigate('Save success',ScreenTransition.Fade,{returnAppNumber:ApplNoLabel});
);
- ### Submit Button:
- Click on Insert → Button. Edit the text to “Submit”.
- Click on the Button created→ choose OnSelect Option → Add this function:
If(IsBlank(Fname.Text) Or IsBlank(Lname.Text) Or IsBlank(DOB.Text) Or IsBlank(Passport.Text) Or IsBlank(email.Text) Or
IsEmpty(collectTemp.FN),
Set(popup,true),
AzureBlobStorage.CopyFile(Concatenate("documents/",Passport.Text,".pdf"),Concatenate("filestoprocess/",Passport.Text,".pdf"),
{overwrite:true});
AzureBlobStorage.DeleteFile(varAzureFile.Id);
MongoDB.InsertDocument("Sandbox","XYZBank","onboarding",{document:
{firstname:Upper(Fname.Text),lastname:Upper(Lname.Text),DateOfBirth:DOB.Text,
passportNumber:Passport.Text,_id:Passport.Text,emailId:email.Text,applicationNumber:ApplNoLabel.Text}});
Navigate(Success,ScreenTransition.Fade,{returnAppNumber:ApplNoLabel});
);
- ### Reset Button:
- Click on Insert → Button. Edit the text to “Submit”.
- Click on the Button created→ choose OnSelect Option → Add this function:
Reset(Fname);Reset(Lname);Reset(DOB);Reset(Passport);Reset(email);
- ### Popup Window:
- We also need a popup window to stop the user if he is trying to submit without entering all the details.
- Click the form(anywhere on the screen)-> Under the Advanced-> Action -> OnVisible, Add
Set(popup,false);
Clear(collectTemp);
- Click on the '+' Button on the left panel. Add a Rectangle. Adjust the size, color, border.
- Inside the Rectangle add a Label and add the below line under text Property :
"Please fill in all details and Upload your passport as a pdf before clicking on Submit"
- Inside the Rectangle add a button. Click on the Button created→ choose OnSelect Option → Add this function:
Set(popup,false)
- Choose these 3(Rectangle+Label+Button) on the left panel, right click and group them. Click on the top container which got created ->Visible property-> add the text "popup".
- Similarly create another popup window to ensure user enters passport number before the first save. This would be necessary for the MongoDB insert and also as a filename for the passport pdf file uploaded. Click on this top container which got created ->Visible property-> add the text "popup_passport".The message for Label text property will be
"Please enter the passport number before clicking on Save"
and Button->OnSelect function as
Set(popup_passport,false)
### 3. Save Screen:
Saving the form should display us saved successfully message on screen.
- ### Save Button:
- Click on Insert → Button. Edit the text to “Save”.
- Click on the Button created→ choose OnSelect Option → Add this function:
If(IsBlank(Passport.Text),Set(popup_passport,true),
MongoDB.InsertDocument("Sandbox","XYZBank","onboarding",{document:
{firstname:Upper(Fname.Text),lastname:Upper(Lname.Text),DateOfBirth:DOB.Text,
passportNumber:Passport.Text,_id:Passport.Text,
emailId:email.Text,applicationNumber:ApplNoLabel}});
Navigate('Save success',ScreenTransition.Fade,{returnAppNumber:ApplNoLabel});
);
- ### Submit Button:
- Click on Insert → Button. Edit the text to “Submit”.
- Click on the Button created→ choose OnSelect Option → Add this function:
If(IsBlank(Fname.Text) Or IsBlank(Lname.Text) Or IsBlank(DOB.Text) Or IsBlank(Passport.Text) Or IsBlank(email.Text) Or
IsEmpty(collectTemp.FN),
Set(popup,true),
AzureBlobStorage.CopyFile(Concatenate("documents/",Passport.Text,".pdf"),Concatenate("filestoprocess/",Passport.Text,".pdf"),
{overwrite:true});
AzureBlobStorage.DeleteFile(varAzureFile.Id);
MongoDB.InsertDocument("Sandbox","XYZBank","onboarding",{document:
{firstname:Upper(Fname.Text),lastname:Upper(Lname.Text),DateOfBirth:DOB.Text,
passportNumber:Passport.Text,_id:Passport.Text,emailId:email.Text,applicationNumber:ApplNoLabel.Text}});
Navigate(Success,ScreenTransition.Fade,{returnAppNumber:ApplNoLabel});
);
- ### Reset Button:
- Click on Insert → Button. Edit the text to “Submit”.
- Click on the Button created→ choose OnSelect Option → Add this function:
Reset(Fname);Reset(Lname);Reset(DOB);Reset(Passport);Reset(email);
- ### Popup Window:
- We also need a popup window to stop the user if he is trying to submit without entering all the details.
- Click the form(anywhere on the screen)-> Under the Advanced-> Action -> OnVisible, Add
Set(popup,false);
Clear(collectTemp);
- Click on the '+' Button on the left panel. Add a Rectangle. Adjust the size, color, border.
- Inside the Rectangle add a Label and add the below line under text Property :
"Please fill in all details and Upload your passport as a pdf before clicking on Submit"
- Inside the Rectangle add a button. Click on the Button created→ choose OnSelect Option → Add this function:
Set(popup,false)
- Choose these 3(Rectangle+Label+Button) on the left panel, right click and group them. Click on the top container which got created ->Visible property-> add the text "popup".
- Similarly create another popup window to ensure user enters passport number before the first save. This would be necessary for the MongoDB insert and also as a filename for the passport pdf file uploaded. Click on this top container which got created ->Visible property-> add the text "popup_passport".The message for Label text property will be
"Please enter the passport number before clicking on Save"
and Button->OnSelect function as
Set(popup_passport,false)
### 3. Save Screen:
Saving the form should display us saved successfully message on screen.
 - Create a New Screen.
- Add a Label and enter the text as: “Your details are successfully saved".
- Add the Check Icon and Cancel Icon from Icons dropdown as shown in the below screenshot. When the Cancel button is clicked, we need to reset the fields entered in the Welcome Screen and navigate back to the Welcome Screen.
- Create a New Screen.
- Add a Label and enter the text as: “Your details are successfully saved".
- Add the Check Icon and Cancel Icon from Icons dropdown as shown in the below screenshot. When the Cancel button is clicked, we need to reset the fields entered in the Welcome Screen and navigate back to the Welcome Screen.
 - Click on the Cancel Icon created→ choose OnSelect Option → Add this function:
Reset(Fname);Reset(Lname);Reset(DOB);Reset(Passport);Reset(email);
Navigate('Welcome Screen',ScreenTransition.Fade);
### 4. Submit Screen:
Submitting the form should display us success message on screen.
Create a New Screen similar to the Save Screen and change the text message accordingly.
- Click on the Cancel Icon created→ choose OnSelect Option → Add this function:
Reset(Fname);Reset(Lname);Reset(DOB);Reset(Passport);Reset(email);
Navigate('Welcome Screen',ScreenTransition.Fade);
### 4. Submit Screen:
Submitting the form should display us success message on screen.
Create a New Screen similar to the Save Screen and change the text message accordingly.
 ### 5. Fetch Existing Application:
If user chooses to open the existing form, it should ask the user to enter the Application Number.
### 5. Fetch Existing Application:
If user chooses to open the existing form, it should ask the user to enter the Application Number.
 - Create a New Screen.
- Add a label and text field as shown in the screenshot. Close Button should navigate to the Welcome Screen just like we did for previous screens.
- Add a Submit button. Click on the Button created→ choose OnSelect Option → Add this function:
If(Or(IsBlank(ApplNoEntered.Text),!IsNumeric(ApplNoEntered.Text)),Set(popup,true),
UpdateContext({varFormData:MongoDB.FindDocument("Sandbox","XYZBank","onboarding",
{filter:{_id:Blank(),applicationNumber:ApplNoEntered.Text}})});
If(IsBlank(varFormData.document.applicationNumber),
Set(popup,true),
If(Or(varFormData.document.status= "Valid",varFormData.document.status= "Invalid"),
Navigate('View Submitted Form',ScreenTransition.Fade,{varFormData:varFormData}),
Navigate('Edit Form',ScreenTransition.Fade,{varFormData:varFormData})
);
);
);
### 6. Edit Application:
If the application was saved earlier, then it should take the user to the Edit form page where the entries can be edited.
- Create a New Screen.
- Add a label and text field as shown in the screenshot. Close Button should navigate to the Welcome Screen just like we did for previous screens.
- Add a Submit button. Click on the Button created→ choose OnSelect Option → Add this function:
If(Or(IsBlank(ApplNoEntered.Text),!IsNumeric(ApplNoEntered.Text)),Set(popup,true),
UpdateContext({varFormData:MongoDB.FindDocument("Sandbox","XYZBank","onboarding",
{filter:{_id:Blank(),applicationNumber:ApplNoEntered.Text}})});
If(IsBlank(varFormData.document.applicationNumber),
Set(popup,true),
If(Or(varFormData.document.status= "Valid",varFormData.document.status= "Invalid"),
Navigate('View Submitted Form',ScreenTransition.Fade,{varFormData:varFormData}),
Navigate('Edit Form',ScreenTransition.Fade,{varFormData:varFormData})
);
);
);
### 6. Edit Application:
If the application was saved earlier, then it should take the user to the Edit form page where the entries can be edited.
 - Create a New Screen.
- Use the similar setup like the New Application. Make change to the Save And Submit Button code as these should do a update to the already saved document. Add the Popup window as we did in the New Application.
- Application number is the number the use enters. We are passing the varFormData collection from the previous page which has all the values retrieved from Database. So for every text Input and the Application Number, Add this under the Default property of the respective fields:
varFormData.document.firstname
varFormData.document.lastname
varFormData.document.DateOfBirth
varFormData.document.passportNumber
varFormData.document.emailId
varFormData.document.applicationNumber
- Click on the Save Button created→ choose OnSelect Option → Add this function:
MongoDB.UpdateDocument("Sandbox","XYZBank","onboarding",{filter:{applicationNumber:ApplNoLabel_1.Text,
passportNumber:Blank()},update:{'$set':{firstname:Upper(Fname_1.Text),lastname:Upper(Lname_1.Text),
DateOfBirth:DOB_1.Text,passportNumber:Passport_1.Text,emailId:email_1.Text,status:Blank()}}});
Navigate('Save success_1',ScreenTransition.Fade,{returnAppNumber:ApplNoLabel_1});
- On Save it should take the user to the "Save success1" screen. Create a screen similar to the [Save Screen](#save-screen) created in the "New Application".
- Click on the Submit Button created→ choose OnSelect Option → Add this function:
If(IsBlank(Fname_1.Text) Or IsBlank(Lname_1.Text) Or IsBlank(DOB_1.Text) Or IsBlank(Passport_1.Text) Or IsBlank(email_1.Text) Or
IsEmpty(collectTemp.FN),
Set(popup,true),
AzureBlobStorage.CopyFile(Concatenate("documents/",Passport_1.Text,".pdf"),Concatenate("filestoprocess/",Passport_1.Text,".pdf"));
AzureBlobStorage.DeleteFile(varAzureFileEditForm.Id);
MongoDB.UpdateDocument("Sandbox","XYZBank","onboarding",{filter:{applicationNumber:ApplNoLabel_1.Text,passportNumber:Blank()},
update:{'$set':{firstname:Upper(Fname_1.Text),lastname:Upper(Lname_1.Text),DateOfBirth:DOB_1.Text,
passportNumber:Passport_1.Text,emailId:email_1.Text,status:Blank()}}});
Navigate(Success_1,ScreenTransition.Fade,{returnAppNumber:ApplNoLabel_1});
);
- On Submit it should take the user to the "Success1" screen. Create a screen similar to the [Success Screen](#success-screen) created in the "New Application".
### 7. View Submitted Application:
If the application was already submitted, then it should be non editable.
- Create a New Screen.
- Use the similar setup like the New Application. Make change to the Save And Submit Button code as these should do a update to the already saved document. Add the Popup window as we did in the New Application.
- Application number is the number the use enters. We are passing the varFormData collection from the previous page which has all the values retrieved from Database. So for every text Input and the Application Number, Add this under the Default property of the respective fields:
varFormData.document.firstname
varFormData.document.lastname
varFormData.document.DateOfBirth
varFormData.document.passportNumber
varFormData.document.emailId
varFormData.document.applicationNumber
- Click on the Save Button created→ choose OnSelect Option → Add this function:
MongoDB.UpdateDocument("Sandbox","XYZBank","onboarding",{filter:{applicationNumber:ApplNoLabel_1.Text,
passportNumber:Blank()},update:{'$set':{firstname:Upper(Fname_1.Text),lastname:Upper(Lname_1.Text),
DateOfBirth:DOB_1.Text,passportNumber:Passport_1.Text,emailId:email_1.Text,status:Blank()}}});
Navigate('Save success_1',ScreenTransition.Fade,{returnAppNumber:ApplNoLabel_1});
- On Save it should take the user to the "Save success1" screen. Create a screen similar to the [Save Screen](#save-screen) created in the "New Application".
- Click on the Submit Button created→ choose OnSelect Option → Add this function:
If(IsBlank(Fname_1.Text) Or IsBlank(Lname_1.Text) Or IsBlank(DOB_1.Text) Or IsBlank(Passport_1.Text) Or IsBlank(email_1.Text) Or
IsEmpty(collectTemp.FN),
Set(popup,true),
AzureBlobStorage.CopyFile(Concatenate("documents/",Passport_1.Text,".pdf"),Concatenate("filestoprocess/",Passport_1.Text,".pdf"));
AzureBlobStorage.DeleteFile(varAzureFileEditForm.Id);
MongoDB.UpdateDocument("Sandbox","XYZBank","onboarding",{filter:{applicationNumber:ApplNoLabel_1.Text,passportNumber:Blank()},
update:{'$set':{firstname:Upper(Fname_1.Text),lastname:Upper(Lname_1.Text),DateOfBirth:DOB_1.Text,
passportNumber:Passport_1.Text,emailId:email_1.Text,status:Blank()}}});
Navigate(Success_1,ScreenTransition.Fade,{returnAppNumber:ApplNoLabel_1});
);
- On Submit it should take the user to the "Success1" screen. Create a screen similar to the [Success Screen](#success-screen) created in the "New Application".
### 7. View Submitted Application:
If the application was already submitted, then it should be non editable.
 - Create a New Screen.
- Use the similar setup like the Edit Application Screen displaying all the retrieved values from varFormData. This screen should be non editable, so for the text inputs-> Properties->Display Mode-> Select View
- Add a new Label and text field for Displaying the Status of the Application
## Build Power Automate Flow:
- Login to Power Automate.
- Create a New Automated Cloud Flow.
- Create a New Screen.
- Use the similar setup like the Edit Application Screen displaying all the retrieved values from varFormData. This screen should be non editable, so for the text inputs-> Properties->Display Mode-> Select View
- Add a new Label and text field for Displaying the Status of the Application
## Build Power Automate Flow:
- Login to Power Automate.
- Create a New Automated Cloud Flow.
 - Give a name and choose flow’s trigger as “When a blob is added or modified”. (Hint : Just type blob in the search). Create the first 2 steps in the workflow as shown below.
#### Note : Storage account name will be the name of the Storage Account created in the Azure Portal.
- Give a name and choose flow’s trigger as “When a blob is added or modified”. (Hint : Just type blob in the search). Create the first 2 steps in the workflow as shown below.
#### Note : Storage account name will be the name of the Storage Account created in the Azure Portal.
 - Create Step3 as below: Choose Dynamic Content → File Content
 - Step 4 and Step 5:
- These steps are to split the file name that is uploaded in the Blob Container.
- Step 4 takes Text: Display Name , Search Text : ‘.’
- Step 5 takes Text: Display Name,starting position: 0 and Length: Text Position(output of Step4)
- Step 4 and Step 5:
- These steps are to split the file name that is uploaded in the Blob Container.
- Step 4 takes Text: Display Name , Search Text : ‘.’
- Step 5 takes Text: Display Name,starting position: 0 and Length: Text Position(output of Step4)
 - Step 6:
- Type MongoDB and then choose the DataAPI created and choose Find
- Document as an Action. Enter all the details as below:
#### Note : _id will be the output of the previous step(Substring)
- Step 6:
- Type MongoDB and then choose the DataAPI created and choose Find
- Document as an Action. Enter all the details as below:
#### Note : _id will be the output of the previous step(Substring)
 - Step 7:
- Type Parse JSON.
- Content : output of the Find Operation.
- Schema→ Generate from sample
- Paste the JSON output of the previous step and click Done.For Example:
{
"document": {
"_id": "N123456",
"firstname": "JOHN",
"lastname": "SMITH",
"DateOfBirth": "2022-01-01",
"passportNumber": "N123456",
"emailId": "xxxxx@xxx.com"
}
}
- Step 7:
- Type Parse JSON.
- Content : output of the Find Operation.
- Schema→ Generate from sample
- Paste the JSON output of the previous step and click Done.For Example:
{
"document": {
"_id": "N123456",
"firstname": "JOHN",
"lastname": "SMITH",
"DateOfBirth": "2022-01-01",
"passportNumber": "N123456",
"emailId": "xxxxx@xxx.com"
}
}
 - Step 8:
- Type Condition.Choose a Value -> Add each field of the Parse JSON output and compare with the AI Model output(Extract information from Identity Documents)
- Step 8:
- Type Condition.Choose a Value -> Add each field of the Parse JSON output and compare with the AI Model output(Extract information from Identity Documents)
 - If Yes/No:
- Add an Action → Type outlook.com →Send an email.
- Add mail content as per your choice:
- If Yes/No:
- Add an Action → Type outlook.com →Send an email.
- Add mail content as per your choice:
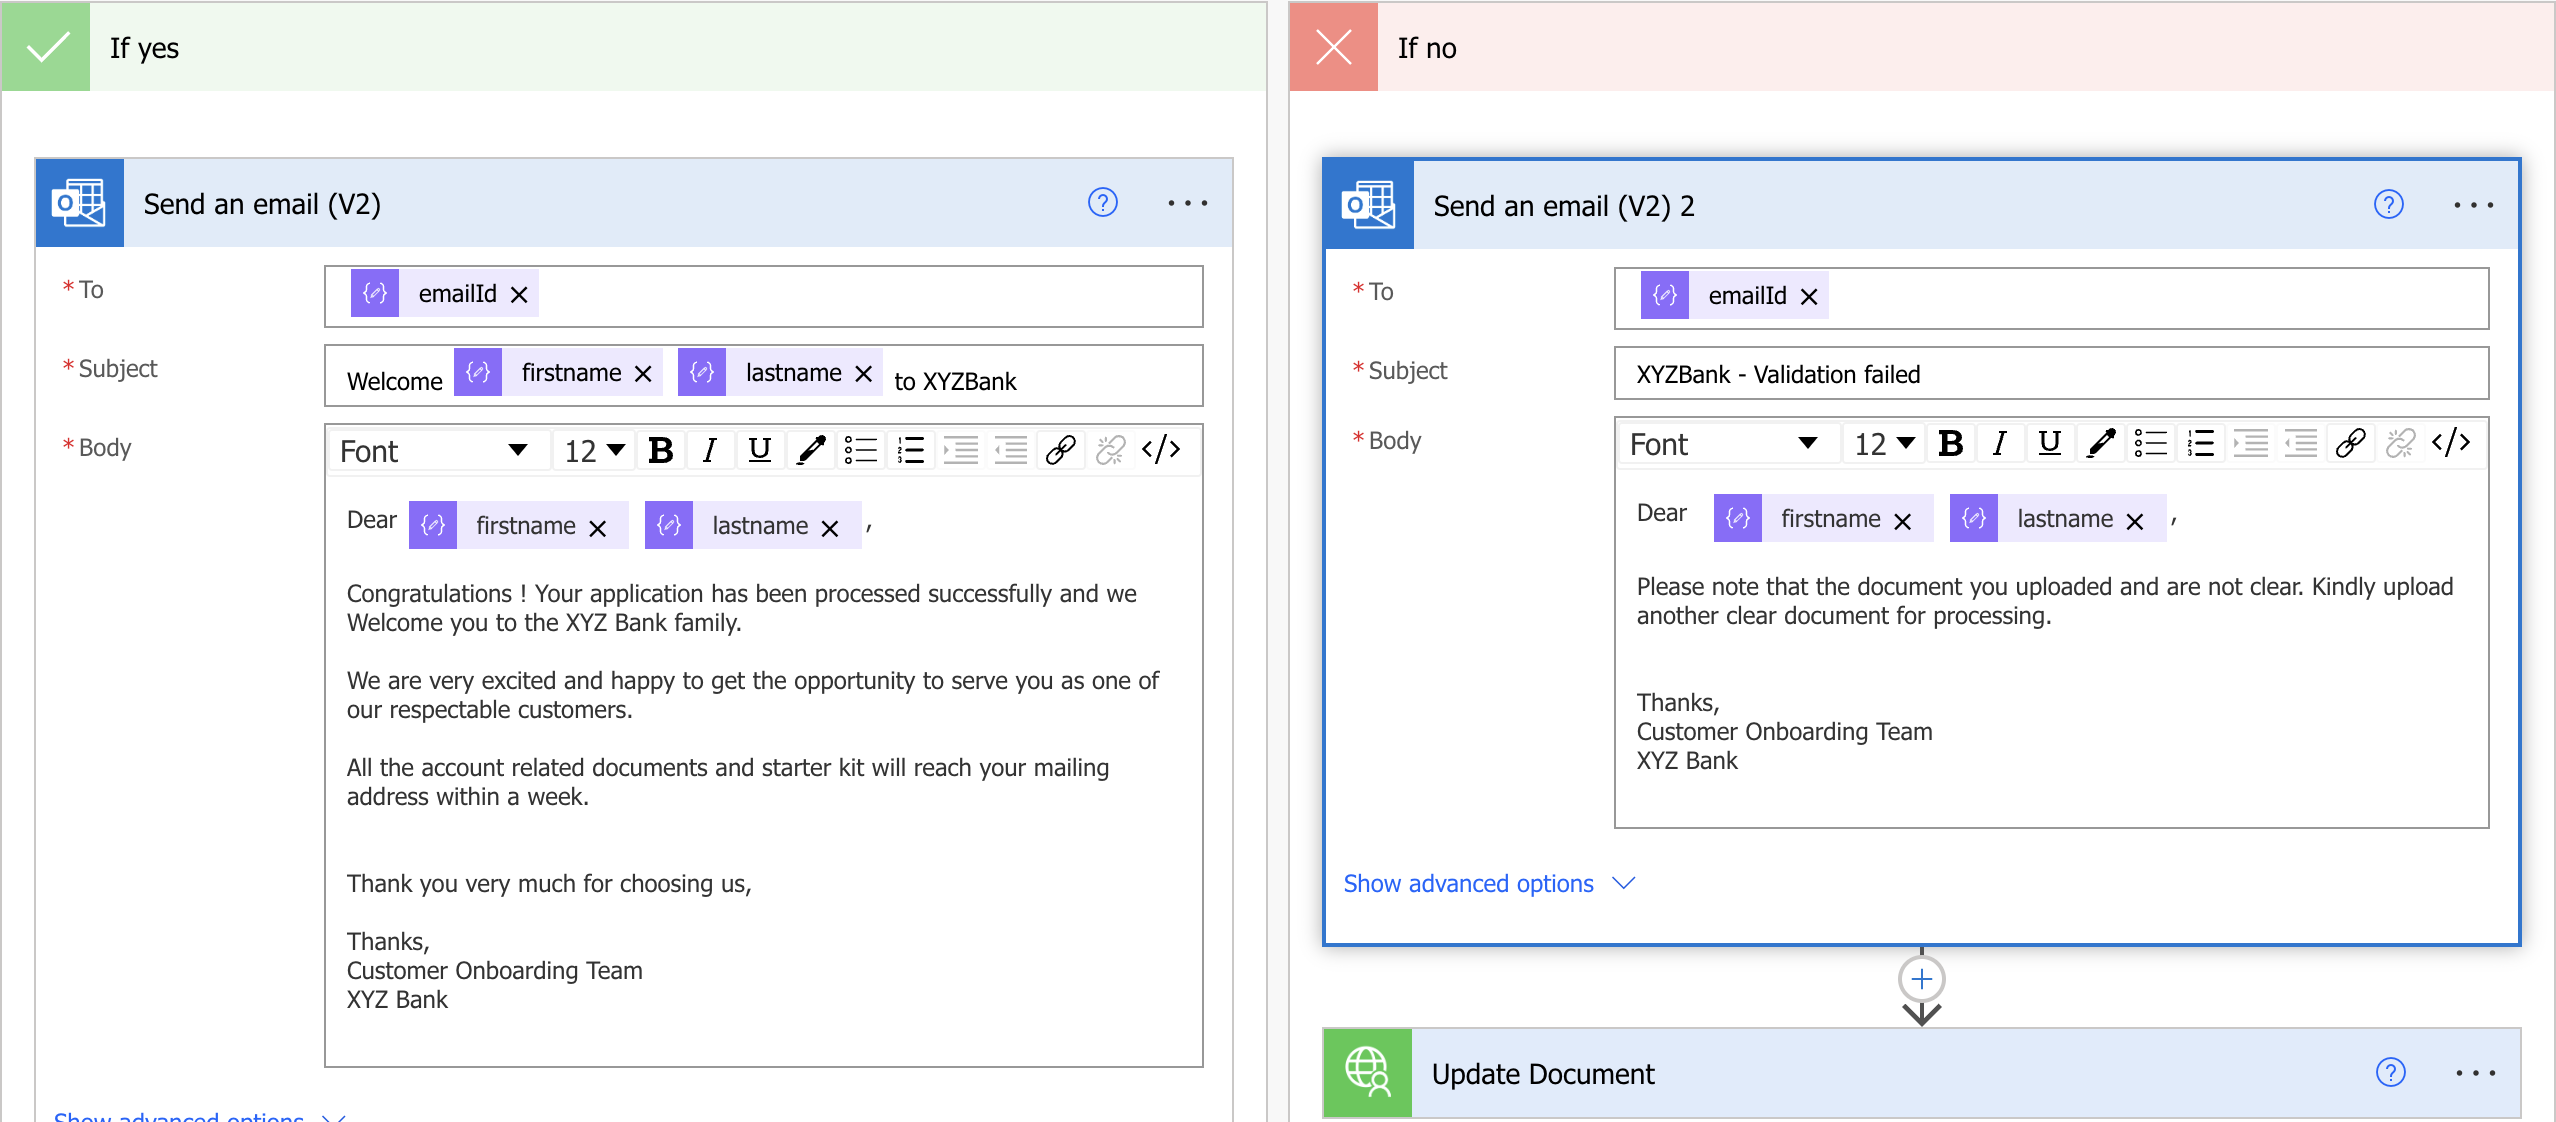 - The status of the application has to stored back in MongoDB. Under each Action (Yes/No) add a "update document" after the "Send email" Action.For YES status should be "Valid" and for NO status should be "Invalid".
 This is the final look of Power Automate Workflow:
 # Execution
1. Click on the “Open New Application”. Enter a few of the User Details in the form. Note the "Application Number" on top right.
2. Click on Save, wait for the Success Message. It will add the details entered in the form, as a new document in a new collection “onboarding” under a new database “XYZBank” in your “Sandbox” cluster.
3. Click on the “Retrieve Existing Application”, enter the Application Number from Step 2.
4. All saved details will be fetched. Click on Submit without adding any further details. It will popup a message saying "Please fill in all details and Upload your passport as a pdf before clicking on Submit". This is because all the fields and the document are mandatory before the form is submitted.
5. Upload the Passport document in a pdf format. Please note that it may not allow “*.pdf” files to be selected, make sure that options to display “All files” is selected when browsing your computer for files selection. Go to Azure Blob Storage, “documents” (temporary storage) container must have the file (as .pdf) that is uploaded through the Power Apps. Click on Submit, wait for the Success Message.
6. Go to the Atlas “onboarding” collection, if there are any changes to any of the text fields then there should be an update made to the document with the details modified in the form.
7. Go to Azure Blob Storage, filestoprocess container must have the file copied from documents container and also the file in the documents container would be deleted by now.
8. Go to Power Automate -> My Flows, Wait for the trigger to start the “Document Validation” flow (usually takes 1-2 minutes to start the flow).
9. Click on the flow, you should see the flow status in the run history. Click on the run entry to view the steps and their status.
If the form details match with the uploaded document, you should receive a mail in your email id mentioned in the form, with the subject as
“Welcome to XYZBank”. Else you should receive a “XYZBank - Validation failed”. Please check your Spam folder if you don’t see it in your Inbox.
10. Click on the “Retrieve Existing Application”, enter the Application Number from Step 2 to see a non-editable form which displays the entered details and the status of the application as Valid or Invalid.Status will be updated in the MongoDB collection also.
For any queries, Please contact partner-presales@mongodb.com
# Execution
1. Click on the “Open New Application”. Enter a few of the User Details in the form. Note the "Application Number" on top right.
2. Click on Save, wait for the Success Message. It will add the details entered in the form, as a new document in a new collection “onboarding” under a new database “XYZBank” in your “Sandbox” cluster.
3. Click on the “Retrieve Existing Application”, enter the Application Number from Step 2.
4. All saved details will be fetched. Click on Submit without adding any further details. It will popup a message saying "Please fill in all details and Upload your passport as a pdf before clicking on Submit". This is because all the fields and the document are mandatory before the form is submitted.
5. Upload the Passport document in a pdf format. Please note that it may not allow “*.pdf” files to be selected, make sure that options to display “All files” is selected when browsing your computer for files selection. Go to Azure Blob Storage, “documents” (temporary storage) container must have the file (as .pdf) that is uploaded through the Power Apps. Click on Submit, wait for the Success Message.
6. Go to the Atlas “onboarding” collection, if there are any changes to any of the text fields then there should be an update made to the document with the details modified in the form.
7. Go to Azure Blob Storage, filestoprocess container must have the file copied from documents container and also the file in the documents container would be deleted by now.
8. Go to Power Automate -> My Flows, Wait for the trigger to start the “Document Validation” flow (usually takes 1-2 minutes to start the flow).
9. Click on the flow, you should see the flow status in the run history. Click on the run entry to view the steps and their status.
If the form details match with the uploaded document, you should receive a mail in your email id mentioned in the form, with the subject as
“Welcome to XYZBank”. Else you should receive a “XYZBank - Validation failed”. Please check your Spam folder if you don’t see it in your Inbox.
10. Click on the “Retrieve Existing Application”, enter the Application Number from Step 2 to see a non-editable form which displays the entered details and the status of the application as Valid or Invalid.Status will be updated in the MongoDB collection also.
For any queries, Please contact partner-presales@mongodb.com