# MMGEN-FaceStylor
**Repository Path**: mirrors_open-mmlab/MMGEN-FaceStylor
## Basic Information
- **Project Name**: MMGEN-FaceStylor
- **Description**: No description available
- **Primary Language**: Unknown
- **License**: Apache-2.0
- **Default Branch**: master
- **Homepage**: None
- **GVP Project**: No
## Statistics
- **Stars**: 0
- **Forks**: 0
- **Created**: 2021-12-11
- **Last Updated**: 2025-12-14
## Categories & Tags
**Categories**: Uncategorized
**Tags**: None
## README
# MMGEN-FaceStylor

 [English](https://github.com/open-mmlab/MMGEN-FaceStylor/blob/master/README.md) | 简体中文
## 介绍
这个仓库是论文 "AgileGAN: Stylizing Portraits by Inversion-Consistent Transfer Learning" 的非官方实现。我们注意到,由于 AgileGAN 的训练代码还没有发布,这个 repo 只是采用了 AgileGAN 的 pipeline,并结合了该领域中的其他有益做法。
这个项目基于[MMCV](https://github.com/open-mmlab/mmcv) 和 [MMGEN](https://github.com/open-mmlab/mmgeneration),欢迎大家给这两个仓库star和fork 🤗!
[English](https://github.com/open-mmlab/MMGEN-FaceStylor/blob/master/README.md) | 简体中文
## 介绍
这个仓库是论文 "AgileGAN: Stylizing Portraits by Inversion-Consistent Transfer Learning" 的非官方实现。我们注意到,由于 AgileGAN 的训练代码还没有发布,这个 repo 只是采用了 AgileGAN 的 pipeline,并结合了该领域中的其他有益做法。
这个项目基于[MMCV](https://github.com/open-mmlab/mmcv) 和 [MMGEN](https://github.com/open-mmlab/mmgeneration),欢迎大家给这两个仓库star和fork 🤗!
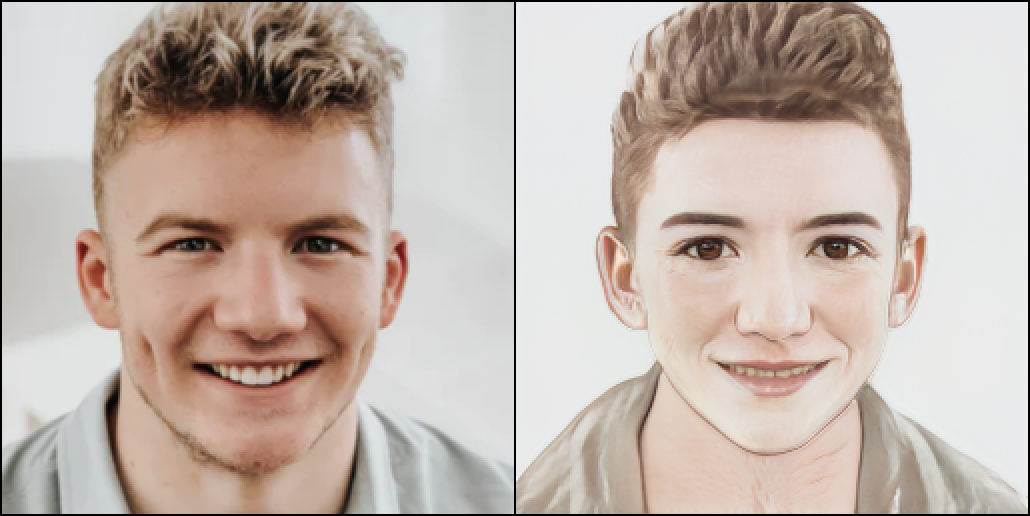
Results from FaceStylor trained by MMGEN

## 配置条件
- CUDA 10.0 / CUDA 10.1
- Python 3
- PyTorch >= 1.6.0
- MMCV-Full >= 1.3.15
- MMGeneration >= 0.3.0
## 安装
### 第一步 创建环境
首先,创建一个conda环境并激活它。
```bash
conda create -n facestylor python=3.7 -y
conda activate facestylor
```
假设你已经安装了 CUDA 10.1, 你需要安装在 CUDA 10.1 上预编译的 PyTorch。
```bash
conda install pytorch=1.6.0 cudatoolkit=10.1 torchvision -c pytorch
```
### 第二步 安装 MMCV 和 MMGEN
运行下面命令来安装 MMCV。
```bash
pip install mmcv-full==1.3.15 -f https://download.openmmlab.com/mmcv/dist/cu101/torch1.6.0/index.html
```
或者参考 MMCV 文档[Docs](https://mmcv.readthedocs.io/en/latest/get_started/installation.html)。
接下来安装 MMGEN
```bash
# Clone the MMGeneration repository.
git clone https://github.com/open-mmlab/mmgeneration.git
cd mmgeneration
# Install build requirements and then install MMGeneration.
pip install -r requirements.txt
pip install -v -e . # or "python setup.py develop"
cd ..
```
### 第三步 克隆该代码仓库
克隆该代码仓库
```bash
git clone https://github.com/open-mmlab/MMGEN-FaceStylor.git
```
### 第四步 下载数据和权重
方便起见,你可以运行下面命令在`MMGEN-FaceStylor`下来创建一些文件夹。
```bash
cd MMGEN-FaceStylor
mkdir data
mkdir work_dirs
mkdir work_dirs/experiments
mkdir work_dirs/pre-trained
```
之后你就可以将你的数据放在 `data` 文件夹下(或者软链进来),然后把实验文件夹放在 `work_dirs/experiments` 下。
为了后续测试和训练,你需要下载一些必要的[文件](https://drive.google.com/drive/folders/1sksjD4awYwSAgibix83hVtx1sm4KOekm)并将其放在 `data` 文件夹下。
我们也提供了一些预训练权重。
| 预训练权重 |
|---------------------------------------|
| [FFHQ-1024 StyleGAN2](https://download.openmmlab.com/mmgen/stylegan2/stylegan2_c2_ffhq_1024_b4x8_20210407_150045-618c9024.pth) |
| [FFHQ-256 StyleGAN2](https://download.openmmlab.com/mmgen/stylegan2/stylegan2_c2_ffhq_256_b4x8_20210407_160709-7890ae1f.pth) |
|[IR-SE50 Model](https://drive.google.com/file/d/1KW7bjndL3QG3sxBbZxreGHigcCCpsDgn/view)|
| [Encoder for FFHQ-1024 StyleGAN2](https://download.openmmlab.com/mmgen/agilegan/agile_encoder_ffhq1024x1024_lr_1e-4_500kiter_20211201_112111-fb1312dc.pth) |
| [Encoder for FFHQ-256 StyleGAN2](https://download.openmmlab.com/mmgen/agilegan/agile_encoder_celebahq256x256_lr_1e-4_150k_20211104_134520-9cce67da.pth) |
| [MetFace-Oil 1024 StyleGAN2](https://download.openmmlab.com/mmgen/agilegan/agile_transfer_metfaces-oil1024x1024_zplus_lpips0.5_freezeD5_ada_bs4x2_lr_1e-4_1600iter_20211104_134350-2b99cb9b.pth) |
| [MetFace-Sketch 1024 StyleGAN2](https://download.openmmlab.com/mmgen/agilegan/agile_transfer_metfaces-sketch1024x1024_zplus_lpips0.5_freezeD5_ada_bs4x2_lr_1e-4_1600iter_20211104_134426-081af2a2.pth) |
| [Toonify 1024 StyleGAN2](https://download.openmmlab.com/mmgen/agilegan/agile_transfer_toonify1024x1024_zplus_lpips0.5_freezeD5_ada_bs4x2_lr_1e-4_1600iter_20211104_134449-cb6785b6.pth) |
|[Cartoon 256](https://openmmlab-share.oss-cn-hangzhou.aliyuncs.com/mmgen/agilegan/agile_transfer_photo2cartoon256x256_zplus_lpips0.5_freezeD5_ada_bs4x2_lr_1e-4_800_iter_20211201_140719-062c09fa.pth)|
|[Bitmoji 256](agile_transfer_bitmoji256x256_z_wolpips_freezeD3_ada_bs4x2_lr_1e-4_iter_1600_20211202_195819-9010a9fe.pth)|
|[Comic 256](https://download.openmmlab.com/mmgen/agilegan/agile_transfer_face2comics256x256_z_wolpips_freezeD3_ada_bs4x2_lr_1e-4_30kiter_best_fid_iter_15000_20211201_111145-4905b63a.pth)|
| More Styles on the Way! |
| 更多风格即将推出! |
## 测试
### 快速试用
你可以直接运行下面的命令来进行试用
```bash
python demo/quick_try.py demo/src.png --style toonify
```
然后找到生成结果`work_dirs/demos/agile_result.png`。
你可以将 `demo/src.png` 换成自己的图片,`toonify` 换成其他风格。
目前可用的风格有 `toonify`, `oil`, `sketch`, `anime`, `bitimoji`, `cartoon`, `cat`.
### 编码
编码是指对于输入图像,找到可使 `GAN` 生成最接近图像的 `latent`, 然后保存该生成图像.
你可以直接使用 `agilegan_demo` 来进行 `inversion` 操作。
```bash
python demo/agilegan_demo.py SOURCE_PATH CONFIG [--ckpt CKPT] [--device DEVICE] [--save-path SAVE_PATH]
```
这里,可以将 `SOURCE_PATH` 设成你的图片路径, `CONFIG` 设成 config 文件路径, `CKPT`设成 checkpoint 路径。
以 [Celebahq-Encoder](configs/agilegan/agile_encoder_celebahq_lr_1e-4_150k.py) 为例, 你需要下载权重 [weights](https://openmmlab-share.oss-cn-hangzhou.aliyuncs.com/mmgen/agilegan/agile_encoder_celebahq1024x1024_lr_1e-4_150k_20211104_133124-a7e2fd7f.pth?versionId=CAEQHhiBgMDpiaGo5xciIDgzNTQ4YTQ2OWQ1OTQ0NmM4NWZiZjg2MTk0ZGEzMmFi) 到 `work_dirs/pre-trained/agile_encoder_celebahq1024x1024_lr_1e-4_150k.pth` 文件夹下, 将测试图像 `src.png` 放到 `data` 文件夹下,然后运行
```bash
python demo/agilegan_demo.py data/src.png configs/agilegan/agile_encoder_celebahq1024x1024_lr_1e-4_150k.py --ckpt work_dirs/pre-trained/agile_encoder_celebahq_lr_1e-4_150k.pth
```
然后找到 Inversion 结果`work_dirs/demos/agile_result.png`。
### 风格化
因为风格化需要的编码器和解码器可能在不同的训练设置中训练得到,你需要在 config 文件中设置好两者的权重路径。
以 [Metface-oil](configs/demo/agile_transfer_metface-oil1024x1024.py) 为例, 该 config 文件的前两行为
```python
encoder_ckpt_path = xxx
stylegan_weights = xxx
```
其中编码器通过 [agile_encoder](configs/agilegan/agile_encoder_celebahq1024x1024_lr_1e-4_150k.py) 训练得到。
后者通过 [agile_transfer](configs/agilegan/agile_transfer_metfaces-oil1024x1024_zplus_lpips0.5_freezeD5_ada_bs4x2_lr_2e-3_1600iter.py) 训练得到。
你需要在 config 文件中设置实际的 checkpoint 路径。和 Inversion 一样运行下面的命令(这里不需要申明`CKPT`)。
```bash
python demo/agilegan_demo.py SOURCE_PATH CONFIG [--device DEVICE] [--save-path SAVE_PATH]
```
## 训练
你也可以在自己的数据集上进行微调。大概用100到200张图片和不超过两个GPU时,你可以训练自己的 `StyleGAN2` 模型(参考AgileGAN)。
你可以参考微调训练的 [config](configs/agilegan/agile_transfer_metfaces-oil1024x1024_zplus_lpips0.5_freezeD5_ada_bs4x2_lr_2e-3_1600iter.py),
将其中 `imgs_root` 换成你实际数据路径,然后根据你的训练环境,选择下面两个命令中的一个来开启训练
```bash
# For distributed training
bash tools/dist_train.sh ${CONFIG_FILE} ${GPUS_NUMBER} \
--work-dir ./work_dirs/experiments/experiments_name \
[optional arguments]
# For slurm training
bash tools/slurm_train.sh ${PARTITION} ${JOB_NAME} ${CONFIG} ${WORK_DIR} \
[optional arguments]
```
## 训练细节
以 [metface-oil](configs/agilegan/agile_transfer_metfaces-oil1024x1024_zplus_lpips0.5_freezeD5_ada_bs4x2_lr_2e-3_1600iter.py) 为例,说明一些训练细节。
```python
model = dict(
lpips_lambda=0.5,
freezeD=5,
discriminator=dict(data_aug=dict(type='ADAAug', aug_pipeline=aug_kwargs)))
```
### ADA 设置
[ADA](https://github.com/NVlabs/stylegan2-ada-pytorch) 是一种 `GAN` 训练的数据增广方法。
为了在你的 GAN 中使用 [ADA](https://github.com/NVlabs/stylegan2-ada-pytorch), 你可以用 `ADAStyleGAN2Discriminator` 作为你的判别器, 然后调整 `ADAAug` 设置, 如下:
```python
model = dict(
discriminator=dict(
type='ADAStyleGAN2Discriminator',
data_aug=dict(type='ADAAug',
aug_pipeline=aug_kwargs, # This and below arguments can be set by yourself.
update_interval=4,
augment_initial_p=0.,
ada_target=0.6,
ada_kimg=500,
use_slow_aug=False)))
```
### Layer Freeze 设置
微调`GAN`有时会冻结某些层。
[FreezeD](https://github.com/sangwoomo/FreezeD) 可用于小数据微调, [FreezeG](https://github.com/bryandlee/FreezeG) 可以用来做伪风格化。
```python
model = dict(
freezeD=5, # set to -1 if not need
freezeG=4 # set to -1 if not need
)
```
这里freezeD, freezeG为冻结到的层到输出层的距离。
### 损失函数设置
在 [AgileGAN](https://github.com/GuoxianSong/AgileGAN)中,为了生成图像保留原图可识别的特征, 他们引入了感知相似性损失, 即一个修改过的 LPIPS loss。 你可以调节这个损失项的权重 `lpips_lambda`:
```python
model = dict(lpips_lambda=0.8)
```
一般来说,`lpips_lambda` 越大,可识别特征被保留地就越好。
## 数据集链接
为了你更方便训练自己的模型,这里提供一些公开数据的链接。
|数据集链接|
|------|
|[MetFaces](https://github.com/NVlabs/metfaces-dataset)|
|[AFHQ](https://github.com/clovaai/stargan-v2/blob/master/README.md#animal-faces-hq-dataset-afhq)|
|[Toonify](https://mega.nz/file/HslSXS4a#7UBanJTjJqUl_2Z-JmAsreQYiJUKC-8UlZDR0rUsarw)|
|[photo2cartoon](https://www.kaggle.com/arnaud58/photo2cartoon)|
|[selfie2anime](https://www.kaggle.com/arnaud58/selfie2anime)|
|[face2comics v2](https://www.kaggle.com/defileroff/comic-faces-paired-synthetic-v2)|
|[High-Resolution Anime Face](https://www.kaggle.com/subinium/highresolution-anime-face-dataset-512x512)|
## 应用
我们也提供了 `LayerSwap` 和 `DNI` 两个应用,你可以用它们来调节生成结果是更多保留原图特征,还是更多的风格化水平。
### LayerSwap
当使用 [Layer Swapping](https://github.com/justinpinkney/toonify) 时, 生成图像会比 AgileGAN 的结果更多保留原图特征。
From Left to Right: Input, Layer-Swap with L = 4, 3, 2, AgileGAN Output

运行下面命令来执行 layer Swap。
```bash
python apps/layerSwap.py source_path modelA modelB \
[--swap-layer SWAP_LAYER] [--device DEVICE] [--save-path SAVE_PATH]
```
这里, 将 `modelA` 设成 `agile_encoder` 类型 config,以 FFHQ-StyleGAN2 作为解码器, 将 `modelB` 设成 `agile_encoder` 类型 config,以风格化 StyleGAN2(比如 toonify) 作为解码器。
一般来说,`swap-layer` 设置地越深,原图结构保留地更好。
我们也提供了脚本来混合两个 `StyleGAN` 的权重。
```bash
python modelA modelB [--swap-layer SWAP_LAYER] [--show-input SHOW_INPUT] [--device DEVICE] [--save-path SAVE_PATH]
```
这里 `modelA` 中解码器的深层网络会被替换为 `modelB`中的对应部分。
### DNI
Deep Network Interpolation between L4 and AgileGAN output

你可以使用 [DNI](https://github.com/xinntao/DNI) 来实现更精细的风格化程度控制:
```bash
python apps/dni.py source_path modelA modelB [--intervals INTERVALS] [--device DEVICE] [--save-folder SAVE_FOLDER]
```
这里, 将 `modelA` 和 `modelB` 设成 `agile_encoder` 类型 config,其中解码器的风格化程度不同. `INTERVALS` 设成插值数量。
你也可以试用 MMGEN 中的 [应用](https://github.com/open-mmlab/mmgeneration/tree/master/apps),比如插值.
### 插值
你可以参考 MMGEN 的 [文档](https://mmgeneration.readthedocs.io/en/latest/tutorials/applications.html) 来获得使用细节。
后续将更新更多应用! 😁
## 画廊
Toonify
***
Oil
***
Cartoon
***
Comic
***
Bitmoji
***
## 参考
代码参考:
- https://github.com/open-mmlab/mmcv
- https://github.com/open-mmlab/mmgeneration
- https://github.com/GuoxianSong/AgileGAN
- https://github.com/flyingbread-elon/AgileGAN
- https://github.com/eladrich/pixel2style2pixel
- https://github.com/happy-jihye/Cartoon-StyleGAN
- https://github.com/NVlabs/stylegan2-ada-pytorch
- https://github.com/sangwoomo/FreezeD
- https://github.com/bryandlee/FreezeG
- https://github.com/justinpinkney/toonify
展示的照片来自:
https://unsplash.com/t/people
网页应用框架:
https://gradio.app/