# folding-cell
**Repository Path**: mk0909/folding-cell
## Basic Information
- **Project Name**: folding-cell
- **Description**: No description available
- **Primary Language**: Unknown
- **License**: MIT
- **Default Branch**: master
- **Homepage**: None
- **GVP Project**: No
## Statistics
- **Stars**: 0
- **Forks**: 0
- **Created**: 2024-03-11
- **Last Updated**: 2024-03-11
## Categories & Tags
**Categories**: Uncategorized
**Tags**: None
## README


FOLDING CELL
Expanding content cell with animation inspired by folding paper card material design.
___
We specialize in the designing and coding of custom UI for Mobile Apps and Websites.

Stay tuned for the latest updates:
 [](https://cocoapods.org/pods/FoldingCell)
[](http://cocoapods.org/pods/FoldingCell)
[](http://twitter.com/Ramotion)
[](https://travis-ci.org/Ramotion/folding-cell)
[](https://codebeat.co/projects/github-com-ramotion-folding-cell)
[](https://github.com/Carthage/Carthage)
[](https://developer.apple.com/swift/)
[](https://github.com/igrigorik/ga-beacon)
[](https://paypal.me/Ramotion)
## Requirements
- iOS 8.0+
- Xcode 10.2
## Installation
Just add the FoldingCell.swift file to your project.
or use [CocoaPods](https://cocoapods.org) with Podfile:
```
pod 'FoldingCell'
```
or [Carthage](https://github.com/Carthage/Carthage) users can simply add Mantle to their `Cartfile`:
```
github "Ramotion/folding-cell"
```
or [Swift Package Manager](https://swift.org/package-manager/) by adding:
```
dependencies: [
.package(url: "https://github.com/Ramotion/folding-cell.git", from: "5.0.2")
]
```
to `Package.swift`
or just drag and drop FoldingCell.swift file to your project
## Solution

## Usage
1) Create a new cell inheriting from `FoldingCell`
2) Add a UIView to your cell in your storyboard or nib file, inheriting from `RotatedView`.
Connect the outlet from this view to the cell property `foregroundView`.
Add constraints from this view to the superview, as in this picture:
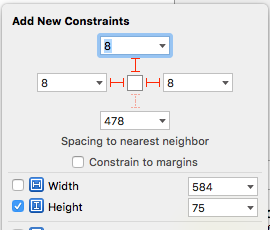
(constants of constraints may be different). Connect the outlet from this top constraint to the cell property `foregroundViewTop`
. (This view will be shown when the cell is in its normal state).
3) Add other UIViews to your cell, connect the outlet from this view to the cell
property `containerView`. Add constraints from this view to the superview like in the picture:
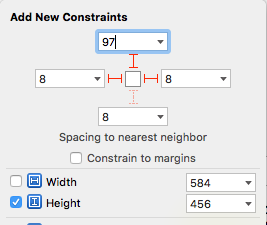
(constants of constraints may be different). Connect the outlet from this top constraint to the cell property `containerViewTop`.
(This view will be shown when the cell is opened)
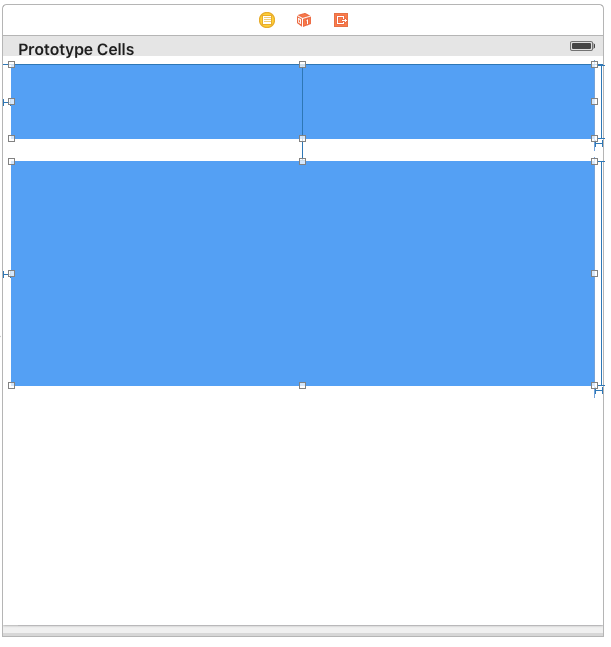
Your result should be something like this picture:
4) Set ``` @IBInspectable var itemCount: NSInteger ``` property is a count of folding (it IBInspectable you can set in storyboard). range 2 or greater. Default value is 2
Ok, we've finished configuring the cell.
5) Adding code to your UITableViewController
5.1) Add constants:
``` swift
fileprivate struct C {
struct CellHeight {
static let close: CGFloat = *** // equal or greater foregroundView height
static let open: CGFloat = *** // equal or greater containerView height
}
}
```
5.2) Add property for calculate cells height
``` swift
var cellHeights = (0.. CGFloat {
return cellHeights[indexPath.row]
}
```
5.4) Added code to method:
``` swift
override func tableView(tableView: UITableView, didSelectRowAtIndexPath indexPath: NSIndexPath) {
guard case let cell as FoldingCell = tableView.cellForRowAtIndexPath(indexPath) else {
return
}
var duration = 0.0
if cellIsCollapsed {
cellHeights[indexPath.row] = Const.openCellHeight
cell.unfold(true, animated: true, completion: nil)
duration = 0.5
} else {
cellHeights[indexPath.row] = Const.closeCellHeight
cell.unfold(false, animated: true, completion: nil)
duration = 0.8
}
UIView.animateWithDuration(duration, delay: 0, options: .CurveEaseOut, animations: { _ in
tableView.beginUpdates()
tableView.endUpdates()
}, completion: nil)
}
```
5.5) Control if the cell is open or closed
``` swift
override func tableView(tableView: UITableView, willDisplayCell cell: UITableViewCell, forRowAtIndexPath indexPath: NSIndexPath) {
if case let cell as FoldingCell = cell {
if cellHeights![indexPath.row] == C.cellHeights.close {
foldingCell.selectedAnimation(false, animated: false, completion:nil)
} else {
foldingCell.selectedAnimation(true, animated: false, completion: nil)
}
}
}
```
6) Add this code to your new cell class
``` swift
override func animationDuration(itemIndex:NSInteger, type:AnimationType)-> NSTimeInterval {
// durations count equal it itemCount
let durations = [0.33, 0.26, 0.26] // timing animation for each view
return durations[itemIndex]
}
```
## if don't use storyboard and xib files
Create foregroundView and containerView from code (steps 2 - 3) look example:
[Folding-cell-programmatically](https://github.com/ober01/Folding-cell-programmatically)
## 🗂 Check this library on other language:
[](https://cocoapods.org/pods/FoldingCell)
[](http://cocoapods.org/pods/FoldingCell)
[](http://twitter.com/Ramotion)
[](https://travis-ci.org/Ramotion/folding-cell)
[](https://codebeat.co/projects/github-com-ramotion-folding-cell)
[](https://github.com/Carthage/Carthage)
[](https://developer.apple.com/swift/)
[](https://github.com/igrigorik/ga-beacon)
[](https://paypal.me/Ramotion)
## Requirements
- iOS 8.0+
- Xcode 10.2
## Installation
Just add the FoldingCell.swift file to your project.
or use [CocoaPods](https://cocoapods.org) with Podfile:
```
pod 'FoldingCell'
```
or [Carthage](https://github.com/Carthage/Carthage) users can simply add Mantle to their `Cartfile`:
```
github "Ramotion/folding-cell"
```
or [Swift Package Manager](https://swift.org/package-manager/) by adding:
```
dependencies: [
.package(url: "https://github.com/Ramotion/folding-cell.git", from: "5.0.2")
]
```
to `Package.swift`
or just drag and drop FoldingCell.swift file to your project
## Solution

## Usage
1) Create a new cell inheriting from `FoldingCell`
2) Add a UIView to your cell in your storyboard or nib file, inheriting from `RotatedView`.
Connect the outlet from this view to the cell property `foregroundView`.
Add constraints from this view to the superview, as in this picture:

(constants of constraints may be different). Connect the outlet from this top constraint to the cell property `foregroundViewTop`
. (This view will be shown when the cell is in its normal state).
3) Add other UIViews to your cell, connect the outlet from this view to the cell
property `containerView`. Add constraints from this view to the superview like in the picture:

(constants of constraints may be different). Connect the outlet from this top constraint to the cell property `containerViewTop`.
(This view will be shown when the cell is opened)
Your result should be something like this picture:

4) Set ``` @IBInspectable var itemCount: NSInteger ``` property is a count of folding (it IBInspectable you can set in storyboard). range 2 or greater. Default value is 2
Ok, we've finished configuring the cell.
5) Adding code to your UITableViewController
5.1) Add constants:
``` swift
fileprivate struct C {
struct CellHeight {
static let close: CGFloat = *** // equal or greater foregroundView height
static let open: CGFloat = *** // equal or greater containerView height
}
}
```
5.2) Add property for calculate cells height
``` swift
var cellHeights = (0.. CGFloat {
return cellHeights[indexPath.row]
}
```
5.4) Added code to method:
``` swift
override func tableView(tableView: UITableView, didSelectRowAtIndexPath indexPath: NSIndexPath) {
guard case let cell as FoldingCell = tableView.cellForRowAtIndexPath(indexPath) else {
return
}
var duration = 0.0
if cellIsCollapsed {
cellHeights[indexPath.row] = Const.openCellHeight
cell.unfold(true, animated: true, completion: nil)
duration = 0.5
} else {
cellHeights[indexPath.row] = Const.closeCellHeight
cell.unfold(false, animated: true, completion: nil)
duration = 0.8
}
UIView.animateWithDuration(duration, delay: 0, options: .CurveEaseOut, animations: { _ in
tableView.beginUpdates()
tableView.endUpdates()
}, completion: nil)
}
```
5.5) Control if the cell is open or closed
``` swift
override func tableView(tableView: UITableView, willDisplayCell cell: UITableViewCell, forRowAtIndexPath indexPath: NSIndexPath) {
if case let cell as FoldingCell = cell {
if cellHeights![indexPath.row] == C.cellHeights.close {
foldingCell.selectedAnimation(false, animated: false, completion:nil)
} else {
foldingCell.selectedAnimation(true, animated: false, completion: nil)
}
}
}
```
6) Add this code to your new cell class
``` swift
override func animationDuration(itemIndex:NSInteger, type:AnimationType)-> NSTimeInterval {
// durations count equal it itemCount
let durations = [0.33, 0.26, 0.26] // timing animation for each view
return durations[itemIndex]
}
```
## if don't use storyboard and xib files
Create foregroundView and containerView from code (steps 2 - 3) look example:
[Folding-cell-programmatically](https://github.com/ober01/Folding-cell-programmatically)
## 🗂 Check this library on other language:
 ## 📄 License
Folding cell is released under the MIT license.
See [LICENSE](./LICENSE) for details.
This library is a part of a selection of our best UI open-source projects.
If you use the open-source library in your project, please make sure to credit and backlink to https://www.ramotion.com/
## 📱 Get the Showroom App for iOS to give it a try
Try this UI component and more like this in our iOS app. Contact us if interested.
## 📄 License
Folding cell is released under the MIT license.
See [LICENSE](./LICENSE) for details.
This library is a part of a selection of our best UI open-source projects.
If you use the open-source library in your project, please make sure to credit and backlink to https://www.ramotion.com/
## 📱 Get the Showroom App for iOS to give it a try
Try this UI component and more like this in our iOS app. Contact us if interested.
