# gulimall
**Repository Path**: programerjava/gulimall
## Basic Information
- **Project Name**: gulimall
- **Description**: 商城系统
- **Primary Language**: Java
- **License**: Apache-2.0
- **Default Branch**: master
- **Homepage**: None
- **GVP Project**: No
## Statistics
- **Stars**: 4
- **Forks**: 4
- **Created**: 2020-07-05
- **Last Updated**: 2023-04-10
## Categories & Tags
**Categories**: Uncategorized
**Tags**: None
## README
### 1、关于vagrant安装过程的坑(转)
执行 vagrant up 命令报错 如下
```
PS F:\centos7> vagrant up
Bringing machine 'default' up with 'virtualbox' provider...
==> default: Importing base box 'centos/7'...
There was an error while executing `VBoxManage`, a CLI used by Vagrant
for controlling VirtualBox. The command and stderr is shown below.
Command: ["import", "\\\\?\\D:\\HashiCorp\\Vagrant\\boxes\\centos-VAGRANTSLASH-7\\0\\virtualbox\\box.ovf", "--vsys", "0", "--vmname", "centos-7-1-1.x86_64_1583492895965_65141", "--vsys", "0", "--unit", "10", "--disk", "C:/Users/\u65E0\u5173\u98CE\u6708/VirtualBox VMs/centos-7-1-1.x86_64_1583492895965_65141/centos-7-1-1.x86_64.vmdk"]
Stderr: 0%...10%...20%...30%...40%...50%...60%...70%...80%...90%...100%
Interpreting \\?\D:\HashiCorp\Vagrant\boxes\centos-VAGRANTSLASH-7\0\virtualbox\box.ovf...
OK.
0%...
Progress state: VBOX_E_INVALID_OBJECT_STATE
VBoxManage.exe: error: Appliance import failed
VBoxManage.exe: error: Storage for the medium 'C:\Users\鏃犲叧椋庢湀\VirtualBox VMs\centos-7-1-1.x86_64_1583492895965_65141\centos-7-1-1.x86_64.vmdk' is not created
VBoxManage.exe: error: Details: code VBOX_E_INVALID_OBJECT_STATE (0x80bb0007), component ApplianceWrap, interface IAppliance
VBoxManage.exe: error: Context: "enum RTEXITCODE __cdecl handleImportAppliance(struct HandlerArg *)" at line 957 of file VBoxManageAppliance.cpp
```
错误是 box的存储硬盘空间不够 修改box的默认存储地址 解决

还有就是在执行 vagrant up命令的时候报 字符编码有问题不能解析 解决方案如下:
1、找到 Vagrant 安装路径 博主是在 C:\HashiCorp\Vagrant\embedded\gems\2.2.6\gems\vagrant-2.2.6\lib\vagrant\util\io.rb
找到io.rb文件 32行替换成:
data << io.readpartial(READ_CHUNK_SIZE).encode(“UTF-8”, invalid: :replace,undef: :replace, replace: ‘?’)
2、Vagrant安装路径不能带有中文。
**注**:vagrant详解:https://blog.csdn.net/cuixhao110/article/details/105519946/
vagrant**常用**命令:
```
1.在空文件夹初始化虚拟机
vagrant init [box-name]
2.在初始化完的文件夹内启动虚拟机
vagrant up
3.ssh登录启动的虚拟机
vagrant ssh
4.挂起启动的虚拟机
vagrant suspend
5.重启虚拟机
vagrant reload
6.关闭虚拟机
vagrant halt
7.查找虚拟机的运行状态
vagrant status
8.销毁当前虚拟机
vagrant destroy
```
- 执行vagrant up:No usable default provider could be found for your system. Vagrant relies on .......报错的解决方法
原文链接:https://blog.csdn.net/M82_A1/java/article/details/97250162
- ### Vagrant使用国内镜像安装插件和box镜像
转:https://blog.csdn.net/dafei1288/article/details/105828516/
### 2、[vagrant]-virtualbox 网络适配器没有 && VirtualBox Host-Only Ethernet Adapter 问题(转)
vagrant ,virtualbox安装完成后
使用vagrant命令
```
vagrant up
1
```
出现以下报错
在 **控制面板\网络和 Internet\网络连接** 中也没有 virtualbox 的虚拟网卡
# 解决办法
1. “win+r”输入“devmgmt.msc”
2. 点击网络适配器
3. 添加硬件向导

\4. 选择从列表安装,下一步

5.选择网络适配器

\5. 选择驱动文件,点击确定
驱动文件路径:VirtualBox安装目录下drivers\ network\ netadp6目录下VBoxNetAdp6.inf 
- 安装完成后

- ### VirtualBox 硬盘容量扩充
- ### 使用df -h查看硬盘容量
- 
- 打开VirtualBox的“管理”-->虚拟介质管理
- 
- 增加容量
-
### 3、docker安装
- 安装所需依赖
```
yum install -y yum-utils device-mapper-persistent-data lvm2
```
- 设置docker下载镜像(阿里云)
```
yum-config-manager --add-repo http://mirrors.aliyun.com/docker-ce/linux/centos/docker-ce.repo
```
- 更新yum软件包索引
我们在更新或配置yum源之后,通常都会使用yum makecache生成缓存,这个命令是将软件包信息提前在本地缓存一份,用来提高搜索安装软件的速度。
```
yum makecache fast
```
- 安装docker ce
```
yum install -y docker-ce
```
- 启动docker
```
systemctl start docker
```
- 配置docker镜像加速器
```
sudo mkdir -p /etc/docker
sudo tee /etc/docker/daemon.json <<-'EOF'
{
"registry-mirrors": ["https://9nmxujqa.mirror.aliyuncs.com"]
}
EOF
sudo systemctl daemon-reload
sudo systemctl restart docker
```
### 4、安装mysql
- 下载镜像
```
docker pull mysql:5.7
```
- 创建mysql容器
```
docker run -p 3306:3306 --name mysql \
-v /mydata/mysql/log:/var/log/mysql \
-v /mydata/mysql/data:/var/lib/mysql \
-v /mydata/mysql/conf:/etc/mysql \
-e MYSQL_ROOT_PASSWORD=root \
-d mysql:5.7
```
- 修改配置文件
```
[client]
default-character-set=utf8
[mysql]
default-character-set=utf8
[mysqld]
init_connect='SET collation_connection = utf8_unicode_ci'
init_connect='SET NAMES utf8'
character-set-server=utf8
collation-server=utf8_unicode_ci
skip-character-set-client-handshake
skip-name-resolve
```
- 查看是否修改成功
```
show variables like "%character%";
```
- 设置docker启动时,就运行mysql
```
docker update mysql --restart=always
```
- 设置docker开机自启动
```
systemctl enable docker
```
- docker启动时没有空间了
- 日志
```
使用 docker logs mysql 查看mysql运行日志
```

- 原因:空间不足,删除多余的镜像或增加容量
### 5、下载redis
- 下载镜像
```
docker pull redis
```
- 创建redis配置文件
```
mkdir -p /mydata/redis/conf
```
- 启动redis
```
docker run -p 6379:6379 --name redis -v /mydata/redis/data:/data \
-v /mydata/redis/conf/redis.conf:/etc/redis/redis.conf \
-d redis redis-server /etc/redis/redis.conf
```
- 修改配置文件
```
echo "appendonly yes" >> /mydata/redis/conf/redis.conf #启用AOF持久化机制
```
- 连接redis客服端
```
docker exec -it redis redis-cli
```
- 设置redis容器在docker启动时便启动
```
docker update redis --restart=always
```
### 6、git下载安装
- 进入git bash
```
# 配置用户名
git config --global user.name "username" (姓名)
# 配置邮箱
git config --global user.email "username.@email.com"
```
- 生成ssh密钥过程
- 查看是否有ssh密码:cd ~/.ssh
如果没有密钥则不会有此文件夹,有则备份删除
- 执行指令创建 mkdir ~/.ssh
- 生成RSA密钥对
ssh-keygen -t rsa -C "邮箱地址"
- 生成密钥对 查看公钥内容
cat ~/.ssh//Users/qingxing/.ssh/id_rsa':
Hi qingxing! You've successfully authenticated, but GITEE.COM does not provide shell access..pub
- 查看密钥 将公钥内容全部赋值并粘贴(注:公钥内容以ssh-rsa开头)
- 粘贴地址 : https://gitee.com/profile/sshkeys
- 将地址添加到gitee 添加完公钥后进行测试公钥(测试SSH连接)
- ssh -T git@gitte.com 当总段提示 welcome to Gitee.com,yourname! 表示连接成功 至此以后只要拷贝ssh链接地址,然后利用git指令即可进行相关操作!
### 7、创建项目微服务
- 商品服务(product)、仓储服务(ware)、订单服务(order)、优惠券服务(coupon)、用户服务(member)
- 共同:
- 都要导入web、openfeign依赖
- 每一个服务,包名:com.qx.gulimall.xxx(product/order/ware/coupon/member)
- 模块名:guli-xxx
### 8、导入人人快速开发平台vue(renren-fast-vue)
- 安装(在该vue项目下终端使用命令)
```
npm install
```
- 运行
```
npm run dev
```
- 运行时错误情况
- node-sass安装导入失败
- ```
Module build failed: Error: Missing binding D:\projects\gulimall-front\renren-fast-vue\node_modules\node-sass\vendor\win32-x64-64\binding.node
Node Sass could not find a binding for your current environment: Windows 64-bit with Node.js 10.x
Found bindings for the following environments:
- Windows 64-bit with Node.js 10.x
This usually happens because your environment has changed since running `npm install`.
Run `npm rebuild node-sass --force` to build the binding for your current environment.
```
- 处理:重新构建
```
npm rebuild node-sass
```
- 情况2:python未下载
- ```
gyp verb check python checking for Python executable "python2" in the PATH
gyp verb `which` failed Error: not found: python2
gyp verb `which` failed at getNotFoundError (D:\projects\gulimall-front\renren-fast-vue\node_modules\which\which.js:13:12)
```
- 下载安装python
### 9、导入renren-generator
- 修改application.yml中的数据库配置
- 修改generator.properties中的生成文件属性
- 导入到SQL文件数据库
- 错误日志:sqlyog不显示数据库名
- 解决:连接数据时,不用写数据/库这一列

### 10、使用renren-generator生成基础类
- 修改配置文件
```
1、改变连接数据库
2、改变主类(mainPath)、包名(package)、模块名(module)、表前缀(tablePrefix)
```
- 在其网页端生成代码
- 将代码导入到微服务模块中
- 创建gulimall-common模块,导入相关类并添加依赖
- 使其他微服务模块导入common模块,作为该项目的基础公共类
```
com.qx.gulimall
gulimall-common
0.0.1-SNAPSHOT
compile
```
### 11、整合Mybatis-Plus、初始化项目
- 导入mysql连接依赖(mysql-connector),mybatis-plus依赖
- 编写数据源配置(url、driver-class-name、password、username)
- 配置mybatis-plus(包扫描规则、日志)
```
mybatis-plus:
# 默认扫描mapper包
# classpath:只扫描当前resources类路径下的文件,
# classpaths:扫描整个类路径下文件,包括java、resources
mapper-locations: classpath:**/mapper/**/*.xml
# Mybatis-Plus日志
configuration:
log-impl: org.apache.ibatis.logging.stdout.StdOutImpl
```
- 在启动类上添加mapper类扫描
```
@MapperScan("com.qx.gulimall.*.dao")
```
### 12、使用技术方案
- SpringCloud Alibaba - Nacos:注册中心(服务发现/注册)
- SpringCloud Alibaba - Nacos:配置中心(服务配置管理)
- SpringCloud Ribbon:负载均衡
- SpringCloud Feign:声明式HTTP客服端(调用远程服务)
- SpringCloud Alibaba - Sentinel:服务容错(限流、降级、熔断)
- SpringCloud - Gateway:Api网关(webflux编程模式)
- SpringCloud - Sleuth:调用链监控
- SpringCloud Alibaba - Seata:原Fescar,即分布式事务解决方案
### 13、导入nacos注册中心和配置中心
- 在common模块中添加依赖
```
com.alibaba.cloud
spring-cloud-starter-alibaba-nacos-discovery
```
- 在application.yml中配置参数
```
# 服务发现
spring.cloud.nacos.discovery.server-addr=127.0.0.1:8848
# 微服务名(必须要写,dataID生成需要用到)
spring.application.name=×××.×××
```
- 在启动类添加服务发现(springcloud2.0后可不写)
```
@EnableDiscoveryClient
```
- 出现错误
日志
```
c.a.cloud.nacos.NacosConfigProperties : create config service error!properties=NacosConfigProperties{serverAddr='null', encode='null', group='DEFAULT_GROUP', prefix='null', fileExtension='properties', timeout=3000, endpoint='null', namespace='null', accessKey='null', secretKey='null', contextPath='null', clusterName='null', name='null', sharedDataids='null', refreshableDataids='null', extConfig=null},e=,
com.alibaba.nacos.api.exception.NacosException: java.lang.reflect.InvocationTargetException
```
原因:
1、将nacos服务发现参数写错了
```
# 错误写法
spring.cloud.nacos.config.server-addr=127.0.0.1:8848
# 应该写成这样
spring.cloud.nacos.discovery.server-addr=127.0.0.1:8848
```
2、导错依赖:将nacos配置中心导入而未配置bootstrap.yml文件
```
com.alibaba.cloud
spring-cloud-starter-alibaba-nacos-config
```
bootstrapProperties-gulimall-coupon-dev.properties
- 导入配置中心
```
com.alibaba.cloud
spring-cloud-starter-alibaba-nacos-config
```
- 创建bootstrap.yml配置文件
```
spring:
application:
name: gulimall-coupon
cloud:
nacos:
config:
server-addr: localhost:8848
```
### 14、Nacos基本原理
- #### Nacos Config 数据结构
```
Nacos Config 主要通过 dataId 和 group 来唯一确定一条配置,我们假定你已经了解此背景。如果不了解,请参考 Nacos 文档。
Nacos Client 从 Nacos Server 端获取数据时,调用的是此接口:ConfigService.getConfig(String dataId, String group, long timeoutMs)。
```
- #### Spring Cloud 应用获取数据
##### dataID
在 Nacos Config Starter 中,dataId 的拼接格式如下
```
${prefix} - ${spring.profiles.active} . ${file-extension}
```
- `prefix` 默认为 `spring.application.name` 的值,也可以通过配置项 `spring.cloud.nacos.config.prefix`来配置。
- `spring.profiles.active` 即为当前环境对应的 profile,可不写。
**注意,当 activeprofile 为空时,对应的连接符 `-` 也将不存在,dataId 的拼接格式变成 `${prefix}`.`${file-extension}`**
- `file-extension` 为配置内容的数据格式,可以通过配置项 `spring.cloud.nacos.config.file-extension`来配置。 目前只支持 `properties` 类型。
##### group
- `group` 默认为 `DEFAULT_GROUP`,可以通过 `spring.cloud.nacos.config.group` 配置。
#### 自动注入
Nacos Config Starter 实现了 `org.springframework.cloud.bootstrap.config.PropertySourceLocator`接口,并将优先级设置成了最高(最先加载)。
在 Spring Cloud 应用启动阶段,会主动从 Nacos Server 端获取对应的数据,并将获取到的数据转换成 PropertySource 且注入到 Environment 的 PropertySources 属性中,所以使用 @Value 注解也能直接获取 Nacos Server 端配置的内容。
#### 动态刷新
Nacos Config Starter 默认为所有获取数据成功的 Nacos 的配置项添加了监听功能,在监听到服务端配置发生变化时会实时触发 `org.springframework.cloud.context.refresh.ContextRefresher` 的 refresh 方法 。
如果需要对 Bean 进行动态刷新,请参照 Spring 和 Spring Cloud 规范。推荐给类添加 `@RefreshScope` 或 `@ConfigurationProperties `注解。
#### 配置空间
##### 命名空间:配置隔离
- 默认:public(保留空间);默认新增的所有配置都在public空间
可做环境隔离,在bootstrap.yml配置文件中指明具体命名空间( 命名空间ID)配置集:所有配置文件的集合
- 配置集ID:类似文件名
DataID:类似文件名(gulimall-ware.yaml)
- 配置分组
默认所有配置集都属于:DEFAULT_GROUP
```
cloud:
nacos:
config:
# 配置文件格式,如果是properties文件则不用配置此项
file-extension: yaml
# 命名空间
namespace: 2239f495-6d59-440d-ad73-e661374610af
# 组名
group: prod
# 新增额外配置集
ext-config:
# 配置集ID
- data-id: aliyun.yaml
# 组名
group: aliyun
# 是否动态刷新
refresh: true # 文件刷新时刷新
```
### 15、SpringCloud Gateway
- 添加依赖(common和gateway)
```
org.springframework.cloud
spring-cloud-starter-gateway
```
- 配置application.properties
```
spring.application.name=gulimall-gateway
spring.cloud.nacos.discovery.server-addr=localhost:8848
```
- 配置bootstrap.yml
```
spring:
application:
name: gulimall-gateway
cloud:
nacos:
# nacos配置属性
config:
# 名称空间
namespace: 4df967df-2df4-4560-b0a3-d19cb02abd3a
# nacos运行地址
server-addr: localhost:8848
# 如果nacos中配置文件是yaml格式的,则file-extension必须写明是yaml文件,
# 默认properties,否则会导致服务启动时找不到配置文件,注册出错
file-extension: yaml
```
- 在nacos网页新建gulimall-gateway.yaml(为yaml格式时,**必须写上file-extension**)
```
server.port=88
spring.cloud.nacos.discovery.server-addr=localhost:8848
spring.cloud.nacos.discovery.namespace=4df967df-2df4-4560-b0a3-d19cb02abd3a
spring:
cloud:
# 网关
gateway:
# 路由
routes:
# 路由ID
- id: baidu-test
# 目的URL
uri: http://www.baidu.com
# 断言
predicates:
- Query=uri,baidu
- id: qq-test
uri: http://www.qq.com
predicates:
- Query=param,qq
```
- 启动类排除数据源自动配置
```
@SpringBootApplication(exclude = DataSourceAutoConfiguration.class)
```
- Spring Cloud Gateway 核心概念
- 路由。路由是网关最基础的部分,路由信息有一个ID、一个目的地URL、一组断言和一组Filter组成。如果断言为真,则说明请求的URL和配置匹配
- 断言。Java8中的断言函数。Spring Cloud Gateway中的断言函数允许开发者去定义匹配来自http request中的任何信息,比如请求头和参数等。
- 过滤器。一个标准的Spring webFilter。Spring Cloud Gateway中的filter分为两种类型的Filter,分别是Gateway Filter和Global Filter。过滤器Filter将会对请求和响应进行处理。
### 16、Vue
- 安装
```
# 最新稳定版
npm install vue
```
- vue声明式渲染
```
let vm = new Vue({
el: "#app",//绑定元素
data: { //封装数据
name: "张三",
num: 1
},
methods:{ //封装方法
cancle(){
this.num -- ;
},
hello(){
return "1"
}
}
});
```
- v-model
双向绑定,模型变化,视图变化,反之亦然
```
{{name}} ,非常帅,有{{num}}个人为他点赞{{hello()}}
```
- 时间处理
v-xx:指令
- 1、创建vue实例,关联页面的模板,将自己的数据(data)渲染到关联的模板,响应式的
- 2、指令来简化对dom的一些操作
- 3、声明方法来做更复杂的操作
v-on:指令:按钮的点击事件,可以简写为 "`@`"
v-html:不会对HTML标签转义,直接在浏览器上显示data所设置的内容
v-text:会对HTML标签转义
- ```html
{{msg}} {{1+1}} {{hello()}}
```
{{msg}}:差值表达式,可以完成数据渲染、数学运算和方法调用
el:用来绑定数据
data:用来封装数据
methods:用来封装方法
v-bind:单向绑定,模型变化,视图变化
事件冒泡:
- ```
```
- 上面嵌套div中,如果点击了内层的div,则外层的div也会被触发;这种问题可以用事件修饰符来完成
```
```
v-for遍历循环
格式
- ```
v-for="(item,index) in items" :key="index"
```
filter过滤器
- Vue.filter(name,callback(param))
- name:管道名
- callback(param):回调函数
- |:管道符,表示使用过滤操作
```html
-
{{user.id}} ==> {{user.name}} ==> {{user.gender == 1?"男":"女"}} ==>
{{user.gender | genderFilter}} ===>
{{user.gender | gFilter}}
```
vue组件
- ```html
```
注意:
- 组件也是一个Vue实例,因此它将在定义时也会接受:data、methods、生命周期函数等
- 不同的是组件不会与页面的元素绑定,否则就无法复用了,因此没有el属性
- 但是组件渲染需要html模板,所以增加了template属性,值就是HTML模板
- 全局组件定义完毕,任何vue实例都可以直接在HTML中通过组件名称来使用组件了
- data必须是一个函数,不再是一个对象
声明周期与钩子函数
- 每个Vue实例在创建时都要经过一系列的初始化过程:创建实例,转载模板,渲染模板等等。
Vue为声明周期中的每个状态都设置了钩子函数(监听函数)。每当Vue实例处于不同的生命周期时,对应的函数就会被触发调用
- 生命周期:创建==》销毁

### 17、ElementUI
- 安装
```
npm install element-ui -S
```
- 在main.js中写入以下内容
```
import ElementUI from 'element-ui'
import 'element-ui/lib/theme-chalk/index.css'
Vue.use(ElementUI)
```
### 18、在页面显示商品树形结构
- 前置工作:在Gateway网关中添加路由
- ```yaml
- id: product_route
uri: lb://gulimall-product
predicates:
- Path=/api/product/**
filters:
- RewritePath=/api/(?/?.*),/$\{segment}
# 该节点必须在下面,不然网关会走先下面的断言,并转发到renren-fast
- id: renren-fast
uri: lb://renren-fast
predicates:
- Path=/api/**
```
- 路由规则:精确的路由规则放置到模糊的路由规则的前面,否则,精确的路由规则将不会被匹配到,类似于异常体系中的try catch子句中异常的处理
- 编写后端代码
service
```java
@Override
public List listTree() {
// 查找所有数据
List entityList = baseMapper.selectList(null);
// 组装数据
List returnList = entityList
// 转换为流的形式
.stream()
// 过滤掉父节点不是0的数据
.filter(categoryEntity -> {
return categoryEntity.getParentCid() == 0;
})
// 组装数据
.map(categoryEntity -> {
// 查找子节点
List childrens = getChildrens(categoryEntity, entityList);
// 设置子节点
categoryEntity.setChildren(childrens);
return categoryEntity;
})
// 排序
.sorted((menu1,menu2) -> {
return (menu1.getSort() == null ? 0 : menu1.getSort()) - ( menu2.getSort() == null ? 0 : menu2.getSort());
})
.collect(Collectors.toList())
;
return returnList;
}
// 递归查找所有菜单的子菜单
private List getChildrens(CategoryEntity root,List all){
// 生成children
List entities = all
.stream()
.filter(categoryEntity -> {
// 遍历的该节点ID与根节点ID是否相同
return categoryEntity.getParentCid().equals(root.getCatId());
})
.map(categoryEntity -> {
// 递归,找到当前菜单子菜单
// root.setChildren(getChildrens(categoryEntity, all)); 这是查找父节点子菜单,不能查到当前节点子菜单
categoryEntity.setChildren(getChildrens(categoryEntity, all));
return categoryEntity;
})
.sorted((menu1, menu2) -> {
return (menu1.getSort() == null ? 0 : menu1.getSort()) - (menu2.getSort() == null ? 0 : menu2.getSort());
})
.collect(Collectors.toList());
return entities;
}
```
- 跨域: 指的是浏览器不能执行其他网站的脚本。它是由浏览器的同源策略造成的,是浏览器对javascript施加的安全限制。
- 同源策略:是指协议,域名,端口都要相同,其中有一个不同都会产生跨域;
即端口号前面地址都要相同
- 跨域流程
非简单请求(put、delete)等等,需要先发送预检请求

- 在网关微服务中添加配置类
```java
@Configuration
public class CorsConfig {
@Bean
public CorsWebFilter corsWebFilter(){
UrlBasedCorsConfigurationSource source=new UrlBasedCorsConfigurationSource();
CorsConfiguration corsConfiguration = new CorsConfiguration();
corsConfiguration.addAllowedHeader("*");
corsConfiguration.addAllowedMethod("*");
corsConfiguration.addAllowedOrigin("*");
corsConfiguration.setAllowCredentials(true);
source.registerCorsConfiguration("/**",corsConfiguration);
return new CorsWebFilter(source);
}
}
```
- 前端
- 在static->index.js中改变api接口请求地址
```
window.SITE_CONFIG['baseUrl'] = 'http://localhost:88/api'
```
- 使用ElementUI的树形节点
```vue
{{ node.label }}
@click="() => append(data)">
Append
@click="() => remove(node, data)">
Delete
```
```vue
提交修改
批量删除
:data="menu"
show-checkbox
node-key="catId"
:expand-on-click-node="false">
:props="categoryProps"
:default-expanded-keys="expandNodes"
:draggable = "isDraggable"
:allow-drop="isHandleDrag"
@node-drop="handleDrop">
{{ node.label }}
Append
Edit
Delete
:title="title"
:visible.sync="dialogVisible"
width="30%"
:close-on-click-modal="false">
```
- 逻辑删除
- 在yaml文件中配置全局删除规则
```yaml
mybatis-plus:
global-config:
db-config:
# logic-delete-field: flag # 全局逻辑删除的实体字段名(since 3.3.0,配置后可以忽略不配置步骤2)
logic-delete-value: 1 # 逻辑已删除值(默认为 1)
logic-not-delete-value: 0 # 逻辑未删除值(默认为 0)
```
- 在实体类中配置当前删除字段规则
```java
/**
* 是否显示[0-不显示,1显示]
*/
@TableLogic(value = "1",delval = "0")
private Integer showStatus;
```
- 设置日志级别
```yaml
logging:
level:
com.bigdata.gulimall.product: debug
```
- 错误日志:
**情况1**:使用gateway网关的`lb://renren-fast`找不到具体微服务(503)
网站报错信息:
```
Whitelabel Error Page
This application has no configured error view, so you are seeing this as a fallback.
[c8234ee8-9] There was an unexpected error (type=Service Unavailable, status=503).
```
控制台日志:
```
c.netflix.loadbalancer.BaseLoadBalancer : Client: bootstrapProperties-gulimall-product instantiated a LoadBalancer: DynamicServerListLoadBalancer:{NFLoadBalancer:name=bootstrapProperties-gulimall-product,current list of Servers=[],Load balancer stats=Zone stats: {},Server stats: []}ServerList:null
c.n.l.DynamicServerListLoadBalancer : Using serverListUpdater PollingServerListUpdater
c.n.l.DynamicServerListLoadBalancer : DynamicServerListLoadBalancer for client bootstrapProperties-gulimall-product initialized: DynamicServerListLoadBalancer:{NFLoadBalancer:name=bootstrapProperties-gulimall-product,current list of Servers=[],Load balancer stats=Zone stats: {},Server stats: []}ServerList:com.alibaba.cloud.nacos.ribbon.NacosServerList@f657dc0
```
解决:使用地址代替
```
// 解决:使用http://localhost:8080
routes:
- id: admin-route
uri: http://localhost:8080
```
原因:不知道为什么将gateway网关的配置文件放在nacos的自定义命名空间,就找不到其他方服务,只有放在 public 公共空间才行
- 网上找了许多都不是具体原因
eg:#注意routes下面的id前面的 `-` 要与routes对齐,不然调用服务时会出现503错误
- 07/09:找到原因了:
- 在配置网关路由时,必须先配置nacos的服务发现地址:discovery:server-addr,否则网关回报找不到服务异常(不是主要原因)
- 必须将gateway的配置文件放在nacos的public空间才能找到其他微服务,放在给gateway网关自己生成的命名空间就找不到其他服务。
- **情况2:**Idea聚合项目的module变灰、多root问题
原因:未在父工程中导入该模块
解决:
```
gulimall-gateway
```
### 19、前端商品品牌
- ### 替换显示状态
- 前端
```vue
```
- 后端
1、将gulimall-third-party微服务注册到nacos中
- 在 “gulimall-gateway” 中配置路由规则:
```yaml
- id: third_party_route
uri: lb://gulimall-gateway
predicates:
- Path=/api/thirdparty/**
filters:
- RewritePath=/api/thirdparty/(?/?.*),/$\{segment}
```
- 创建命名空间 “ gulimall-third-party ” 并编写 gulimall-third-party .yml文件
```yaml
server:
port: 9050
spring:
application:
name: gulimall-third-party
cloud:
alicloud:
access-key: LTAI4G6sLYD3UTuX1NkAbbWx
secret-key: NrrUFkrQAAUmnmQvjsClwXZD8HpAG7
oss:
endpoint: oss-cn-beijing.aliyuncs.com
bucketName: gulimall-qx
# 日志输出
logging:
level:
com.qx.gulimall.product: debug
```
- 编写bootstrap.properties文件
```properties
spring.application.name=gulimall-third-party
spring.cloud.nacos.config.server-addr=localhost:8848
spring.cloud.nacos.config.namespace=8cad2ad2-ea07-4fa1-9563-ec32751c108a
spring.cloud.nacos.discovery.namespace=8cad2ad2-ea07-4fa1-9563-ec32751c108a
spring.cloud.nacos.discovery.server-addr=localhost:8848
# 如果nacos中配置文件为yaml格式,则必须写明此项
spring.cloud.nacos.config.file-extension=yaml
```
- 创建OssController编写代码
```java
@RequestMapping("/thirdparty/oss")
@RestController
public class OssController {
@Autowired
private OSS ossClient;
@Value("${spring.cloud.alicloud.access-key}")
private String accessKey;
@Value("${spring.cloud.alicloud.secret-key}")
private String secretKey;
@Value("${spring.cloud.alicloud.oss.endpoint}")
private String endpointKey;
@Value("${spring.cloud.alicloud.oss.bucketName}")
private String bucketName;
@RequestMapping("policy")
public R getPoliceoGet() {
String accessId = accessKey; // 请填写您的AccessKeyId。
String accessKey = secretKey; // 请填写您的AccessKeySecret。
String endpoint = endpointKey; // 请填写您的 endpoint。
String bucket = bucketName; // 请填写您的 bucketname 。
String host = "https://" + bucket + "." + endpoint; // host的格式为 bucketname.endpoint
// callbackUrl为 上传回调服务器的URL,请将下面的IP和Port配置为您自己的真实信息。
// String callbackUrl = "http://88.88.88.88:8888";
// 定义文件夹名称
String dateTime = new SimpleDateFormat("yyyy/MM/dd").format(new Date());
String dir = dateTime + "/"; // 用户上传文件时指定的前缀。
// 创建OSSClient实例。
OSS ossClient = new OSSClientBuilder().build(endpoint, accessId, accessKey);
Map respMap = null;
try {
long expireTime = 30;
long expireEndTime = System.currentTimeMillis() + expireTime * 1000;
Date expiration = new Date(expireEndTime);
// PostObject请求最大可支持的文件大小为5 GB,即CONTENT_LENGTH_RANGE为5*1024*1024*1024。
PolicyConditions policyConds = new PolicyConditions();
policyConds.addConditionItem(PolicyConditions.COND_CONTENT_LENGTH_RANGE, 0, 1048576000);
policyConds.addConditionItem(MatchMode.StartWith, PolicyConditions.COND_KEY, dir);
String postPolicy = ossClient.generatePostPolicy(expiration, policyConds);
byte[] binaryData = postPolicy.getBytes("utf-8");
String encodedPolicy = BinaryUtil.toBase64String(binaryData);
String postSignature = ossClient.calculatePostSignature(postPolicy);
respMap = new LinkedHashMap();
respMap.put("accessid", accessId);
respMap.put("policy", encodedPolicy);
respMap.put("signature", postSignature);
respMap.put("dir", dir);
respMap.put("host", host);
respMap.put("expire", String.valueOf(expireEndTime / 1000));
// respMap.put("expire", formatISO8601Date(expiration));
} catch (Exception e) {
// Assert.fail(e.getMessage());
System.out.println(e.getMessage());
} finally {
ossClient.shutdown();
}
return R.ok().put("data",respMap);
}
}
```
- 在前段执行上传时,有跨域访问限制,需要在oss控制台配置跨域规则
```
Access to XMLHttpRequest at 'http://gulimall-images.oss-cn-beijing.aliyuncs.com/' from origin 'http://localhost:8001' has been blocked by CORS policy: Response to preflight request doesn't pass access control check: No 'Access-Control-Allow-Origin' header is present on the requested resource.
```

- 服务端签名直传
#### 背景
采用JavaScript客户端直接签名(参见[JavaScript客户端签名直传](https://help.aliyun.com/document_detail/31925.html#concept-frd-4gy-5db))时,AccessKeyID和AcessKeySecret会暴露在前端页面,因此存在严重的安全隐患。因此,OSS提供了服务端签名后直传的方案。
#### 原理介绍
[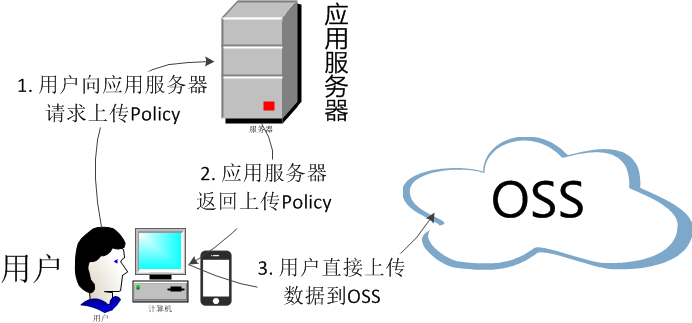](http://static-aliyun-doc.oss-cn-hangzhou.aliyuncs.com/assets/img/6875011751/p1472.png)
服务端签名后直传的原理如下:
1. 用户发送上传Policy请求到应用服务器。
2. 应用服务器返回上传Policy和签名给用户。
3. 用户直接上传数据到OSS。
- 在brand.vue中替换logo为图片
```vue
```
- 使用elemen提供的自定义规则
```js
firstLetter: [
// 使用自定义规则验证表单有效性
{validator: (rule, value, callback) => {
if (value === '') {
callback(new Error('请输入首字母'))
// 正则表达式错误写法:/^[a-Z]$/
} else if (!/^[A-z]$/.test(value)) {
// 使用正则表达式定义规则
callback(new Error('检索首字母必须为a-Z的单个字母'))
} else {
callback()
}
},
trigger: 'blur'}
],
sort: [
// { required: true, message: '排序不能为空', trigger: 'blur' }
{validator: (rule, value, callback) => {
if (value === '') {
callback(new Error('排序不能为空'))
} else if (!/^\d{1,}$/.test(value)) {
callback(new Error('排序字段只能为数字'))
} else {
callback()
}
},
trigger: 'blur'}
]
```
- 使用``标签后,报异常
日志:
```
[Vue warn]: Unknown custom element: - did you register the component correctly? For recursive components, make sure to provide the "name" option.
```
原因:使用的ElementUI组件未引入``标签
解决:手动引入
- 在`src/element-ui/index.js`中配置使用``
```js
import {
……
// 引入组件
Image
} from 'element-ui'
……
// 使用组件
Vue.use(Image)
```
- 使用正则表达式报错
- 错误日志
```
Invalid regular expression: /^[a-Z]$/: Range out of order in character class (70:25)
You may need an appropriate loader to handle this file type.
```
- 原因:正则表达式书写错误/^[a-Z]$/,没有改正则表达式,正确写法:/^[A-z]$/
### 20、JSR303效验
- 使用效验注解
- @NotNull : 注解元素禁止为null,能够接收任何类型
- @NotEmpty : 该注解修饰的字段不能为null或"" ,支持Collection、Map、Array
- @NotBlank : 该注解不能为null,并且至少包含一个非空白字符。接收字符序列。
- 在请求方法上开启效验注解@Valid
- ```
@RequestMapping("/save")
public R save( @Valid @RequestBody BrandEntity brand)
```
- 给效验的Bean后,紧跟一个BindResult,就可以获取效验的结果,拿到效验结果,自定义封装
- ```java
@RequestMapping("/save")
public R save( @Valid @RequestBody BrandEntity brand,BindingResult bindingResult){
System.out.println(bindingResult);
// 判断结果是否有错
if(bindingResult.hasErrors()){
Map resultMap = new HashMap<>();
// 遍历所有字段错误并封装到Map中
bindingResult.getFieldErrors().forEach((item) -> {
String message = item.getDefaultMessage();
String field = item.getField();
resultMap.put(field,message);
});
return R.error(400,"提交数据不合法!").put("data",resultMap);
} else {
brandService.save(brand);
return R.ok();
}
}
```
- 统一异常处理
- 使用SpringMVC提供的@ControllerAdvice,通过“basepackages”处理具体路径下的异常
- 代码
```java
@Slf4j
// RestControllerAdvice = ControllerAdvice + ResponseBody
@RestControllerAdvice(basePackages = "com.qx.gulimall.product.controller")
public class ExceptionAdvice {
// 标记该方法为异常处理方法 value:具体异常
@ExceptionHandler(value = MethodArgumentNotValidException.class)
public R handleValidException(MethodArgumentNotValidException e){
// 记录日志
log.error("数据不合法:" + e);
// 获取结果集
BindingResult bindingResult = e.getBindingResult();
// 創建map封装结果
Map map = new HashMap<>();
bindingResult.getFieldErrors().forEach((item) -> {
// 将错误放入map
map.put(item.getField(),item.getDefaultMessage());
});
// 使用自定义封装的结果集返回自定义内容
return R.error(BizCodeEnum.VALID_EXCEPTION.getCode(),BizCodeEnum.VALID_EXCEPTION.getMsg()).put("data",map);
}
@ExceptionHandler(Exception.class)
public R globalException(Exception e){
log.error(e.getMessage());
return R.error(BizCodeEnum.UNKNOW_EXEPTION.getCode(),BizCodeEnum.UNKNOW_EXEPTION.getMsg());
}
}
```
- 分组校验功能(完成多场景下的复杂校验)
- 给校验加注解,标注groups,指定具体情况下执行校验
```
@TableId
@Null(message = "品牌id自增,无需携带",groups = {AddGroup.class})
@NotNull(message = "品牌id不能为空",groups = {UpdateGroup.class})
private Long brandId;
@NotBlank(message = "品牌名必须非空",groups = {AddGroup.class})
private String name;
……
```
- 给字段添加注解后,必须使用@Validated注解,并且指定groups
@Validated的value方法: 指定一个或多个验证组以应用于此注释启动的验证步骤。
```java
/**
* 保存
* @Valid:如果想使用效验规则,则必须添加该注解
* 如果字段使用Groups指定了,那么必须使用@Validated注解,并且指定group接口类
*/
@RequestMapping("/save")
public R save( @RequestBody /*@Valid*/ @Validated({AddGroup.class}) BrandEntity brand){
brandService.save(brand);
return R.ok();
// }
}
```
- 自定义校验规则
- 编写一个自定义的校验注解
```java
@Documented
// 指定自定义的校验注解
@Constraint(validatedBy = { ListValueConstraintValidator.class })
// 该注解可以作用的地方
@Target({ METHOD, FIELD, ANNOTATION_TYPE, CONSTRUCTOR, PARAMETER, TYPE_USE })
// 校验时机
@Retention(RUNTIME)
public @interface ListValue {
// 自定义消息接收路径
String message() default "{com.qx.common.valid.message}";
// 分组
Class[] groups() default { };
//
Class[] payload() default { };
// 自定义数组值
int[] value() default { };
}
```
- 编写一个自定义的校验器
```java
public class ListValueConstraintValidator implements ConstraintValidator {
// 初始化一个set
Set set = new HashSet<>();
// 校验初始化
@Override
public void initialize(ListValue constraintAnnotation) {
int[] value = constraintAnnotation.value();
for (int i : value) {
// 添加到set中
set.add(i);
}
}
/**value:判断要校验的内容*/
@Override
public boolean isValid(Integer value, ConstraintValidatorContext context) {
return set.contains(value);
}
}
```
- 关联自定义的校验器和自定义的校验注解
```java
// 指定自定义的校验注解,可以指定多个校验器
@Constraint(validatedBy = { ListValueConstraintValidator.class })
```
- 使用
```java
/**
* 显示状态[0-不显示;1-显示]
必须指定value = {0,1}
*/
@ListValue(value = {0,1},groups = {AddGroup.class, UpdateStatusGroup.class,UpdateGroup.class})
private Integer showStatus;
```
- @Valid注解不生效,参数不能正确效验(转)
- spirngboot升级到2.3之后,hibernate-validator消失
原版本会有, 2.3中已经删除了
```
org.hibernate.validator
hibernate-validator
6.0.17.Final
compile
```
- 解决:手动引入依赖
```
org.springframework.boot
spring-boot-starter-validation
```
- 启动renren-fast失败
- 日志
```
javax.management.InstanceNotFoundException: org.springframework.boot:type=Admin,name=SpringApplication
at com.sun.jmx.interceptor.DefaultMBeanServerInterceptor.getMBean(DefaultMBeanServerInterceptor.java:1095)
```
- 原因:未加载配置文件
- 解决:去掉下面这两个**√**

- 校验注解写错,报错
- 错误日志
```
avax.validation.UnexpectedTypeException: HV000030: No validator could be found for constraint 'javax.validation.constraints.NotBlank' validating type 'java.lang.Integer'. Check configuration for 'showStatus'
```
- 错误位置
```
@NotBlank
private Integer showStatus;
```
- 原因:@NotBlank只能处理字符类型数据,showStatus为int类型数据
- 解决:使用@NotEmpty
```
@NotNull
private Integer showStatus;
```
### 21、商品SPU和SKU管理(转)
- 认识SPU和SKU
- #### SPU = Standard Product Unit (标准化产品单元)
- SPU是商品信息聚合的最小单位,是一组可复用、易检索的标准信息的集合,该集合描述了一个产品的特性。
- #### SKU = Stock Keeping Unit (库存量单元)
- SKU即库存进出计量的单位。SKU是物理上不可分割的最小存货单元。也就是锁一款商品,可以根据SKU来确定具体的货物存量。
```
如一件M码(四个尺码:S码、M码、L码、X码)的粉色(三种颜色:粉色、黄色、黑色)Zara女士风衣,其中M码、粉色就是一组SKU的组合。
SKU在生成时, 会根据属性生成相应的笛卡尔积,根据一组SKU可以确定商品的库存情况,那么上面的Zara女士风衣一共有4 * 3 = 12个SKU组合。
M码+粉色这两个属性组合被称为一组SKU、因为SKU是物理上不可分割的最小存货单元,单凭尺寸或者颜色是没有办法确认这款商品的库存情况。
同理商家进货补货也是通过SKU来完成的,试问淘宝店家跟供货商说我要100件红色女士风衣?供应商知道该怎么给他备货吗?
显然是不知道的。因为还欠缺了另外的一个销售属性【尺码】。
```
- SKU 属性(会影响到库存和价格的属性, 又叫销售属性)
- #### SKU和商品之间的关系
1)SKU(或称商品SKU)指的是商品子实体。
2)商品SPU和商品SKU是包含关系,一个商品SPU包含若干个商品SKU子实体,商品SKU从属于商品SPU。
3)SKU不是编码,每个SKU包含一个唯一编码,即SKU Code,用于管理。
4)商品本身也有一个编码,即Product Code,但不作为直接库存管理使用。
- 父子组件传递数据
- 子组件给父组件传递数据,事件机制:子组件给父组件发送一个事件,携带上数据
this.$emit("定义事件名",参数……)
- 公共组件
- 商品——category
- 前端
```vue
```
- 属性分组
- 前端——attgroup
```vue
```
- 前端——attr-add-or-update
```vue
……
……
```
- 前端——category-cascader
```vue
```
- 后端
```java
/**
* 商品子菜单(数据表中不存在)
* @JsonInclude(value = JsonInclude.Include.NON_EMPTY):设置数据包含,表示当数据为“NON_EMPTY“不为空才设置
*/
@TableField(exist = false)
@JsonInclude(value = JsonInclude.Include.NON_EMPTY)
private List children;
```
```java
/**
* 查找当前分类id的三级id
* @param catelogId
* @return
*/
@Override
public Long[] getCatlogPath(Long catelogId) {
List longList = new ArrayList<>();
// List longListResult = recursionSearchPidByCatId(catelogId, longList);
recursionSearchPidByCatId(catelogId, longList);
longList.add(catelogId);
/*Long [] ids = new Long[3];
ids[0] = catelogId;
for (int i = 1; i < longListResult.size(); i++) {
// 从i-1 == 0 开始
ids[i] = longListResult.get(i-1);
}
// 以上for方法可以使用toArray转为Long数组
// longList.toArray(new Long[longList.size()])
// 如果在递归方法插入之前,必须使用倒序,因为前段数据需要这样排列
Collections.reverse(longList);
*/
// java.lang.ClassCastException: [Ljava.lang.Object; cannot be cast to [Ljava.lang.Long; at com.qx.gulimall.product.service.impl.CategoryServiceImpl.getCatlogPath(CategoryServiceImpl.java:130) ~[classes/:na]
// 直接强转,List会直接转为Object类型,不能转为Long类型
return longList.toArray(new Long[longList.size()]);
}
/**
* 递归查找
* @param catelogId
* @return
*/
private List recursionSearchPidByCatId(Long catelogId , List idList){
// 设置查询条件
QueryWrapper wrapper = new QueryWrapper().select("parent_cid").eq("cat_id", catelogId);
// 查询
List