# lh-schedule-spring
**Repository Path**: qingchengfeiyu/lh-schedule-v1
## Basic Information
- **Project Name**: lh-schedule-spring
- **Description**: 日复一日,学习总结
- **Primary Language**: Unknown
- **License**: Not specified
- **Default Branch**: master
- **Homepage**: None
- **GVP Project**: No
## Statistics
- **Stars**: 1
- **Forks**: 0
- **Created**: 2021-11-18
- **Last Updated**: 2022-10-25
## Categories & Tags
**Categories**: Uncategorized
**Tags**: 架构
## README
# 学习日程

## 自定义配置详解 (更新)
> 一下配置只用在yml中配置即可,在基础模块中可以查看相关代码,其他模块只需要引入基础模块pom,并且在启动类中加入@SpringBootApplication(scanBasePackages = {"com.schedule"})
>
> 即可完成配置
### 1.缓存字典功能 (维护中)
*基础模块中配置了全自动字典翻译功能,如需自行配置实现DictCacheService类完成提供字典源*
*备用处理实现AlternateProcessingService类中gatNameAndRefactoringMap方法,更新源信息,并返回处理*
```yaml
lh-config:
# 配置缓存字典翻译
automatic:
translation:
redis-cache: true
```
**默认false表示存储内存中,配置为true需要连接redis,表示字典项将存储在缓存之中**
### 2.线程池配置 (维护中)
```yaml
lh-config:
task-pool:
corePoolSize: 2 #核心线程池大小
maxPoolSize: 3 # 最大线程数
keepAliveSeconds: 300 # 活跃时间
queueCapacity: 4 #队列容量
prefixName: customize-thread- #前缀名
```
### 3.全自动数据库维护
```yaml
lh-config:
flyway-config:
switch: true #自定义注解,配置开启关闭全自动数据库版本管理
locations: classpath:db/migration
baseline-on-migrate: true
validate-on-migrate: true
table: sys_flyway_history # 自定义数据表名
```
### 4.swagger整合log全自动日志
> 默认扫描类中api注解,存在时自动开启切面日志
>
> @Api("商品模块") 为一级路径介绍
>
> @ApiOperation("添加商品") 为二级路径介绍
>
> @ApiOperation(value = "查询商品及其附加分类信息",notes = "SELECT") 不写notes默认操作类型为未知
```yaml
lh-config:
swagger-config: #swagger扫包路径
base-package: com.schedule.zyjshopping
```
## 1.SpringBoot自定义注解
> 常用注解 @interface
#### **@Target:修饰对象作用范围**
| 值(ElementType) | 作用 | 备注 |
| --------------- | ------------------------------------- | ---- |
| CONSTRUCTOR | 描述构造器 | |
| FIELD | 描述域 | |
| LOCAL_VARIABLE | 描述局部变量 | |
| METHOD | 描述方法 | 常用 |
| PACKAGE | 描述包 | |
| PARAMETER | 描述参数 | |
| TYPE | 描述类、接口(包括注解类型) 或enum声明 | 常用 |
#### **@Retention**:修饰生命周期
| 值(ElementType) | 作用 | 备注 |
| --------------- | -------------------------------- | ---- |
| SOURCE | 在源文件中有效(即源文件保留) | |
| CLASS | 在class文件中有效(即class保留) | |
| RUNTIME | 在运行时有效(即运行时保留) | 常用 |
#### **@**Documented:注解表明这个注解应该被 javadoc工具记录
#### **@Inherited** :允许子类继承

## 2.SpringBoot切面AOP
> 什么是aop?
AOP(Aspect Oriented Programming)意为“面向切面编程”。面向切面编程的目标就是分离关注点,不改变源代码情况下,增强逻辑,适用于日志,权限验证,加密解密等处理.....
官方介绍:在软件业,AOP为Aspect Oriented Programming的缩写,意为:**面向切面编程**,通过预编译方式和运行期动态代理实现程序功能的统一维护的一种技术。AOP是OOP的延续,是软件开发中的一个热点,也是Spring框架中的一个重要内容,是函数式编程的一种衍生范型。利用AOP可以对业务逻辑的各个部分进行隔离,从而使得业务逻辑各部分之间的耦合度降低,提高程序的可重用性,同时提高了开发的效率。
简单来说:就是切面编程,通过动态代理实现在不修改源代码的情况下给程序动态统一添加功能的一种技术。
主要功能:打印日志,性能统计,安全控制,事务处理,异常处理等等。
### 2.1 AOP依赖
```xml
org.springframework.boot
spring-boot-starter-aop
```
### 2.2 实现AOP切面
只需要加上必备的@Aspect 和@Component 注解
@Component :将该类交给 Spring 来管理
@Aspect :描述一个切面类
```java
@Aspect
@Component
@Slf4j
public class DSAspect {
}
```
### 2.3 常用注解
| 注解名 | 含义 | 备注 |
| --------------- | ------------------------------------------------------------ | ---- |
| @Aspect | 声明该类为一个注解类 | |
| @Pointcut | 定义一个切点,后面跟随一个表达式,表达式可以定义为某个 package 下的方法,也可以是自定义注解等 | |
| @Before | 在切点之前,织入相关代码 | |
| @After | 在切点之后,织入相关代码 | |
| @AfterReturning | 在切点返回内容后,织入相关代码,一般用于对返回值做些加工处理的场景 | |
| @AfterThrowing | 用来处理当织入的代码抛出异常后的逻辑处理 | |
| @Around | 在切入点前后织入代码,并且可以自由的控制何时执行切点 | |
### 2.4 切点函数
| 函数名 | 作用 | 备注 |
| ---------- | ---------------------- | ------------ |
| execution | 指明包下方法来定义切面 | 常用 重点 |
| annotation | 指明注解来定义切面 | 常用 重点 |
| within | 指明java类或者包 | |
| this | 用于传入代理对象 | |
| target | 传入对象引用 | |
| args | 传入参数 | 常用 |

## 3.全自动字典翻译
需要**实现DictCacheService接口**,并将这个对象交给Spring 容器,否则扩展将不会自动生效
举例:
```java
@Component
public class DictCache implements DictCacheService {
@Override
public BiMap getDictMapByName(String dictName) {
//举例,通过字典名称返回所有的字典项
BiMap map = HashBiMap.create();
switch (dictName) {
case "sex":
map.put("1", "男");
map.put("2", "女");
break;
case "car:color":
map.put("1", "芭比粉");
map.put("2", "烈焰红");
break;
case "license:type":
map.put("A1","大型汽车");
map.put("C1","小型汽车");
map.put("C2","小型自动挡汽车");
map.put("D","普通三轮摩托车");
break;
}
return map;
}
}
```
### 实体类注解说明
#### @Dict
> 标记一个字段进行字典翻译
| 注解名 | 含义 | 描述 | 默认值 |
| -------------- | -------------- | ------------------------------------------------------------ | ------------- |
| dictName | 翻译字典名称 | 明翻译这个字段使用的字典名称,与数据sys_dict.name对应 | |
| targetField | 目标字段 | 用于存放字典翻译之后的name的值 | 前字段名+Name |
| nullValueName | 空值默认值 | 当注解的字段为空时的默认值,与表格显示所对应 | - |
| undefinedValue | 空字典项默认值 | 当翻译的字段在对应的字典中未定义时的默认值 | “” |
| multiple | 是否多个字典项 | 标记这个字段是否包含多个字典项,为true时将会按照","进行拆分,然后逐个翻译之后放到目标字段中 | false |
#### @DictEntity
> 标记说明类中的这个字段是一个实体类型,其中有字段进行字典翻译。
#### @DictCollection
> 标记说明类中的这个字段是一个Collection类型,其中有字段进行字典翻译。
#### @DictTranslation
> 使用这个注解的方法将进行字典翻译,其返回值类型需要是一个含有@Dcit、@DictCollection或@DictTranslation的类型或者集合类型
#### @DictMapper
> 这个注解相比@Dict多了一个参数“fieldName”,给出翻译的源key。
#### @DictMap
> 用于标记一个返回值是java.util.Map子类的方法。其中参数为@DictMapper数组
### 设计思路
> 基于Spring Boot使用aop对标记注解的方法进行拦截 >> 利用反射获取到翻译信息 >> 反射获取值翻译并将值填写回对象。
> 封装成Starter,为了能自动装配到不同的项目,定义接口DictCacheService,是否含有这个接口的实例化对象是切面是否生效的关键
> DictCacheService.getDictMapByName为了从项目的字典目录中根据字典名称获取到字典项,其中返回值使用双向链表BiMap是为了后期扩展根据name查找对应的value(例如在excel导入的时候可以逆向翻译),这些也都是我的一些想法,还不知道能少时候做出来,哈哈
> DictCacheService 名字的来源,为了在翻译的时候不用每次都从数据库里取值,所以叫缓存

## 4.整合redis缓存处理
> 加入依赖
```xml
org.springframework.boot
spring-boot-starter-redis
1.4.7.RELEASE
redis.clients
jedis
```
> 配置文件
```yaml
spring:
# redis 配置
redis:
# 地址
host: localhost
# 端口,默认为6379
port: 6379
# 密码
password:
# 连接超时时间
timeout: 10s
lettuce:
pool:
# 连接池中的最小空闲连接
min-idle: 0
# 连接池中的最大空闲连接
max-idle: 8
# 连接池的最大数据库连接数
max-active: 8
# #连接池最大阻塞等待时间(使用负值表示没有限制)
max-wait: -1ms
```
### **创建RedlisConfig**
用于Redis数据缓存。继承CachingConfigurerSupport,为了自定义生成KEY的策略。可以不继承
```java
/**
* redis配置类
**/
@Configuration
@EnableCaching//开启注解式缓存
//继承CachingConfigurerSupport,为了自定义生成KEY的策略。可以不继承。
public class RedisConfig extends CachingConfigurerSupport {
/**
* 生成key的策略 根据类名+方法名+所有参数的值生成唯一的一个key
*
* @return
*/
@Bean
@Override
public KeyGenerator keyGenerator() {
return new KeyGenerator() {
@Override
public Object generate(Object target, Method method, Object... params) {
StringBuilder sb = new StringBuilder();
sb.append(target.getClass().getName());
sb.append(method.getName());
for (Object obj : params) {
sb.append(obj.toString());
}
return sb.toString();
}
};
}
/**
* 管理缓存
*
* @param redisConnectionFactory
* @return
*/
@Bean
public CacheManager cacheManager(RedisConnectionFactory redisConnectionFactory) {
//通过Spring提供的RedisCacheConfiguration类,构造一个自己的redis配置类,从该配置类中可以设置一些初始化的缓存命名空间
// 及对应的默认过期时间等属性,再利用RedisCacheManager中的builder.build()的方式生成cacheManager:
RedisCacheConfiguration config = RedisCacheConfiguration.defaultCacheConfig(); // 生成一个默认配置,通过config对象即可对缓存进行自定义配置
config = config.entryTtl(Duration.ofMinutes(1)) // 设置缓存的默认过期时间,也是使用Duration设置
.disableCachingNullValues(); // 不缓存空值
// 设置一个初始化的缓存空间set集合
Set cacheNames = new HashSet<>();
cacheNames.add("my-redis-cache1");
cacheNames.add("my-redis-cache2");
// 对每个缓存空间应用不同的配置
Map configMap = new HashMap<>();
configMap.put("my-redis-cache1", config);
configMap.put("my-redis-cache2", config.entryTtl(Duration.ofSeconds(120)));
RedisCacheManager cacheManager = RedisCacheManager.builder(redisConnectionFactory) // 使用自定义的缓存配置初始化一个cacheManager
.initialCacheNames(cacheNames) // 注意这两句的调用顺序,一定要先调用该方法设置初始化的缓存名,再初始化相关的配置
.withInitialCacheConfigurations(configMap)
.build();
return cacheManager;
}
@Bean
public RedisTemplate redisTemplate(RedisConnectionFactory connectionFactory) {
RedisTemplate template = new RedisTemplate<>();
template.setConnectionFactory(connectionFactory);
//使用Jackson2JsonRedisSerializer来序列化和反序列化redis的value值(默认使用JDK的序列化方式)
Jackson2JsonRedisSerializer serializer = new Jackson2JsonRedisSerializer(Object.class);
ObjectMapper mapper = new ObjectMapper();
mapper.setVisibility(PropertyAccessor.ALL, JsonAutoDetect.Visibility.ANY);
mapper.enableDefaultTyping(ObjectMapper.DefaultTyping.NON_FINAL);
serializer.setObjectMapper(mapper);
template.setValueSerializer(serializer);
//使用StringRedisSerializer来序列化和反序列化redis的key值
template.setKeySerializer(new StringRedisSerializer());
template.afterPropertiesSet();
return template;
}
@Bean
public StringRedisTemplate stringRedisTemplate(RedisConnectionFactory factory) {
StringRedisTemplate stringRedisTemplate = new StringRedisTemplate();
stringRedisTemplate.setConnectionFactory(factory);
return stringRedisTemplate;
}
}
```
[^注意:@EnableCaching:激活缓存支持]:
### springboot整合redis及其注解式开发
#### 常用缓存注解
##### @Cacheable
> 作用是主要针对方法配置,能够根据方法的请求参数对其结果进行缓存
value :
缓存的名称,在 spring 配置文件中定义,必须指定至少一个,
例如:@Cacheable(value=”mycache”) 或者 @Cacheable(value={”cache1”,”cache2”}。
key :缓存的 key,可以为空,
如果指定要按照 SpEL 表达式编写,如果不指定,则缺省按照方法的所有参数进行组合,
例如:@Cacheable(value=”testcache”,key=”#userName”)。
condition :缓存的条件,可以为空,
##### @CachePut
> 作用是主要针对方法配置,能够根据方法的请求参数对其结果进行缓存,和 @Cacheable 不同的是,它每次都会触发真实查询
方法的调用
主要参数说明:
参数配置和@Cacheable一样。
##### @CacheEvict
> 作用是主要针对方法配置,能够根据一定的条件对缓存进行清空
主要参数说明:
value , key 和 condition 参数配置和@Cacheable一样。
allEntries :
是否清空所有缓存内容,缺省为 false,
如果指定为 true,则方法调用后将立即清空所有缓存,
例如:@CachEvict(value=”testcache”,allEntries=true)
service层代码
@CacheEvict(value = "my-redis-cache2",allEntries = true)
public void clear() {
System.out.println("清空my-redis-cache2缓存槽中的所有对象....");
}
需要测试的话,先往缓存中缓存2个对象
beforeInvocation :
是否在方法执行前就清空,缺省为 false,
如果指定为 true,则在方法还没有执行的时候就清空缓存,
缺省情况下,如果方法执行抛出异常,则不会清空缓存,
例如@CachEvict(value=”testcache”,beforeInvocation=true)
------

## 4.整合undertow代替tomcat
`SpingBoot`中我们既可以使用`Tomcat`作为`Http`服务,也可以用`Undertow`来代替。`Undertow`在高并发业务场景中,性能优于`Tomcat`。所以,如果我们的系统是高并发请求,不妨使用一下`Undertow`,你会发现你的系统性能会得到很大的提升。
###### 1、`pom.xml`模块修改web容器依赖,使用undertow来替代tomcat容器
```xml
org.springframework.boot
spring-boot-starter-web
spring-boot-starter-tomcat
org.springframework.boot
org.springframework.boot
spring-boot-starter-undertow
```
###### 2、修改`application.yml`,使用undertow来替代tomcat容器
```yml
# 开发环境配置
server:
# 服务器的HTTP端口,默认为80
port: 80
servlet:
# 应用的访问路径
context-path: /
# undertow 配置
undertow:
# HTTP post内容的最大大小。当值为-1时,默认值为大小是无限的
max-http-post-size: -1
# 以下的配置会影响buffer,这些buffer会用于服务器连接的IO操作,有点类似netty的池化内存管理
# 每块buffer的空间大小,越小的空间被利用越充分
buffer-size: 512
# 设置IO线程数, 它主要执行非阻塞的任务,它们会负责多个连接, 默认设置每个CPU核心一个线程
io-threads: 8
# 阻塞任务线程池, 当执行类似servlet请求阻塞操作, undertow会从这个线程池中取得线程,它的值设置取决于系统的负载
worker-threads: 256
# 是否分配的直接内存
direct-buffers: true
```

## 5.集成actuator实现优雅关闭服务
优雅停机主要应用在版本更新的时候,为了等待正在工作的线程全部执行完毕,然后再停止。我们可以使用`SpringBoot`提供的`Actuator`
###### 1、`pom.xml`中引入`actuator`依赖
```xml
org.springframework.boot
spring-boot-starter-actuator
```
###### 2、配置文件中`endpoint`开启`shutdown`
```yml
management:
endpoint:
shutdown:
enabled: true
endpoints:
web:
exposure:
include: "shutdown"
base-path: /monitor
```
###### 3、`Post`请求测试验证优雅停机 curl -X POST http://localhost:8081/monitor/shutdown

## 6.集成flyway数据库版本控制
> 引入依赖pom
```xml
org.flywaydb
flyway-core
```
> 相关yml配置
```yaml
spring:
flyway:
# 数据库名称
schemas: yjx
# flyway自动配置 true 开启
enabled: true
#设定 SQL 脚本的目录,多个路径使用逗号分隔, 比如取值为 classpath:db/migration,filesystem:/sql-migrations
locations:
- classpath:db/migration
# 如果数据库不是空表,需要设置成 true,否则启动报错
baseline-on-migrate: true
# 与 baseline-on-migrate: true 搭配使用
baseline-version: 0
encoding: UTF-8
# 开发环境最好开启 outOfOrder, 生产环境关闭 outOfOrder .
out-of-order: false
# 禁止清理数据库表
clean-disabled: true
# 校验
validate-on-migrate: true
# 版本控制日志表,默认flyway_schema_history,不同系统建议修改改数据
table: flyway_schema_history
```
------
#### 自定义config配置
```java
@Configuration
@Slf4j
public class FlywayConfig {
@Autowired
private DataSource dataSource;
@PostConstruct
public void migrate() {
log.info("开始校验数据库版本信息");
Flyway flywayInit = Flyway.configure()
.dataSource(dataSource)
.locations("db/migration")
.baselineOnMigrate(true)
.load();
try{
flywayInit.migrate();
log.info("数据库版本更新完成");
}catch (Exception e) {
flywayInit.repair();
log.error("遇到错误,启用备用方案");
Flyway flywayInitTow = Flyway.configure()
.dataSource(dataSource)
.locations("db/migration")
.baselineOnMigrate(true)
.outOfOrder(true)
.load();
flywayInitTow.migrate();
log.info("解决成功");
}
}
}
```
#### springboot集成flyway中启动顺序前后问题解决方案
在对应启动处理位置加入如下注解,表示等待flywayConfig执行完毕后运行
> ```java
> @DependsOn("flywayConfig")
> ```
#### SQL 的文件名规则
**开发环境和生产环境的 migration SQL 不共用. 开发过程往往是多人协作开发, DB migration 也相对比较频繁, 所以 SQL 脚本会很多. 而生产环境 DB migration 往往由 DBA 完成, 每次升级通常需要提交一个 SQL 脚本.**
> 开发环境 SQL 文件建议采用时间戳作为版本号.
>
> 生产环境 SQL 文件, 应该是手动 merge 开发环境的 SQL 脚本, 版本号按照正常的版本
>
migration 后的SQL 脚本不应该再被修改.
**spring.flyway.outOfOrder 取值 true /false**
对于开发环境, 可能是多人协作开发, 很可能先 apply 了自己本地的最新 SQL 代码, 然后发现其他同事早先时候提交的 SQL 代码还没有 apply, 所以 开发环境应该设置 spring.flyway.outOfOrder=true, 这样 flyway 将能加载漏掉的老版本 SQL 文件; 而生产环境应该设置 spring.flyway.outOfOrder=false
**多个系统公用要 DB schema**
很多时候多个系统公用一个 DB schema , 这时候使用 spring.flyway.table 为不同的系统设置不同的 metadata 表, 缺省为 flyway_schema_history
> flyway的其他配置
> flyway.baseline-description对执行迁移时基准版本的描述.
> flyway.baseline-on-migrate当迁移时发现目标schema非空,而且带有没有元数据的表时,是否自动执行基准迁移,默认false.
> flyway.baseline-version开始执行基准迁移时对现有的schema的版本打标签,默认值为1.
> flyway.check-location检查迁移脚本的位置是否存在,默认false.
> flyway.clean-on-validation-error当发现校验错误时是否自动调用clean,默认false.
> flyway.enabled是否开启flywary,默认true.
> flyway.encoding设置迁移时的编码,默认UTF-8.
> flyway.ignore-failed-future-migration当读取元数据表时是否忽略错误的迁移,默认false.
> flyway.init-sqls当初始化好连接时要执行的SQL.
> flyway.locations迁移脚本的位置,默认db/migration.
> flyway.out-of-order是否允许无序的迁移,默认false.
> flyway.password目标数据库的密码.
> flyway.placeholder-prefix设置每个placeholder的前缀,默认${.
> flyway.placeholder-replacementplaceholders是否要被替换,默认true.
> flyway.placeholder-suffix设置每个placeholder的后缀,默认}.
> flyway.placeholders.[placeholder name]设置placeholder的value
> flyway.schemas设定需要flywary迁移的schema,大小写敏感,默认为连接默认的schema.
> flyway.sql-migration-prefix迁移文件的前缀,默认为V.
> flyway.sql-migration-separator迁移脚本的文件名分隔符,默认__
> flyway.sql-migration-suffix迁移脚本的后缀,默认为.sql
> flyway.tableflyway使用的元数据表名,默认为schema_version
> flyway.target迁移时使用的目标版本,默认为latest version
> flyway.url迁移时使用的JDBC URL,如果没有指定的话,将使用配置的主数据源
> flyway.user迁移数据库的用户名
> flyway.validate-on-migrate迁移时是否校验,默认为true.
## 7.线程池
> 参考Java多线程几种实现方式,我们可以很快速的通过new Thread(...).start()开启一个新的线程,但是这样创建线程会有很多坏处:
>
- 每次都要新建一个对象,性能差;
- 建出来的很多个对象是独立的,缺乏统一的管理。如果在代码中无限新建线程会导致这些线程相互竞争,占用过多的系统资源从而导致死机或者 oom ;
- 缺乏许多功能如定时执行、中断等。
> 因此Java给我们提供好一个十分好用的工具,那就是线程池
Java提供了一个工厂类来构造我们需要的线程池,这个工厂类就是 Executors 。这里主要讲4个创建线程池的方法,即
> newCachedThreadPool()
>
> newFixedThreadPool(int nThreads)
>
> newScheduledThreadPool(int corePoolSize)
>
> newSingleThreadExecutor()
------
### newCachedThreadPool()
创建缓存线程池。缓存的意思就是这个线程池会**根据需要创建新的线程** ,在有新任务的时候会优先使用先前创建出的线程。线程一旦创建了就一直在这个池子里面了,执行完任务后后续还有任务需要会**重用这个线程** ,若是**线程不够用了再去新建线程** 。
```java
ExecutorService executorService = Executors.newCachedThreadPool();
for (int i = 0; i < 10; i++) {
final int index = i;
// 每次发布任务前根据奇偶不同等待一段时间,如1s,这样就会创建两个线程
if (i % 2 == 0) {
try {
Thread.sleep(1000);
} catch (InterruptedException e) {
e.printStackTrace();
}
}
// 执行任务
cachedThreadPool.execute(() -> System.out.println(Thread.currentThread().getName() + ":" + index));
```
注意这里的线程池是**无限大的** ,并没有规定他的大小
### newFixedThreadPool(int nThreads)
创建定长线程池,参数是线程池的大小。也就是说,在同一时间执行的线程数量只能是 nThreads 这么多,这个线程池可以有效的控制最大并发数从而防止占用过多资源。超出的线程会放在线程池的一个**无界队列里等待** 其他线程执行完。
```java
ExecutorService executorService = Executors.newFixedThreadPool(5);
```
### newScheduledThreadPool(int corePoolSize)
第3个坏处线程池的坏处就是缺乏定时执行功能,这个Scheduled代表是支持的,这个线程池也是定长的,参数 corePoolSize 就是线程池的大小,即在空闲状态下要保留在池中的线程数量。而要实现调度需要使用这个线程池的 schedule() 方法
```java
ScheduledExecutorService scheduledExecutorService = Executors.newScheduledThreadPool(5);
// 三秒后执行
scheduledExecutorService.schedule(() -> System.out.println(Thread.currentThread().getName() + ": 我会在3秒后执行。"),
3, TimeUnit.SECONDS);
```
### newSingleThreadExecutor()
创建单线程池 ,只使用一个线程 来执行任务。但是它与 newFixedThreadPool(1, threadFactory) 不同,它会保证创建的这个线程池不会被重新配置为使用其他的线程 ,也就是说这个线程池里的线程始终如一。
```java
ExecutorService executorService = Executors.newSingleThreadExecutor();
```
### 线程池的关闭
线程池启动后需要手动关闭,否则会一直不结束
- shutdown() : 将线程池状态置成 SHUTDOWN,此时不再接受新的任务 ,等待线程池中已有任务执行完成后结束 ;
- shutdownNow() : 将线程池状态置成 SHUTDOWN,将线程池中所有线程中断 (调用线程的 interrupt() 操作),清空队列,并返回正在等待执行的任务列表 。
并且它还提供了查看线程池是否关闭和是否终止的方法,分别为 isShutdown() 和 isTerminated() 。

## 7.集成SpringSecurity权限控制
使用Spring Security为的就是写最少的代码,实现更多的功能,在定制化Spring Security,核心思路就是:重写某个功能,然后配置。
- 比如你要查自己的用户表做登录,那就实现UserDetailsService接口;
- 比如前后端分离项目,登录成功和失败后返回json,那就实现AuthenticationFailureHandler/AuthenticationSuccessHandler接口;
- 比如扩展token存放位置,那就实现HttpSessionIdResolver接口;
- 等等...
Don't bb, show me code.

## 8.集成Swagger
> 引入依赖
```xml
io.springfox
springfox-swagger2
2.9.2
io.springfox
springfox-swagger-ui
2.9.2
```
> UI增强版本
```xml
com.github.xiaoymin
knife4j-spring-boot-starter
3.0.3
com.github.xiaoymin
swagger-bootstrap-ui
1.9.6
```
### 2、创建Swagger2配置文件
```java
@Configuration
@EnableSwagger2
@EnableKnife4j//UI增强注解
public class Swagger2Config {
@Bean
public Docket buildDocket(){
return new Docket(DocumentationType.SWAGGER_2)
.apiInfo(buildApiInfo())
.select()
.apis(RequestHandlerSelectors.basePackage("com.dragonsoft.dataManage.controller"))
.paths(PathSelectors.any())
.build();
}
private ApiInfo buildApiInfo(){
return new ApiInfoBuilder()
//页面标题,导入postman时必须有该项配置
.title("模拟创建仿真数据")
//版本号,导入postman时必须有该项配置
.version("1.0")
.description("视频大数据平台基线V1.1-区域分析-业务数据构造")
//创建人
.contact(new Contact("jiangmy","http://localhost:9999/swagger-ui.html","jiangmy@dragoninfo.com.cn"))
.build();
}
}
```
### 3、修改Controller,添加API注解
```java
@RestController
@PostMapping(value = "/ryxx")
@Api(description = "人员基础信息")
public class PeopleApiController {
@ResponseBody
@GetMapping(value = "/ryjcxx", produces = MediaType.APPLICATION_JSON_UTF8_VALUE)
@ApiOperation(value = "人员基础信息",notes = "人员基础信息生成")
public Map ryjcxx() {
Map returnResult = null;
try {
returnResult = CzrkComponet.ryJcxx();
} catch (Exception e) {
e.printStackTrace();
}
return returnResult;
}
```
### 4,注解说明
#### @Api注解可以用来标记当前Controller的功能。
> (1)tags="说明该类的作用,可以在UI界面上看到的注解" (非空时将覆盖value的值)
>
> (2)value="说明类的作用"
>
> (3)description="说明类的作用,对类的作用进行描述"
#### @ApiOperation注解用来标记一个方法的作用。
> (1)value="说明该方法的作用和用途"
>
> (2)notes="对该方法的备注信息说明"
#### @ApiImplicitParam注解用来描述一个参数,可以配置参数的中文含义,也可以给参数设置默认值,这样在接口测试的时候可以避免手动输入。
------
如果有多个参数,则需要使用多个@ApiImplicitParam注解来描述,多个@ApiImplicitParam注解需要放在一个@ApiImplicitParams注解中。
需要注意的是,@ApiImplicitParam注解中虽然可以指定参数是必填的,但是却不能代替@RequestParam(required = true),前者的必填只是在Swagger2框架内必填,抛弃了Swagger2,这个限制就没用了,所以假如开发者需要指定一个参数必填,@RequestParam(required = true)注解还是不能省略。
> (1)name参数名
> (2)value对参数的说明
> (3)required参数是否必传(值为true或者false)
> (4)dataType参数类型,默认是String,其他例如:Integer
> (5)paramType 参数放在什么地方
> · header --> 请求参数的获取:@RequestHeader ·
> query --> 请求参数的获取:@RequestParam ·
> path(用于restful接口)--> 请求参数的获取:@PathVariable ·
> body(不常用) ·
> form(不常用)
------
#### @ApiResponses:用在请求的方法上,表示一组响应
```
@ApiResponse用在@ApiResponses中,常用于表示一组错误的信息的响应
```
> (1)code错误代码
> (2)massege错误信息提示
> (3)response 抛出异常的类
> 示例:
> @ApiResponses({
> @ApiResponse(code=400,message="请求参数没填好"),
> @ApiResponse(code=404,message="请求路径没有或页面跳转路径不对")
> })
#### @ApiParam用在请求方法中,描述参数的信息
> name参数名称,参数名称可以覆盖方法参数名称,路径参数必须与方法参数一致
> value参数的简要说明。
> defaultValue参数默认值
> required 属性是否必填,默认为false [路径参数必须填]
#### @ApiModelProperty作为字段的描述
#### @ApiIgnore() 用在类或者方法上,表明在swagger2中忽略这个类或者方法或者参数。
> 不想接口在页面上显示可以使用@ApiIgnore()注解
------
***模块的排序,使用tag名称排序,在名称前加上前缀0X-,即在名称就加上"01-"、"02-"。但为了页面展示效果,在排序后把前缀进行处理;***
------
### 5,swagger文档转成word 文档
参考链接:https://www.cnblogs.com/jmcui/p/8298823.html
### 6,swagger访问URL
> 原生版本
[http://$](http://%24/){host}:{port}/swagger-ui.html
> UI增强版本
[http://$](http://%24/){host}:{port}/doc.html
------

------
## 9.集成参数校验&全局异常处理&返回处理
> 引入pom
>
```xml
org.springframework.boot
spring-boot-starter-validation
```
### 常用注解
[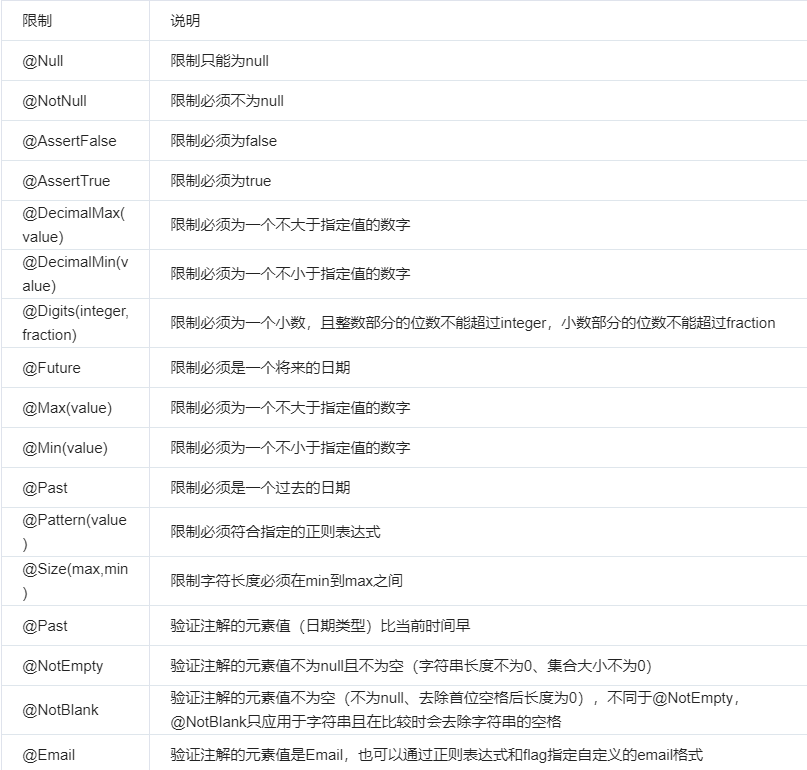](https://img2020.cnblogs.com/blog/1564232/202107/1564232-20210729111824613-703871468.png)
### 定义分组
> 用于分组校验。
> 使用场景,对同一个对象例如User(username , id) 在不同的接口时 需要的校验规则不同。
> 例如,访问一个接口需要 username 不为null且长度大于0 ,id>=0 ; 访问另一个接口 需要 username 参数的长度 在 [1,3]之间。
```java
public class ValidateGroup {
public interface FirstGroup {
}
public interface SecondeGroup {
}
public interface ThirdGroup {
}
}
```
### 定义需要校验的对象
```java
import javax.validation.constraints.Min;
import javax.validation.constraints.NotEmpty;
import javax.validation.constraints.Size;
import lombok.Data;
@Data
public class User {
@NotEmpty(message = "用户名不能为空")
@Size(message = "用户名长度 [1-3] ", min = 1, max = 3,groups = ValidateGroup.FirstGroup.class)
private String username;
@Min(message = "id不得小于0", value = 0)
private Integer id;
}
```
### 在handler 即 Controller中 校验
```java
import org.springframework.web.bind.annotation.PostMapping;
import org.springframework.web.bind.annotation.RequestBody;
import org.springframework.web.bind.annotation.PostMapping;
import org.springframework.web.bind.annotation.RestController;
import com.nbpicc.controller.ValidateGroup.FirstGroup;
@RestController
@PostMapping("/")
public class TestController {
@PostMapping("test3")
public User test3(@RequestBody @Validated({ FirstGroup.class }) User u) {
System.out.println(u);
return u;
}
@PostMapping("test4")
public User test4(@Validated User u) {
System.out.println(u);
return u;
}
}
```
校验失败,会直接抛出异常。这样不太友好,可以使用@ControllerAdvice处理全局异常。
注意:这里一定要在方法所在的controller类上加入`@Validated`注解,不然没有任何效果。
### 定义全局异常处理类
```java
import java.util.List;
import org.springframework.validation.BindException;
import org.springframework.validation.BindingResult;
import org.springframework.validation.FieldError;
import org.springframework.web.bind.MethodArgumentNotValidException;
import org.springframework.web.bind.annotation.ExceptionHandler;
import org.springframework.web.bind.annotation.RestControllerAdvice;
import lombok.extern.slf4j.Slf4j;
@Slf4j
@RestControllerAdvice
public class GlobalExceptionHandler {
@ExceptionHandler(value = BindException.class)
public JsonResult exceptionHandle(BindException exception) {
BindingResult result = exception.getBindingResult();
StringBuilder errorMsg = new StringBuilder();
List fieldErrors = result.getFieldErrors();
fieldErrors.forEach(error -> {
log.error("field: " + error.getField() + ", msg:" + error.getDefaultMessage());
errorMsg.append(error.getDefaultMessage()).append("!");
});
return JsonResult.failure(errorMsg.toString());
}
@ExceptionHandler(value = MethodArgumentNotValidException.class)
public JsonResult MyExceptionHandle(MethodArgumentNotValidException exception) {
BindingResult result = exception.getBindingResult();
StringBuilder errorMsg = new StringBuilder();
List fieldErrors = result.getFieldErrors();
fieldErrors.forEach(error -> {
log.error("field: " + error.getField() + ", msg:" + error.getDefaultMessage());
errorMsg.append(error.getDefaultMessage()).append("!");
});
return JsonResult.failure(errorMsg.toString());
}
// 处理运行时异常
@ExceptionHandler(RuntimeException.class)
public JsonResult doHandleRuntimeException(RuntimeException e) {
log.error(e.getMessage(), e);
e.printStackTrace();
return JsonResult.failure(e.getMessage());
}
}
```
另外JsonResult.java用于接口返回统一个json格式
```java
import com.fasterxml.jackson.annotation.JsonInclude;
import lombok.AllArgsConstructor;
import lombok.Data;
import lombok.NoArgsConstructor;
import lombok.experimental.Accessors;
/**
*@author wang
*@Date 2020-9-14
*
**/
@Data
@Accessors(chain = true)
@NoArgsConstructor
@AllArgsConstructor
@JsonInclude(JsonInclude.Include.NON_NULL)
public class JsonResult {
/** 成功 */
public static final int SUCCESS=200;
/**内部服务器错误**/
public static final int failure=500;
/** 没有登录 */
public static final int NOT_LOGIN = 400;
/** 发生异常 */
public static final int EXCEPTION = 401;
/** 系统错误 */
public static final int SYS_ERROR = 402;
/** 参数错误 */
public static final int PARAMS_ERROR = 403;
/** 不支持或已经废弃 */
public static final int NOT_SUPPORTED = 410;
/** AuthCode错误 */
public static final int INVALID_AUTHCODE = 444;
/** 太频繁的调用 */
public static final int TOO_FREQUENT = 445;
/** 未知的错误 */
public static final int UNKNOWN_ERROR = 499;
private Integer code;
private String msg;
private T data;
public static JsonResult failure() {
return new JsonResult(failure, "请求处理失败",null);
}
public static JsonResult failure(String msg) {
return new JsonResult(failure, msg,null);
}
public static JsonResult failure(Integer code,String msg) {
return new JsonResult(code, msg,null);
}
public static JsonResult success() {
return new JsonResult(SUCCESS,"请求处理成功",null);
}
public static JsonResult success(String msg) {
return new JsonResult(SUCCESS,msg,null);
}
public static JsonResult success(T data) {
return new JsonResult (SUCCESS,"请求处理成功",data);
}
public static JsonResult success(String msg,T data) {
return new JsonResult(SUCCESS, msg,data);
}
public static JsonResult err() {
return build(EXCEPTION);
}
public static JsonResult err(String msg) {
return build(EXCEPTION, msg);
}
public JsonResult code(int code) {
this.code = code;
return this;
}
public JsonResult msg(String msg) {
this.msg = msg;
return this;
}
public JsonResult data(T data) {
this.data = data;
return this;
}
public static JsonResult build() {
return new JsonResult();
}
public static JsonResult build(int code) {
return new JsonResult().code(code);
}
public static JsonResult build(int code, String msg) {
return new JsonResult().code(code).msg(msg);
}
public static JsonResult build(int code, T data) {
return new JsonResult().code(code).data(data);
}
public static JsonResult build(int code, String msg, T data) {
return new JsonResult().code(code).msg(msg).data(data);
}
}
```
## 日常笔记
------
### lombok @Accessors用法
> @Accessors
> Accessor的中文含义是存取器,@Accessors用于配置getter和setter方法的生成结果,下面介绍三个属性
#### fluent
fluent的中文含义是流畅的,设置为true,则getter和setter方法的方法名都是基础属性名,且setter方法返回当前对象。如下
```java
@Data
@Accessors(fluent = true)
public class User {
private Long id;
private String name;
// 生成的getter和setter方法如下,方法体略
public Long id() {}
public User id(Long id) {}
public String name() {}
public User name(String name) {}
}
```
#### chain
chain的中文含义是链式的,设置为true,则setter方法返回当前对象。如下
```java
@Data
@Accessors(chain = true)
public class User {
private Long id;
private String name;
// 生成的setter方法如下,方法体略
public User setId(Long id) {}
public User setName(String name) {}
}
```
#### prefix
prefix的中文含义是前缀,用于生成getter和setter方法的字段名会忽视指定前缀(遵守驼峰命名)。如下
```java
@Data
@Accessors(prefix = "p")
class User {
private Long pId;
private String pName;
// 生成的getter和setter方法如下,方法体略
public Long getId() {}
public void setId(Long id) {}
public String getName() {}
public void setName(String name) {}
}
```