# ComfyUI_IPAdapter_plus
**Repository Path**: wang-derder/ComfyUI_IPAdapter_plus
## Basic Information
- **Project Name**: ComfyUI_IPAdapter_plus
- **Description**: No description available
- **Primary Language**: Unknown
- **License**: GPL-3.0
- **Default Branch**: main
- **Homepage**: None
- **GVP Project**: No
## Statistics
- **Stars**: 0
- **Forks**: 0
- **Created**: 2023-11-05
- **Last Updated**: 2023-11-05
## Categories & Tags
**Categories**: Uncategorized
**Tags**: None
## README
# ComfyUI IPAdapter plus
[ComfyUI](https://github.com/comfyanonymous/ComfyUI) reference implementation for [IPAdapter](https://github.com/tencent-ailab/IP-Adapter/) models.
IPAdapter implementation that follows the ComfyUI way of doing things. The code is memory efficient, fast, and shouldn't break with Comfy updates.
## Important updates
**2023/11/02**: Added compatibility with the new models in safetensors format (available on [huggingface](https://huggingface.co/h94/IP-Adapter)).
**2023/10/12**: Added image weighting in the `IPAdapterEncoder` node. This update is somewhat breaking; if you use `IPAdapterEncoder` and `PrepImageForClipVision` nodes you need to remove them from your workflow, refresh and recreate them. In the examples you'll find a [workflow](examples/IPAdapter_weighted.json) for weighted images.
**2023/9/29**: Added save/load of encoded images. Fix minor bugs.
**2023/9/27**: Added a `PrepImageForClipVision` node to prepare your images for IPAdapters and get generally better results. See below for details. Note that this is useful for any clip vision encoded image, not only IPAdapter.
**2023/9/17**: Better image handling, lower memory usage. Changed how the noise is generated.
**2023/9/15**: Huge code cleanup! I streamlined the node structure for a tidier workflow. **IMPORTANT** this is a breaking update, we don't need the dedicated clip vision encoder anymore. Please check the new included workflows. Also introduced the new `noise` option, see below for details.
**2023/9/11**: The code has been rewritten to take advantage of the new ComfyUI updates regarding clip vision. Expect lower memory usage.
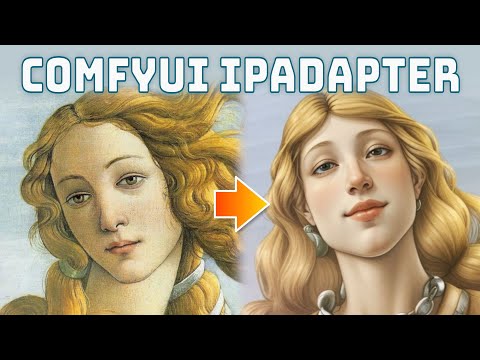
## What is it?
The IPAdapter are very powerful models for image-to-image conditioning. Given a reference image you can do variations augmented by text prompt, controlnets and masks. Think of it as a 1-image lora.
## Example workflow

## Video Introduction
 **:nerd_face: [Basic usage video](https://youtu.be/7m9ZZFU3HWo)**
**:rocket: [Advanced features video](https://www.youtube.com/watch?v=mJQ62ly7jrg)**
## Installation
Download or git clone this repository inside `ComfyUI/custom_nodes/` directory.
The pre-trained models are available on [huggingface](https://huggingface.co/h94/IP-Adapter), download and place them in the `ComfyUI/custom_nodes/ComfyUI_IPAdapter_plus/models` directory.
For SD1.5 you need:
- [ip-adapter_sd15.bin](https://huggingface.co/h94/IP-Adapter/resolve/main/models/ip-adapter_sd15.bin)
- [ip-adapter_sd15_light.bin](https://huggingface.co/h94/IP-Adapter/blob/main/models/ip-adapter_sd15_light.bin), use this when text prompt is more important than reference images
- [ip-adapter-plus_sd15.bin](https://huggingface.co/h94/IP-Adapter/resolve/main/models/ip-adapter-plus_sd15.bin)
- [ip-adapter-plus-face_sd15.bin](https://huggingface.co/h94/IP-Adapter/resolve/main/models/ip-adapter-plus-face_sd15.bin)
For SDXL you need:
- [ip-adapter_sdxl.bin](https://huggingface.co/h94/IP-Adapter/resolve/main/sdxl_models/ip-adapter_sdxl.bin)
- [ip-adapter_sdxl_vit-h.bin](https://huggingface.co/h94/IP-Adapter/resolve/main/sdxl_models/ip-adapter_sdxl_vit-h.bin) **This model requires the use of the SD1.5 encoder despite being for SDXL checkpoints**
- [ip-adapter-plus_sdxl_vit-h.bin](https://huggingface.co/h94/IP-Adapter/resolve/main/sdxl_models/ip-adapter-plus_sdxl_vit-h.bin) Same as above, use the SD1.5 encoder
- [ip-adapter-plus-face_sdxl_vit-h.bin](https://huggingface.co/h94/IP-Adapter/resolve/main/sdxl_models/ip-adapter-plus-face_sdxl_vit-h.bin) As always, use the SD1.5 encoder
Please note that now the models are also available in safetensors format, you can find them on [huggingface](https://huggingface.co/h94/IP-Adapter).
Additionally you need the image encoders to be placed in the `ComfyUI/models/clip_vision/` directory:
- [SD 1.5 model](https://huggingface.co/h94/IP-Adapter/resolve/main/models/image_encoder/model.safetensors) (use this also for all models ending with **_vit-h**)
- [SDXL model](https://huggingface.co/h94/IP-Adapter/resolve/main/sdxl_models/image_encoder/model.safetensors)
You can rename them to something easier to remember or put them into a sub-directory.
**Note:** the image encoders are actually [ViT-H](https://huggingface.co/laion/CLIP-ViT-H-14-laion2B-s32B-b79K) and [ViT-bigG](https://huggingface.co/laion/CLIP-ViT-bigG-14-laion2B-39B-b160k) (used only for one SDXL model). You probably already have them.
## How to
There's a basic workflow included in this repo and a few examples in the [examples](./examples/) directory. Usually it's a good idea to lower the `weight` to at least `0.8`.
The `noise` paramenter is an experimental exploitation of the IPAdapter models. You can set it as low as `0.01` for an arguably better result.
**:nerd_face: [Basic usage video](https://youtu.be/7m9ZZFU3HWo)**
**:rocket: [Advanced features video](https://www.youtube.com/watch?v=mJQ62ly7jrg)**
## Installation
Download or git clone this repository inside `ComfyUI/custom_nodes/` directory.
The pre-trained models are available on [huggingface](https://huggingface.co/h94/IP-Adapter), download and place them in the `ComfyUI/custom_nodes/ComfyUI_IPAdapter_plus/models` directory.
For SD1.5 you need:
- [ip-adapter_sd15.bin](https://huggingface.co/h94/IP-Adapter/resolve/main/models/ip-adapter_sd15.bin)
- [ip-adapter_sd15_light.bin](https://huggingface.co/h94/IP-Adapter/blob/main/models/ip-adapter_sd15_light.bin), use this when text prompt is more important than reference images
- [ip-adapter-plus_sd15.bin](https://huggingface.co/h94/IP-Adapter/resolve/main/models/ip-adapter-plus_sd15.bin)
- [ip-adapter-plus-face_sd15.bin](https://huggingface.co/h94/IP-Adapter/resolve/main/models/ip-adapter-plus-face_sd15.bin)
For SDXL you need:
- [ip-adapter_sdxl.bin](https://huggingface.co/h94/IP-Adapter/resolve/main/sdxl_models/ip-adapter_sdxl.bin)
- [ip-adapter_sdxl_vit-h.bin](https://huggingface.co/h94/IP-Adapter/resolve/main/sdxl_models/ip-adapter_sdxl_vit-h.bin) **This model requires the use of the SD1.5 encoder despite being for SDXL checkpoints**
- [ip-adapter-plus_sdxl_vit-h.bin](https://huggingface.co/h94/IP-Adapter/resolve/main/sdxl_models/ip-adapter-plus_sdxl_vit-h.bin) Same as above, use the SD1.5 encoder
- [ip-adapter-plus-face_sdxl_vit-h.bin](https://huggingface.co/h94/IP-Adapter/resolve/main/sdxl_models/ip-adapter-plus-face_sdxl_vit-h.bin) As always, use the SD1.5 encoder
Please note that now the models are also available in safetensors format, you can find them on [huggingface](https://huggingface.co/h94/IP-Adapter).
Additionally you need the image encoders to be placed in the `ComfyUI/models/clip_vision/` directory:
- [SD 1.5 model](https://huggingface.co/h94/IP-Adapter/resolve/main/models/image_encoder/model.safetensors) (use this also for all models ending with **_vit-h**)
- [SDXL model](https://huggingface.co/h94/IP-Adapter/resolve/main/sdxl_models/image_encoder/model.safetensors)
You can rename them to something easier to remember or put them into a sub-directory.
**Note:** the image encoders are actually [ViT-H](https://huggingface.co/laion/CLIP-ViT-H-14-laion2B-s32B-b79K) and [ViT-bigG](https://huggingface.co/laion/CLIP-ViT-bigG-14-laion2B-39B-b160k) (used only for one SDXL model). You probably already have them.
## How to
There's a basic workflow included in this repo and a few examples in the [examples](./examples/) directory. Usually it's a good idea to lower the `weight` to at least `0.8`.
The `noise` paramenter is an experimental exploitation of the IPAdapter models. You can set it as low as `0.01` for an arguably better result.
More info about the noise option
 Basically the IPAdapter sends two pictures for the conditioning, one is the reference the other --that you don't see-- is an empty image that could be considered like a negative conditioning.
What I'm doing is to send a very noisy image instead of an empty one. The `noise` parameter determines the amount of noise that is added. A value of `0.01` adds a lot of noise (more noise == less impact becaue the model doesn't get it); a value of `1.0` removes most of noise so the generated image gets conditioned more.
Basically the IPAdapter sends two pictures for the conditioning, one is the reference the other --that you don't see-- is an empty image that could be considered like a negative conditioning.
What I'm doing is to send a very noisy image instead of an empty one. The `noise` parameter determines the amount of noise that is added. A value of `0.01` adds a lot of noise (more noise == less impact becaue the model doesn't get it); a value of `1.0` removes most of noise so the generated image gets conditioned more.
### IMPORTANT: Preparing the reference image
The reference image needs to be encoded by the CLIP vision model. The encoder resizes the image to 224×224 **and crops it to the center!**. It's not an IPAdapter thing, it's how the clip vision works. This means that if you use a portrait or landscape image and the main attention (eg: the face of a character) is not in the middle you'll likely get undesired results. Use square pictures as reference for more predictable results.
I've added a `PrepImageForClipVision` node that does all the required operations for you. You just have to select the crop position (top/left/center/etc...) and a sharpening amount if you want.
The `add_weight` option is useful **only** in case of image batches, **do not use otherwise**. It effectively doubles the image weight in a batch of images. It's like sending the same image twice.
In the image below you can see the difference between prepped and not prepped images.
 ### KSampler configuration suggestions
The IPAdapter generally requires a few more `steps` than usual, if the result is underwhelming try to add 10+ steps. `ddmin`, `ddpm` and `euler` seem to perform better than others.
The model tends to burn the images a little. If needed lower the CFG scale.
The SDXL models are weird but the `noise` option sometimes helps.
### IPAdapter + ControlNet
The model is very effective when paired with a ControlNet. In the example below I experimented with Canny. [The workflow](./examples/IPAdapter_Canny.json) is in the examples directory.
### KSampler configuration suggestions
The IPAdapter generally requires a few more `steps` than usual, if the result is underwhelming try to add 10+ steps. `ddmin`, `ddpm` and `euler` seem to perform better than others.
The model tends to burn the images a little. If needed lower the CFG scale.
The SDXL models are weird but the `noise` option sometimes helps.
### IPAdapter + ControlNet
The model is very effective when paired with a ControlNet. In the example below I experimented with Canny. [The workflow](./examples/IPAdapter_Canny.json) is in the examples directory.
 ### IPAdapter Face
IPAdapter offers an interesting model for a kind of "face swap" effect. [The workflow is provided](./examples/IPAdapter_face.json). Set a close up face as reference image and then input your text prompt as always. The generated character should have the face of the reference. It also works with img2img given a high denoise.
### IPAdapter Face
IPAdapter offers an interesting model for a kind of "face swap" effect. [The workflow is provided](./examples/IPAdapter_face.json). Set a close up face as reference image and then input your text prompt as always. The generated character should have the face of the reference. It also works with img2img given a high denoise.
 ### Masking
The most effective way to apply the IPAdapter to a region is by an [inpainting workflow](./examples/IPAdapter_inpaint.json). Remeber to use a specific checkpoint for inpainting otherwise it won't work. Even if you are inpainting a face I find that the *IPAdapter-Plus* (not the *face* one), works best.
### Masking
The most effective way to apply the IPAdapter to a region is by an [inpainting workflow](./examples/IPAdapter_inpaint.json). Remeber to use a specific checkpoint for inpainting otherwise it won't work. Even if you are inpainting a face I find that the *IPAdapter-Plus* (not the *face* one), works best.
 ### Image Batches
It is possible to pass multiple images for the conditioning with the `Batch Images` node. An [example workflow](./examples/IPAdapter_batch_images.json) is provided; in the picture below you can see the result of one and two images conditioning.
### Image Batches
It is possible to pass multiple images for the conditioning with the `Batch Images` node. An [example workflow](./examples/IPAdapter_batch_images.json) is provided; in the picture below you can see the result of one and two images conditioning.
 It seems to be effective with 2-3 images, beyond that it tends to *blur* the information too much.
### Image Weighting
When sending multiple images you can increase/decrease the weight of each image by using the `IPAdapterEncoder` node. The workflow ([included in the examples](examples/IPAdapter_weighted.json)) looks like this:
It seems to be effective with 2-3 images, beyond that it tends to *blur* the information too much.
### Image Weighting
When sending multiple images you can increase/decrease the weight of each image by using the `IPAdapterEncoder` node. The workflow ([included in the examples](examples/IPAdapter_weighted.json)) looks like this:
 The node accepts 4 images, but remember that you can send batches of images to each slot.
## Troubleshooting
**Error: 'CLIPVisionModelOutput' object has no attribute 'penultimate_hidden_states'**
You are using an old version of ComfyUI. Update and you'll be fine.
**Error with Tensor size mismatch**
You are using the wrong CLIP encoder+IPAdapter Model+Checkpoint combo. Remember that you need to select the CLIP encoder v1.5 for all v1.5 IPAdapter models AND for all models ending with `vit-h` (even if they are for SDXL).
**Is it true that the input reference image must have the same size of the output image?**
No, that's a metropolitan legend. Your input and output images can be of any size. Remember that all input images are scaled and cropped to 224x224 anyway.
## Diffusers version
If you are interested I've also implemented the same features for [Huggingface Diffusers](https://github.com/cubiq/Diffusers_IPAdapter).
## Credits
- [IPAdapter](https://github.com/tencent-ailab/IP-Adapter/)
- [laksjdjf](https://github.com/laksjdjf/IPAdapter-ComfyUI/)
- [ComfyUI](https://github.com/comfyanonymous/ComfyUI)
## IPAdapter in the wild
Let me know if you spot the IPAdapter in the wild!
- For German speakers you can find interesting YouTube tutorials on [A Latent Place](https://www.youtube.com/watch?v=rAWn_0YOBU0).
- [Scott Detweiler](https://www.youtube.com/watch?v=xzGdynQDzsM) covered this extension.
The node accepts 4 images, but remember that you can send batches of images to each slot.
## Troubleshooting
**Error: 'CLIPVisionModelOutput' object has no attribute 'penultimate_hidden_states'**
You are using an old version of ComfyUI. Update and you'll be fine.
**Error with Tensor size mismatch**
You are using the wrong CLIP encoder+IPAdapter Model+Checkpoint combo. Remember that you need to select the CLIP encoder v1.5 for all v1.5 IPAdapter models AND for all models ending with `vit-h` (even if they are for SDXL).
**Is it true that the input reference image must have the same size of the output image?**
No, that's a metropolitan legend. Your input and output images can be of any size. Remember that all input images are scaled and cropped to 224x224 anyway.
## Diffusers version
If you are interested I've also implemented the same features for [Huggingface Diffusers](https://github.com/cubiq/Diffusers_IPAdapter).
## Credits
- [IPAdapter](https://github.com/tencent-ailab/IP-Adapter/)
- [laksjdjf](https://github.com/laksjdjf/IPAdapter-ComfyUI/)
- [ComfyUI](https://github.com/comfyanonymous/ComfyUI)
## IPAdapter in the wild
Let me know if you spot the IPAdapter in the wild!
- For German speakers you can find interesting YouTube tutorials on [A Latent Place](https://www.youtube.com/watch?v=rAWn_0YOBU0).
- [Scott Detweiler](https://www.youtube.com/watch?v=xzGdynQDzsM) covered this extension.