# thunder-client-support
**Repository Path**: william198824/thunder-client-support
## Basic Information
- **Project Name**: thunder-client-support
- **Description**: No description available
- **Primary Language**: Unknown
- **License**: Not specified
- **Default Branch**: master
- **Homepage**: None
- **GVP Project**: No
## Statistics
- **Stars**: 0
- **Forks**: 0
- **Created**: 2024-01-24
- **Last Updated**: 2024-01-24
## Categories & Tags
**Categories**: Uncategorized
**Tags**: None
## README

# Thunder Client
[](https://marketplace.visualstudio.com/items?itemName=rangav.vscode-thunder-client) [](https://marketplace.visualstudio.com/items?itemName=rangav.vscode-thunder-client) [](https://discord.gg/yw6UsfwrkH)
Thunder Client is a lightweight Rest API Client Extension for Visual Studio Code, hand-crafted by [Ranga Vadhineni](https://twitter.com/ranga_vadhineni) with a simple and clean design. The source code is not open source. You can report any Bugs Or Feature requests here.
- **Featured on Product Hunt** - [Product Hunt](https://www.producthunt.com/posts/thunder-client)
- Website - [www.thunderclient.com](https://www.thunderclient.com)
#### Story behind Thunder Client
- Read Launch Blog Post on [Medium](https://rangav.medium.com/thunder-client-alternative-to-postman-68ee0c9486d6)
#### Milestones
- **2 Million** downloads on Apr 17, 2023
- **1 Million** downloads on July 13, 2022
- **500K** downloads on Dec 20, 2021
- Extension **launched** on Mar 31, 2021
#### Follow Us for Updates
[](https://twitter.com/thunder_client)
[](https://www.linkedin.com/company/thunderclient/)
## Menu
- [How to Use](#usage)
- [Features](#features)
- [Git Sync](#git-sync)
- [CLI & CI/CD Integration](#cli)
- [Storage Location](#storage)
- [Code Snippet](#codegen)
- [Pre Request Scripting](#pre-request)
- [Testing](#testing)
- [Environments](#environments)
- [Set Environment Variable](#setenv)
- [Auth](#auth)
- [Logs](#logs)
- [Cookies](#cookies)
- [Path Variables](#path)
- [System Variables](#variables)
- [Proxy](#proxy)
- [Http/2](#http2)
- [Import/Export](#import)
- [Keyboard Shortcuts](#keyboard)
- [VS Code Settings](#settings)
- [Contribution](#contribution)
- [Privacy](#privacy)
## How to Use
- Install the extension, click the Thunder Client icon on the Action Bar.
- From the sidebar click `New Request` button to test API
- Video: [youtube.com/watch?v=NKZ0ahNbmak](https://youtu.be/NKZ0ahNbmak?t=3)
 #### Requirements
- Minimum **VS Code** version now required is `v1.71.0`
## Main Features
- **Lightweight** and Easy to use Rest API Client.
- Supports **Collections and Environment variables**.
- **Scriptless Testing:** Test API response easily with GUI-based interface.
- **Themes:** The extension supports VS Code themes.
- **Offline & Local Storage:** Works offline and saves all the requests data locally on your device.
- **Git Sync:** Save requests data in your Git Repository.
## Git Sync
**----_>>> Subscription required to use this feature_ <<<----**
This feature is useful to share requests with your team by saving data in a git project or custom location.
Integration with Git is supported by VSCode settings below.
**NOTE:** choose **any one setting** as required.
### 1. Save To Workspace (Recommended):
Enable this setting when you'd like to save requests data in the current workspace. This will create a `thunder-tests` folder in the root of the workspace. The extension will load the data automatically when you open the project in VS Code.
- **Workspace Relative Path** (Optional Setting): The default location of the `thunder-tests` folder is at the root of your workspace. Use the `Workspace Relative Path` setting to specify a different relative path (see below for examples).
- Make sure the `Workspace Relative Path` setting is "**Workspace**" scope, not "**User**".
- **Example 1**: To save requests in the folder named `Child` inside the workspace, the Workspace relative path is `Child`. Similarly, for a folder `Child/folder_name` inside the workspace the workspace relative path is `Child/folder_name`
- **Example 2**: To save requests in the Parent folder of the workspace, the workspace relative path is `../`
#### Requirements
- Minimum **VS Code** version now required is `v1.71.0`
## Main Features
- **Lightweight** and Easy to use Rest API Client.
- Supports **Collections and Environment variables**.
- **Scriptless Testing:** Test API response easily with GUI-based interface.
- **Themes:** The extension supports VS Code themes.
- **Offline & Local Storage:** Works offline and saves all the requests data locally on your device.
- **Git Sync:** Save requests data in your Git Repository.
## Git Sync
**----_>>> Subscription required to use this feature_ <<<----**
This feature is useful to share requests with your team by saving data in a git project or custom location.
Integration with Git is supported by VSCode settings below.
**NOTE:** choose **any one setting** as required.
### 1. Save To Workspace (Recommended):
Enable this setting when you'd like to save requests data in the current workspace. This will create a `thunder-tests` folder in the root of the workspace. The extension will load the data automatically when you open the project in VS Code.
- **Workspace Relative Path** (Optional Setting): The default location of the `thunder-tests` folder is at the root of your workspace. Use the `Workspace Relative Path` setting to specify a different relative path (see below for examples).
- Make sure the `Workspace Relative Path` setting is "**Workspace**" scope, not "**User**".
- **Example 1**: To save requests in the folder named `Child` inside the workspace, the Workspace relative path is `Child`. Similarly, for a folder `Child/folder_name` inside the workspace the workspace relative path is `Child/folder_name`
- **Example 2**: To save requests in the Parent folder of the workspace, the workspace relative path is `../`

### 2. Custom Location:
Use this setting when you'd like to save all of the requests data in one fixed location. Enter the full folder path to save the data.
- Supports relative path to user root directory. Use prefix **$HOME**. e.g `$HOME/Documents/folderName`

- **Note 1**: The environments will be stored in `thunderEnvironment.json`, in the **thunder-tests** folder. If you'd like to exclude any secrets from `thunderEnvironment.json` file then use `Local Environment` to store values locally on your computer.
- **Note 2**: Please **restart VS Code** after updating settings.
- **Note 3**: Requests that existed before activating the git sync feature are not saved automatically. To save them, create the `thunder-tests` folder and copy the `.json` files found in the [default storage](#storage-location) into it.
- **Note 4**: If you use both settings, then `Save To Workspace` will be used.
## CLI & CI/CD Integration
- Test APIs using the `CLI` and integrate with the `CI/CD build` pipeline, see [documentation](https://rangav.medium.com/d91eb5c71d8e).
- CLI privacy [details here](#privacy)
## Storage Location
The requests data files default storage location paths:
- **Windows**: `%APPDATA%\Code\User\globalStorage\rangav.vscode-thunder-client`
- **Linux**: `~/.config/Code/User/globalStorage/rangav.vscode-thunder-client`
- **Mac**: `/Users/{{userName}}/Library/Application Support/Code/User/globalStorage/rangav.vscode-thunder-client/`
- Replace `{{username}}` with yours.
For VSCode Server:
- **Linux**: `~/.vscode-server/data/User/globalStorage/rangav.vscode-thunder-client`
## Code Snippet
Code snippet generation is available for the following languages:
- C# - HttpClient
- cURL
- Dart Http
- JavaScript Fetch & Axios
- Php Laravel
- PowerShell
- Python requests & http.client
- and other languages are powered by [httpsnippet](https://github.com/Kong/httpsnippet)
Open request view and click the `{}` icon to see the Code Tab:
 #### Key Features
- Supports most languages including Flutter, Dart, PHP Laravel, C#, JS, Python, Swift, etc.
- Updates the code snippet in **real-time** as you make changes to a request.
- You can save the code snippet to a file or open the snippet on VS Code `tab` using
#### Key Features
- Supports most languages including Flutter, Dart, PHP Laravel, C#, JS, Python, Swift, etc.
- Updates the code snippet in **real-time** as you make changes to a request.
- You can save the code snippet to a file or open the snippet on VS Code `tab` using  ## Pre Request Scripting
- Pre Request scripting is now supported - see docs [Pre Req Scripting](https://github.com/rangav/thunder-client-support/blob/master/docs/filters.md#scripting)
## Scriptless Testing
## Pre Request Scripting
- Pre Request scripting is now supported - see docs [Pre Req Scripting](https://github.com/rangav/thunder-client-support/blob/master/docs/filters.md#scripting)
## Scriptless Testing
 - We need to write a lot of boilerplate code in Postman and other clients to do basic testing using scripting (like status code equals `200`). So we implemented GUI-based tests, where you can select a couple of dropdowns to do most standard tests easily, without any scripting knowledge.
- Tests can be done for strings, numbers, count, and type checking.
- Json schema validation.
- Re-arrange tests order using drag & drop.
#### Test Arrays
- Test array data in response using array filters [details here](https://github.com/rangav/thunder-client-support/blob/master/docs/array-testing.md)
#### Set Env Variable
- You can save response data to Env Variables [details here](https://github.com/rangav/thunder-client-support#setenv)
#### Xml Testing
- To perform tests and save response data to environment [click here](https://github.com/rangav/thunder-client-support/blob/master/docs/xml-testing.md)
#### Scripting
- For Advanced use-cases you can use [Scripting](https://github.com/rangav/thunder-client-support/blob/master/docs/filters.md#scripting)
#### Response Visualization
- Create charts or tables from response [Chart View](https://github.com/rangav/thunder-client-support/blob/master/docs/chart-view.md)
## Environment Variables
- We need to write a lot of boilerplate code in Postman and other clients to do basic testing using scripting (like status code equals `200`). So we implemented GUI-based tests, where you can select a couple of dropdowns to do most standard tests easily, without any scripting knowledge.
- Tests can be done for strings, numbers, count, and type checking.
- Json schema validation.
- Re-arrange tests order using drag & drop.
#### Test Arrays
- Test array data in response using array filters [details here](https://github.com/rangav/thunder-client-support/blob/master/docs/array-testing.md)
#### Set Env Variable
- You can save response data to Env Variables [details here](https://github.com/rangav/thunder-client-support#setenv)
#### Xml Testing
- To perform tests and save response data to environment [click here](https://github.com/rangav/thunder-client-support/blob/master/docs/xml-testing.md)
#### Scripting
- For Advanced use-cases you can use [Scripting](https://github.com/rangav/thunder-client-support/blob/master/docs/filters.md#scripting)
#### Response Visualization
- Create charts or tables from response [Chart View](https://github.com/rangav/thunder-client-support/blob/master/docs/chart-view.md)
## Environment Variables
 - **Common Variables**: The following variables are available for all the requests `{{request_name}}`, `{{collection_name}}` and `{{folder_name}}`
The following environments can be used in Thunder Client, ranked from least to highest precedence:
1. **OS Environment Variables**: You can use OS System environment variables as global variables using the format `{{variable}}`.
2. **Global Environment**: You can use Global Environment to save variables and share them with all collections. The values will be stored in the main `thunderEnvironment.json` file. (See above image, option 2)
3. **Local Environment**: You can use Local Environment to save secrets and transient tokens locally on your computer; useful to exclude `secrets` from a git project. This environment is a `global type` and the variables are available to all collections. The values will not be saved in the main `thunderEnvironement.json` file (See above image, option 3)
4. **env file**: You can use `.env` files in Thunder Client. To use a `.env` file follow the below steps:
- Create an Environment (using option 1 in above image).
- Open the Environment view, where you will see the option `Link to .env file`.
- Select the `.env` file and save it. Now you can use the variables in Requests using `{{variable}}`.
- The variables in the `.env` file should be in the format:
```
key=value
name=thunder
number=25543
```
5. **Active Environment**: To use an environment's variables, you need to make it active using the options menu `...`, then select `Set Active`.
6. **Attach Env to Collection** (Optional): You can attach an environment to a collection from the Collection Settings view. Use this option when you'd like to link multiple collections to multiple environments. The values in this environment will take precedence over the active environment. If you change environments frequently, this option is **not** recommended. Please see the example below:
```
CollectionA -> EnvA
CollectionB -> EnvB
CollectionC -> EnvC
```
7. **Collection and Request Variables**
- You can set `collection` and `request` specific env variables in scripting using `request` scope.
- These variable values are available during the execution of the request only.
- To use - open collection settings or request view -> then select `Pre Run` Tab and use the `Scripting` tab
```js
tc.setVar("name", "Thunder Client", "request");
tc.setVar("baseUrl", "http://localhost:8744", "request");
```
#### How to use Environment Variables
- To use environment variables use the format `{{variableName}}`. You can use variables in Query Params, Headers, Body & Tests.
#### Import `.env` Files
- You can import Thunder Client, Postman and `.env` files using the Import Menu Option (see above image, option 4). More details [here](#import).
- **Common Variables**: The following variables are available for all the requests `{{request_name}}`, `{{collection_name}}` and `{{folder_name}}`
The following environments can be used in Thunder Client, ranked from least to highest precedence:
1. **OS Environment Variables**: You can use OS System environment variables as global variables using the format `{{variable}}`.
2. **Global Environment**: You can use Global Environment to save variables and share them with all collections. The values will be stored in the main `thunderEnvironment.json` file. (See above image, option 2)
3. **Local Environment**: You can use Local Environment to save secrets and transient tokens locally on your computer; useful to exclude `secrets` from a git project. This environment is a `global type` and the variables are available to all collections. The values will not be saved in the main `thunderEnvironement.json` file (See above image, option 3)
4. **env file**: You can use `.env` files in Thunder Client. To use a `.env` file follow the below steps:
- Create an Environment (using option 1 in above image).
- Open the Environment view, where you will see the option `Link to .env file`.
- Select the `.env` file and save it. Now you can use the variables in Requests using `{{variable}}`.
- The variables in the `.env` file should be in the format:
```
key=value
name=thunder
number=25543
```
5. **Active Environment**: To use an environment's variables, you need to make it active using the options menu `...`, then select `Set Active`.
6. **Attach Env to Collection** (Optional): You can attach an environment to a collection from the Collection Settings view. Use this option when you'd like to link multiple collections to multiple environments. The values in this environment will take precedence over the active environment. If you change environments frequently, this option is **not** recommended. Please see the example below:
```
CollectionA -> EnvA
CollectionB -> EnvB
CollectionC -> EnvC
```
7. **Collection and Request Variables**
- You can set `collection` and `request` specific env variables in scripting using `request` scope.
- These variable values are available during the execution of the request only.
- To use - open collection settings or request view -> then select `Pre Run` Tab and use the `Scripting` tab
```js
tc.setVar("name", "Thunder Client", "request");
tc.setVar("baseUrl", "http://localhost:8744", "request");
```
#### How to use Environment Variables
- To use environment variables use the format `{{variableName}}`. You can use variables in Query Params, Headers, Body & Tests.
#### Import `.env` Files
- You can import Thunder Client, Postman and `.env` files using the Import Menu Option (see above image, option 4). More details [here](#import).
## Set Environment Variable
Setting environment variables is supported in the Tests tab. Follow the steps below:
- Create an environment first from the Env tab (if it's not already created).
- In the Tests tab, select the `Set Env Variable` dropdown option (The action will automatically become `setTo`).
- Enter the appropriate source of the variable value in the left input box:
- **Header:** Enter `header.headerName` where `headerName` is the response header name.
- **Cookie:** Enter `cookie.cookieName` where `cookieName` is the response cookie name.
- **JSON Response:** Enter `json.propertyName` where `propertyName` is the JSON key in the response body.
- **Text Response:** Enter the `text` keyword. This sets the entire response body to the variable.
- **Custom Value:** To set any custom value manually, Just type the text as required in the left input e.g `processing`
- **Clear Value:** To clear values use `null` keyword in the left input.
- **Delete Variable:** To delete a variable completely use the `delete` keyword in left input.
- In the value input, enter a variable name in the format `{{variableName}}`.
- When it matches a variable name in Env, it will turn **green**. If the variable doesn't exist, it will be created.
- Now execute the request. You will see the variable value set in the Env tab.
- If you don't see the change in the Env tab, close and re-open the tab to refresh it.
#### Set Env with Scope
The default location will be Active Environment when you use `{{variable}}`. You can use a scope to control which environment variable to set the value explicitly.
- To set a variable in the **local** environment use `{{variable, local}}`.
- To set a variable in the **global** environment use `{{variable, global}}`.
#### Set Environment Variables in Scripting
To set Env variables from [Scripting](https://github.com/rangav/thunder-client-support/blob/master/docs/filters.md#scripting), please see the below examples.
```js
// To save to active environment
tc.setVar(varName, value);
// To save to local environment
tc.setVar(varName, value, "local");
// To save to global environment
tc.setVar(varName, value, "global");
// To set collection or request level variables
tc.setVar(varName, value, "request");
```
## Auth
- OAuth 2.0's **callback url**, when grant type is **Authorization Code**, needs to be entered into your oauth server trusted redirect url list.
- OAuth authentication credentials are sent **via header or body**; please select the appropriate one based on your server requirements.
- ### OAuth 2.0 Callback Url
* You need to use the provided callback url to get access code from auth server to extension.
* You can use default url `https://www.thunderclient.com/oauth/callback`
* Or You can use the localhost version `http://localhost:6789/callback`
* The Callback Url should be added to your `OAuth server` authorised callback list.
- ### Automatically Refresh Tokens
* The `OAuth 2` tokens will be refreshed automatically at request, folder & collection level
* The token values are saved locally and not in json files
* You can also save tokens per environment, please enable VS Code setting `Save Token Per Environment`
* if there is any problem, please click `Generate Token` button again, the refresh should work.
- ### Manual SSL Certificates
- Provide SSL certificate paths for auth, using the relative path to the workspace or absolute paths.
- Use the **Certificates** VS Code setting, see example below:
```json
"thunder-client.certificates": [
{
"host": "thunderclient.io",
"certPath": "ssl/cert.pem",
"keyPath": "ssl/keyfile.key",
"pfxPath": "ssl/pfx.p12",
"passphrase": "test"
},
{
"host": "localhost:8081",
"pfxPath": "/Users/test/Documents/ssl/pfx.p12",
"passphrase": "test"
},
{
"host": "testing.com",
"certPath": "ssl/cert.pem",
"keyPath": "ssl/keyfile.key"
},
]
```
## Logs
- To view the logs open `Output` Window and select `Thunder Client` in filter dropdown
- Logs will display request details and error logs
 ## Cookies
### Create Cookies
- You can create or modify cookies using the `Cookie` header in the request
- Cookies are separated by `;`
## Cookies
### Create Cookies
- You can create or modify cookies using the `Cookie` header in the request
- Cookies are separated by `;`

**Create Cookies from scripting**
```js
// set cookie for current url
await tc.setCookie("https://www.thunderclient.com", "cookieName", "cookieValue");
await tc.setCookie(tc.request.url, "cookieName", "cookieValue");
```
### Clear Cookies
- From the Request `Pre Run` tab you can check `Clear Cookies` option, This will clear cookies for the current domain
- `Clear All Cookies`: From Cookies tab on the right, click `Clear All` to remove all cookies from store.
**Clear Cookies from scripting**
```js
// clear all cookies in store
await tc.clearCookies();
// clear all cookies for current domain
await tc.clearCookies("url");
await tc.clearCookies(tc.request.url);
// clear single cookie by name of cookie
await tc.clearCookies(tc.request.url, "cookieName");
```
### View Cookies
```js
// get all cookies in store
var list = await tc.getCookies();
// get all cookies for current url
var listDomain = await tc.getCookies("url");
var listDomain = await tc.getCookies(tc.request.url);
```
## Path Variables
Path variables are supported using the format `{variable}` in the url field:
- **Example 1**: `https://www.thunderclient.com/details/customer/{customerId}`
- **Example 2**: `https://www.thunderclient.com/details/{customerId}{name}/`
## System Variables
System variables are useful to generate random/dynamic data for use in request query params or body. The format is `{{#variableName}}`
- `{{#guid}}` — Generates random uuid.
- `{{#name}}` - Generates random name.
- `{{#string}}` — Generates random string.
- `{{#number}}` — Generates random number between 1 to 1000000.
- **Custom Range**: use `{{#number, min, max}}`
- Example: `{{#number, 100, 999}}`
- `{{#email}}` — Generates random email.
- `{{#bool}}` — Generates true or false.
- `{{#enum, val1, val2, val3,...}}` — Generates one of the enum values provided (comma separated).
- Example 1: `{{#enum, red, green, blue}}`
- Example 2: `{{#enum, 1, 2, 3}}`
- `{{#date}}` — Generates unix date timestamp in milliseconds.
- **Custom date format**: use `{{#date, 'YYYY-MM-DD hh:mm:ss:fff'}}`, the format should be in `single` quotes.
- Unix timestamp: use `{{#date, 'X'}}`, this will output unix timestamp in seconds.
- **Manipulate date** using format : `{year:2, mon:-3, day:-2, hour:3, min:5, sec:7}`
- Example 1: `{{#date, {year: -1, day: 3, mon: 5}}}`
- Example 2: `{{#date,'YYYY-MM-DD', {year: -1}}}`
- `{{#dateISO}}` — Generates date ISO format.
- **Manipulate date** using format : `{year:2, mon:-3, day:-2, hour:3, min:5, sec:7}`
- Example 1: `{{#dateISO, {year: 1}}}`
- Example 2: `{{#dateISO, { year : -1, day: 3 } }}`
### Using Node Modules to generate fake data
- You can use node libraries like [faker-js](https://www.npmjs.com/package/@faker-js/faker), or lightweight [chance](https://www.npmjs.com/package/chance), [falso](https://www.npmjs.com/package/@ngneat/falso) to generate random data in `Pre Request Script`.
- Use `Pre Run` tab -> `Scripting` tab to generate fake data using code.
- Example custom script
```js
// example code to load faker-js module
var { faker } = await tc.loadModule("@faker-js/faker");
tc.setVar("firstName", faker.person.firstName());
// example code to load chance module
var Chance = await tc.loadModule("chance");
var chance = new Chance();
tc.setVar("firstName", chance.name());
// example code to load falso module
var falso = await tc.loadModule("@ngneat/falso");
var user = falso.randUser();
tc.setVar("firstName", user.firstName);
```
**NOTE**
```js
// to save Env value to Active Environment
tc.setVar("firstName", faker.person.firstName());
// If you do not want to save to the Environment file
// then use the request scope
tc.setVar("firstName", faker.person.firstName(), "request");
```
## Proxy
- VS Code proxy setting - https://code.visualstudio.com/docs/setup/network#_proxy-server-support
#### CLI Proxy
- You need to set in `workspace -> .vscode -> settings.json` for cli to use proxy.
```json
{
"http.proxy": "http://username:password@host:port"
}
```
- **exclude Proxy Host List**: Use this setting to exclude hosts from proxy, supports comma separated values e.g: `*.abc.com,xyz.com`.
## Http/2
- To send a request using the HTTP/2 protocol, please select `HTTP/2` option in VS Code settings for **Http Version**.
## Import/Export
- The following imports of Collections and Environments are supported:
- Postman 2.1.0 format
- Insomnia v4 json file
- Open API v3 json or yaml files
- Thunder Client
- You can import or export Thunder Client Collections and Environments data.
- Import of **.env files** is also supported, select `Import` from Env tab and choose `.env` file
#### Import CURL
- From Activity tab menu, select `Import Curl`
- Now you can enter `Curl Text` or `Url` in the same input ( shortcut `Ctrl/Cmd + u` )
- From Command Palette select `Thunder Client: Import Curl`, which is helpful to test a request from anywhere. Here also you can enter Curl text or Url
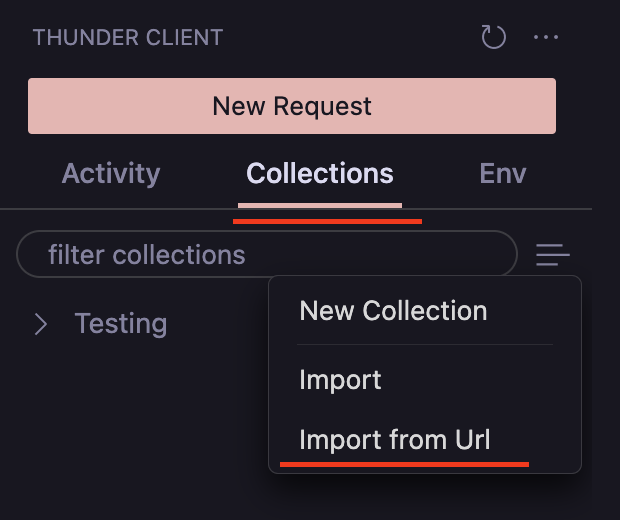
#### How to Import a Collection
1. Select the `Collection` tab from the sidebar.
2. Click the `Menu` icon (see image) and select `Import` or `Import from Url`.
3. Now select a file from Postman, Thunder Client, Insomnia, or Open API.
 ### Export Data
#### How to Convert to Postman Format
- **From the Sidebar menu at the Top `(...)`** — Select `Convert To Postman Format`.
- **From Command Palette** — Via the `Convert To Postman Format` option.
## Keyboard Shortcuts
- `Ctl+Shift+P` (From Command Palette):
- Thunder Client — New Request
- Thunder Client — Run Last Request
- Thunder Client — Import Curl
- Thunder Client — Change Environment
- Thunder Client — Convert To Postman Format
- `Cmd/Ctrl + Enter` — To execute the request.
- `Enter` — on request url field to send request.
- `Cmd/Ctrl + s` — Save Request without run.
- `Cmd/Ctrl + click` — on request in Sidebar will open it in a new tab.
- `Cmd/Ctrl + click` — on collection/folder will open collection settings.
- `Cmd/Ctrl + s` — Environment view save data.
- `Cmd/Ctrl + e` — Change active environment.
- `Alt+Shft + f` — Format Post Body data.
- `Cmd/Ctrl + u` — Import Curl.
- `Alt + z` — Toggle word-wrap on response.
- `Escape` — Cancel response full-screen mode.
## VS Code Settings
To see all the VS Code settings for Thunder Client:
1. Open VSCode settings View, then search for `Thunder Client`.
2. From Sidebar View -> Click `...` menu at the top, then click `Extension Settings`.
## Contribution
- If you'd like to improve documentation, please submit a PR.
- Suggestions to further improve the product.
## Privacy
- Basic anonymized analytics data is collected using [vscode-extension-telemetry](https://github.com/Microsoft/vscode-extension-telemetry). No personal or requests data is collected. You can opt-out using VS Code Settings [details here](https://code.visualstudio.com/docs/getstarted/telemetry).
- There is no backend or cloud sync; all data is stored locally on your computer, but you can sync data using [git](https://github.com/rangav/thunder-client-support#git-sync).
#### Thunder Client CLI
- There is no analytics tracking used in the Thunder Client CLI. So when you run CLI in the CI and CD build pipelines, there is zero tracking and no data is shared with us.
- When CLI is used locally along the extension, basic anonymized analytics data is collected in the extension, which can be turned off as mentioned above.
### Export Data
#### How to Convert to Postman Format
- **From the Sidebar menu at the Top `(...)`** — Select `Convert To Postman Format`.
- **From Command Palette** — Via the `Convert To Postman Format` option.
## Keyboard Shortcuts
- `Ctl+Shift+P` (From Command Palette):
- Thunder Client — New Request
- Thunder Client — Run Last Request
- Thunder Client — Import Curl
- Thunder Client — Change Environment
- Thunder Client — Convert To Postman Format
- `Cmd/Ctrl + Enter` — To execute the request.
- `Enter` — on request url field to send request.
- `Cmd/Ctrl + s` — Save Request without run.
- `Cmd/Ctrl + click` — on request in Sidebar will open it in a new tab.
- `Cmd/Ctrl + click` — on collection/folder will open collection settings.
- `Cmd/Ctrl + s` — Environment view save data.
- `Cmd/Ctrl + e` — Change active environment.
- `Alt+Shft + f` — Format Post Body data.
- `Cmd/Ctrl + u` — Import Curl.
- `Alt + z` — Toggle word-wrap on response.
- `Escape` — Cancel response full-screen mode.
## VS Code Settings
To see all the VS Code settings for Thunder Client:
1. Open VSCode settings View, then search for `Thunder Client`.
2. From Sidebar View -> Click `...` menu at the top, then click `Extension Settings`.
## Contribution
- If you'd like to improve documentation, please submit a PR.
- Suggestions to further improve the product.
## Privacy
- Basic anonymized analytics data is collected using [vscode-extension-telemetry](https://github.com/Microsoft/vscode-extension-telemetry). No personal or requests data is collected. You can opt-out using VS Code Settings [details here](https://code.visualstudio.com/docs/getstarted/telemetry).
- There is no backend or cloud sync; all data is stored locally on your computer, but you can sync data using [git](https://github.com/rangav/thunder-client-support#git-sync).
#### Thunder Client CLI
- There is no analytics tracking used in the Thunder Client CLI. So when you run CLI in the CI and CD build pipelines, there is zero tracking and no data is shared with us.
- When CLI is used locally along the extension, basic anonymized analytics data is collected in the extension, which can be turned off as mentioned above.