# DFace
**Repository Path**: wk_09/DFace
## Basic Information
- **Project Name**: DFace
- **Description**: 修改的DFace代码,可以完整训练得到MTCNN模型
- **Primary Language**: Unknown
- **License**: Not specified
- **Default Branch**: master
- **Homepage**: None
- **GVP Project**: No
## Statistics
- **Stars**: 0
- **Forks**: 0
- **Created**: 2020-04-05
- **Last Updated**: 2024-11-27
## Categories & Tags
**Categories**: Uncategorized
**Tags**: None
## README
-----------------
# DFace (Deeplearning Face) • [](https://opensource.org/licenses/Apache-2.0)
| **`Linux CPU`** | **`Linux GPU`** | **`Mac OS CPU`** | **`Windows CPU`** |
|-----------------|---------------------|------------------|-------------------|
| [](http://dftech.oss-cn-hangzhou.aliyuncs.com/opendface/img/build_pass.svg) | [](http://dftech.oss-cn-hangzhou.aliyuncs.com/opendface/img/build_pass.svg) | [](http://dftech.oss-cn-hangzhou.aliyuncs.com/opendface/img/build_pass.svg) | [](http://dftech.oss-cn-hangzhou.aliyuncs.com/opendface/img/build_pass.svg) |
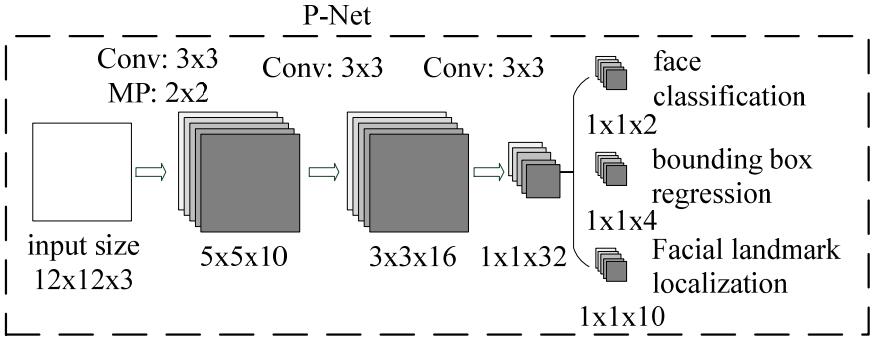
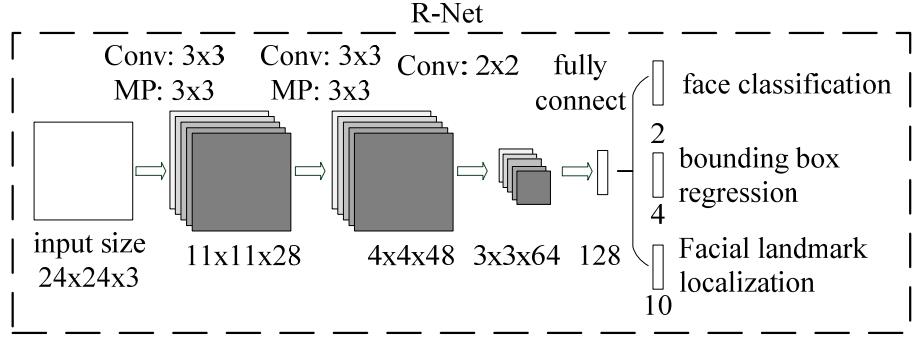
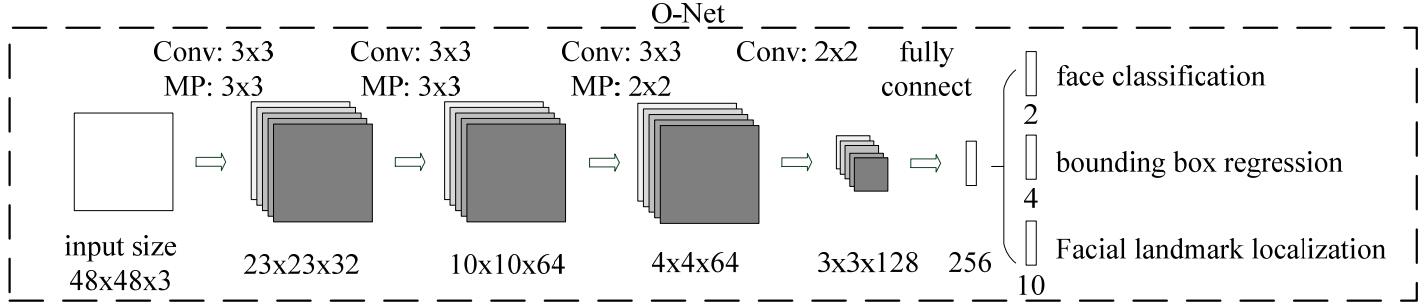
**MTCNN Structure**
## Installation
DFace has two major module, detection and recognition.In these two, We provide all tutorials about how to train a model and running.
First setting a pytorch and cv2. We suggest Anaconda to make a virtual and independent python envirment.**If you want to train on GPU,please install Nvidia cuda and cudnn.**
### Requirements
* pytorch==0.4.0
* torchvision
* cv2
```shell
git clone https://github.com/inisis/DFace.git
```
Add DFace to your local python path
```shell
export PYTHONPATH=$PYTHONPATH:{your local DFace root path}
```
### Face Detetion and Recognition
If you are interested in how to train a mtcnn model, you can follow next step.
#### Train mtcnn Model
MTCNN have three networks called **PNet**, **RNet** and **ONet**.So we should train it on three stage, and each stage depend on previous network which will generate train data to feed current train net, also propel the minimum loss between two networks.
Please download the train face **datasets** before your training. We use **[WIDER FACE](http://mmlab.ie.cuhk.edu.hk/projects/WIDERFace/)** and **[CelebA](http://mmlab.ie.cuhk.edu.hk/projects/CelebA.html)** .WIDER FACE is used for training face classification and face bounding box, also CelebA is used for face landmarks. The original wider face annotation file is matlab format, you must transform it to text. I have put the transformed annotation text file into [anno_store/wider_origin_anno.txt](https://github.com/kuaikuaikim/DFace/blob/master/anno_store/wider_origin_anno.txt). This file is related to the following parameter called --anno_file.
* Generate PNet Train data and annotation file
```shell
python dface/prepare_data/gen_Pnet_train_data.py --prefix_path WIDER_train/images/ --dface_traindata_store data/ --anno_file anno_store/wider_origin_anno.txt
```
* Assemble annotation file and shuffle it
```shell
python dface/prepare_data/assemble_pnet_imglist.py
```
* Train PNet model
```shell
python dface/train_net/train_p_net.py
```
* Generate RNet Train data and annotation file
```shell
python dface/prepare_data/gen_Rnet_train_data.py --prefix_path WIDER_train/images/ --dface_traindata_store data/ --anno_file anno_store/wider_origin_anno.txt --pmodel_file model_store/pnet_epoch_10.pt
```
* Assemble annotation file and shuffle it
```shell
python dface/prepare_data/assemble_rnet_imglist.py
```
* Train RNet model
```shell
python dface/train_net/train_r_net.py
```
* Generate ONet Train data and annotation file
```shell
python dface/prepare_data/gen_Onet_train_data.py --prefix_path WIDER_train/images/ --dface_traindata_store data/ --anno_file anno_store/wider_origin_anno.txt --pmodel_file model_store/pnet_epoch_10.pt --rmodel_file model_store/rnet_epoch_10.pt
```
* Generate ONet Train landmarks data
To generate testImageList.txt, you need to cpoy merge_file.py to celeba/CelebA/Anno/ floder
```shell
python dface/prepare_data/gen_landmark_48.py --dface_traindata_store data/ --anno_file celeba/CelebA/Anno/testImageList.txt --prefix_path celeba/CelebA/Img/img_celeba.7z/img_celeba
```
* Assemble annotation file and shuffle it
```shell
python dface/prepare_data/assemble_onet_imglist.py
```
* Train ONet model
```shell
python dface/train_net/train_o_net.py
```
#### Test face detection
**If you don't want to train,i have put onet_epoch10.pt,pnet_epoch10.pt,rnet_epoch10.pt in model_store folder.You just try test_image.py**
```shell
python test_image.py
```
## License
[Apache License 2.0](LICENSE)