# mask_rcnn_in_tf2_keras
**Repository Path**: yyccR/mask_rcnn_in_tf2_keras
## Basic Information
- **Project Name**: mask_rcnn_in_tf2_keras
- **Description**: tf2-keras implement mask-rcnn
- **Primary Language**: Python
- **License**: Not specified
- **Default Branch**: master
- **Homepage**: None
- **GVP Project**: No
## Statistics
- **Stars**: 1
- **Forks**: 1
- **Created**: 2022-03-27
- **Last Updated**: 2024-03-23
## Categories & Tags
**Categories**: Uncategorized
**Tags**: None
## README
## Mask RCNN in tf2-keras
### bilibili讲解视频
[](https://www.bilibili.com/video/BV1qA411w7Zg?share_source=copy_web)
### requirements
- tensorflow-gpu >= 2.1.0
- xmltodict
- Pillow
- opencv-python
- matplotlib
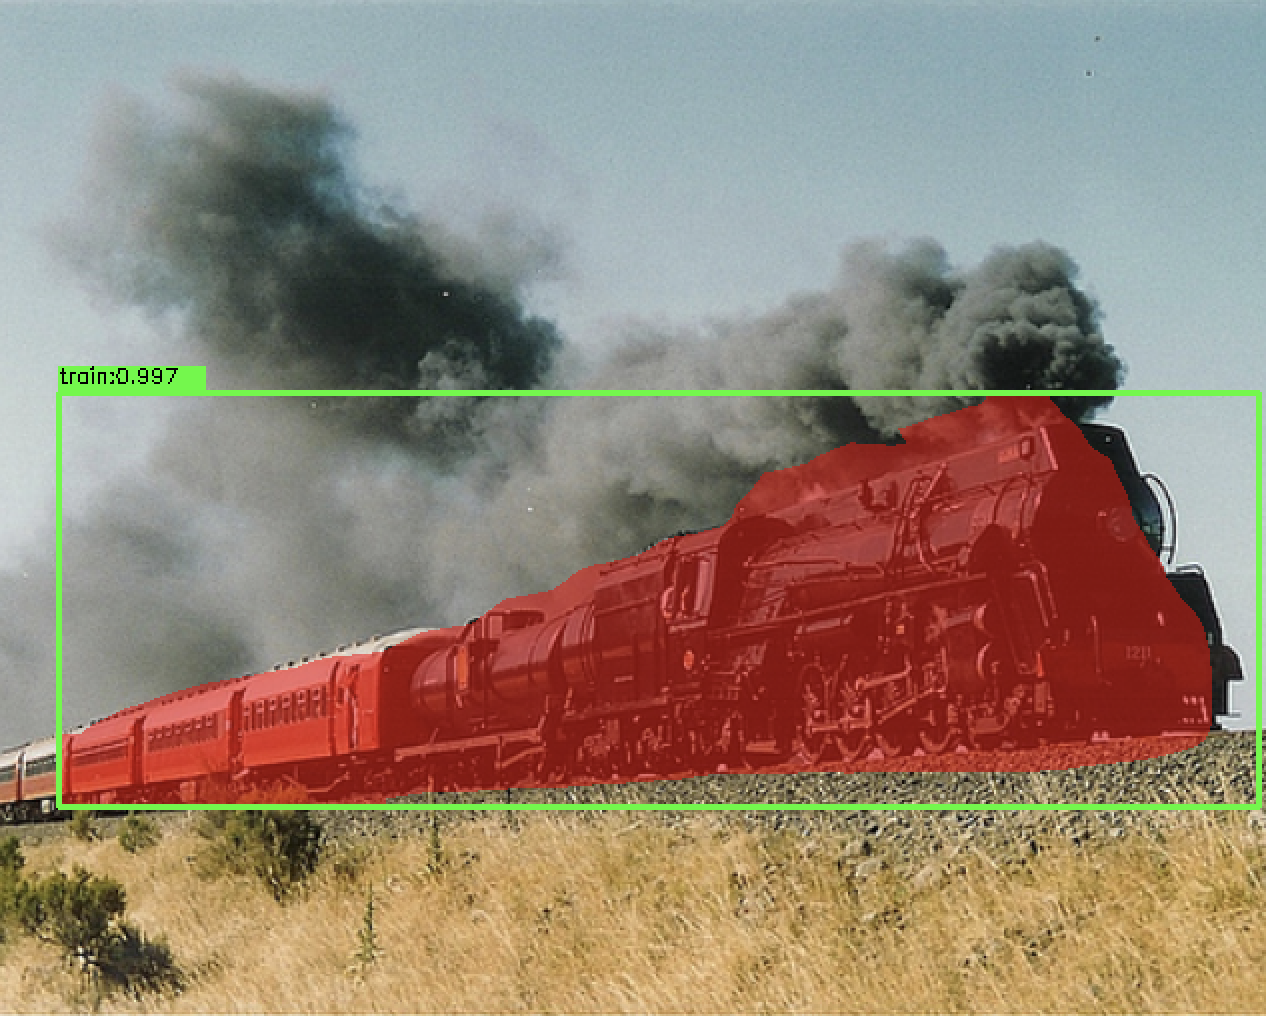
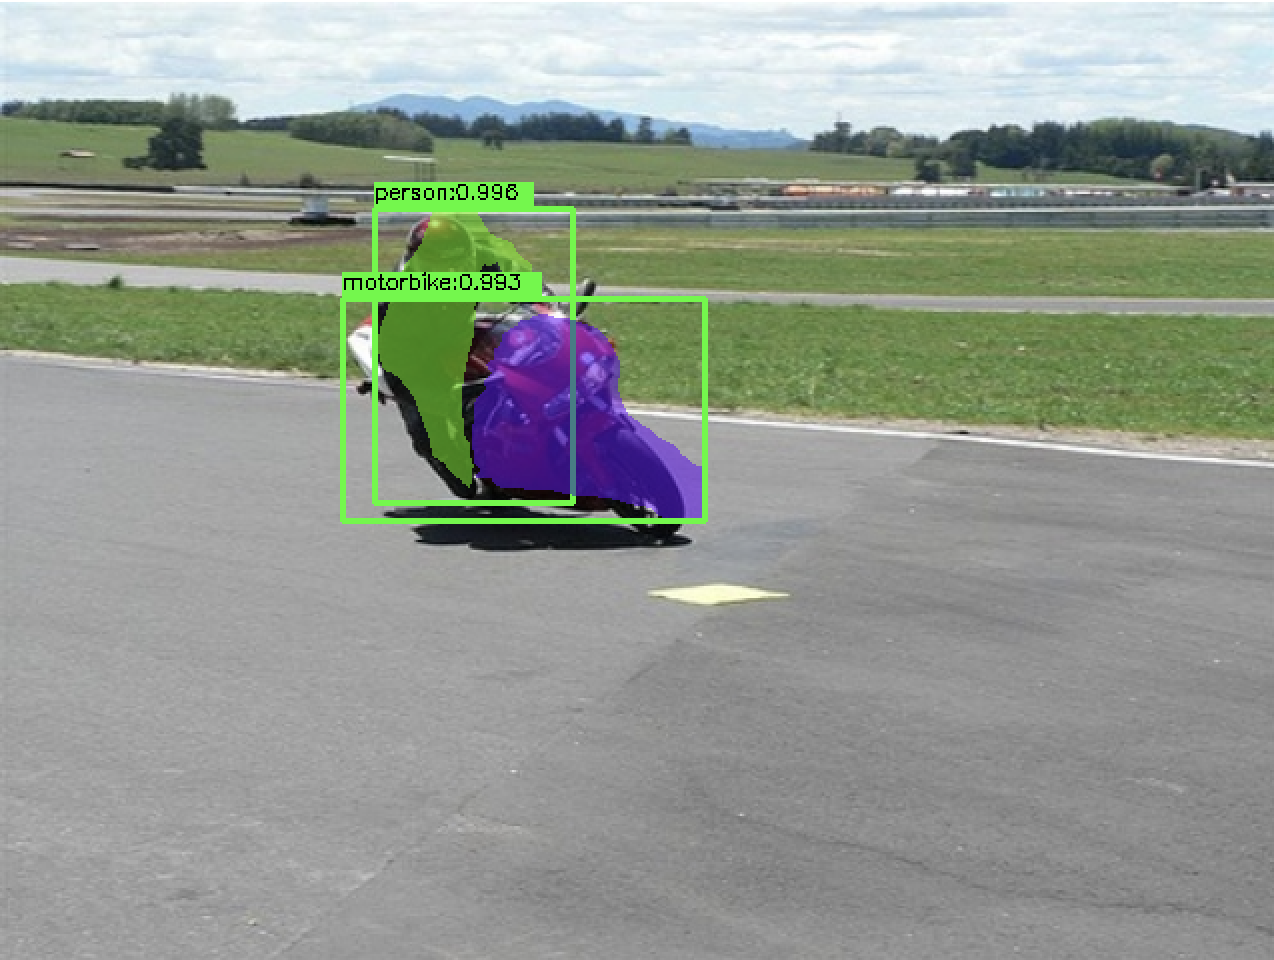
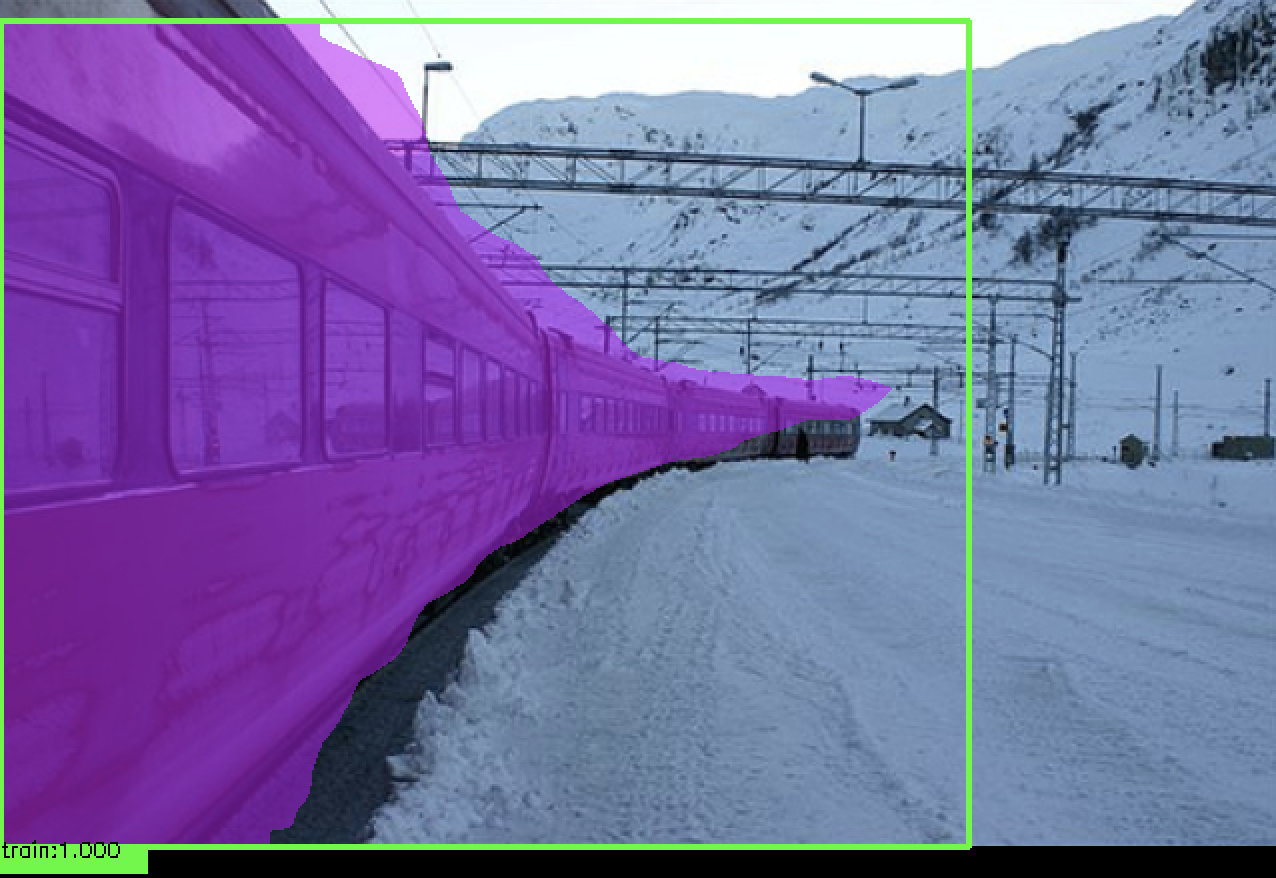
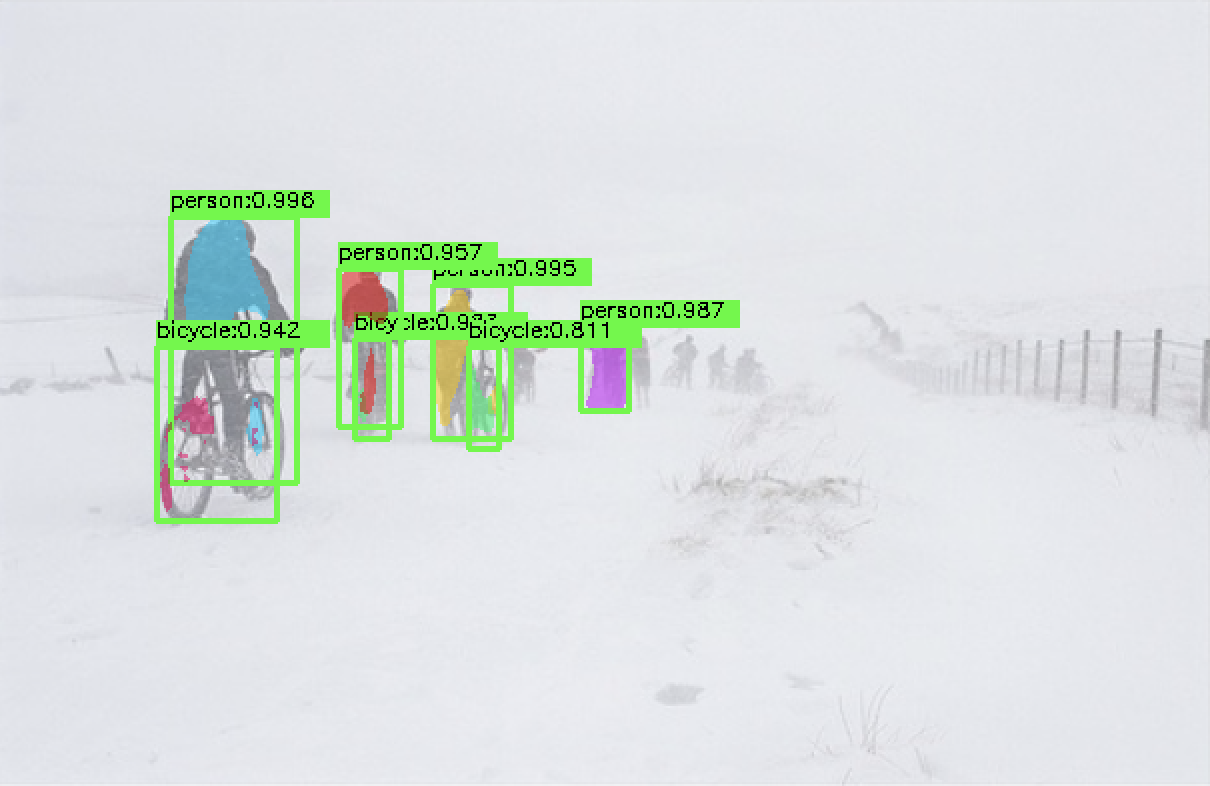
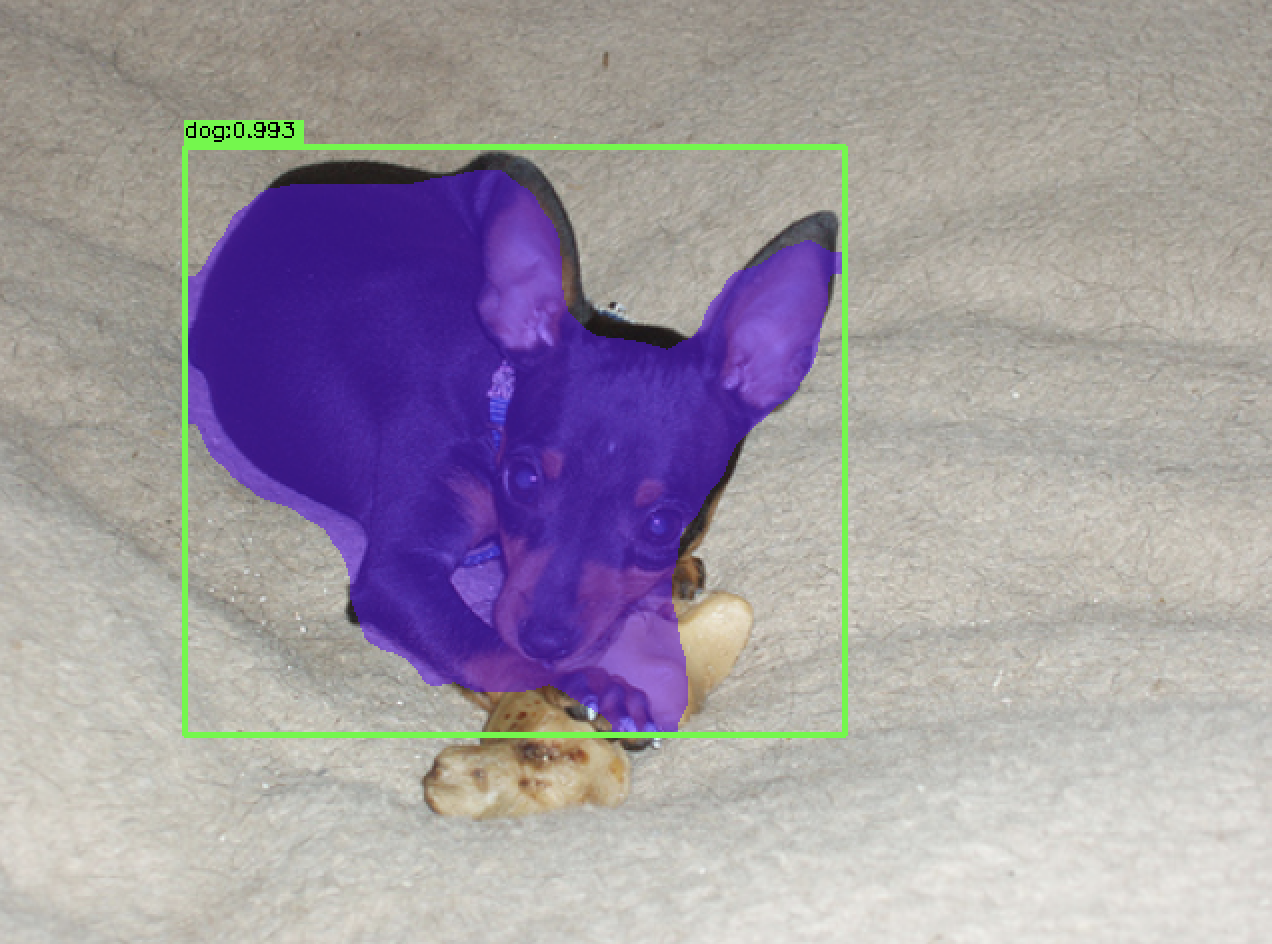
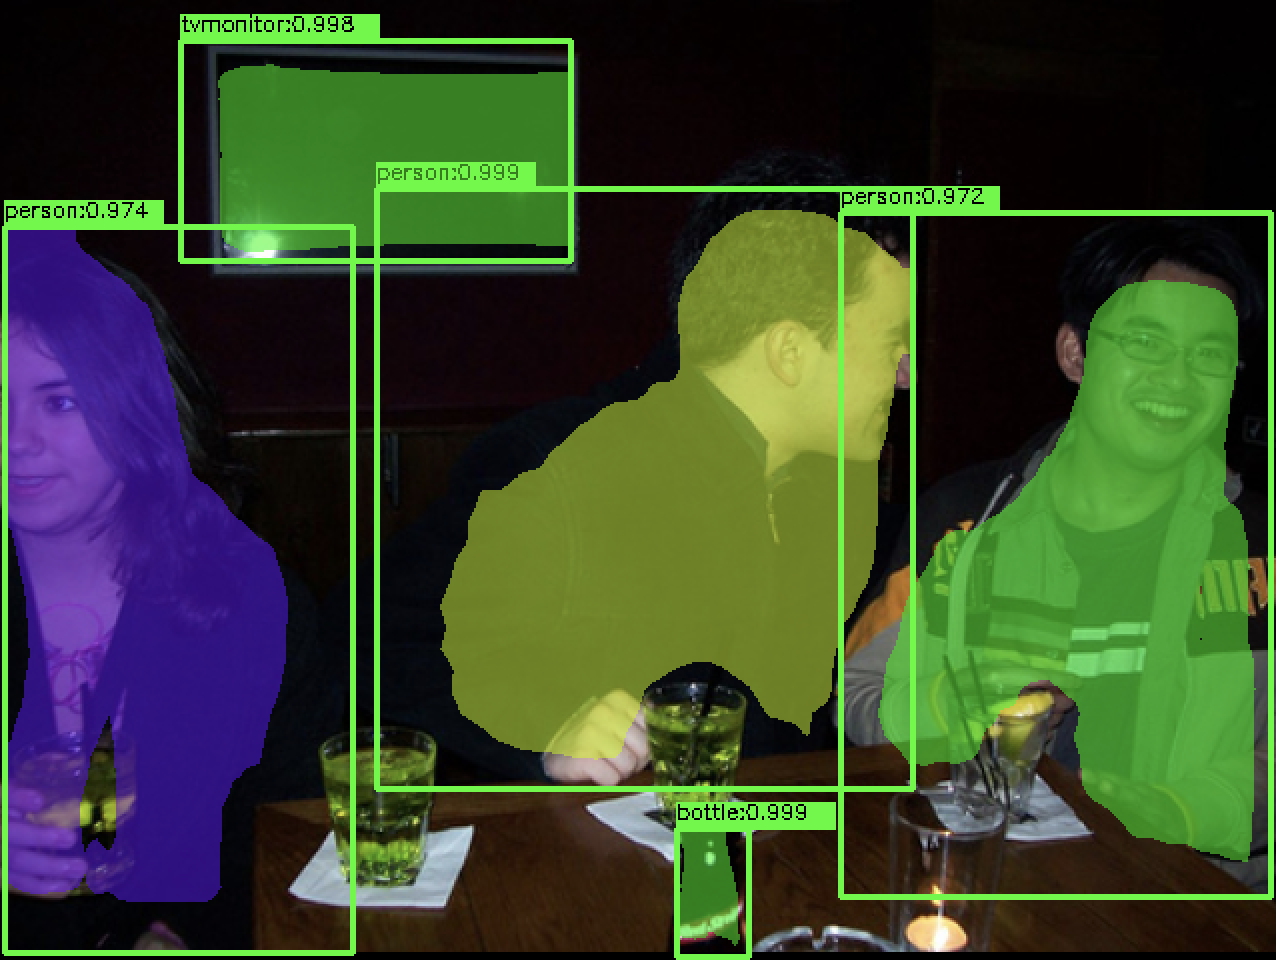
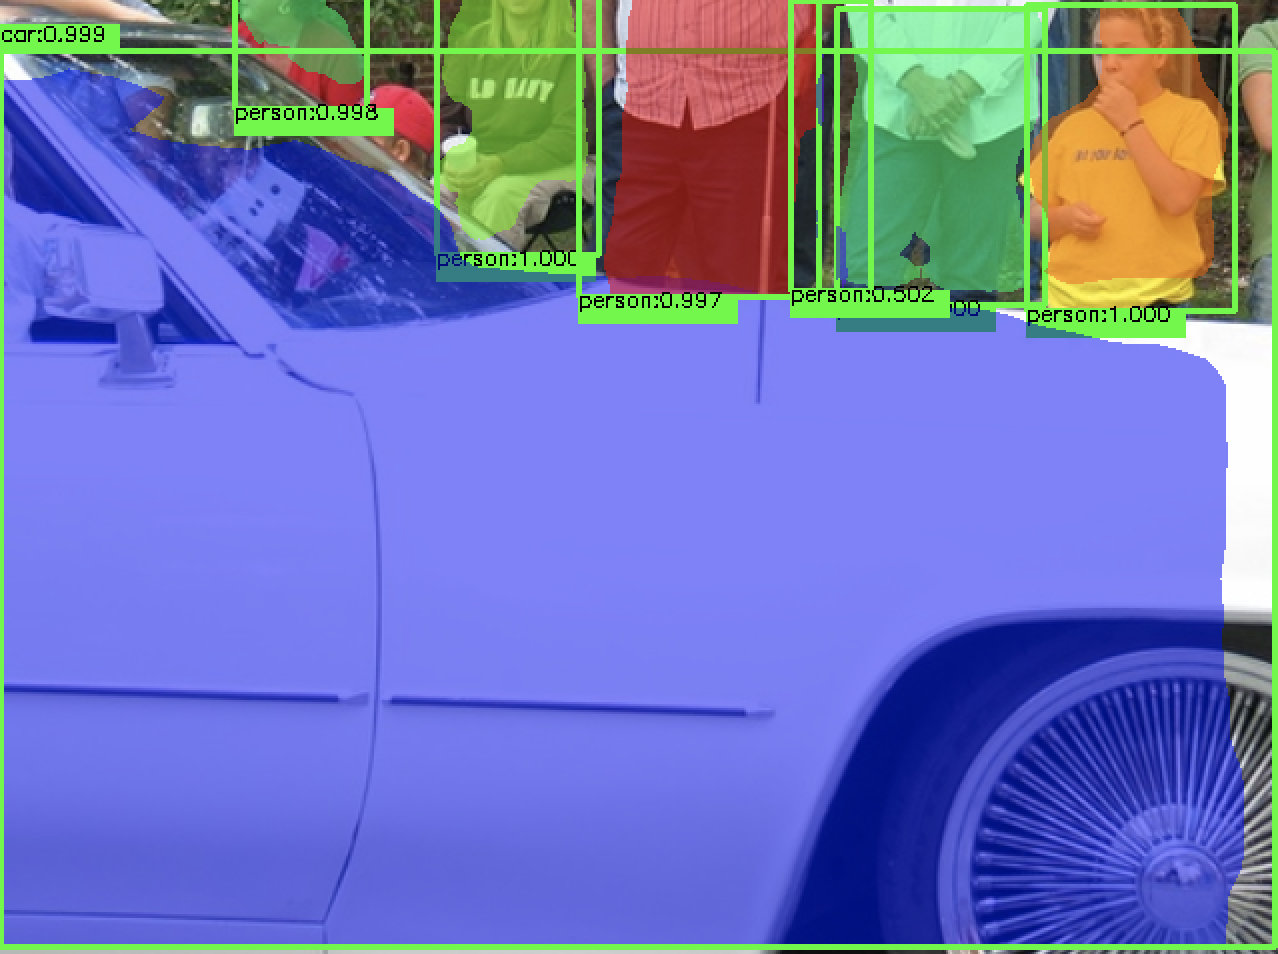
### 检测效果
- VOC2012

 ### 训练`Voc2012`或者`CoCo`数据
0. 训练voc数据
```python
python3 train_voc.py
```
1. 训练coco数据
```python
python3 train_coco.py
```
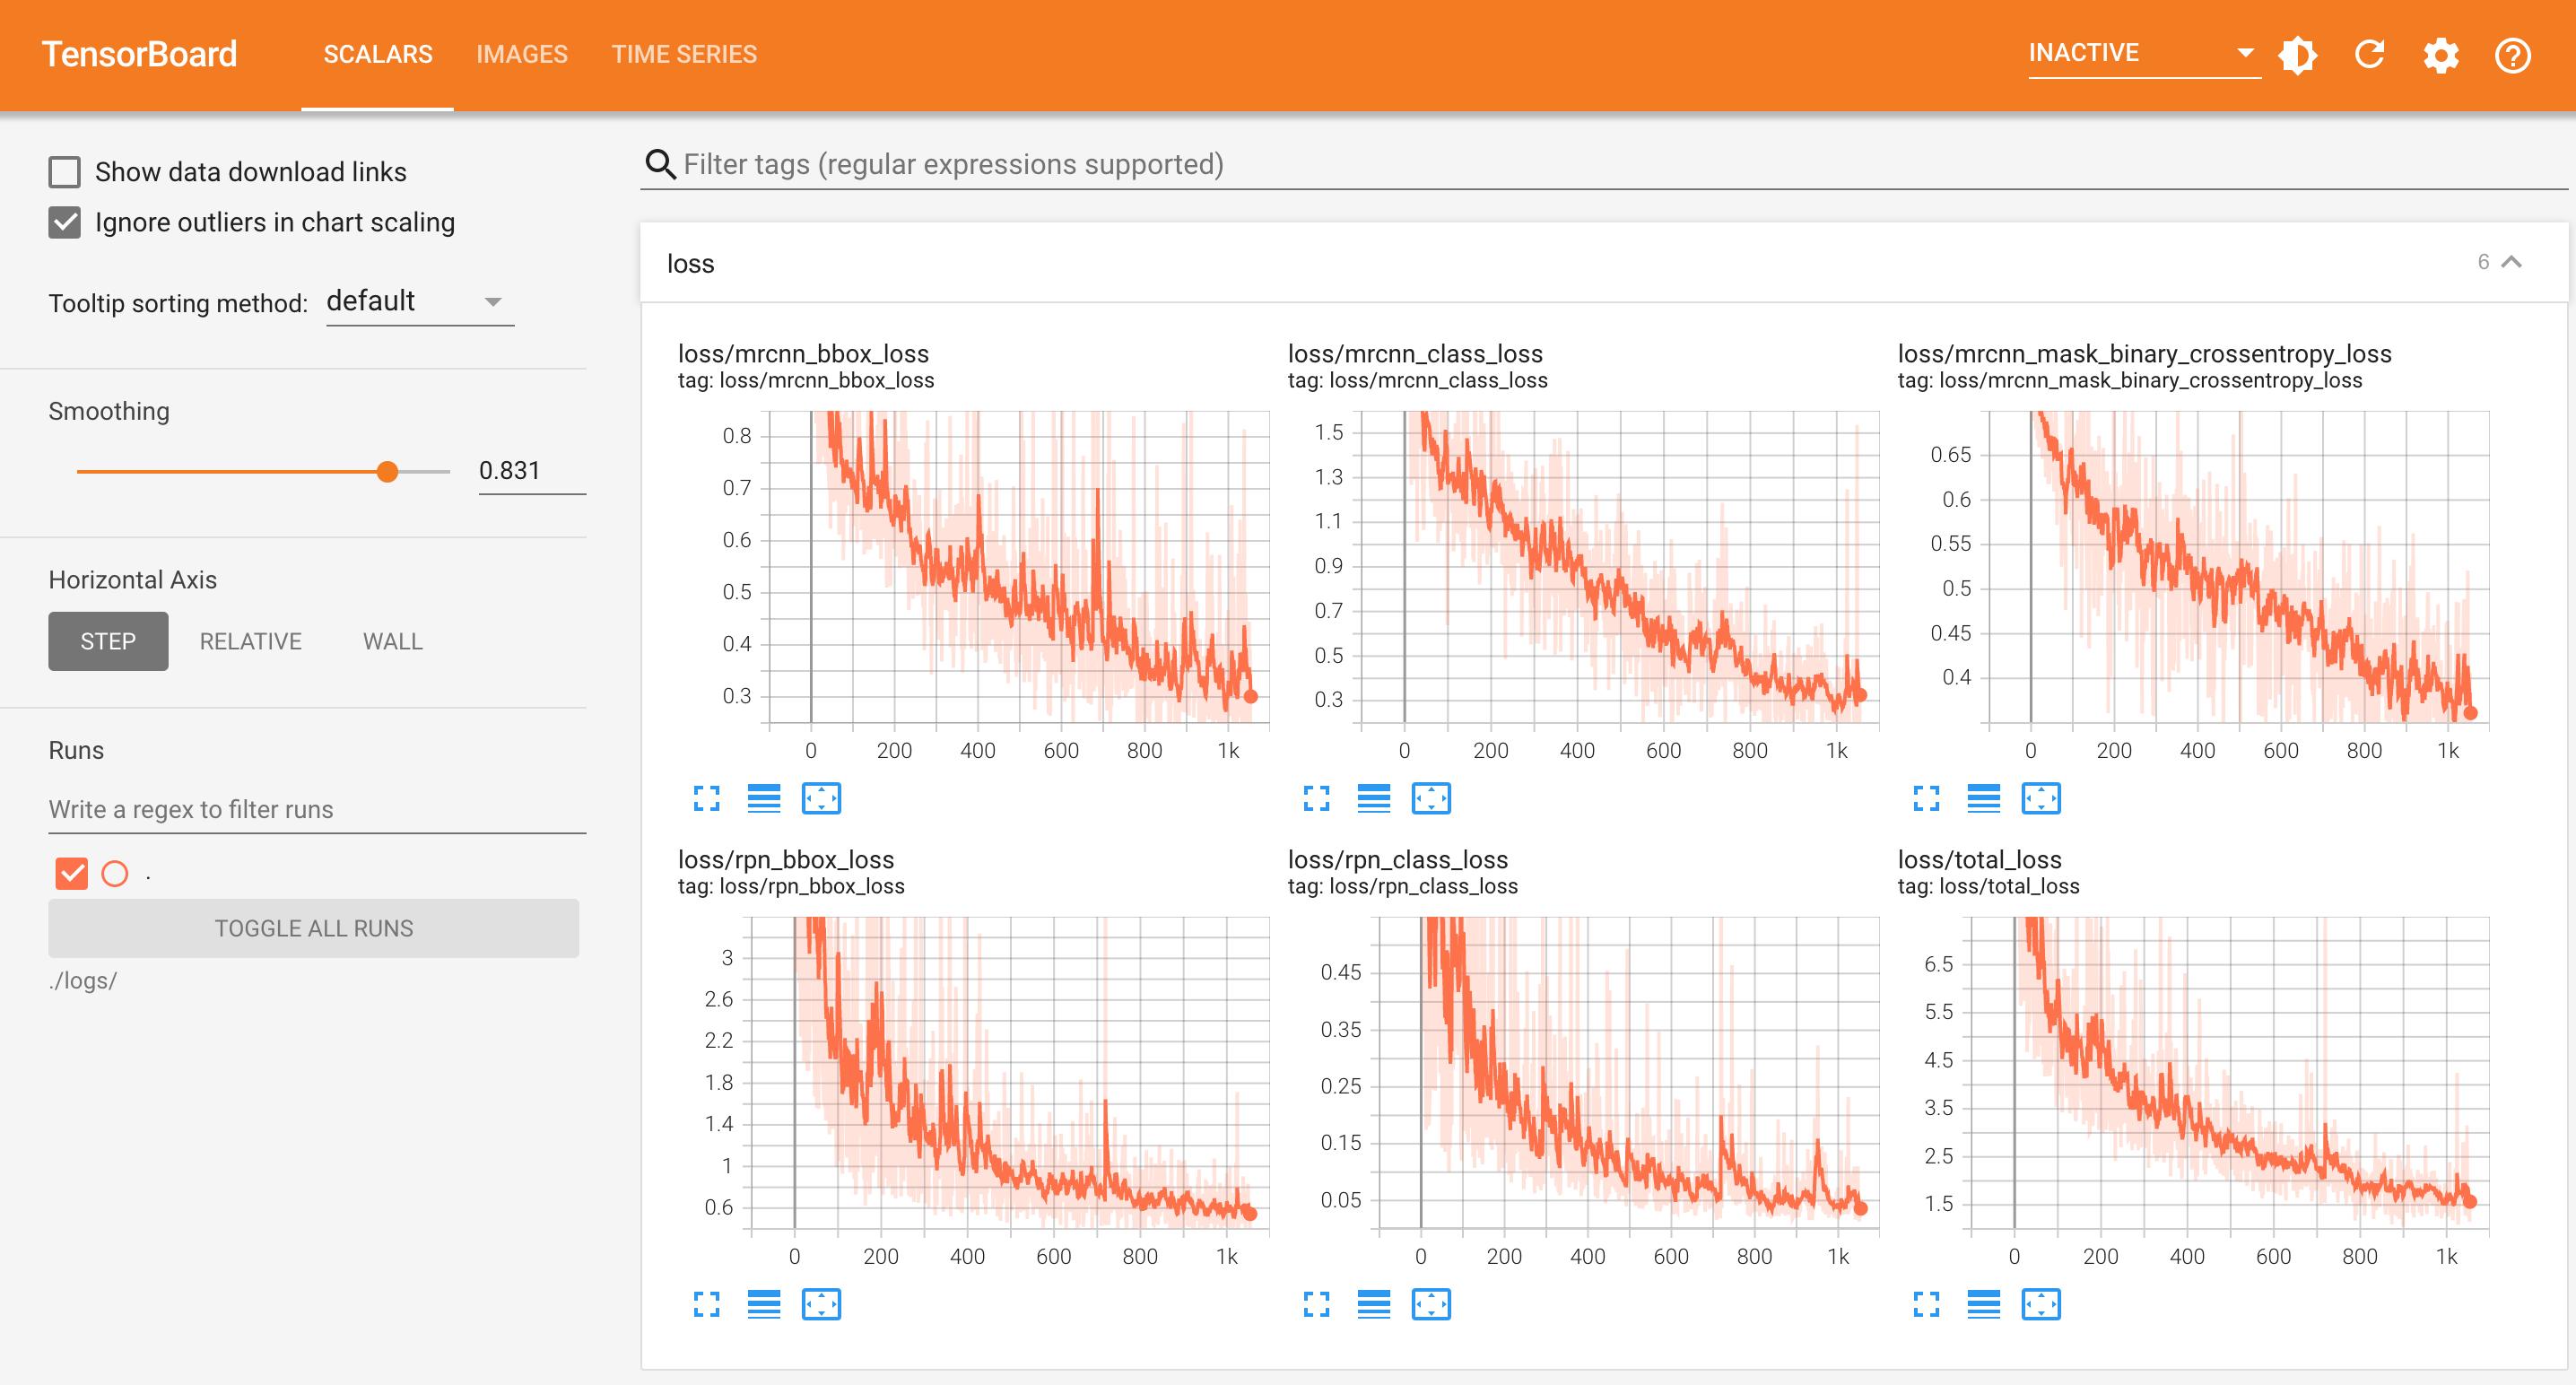
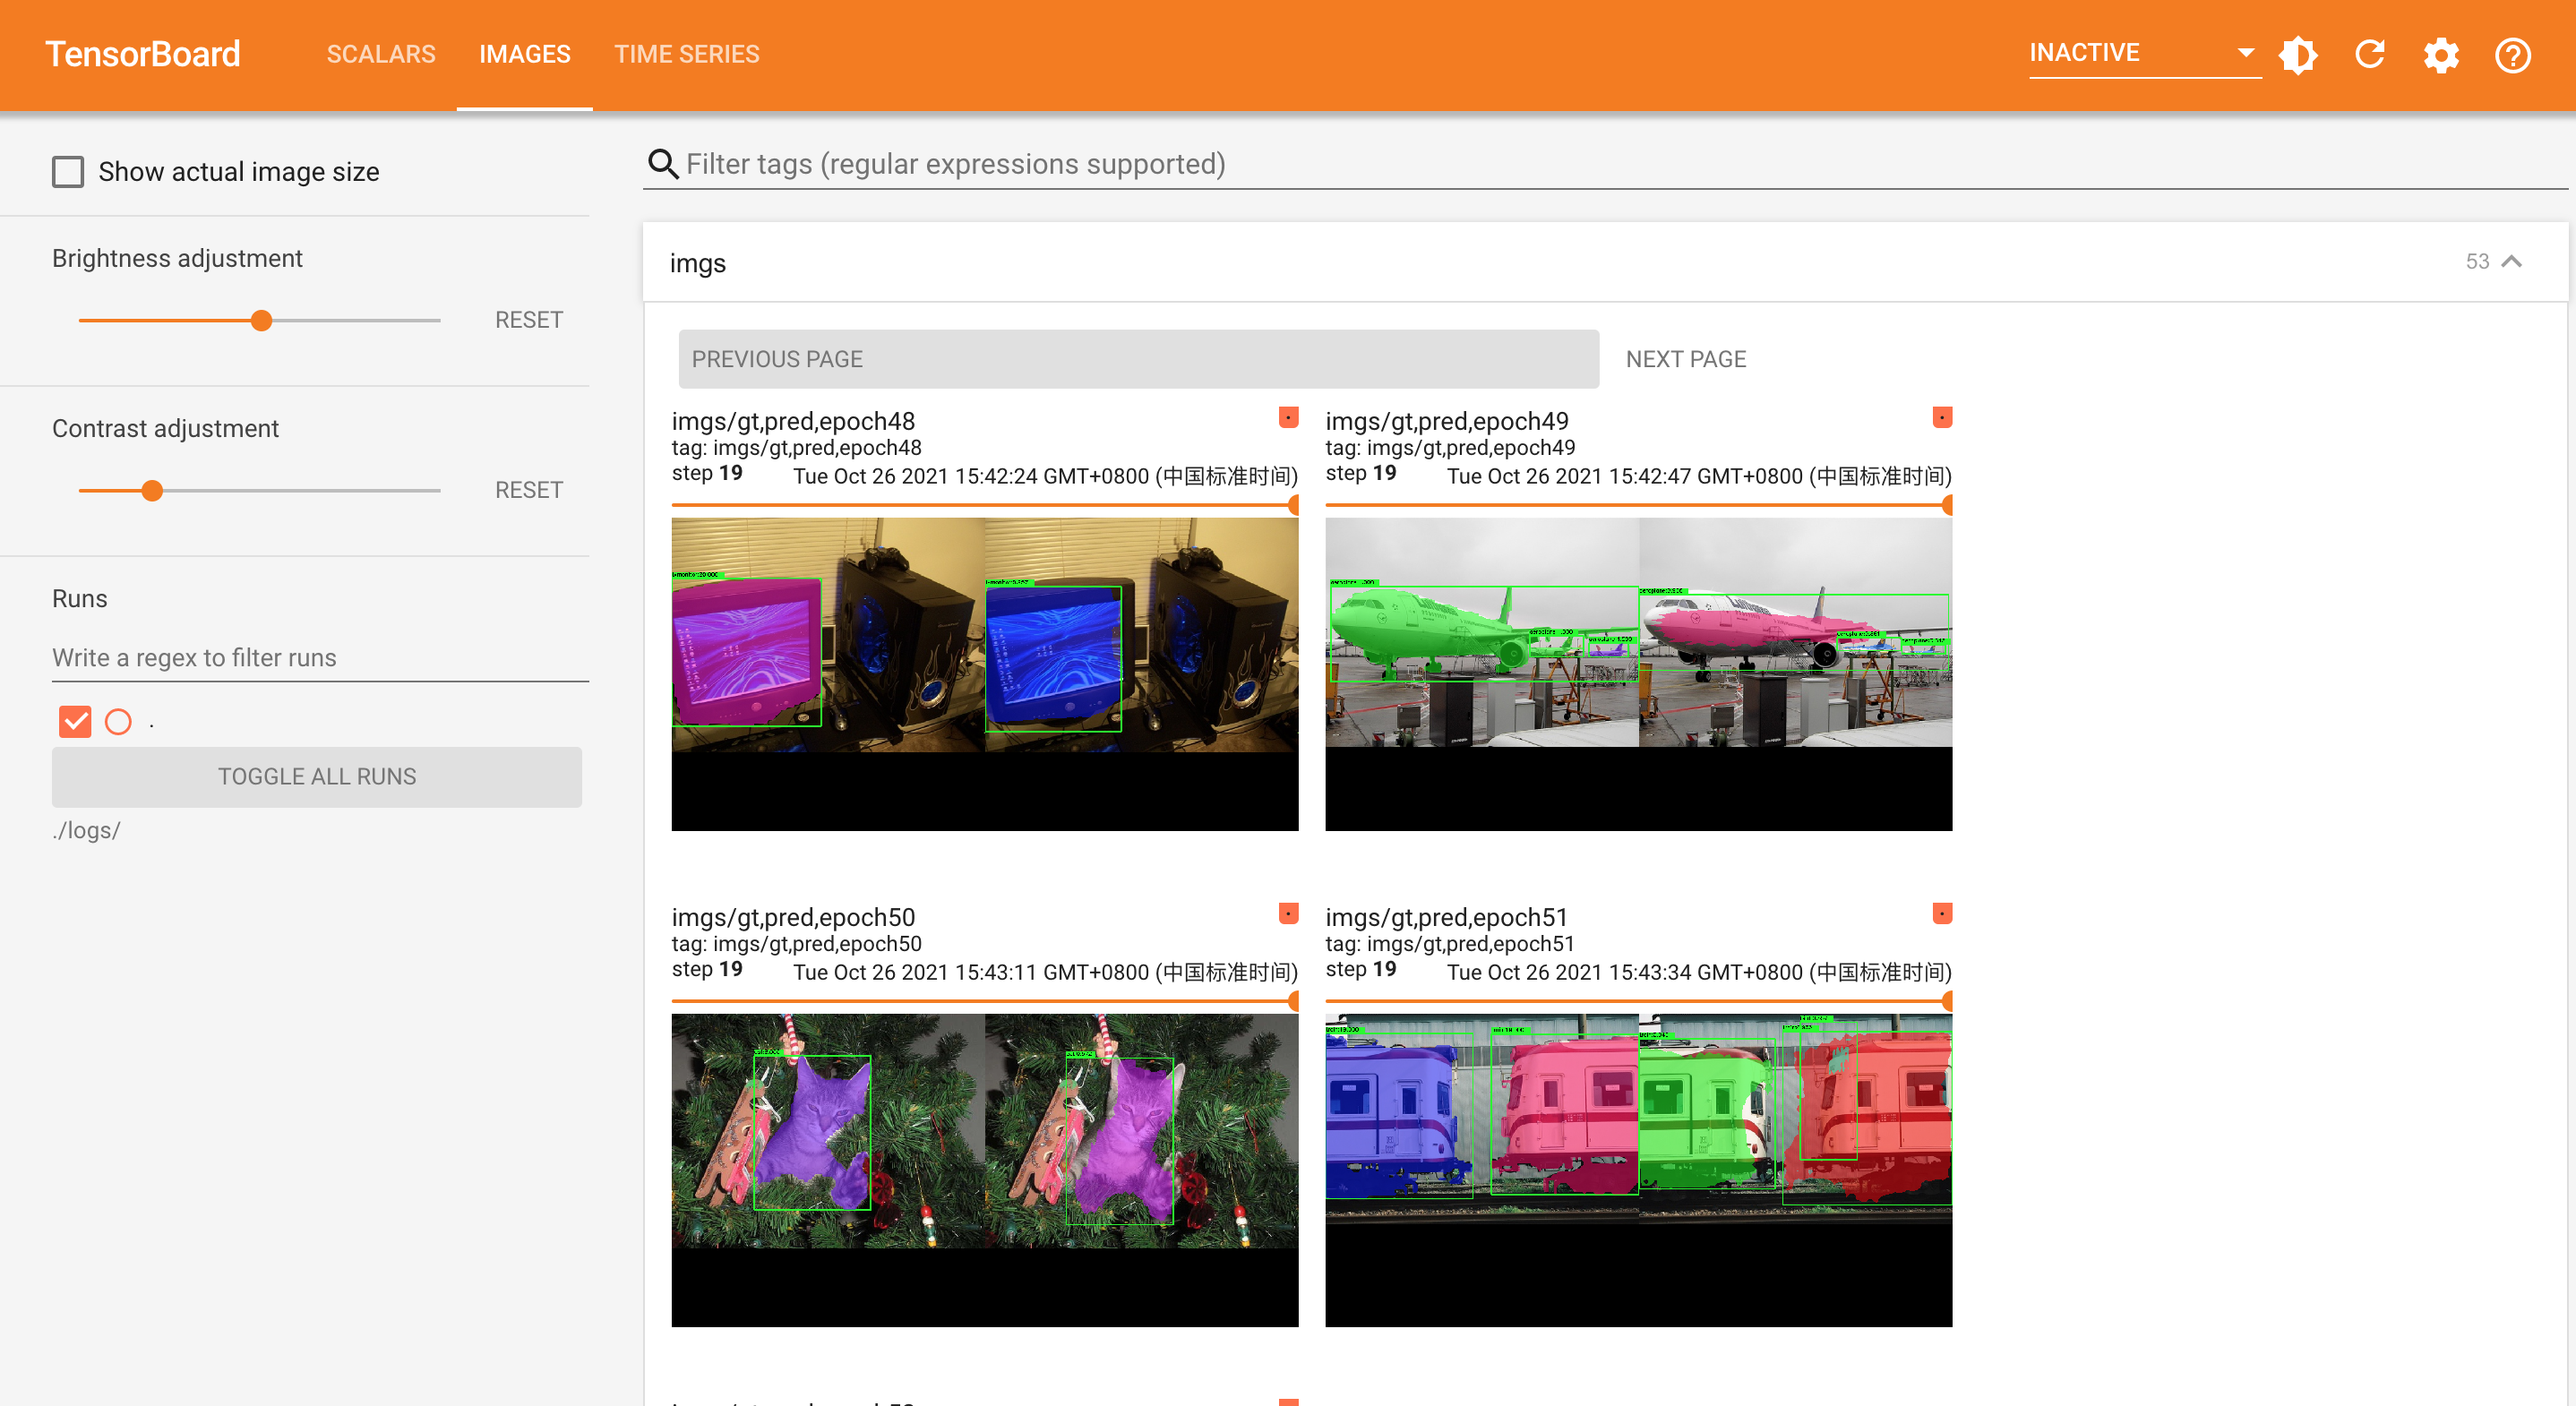
2. tensorboard查看效果
```python
tensorboard --host 0.0.0.0 --logdir ./logs/ --port 9013 --samples_per_plugin=images=40
```
3. 浏览器打开: `http://127.0.0.1:9013`
### 训练`Voc2012`或者`CoCo`数据
0. 训练voc数据
```python
python3 train_voc.py
```
1. 训练coco数据
```python
python3 train_coco.py
```
2. tensorboard查看效果
```python
tensorboard --host 0.0.0.0 --logdir ./logs/ --port 9013 --samples_per_plugin=images=40
```
3. 浏览器打开: `http://127.0.0.1:9013`
 ### 测试
1. 构建模型
```python
# 预测时候batch_size设置为1
from mrcnn.mask_rcnn import MaskRCNN
mrcnn = MaskRCNN(classes=['_background_', 'aeroplane', 'bicycle', 'bird', 'boat', 'bottle', 'bus',
'car', 'cat', 'chair', 'cow', 'diningtable', 'dog', 'horse', 'motorbike',
'person', 'pottedplant', 'sheep', 'sofa', 'train', 'tvmonitor'],
is_training=False,
batch_size=1,
image_shape=[640,640,3])
```
2. 加载权重
```python
model_path = '.h5 file path'
mrcnn.load_weights(model_path, by_name=True)
```
3. 测试, 在`../data/tmp`目录下可以看到检测结果保存的图片
```python
import cv2
from mrcnn.anchors_ops import get_anchors
anchors = get_anchors(image_shape=mrcnn.image_shape,
scales=mrcnn.scales,
ratios=mrcnn.ratios,
feature_strides=mrcnn.feature_strides,
anchor_stride=mrcnn.anchor_stride)
image_file = "你的测试图片路径"
image = cv2.imread(image_file)
# draw_detect_res_figure=True, 这里会将预测结果的目标边框,分割mask画到原图上, 保存在../data/tmp/test.jpeg下
boxes, class_ids, scores, masks = mrcnn.predict(image=image, anchors=anchors, draw_detect_res_figure=True)
```
### 训练自己的数据
1. labelme打标好自己的数据
2. 打开`data/labelme2coco.py`脚本, 修改如下地方
```angular2html
input_dir = '这里写labelme打标时保存json标记文件的目录'
output_dir = '这里写要转CoCo格式的目录,建议建一个空目录'
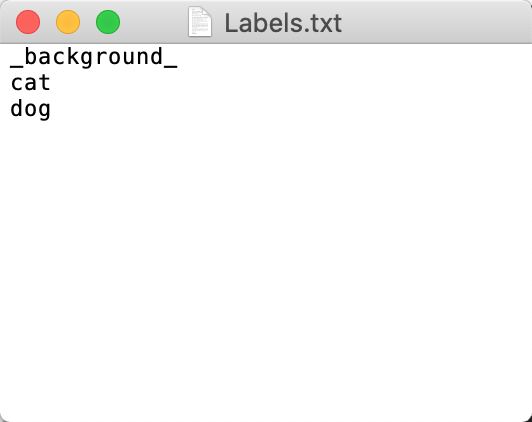
labels = "这里是你打标时所有的类别名, txt文本即可, 注意第一个类名是_background_, 剩下的都是你打标的类名, 每行一个类, 如下图示例"
```
### 测试
1. 构建模型
```python
# 预测时候batch_size设置为1
from mrcnn.mask_rcnn import MaskRCNN
mrcnn = MaskRCNN(classes=['_background_', 'aeroplane', 'bicycle', 'bird', 'boat', 'bottle', 'bus',
'car', 'cat', 'chair', 'cow', 'diningtable', 'dog', 'horse', 'motorbike',
'person', 'pottedplant', 'sheep', 'sofa', 'train', 'tvmonitor'],
is_training=False,
batch_size=1,
image_shape=[640,640,3])
```
2. 加载权重
```python
model_path = '.h5 file path'
mrcnn.load_weights(model_path, by_name=True)
```
3. 测试, 在`../data/tmp`目录下可以看到检测结果保存的图片
```python
import cv2
from mrcnn.anchors_ops import get_anchors
anchors = get_anchors(image_shape=mrcnn.image_shape,
scales=mrcnn.scales,
ratios=mrcnn.ratios,
feature_strides=mrcnn.feature_strides,
anchor_stride=mrcnn.anchor_stride)
image_file = "你的测试图片路径"
image = cv2.imread(image_file)
# draw_detect_res_figure=True, 这里会将预测结果的目标边框,分割mask画到原图上, 保存在../data/tmp/test.jpeg下
boxes, class_ids, scores, masks = mrcnn.predict(image=image, anchors=anchors, draw_detect_res_figure=True)
```
### 训练自己的数据
1. labelme打标好自己的数据
2. 打开`data/labelme2coco.py`脚本, 修改如下地方
```angular2html
input_dir = '这里写labelme打标时保存json标记文件的目录'
output_dir = '这里写要转CoCo格式的目录,建议建一个空目录'
labels = "这里是你打标时所有的类别名, txt文本即可, 注意第一个类名是_background_, 剩下的都是你打标的类名, 每行一个类, 如下图示例"
```
 3. 执行`data/labelme2coco.py`脚本会在`output_dir`生成对应的json文件和图片
4. 修改`train_coco.py`文件中`classes`和`coco_annotation_file`, 注意`classes`第一个需要是'\_background\_', 每个类名单独一行
5. 修改`train_coco.py`里面的data_size=-1, 表示训练全部数据, 然后开始训练 `python3 train_coco.py`
### 代码细节
- tf2复现代码: /mrcnn
- tf2复现代码训练coco数据: /mrcnn/train_coco.py
- tf2复现代码训练voc2012数据: /mrcnn/train_voc.py
- tf1官方代码: /official_mask_rcnn/mrcnn
- tf1官方代码训练voc2012数据: /official_mask_rcnn/samples/voc/voc2012.py
3. 执行`data/labelme2coco.py`脚本会在`output_dir`生成对应的json文件和图片
4. 修改`train_coco.py`文件中`classes`和`coco_annotation_file`, 注意`classes`第一个需要是'\_background\_', 每个类名单独一行
5. 修改`train_coco.py`里面的data_size=-1, 表示训练全部数据, 然后开始训练 `python3 train_coco.py`
### 代码细节
- tf2复现代码: /mrcnn
- tf2复现代码训练coco数据: /mrcnn/train_coco.py
- tf2复现代码训练voc2012数据: /mrcnn/train_voc.py
- tf1官方代码: /official_mask_rcnn/mrcnn
- tf1官方代码训练voc2012数据: /official_mask_rcnn/samples/voc/voc2012.py