# 电商
**Repository Path**: zhanghrCode/online-retailers
## Basic Information
- **Project Name**: 电商
- **Description**: 谷粒商城
- **Primary Language**: Java
- **License**: Apache-2.0
- **Default Branch**: master
- **Homepage**: None
- **GVP Project**: No
## Statistics
- **Stars**: 0
- **Forks**: 1
- **Created**: 2024-01-12
- **Last Updated**: 2024-01-12
## Categories & Tags
**Categories**: Uncategorized
**Tags**: None
## README
# 1. 谷粒商城
## 1.1 介绍
谷粒商城
## 1.2 软件架构

## 1.3 环境搭建
使用renren-fast快速搭建前后端分离项目
### 1.3.1 数据库创建
### 1.3.2 创建common模块
### 1.3.3 使用代码生成器生成代码
需要修改5个地方
1. 数据库的url
2. modulName
3. tablePrefix
4. package
5. mainPath
#### 1.3.3.1 导入common模块
#### 1.3.3.2. 整合mybatis-plus
```yml
spring:
datasource:
type: com.alibaba.druid.pool.DruidDataSource
#MySQL配置
driverClassName: com.mysql.cj.jdbc.Driver
url: jdbc:mysql://192.168.200.100:3306/gulimall_sms?useUnicode=true&characterEncoding=UTF-8&useSSL=false&serverTimezone=Asia/Shanghai
username: root
password: root
mybatis-plus:
mapper-locations: classpath*:/mapper/**/*.xml
global-config:
db-config:
id-type: auto
```
#### 1.3.3.3. 测试代码
## 1.4 分布式组件
- Nacos:注册中心(服务发现、注册)
- Nacos:配置中心(动态配置管理)
- Sentinel:服务容错(限流、降级、熔断)
- Seata:分布式事务解决方案
- Ribbon:负载均衡
- Feign:声明式HTTP客户端(调用远程服务)
- Gateway:API网关(webflux编程模式)
- Sleuth:调用链监控
### 1.4.1 Nacos
#### 1.4.1.1 注册中心(服务注册发现)
1. 导入坐标
```
com.alibaba.cloud
spring-cloud-starter-alibaba-nacos-discovery
2.1.0.RELEASE
```
2. 编写bootstrap.properties
一定要用这个配置文件.yml不行
```
spring.application.name=gulimall-member
spring.cloud.nacos.discovery.server-addr=47.97.40.63:8848
```
3. 在启动类上添加注解@EnableDiscoveryClient
#### 1.4.1.2 配置中心(配置管理)
1. 导入坐标
```xml
com.alibaba.cloud
spring-cloud-starter-alibaba-nacos-config
2.1.0.RELEASE
```
2. 在bootstrap.properties中配置 Nacos server 的地址和应用名
```java
spring.application.name=gulimall-coupon
spring.cloud.nacos.discovery.server-addr=47.97.40.63:8848
spring.cloud.nacos.config.server-addr=47.97.40.63:8848
```
3. 在nacos中添加配置文件
4. 在Controller上添加@RefreshScope注解
##### 基本概念
1. 命名空间:配置隔离
默认:public(保留空间);默认新增的所有配置都在public空间
- 开发,测试,生产:利用命名空间来做环境隔离
注意要在bootstrap.properties中写命名空间namespace
- 每一微服务之间相互隔离配置,每一个微服务创建一个命名空间
2. 配置集:所有的配置的集合,类似与配置文件
3. 配置集ID:类似与配置文件名
4. 配置分组:
默认所有配置集都属于DEFAULT_GROUP
也可以用配置分组来区分开发环境
### 1.4.2 Feign
1. 导入坐标
```
org.springframework.cloud
spring-cloud-starter-openfeign
```
2. 创建一个feign包,并编写接口
```java
public interface CouponFeign {
}
```
3. 将要远程调用的方法复制粘贴到接口中,注意url要写全
```Java
public interface CouponFeign {
@RequestMapping("/coupon/coupon/feign")
R openFeignTest();
}
```
4. 给接口加上@FeignClient注解并写上要远程服务名
```java
@FeignClient("gulimall-coupon")
public interface CouponFeign {
@RequestMapping("/coupon/coupon/feign")
R openFeignTest(@RequestParam("id") Long id);
}
```
5. 给启动类加上注解并写上要扫描的包路径@EnableFeignClients(basePackages = "com.atguigu.gulimall.member.feign")
6. 调用远程方法(当Service来用)
### 1.4.3 Gateway
1. 导入坐标
```
org.springframework.cloud
spring-cloud-starter-gateway
```
2. 编写配置文件
```
spring.application.name=gulimall-gateway
spring.cloud.nacos.discovery.server-addr=47.97.40.63:8848
spring.cloud.nacos.config.server-addr=47.97.40.63:8848
spring.cloud.nacos.config.namespace=08a42a5f-6689-4a53-a510-05873f5c6834
```
3. 给启动类添加注解
```
@EnableDiscoveryClient
@SpringBootApplication(exclude = {DataSourceAutoConfiguration.class})
public class GulimallGatewayApplication {
public static void main(String[] args) {
SpringApplication.run(GulimallGatewayApplication.class, args);
}
}
```
4. 编写拦截的配置文件
```
spring:
cloud:
gateway:
routes:
- id: test_route
uri: https://www.baidu.com
predicates:
- Query=url,baidu
- id: bilibili_route
uri: https://www.bilibili.com
predicates:
- Query=url,bilibili
```
# 2. 前端

## 2.1 Vue
### 2.1.1 MVVM
- M(Model):模型层。就是业务逻辑相关的数据对象,通常从数据库映射而来,我们可以说是与数据库对应的model。
- V(View):视图层。就是展现出来的用户界面。
- VM(ViewModel):视图模型层。连接view和model的桥梁。因为,Model层中的数据往往是不能直接跟View中的控件一一对应上的,所以,需要再定义一个数据对象专门对应view上的控件。而ViewModel的职责就是把model对象封装成可以显示和接受输入的界面数据对象。

```js
let vm = new Vue({
el: "#app",// 绑定元素
data: { // 封装数据
name: "zhangsan",
num: 1
},
methods: { // 封装方法
cansel(){
this.num--;
}
}
})
```
### 2.1.2 指令
1. 插值表达式
{{msg}}
2. v-text
内容当作文本处理
3. v-html
内容当作html处理
4. v-bind
设置属性值
5. v-model
双向绑定,一般用于表单项
6. v-on可简写为@
用于绑定事件
使用事件修饰符阻止事件冒泡
按键修饰符(键码)
7. v-for
遍历循环
8. v-if
条件判断为true是元素才会被渲染
9. v-show
条件判断为true是元素才会被显示
### 2.1.3 计算属性和侦听器
- 计算属性computed:是一个类似与data的属性,但他却是一个函数
- 监听器watch:就是一个函数
### 2.1.4 过滤器
过滤器是一个方法
过滤器常用来处理文本个刷的操作
### 2.1.5 组件化
组件其实本质上就是一个Vue实例
### 2.1.6 生命周期

# 3. 商品服务业务开发
## 3.1 三级分类
### 3.1.1 数据库设计
```sql
CREATE TABLE `pms_category` (
`cat_id` bigint(20) NOT NULL AUTO_INCREMENT COMMENT '分类id',
`name` char(50) DEFAULT NULL COMMENT '分类名称',
`parent_cid` bigint(20) DEFAULT NULL COMMENT '父分类id',
`cat_level` int(11) DEFAULT NULL COMMENT '层级',
`show_status` tinyint(4) DEFAULT NULL COMMENT '是否显示[0-不显示,1显示]',
`sort` int(11) DEFAULT NULL COMMENT '排序',
`icon` char(255) DEFAULT NULL COMMENT '图标地址',
`product_unit` char(50) DEFAULT NULL COMMENT '计量单位',
`product_count` int(11) DEFAULT NULL COMMENT '商品数量',
PRIMARY KEY (`cat_id`)
) ENGINE=InnoDB AUTO_INCREMENT=1433 DEFAULT CHARSET=utf8mb4 COMMENT='商品三级分类';
```
### 3.1.2 查询函数的编写
1. Dao层的编写
这一步就是直接selectList即可
2. Service层的编写
1. 首先调用baseMapper的selectList方法查询所有的数据
2. 然后获取一级分类
3. 为每一个分类添加一个子分类
4. 排序
```Java
@Override
public List queryWithTree() {
// 查询所有分类
List categoryEntities = baseMapper.selectList(null);
// 1. 获取一级分类
List collect = categoryEntities.stream().filter(categoryEntity ->
categoryEntity.getParentCid() == 0
).map((meun) -> {
// 2. 为每一个一级分类添加子分类
meun.setChildren(getChildren(meun.getCatId(), categoryEntities));
return meun;
// 3. 排序
}).sorted((menu1, menu2) ->
(menu1.getSort()==null?0:menu1.getSort()) - (menu2.getSort()==null?0:menu2.getSort())
).collect(Collectors.toList());
return collect;
}
private List getChildren(Long id, List categoryEntities) {
List collect = categoryEntities.stream().filter(categoryEntity ->
categoryEntity.getParentCid() == id
).map((menu) -> {
// 递归调用
menu.setChildren(getChildren(menu.getCatId(), categoryEntities));
return menu;
}).sorted((menu1, menu2) ->
(menu1.getSort()==null?0:menu1.getSort()) - (menu2.getSort()==null?0:menu2.getSort())
).collect(Collectors.toList());
return collect;
}
```
### 3.1.3 网关统一配置跨域
- 跨域:指的是浏览器不能执行其他网站的脚本。它是由浏览器的同源策略造成的,是浏览器对javascript施加的安全限制
- 同源策略:是指协议,域名,端口都要相同,其中有一个不同都会产生跨域

非简单请求(PUT、 DELETE) 等,需要先发送预检请求

> 解决跨域-(一)使用nginx部署为同一域

> 解决跨域-(二)配置当次请求允许跨域
添加响应头
- Access-Control-Allow-Origin:支持哪些来源的请求跨域
- Access-Control-Allow-Methods:支持哪些方法跨域
- Access-Control-Allow-Credentials:跨域请求默认不包含cookie,设置为true可以包含cookie
- Access-Control-Expose-Headers:跨域请求暴露的字段
- CORS请求时,XMLHttpRequest对象的getResponseHeader()方法只能拿到6个基本字段:Cache-Control、Content-Language、Content-Type、Expires、Last-Modified、Pragma。如果想拿到其他字段,就必须在Access-Control-Expose-Headers里面指定。
- Access-Control-Max-Age:表明该响应的有效时间为多少秒。在有效时间内,浏览器无须为同一请求再次发起预检请求。请注意,浏览器自身维护了一个最大有效时间,如果该首部字段的值超过了最大有效时间,将不会生效。
> 在网关模块创建配置类 GulimallCorsConfiguration
```java
@Configuration
public class GulimallCorsConfiguration {
@Bean
public CorsWebFilter corsWebFilter() {
UrlBasedCorsConfigurationSource source = new UrlBasedCorsConfigurationSource();
CorsConfiguration corsConfiguration = new CorsConfiguration();
// 配置跨域信息
corsConfiguration.addAllowedHeader("*");
corsConfiguration.addAllowedMethod("*");
corsConfiguration.addAllowedOrigin("*");
corsConfiguration.setAllowCredentials(true);
source.registerCorsConfiguration("/**",corsConfiguration);
return new CorsWebFilter(source);
}
}
```
### 3.1.4 批量删除
采用mp提供的逻辑删除功能
1. 修改配置信息
```yaml
mybatis-plus:
global-config:
db-config:
logic-delete-field: flag # 全局逻辑删除的实体字段名(since 3.3.0,配置后可以忽略不配置步骤2)
logic-delete-value: 1 # 逻辑已删除值(默认为 1)
logic-not-delete-value: 0 # 逻辑未删除值(默认为 0)
```
2. 实体类字段上加上`@TableLogic`注解
```java
@TableLogic
private Integer deleted;
```
## 3.2 品牌管理功能
### 3.2.1 数据库设计
```sql
/*==============================================================*/
/* Table: pms_brand */
/*==============================================================*/
create table pms_brand
(
brand_id bigint not null auto_increment comment '品牌id',
name char(50) comment '品牌名',
logo varchar(2000) comment '品牌logo地址',
descript longtext comment '介绍',
show_status tinyint comment '显示状态[0-不显示;1-显示]',
first_letter char(1) comment '检索首字母',
sort int comment '排序',
primary key (brand_id)
);
alter table pms_brand comment '品牌';
```
### 3.2.2 阿里云OSS
> 基础操作

1. 导入坐标
```xml
com.alibaba.cloud
aliyun-oss-spring-boot-starter
com.aliyun
aliyun-java-sdk-core
com.aliyun
aliyun-java-sdk-core
4.5.0
com.alibaba.cloud
spring-cloud-alibaba-dependencies
2.1.0.RELEASE
pom
import
com.alibaba.cloud
aliyun-spring-boot-dependencies
1.0.0
pom
import
```
2. 写配置文件
```yaml
alibaba:
cloud:
access-key: LTAI5tBPE6H2FfizGLphJaNd
secret-key: vWsmiu2nLMlOMdbQnr3ctLxSm4euog
oss:
endpoint: https://oss-cn-hangzhou.aliyuncs.com
```
3. 调用API
```java
@Autowired
private OSSClient ossClient;
@Test
public void test() {
ossClient.putObject("mygulimall-my", "objectName", new File("F:\\fate.png"));
}
```
> 优化

### 3.2.3 第三方服务模块编写
1. 创建模块
2. 编写配置文件
```properties
spring.application.name=gulimall-third-party
spring.cloud.nacos.discovery.server-addr=47.97.40.63:8848
spring.cloud.nacos.config.server-addr=47.97.40.63:8848
spring.cloud.nacos.config.namespace=36a83b57-fcc7-4175-b313-56a0a4b957b2
spring.cloud.nacos.config.ext-config[0].data-id=oss.yaml
spring.cloud.nacos.config.ext-config[0].group=dev
spring.cloud.nacos.config.ext-config[0].refresh=true
```
```yaml
alibaba:
cloud:
access-key: LTAI5tBPE6H2FfizGLphJaNd
secret-key: vWsmiu2nLMlOMdbQnr3ctLxSm4euog
oss:
endpoint: oss-cn-hangzhou.aliyuncs.com
bucket: mygulimall-my
server:
port: 30000
```
3. 创建Controller
```java
package com.atguigu.gulimall.thirdparty.controller;
import com.aliyun.oss.common.utils.BinaryUtil;
import com.aliyun.oss.model.MatchMode;
import com.aliyun.oss.model.PolicyConditions;
import com.atguigu.common.utils.R;
import org.springframework.beans.factory.annotation.Autowired;
import org.springframework.beans.factory.annotation.Value;
import org.springframework.web.bind.annotation.RequestMapping;
import org.springframework.web.bind.annotation.RestController;
import java.text.SimpleDateFormat;
import java.util.Date;
import java.util.LinkedHashMap;
import java.util.Map;
import com.aliyun.oss.OSS;
@RestController
@RequestMapping("thirdparty")
public class OssController {
@Autowired
OSS ossClient;
@Value("${alibaba.cloud.oss.endpoint}")
private String endpoint;
@Value("${alibaba.cloud.oss.bucket}")
private String bucket;
@Value("${alibaba.cloud.access-key}")
private String accessId;
@RequestMapping("/oss/polcy")
public R polcy() {
// String accessId = ""; // 请填写您的AccessKeyId。
// String accessKey = ""; // 请填写您的AccessKeySecret。
// String endpoint = "oss-cn-hangzhou.aliyuncs.com"; // 请填写您的 endpoint。
// String bucket = "codingce-product"; // 请填写您的 bucketname 。
String host = "https://" + bucket + "." + endpoint; // host的格式为 bucketname.endpoint
// callbackUrl为 上传回调服务器的URL,请将下面的IP和Port配置为您自己的真实信息。
//String callbackUrl = "http://88.88.88.88:8888";
String format = new SimpleDateFormat("yyyy-MM-dd").format(new Date());
// String dir = "user-dir-prefix/"; // 用户上传文件时指定的前缀。
String dir = format+"/"; // 用户上传文件时指定的前缀。
// 创建OSSClient实例。
// OSS ossClient = new OSSClientBuilder().build(endpoint, accessId, accessKey);
Map respMap = null;
try {
long expireTime = 30;
long expireEndTime = System.currentTimeMillis() + expireTime * 1000;
Date expiration = new Date(expireEndTime);
// PostObject请求最大可支持的文件大小为5 GB,即CONTENT_LENGTH_RANGE为5*1024*1024*1024。
PolicyConditions policyConds = new PolicyConditions();
policyConds.addConditionItem(PolicyConditions.COND_CONTENT_LENGTH_RANGE, 0, 1048576000);
policyConds.addConditionItem(MatchMode.StartWith, PolicyConditions.COND_KEY, dir);
String postPolicy = ossClient.generatePostPolicy(expiration, policyConds);
byte[] binaryData = postPolicy.getBytes("utf-8");
String encodedPolicy = BinaryUtil.toBase64String(binaryData);
String postSignature = ossClient.calculatePostSignature(postPolicy);
respMap = new LinkedHashMap();
respMap.put("accessid", accessId);
respMap.put("policy", encodedPolicy);
respMap.put("signature", postSignature);
respMap.put("dir", dir);
respMap.put("host", host);
respMap.put("expire", String.valueOf(expireEndTime / 1000));
// respMap.put("expire", formatISO8601Date(expiration));
} catch (Exception e) {
// Assert.fail(e.getMessage());
System.out.println(e.getMessage());
} finally {
ossClient.shutdown();
}
return R.ok().put("data",respMap);
}
}
```
4. 配置网关
```yaml
- id: third_party_route
uri: lb://gulimall-third-party
predicates:
- Path=/api/thirdparty/** # 规定前端项目发送给thirdparty模块的请求都带有/api/thirdparty
filters:
- RewritePath=/api/(?.*),/$\{segment}
```
### 3.2.4 JSR303校验注解
### 3.2.5 异常统一处理
```java
@ExceptionHandler(value = MethodArgumentNotValidException.class)
public R handleVaildException(MethodArgumentNotValidException e) {
log.error("数据校验出现问题:{},异常类型:{}",e.getMessage(),e.getClass());
BindingResult result = e.getBindingResult();
Map map = new HashMap<>();
result.getFieldErrors().forEach(item-> {
// 获取错误提示
String message = item.getDefaultMessage();
// 获取错误属性名
String field = item.getField();
map.put(field, message);
});
return R.error(400,"提交格式不规范").put("msg",map);
}
```
### 3.2.6 分组校验
1. 给校验注解标注什么情况下要校验@NotBlank(message = "品牌名不能为空",groups = {AddGroup.class, UpdateGroup.class})
2. 给controller的方法标注分组的注解@Validated({AddGroup.class})
如果没有添加分组信息,在有分组信息的方法中默认则不生效
## 3.3 属性分组
- SPU(Standard Product Unit):标准化产品单元。是商品信息聚合的最小单位,是一组**可复用、易检索**的标准化信息的集合,该集合描述了一个产品的特性。
- SKU=Stock Keeping Unit(库存量单位)。即库存进出计量的基本单元,可以是以件,盒,托盘等为单位。SKU这是对于大型连锁超市DC(配送中心)物流管理的一个必要的方法。现在已经被引申为产品统一编号的简称,每种产品均对应有唯一的SKU号。
- 比如,咱们购买一台iPhoneX手机,iPhoneX手机就是一个SPU,但是你购买的时候,不可能是以iPhoneX手机为单位买的,商家也不可能以iPhoneX为单位记录库存。必须要以什么颜色什么版本的iPhoneX为单位。比如,你购买的是一台银色、128G内存的、支持联通网络的iPhoneX ,商家也会以这个单位来记录库存数。那这个更细致的单位就叫库存单元(SKU)。


## 3.4 平台管理
### 3.4.1 Object 划分
1. PO(persistant object) 持久对象
PO 就是对应数据库中某个表中的一条记录,多个记录可以用PO 的集合。PO 中应该不包含任何对数据库的操作。
2. DO(Domain Object)领域对象
就是从现实世界中抽象出来的有形或无形的业务实体。
3. TO(Transfer Object) ,数据传输对象
不同的应用程序之间传输的对象
4. DTO(Data Transfer Object)数据传输对象
这个概念来源于J2EE 的设计模式,原来的目的是为了EJB 的分布式应用提供粗粒度的数据实体,以减少分布式调用的次数,从而提高分布式调用的性能和降低网络负载,但在这里,泛指用于展示层与服务层之间的数据传输对象。
5. VO(value object) 值对象
通常用于业务层之间的数据传递,和PO 一样也是仅仅包含数据而已。但应是抽象出的业务对象, 可以和表对应, 也可以不, 这根据业务的需要。用new 关键字创建,由GC 回收的。View object:视图对象;接受页面传递来的数据,封装对象将业务处理完成的对象,封装成页面要用的数据
6. BO(business object) 业务对象
从业务模型的角度看, 见UML 元件领域模型中的领域对象。封装业务逻辑的java 对象, 通过调用DAO 方法, 结合PO,VO 进行业务操作。business object: 业务对象主要作用是把业务逻辑封装为一个对象。这个对象可以包括一个或多个其它的对象。比如一个简历,有教育经历、工作经历、社会关系等等。我们可以把教育经历对应一个PO ,工作经历对应一个PO ,社会关系对应一个PO 。建立一个对应简历的BO 对象处理简历,每个BO 包含这些PO 。这样处理业务逻辑时,我们就可以针对BO 去处理。
7. POJO(plain ordinary java object) 简单无规则java 对象
传统意义的java 对象。就是说在一些Object/Relation Mapping 工具中,能够做到维护数据库表记录的persisent object 完全是一个符合Java Bean 规范的纯Java 对象,没有增加别的属性和方法。我的理解就是最基本的java Bean ,只有属性字段及setter 和getter方法!。POJO 是DO/DTO/BO/VO 的统称。
8. DAO(data access object) 数据访问对象
是一个sun 的一个标准j2ee 设计模式, 这个模式中有个接口就是DAO ,它负持久层的操作。为业务层提供接口。此对象用于访问数据库。通常和PO 结合使用, DAO 中包含了各种数据库的操作方法。通过它的方法, 结合PO 对数据库进行相关的操作。夹在业务逻辑与数据库资源中间。配合VO, 提供数据库的CRUD 操作.
### 3.4.2 服务远程调用
1. 创建FeignService接口并加上**@FeignClient**注解并写上要远程服务名注意是@FeignClient不是@EnableFeignClients
2. 给启动类加上@EnableFeignClients注解
3. 远程调用服务
# 4. ElasticSearch

## 4.1 基本概念
1. Index(索引)
动词,相当于MySQL 中的insert;
名词,相当于MySQL 中的Database
2. Type(类型)
在Index(索引)中,可以定义一个或多个类型。
类似于MySQL 中的Table;每一种类型的数据放在一起;
3. Document(文档)
保存在某个索引(Index)下,某种类型(Type)的一个数据(Document),文档是JSON 格式的,Document 就像是MySQL 中的某个Table 里面的内容;
## 4.2 Docker部署ES
### 1、下载镜像文件
```shell
docker pull elasticsearch:7.4.2 存储和检索数据
docker pull kibana:7.4.2 可视化检索数据
```
### 2、创建实例
1、ElasticSearch
```shell
mkdir -p /mydata/elasticsearch/config
mkdir -p /mydata/elasticsearch/data
echo "http.host: 0.0.0.0" >> /mydata/elasticsearch/config/elasticsearch.yml
docker run --name elasticsearch -p 9200:9200 -p 9300:9300 \
-e "discovery.type=single-node" \
-e ES_JAVA_OPTS="-Xms64m -Xmx512m" \
-v /mydata/elasticsearch/config/elasticsearch.yml:/usr/share/elasticsearch/config/elasticsearch.yml \
-v /mydata/elasticsearch/data:/usr/share/elasticsearch/data \
-v /mydata/elasticsearch/plugins:/usr/share/elasticsearch/plugins \
-d elasticsearch:7.4.2
```
以后再外面装好插件重启即可;
特别注意:
-e ES_JAVA_OPTS="-Xms64m -Xmx256m" \ 测试环境下,设置ES 的初始内存和最大内存,否则导
致过大启动不了ES
2、Kibana
```shell
docker run --name kibana -e ELASTICSEARCH_HOSTS=http://192.168.200.100:9200 -p 5601:5601 \
-d kibana:7.4.2
```
`http://192.168.200.100:9200` 一定改为自己虚拟机的地址
# 5. 商品上架功能
上架的商品才可以在网站展示。
上架的商品需要可以被检索。
**将数据库信息保存到es中。**
## 5.1 建立product索引
最终选用的数据模型:
- { "type": "keyword" }, # 保持数据精度问题,可以检索,但不分词
- "analyzer": "ik_smart" # 中文分词器
- "index": false, # 不可被检索,不生成index
- "doc_values": false # 默认为true,不可被聚合,es就不会维护一些聚合的信息
```json
PUT product
{
"mappings":{
"properties": {
"skuId":{ "type": "long" },
"spuId":{ "type": "keyword" }, # 不可分词
"skuTitle": {
"type": "text",
"analyzer": "ik_smart" # 中文分词器
},
"skuPrice": { "type": "keyword" }, # 保证精度问题
"skuImg" : { "type": "keyword" }, # 视频中有false
"saleCount":{ "type":"long" },
"hasStock": { "type": "boolean" },
"hotScore": { "type": "long" },
"brandId": { "type": "long" },
"catalogId": { "type": "long" },
"brandName": {"type": "keyword"}, # 视频中有false
"brandImg":{
"type": "keyword",
"index": false, # 不可被检索,不生成index,只用做页面使用
"doc_values": false # 不可被聚合,默认为true
},
"catalogName": {"type": "keyword" }, # 视频里有false
"attrs": {
"type": "nested",
"properties": {
"attrId": {"type": "long" },
"attrName": {
"type": "keyword",
"index": false, # 不可被索引,不生成索引
"doc_values": false
},
"attrValue": {"type": "keyword" }
}
}
}
}
}
```
> 如果检索不到商品,自己用postman测试一下,可能有的字段需要更改,你也可以把没必要的"keyword"去掉
冗余存储的字段:不用来检索,也不用来分析,节省空间
> 库存是bool。
>
> 检索品牌id,但是不检索品牌名字、图片
>
> 用skuTitle检索
### 5.1.1 nested嵌入式对象
属性是"type": "nested",因为是内部的属性进行检索
数组类型的对象会被扁平化处理(对象的每个属性会分别存储到一起)
```json
user.name=["aaa","bbb"]
user.addr=["ccc","ddd"]
这种存储方式,可能会发生如下错误:
错误检索到{aaa,ddd},这个组合是不存在的
```
数组的扁平化处理会使检索能检索到本身不存在的,为了解决这个问题,就采用了嵌入式属性,数组里是对象时用嵌入式属性(不是对象无需用嵌入式属性)
nested阅读:https://blog.csdn.net/weixin_40341116/article/details/80778599
使用聚合:https://blog.csdn.net/kabike/article/details/101460578
## 5.2 按skuId上架
POST /product/spuinfo/{spuId}/up
```java
@GetMapping("/skuId/{id}")
public R getSkuInfoBySkuId(@PathVariable("id") Long skuId){
SpuInfoEntity entity = spuInfoService.getSpuInfoBySkuId(skuId);
return R.ok().setData(entity);
}
```
> product里组装好,search里上架
**上架实体类**
商品上架需要在es中保存spu信息并更新spu的状态信息,由于`SpuInfoEntity`与索引的数据模型并不对应,所以我们要建立专门的vo进行数据传输
```java
@Data
public class SkuEsModel { //common中
private Long skuId;
private Long spuId;
private String skuTitle;
private BigDecimal skuPrice;
private String skuImg;
private Long saleCount;
private boolean hasStock;
private Long hotScore;
private Long brandId;
private Long catalogId;
private String brandName;
private String brandImg;
private String catalogName;
private List attrs;
@Data
public static class Attr{
private Long attrId;
private String attrName;
private String attrValue;
}
}
```
**R工具类**
因为R继承HashMap所以不能有属性
```java
/**
* 返回数据
*
* @author Mark sunlightcs@gmail.com
*/
@Data
public class R extends HashMap {
private static final long serialVersionUID = 1L;
/**
* @param key 获取指定key的名字
*/
public T getData(String key, TypeReference typeReference){
Object data = get(key);
return JSON.parseObject(JSON.toJSONString(data), typeReference);
}
/**
* 复杂类型转换 TypeReference
*/
public T getData(TypeReference typeReference){
Object data = get("data");
String s = JSON.toJSONString(data);
return JSON.parseObject(s, typeReference);
}
public R setData(Object data){
// 放入Object
put("data", data);
return this;
}
public R() {
put("code", 0);
put("msg", "success");
}
public static R error() {
return error(HttpStatus.SC_INTERNAL_SERVER_ERROR, "未知异常,请联系管理员");
}
public static R error(String msg) {
return error(HttpStatus.SC_INTERNAL_SERVER_ERROR, msg);
}
public static R error(int code, String msg) {
R r = new R();
r.put("code", code);
r.put("msg", msg);
return r;
}
public static R ok(String msg) {
R r = new R();
r.put("msg", msg);
return r;
}
public static R ok(Map map) {
R r = new R();
r.putAll(map);
return r;
}
public static R ok() {
return new R();
}
public R put(String key, Object value) {
super.put(key, value);
return this;
}
public Integer getCode() {
return (Integer) this.get("code");
}
}
```
### 5.2.1 库存量查询
上架要确保还有库存
1)在ware微服务里添加"查询sku是否有库存"的controller
```java
// sku的规格参数相同,因此我们要将查询规格参数提前,只查询一次
/**
* 查询sku是否有库存
* 返回skuId 和 stock库存量
*/
@PostMapping("/hasstock")
public R> getSkusHasStock(@RequestBody List skuIds) {
List vos = wareSkuService.getSkusHasStock(skuIds);
R> ok = R.ok();
ok.setData(vos);
return ok;
}
```
然后用feign调用
2)设置R的时候最后设置成泛型的
3)收集成map的时候,`toMap()`参数为两个方法,如`SkyHasStockVo::getSkyId, item->item.getHasStock()`
4) 将封装好的SkuInfoEntity,调用search的feign,保存到es中
下面代码为更具sku的各种信息保存到es中
```java
@Override
public void up(Long spuId) {
//1. 查出当前spuid对应的所有sku信息,品牌名字
List skus = skuInfoService.list(new QueryWrapper().eq("spu_id",spuId));
List skuList = skus.stream().map(SkuInfoEntity::getSkuId).collect(Collectors.toList());
// TODO 4. 查询当前sku的所有可以被用来检索的规格属性
List baseAttrs = attrValueService.list(new QueryWrapper().eq("spu_id",spuId));
List attrIds = baseAttrs.stream().map(attr-> attr.getAttrId()).collect(Collectors.toList());
List searchAttrIds = attrService.selectSearchAttrIds(attrIds);
Set idSet = new HashSet<>(searchAttrIds);
List attrsList = baseAttrs.stream().filter(item-> idSet.contains(item.getAttrId())).map(item->{
SkuEsModel.Attrs attrs = new SkuEsModel.Attrs();
BeanUtils.copyProperties(item,attrs);
return attrs;
}).collect(Collectors.toList());
// TODO 1. 发送远程调用,库存系统查询是否有库存
Map collect = null;
try {
R> skusHasStock = wareFeignService.getSkusHasStock(skuList);
List data = skusHasStock.getData(new TypeReference>() {});
collect = data.stream().collect(Collectors.toMap(SkuHasStockVo::getSkuId, item -> item.getHasStock()));
} catch (Exception e) {
log.error("库存服务查询有异常:原因{}",e);
}
//2. 封装每个sku的信息
Map finalCollect = collect;
List skuEsModelList = skus.stream().map(sku -> {
// 组装需要的数据
SkuEsModel esModel = new SkuEsModel();
BeanUtils.copyProperties(sku,esModel);
// skuPrice,skuImg
esModel.setSkuPrice(sku.getPrice());
esModel.setSkuImg(sku.getSkuDefaultImg());
// hasStock,hotScore
if (finalCollect == null) {
esModel.setHasStock(true);
}
else {
esModel.setHasStock(finalCollect.get(sku.getSkuId()));
}
// TODO 2. 热度评分 默认设置为0
esModel.setHotScore(0L);
// TODO 3. 查询品牌和分类的名字信息
BrandEntity brand = brandService.getById(sku.getBrandId());
esModel.setBrandName(brand.getName());
esModel.setBrandImg(brand.getLogo());
CategoryEntity category = categoryService.getById(sku.getCatalogId());
esModel.setCatalogName(category.getName());
esModel.setCatalogName(category.getIcon());
// 设置检索属性
esModel.setAttrs(attrsList);
return esModel;
}).collect(Collectors.toList());
// TODO 5. 将数据发送给es保存
R r = searchFeignService.productStatusUp(skuEsModelList);
if (r.getCode() == 0) {
// 远程调用成功
baseMapper.updateSpuStatus(spuId, ProductConstant.StatusEnum.SPU_UP.getCode());
} else {
// 远程调用失败 TODO 接口幂等性 重试机制
/**
* Feign 的调用流程 Feign有自动重试机制
* 1. 发送请求执行
* 2.
*/
}
}
```
5)上架失败返回R.error(错误码,消息)
此时再定义一个错误码枚举。
在接收端获取他返回的状态码
6)上架后再让数据库中变为上架状态
7)mybatis为了能兼容接收null类型,要把long改为Long
debug时很容易远程调用异常,因为超时了
### 5.2.2 根据spuId封装上架数据
前面我们写了把sku信息放到es中,但是这些信息需要我们封装,前端只是传过来了一个spuId
```java
@Override // SpuInfoServiceImpl
public void up(Long spuId) {
// 1 组装数据 查出当前spuId对应的所有sku信息
List skus = skuInfoService.getSkusBySpuId(spuId);
// 查询这些sku是否有库存
List skuids = skus.stream().map(sku -> sku.getSkuId()).collect(Collectors.toList());
// 2 封装每个sku的信息
// 3.查询当前sku所有可以被用来检索的规格属性
List baseAttrs = attrValueService.baseAttrListForSpu(spuId);
// 得到基本属性id
List attrIds = baseAttrs.stream().map(attr -> attr.getAttrId()).collect(Collectors.toList());
// 过滤出可被检索的基本属性id,即search_type = 1 [数据库中目前 4、5、6、11不可检索]
Set ids = new HashSet<>(attrService.selectSearchAttrIds(attrIds));
// 可被检索的属性封装到SkuEsModel.Attrs中
List attrs = baseAttrs.stream()
.filter(item -> ids.contains(item.getAttrId()))
.map(item -> {
SkuEsModel.Attrs attr = new SkuEsModel.Attrs();
BeanUtils.copyProperties(item, attr);
return attr;
}).collect(Collectors.toList());
// 每件skuId是否有库存
Map stockMap = null;
try {
// 3.1 远程调用库存系统 查询该sku是否有库存
R hasStock = wareFeignService.getSkuHasStock(skuids);
// 构造器受保护 所以写成内部类对象
stockMap = hasStock.getData(new TypeReference>() {})
.stream()
.collect(Collectors.toMap(SkuHasStockVo::getSkuId, item -> item.getHasStock()));
log.warn("服务调用成功" + hasStock);
} catch (Exception e) {
log.error("库存服务调用失败: 原因{}", e);
}
Map finalStockMap = stockMap;//防止lambda中改变
// 开始封装es
List skuEsModels = skus.stream().map(sku -> {
SkuEsModel esModel = new SkuEsModel();
BeanUtils.copyProperties(sku, esModel);
esModel.setSkuPrice(sku.getPrice());
esModel.setSkuImg(sku.getSkuDefaultImg());
// 4 设置库存,只查是否有库存,不查有多少
if (finalStockMap == null) {
esModel.setHasStock(true);
} else {
esModel.setHasStock(finalStockMap.get(sku.getSkuId()));
}
// TODO 1.热度评分 刚上架是0
esModel.setHotScore(0L);
// 设置品牌信息
BrandEntity brandEntity = brandService.getById(esModel.getBrandId());
esModel.setBrandName(brandEntity.getName());
esModel.setBrandImg(brandEntity.getLogo());
// 查询分类信息
CategoryEntity categoryEntity = categoryService.getById(esModel.getCatalogId());
esModel.setCatalogName(categoryEntity.getName());
// 保存商品的属性, 查询当前sku的所有可以被用来检索的规格属性,同一spu都一样,在外面查一遍即可
esModel.setAttrs(attrs);
return esModel;
}).collect(Collectors.toList());
// 5.发给ES进行保存 gulimall-search
R r = searchFeignService.productStatusUp(skuEsModels);
if (r.getCode() == 0) {
// 远程调用成功
baseMapper.updateSpuStatus(spuId, ProductConstant.StatusEnum.SPU_UP.getCode());
} else {
// 远程调用失败 TODO 接口幂等性 重试机制
/**
* Feign 的调用流程 Feign有自动重试机制
* 1. 发送请求执行
* 2.
*/
}
}
```
### 5.2.3 gulimall-search
pom依赖:thymeleaf
修改源文档index.html中的路径,加上/static前缀,交由nginx响应
修改hosts search.gulimall.com
修改nginx的配置文件 *.gulimall.com; 要注意这种配置方式不包含gulimall.com
```
server_name gulimall.com *.gulimall.com;
```
修改index.html成list.html。添加对应controller
### 5.2.4 上架controller
在product封装好了数据,远程调用search服务,接收的controller:
```java
@PostMapping("/product")
public R productStatusUp(@RequestBody List skuEsModels) {
Boolean status;
try {
status = productSaveService.productStatusUp(skuEsModels);
} catch (IOException e) {
log.error("ElasticSaveController商品上架错误: {}", e);
return R.error(BizCodeEnum.PRODUCT_UP_EXCEPTION.getCode(), BizCodeEnum.PRODUCT_UP_EXCEPTION.getMsg());
}
if(!status){
return R.ok();
}
return R.error(BizCodeEnum.PRODUCT_UP_EXCEPTION.getCode(), BizCodeEnum.PRODUCT_UP_EXCEPTION.getMsg());
}
```
```java
@Slf4j
@Service
public class ProductSaveServiceImpl implements ProductSaveService {
@Autowired
private RestHighLevelClient client;
/**
* 将数据保存到ES
* 用bulk代替index,进行批量保存
* BulkRequest bulkRequest, RequestOptions options
*/
@Override
public Boolean productStatusUp(List skuEsModels) throws IOException {
// 1.给ES建立一个索引 product
BulkRequest bulkRequest = new BulkRequest();
// 2.构造保存请求
for (SkuEsModel esModel : skuEsModels) {
// 设置es索引
IndexRequest indexRequest = new IndexRequest(EsConstant.PRODUCT_INDEX);
// 设置索引id
indexRequest.id(esModel.getSkuId().toString());
// json格式
String s = JSON.toJSONString(esModel);
indexRequest.source(s,XContentType.JSON);
// 添加到文档
bulkRequest.add(indexRequest);
}
// bulk批量保存
BulkResponse bulk = client.bulk(bulkRequest, GulimallElasticSearchConfig.COMMON_OPTIONS);
// TODO 是否拥有错误
boolean hasFailures = bulk.hasFailures();
if(hasFailures){
List collect = Arrays.stream(bulk.getItems()).map(item -> item.getId()).collect(Collectors.toList());
log.error("商品上架错误:{}",collect);
}
return hasFailures;
}
}
```
# 6 商城系统首页
#### 页面与静态资源处理
不使用前后端分离开发了,管理后台用vue
页面在课件位置: 【尚硅谷公众号-回复谷粒商城-高级篇-资料源码.zip\代码\html】
**静态资源处理**
nginx发给网关集群,网关再路由到微服务
静态资源放到nginx中,后面的很多服务都需要放到nginx中
html\首页资源\index放到gulimall-product下的static文件夹
把index.html放到templates中
**pom依赖**
导入thymeleaf依赖、热部署依赖devtools使页面实时生效
```xml
org.springframework.boot
spring-boot-devtools
org.springframework.boot
spring-boot-starter-thymeleaf
```
关闭thymeleaf缓存,方便开发实时看到更新
```yaml
thymeleaf:
cache: false
suffix: .html
prefix: classpath:/templates/
```
web开发放到web包下,原来的controller是前后分离对接手机等访问的,所以可以改成app,对接app应用
#### 渲染一级分类菜单
刚导入index.html时,里面的分类菜单都是写死的,我们要访问数据库拿到放到model中,然后在页面foreach填入
```java
@Controller
public class IndexController {
@Autowired
private CategoryService categoryService;
@RequestMapping({"/", "index", "/index.html"})
public String indexPage(Model model) {
// 获取一级分类所有缓存
List catagories = categoryService.getLevel1Categorys();
model.addAttribute("catagories", catagories);
return "index";
}
@ResponseBody
@RequestMapping("index/json/catalog.json")
public Map> getCatlogJson() {
Map> map = categoryService.getCatelogJson();
return map;
}
}
```
页面遍历菜单数据
```html
```
#### 渲染三级分类菜单
```java
@ResponseBody
@RequestMapping("index/catalog.json")
public Map> getCatlogJson() {
Map> map = categoryService.getCatelogJson();
return map;
}
```
```java
@AllArgsConstructor
@NoArgsConstructor
@Data
public class Catelog2Vo {
private String id;
private String name;
private String catalog1Id;
private List catalog3List;
@AllArgsConstructor
@NoArgsConstructor
@Data
public static class Catalog3Vo {
private String id;
private String name;
private String catalog2Id;
}
}
```
```java
@Override
public List getLevel1Categorys() {
return baseMapper.selectList(new QueryWrapper().eq("cat_level",1));
}
@Override
public Map> getCatelogJson() {
List level1Categorys = getLevel1Categorys();
return level1Categorys.stream().collect(Collectors.toMap(key->key.getCatId().toString(),value->{
// 通过一级分类找到其对应的所有二级分类
List categoryEntities = baseMapper.selectList(new QueryWrapper().eq("parent_cid", value.getCatId()));
// 封装上面的结果,将二级分类对象封装成二级VO并将三级VO放入二级VO中
List catelog2VoList = null;
if (categoryEntities != null) {
catelog2VoList = categoryEntities.stream().map(item -> {
//将二级分类对象封装成二级VO
Catelog2Vo catelog2Vo = new Catelog2Vo(value.getCatId().toString(), item.getName(), item.getCatId().toString(),null);
// 先查出二级分类的所有三级分类
List categoryEntity3 = baseMapper.selectList(new QueryWrapper().eq("parent_cid", item.getCatId()));
// 将三级分类转化成三级VO
if (categoryEntity3 != null) {
List collect = categoryEntity3.stream().map(i3 -> {
Catelog2Vo.Catalog3Vo catalog3Vo = new Catelog2Vo.Catalog3Vo(i3.getCatId().toString(), i3.getName(), item.getCatId().toString());
return catalog3Vo;
}).collect(Collectors.toList());
// 将三级分类VO塞进去
catelog2Vo.setCatalog3List(collect);
}
return catelog2Vo;
}).collect(Collectors.toList());
}
return catelog2VoList;
}));
}
```
# 7 压测
| 压测内容 | 压测线程数 | 吞吐量/s | 90%响应时间 | 99%响应时间 |
| :----------------------------: | :--------: | :------: | :---------: | :---------: |
| Nginx(浪费CPU) | 200 | 1,773 | 129 | 152 |
| Gateway(浪费CPU) | 200 | 3,866 | 51 | 130 |
| 简单服务(返回字符串) | 200 | 19,379 | 2 | 4 |
| 首页一级菜单渲染 | 200 | 746 | 301 | 812 |
| 首页菜单渲染(开缓存) | 200 | 750 | 288 | 363 |
| 三级分类数据获取 | 200 | 12 | 19986 | 20603 |
| 三级分类(优化业务) | 200 | 210 | 1353 | 1772 |
| 三级分类(redis优化) | 200 | 1,321 | 160 | 201 |
| 首页全量数据获取 | 200 | 崩了 | 崩了 | 崩了 |
| 首页全量数据获取(动静分类) | 200 | 17 | | |
| 全链路(Nginx+GateWay+简单服务) | 200 | 1,379 | 141 | 180 |
# 8 Redis缓存
为了系统性能的提升,我们一般都会将部分数据放入缓存中,加速访问。而db 承担数据落
盘工作。
哪些数据适合放入缓存?
- 即时性、数据一致性要求不高的
- 访问量大且更新频率不高的数据(读多,写少)
#### 8.1 缓存失效
**缓存穿透**
缓存穿透是指==**缓存和数据库中都没有的数据**==,而用户不断发起请求,如发起为id为“-1”的数据或id为特别大不存在的数据。这时的用户很可能是攻击者,攻击会导致数据库压力过大。
解决:缓存空对象、布隆过滤器、mvc拦截器
**缓存雪崩**
缓存雪崩是指在我们设置缓存时key采用了**相同的过期时间**,导致缓存在某一时刻**同时失效**,请求全部转发到DB,DB瞬时压力过重雪崩。
解决方案:
- 规避雪崩:缓存数据的**过期时间设置随机**,防止同一时间大量数据过期现象发生。
- 如果缓存数据库是**分布式部署**,将热点数据均匀分布在不同缓存数据库中。
- 设置热点数据永远不过期。
- 出现雪崩:降级 熔断
- 事前:尽量保证整个 redis 集群的高可用性,发现机器宕机尽快补上。选择合适的内存淘汰策略。
- 事中:本地ehcache缓存 + hystrix**限流&降级**,避免MySQL崩掉
- 事后:利用 redis 持久化机制保存的数据尽快恢复缓存
**缓存击穿**
缓存雪崩和缓存击穿不同的是:
- **==缓存击穿 指 并发查同一条数据==**。缓存击穿是指==缓存中没有但数据库中有的数据==(一般是缓存时间到期),这时由于并发用户特别多,同时读缓存没读到数据,又同时去数据库去取数据,引起数据库压力瞬间增大,造成过大压力
- **缓存雪崩是不同数据都过期了,很多数据都查不到从而查数据库。**
**解决方案:**
- 设置热点数据永远不过期。
- 加互斥锁:业界比较常用的做法,是使用mutex。简单地来说,就是在缓存失效的时候(判断拿出来的值为空),不是立即去load db去数据库加载,而是先使用缓存工具的某些带成功操作返回值的操作(比如Redis的`SETNX`或者Memcache的`ADD`)去set一个mutex key,当操作返回成功时,再进行load db的操作并回设缓存;否则,就重试整个get缓存的方法。
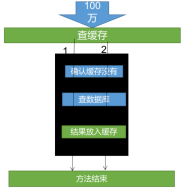
#### 4) 缓存击穿:加锁
不好的方法是synchronized(this),肯定不能这么写 ,不具体写了
锁时序问题:之前的逻辑是查缓存没有,然后取竞争锁查数据库,这样就造成多次查数据库。
解决方法:竞争到锁后,再次确认缓存中没有,再去查数据库。
# 9 分布式锁
https://github.com/redisson/redisson
Redisson是一个在Redis的基础上实现的Java驻内存数据网格(In-Memory Data Grid)。它不仅提供了一系列的分布式的Java常用对象,还提供了许多分布式服务。其中包括(`BitSet`, `Set`, `Multimap`, `SortedSet`, `Map`, `List`, `Queue`, `BlockingQueue`, `Deque`, `BlockingDeque`, `Semaphore`, `Lock`, `AtomicLong`, `CountDownLatch`, `Publish / Subscribe`, `Bloom filter`, `Remote service`, `Spring cache`, `Executor service`, `Live Object service`, `Scheduler service`) Redisson提供了使用Redis的最简单和最便捷的方法。Redisson的宗旨是促进使用者对Redis的关注分离(Separation of Concern),从而让使用者能够将精力更集中地放在处理业务逻辑上。
本文我们仅关注分布式锁的实现,更多请参考[官方文档](https://github.com/redisson/redisson/wiki/8.-%E5%88%86%E5%B8%83%E5%BC%8F%E9%94%81%E5%92%8C%E5%90%8C%E6%AD%A5%E5%99%A8)
#### (1) 环境搭建
**导入依赖**
```xml
org.redisson
redisson
3.13.4
这个用作连续,后面可以使用redisson-spring-boot-starter
```
开启配置https://github.com/redisson/redisson/wiki/2.-%E9%85%8D%E7%BD%AE%E6%96%B9%E6%B3%95
```java
@Configuration
public class MyRedisConfig {
@Value("${ipAddr}")
private String ipAddr;
// redission通过redissonClient对象使用 // 如果是多个redis集群,可以配置
@Bean(destroyMethod = "shutdown")
public RedissonClient redisson() {
Config config = new Config();
// 创建单例模式的配置
config.useSingleServer().setAddress("redis://" + ipAddr + ":6379");
return Redisson.create(config);
}
}
```
#### (2) redis可重入锁(Reentrant Lock)
分布式锁:github.com/redisson/redisson/wiki/8.-分布式锁和同步器
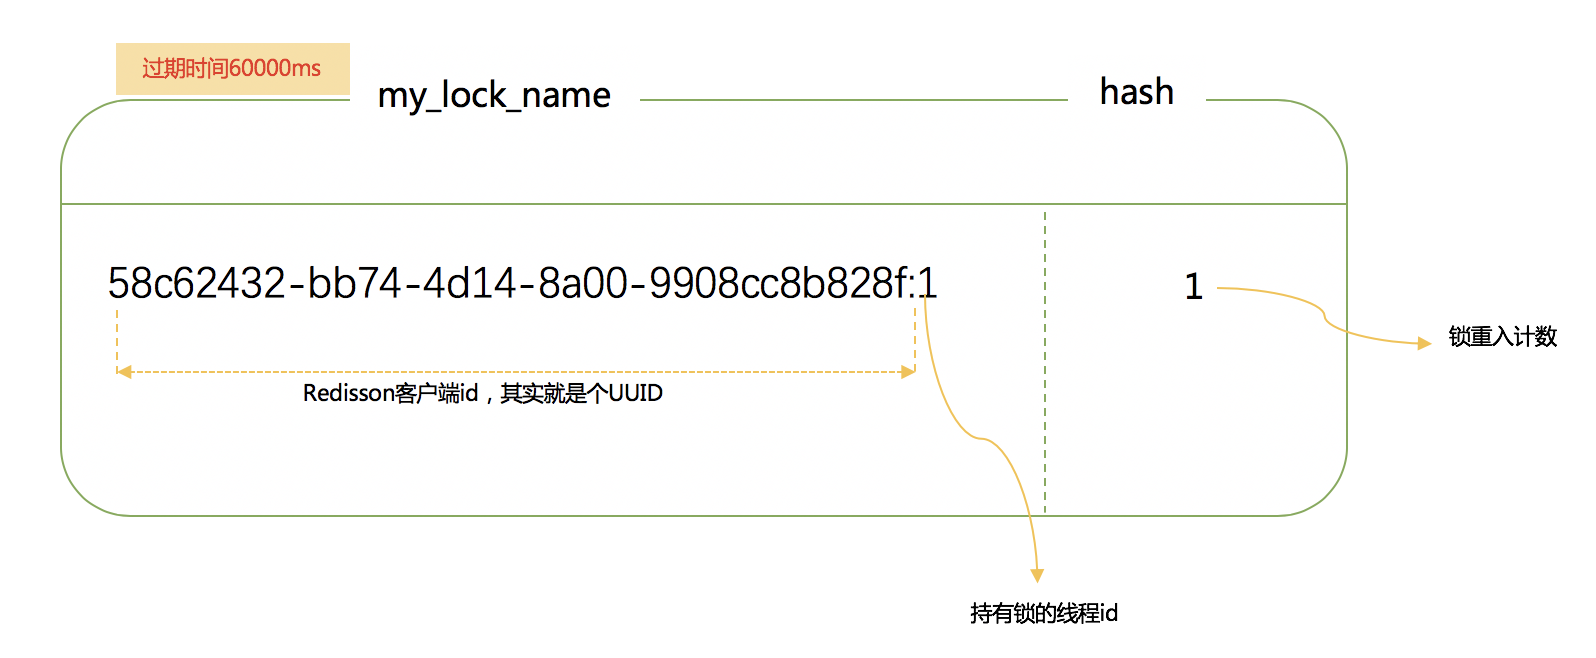
锁其实也是一种资源,各线程争抢锁操作对应到redisson中就是争抢着去创建一个`hash`结构,谁先创建就代表谁获得锁;**hash的名称为锁名**,hash里面内容仅包含一条键值对,键为`redisson`客户端**唯一标识+持有锁线程id**,值为**锁重入计数**;给hash设置的过期时间就是锁的过期时间。放个图直观感受下:
```java
// 参数为锁名字
RLock lock = redissonClient.getLock("CatalogJson-Lock");//该锁实现了JUC.locks.lock接口
lock.lock();//阻塞等待
lock.lock();//重入锁
lock.unlock();
// 解锁放到finally // 如果这里宕机:有看门狗,不用担心
lock.unlock();
```
```java
// 加锁以后10秒钟自动解锁
// 无需调用unlock方法手动解锁
lock.lock(10, TimeUnit.SECONDS);
// 尝试加锁,最多等待100秒,上锁以后10秒自动解锁
boolean res = lock.tryLock(100, 10, TimeUnit.SECONDS);
if (res) {
try {
...
} finally {
lock.unlock();
}
}
```
```java
@ResponseBody
@RequestMapping("string")
public String returnString() {
// 获取一把锁,只要锁名字一样,就是同一把锁
RLock lock = redisson.getLock("my-lock");
// 加锁
// lock.lock();//默认加锁时间为30s
//1. 锁的自动续期,如果业务超长,运行期间自动续上新的30s
//2. 加锁的业务只要完成,就不会给当前锁续期,即使不手动解锁,锁也默认在30s以后删除
//lock.lock(10, TimeUnit.SECONDS); // 10s后自动解锁,自动解锁时间一定要大于业务的执行时间,因为时间到了以后不会自动续期
//1. 如果我们传递了锁的超时时间,就发送给redis执行脚本,进行占锁,默认超时时间时我们的指定时间
//2. 如果我们为指定锁的超时就是用30*1000看门狗的默认时间
// 只要占锁成功就会启动一个定时认为每过【最大时间/3】会刷新时间
//一般使用lock.lock(30, TimeUnit.SECONDS);
lock.lock(10, TimeUnit.SECONDS);
try {
System.out.println("上锁"+Thread.currentThread().getId());
System.out.println("执行业务代码");
Thread.sleep(10000);
} catch (InterruptedException e) {
e.printStackTrace();
} finally {
System.out.println("解锁"+Thread.currentThread().getId());
lock.unlock();
}
return "hello";
}
```
基于Redis的Redisson分布式可重入锁[`RLock`](http://static.javadoc.io/org.redisson/redisson/3.10.0/org/redisson/api/RLock.html) Java对象实现了`java.util.concurrent.locks.Lock`接口。同时还提供了[异步(Async)](http://static.javadoc.io/org.redisson/redisson/3.10.0/org/redisson/api/RLockAsync.html)、[反射式(Reactive)](http://static.javadoc.io/org.redisson/redisson/3.10.0/org/redisson/api/RLockReactive.html)和[RxJava2标准](http://static.javadoc.io/org.redisson/redisson/3.10.0/org/redisson/api/RLockRx.html)的接口。
###### 锁的续期
锁的续期:大家都知道,如果负责储存这个分布式锁的Redisson节点宕机以后,而且这个锁正好处于锁住的状态时,这个锁会出现锁死的状态。为了避免这种情况的发生,Redisson内部提供了一个**监控锁的看门狗**,它的作用是在Redisson实例被关闭前,不断的**延长锁的有效期**。默认情况下,看门狗的检查锁的超时时间是30秒钟(每到20s就会自动续借成30s,是1/3的关系),也可以通过修改[Config.lockWatchdogTimeout](https://github.com/redisson/redisson/wiki/2.-配置方法#lockwatchdogtimeout监控锁的看门狗超时单位毫秒)来另行指定。
> lockWatchdogTimeout(监控锁的看门狗超时,单位:毫秒)
>
> 监控锁的看门狗超时时间单位为毫秒。该参数只适用于分布式锁的加锁请求中未明确使用`leaseTimeout`参数的情况。如果该看门口未使用`lockWatchdogTimeout`去重新调整一个分布式锁的`lockWatchdogTimeout`超时,那么这个锁将变为失效状态。这个参数可以用来避免由Redisson客户端节点宕机或其他原因造成死锁的情况。
```java
如果传递了锁的超时时间,就执行脚本,进行占锁;
如果没传递锁时间,代表是永久锁,使用看门狗的时间,占锁。如果返回占锁成功future,调用future.onComplete();
没异常的话调用scheduleExpirationRenewal(threadId);
重新设置过期时间,定时任务;
看门狗的原理是定时任务:重新给锁设置过期时间,新的过期时间就是看门狗的默认时间;
锁时间/3是定时任务周期;
```
Redisson同时还为分布式锁提供了异步执行的相关方法:
```java
RLock lock = redisson.getLock("anyLock");
lock.lockAsync();
lock.lockAsync(10, TimeUnit.SECONDS);
Future res = lock.tryLockAsync(100, 10, TimeUnit.SECONDS);
```
`RLock`对象完全符合Java的Lock规范。也就是说只有拥有锁的进程才能解锁,其他进程解锁则会抛出`IllegalMonitorStateException`错误。但是如果遇到需要其他进程也能解锁的情况,请使用[分布式信号量`Semaphore`](https://github.com/redisson/redisson/wiki/8.-分布式锁和同步器#86-信号量semaphore) 对象.
```java
public Map> getCatalogJsonDbWithRedisson() {
Map> categoryMap=null;
RLock lock = redissonClient.getLock("CatalogJson-Lock");
lock.lock();
try {
Thread.sleep(30000);
categoryMap = getCategoryMap();
} catch (InterruptedException e) {
e.printStackTrace();
}finally {
lock.unlock();
return categoryMap;
}
}
```
最佳实战:自己指定锁时间,时间长点即可
#### (3) 读写锁(ReadWriteLock)
基于Redis的Redisson分布式可重入读写锁[`RReadWriteLock`](http://static.javadoc.io/org.redisson/redisson/3.4.3/org/redisson/api/RReadWriteLock.html) Java对象实现了`java.util.concurrent.locks.ReadWriteLock`接口。其中读锁和写锁都继承了[RLock](https://github.com/redisson/redisson/wiki/8.-分布式锁和同步器#81-可重入锁reentrant-lock)接口。
分布式可重入读写锁允许同时有多个读锁和一个写锁处于加锁状态。
```java
RReadWriteLock rwlock = redisson.getReadWriteLock("anyRWLock");
// 10秒钟以后自动解锁
// 无需调用unlock方法手动解锁
rwlock.readLock().lock(10, TimeUnit.SECONDS);
// 或
rwlock.writeLock().lock(10, TimeUnit.SECONDS);
// 尝试加锁,最多等待100秒,上锁以后10秒自动解锁
boolean res = rwlock.readLock().tryLock(100, 10, TimeUnit.SECONDS);
// 或
boolean res = rwlock.writeLock().tryLock(100, 10, TimeUnit.SECONDS);
...
lock.unlock();
```
上锁时在redis的状态
```
HashWrite-Lock
key:mode value:read
key:sasdsdffsdfsdf... value:1
```
#### (4) 闭锁(CountDownLatch)
基于Redisson的Redisson分布式闭锁([CountDownLatch](http://static.javadoc.io/org.redisson/redisson/3.10.0/org/redisson/api/RCountDownLatch.html))Java对象`RCountDownLatch`采用了与`java.util.concurrent.CountDownLatch`相似的接口和用法。
```java
@GetMapping("/door")
@ResponseBody
public String door() throws InterruptedException {
RCountDownLatch door = redisson.getCountDownLatch("door");
door.trySetCount(5);
door.await();
return "解锁";
}
@GetMapping("/gogogo/{id}")
@ResponseBody
public String gogogo(@PathVariable("id") Integer id) throws InterruptedException {
RCountDownLatch door = redisson.getCountDownLatch("door");
door.countDown();
return id.toString();
}
```
以下代码只有`offLatch()`被调用5次后 `setLatch()`才能继续执行
```java
RCountDownLatch latch = redisson.getCountDownLatch("anyCountDownLatch");
latch.trySetCount(1);
latch.await(); // 阻塞等待减为0
// 在其他线程或其他JVM里
RCountDownLatch latch = redisson.getCountDownLatch("anyCountDownLatch");
latch.countDown();
```
说白了就是要其他线程执行指定次数后才能执行
#### (4) 信号量(Semaphore)
信号量为存储在redis中的一个数字,当这个数字大于0时,即可以调用`acquire()`方法增加数量,也可以调用`release()`方法减少数量,但是当调用`release()`之后小于0的话方法就会阻塞,直到数字大于0
基于Redis的Redisson的分布式信号量([Semaphore](http://static.javadoc.io/org.redisson/redisson/3.10.0/org/redisson/api/RSemaphore.html))Java对象`RSemaphore`采用了与`java.util.concurrent.Semaphore`相似的接口和用法。同时还提供了[异步(Async)](http://static.javadoc.io/org.redisson/redisson/3.10.0/org/redisson/api/RSemaphoreAsync.html)、[反射式(Reactive)](http://static.javadoc.io/org.redisson/redisson/3.10.0/org/redisson/api/RSemaphoreReactive.html)和[RxJava2标准](http://static.javadoc.io/org.redisson/redisson/3.10.0/org/redisson/api/RSemaphoreRx.html)的接口。
```java
RSemaphore semaphore = redisson.getSemaphore("semaphore");
semaphore.acquire();
//或
semaphore.acquireAsync();
semaphore.acquire(23);
semaphore.tryAcquire();
//或
semaphore.tryAcquireAsync();
semaphore.tryAcquire(23, TimeUnit.SECONDS);
//或
semaphore.tryAcquireAsync(23, TimeUnit.SECONDS);
semaphore.release(10);
semaphore.release();
//或
semaphore.releaseAsync();
```
```java
@GetMapping("/park")
@ResponseBody
public String park() {
RSemaphore pack = redisson.getSemaphore("pack");
try {
pack.acquire(2);
} catch (Exception e) {
e.printStackTrace();
}
return "停车2个";
}
@GetMapping("/go")
@ResponseBody
public String go() {
RSemaphore pack = redisson.getSemaphore("pack");
try {
pack.release(2);
} catch (Exception e) {
e.printStackTrace();
}
return "开走2个";
}
```
### 缓存和数据库一致性
- 双写模式:写数据库后,写缓存
- 问题:并发时,2写进入,写完DB后都写缓存。有暂时的脏数据
- 失效模式:写完数据库后,删缓存
- 问题:还没存入数据库呢,线程2又读到旧的DB了
- 解决:缓存设置过期时间,定期更新
- 解决:写数据写时,加分布式的读写锁。
解决方案:
* 如果是用户维度数据(订单数据、用户数据),这种并发几率非常小,不用考虑这个问题,缓存数据加上过期时间,每隔一段时间触发读的主动更新即可
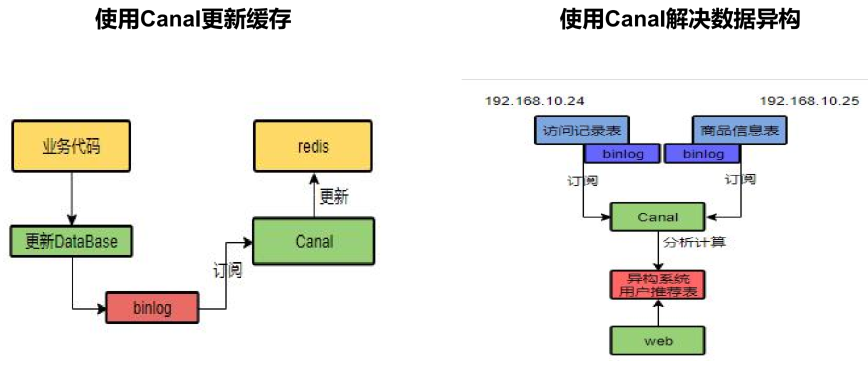
* 如果是菜单,商品介绍等基础数据,也可以去使用canal订阅binlog的方式
* 缓存数据+过期时间也足够解决大部分业务对于缓存的要求。
* 通过加锁保证并发读写,写写的时候按顺序排好队。读无所谓。所以适合使用读写锁。(业务不关心脏数据,允许临时脏数据可忽略);
总结:
* 我们能放入缓存的数据本就不应该是实时性、一致性要求超高的。所以缓存数据的时候加上过期时间,保证每天拿到当前最新数据即可。
* 我们不应该过度设计,增加系统的复杂性
* 遇到实时性、一致性要求高的数据,就应该查数据库,即使慢点。
我们的系统一致性解决方案:
- 缓存的所以数据都有过期时间,数据过期下一次查询触发主动更新
- 读写数据的时候,加上分布式的读写锁。(如果经常写性能会比较低,但我们业务不会经常写)
# 10 SpringCache
> 随便找篇cache文章阅读:https://blog.csdn.net/er_ving/article/details/105421572
每次都那样写缓存太麻烦了,spring从3.1开始定义了Cache、CacheManager接口来统一不同的缓存技术。并支持使用JCache(JSR-107)注解简化我们的开发
Cache接口的实现包括RedisCache、EhCacheCache、ConcurrentMapCache等
每次调用需要缓存功能的方法时,spring会检查检查指定参数的指定的目标方法是否已经被调用过;如果有就直接从缓存中获取方法调用后的结果,如果没有就调用方法并缓存结果后返回给用户。下次调用直接从缓存中获取。
使用Spring缓存抽象时我们需要关注以下两点:
1、确定方法需要缓存以及他们的缓存策略
2、从缓存中读取之前缓存存储的数据
#### 1) 配置
1. 依赖
```xml
org.springframework.boot
spring-boot-starter-cache
```
2. 指定缓存类型并在主配置类上加上注解`@EnableCaching`
3. 指定缓存为redis
```yaml
spring:
cache:
#指定缓存类型为redis
type: redis
redis:
# 指定redis中的过期时间为1h
time-to-live: 3600000
```
**默认使用jdk进行序列化(可读性差),默认ttl为-1永不过期,自定义序列化方式需要编写配置类**
```java
@Configuration
public class MyCacheConfig {
@Bean
public RedisCacheConfiguration redisCacheConfiguration( CacheProperties cacheProperties) {
CacheProperties.Redis redisProperties = cacheProperties.getRedis();
org.springframework.data.redis.cache.RedisCacheConfiguration config = org.springframework.data.redis.cache.RedisCacheConfiguration
.defaultCacheConfig();
//指定缓存序列化方式为json
config = config.serializeValuesWith(
RedisSerializationContext.SerializationPair.fromSerializer(new GenericJackson2JsonRedisSerializer()));
//设置配置文件中的各项配置,如过期时间
if (redisProperties.getTimeToLive() != null) {
config = config.entryTtl(redisProperties.getTimeToLive());
}
if (redisProperties.getKeyPrefix() != null) {
config = config.prefixKeysWith(redisProperties.getKeyPrefix());
}
if (!redisProperties.isCacheNullValues()) {
config = config.disableCachingNullValues();
}
if (!redisProperties.isUseKeyPrefix()) {
config = config.disableKeyPrefix();
}
return config;
}
}
```
#### 2) 缓存自动配置
```java
// 缓存自动配置源码
@Configuration(proxyBeanMethods = false)
@ConditionalOnClass(CacheManager.class)
@ConditionalOnBean(CacheAspectSupport.class)
@ConditionalOnMissingBean(value = CacheManager.class, name = "cacheResolver")
@EnableConfigurationProperties(CacheProperties.class)
@AutoConfigureAfter({ CouchbaseAutoConfiguration.class, HazelcastAutoConfiguration.class,
HibernateJpaAutoConfiguration.class, RedisAutoConfiguration.class })
@Import({ CacheConfigurationImportSelector.class, // 看导入什么CacheConfiguration
CacheManagerEntityManagerFactoryDependsOnPostProcessor.class })
public class CacheAutoConfiguration {
@Bean
@ConditionalOnMissingBean
public CacheManagerCustomizers cacheManagerCustomizers(ObjectProvider> customizers) {
return new CacheManagerCustomizers(customizers.orderedStream().collect(Collectors.toList()));
}
@Bean
public CacheManagerValidator cacheAutoConfigurationValidator(CacheProperties cacheProperties,
ObjectProvider cacheManager) {
return new CacheManagerValidator(cacheProperties, cacheManager);
}
@ConditionalOnClass(LocalContainerEntityManagerFactoryBean.class)
@ConditionalOnBean(AbstractEntityManagerFactoryBean.class)
static class CacheManagerEntityManagerFactoryDependsOnPostProcessor
extends EntityManagerFactoryDependsOnPostProcessor {
CacheManagerEntityManagerFactoryDependsOnPostProcessor() {
super("cacheManager");
}
}
```
```java
@Configuration(proxyBeanMethods = false)
@ConditionalOnClass(RedisConnectionFactory.class)
@AutoConfigureAfter(RedisAutoConfiguration.class)
@ConditionalOnBean(RedisConnectionFactory.class)
@ConditionalOnMissingBean(CacheManager.class)
@Conditional(CacheCondition.class)
class RedisCacheConfiguration {
@Bean // 放入缓存管理器
RedisCacheManager cacheManager(CacheProperties cacheProperties,
CacheManagerCustomizers cacheManagerCustomizers,
ObjectProvider redisCacheConfiguration,
ObjectProvider redisCacheManagerBuilderCustomizers,
RedisConnectionFactory redisConnectionFactory, ResourceLoader resourceLoader) {
RedisCacheManagerBuilder builder = RedisCacheManager.builder(redisConnectionFactory).cacheDefaults(
determineConfiguration(cacheProperties, redisCacheConfiguration, resourceLoader.getClassLoader()));
List cacheNames = cacheProperties.getCacheNames();
if (!cacheNames.isEmpty()) {
builder.initialCacheNames(new LinkedHashSet<>(cacheNames));
}
redisCacheManagerBuilderCustomizers.orderedStream().forEach((customizer) -> customizer.customize(builder));
return cacheManagerCustomizers.customize(builder.build());
}
```
#### 3) 缓存使用@Cacheable@CacheEvict
- @Cacheable存放缓存
- @CacheEvict清空缓存 [ɪˈvɪkt]
```java
// 调用该方法时会将结果缓存,缓存名为category,key为方法名
@Cacheable(value = {"category"}, // value等同于cacheNames
key = "#root.methodName",// key如果是字符串"''"
sync = true) // sync表示该方法的缓存被读取时会加锁
public Map> getCatalogJsonDbWithSpringCache() {
return getCategoriesDb();
}
//调用该方法会删除缓存category下的所有cache,如果要删除某个具体,用key="''"
@Override
@CacheEvict(value = {"category"},allEntries = true)
public void updateCascade(CategoryEntity category) {
this.updateById(category);
if (!StringUtils.isEmpty(category.getName())) {
categoryBrandRelationService.updateCategory(category);
}
}
如果要清空多个缓存,用@Caching(evict={@CacheEvict(value="")})
```
#### 4) SpringCache原理与不足
1)、读模式
- 缓存穿透:查询一个null数据。
- 解决方案:缓存空数据,可通过`spring.cache.redis.cache-null-values=true`
- 缓存击穿:大量并发进来同时查询一个正好过期的数据。解决方案:加锁 ? 默认是无加锁的;
- 使用`sync = true`来解决击穿问题
- 缓存雪崩:大量的key同时过期。解决:加随机时间。
2)、写模式:(缓存与数据库一致)
- 读写加锁。
- 引入Canal,感知到MySQL的更新去更新Redis
- 读多写多,直接去数据库查询就行
3)、总结:
常规数据(读多写少,即时性,一致性要求不高的数据,完全可以使用Spring-Cache):
写模式(只要缓存的数据有过期时间就足够了)
特殊数据:特殊设计