

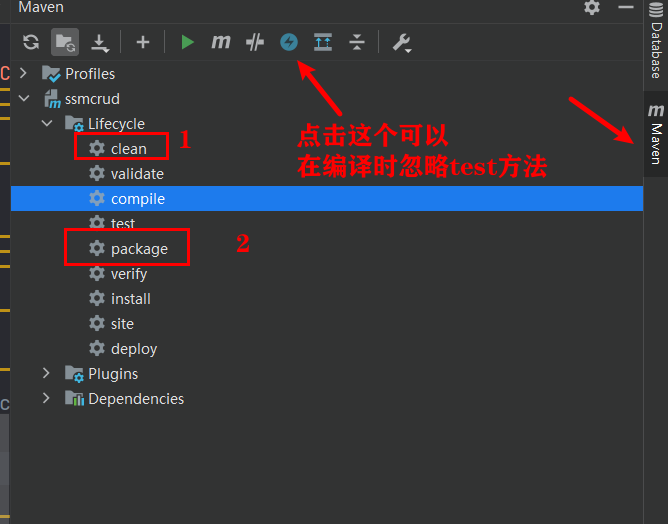
代码拉取完成,页面将自动刷新
使用maven创建一个工程
<?xml version="1.0" encoding="UTF-8"?>
<project xmlns="http://maven.apache.org/POM/4.0.0"
         xmlns:xsi="http://www.w3.org/2001/XMLSchema-instance"
         xsi:schemaLocation="http://maven.apache.org/POM/4.0.0 http://maven.apache.org/xsd/maven-4.0.0.xsd">
    <modelVersion>4.0.0</modelVersion>

    <groupId>com.szx.ssm</groupId>
    <artifactId>ssmcrud</artifactId>
    <version>1.0-SNAPSHOT</version>
    <packaging>war</packaging>

    <properties>
        <maven.compiler.source>8</maven.compiler.source>
        <maven.compiler.target>8</maven.compiler.target>
    </properties>

    <dependencies>
        <!--SpringWebMVC-->
        <dependency>
            <groupId>org.springframework</groupId>
            <artifactId>spring-webmvc</artifactId>
            <version>5.2.22.RELEASE</version>
        </dependency>

        <!--spring-jdbc-->
        <dependency>
            <groupId>org.springframework</groupId>
            <artifactId>spring-jdbc</artifactId>
            <version>5.2.22.RELEASE</version>
        </dependency>
        <!--spring-aspects面向切面和事务-->
        <dependency>
            <groupId>org.springframework</groupId>
            <artifactId>spring-aspects</artifactId>
            <version>5.2.22.RELEASE</version>
        </dependency>
        <!-- spring-test -->
        <dependency>
            <groupId>org.springframework</groupId>
            <artifactId>spring-test</artifactId>
            <version>5.2.22.RELEASE</version>
            <scope>test</scope>
        </dependency>

        <!--mybatis-->
        <dependency>
            <groupId>org.mybatis</groupId>
            <artifactId>mybatis</artifactId>
            <version>3.5.10</version>
        </dependency>
        <!--mybatis-spring适配包-->
        <dependency>
            <groupId>org.mybatis</groupId>
            <artifactId>mybatis-spring</artifactId>
            <version>2.0.7</version>
        </dependency>
        <!--分页插件-->
        <dependency>
            <groupId>com.github.pagehelper</groupId>
            <artifactId>pagehelper</artifactId>
            <version>5.2.0</version>
        </dependency>
        <!--druid连接池-->
        <dependency>
            <groupId>com.alibaba</groupId>
            <artifactId>druid</artifactId>
            <version>1.1.6</version>
        </dependency>
        <!-- MySQL驱动 -->
        <dependency>
            <groupId>mysql</groupId>
            <artifactId>mysql-connector-java</artifactId>
            <version>8.0.29</version>
        </dependency>
        <!--jsp-->
        <dependency>
            <groupId>jstl</groupId>
            <artifactId>jstl</artifactId>
            <version>1.2</version>
        </dependency>
        <!-- ServletAPI -->
        <dependency>
            <groupId>javax.servlet</groupId>
            <artifactId>javax.servlet-api</artifactId>
            <version>3.1.0</version>
            <scope>provided</scope>
        </dependency>
        <!--junit-->
        <dependency>
            <groupId>junit</groupId>
            <artifactId>junit</artifactId>
            <version>4.13.2</version>
        </dependency>
        <!-- Spring5和Thymeleaf整合包 -->
        <dependency>
            <groupId>org.thymeleaf</groupId>
            <artifactId>thymeleaf-spring5</artifactId>
            <version>3.0.12.RELEASE</version>
        </dependency>
        <!-- log4j日志 -->
        <dependency>
            <groupId>log4j</groupId>
            <artifactId>log4j</artifactId>
            <version>1.2.17</version>
        </dependency>
    </dependencies>

    <!-- 控制Maven在构建过程中相关配置 -->
    <build>
        <!-- 构建过程中用到的插件 -->
        <plugins>
            <!-- 具体插件,逆向工程的操作是以构建过程中插件形式出现的 -->
            <plugin>
                <groupId>org.mybatis.generator</groupId>
                <artifactId>mybatis-generator-maven-plugin</artifactId>
                <version>1.3.0</version>
                <!-- 插件的依赖 -->
                <dependencies>
                    <!-- 逆向工程的核心依赖 -->
                    <dependency>
                        <groupId>org.mybatis.generator</groupId>
                        <artifactId>mybatis-generator-core</artifactId>
                        <version>1.3.2</version>
                    </dependency>
                    <!-- 数据库连接池 -->
                    <dependency>
                        <groupId>com.alibaba</groupId>
                        <artifactId>druid</artifactId>
                        <version>1.1.6</version>
                    </dependency>
                    <!-- MySQL驱动 -->
                    <dependency>
                        <groupId>mysql</groupId>
                        <artifactId>mysql-connector-java</artifactId>
                        <version>8.0.29</version>
                    </dependency>
                </dependencies>
            </plugin>
        </plugins>
    </build>

</project>
<?xml version="1.0" encoding="UTF-8"?>
<web-app xmlns="http://xmlns.jcp.org/xml/ns/javaee"
         xmlns:xsi="http://www.w3.org/2001/XMLSchema-instance"
         xsi:schemaLocation="http://xmlns.jcp.org/xml/ns/javaee http://xmlns.jcp.org/xml/ns/javaee/web-app_4_0.xsd"
         version="4.0">
    <!-- 1. 配置监听器启动Spring的容器 -->
    <!-- needed for ContextLoaderListener -->
    <context-param>
        <param-name>contextConfigLocation</param-name>
        <param-value>classpath:ApplicationContext.xml</param-value>
    </context-param>

    <!-- Bootstraps the root web application context before servlet initialization -->
    <listener>
        <listener-class>org.springframework.web.context.ContextLoaderListener</listener-class>
    </listener>

    <!-- 2. springmvc的前端控制器 -->
    <!-- The front controller of this Spring Web application, responsible for handling all application requests -->
    <servlet>
        <servlet-name>dispatcherServlet</servlet-name>
        <servlet-class>org.springframework.web.servlet.DispatcherServlet</servlet-class>
        <!--设置SpringMVC配置文件的地址和名称-->
        <init-param>
            <param-name>contextConfigLocation</param-name>
            <param-value>classpath:SpringMvc.xml</param-value>
        </init-param>
        <load-on-startup>1</load-on-startup>
    </servlet>

    <!-- Map all requests to the DispatcherServlet for handling -->
    <servlet-mapping>
        <servlet-name>dispatcherServlet</servlet-name>
        <url-pattern>/</url-pattern>
    </servlet-mapping>

    <!-- 3. 字符编码过滤器,一定在其余filter之前 -->
    <filter>
        <filter-name>CharacterEncodingFilter</filter-name>
        <filter-class>org.springframework.web.filter.CharacterEncodingFilter</filter-class>
        <init-param>
            <param-name>encoding</param-name>
            <param-value>utf-8</param-value>
        </init-param>
        <init-param>
            <param-name>forceRequestEncoding</param-name>
            <param-value>true</param-value>
        </init-param>
        <init-param>
            <param-name>forceResponseEncoding</param-name>
            <param-value>true</param-value>
        </init-param>
    </filter>
    <filter-mapping>
        <filter-name>CharacterEncodingFilter</filter-name>
        <url-pattern>/*</url-pattern>
    </filter-mapping>


    <!-- 4. Restful风格的配置 -->
    <filter>
        <filter-name>HiddenHttpMethodFilter</filter-name>
        <filter-class>org.springframework.web.filter.HiddenHttpMethodFilter</filter-class>
    </filter>
    <filter-mapping>
        <filter-name>HiddenHttpMethodFilter</filter-name>
        <url-pattern>/*</url-pattern>
    </filter-mapping>
    <filter>
        <filter-name>HttpPutFormContentFilter</filter-name>
        <filter-class>org.springframework.web.filter.HttpPutFormContentFilter</filter-class>
    </filter>
    <filter-mapping>
        <filter-name>HttpPutFormContentFilter</filter-name>
        <url-pattern>/*</url-pattern>
    </filter-mapping>
</web-app>
<?xml version="1.0" encoding="UTF-8"?>
<beans xmlns="http://www.springframework.org/schema/beans"
       xmlns:xsi="http://www.w3.org/2001/XMLSchema-instance"
       xmlns:context="http://www.springframework.org/schema/context"
       xmlns:mvc="http://www.springframework.org/schema/mvc"
       xsi:schemaLocation="http://www.springframework.org/schema/beans http://www.springframework.org/schema/beans/spring-beans.xsd http://www.springframework.org/schema/context https://www.springframework.org/schema/context/spring-context.xsd http://www.springframework.org/schema/mvc https://www.springframework.org/schema/mvc/spring-mvc.xsd">

    <!--开启自动扫描-->
    <context:component-scan base-package="com.szx.ssm" use-default-filters="false">
        <context:include-filter type="annotation" expression="org.springframework.stereotype.Controller"/>
    </context:component-scan>

    <!-- 配置Thymeleaf视图解析器 -->
    <bean id="viewResolver" class="org.thymeleaf.spring5.view.ThymeleafViewResolver">
        <property name="order" value="1"/>
        <property name="characterEncoding" value="UTF-8"/>
        <property name="templateEngine">
            <bean class="org.thymeleaf.spring5.SpringTemplateEngine">
                <property name="templateResolver">
                    <bean class="org.thymeleaf.spring5.templateresolver.SpringResourceTemplateResolver">
                        <!-- 视图前缀 -->
                        <property name="prefix" value="/WEB-INF/static/"/>
                        <!-- 视图后缀 -->
                        <property name="suffix" value=".html"/>
                        <property name="templateMode" value="HTML5"/>
                        <property name="characterEncoding" value="UTF-8" />
                    </bean>
                </property>
            </bean>
        </property>
    </bean>

    <!--两个标准配置  -->
    <mvc:default-servlet-handler/>

    <mvc:annotation-driven/>

</beans>
<?xml version="1.0" encoding="UTF-8"?>
<beans xmlns="http://www.springframework.org/schema/beans"
       xmlns:xsi="http://www.w3.org/2001/XMLSchema-instance"
       xmlns:context="http://www.springframework.org/schema/context"
       xmlns:tx="http://www.springframework.org/schema/tx" xmlns:aop="http://www.springframework.org/schema/aop"
       xsi:schemaLocation="http://www.springframework.org/schema/beans
       http://www.springframework.org/schema/beans/spring-beans.xsd
       http://www.springframework.org/schema/context
       http://www.springframework.org/schema/context/spring-context.xsd
       http://www.springframework.org/schema/tx http://www.springframework.org/schema/tx/spring-tx.xsd http://www.springframework.org/schema/aop https://www.springframework.org/schema/aop/spring-aop.xsd">
    <!--扫描包-->
    <context:component-scan base-package="com.szx">
        <context:exclude-filter type="annotation" expression="org.springframework.stereotype.Controller" />
    </context:component-scan>

    <!--引入jdbc配置文件-->
    <context:property-placeholder location="classpath:jdbc.properties"/>

    <!--配置连接池-->
    <bean id="dataSource" class="com.alibaba.druid.pool.DruidDataSource">
        <property name="url" value="${jdbc.url}" />
        <property name="username" value="${jdbc.username}" />
        <property name="password" value="${jdbc.password}" />
        <property name="driverClassName" value="${jdbc.driver}" />
    </bean>

    <!--配置和mybatis整合-->
    <bean id="sqlSessionFactory" class="org.mybatis.spring.SqlSessionFactoryBean">
        <!--设置数据源-->
        <property name="dataSource" ref="dataSource"></property>
        <!--设置mybatis核心配置文件的位置-->
        <property name="configLocation" value="classpath:mybatis-config.xml"></property>
        <!--指定mybatis mapper文件的位置-->
        <property name="mapperLocations" value="classpath:com/szx/ssm/mapper/*.xml"></property>
    </bean>

    <!--配置一个可以执行批量操作的sqlsession-->
    <bean id="sqlSession" class="org.mybatis.spring.SqlSessionTemplate">
        <constructor-arg name="sqlSessionFactory" ref="sqlSessionFactory"/>
        <constructor-arg name="executorType" value="SIMPLE"/>
    </bean>

    <!--配置扫描器,将mybatis接口添加到ioc容器中-->
    <bean class="org.mybatis.spring.mapper.MapperScannerConfigurer">
        <!--扫描所有dao接口的实现,加入到ioc容器-->
        <property name="basePackage" value="com.szx.ssm.dao"></property>
    </bean>


    <!-- ===============事务控制的配置 ================-->
    <bean id="transactionManager" class="org.springframework.jdbc.datasource.DataSourceTransactionManager">
        <!--控制住数据源  -->
        <property name="dataSource" ref="dataSource"></property>
    </bean>
    <!--开启基于注解的事务,使用xml配置形式的事务(必要主要的都是使用配置式)  -->
    <aop:config>
        <!-- 切入点表达式 -->
        <aop:pointcut expression="execution(* com.szx.ssm.servlet..*(..))" id="txPoint"/>
        <!-- 配置事务增强 -->
        <aop:advisor advice-ref="txAdvice" pointcut-ref="txPoint"/>
    </aop:config>

    <!--配置事务增强,事务如何切入  -->
    <tx:advice id="txAdvice" transaction-manager="transactionManager">
        <tx:attributes>
            <!-- 所有方法都是事务方法 -->
            <tx:method name="*"/>
            <!--以get开始的所有方法只读  -->
            <tx:method name="get*" read-only="true"/>
        </tx:attributes>
    </tx:advice>

</beans>
jdbc.url=jdbc:mysql://127.0.0.1:3306/ssm
jdbc.username=root
jdbc.password=abc123
jdbc.driver=com.mysql.jdbc.Driver
<?xml version="1.0" encoding="UTF-8" ?>
<!DOCTYPE configuration
        PUBLIC "-//mybatis.org//DTD Config 3.0//EN"
        "http://mybatis.org/dtd/mybatis-3-config.dtd">
<configuration>
    <settings>
        <!--驼峰式命名-->
        <setting name="mapUnderscoreToCamelCase" value="true"/>
        <!--开启分布式查询延迟加载-->
        <setting name="lazyLoadingEnabled" value="true"/>
    </settings>

    <!--设置类型别名-->
    <typeAliases>
        <package name="com.szx.ssm.bean"/>
    </typeAliases>

    <plugins>
        <!--设置分页插件-->
        <plugin interceptor="com.github.pagehelper.PageInterceptor"></plugin>
    </plugins>

</configuration>
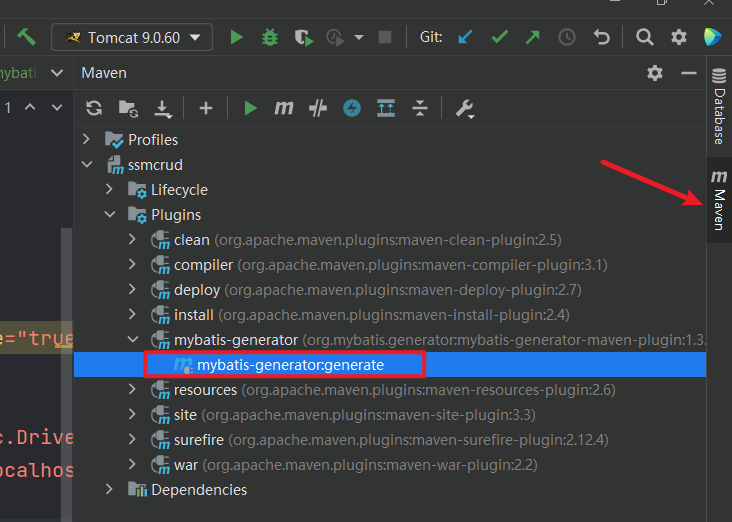
设置逆向工程的配置文件
<?xml version="1.0" encoding="UTF-8"?>
<!DOCTYPE generatorConfiguration
        PUBLIC "-//mybatis.org//DTD MyBatis Generator Configuration 1.0//EN"
        "http://mybatis.org/dtd/mybatis-generator-config_1_0.dtd">
<generatorConfiguration>
    <!--
    targetRuntime: 执行生成的逆向工程的版本
    MyBatis3Simple: 生成基本的CRUD(清新简洁版)
    MyBatis3: 生成带条件的CRUD(奢华尊享版)
    -->
    <context id="DB2Tables" targetRuntime="MyBatis3">
        <!--设置生成的代码不带注释-->
        <commentGenerator>
            <property name="suppressAllComments" value="true"></property>
        </commentGenerator>
        <!-- 数据库的连接信息 -->
        <jdbcConnection driverClass="com.mysql.cj.jdbc.Driver"
                        connectionURL="jdbc:mysql://localhost:3306/ssm"
                        userId="root"
                        password="abc123">
        </jdbcConnection>
        <!-- javaBean的生成策略-->
        <javaModelGenerator targetPackage="com.szx.ssm.bean" targetProject=".\src\main\java">
            <property name="enableSubPackages" value="true" />
            <property name="trimStrings" value="true" />
        </javaModelGenerator>
        <!-- SQL映射文件的生成策略 -->
        <sqlMapGenerator targetPackage="com.szx.ssm.mapper"
                         targetProject=".\src\main\resources">
            <property name="enableSubPackages" value="true" />
        </sqlMapGenerator>
        <!-- Mapper接口的生成策略 -->
        <javaClientGenerator type="XMLMAPPER"
                             targetPackage="com.szx.ssm.dao" targetProject=".\src\main\java">
            <property name="enableSubPackages" value="true" />
        </javaClientGenerator>
        <!-- 逆向分析的表 -->
        <!-- tableName设置为*号,可以对应所有表,此时不写domainObjectName -->
        <!-- domainObjectName属性指定生成出来的实体类的类名 -->
        <table tableName="tb_dept" domainObjectName="tbDept"/>
        <table tableName="tb_emp" domainObjectName="tbEmp"/>
    </context>
</generatorConfiguration>
日志文件
<?xml version="1.0" encoding="UTF-8" ?>
<!DOCTYPE log4j:configuration SYSTEM "log4j.dtd">
<log4j:configuration xmlns:log4j="http://jakarta.apache.org/log4j/">
    <appender name="STDOUT" class="org.apache.log4j.ConsoleAppender">
        <param name="Encoding" value="UTF-8" />
        <layout class="org.apache.log4j.PatternLayout">
            <param name="ConversionPattern" value="%-5p %d{MM-dd HH:mm:ss,SSS} %m (%F:%L) \n" />
        </layout>
    </appender>
    <logger name="java.sql">
        <level value="debug" />
    </logger>
    <logger name="org.apache.ibatis">
        <level value="info" />
    </logger>
    <root>
        <level value="debug" />
        <appender-ref ref="STDOUT" />
    </root>
</log4j:configuration>
上面的配置文件配置成功后双击这里自动生成代码
@RunWith(SpringJUnit4ClassRunner.class)
@ContextConfiguration(locations = {"classpath:ApplicationContext.xml"})
public class TestEmp {
    @Autowired
    private tbEmpMapper tbEmpMapper;
    @Autowired
    private tbDeptMapper tbDeptMapper;
    @Autowired
    private SqlSession sqlSession;


    @Test
    public void test(){
        PageHelper.startPage(1,5);
        List<tbEmp> tbEmps = tbEmpMapper.selectByExample(null);
        PageInfo<tbEmp> pageInfo = new PageInfo<>(tbEmps,5);
        tbEmps.forEach(emp-> System.out.println(emp));
        System.out.println(pageInfo);
    }
}
在 ApplicationContext.xml 配置文件中添加如下配置,配置的位置在 sqlSessionFactory 之后
<!--配置一个可以执行批量操作的sqlsession-->
<bean id="sqlSession" class="org.mybatis.spring.SqlSessionTemplate">
    <constructor-arg name="sqlSessionFactory" ref="sqlSessionFactory"/>
    <constructor-arg name="executorType" value="SIMPLE"/>
</bean>
添加测试方法
/**
 * 批量添加数据
 */
@Test
public void test6(){
    tbEmpMapper mapper = sqlSession.getMapper(tbEmpMapper.class);
    for (int i = 0; i < 200; i++) {
        String empName = UUID.randomUUID().toString().substring(0, 6);
        tbEmp emp = new tbEmp(null, empName, "1", empName + "@szx.com", 1);
        int i1 = mapper.insertSelective(emp);
        System.out.println(i1);
    }
}
package com.szx.ssm.test;

import com.github.pagehelper.PageInfo;
import org.junit.Before;
import org.junit.Test;
import org.junit.runner.RunWith;
import org.springframework.beans.factory.annotation.Autowired;
import org.springframework.mock.web.MockHttpServletRequest;
import org.springframework.test.context.ContextConfiguration;
import org.springframework.test.context.junit4.SpringJUnit4ClassRunner;
import org.springframework.test.context.web.WebAppConfiguration;
import org.springframework.test.web.servlet.MockMvc;
import org.springframework.test.web.servlet.MvcResult;
import org.springframework.test.web.servlet.request.MockMvcRequestBuilders;
import org.springframework.test.web.servlet.setup.MockMvcBuilders;
import org.springframework.web.context.WebApplicationContext;

import java.util.List;

/**
 * @author songzx
 * @create 2022-06-30 13:54
 */
@RunWith(SpringJUnit4ClassRunner.class)
@WebAppConfiguration
@ContextConfiguration(locations = {"classpath:ApplicationContext.xml","classpath:SpringMvc.xml"})
public class TestMvc {
    // 拿到SprigMVC的ioc
    @Autowired
    WebApplicationContext ioc;
    // 虚拟mvc,拿到测试方法返回的结果
    MockMvc mockMvc;

    @Before
    public void initMockMvc(){
        mockMvc = MockMvcBuilders.webAppContextSetup(ioc).build();
    }

    @Test
    public void test() throws Exception {
        // 发送get请求到 /,并且传递pageNumber参数,值为2
        MvcResult result = mockMvc.perform(MockMvcRequestBuilders.get("/")
                .param("pageNumber", "2"))
                .andReturn();
        // 获取request
        MockHttpServletRequest request = result.getRequest();
        // 读取保存的pageInfo
        PageInfo pageInfo = (PageInfo) request.getAttribute("pageInfo");
        // 从分页信息中获取员工列表
        List empList = pageInfo.getList();
        empList.forEach(emp-> System.out.println(emp));
        System.out.println(pageInfo);
    }

}
package com.szx.ssm.servlet;

import com.github.pagehelper.PageHelper;
import com.github.pagehelper.PageInfo;
import com.szx.ssm.bean.tbDept;
import com.szx.ssm.bean.tbEmp;
import com.szx.ssm.dao.tbDeptMapper;
import com.szx.ssm.dao.tbEmpMapper;
import org.springframework.beans.factory.annotation.Autowired;
import org.springframework.stereotype.Service;

import java.util.List;

/**
 * @author songzhengxiang
 * @create 2022-06-29 23:28
 */
@Service
public class tbEmpServlet {
    @Autowired
    tbEmpMapper tbEmpMapper;
    @Autowired
    tbDeptMapper tbDeptMapper;

    public PageInfo getEmpList(Integer pageNumber){
        PageHelper.startPage(pageNumber,10);
        // 获取所有员工
        List<tbEmp> empList = tbEmpMapper.selectByExample(null);
        // 根据员工获取部门信息
        for (tbEmp tbEmp : empList) {
            tbDept dept = tbDeptMapper.selectByPrimaryKey(tbEmp.getdId());
            tbEmp.setTbDept(dept);
        }
        // 获取分页信息
        PageInfo<tbEmp> pageInfo = new PageInfo<>(empList,5);
        // 返回分页信息
        return pageInfo;
    }
}
package com.szx.ssm.controller;

import com.github.pagehelper.PageHelper;
import com.github.pagehelper.PageInfo;
import com.szx.ssm.bean.tbEmp;
import com.szx.ssm.servlet.tbEmpServlet;
import org.springframework.beans.factory.annotation.Autowired;
import org.springframework.stereotype.Controller;
import org.springframework.ui.Model;
import org.springframework.web.bind.annotation.GetMapping;
import org.springframework.web.bind.annotation.RequestParam;

import java.util.List;

/**
 * @author songzx
 * @create 2022-06-28 15:16
 */
@Controller
public class IndexController {
    @Autowired
    tbEmpServlet tbEmpServlet;

    @GetMapping("/")
    public String index(@RequestParam(value = "pageNumber",defaultValue = "1") Integer pageNumber,Model model){
        PageInfo pageInfo = tbEmpServlet.getEmpList(pageNumber);
        model.addAttribute("pageInfo",pageInfo);
        return "index";
    }
}
用到的 thymeleaf 语法
th:class="${pageInfo.pageNum eq 1} ? 'disabled' : ''" eq 相当于 ==th:if="${pageInfo.pageNum ne 1}" ne 相当于 !=<!DOCTYPE html>
<html lang="en" xmlns:th="http://www.thymeleaf.org">
<head>
<meta charset="UTF-8">
<title>Title</title>
<link rel="stylesheet" href="https://stackpath.bootstrapcdn.com/bootstrap/3.4.1/css/bootstrap.min.css">
</head>
<body>
<div class="row" style="margin-top: 30px">
<div class="col-md-8 col-md-offset-2">
<h3>员工管理系统</h3>
<table class="table table-bordered table-striped">
<tr>
<th>序号</th>
<th>姓名</th>
<th>性别</th>
<th>邮箱</th>
<th>所在部门</th>
<th>操作</th>
</tr>
<tr th:each="item : ${pageInfo.list}">
<td th:text="${item.empId}">123</td>
<td th:text="${item.empName}">123</td>
<td th:text="${item.gender}">123</td>
<td th:text="${item.email}">123</td>
<td th:text="${item.tbDept.deptName}">123</td>
<td>
<button type="button" class="btn btn-warning">编辑</button>
<button type="button" class="btn btn-danger">删除</button>
</td>
</tr>
</table>
<!--分页组件-->
<nav aria-label="Page navigation"
style="margin-top: -27px; float: right;">
<ul class="pagination">
<li th:class="${pageInfo.pageNum eq 1} ? 'disabled' : ''">
<a th:href="@{/?pageNumber=1}">首页</a>
</li>
<!--上一页,不等于第一页的时候展示-->
<li th:if="${pageInfo.pageNum ne 1}">
<a th:href="@{/(pageNumber=${pageInfo.prePage})}" aria-label="Previous">
<span aria-hidden="true">«</span>
</a>
</li>
<!--循环的每一页-->
<li th:each="page : ${pageInfo.navigatepageNums}"
th:class="${page eq pageInfo.pageNum} ? 'active' : ''">
<a th:href="@{/(pageNumber=${page})}" th:text="${page}"></a>
</li>
<!--下一页,有下一页时展示-->
<li th:if="${pageInfo.hasNextPage}">
<a th:href="@{/(pageNumber=${pageInfo.nextPage})}" aria-label="Next">
<span aria-hidden="true">»</span>
</a>
</li>
<!--尾页-->
<li th:class="${pageInfo.pageNum eq pageInfo.pages} ? 'disabled' : ''">
<a th:href="@{/(pageNumber=${pageInfo.pages})}">尾页</a>
</li>
</ul>
</nav>
</div>
</div>
<!-- jQuery (Bootstrap 的所有 JavaScript 插件都依赖 jQuery,所以必须放在前边) -->
<script src="https://code.jquery.com/jquery-3.6.0.min.js"></script>
<!-- 加载 Bootstrap 的所有 JavaScript 插件。你也可以根据需要只加载单个插件。 -->
<script src="https://stackpath.bootstrapcdn.com/bootstrap/3.4.1/js/bootstrap.min.js"></script>
</body>
</html>
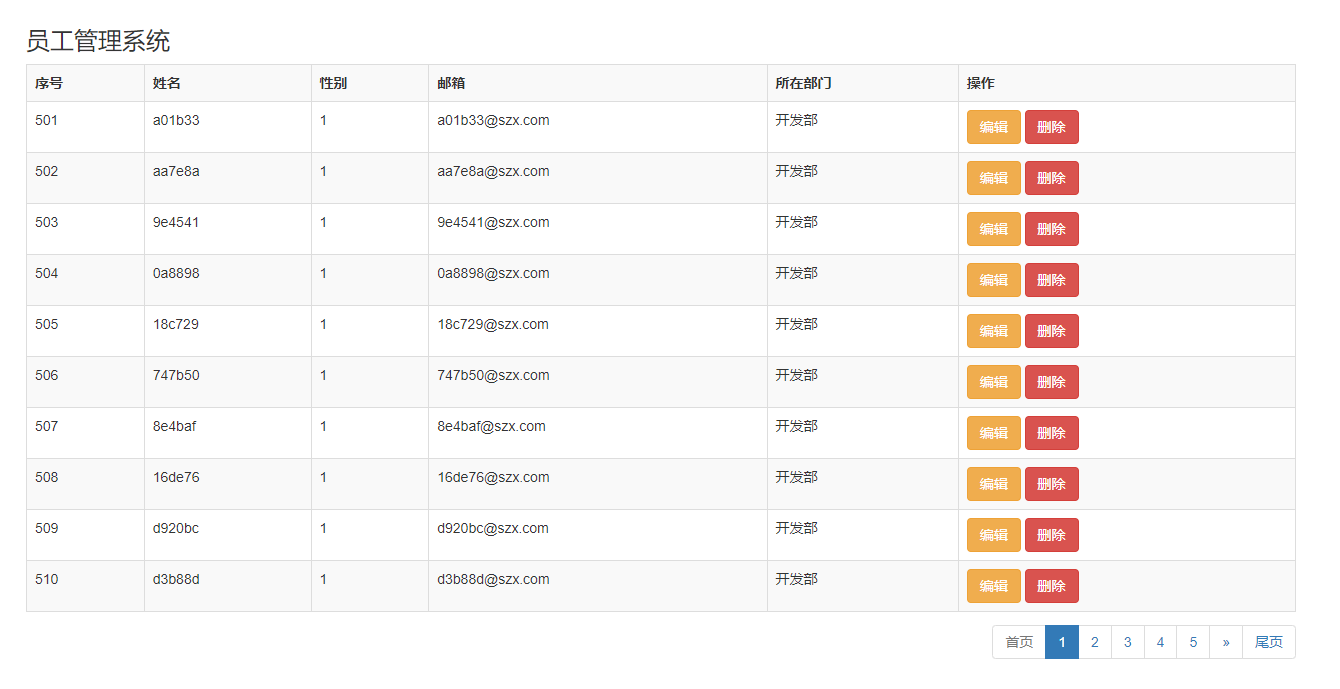
效果展示
定义通用的msg对象
package com.szx.ssm.bean;

import java.util.HashMap;
import java.util.Map;

/**
 * @author songzx
 * @create 2022-07-02 16:43
 */
public class Msg {
    int code; // 接口响应状态码,500 异常,200 OK
    String message; // 接口返回的信息
    HashMap<String,Object> data = new HashMap<>(); // 接口实际返回的内容

    /**
     * 接口成功返回方法
     * @author Songzx
     * @date 2022/7/2
     */
    public static Msg success(){
        Msg msg = new Msg();
        msg.setCode(200);
        msg.setMessage("成功");
        return msg;
    }

    /**
     * 接口失败返回方法
     * @author Songzx
     * @date 2022/7/2
     */
    public static Msg error(){
        Msg msg = new Msg();
        msg.setCode(500);
        msg.setMessage("失败");
        return msg;
    }

    /**
     * 可以链式调用的add方法
     * @author Songzx
     * @date 2022/7/2
     */
    public Msg add(String key,Object data){
        this.getData().put(key,data);
        return this;
    }

    public int getCode() {
        return code;
    }

    public void setCode(int code) {
        this.code = code;
    }

    public String getMessage() {
        return message;
    }

    public void setMessage(String message) {
        this.message = message;
    }

    public HashMap<String, Object> getData() {
        return data;
    }

    public void setData(HashMap<String, Object> data) {
        this.data = data;
    }

    public Msg(int code, String message, HashMap<String, Object> data) {
        this.code = code;
        this.message = message;
        this.data = data;
    }

    public Msg() {
    }
}
添加返回json的依赖包
<!--返回JSON数据-->
<dependency>
    <groupId>com.fasterxml.jackson.core</groupId>
    <artifactId>jackson-databind</artifactId>
    <version>2.12.1</version>
</dependency>
在 SpringMVC.xml 中添加注解驱动
<mvc:annotation-driven/>
重写获取员工列表的接口
// 返回json格式的数据
@GetMapping("/")
@ResponseBody
public Msg getEmpList(@RequestParam(value = "pageNum",defaultValue = "1") Integer pageNum){
    PageInfo empList = tbEmpServlet.getEmpList(pageNum);
    Msg msg = Msg.success().add("empList", empList);
    return msg;
}
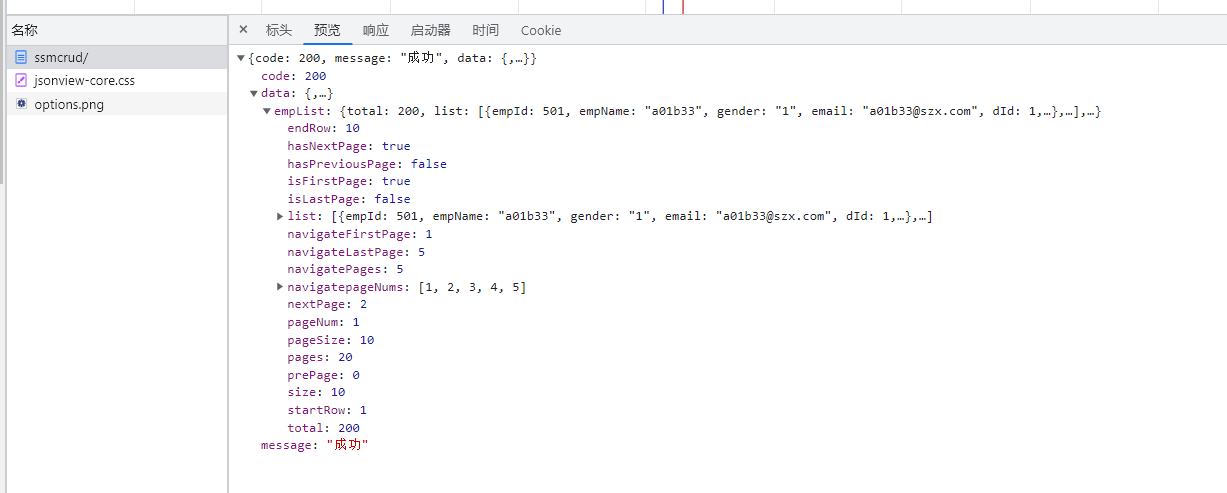
再次发起请求查看返回
<!DOCTYPE html>
<html lang="en">
<head>
<meta charset="UTF-8">
<title>Title</title>
<link rel="stylesheet" href="https://stackpath.bootstrapcdn.com/bootstrap/3.4.1/css/bootstrap.min.css">
</head>
<body>
<div class="row" style="margin-top: 30px" id="app">
<div class="col-md-8 col-md-offset-2">
<h3>员工管理系统</h3>
<div>
<div class="form-inline">
<div class="form-group">
<div class="input-group">
<input type="text" class="form-control" v-model="empname"
placeholder="请输入员工姓名">
</div>
</div>
<button class="btn btn-primary" @click="pageFun(1)">查询</button>
</div>
</div>
<table class="table table-bordered table-striped">
<tr>
<th>序号</th>
<th>姓名</th>
<th>性别</th>
<th>邮箱</th>
<th>所在部门</th>
<th>操作</th>
</tr>
<tr v-for="(item,index) in empList" :key="index">
<td>{{index + 1}}</td>
<td>{{item.empName}}</td>
<td>{{item.gender == '1' ? '男' : '女'}}</td>
<td>{{item.email}}</td>
<td>{{item.tbDept ? item.tbDept.deptName : ''}}</td>
<td>
<button type="button" class="btn btn-warning" @click="showEdit(item)"
data-toggle="modal" data-target="#myModal">
编辑
</button>
<button type="button" class="btn btn-danger"
@click="deleteEmp(item.empId)">
删除
</button>
</td>
</tr>
</table>
<!--底部页码信息和分页-->
<div class="row">
<div class="col-md-6">
当前第{{pageNum}}页,共{{pageNums}}页,一共有{{total}}条数据
</div>
<div class="col-md-6">
<!--分页组件-->
<nav aria-label="Page navigation"
style="margin-top: -27px; float: right;">
<ul class="pagination">
<li :class="{disabled:pageNum == 1}" @click="pageFun(1)">
<a>首页</a>
</li>
<!--上一页,不等于第一页的时候展示-->
<li v-show="hasPreviousPage" @click="pageFun(pageNum-=1)">
<a aria-label="Previous">
<span aria-hidden="true">«</span>
</a>
</li>
<!--循环的每一页-->
<li v-for="page in pageList" :key="page" @click="pageFun(page)"
:class="{active:pageNum == page}">
<a>{{page}}</a>
</li>
<!--下一页,有下一页时展示-->
<li v-show="hasNextPage" @click="pageFun(pageNum+=1)">
<a aria-label="Next">
<span aria-hidden="true">»</span>
</a>
</li>
<!--尾页-->
<li @click="pageFun(pageNums)" :class="{disabled:pageNum == pageNums}">
<a>尾页</a>
</li>
</ul>
</nav>
</div>
</div>
</div>
</div>
<!-- jQuery (Bootstrap 的所有 JavaScript 插件都依赖 jQuery,所以必须放在前边) -->
<script src="https://code.jquery.com/jquery-3.6.0.min.js"></script>
<!-- 添加vue.js -->
<script src="https://cdn.jsdelivr.net/npm/vue@2.6.14"></script>
<!-- 加载 Bootstrap 的所有 JavaScript 插件。你也可以根据需要只加载单个插件。 -->
<script src="https://stackpath.bootstrapcdn.com/bootstrap/3.4.1/js/bootstrap.min.js"></script>
<!-- 添加axios请求 -->
<script src="https://unpkg.com/axios/dist/axios.min.js"></script>
<!--js逻辑-->
<script>
const http = axios.create({
baseURL: '/ssmcrud', // tomcat 启动时的默认地址后缀
});
// 添加响应拦截器
http.interceptors.response.use(function (response) {
// 对响应数据做点什么
return response.data;
}, function (error) {
// 对响应错误做点什么
return Promise.reject(error);
});
new Vue({
el: '#app',
data: {
empList: [],
pageList: [],
total:0, // 数据总条数
pageNums:0, // 总分页数
hasNextPage:false, // 是否有下一页
hasPreviousPage:false, // 是否有上一页
pageNum:1, // 默认请求第几页
empname:"", // 查询员工姓名
rowEmp:{}, // 表单信息
deptList:[] // 所有部门
},
mounted: function () {
this.getEmpList()
},
methods: {
// 分页方法
pageFun(page){
this.pageNum = page
this.getEmpList()
},
// 查询数据方法
getEmpList: function () {
http.get(`/getEmpList/${this.pageNum}/${this.empname}`).then(res=>{
console.log(res)
this.empList = res.data.empList.list
this.pageList = res.data.empList.navigatepageNums
this.total = res.data.empList.total
this.pageNums = res.data.empList.pages
this.hasNextPage = res.data.empList.hasNextPage
this.hasPreviousPage = res.data.empList.hasPreviousPage
})
},
}
})
</script>
</body>
</html>
在 tbEmpServlet 中添加模糊查询方法
/**
 * 根据姓名模糊查询
 * @author Songzx
 * @date 2022/7/2
 */
public PageInfo getEmpListByName(Integer pageNum,String name){
    PageHelper.startPage(pageNum,10);
    tbEmpExample example = new tbEmpExample();
    example.createCriteria().andEmpNameLike("%"+name+"%");
    List<tbEmp> tbEmps = tbEmpMapper.selectByExample(example);
    for (tbEmp tbEmp : tbEmps) {
        tbDept dept = tbDeptMapper.selectByPrimaryKey(tbEmp.getdId());
        tbEmp.setTbDept(dept);
    }
    PageInfo<tbEmp> pageInfo = new PageInfo<>(tbEmps,5);
    return pageInfo;
}
在 IndexController 中调用
/**
 * 模糊查询
 * @author Songzx
 * @date 2022/7/3
 */
@GetMapping("/getEmpList/{pageNum}/{empName}")
@ResponseBody
public Msg getEmpListByName(@PathVariable("pageNum") Integer pageNum,
                            @PathVariable("empName") String name ){
    PageInfo empListByName = tbEmpServlet.getEmpListByName(pageNum, name);
    Msg msg = Msg.success().add("empList", empListByName);
    return msg;
}
前端发起请求
// 查询数据方法
getEmpList: function () {
    http.get(`/getEmpList/${this.pageNum}/${this.empname}`).then(res=>{
        console.log(res)
        this.empList = res.data.empList.list
        this.pageList = res.data.empList.navigatepageNums
        this.total = res.data.empList.total
        this.pageNums = res.data.empList.pages
        this.hasNextPage = res.data.empList.hasNextPage
        this.hasPreviousPage = res.data.empList.hasPreviousPage
    })
},
在 tbEmpServlet 中添加根据id删除
/**
 * 根据id删除
 * @author Songzx
 * @date 2022/7/3
 */
public int deleteEmpById(Integer id){
    int i = tbEmpMapper.deleteByPrimaryKey(id);
    return i;
}
在 IndexController 中调用 deleteEmpById 方法
/**
 * 根据id删除
 * @author Songzx
 * @date 2022/7/3
 */
@DeleteMapping("/deleteEmp/{id}")
@ResponseBody
public Msg deleteEmpByid(@PathVariable("id") Integer id){
    tbEmpServlet.deleteEmpById(id);
    Msg msg = Msg.success();
    return msg;
}
前端发起请求
<td>
    <button type="button" class="btn btn-warning"
            data-toggle="modal" data-target="#myModal">
        编辑
    </button>
    <button type="button" class="btn btn-danger"
            @click="deleteEmp(item.empId)">
        删除
    </button>
</td>
// 删除
deleteEmp(id){
    http.delete(`/deleteEmp/${id}`).then(res=>{
        this.pageNum = 1
        this.getEmpList()
    })
},
首先添加查询所有部门的方法
在 tbDepServlet 添加获取部门
package com.szx.ssm.servlet;

import com.szx.ssm.bean.tbDept;
import com.szx.ssm.dao.tbDeptMapper;
import org.springframework.beans.factory.annotation.Autowired;
import org.springframework.stereotype.Service;

import java.util.List;

/**
 * @author songzx
 * @create 2022-07-03 9:03
 */
@Service
public class tbDepServlet {
    @Autowired
    tbDeptMapper deptMapper;

    /**
     * 查询所有部门
     * @author Songzx
     * @date 2022/7/3
     */
    public List<tbDept> getDeptList(){
        List<tbDept> tbDepts = deptMapper.selectByExample(null);
        return tbDepts;
    }
}
在 DeptController 调用 getDeptList 方法
package com.szx.ssm.controller;

import com.szx.ssm.bean.Msg;
import com.szx.ssm.bean.tbDept;
import com.szx.ssm.servlet.tbDepServlet;
import org.springframework.beans.factory.annotation.Autowired;
import org.springframework.stereotype.Controller;
import org.springframework.web.bind.annotation.GetMapping;
import org.springframework.web.bind.annotation.ResponseBody;

import java.util.List;

/**
 * @author songzx
 * @create 2022-07-03 9:05
 */
@Controller
public class DeptController {
    @Autowired
    tbDepServlet depServlet;

    /**
     * 获取所有部门
     * @author Songzx
     * @date 2022/7/3
     */
    @GetMapping("/getDeptList")
    @ResponseBody
    public Msg getDeptList(){
        List<tbDept> deptList = depServlet.getDeptList();
        Msg msg = Msg.success().add("deptList", deptList);
        return msg;
    }
}
在 tbEmpServlet 中添加编辑和新增方法
/**
 * 新增员工
 * @author Songzx
 * @date 2022/7/3
 */
public int addEmpInfo(tbEmp tbEmp){
    int insert = tbEmpMapper.insertSelective(tbEmp);
    return insert;
}

/**
 * 编辑员工
 * @author Songzx
 * @date 2022/7/3
 */
public int updateEmp(tbEmp tbEmp){
    int i = tbEmpMapper.updateByPrimaryKeySelective(tbEmp);
    return i;
}
在 IndexController 调用
/**
 * 增加或者删除
 * @author Songzx
 * @date 2022/7/3
 */
@PostMapping("/andOrUpdateEmp")
@ResponseBody
public Msg addOrUpdateEmp(@RequestBody tbEmp emp){
    System.out.println(emp);
    if(emp.getEmpId() == null){
        tbEmpServlet.addEmpInfo(emp);
    }else {
        tbEmpServlet.updateEmp(emp);
    }
    return Msg.success();
}
前端发送请求
<!DOCTYPE html>
<html lang="en">
<head>
<meta charset="UTF-8">
<title>Title</title>
<link rel="stylesheet" href="https://stackpath.bootstrapcdn.com/bootstrap/3.4.1/css/bootstrap.min.css">
</head>
<body>
<div class="row" style="margin-top: 30px" id="app">
<div class="col-md-8 col-md-offset-2">
<h3>员工管理系统</h3>
<button type="button" class="btn btn-primary" @click="showEdit()"
data-toggle="modal" data-target="#myModal">新增</button>
<div>
<div class="form-inline">
<div class="form-group">
<div class="input-group">
<input type="text" class="form-control" v-model="empname"
placeholder="请输入员工姓名">
</div>
</div>
<button class="btn btn-primary" @click="pageFun(1)">查询</button>
</div>
</div>
<table class="table table-bordered table-striped">
<tr>
<th>序号</th>
<th>姓名</th>
<th>性别</th>
<th>邮箱</th>
<th>所在部门</th>
<th>操作</th>
</tr>
<tr v-for="(item,index) in empList" :key="index">
<td>{{index + 1}}</td>
<td>{{item.empName}}</td>
<td>{{item.gender == '1' ? '男' : '女'}}</td>
<td>{{item.email}}</td>
<td>{{item.tbDept ? item.tbDept.deptName : ''}}</td>
<td>
<button type="button" class="btn btn-warning" @click="showEdit(item)"
data-toggle="modal" data-target="#myModal">
编辑
</button>
<button type="button" class="btn btn-danger"
@click="deleteEmp(item.empId)">
删除
</button>
</td>
</tr>
</table>
<!--底部页码信息和分页-->
<div class="row">
<div class="col-md-6">
当前第{{pageNum}}页,共{{pageNums}}页,一共有{{total}}条数据
</div>
<div class="col-md-6">
<!--分页组件-->
<nav aria-label="Page navigation"
style="margin-top: -27px; float: right;">
<ul class="pagination">
<li :class="{disabled:pageNum == 1}" @click="pageFun(1)">
<a>首页</a>
</li>
<!--上一页,不等于第一页的时候展示-->
<li v-show="hasPreviousPage" @click="pageFun(pageNum-=1)">
<a aria-label="Previous">
<span aria-hidden="true">«</span>
</a>
</li>
<!--循环的每一页-->
<li v-for="page in pageList" :key="page" @click="pageFun(page)"
:class="{active:pageNum == page}">
<a>{{page}}</a>
</li>
<!--下一页,有下一页时展示-->
<li v-show="hasNextPage" @click="pageFun(pageNum+=1)">
<a aria-label="Next">
<span aria-hidden="true">»</span>
</a>
</li>
<!--尾页-->
<li @click="pageFun(pageNums)" :class="{disabled:pageNum == pageNums}">
<a>尾页</a>
</li>
</ul>
</nav>
</div>
</div>
</div>
<!--弹出框-->
<div class="modal fade" tabindex="-1" role="dialog" aria-labelledby="myLargeModalLabel" id="myModal">
<div class="modal-dialog modal-lg modal-content" role="document">
<div class="modal-header">
<button type="button" class="close" data-dismiss="modal" aria-label="Close"><span aria-hidden="true">×</span></button>
<h4 class="modal-title">编辑</h4>
</div>
<div class="modal-body" style="padding: 20px">
<div>
<div class="form-group">
<label>姓名</label>
<input v-model="rowEmp.empName" class="form-control" placeholder="请输入姓名">
</div>
<div class="form-group">
<label>性别</label>
<div>
<label class="radio-inline">
<input v-model="rowEmp.gender" type="radio" name="inlineRadioOptions" value="1"> 男
</label>
<label class="radio-inline">
<input v-model="rowEmp.gender" type="radio" name="inlineRadioOptions" value="2"> 女
</label>
</div>
</div>
<div class="form-group">
<label>邮箱</label>
<input v-model="rowEmp.email" class="form-control" type="text" placeholder="请输入邮箱">
</div>
<div class="form-group">
<label>部门</label>
<select class="form-control" v-model="rowEmp.dId">
<option v-for="item in deptList" :key="item.deptId"
:value="item.deptId">
{{item.deptName}}
</option>
</select>
</div>
</div>
</div>
<div class="modal-footer">
<button type="button" class="btn btn-default" data-dismiss="modal" id="closeBtn">关闭</button>
<button type="button" class="btn btn-primary" @click="saveEmpForm">保存</button>
</div>
</div>
</div>
</div>
<!-- jQuery (Bootstrap 的所有 JavaScript 插件都依赖 jQuery,所以必须放在前边) -->
<script src="https://code.jquery.com/jquery-3.6.0.min.js"></script>
<!-- 添加vue.js -->
<script src="https://cdn.jsdelivr.net/npm/vue@2.6.14"></script>
<!-- 加载 Bootstrap 的所有 JavaScript 插件。你也可以根据需要只加载单个插件。 -->
<script src="https://stackpath.bootstrapcdn.com/bootstrap/3.4.1/js/bootstrap.min.js"></script>
<!-- 添加axios请求 -->
<script src="https://unpkg.com/axios/dist/axios.min.js"></script>
<!--js逻辑-->
<script>
const http = axios.create({
baseURL: '/ssmcrud',
});
// 添加响应拦截器
http.interceptors.response.use(function (response) {
// 对响应数据做点什么
return response.data;
}, function (error) {
// 对响应错误做点什么
return Promise.reject(error);
});
new Vue({
el: '#app',
data: {
empList: [],
pageList: [],
total:0, // 数据总条数
pageNums:0, // 总分页数
hasNextPage:false, // 是否有下一页
hasPreviousPage:false, // 是否有上一页
pageNum:1, // 默认请求第几页
empname:"", // 查询员工姓名
rowEmp:{}, // 表单信息
deptList:[] // 所有部门
},
mounted: function () {
this.getEmpList()
this.getDeptList()
},
methods: {
// 查询所有的部门
getDeptList(){
http.get("/getDeptList").then(res=>{
this.deptList = res.data.deptList
})
},
// 分页方法
pageFun(page){
this.pageNum = page
this.getEmpList()
},
// 查询数据方法
getEmpList: function () {
http.get(`/getEmpList/${this.pageNum}/${this.empname}`).then(res=>{
console.log(res)
this.empList = res.data.empList.list
this.pageList = res.data.empList.navigatepageNums
this.total = res.data.empList.total
this.pageNums = res.data.empList.pages
this.hasNextPage = res.data.empList.hasNextPage
this.hasPreviousPage = res.data.empList.hasPreviousPage
})
},
// 删除
deleteEmp(id){
http.delete(`/deleteEmp/${id}`).then(res=>{
this.pageNum = 1
this.getEmpList()
})
},
// 显示弹框
showEdit(row){
this.rowEmp = row || {}
},
// 保存表单信息
saveEmpForm(){
http.post("/andOrUpdateEmp",this.rowEmp).then(res=>{
// 请求成功后关闭弹框
$("#closeBtn").click()
// 刷新数据
this.pageNum = 1
this.getEmpList()
})
}
}
})
</script>
</body>
</html>
在 tbEmpServlet 添加批量删除的方法
/**
 * 批量删除
 * @author Songzx
 * @date 2022/7/3
 */
public void deletesEmp(List<Integer> ids){
    for (Integer id : ids) {
        tbEmpMapper.deleteByPrimaryKey(id);
    }
}
在 IndexController 控制器中调用
/**
 * 批量删除
 * @author Songzx
 * @date 2022/7/3
 */
@PostMapping("/deleteEmpByIds")
@ResponseBody
public Msg deleteEmpBuIds(@RequestBody Map<String,List<Integer>> map){
    List<Integer> ids = map.get("ids");
    tbEmpServlet.deletesEmp(ids);
    return Msg.success();
}
前端代码
<button type="button" class="btn btn-danger" @click="deleteAll">删除</button>
<th>
    <input type="checkbox" v-model="checkAll" @input="changeCheckAll">
</th>
<tr v-for="(item,index) in empList" :key="index">
    <td><input type="checkbox" v-model="item.checkOne"
               @input="changeCheckOne(item)"></td>
    <td>{{index + 1}}</td>
    <td>{{item.empName}}</td>
    <td>{{item.gender == '1' ? '男' : '女'}}</td>
    <td>{{item.email}}</td>
    <td>{{item.tbDept ? item.tbDept.deptName : ''}}</td>
    <td>
        <button type="button" class="btn btn-warning" @click="showEdit(item)"
                data-toggle="modal" data-target="#myModal">
            编辑
        </button>
        <button type="button" class="btn btn-danger"
                @click="deleteEmp(item.empId)">
            删除
        </button>
    </td>
</tr>
// 切换全选
changeCheckAll(statu){
    let checked = statu.target.checked
    this.empList.forEach(item=>{
        item.checkOne = checked
    })
    this.selectRow = this.empList.filter(item=>item.checkOne)
},
changeCheckOne(){
    if(this.empList.every(item=>item.checkOne)){
        this.checkAll = true
    }else{
        this.checkAll = false
    }
    this.selectRow = this.empList.filter(item=>item.checkOne)
},
deleteAll(){
    http.post("/deleteEmpByIds",{
        ids:this.selectRow.map(item=>item.empId)
    }).then(res=>{
        this.pageNum = 1
        this.getEmpList()
    })
}

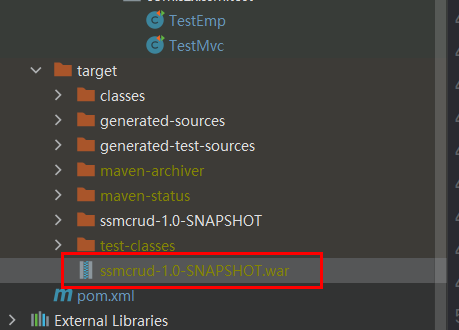
然后会在 target 文件夹中生成一个 war 包
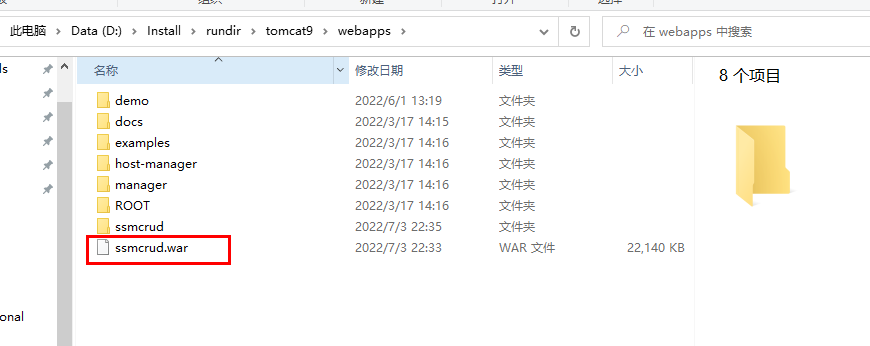
重命名放在 tomcat 服务器中可以在本地运行项目
此处可能存在不合适展示的内容,页面不予展示。您可通过相关编辑功能自查并修改。
如您确认内容无涉及 不当用语 / 纯广告导流 / 暴力 / 低俗色情 / 侵权 / 盗版 / 虚假 / 无价值内容或违法国家有关法律法规的内容,可点击提交进行申诉,我们将尽快为您处理。


