

代码拉取完成,页面将自动刷新
同步操作将从 Chave-Z/le-markdown-editor 强制同步,此操作会覆盖自 Fork 仓库以来所做的任何修改,且无法恢复!!!
确定后同步将在后台操作,完成时将刷新页面,请耐心等待。
本地图片上传因为没有各种云存储账号的的原因,所以暂时只支持拖拽或者粘贴剪切板图片(windows粘贴本地图片需要先预览,截图则不需要)上传到Github仓库和自己的服务器,虽然都在说Github访问有点慢,但是我这几天测试了一下,虽然上传速度不快,但是访问时感觉效果还行,但是毕竟免费的,对于没有图床和服务器的用户还是很不错的,介意的话可以传到自己的服务器或者利用拓展方法上传到自己的云存储上。
注意:mac系统下粘贴本地图片会在编辑区留下原文件名,windows上没有问题,但是不影响使用,虽然能直接通过编辑器操作去除那一段文本,但是总感觉很别扭,所以就没处理,功能待优化,介意的话,请使用拖拽上传的功能。
| 参数名 | 默认值 | 描述 |
|---|---|---|
| custom | false | 当这个参数的值为true时,组件使用用户自定义的上传方式,否则使用组件自带的方法 |
| type | '' | 此参数表示组件内置的图片上传的方式,暂时支持github和server两种方式 |
| url | '' | 接口地址,当type为server时需要配置 |
| token | '' |
github的token,当type为github时需要配置 |
| repo | '' |
github图床所在仓库名,当type为github时需要配置 |
| username | '' |
github用户名,当type为github时需要配置 |
| fileType | '' | 使用自定义上传时返回的文件类型,可选值为file和base64,不填则为file类型 |
| fileNameType | uuid | 图片上传后的文件名,默认为uuid,为空时则按照原文件名处理 |
| imagePrefix | https://cdn.jsdelivr.net/gh/ | 图片地址前缀,为github时推荐使用CDN:https://cdn.jsdelivr.net/gh/
|
imageUploader: {
    // 是否使用自定义的图片上传
    custom: false,
    type: '',
    fileNameType: 'uuid',
    url: '',
    token: '',
    username: '',
    repo: '',
    fileType:'',
    // 图片前缀地址
    imagePrefix: 'https://cdn.jsdelivr.net/gh/'
}
<template>
  <div id="app">
    <div id="editor-main">
      <le-editor :image-uploader="imageUploader" @save="save"></le-editor>
    </div>
  </div>
</template>

<script>
    export default {
        name: 'app',
        data() {
            return {
                imageUploader: {
                    custom: false,
                    fileType: 'file',
                    fileNameType: '',
                    imagePrefix: 'http://47.100.125.98', // 图片前缀地址
                    type: 'server',
                    url: 'http://47.100.125.98:82/upload' // 接口地址
                }
            }
        },
        methods: {
            save: function (val) {
                // 获取预览文本
                console.log(val)
            }
        }
    }
</script>

<style lang="scss">
  #app {
    width: 1200px;
    height: 500px;
    margin: 50px auto;
  }

  #editor-main {
    color: #2c3e50;
    width: 100%;
    height: 100%;
  }
</style>
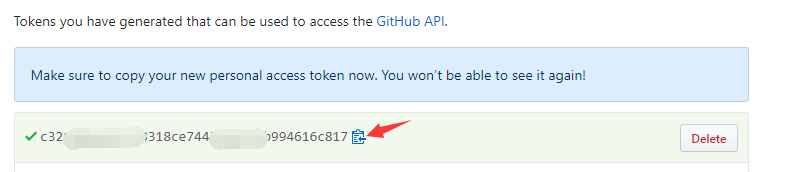
repo。然后翻到页面最底部,点击绿色按钮Generate token的按钮生成token。

接下来简单配置一下组件,就能愉快的使用了:
<template>
  <div id="app">
    <div id="editor-main">
      <le-editor :image-uploader="imageUploader" @save="save"></le-editor>
    </div>
  </div>
</template>

<script>
    export default {
        name: 'app',
        data() {
            return {
                imageUploader: {
                  custom: false,
                  type: 'github',
                  username: 'xxx', // github的用户名
                  repo: 'xxx', // 上面新建的仓库地址
                  token: 'xxxxxxx', // 自己的token
                  fileType: 'base64', // 必须为base64
                  fileNameType: 'uuid',
                  imagePrefix: 'https://cdn.jsdelivr.net/gh/', // 图片前缀地址
                }
            }
        },
        methods: {
            save: function (val) {
                // 获取预览文本
                console.log(val)
            }
        }
    }
</script>

<style lang="scss">
  #app {
    width: 1200px;
    height: 500px;
    margin: 50px auto;
  }

  #editor-main {
    color: #2c3e50;
    width: 100%;
    height: 100%;
  }
</style>
<template>
  <div id="app">
    <div id="editor-main">
      <le-editor :image-uploader="imageUploader" @uploadImg="uploadImg"></le-editor>
    </div>
  </div>
</template>

<script>
export default {
  name: 'app',
  data () {
    return {
        imageUploader:{
            custom: true,
            fileType:'file',
            fileNameType: 'uuid',
            imagePrefix: 'https://cdn.jsdelivr.net/gh/', // 图片前缀地址
        }
    }
  },
  methods:{
      uploadImg:function ($vm,file,fileName) {
        console.log($vm) // 组件对象
        console.log(file) // 文件 file或者是base64串,基于配置
        console.log(fileName) // 文件名 uuid或原文件名 基于配置
        // 添加图片
        // 两个参数 第一个是图片访问路径 第二个是文件名 按照如下类似的方法即可向编辑区插入上传好的图片了
        $vm.insertImg(`${$vm.config.imageUploader.imagePrefix}${fileName}`, fileName)
      }
  }
}
</script>

<style lang="scss">
#app {
    width: 1200px;
    height: 500px;
    margin: 50px auto;
  }

#editor-main {
	color: #2c3e50;
	width: 100%;
	height: 100%;
}
</style>
此处可能存在不合适展示的内容,页面不予展示。您可通过相关编辑功能自查并修改。
如您确认内容无涉及 不当用语 / 纯广告导流 / 暴力 / 低俗色情 / 侵权 / 盗版 / 虚假 / 无价值内容或违法国家有关法律法规的内容,可点击提交进行申诉,我们将尽快为您处理。


