

代码拉取完成,页面将自动刷新
master 分支是的 RN 依赖是 0.55.4,如果是 Taro 2.0+ (RN 依赖升级为 0.59.9),请使用 0.59.9 分支。
Taro 原生 React Native 壳子
参考:https://github.com/NervJS/taro-native-shell/issues/4
react-native run-android 的时候提示红字:找不到 index.android.bundle
保证在手机电脑在同一局域网,然后运行一下:adb reverse tcp:8081 tcp:8081,然后重新运行。
参考:https://github.com/NervJS/taro-native-shell/issues/6
参考:https://github.com/NervJS/taro/issues/3572
运行 taro build 命令,Taro 将会开始编译文件:
➜  taro-demo git:(master) ✗ taro build --type rn --watch
👽 Taro v1.2.20

开始编译项目 taro-demo
编译  JS        /Users/chengshuai/Taro/taro-demo/src/app.js
编译  SCSS      /Users/chengshuai/Taro/taro-demo/src/app.scss
拷贝  HTML      /Users/chengshuai/Taro/taro-demo/src/index.html
生成  生成文件  /Users/chengshuai/Taro/taro-demo/rn_temp/app_styles.js
编译  JS        /Users/chengshuai/Taro/taro-demo/src/pages/index/index.js
编译  SCSS      /Users/chengshuai/Taro/taro-demo/src/pages/index/index.scss
生成  index.js  /Users/chengshuai/Taro/taro-demo/rn_temp/index.js
生成  app.json  /Users/chengshuai/Taro/taro-demo/rn_temp/app.json
生成  package.json  /Users/chengshuai/Taro/taro-demo/rn_temp/package.json
编译  编译完成,花费2504 ms
生成  生成文件  /Users/chengshuai/Taro/taro-demo/rn_temp/pages/index/index_styles.js

初始化完毕,监听文件修改中...
如果编译没有报错,会自动打开一个终端,并在 8081 端口启动 Metro Bundler 负责打包 jsbundle:

这时,在浏览器输入 http://127.0.0.1:8081,可以看到如下页面:

输入 http://127.0.0.1:8081/rn_temp/index.bundle?platform=ios&dev=true 会触发对应终端平台的 js bundle 构建。

构建完成后,浏览器会显示构建后的 js 代码。
Note:进入下一步之前请确保 Metro Bundler Server 正常启动,即浏览器能正常访问访问 jsbundle。
如果上一步的编译和 Metro Bundler Server 启动没问题,接下来就可以启动应用了。
开发者可以自行整合 React Native (0.55.4) 到原生应用,同时为了方便大家开发和整合,Taro 将 React Native 工程中原生的部分剥离出来,单独放在一个工程里面 NervJS/taro-native-shell,你可以把它看成是 React Native iOS/Android 空应用的壳子。
首先将应用代码 clone 下来:
git clone git@github.com:NervJS/taro-native-shell.git
然后 cd taro-native-shell,使用 yarn 或者 npm install 安装依赖。
工程目录如下:
➜  taro-native-shell git:(master) ✗ tree -L 1
.
├── LICENSE
├── README.md
├── android // Android 工程目录
├── ios // iOS 工程目录
├── node_modules
├── package.json
└── yarn.lock
在 iOS 目录运行
$ pod install
如果没有安装 CocoaPods,可以参考官方文档:Getting Started
$ react-native run-ios
iOS 模拟器会自行启动,并访问 8081 端口获取 js bundle,这时 Metro Bundler 终端会打印以下内容:
BUNDLE [ios, dev] ./index.js ▓▓▓▓▓▓▓▓▓▓▓▓▓▓▓▓ 100.0% (1/1), done.
iOS 的启动比较简单,使用 Xcode 打开 ios 目录,然后点击 Run 按钮就行。

这里需要注意的是 jsBundle 的 moduleName,默认的 moduleName 为 "taroDemo",需要和 rn_temp/app.json 里面的 name 字段保持一致。该配置在 AppDelegate.m 文件中。
@implementation AppDelegate

- (BOOL)application:(UIApplication *)application didFinishLaunchingWithOptions:(NSDictionary *)launchOptions
{
  NSURL *jsCodeLocation;

  jsCodeLocation = [[RCTBundleURLProvider sharedSettings] jsBundleURLForBundleRoot:@"rn_temp/index" fallbackResource:nil];

  RCTRootView *rootView = [[RCTRootView alloc] initWithBundleURL:jsCodeLocation
                                                      moduleName:@"taroDemo"
                                               initialProperties:nil
                                                   launchOptions:launchOptions];
  rootView.backgroundColor = [[UIColor alloc] initWithRed:1.0f green:1.0f blue:1.0f alpha:1];

  self.window = [[UIWindow alloc] initWithFrame:[UIScreen mainScreen].bounds];
  UIViewController *rootViewController = [UIViewController new];
  rootViewController.view = rootView;
  self.window.rootViewController = rootViewController;
  [self.window makeKeyAndVisible];
  return YES;
}

@end
app.json 字段的配置默认取自于 package.json 的 name 字段,除非你在 rn -> appJson 里面有配置。
更多资料,可以查看 Xcode 文档:Building Your App
在 taro-native-shell/android 目录下,你就可以看到 React Native 的工程代码。
$ react-native run-android
Android 模拟器会自行启动,并访问 8081 端口获取 js bundle,这时 Metro Bundler 终端会打印一下内容:
BUNDLE [android, dev] ./index.js ▓▓▓▓▓▓▓▓▓▓▓▓▓▓▓▓ 100.0% (1/1), done.
按照以下步骤设置您的设备:
使用一根 USB 电缆将您的设备连接到您的开发机器。如果您是在 Windows 上开发,可能需要为您的设备 安装相应的 USB 驱动程序。
按照以下步骤操作,在 Developer options 中启用 USB debugging。 首先,您必须启用开发者选项:
按照以下步骤操作,在您的设备上运行应用:
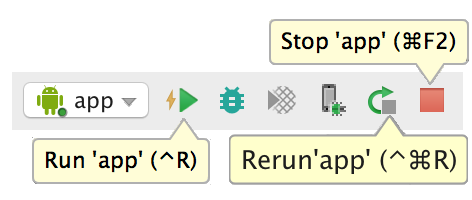

Android Studio 会在您连接的设备上安装并启动应用。
按照以下步骤操作,在模拟器上运行应用:

Android Studio 会在模拟器上安装并启动应用。
同样,Android 这边默认的 jsBundle moduleName 也是 “taroDemo”,位于 MainActivity.java 的文件里面:
package com.tarodemo;

import com.facebook.react.ReactActivity;

public class MainActivity extends ReactActivity {

    /**
     * Returns the name of the main component registered from JavaScript.
     * This is used to schedule rendering of the component.
     */
    @Override
    protected String getMainComponentName() {
        return "taroDemo";
    }
}
你可以根据实际情况自行修改。
此处可能存在不合适展示的内容,页面不予展示。您可通过相关编辑功能自查并修改。
如您确认内容无涉及 不当用语 / 纯广告导流 / 暴力 / 低俗色情 / 侵权 / 盗版 / 虚假 / 无价值内容或违法国家有关法律法规的内容,可点击提交进行申诉,我们将尽快为您处理。


