# vue3-vite-ts-cli
**Repository Path**: charleydeng/vue3-vite-ts-cli
## Basic Information
- **Project Name**: vue3-vite-ts-cli
- **Description**: typescript+vite+vue3生态链项目架构(脚手架),配置了全流程文档,手把手教你开发自己的项目架构。
- **Primary Language**: TypeScript
- **License**: Not specified
- **Default Branch**: master
- **Homepage**: None
- **GVP Project**: No
## Statistics
- **Stars**: 4
- **Forks**: 0
- **Created**: 2022-05-25
- **Last Updated**: 2025-01-07
## Categories & Tags
**Categories**: Uncategorized
**Tags**: vue3, vite, TypeScript
## README
# 项目介绍
## 简介
1. ==架构一个 Vite + typescript + vue3 生态链项目==。文档记录了作者搭建此项目架构的全过程,每个阶段的分支都留在了仓库中,可以一步一步跟着此文档的流程进入到相应的分支中查看对应代码,进而自己搭建出一个类似项目的开发环境。
2. 此项目架构可作为一个通用架构便于开发相同技术栈的项目。
3. 此项目可用于学习 Vite + typescript + vue3 生态链的相关技术
## 包含内容
- Vite + typescript + vue3 生态链 项目架构
- Vite 分开发环境和生产环境进行配置
- 新旧浏览器的兼容性处理
- 配置 eslint + stylelint + prettier 去统一代码风格
- 配置 `commitizen` + `commitlint` 去规范代码提交,提交代码时不要执行`git commit` ,而是执行封装好的命令`pnpm commit`
- 对 vue-router 、 pinia、 本地 mock、axios 拦截器、表单验证进行封装
- 支持自动注册组件和自动引入 api
- 集成 icon-park 库和 animate.css 以及 gsap
## 关于类型声明
组件和 apis 的类型声明写在自身文件内
store 里的类型声明单独创建一个 types 文件
## 版权声明
项目本身由作者一人开发完成,其中借鉴了许多网络和书籍的资料,如有侵犯您的权益,可联系作者删除相关内容。
# 初始化项目
## 使用 vite-cli 命令
### 法一:常规做法
```
# pnpm
pnpm create vite
# npm
npm init vite@latest
# yarn
yarn create vite
```
### 法二:快速初始化
```
# pnpm
pnpm create vite project-name -- --template vue-ts
# npm 6.x
npm init vite@latest project-name --template vue-ts
# npm 7+, 需要额外的双横线:
npm init vite@latest project-name -- --template vue-ts
# yarn
yarn create vite project-name --template vue-ts
```
## 环境配置
### 保证 node 的使用
```
pnpm i @types/node --save-dev
```
### 修改 `tsconfig.json`
```json
{
"compilerOptions": {
"typeRoots": [
// 要包含的类型声明文件路径列表
"node_modules/@types",
"src/types"
],
"target": "esnext",
"useDefineForClassFields": true,
"module": "esnext",
"moduleResolution": "node",
"strict": true,
"jsx": "preserve",
"sourceMap": true,
"resolveJsonModule": true,
"esModuleInterop": true,
"lib": ["esnext", "dom"],
"baseUrl": "./",
"paths": {
//模块名到基于 baseUrl的路径映射的列表(配置别名)
"@": ["src"],
"@/*": ["src/*"]
}
},
"include": ["src/**/*.ts", "src/**/*.d.ts", "src/**/*.tsx", "src/**/*.vue"]
}
```
### 修改 `vite.config.ts`
```typescript
import { defineConfig } from 'vite'
import vue from '@vitejs/plugin-vue'
import * as path from 'path'
// https://vitejs.dev/config/
export default defineConfig({
resolve: {
//设置别名
alias: {
'@': path.resolve(__dirname, 'src'),
},
},
plugins: [vue()],
server: {
port: 8080, //启动端口
hmr: {
host: '127.0.0.1',
port: 8080,
},
// 设置 https 代理
proxy: {
'/api': {
target: 'your https address',
changeOrigin: true,
rewrite: (path: string) => path.replace(/^\/api/, ''),
},
},
},
})
```
### 给自定义的环境变量获得类型提示
默认情况下,Vite 在 [`vite/client.d.ts`](https://github.com/vitejs/vite/blob/main/packages/vite/client.d.ts) 中为 `import.meta.env` 提供了类型定义。 `src` 目录下创建一个 `env.d.ts` 文件,接着按下面这样增加 `ImportMetaEnv` 的定义:
```typescript
interface ImportMetaEnv {
readonly VITE_APP_TITLE: string
// 更多环境变量...
}
```
### 按环境划分 vite 配置文件
#### 新建 config 目录
目录结构:
.
├── productionPlugins
│ ├── compress.ts
│ └── visualizer.ts
├── utils
│ └── index.ts //存放一些配置里用到的工具函数
├── vite.config.base.ts
├── vite.config.dev.ts
└── vite.config.prod.ts
具体内容进目录的文件自己看
#### 修改 pachage.json 文件
```json
"dev": "vite --config ./config/vite.config.dev.ts",
"build": "vue-tsc --noEmit && vite build --config ./config/vite.config.prod.ts",
"report": "cross-env REPORT=true pnpm build", /*设置环境变量process.env.REPORT为'true'且执行pnpm build !若系统没有cross-env 命令可以全局装一下*/
"preview": "vite preview",
```
#### vite.config.prod.ts
##### 可视化
使用 [rollup-plugin-visualizer (opens new window)](https://github.com/btd/rollup-plugin-visualizer)可以对打包结果进行可视化的展示。

安装配置
```text
yarn add --dev rollup-plugin-visualizer
```
##### 分块打包(可选)
使用分块打包可以将内容打包到不同的文件中,减少单个文件大小,提高加载速度。下面将 node_modules 的扩展单独进行打包。(具体我们这个项目怎么打包还需要了解)
```json
export default defineConfig({
plugins: [vue()],
build: {
rollupOptions: {
emptyOutDir: true,
output: {
manualChunks(id) {
if (id.includes('node_modules')) {
return id.toString().split('node_modules/')[1].split('/')[0].toString()
}
},
},
},
},
})
```
实际内容见文件里的
### CDN 加载
可以使用 cdn 加载的包,建议使用 cdn 完成,这样会减少打包后的文件大小。(前提是 CDN 得稳定)
下面是使用 cdn 加载 echarts、font-awesome、animate.css 包。
```html
```
## 兼容性处理
### Vite
#### [浏览器兼容性](https://vitejs.cn/guide/build.html#browser-compatibility)
用于生产环境的构建包会假设目标浏览器支持现代 JavaScript 语法。默认情况下,Vite 的目标浏览器是指能够 [支持原生 ESM script 标签](https://caniuse.com/es6-module) 和 [支持原生 ESM 动态导入](https://caniuse.com/es6-module-dynamic-import) 的。作为参考,Vite 使用这个 [browserslist](https://github.com/browserslist/browserslist) 作为查询标准:
```
defaults and supports es6-module and supports es6-module-dynamic-import, not opera > 0, not samsung > 0, not and_qq > 0
```
你也可以通过 [`build.target` 配置项](https://vitejs.cn/config/#build-target) 指定构建目标,最低支持 `es2015`。
请注意,默认情况下 Vite 只处理语法转译,且 **默认不包含任何 polyfill**。你可以前往 [Polyfill.io](https://polyfill.io/v3/) 查看,这是一个基于用户浏览器 User-Agent 字符串自动生成 polyfill 包的服务。
传统浏览器可以通过插件 [@vitejs/plugin-legacy](https://github.com/vitejs/vite/tree/main/packages/plugin-legacy) 来支持,它将自动生成传统版本的 chunk 及与其相对应 ES 语言特性方面的 polyfill。兼容版的 chunk 只会在不支持原生 ESM 的浏览器中进行按需加载。
#### [@vitejs/plugin-legacy](https://github.com/vitejs/vite/tree/main/packages/plugin-legacy)
[参考资料](https://blog.csdn.net/qj11803017/article/details/121766133)
首先安装插件:`pnpm add @vitejs/plugin-legacy -D`
·然后在 vite.config.js 中配置
```javascript
import legacyPlugin from '@vitejs/plugin-legacy'
export default defineConfig({
plugins: [
legacyPlugin({
targets: ['chrome 52'], // 需要兼容的目标列表,可以设置多个
additionalLegacyPolyfills: ['regenerator-runtime/runtime'], // 面向IE11时需要此插件
}),
],
})
```
#### [build.target](https://vitejs.cn/config/#build-target)
- **类型:** `string | string[]`
- **默认:** `'modules'`
设置最终构建的浏览器兼容目标。默认值是一个 Vite 特有的值——`'modules'`,这是指 [支持原生 ES 模块的浏览器](https://caniuse.com/es6-module)。
另一个特殊值是 “esnext” —— 即假设有原生动态导入支持,并且将会转译得尽可能小:
- 如果 [`build.minify`](https://vitejs.cn/config/#build-minify) 选项为 `'terser'`, `'esnext'` 将会强制降级为 `'es2019'`。
- 其他情况下将完全不会执行转译。
转换过程将会由 esbuild 执行,并且此值应该是一个合法的 [esbuild 目标选项](https://esbuild.github.io/api/#target)。自定义目标也可以是一个 ES 版本(例如:`es2015`)、一个浏览器版本(例如:`chrome58`)或是多个目标组成的一个数组。
注意:如果代码包含不能被 `esbuild` 安全地编译的特性,那么构建将会失败。查看 [esbuild 文档](https://esbuild.github.io/content-types/#javascript) 获取更多细节。
#### [build.cssTarget](https://vitejs.cn/config/#build-csstarget)
- **类型:** `string | string[]`
- **默认值:** 与 [`build.target`](https://vitejs.cn/config/#build-target) 一致
此选项允许用户为 CSS 的压缩设置一个不同的浏览器 target,此处的 target 并非是用于 JavaScript 转写目标。
应只在针对非主流浏览器时使用。 最直观的示例是当你要兼容的场景是安卓微信中的 webview 时,它支持大多数现代的 JavaScript 功能,但并不支持 [CSS 中的 `#RGBA` 十六进制颜色符号](https://developer.mozilla.org/en-US/docs/Web/CSS/color_value#rgb_colors)。 这种情况下,你需要将 `build.cssTarget` 设置为 `chrome61`,以防止 vite 将 `rgba()` 颜色转化为 `#RGBA` 十六进制符号的形式。
### postcss(可选)
也许 vite 不需要用这个插件(待研究)
vite 默认已经集成了 postcss 无需安装`postcss`
#### 自动添加前缀
使用前:

使用后:

##### 安装 `postcss-preset-env` 插件
```
pnpm install postcss-preset-env -D
```
##### 两种配置方法
1. `vite.config.prod.ts`:
```js
import postcssPresetEnv from 'postcss-preset-env'
export default defineConfig({
plugins: [vue()],
css: {
postcss: {
plugins: [postcssPresetEnv],
},
},
})
```
2. 新建 `postcss.config.js` 并配置
```javascript
module.exports = {
plugins: [require('postcss-preset-env')],
}
```
#### 其他 postcss 插件
[参考资料 1](https://blog.csdn.net/JunChow520/article/details/117020367) [参考资料 2](https://www.cnblogs.com/ToBeBest/p/15628513.html) 或者 用到时再继续查找
### babel(可选)
[vite-babel-plugin](https://www.npmjs.com/package/vite-babel-plugin): A plugin for [vite](https://github.com/vitejs/vite) using babel plugin.
```
$ pnpm i -D vite-babel-plugin
```
then in `vite.config.js`
```javascript
import babel from 'vite-babel-plugin'
export default {
plugins: [babel()],
}
```
then `vite-babel-plugin` will Will read `.babelrc` in the root directory of your project.
## 统一代码风格
### 集成 `eslint`
#### 安装
```
pnpm i eslint eslint-plugin-vue eslint-config-airbnb-base eslint-plugin-import eslint-import-resolver-typescript -D
```
由于 ESLint 默认使用 [Espree](https://link.juejin.cn/?target=https%3A%2F%2Fgithub.com%2Feslint%2Fespree) 进行语法解析,无法识别 TypeScript 的一些语法,故我们需要安装 [`@typescript-eslint/parser`](https://link.juejin.cn/?target=https%3A%2F%2Fgithub.com%2Ftypescript-eslint%2Ftypescript-eslint%2Ftree%2Fmaster%2Fpackages%2Fparser) 替代掉默认的解析器
```
pnpm install @typescript-eslint/parser -D
```
安装对应的插件 [@typescript-eslint/eslint-plugin](https://link.juejin.cn/?target=https%3A%2F%2Fgithub.com%2Ftypescript-eslint%2Ftypescript-eslint%2Ftree%2Fmaster%2Fpackages%2Feslint-plugin) 它作为 eslint 默认规则的补充,提供了一些额外的适用于 ts 语法的规则。
```
pnpm install @typescript-eslint/eslint-plugin -D
```
#### 创建配置文件
`.eslintrc.js` 或 `.eslintrc.json`
```javascript
module.exports = {
parser: 'vue-eslint-parser',
parserOptions: {
parser: '@typescript-eslint/parser',
ecmaVersion: 2020,
sourceType: 'module',
ecmaFeatures: {
jsx: true,
},
},
env: {
browser: true,
node: true,
'vue/setup-compiler-macros': true,
},
plugins: ['@typescript-eslint'],
extends: [
'airbnb-base',
'plugin:vue/vue3-recommended',
'plugin:import/recommended',
'plugin:import/typescript',
'plugin:@typescript-eslint/recommended',
// 'prettier', //解决prettier和eslint的冲突
'plugin:prettier/recommended', //解决prettier和eslint的冲突
],
rules: {
// override/add rules settings here, such as:
'no-console': process.env.NODE_ENV === 'production' ? 'error' : 'off',
'no-debugger': process.env.NODE_ENV === 'production' ? 'error' : 'off',
'no-var': 'off',
semi: ['error', 'never'], //强制不使用分号
// 'quotes': [2, 'single'],//强制使用单引号
'no-trailing-spaces': 2, //不允许行末空格
'no-plusplus': 'off', // 允许使用++
'no-await-in-loop': 'error', // 禁止在循环中使用await
'no-unused-vars': 'error', //禁止出现未使用的变量
},
}
```
#### 创建忽略文件
`.eslintignore`
```
node_modules/
dist/
index.html
/*.json
```
#### 命令行式运行
修改 `package.json`
```json
{
...
"scripts": {
...
"eslint:comment": "使用 ESLint 检查并自动修复 src 目录下所有扩展名为 .js 和 .vue 的文件",
"eslint": "eslint --ext .js,.vue,.ts,.jsx --ignore-path .gitignore --fix src",
}
...
}
```
### 集成 `prettier`
[prettier](https://prettier.io/docs/en/index.html) 是一套代码格式规范,一般用作格式化工具。而在项目中,js 交给 eslint,css 交给 stylelint,这个主要就用于 html 或 jsx 或 json 部分的格式化。
#### 安装
```javascript
pnpm i prettier eslint-config-prettier eslint-plugin-prettier -D //解决prettier和eslint的冲突
```
#### 创建配置文件
`prettier.config.js` 或 `.prettierrc.js`
prettier 的配置似乎是每次更改后都要重新打开 vscode 才能生效
```javascript
module.exports = {
// 一行最多 80 字符
printWidth: 120,
// 使用 4 个空格缩进
tabWidth: 4,
// 使用 tab 缩进,而使用空格
useTabs: true,
// // 行尾需要有分号
semi: false,
// 使用单引号代替双引号
singleQuote: true,
// 对象的 key 仅在必要时用引号
quoteProps: 'as-needed',
// jsx 不使用单引号,而使用双引号
jsxSingleQuote: false,
// 末尾使用逗号
trailingComma: 'all',
// 大括号内的首尾需要空格 { foo: bar }
bracketSpacing: true,
// jsx 标签的反尖括号需要换行
bracketSameLine: false,
// 箭头函数,只有一个参数的时候,不需要括号
arrowParens: 'avoid',
// 每个文件格式化的范围是文件的全部内容
rangeStart: 0,
rangeEnd: Infinity,
// 不需要写文件开头的 @prettier
requirePragma: false,
// 不需要自动在文件开头插入 @prettier
insertPragma: false,
// 使用默认的折行标准
proseWrap: 'preserve',
// 根据显示样式决定 html 要不要折行
htmlWhitespaceSensitivity: 'css',
// 换行符使用 lf
endOfLine: 'auto',
}
```
#### 创建`.prettierignore`文件
```
/dist/*
.local
.output.js
/node_modules/**
**/*.svg
**/*.sh
src/**/*.scss
src/**/*.css
/*不知为啥prettier自动修复完缩进后,stylelint插件会说不对,所以先让prettier不格式化scss和css问件忽略*/
```
#### 修改 `.eslintrc.js` 配置
```javascript
module.exports = {
...
extends: [
'plugin:vue/vue3-recommended',
'plugin:@typescript-eslint/recommended',
'prettier',//解决prettier和eslint的冲突
'plugin:prettier/recommended'//解决prettier和eslint的冲突
],
...
};
```
#### 命令行式运行
```json
"scripts": {
……
"prettier": "prettier --write .",
},
```
### 集成 stylelint
#### 下载依赖
```
pnpm i -D stylelint stylelint-config-standard stylelint-config-rational-order stylelint-config-prettier
```
stylelint-config-rational-order 处理 css 属性间的顺序(Stylelint 配置通过按顺序组合在一起对相关属性声明进行排序: 定位 盒子模型 排版 视觉的 动画片 杂项 ---npm 介绍)
stylelint-config-prettier 禁用所有与格式相关的 Stylelint 规则,解决 prettier 与 stylelint 规则冲突,确保将其放在 `extends` 队列最后,这样它将覆盖其他配置。(Turns off all rules that are unnecessary or might conflict with Prettier. This lets you use your favorite shareable config without letting its stylistic choices get in the way when using Prettier---npm 介绍)
#### 新建 `.stylelintrc.js` 文件
```js
module.exports = {
extends: ['stylelint-config-standard', 'stylelint-config-rational-order', 'stylelint-config-prettier'],
defaultSeverity: 'error',
plugins: ['stylelint-order'],
rules: {
indentation: 4,
'at-rule-no-unknown': [
true,
{
ignoreAtRules: ['plugin'],
},
],
'rule-empty-line-before': [
'always',
{
except: ['after-single-line-comment', 'first-nested'],
},
],
'selector-pseudo-class-no-unknown': [
true,
{
ignorePseudoClasses: ['deep'],
},
],
},
}
```
如果你想修改插件的默认规则,可以看[官方文档](https://link.juejin.cn?target=https%3A%2F%2Fgithub.com%2Fstylelint%2Fstylelint%2Fblob%2F5a8465770b4ec17bb1b47f359d1a17132a204a71%2Fdocs%2Fuser-guide%2Frules%2Flist.md),它提供了 170 项规则修改。例如我想要用 4 个空格作为缩进,可以这样配置:
```javascript
module.exports = {
extends: 'stylelint-config-standard',
rules: {
indentation: 4,
},
}
```
#### 命令行
在 package.json 配置检查与修复命令:
```json
"scripts": {
"lint:style": "stylelint \"src/*.{css,scss}\"",
"fix:style": "stylelint --fix \"src/*.{css,scss}\""
}
```
#### scss
如果你想格式化 `scss` 文件,则需要下载 `stylelint-scss` `stylelint-config-standard-scss ` 插件:
```
npm i -D stylelint-scss stylelint-config-standard-scss
```
注意,要把 `stylelint-config-standard` 改成 `stylelint-config-standard-scss`,然后就可以格式化 scss 文件了。
```javascript
module.exports = {
extends: ['stylelint-config-standard-scss', ……],
……
}
```
如果检测不到 scss 代码,可能是因为插件的设置这里没加上 scss
### 自动检查并修复
#### 安装`Eslint`插件
新版 `vscode` 需要手动启用 `eslint` 插件,在右下角查看 eslint 工作状态,可以点击开启。(如下图)

右下角查看 eslint 工作状态,点击会输出日志。(如下图)

根据输出日志,进行修复
#### 安装`prettier`插件
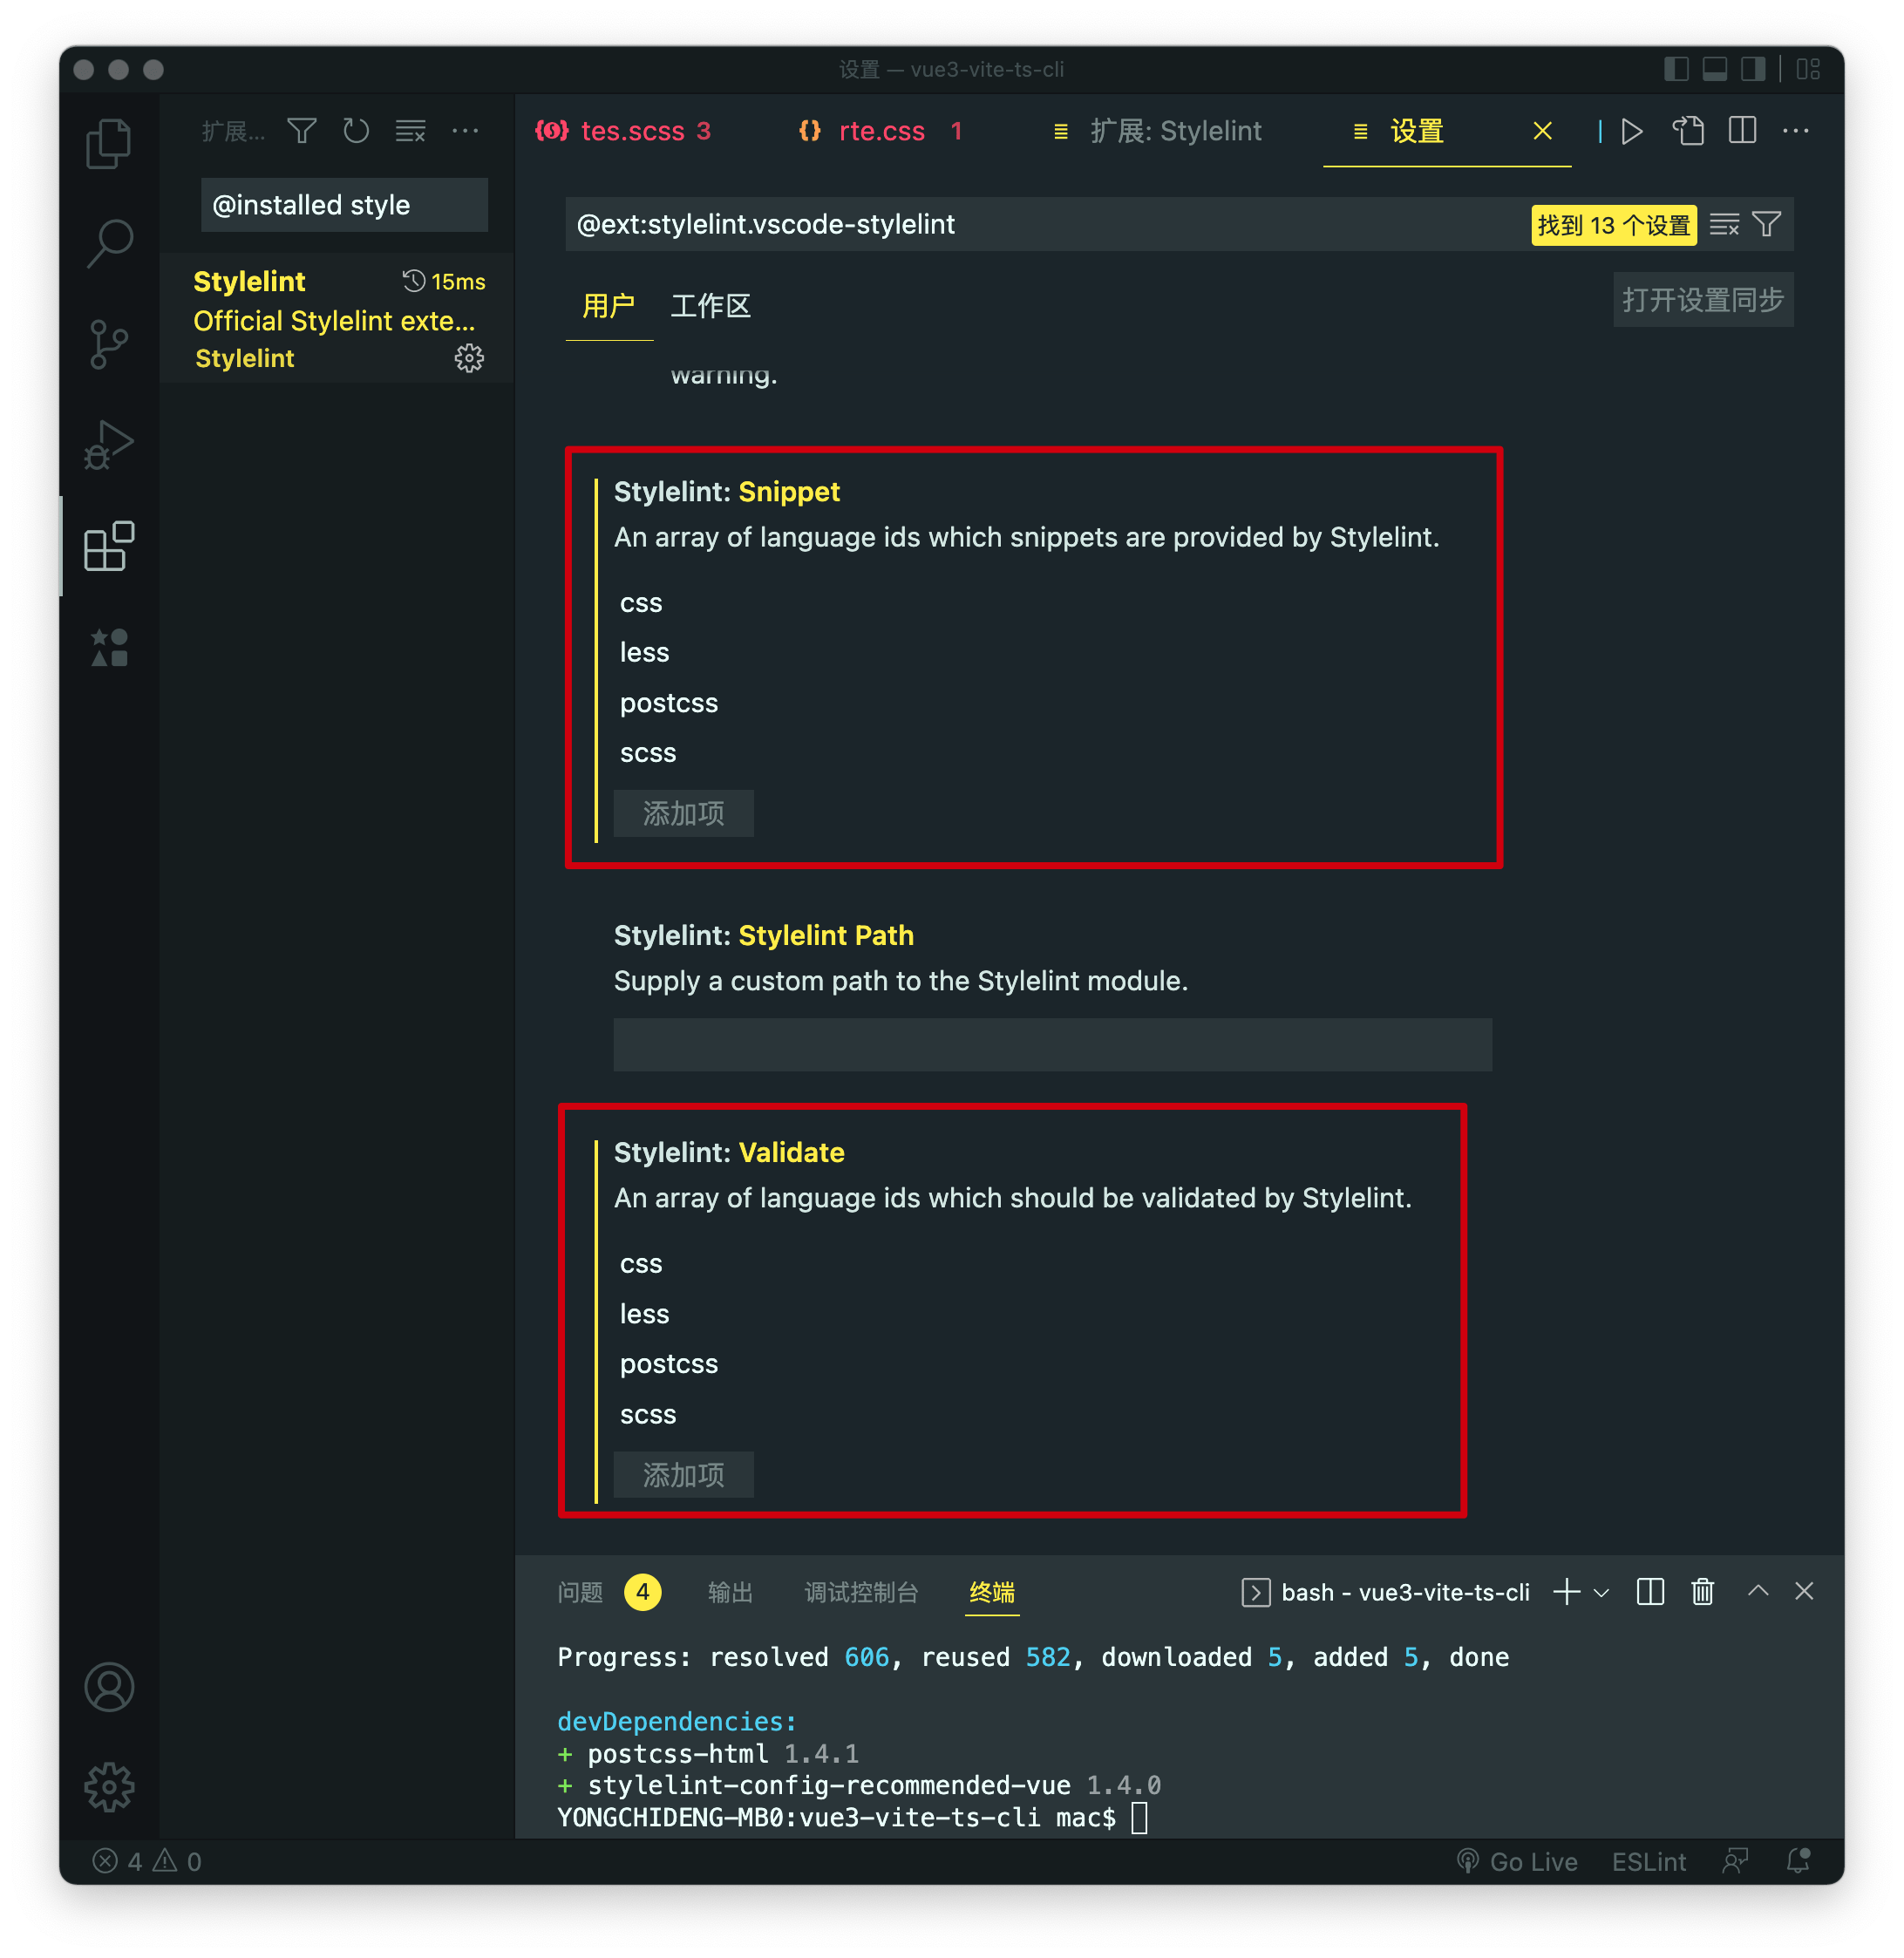
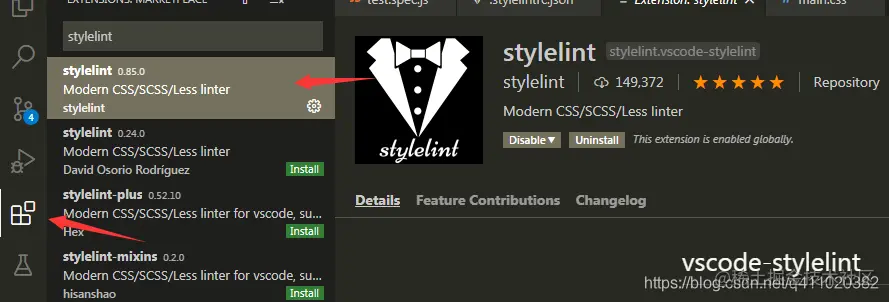
#### 安装`stylelint` 插件
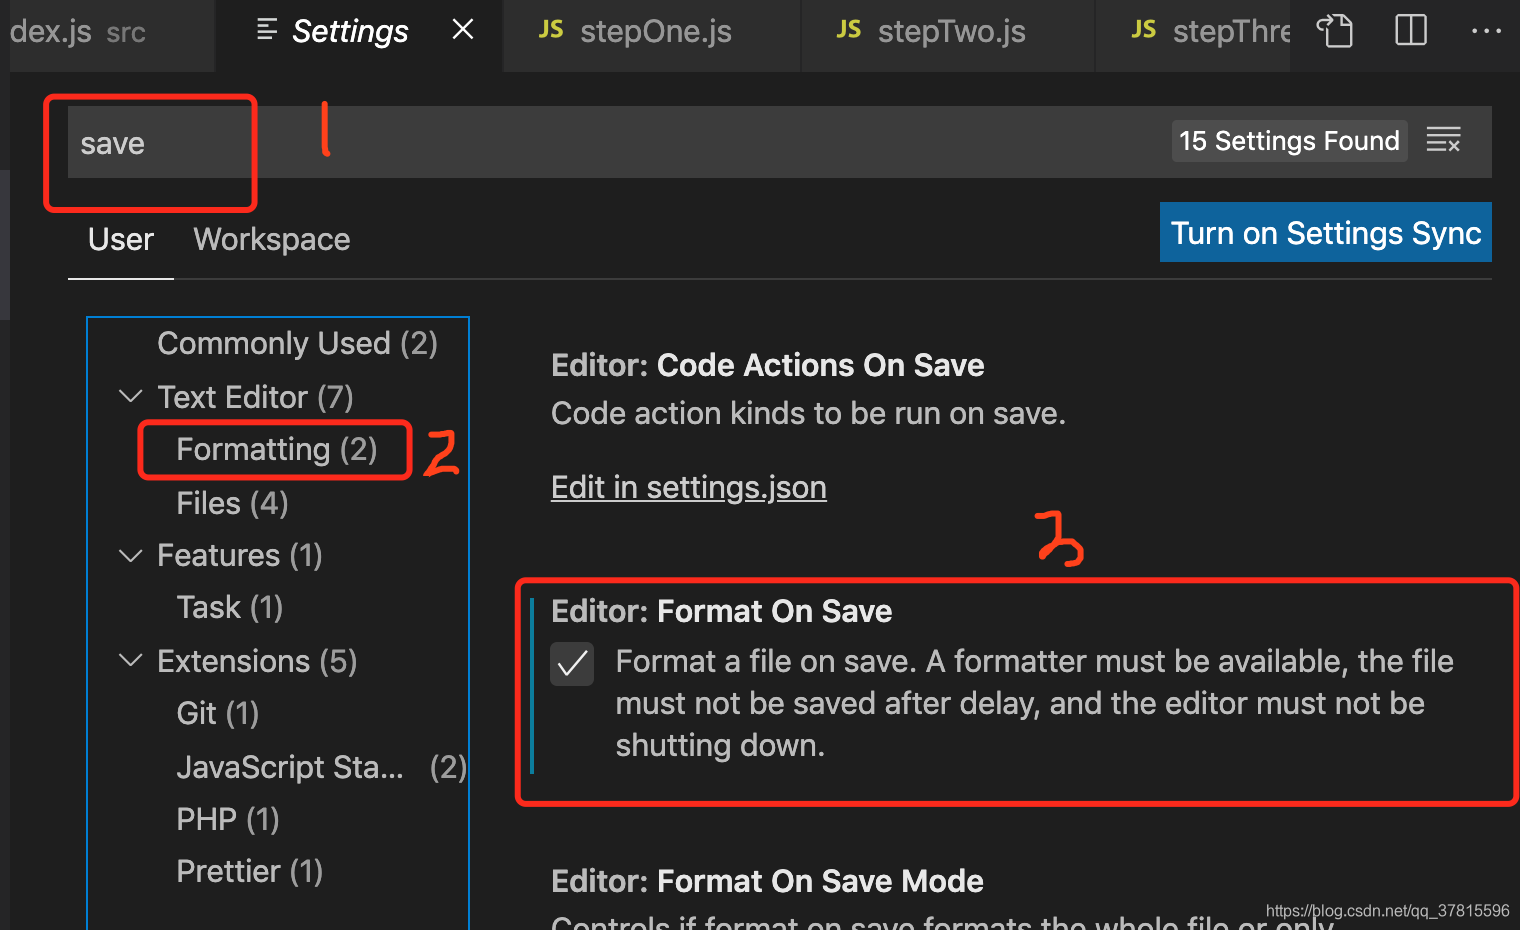
#### 保存自动格式化
`settings.json`中设置
```json
"editor.codeActionsOnSave": {
"source.fixAll.eslint": true,
"source.fixAll.stylelint": true,
"source.fixAll.prettier": true
},
```
editor 设置保存自动格式化
#### bug
App.vue 文件里的 style 保存时没有被格式化,不知为啥???
## 规范 git 提交
### 利用 `commitizen` + `commitlint`
- @commitlint/cli + @commitlint/config-conventional
- commit 信息校验工具
- **@commitlint/config-conventional**
这是一个规范配置,标识采用什么规范来执行消息校验, 这个默认是**_Angular_**的提交规范
| **类型** | **描述** |
| -------- | ------------------------------------------------------ |
| build | 编译相关的修改,例如发布版本、对项目构建或者依赖的改动 |
| chore | 其他修改, 比如改变构建流程、或者增加依赖库、工具等 |
| ci | 持续集成修改 |
| docs | 文档修改 |
| feat | 新特性、新功能 |
| fix | 修改 bug |
| perf | 优化相关,比如提升性能、体验 |
| refactor | 代码重构 |
| revert | 回滚到上一个版本 |
| style | 代码格式修改, 注意不是 css 修改 |
| test | 测试用例修改 |
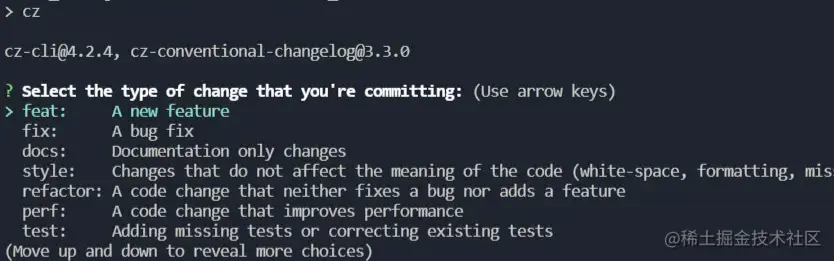
- commitizen + cz-conventional-changelog
- 辅助 commit 信息 ,就像这样,通过选择输入,规范提交信息
#### 安装
```shell
pnpm install -D @commitlint/config-conventional @commitlint/cli commitizen cz-conventional-changelog
```
#### 自定义提交(可选)
commitlint-config-cz 自定义提交规范
cz-customizable 自定义提交提示信息
#### 配置 `package.json`
```json
{
...
"scripts": {
"commit:comment": "引导设置规范化的提交信息",
"commit":"git-cz",
},
//如果没有自定义规范则用默认的
"config": {
"commitizen": {
"path": "./node_modules/cz-conventional-changelog"
}
},
//如果有自定义提交规范的话
"config": {
"commitizen": {
"path": "node_modules/cz-customizable" //将原来commit配置,变更为自定义配置
}
},
...
}
```
#### 新增配置 `commitlint.config.js`
[commitlint 官网](https://commitlint.js.org/#/reference-rules)
```javascript
module.exports = {
extends: ['@commitlint/config-conventional', 'cz'],
//下面这些是自定义的,可以都不要
rules: {
'type-enum': [
2,
'always',
[
'feature', // 新功能(feature)
'bug', // 此项特别针对bug号,用于向测试反馈bug列表的bug修改情况
'fix', // 修补bug
'ui', // 更新 ui
'docs', // 文档(documentation)
'style', // 格式(不影响代码运行的变动)
'perf', // 性能优化
'release', // 发布
'deploy', // 部署
'refactor', // 重构(即不是新增功能,也不是修改bug的代码变动)
'test', // 增加测试
'chore', // 构建过程或辅助工具的变动
'revert', // feat(pencil): add ‘graphiteWidth’ option (撤销之前的commit)
'merge', // 合并分支, 例如: merge(前端页面): feature-xxxx修改线程地址
'build', // 打包
],
],
// 格式 小写
'type-case': [2, 'always', 'lower-case'],
// 不能为空
'type-empty': [2, 'never'],
// 范围不能为空
'scope-empty': [2, 'never'],
// 范围格式
'scope-case': [0],
// 主要 message 不能为空
'subject-empty': [2, 'never'],
// 以什么为结束标志,禁用
'subject-full-stop': [0, 'never'],
// 格式,禁用
'subject-case': [0, 'never'],
// 以空行开头
'body-leading-blank': [1, 'always'],
'header-max-length': [0, 'always', 72],
},
}
```
#### 自定义提示则添加 `.cz-config.js`(可选)
```javascript
module.exports = {
types: [
{ value: 'feature', name: 'feature: 增加新功能' },
{ value: 'bug', name: 'bug: 测试反馈bug列表中的bug号' },
{ value: 'fix', name: 'fix: 修复bug' },
{ value: 'ui', name: 'ui: 更新UI' },
{ value: 'docs', name: 'docs: 文档变更' },
{ value: 'style', name: 'style: 代码格式(不影响代码运行的变动)' },
{ value: 'perf', name: 'perf: 性能优化' },
{ value: 'refactor', name: 'refactor: 重构(既不是增加feature,也不是修复bug)' },
{ value: 'release', name: 'release: 发布' },
{ value: 'deploy', name: 'deploy: 部署' },
{ value: 'test', name: 'test: 增加测试' },
{ value: 'chore', name: 'chore: 构建过程或辅助工具的变动(更改配置文件)' },
{ value: 'revert', name: 'revert: 回退' },
{ value: 'build', name: 'build: 打包' },
],
// override the messages, defaults are as follows
messages: {
type: '请选择提交类型:',
customScope: '请输入您修改的范围(可选):',
subject: '请简要描述提交 message (必填):',
body: '请输入详细描述(可选,待优化去除,跳过即可):',
footer: '请输入要关闭的issue(待优化去除,跳过即可):',
confirmCommit: '确认使用以上信息提交?(y/n/e/h)',
},
allowCustomScopes: true,
skipQuestions: ['body', 'footer'],
subjectLimit: 72,
}
```
### husky +lint-staged
- 前面只是规范了 git 的提交信息,我们对提交前代码的检查还没有做到位,例如 ESLint、Prettier,毕竟谁都会有疏忽的时候,
- 那么现在我们的 husky 就闪亮登场了
`lint-staged` 是一个只检测`git`==**暂存区**==的`lint`工具,`husky`是一个用来给我们的项目添加`git hook`的工具,`git hook`是进行 git 操作会触发的脚本,例如:提交的时候会触发`pre-commit`钩子,输入提交信息会触发`commit-msg`钩子。 我们用`husky`安装`pre-commit`钩子,我们就可以在进行`git commit`操作的时候,运行我们的脚本来检测待提交的代码是否规范,便可以只对暂存区的文件进行检查。
安装
```shell
# 1.安装
pnpm i husky lint-staged -D
# 2.生成 .husky 的文件夹
npx husky install
# 3.添加 hooks,会在 .husky 目录下生成一个 pre-commit 脚本文件
npx husky add .husky/pre-commit "npx --no-install lint-staged"
# 4.添加 commit-msg
npx husky add .husky/commit-msg 'npx --no-install commitlint --edit "$1"'
```
添加配置 `package.json`
```json
{
...
"scripts": {
"lint-staged": "npx lint-staged",
"prepare": "husky install"
},
"lint-staged": {
"*.{js,ts,jsx,tsx,vue}": [
"prettier --write",
"eslint --fix"
],
"*.{scss,less,css}": [
"stylelint --fix"
],
"*.{html,json,yaml,md}": [
"prettier --write"
]
},
...
}
```
## 版本控制(可选)
- [standard-version](https://link.juejin.cn/?target=https%3A%2F%2Fgithub.com%2Fconventional-changelog%2Fstandard-version) 或者 [conventional-changelog](https://link.juejin.cn/?target=https%3A%2F%2Fgithub.com%2Fconventional-changelog%2Fconventional-changelog)
## 集成各种插件
```shell
pnpm i @vueuse/core
# .scss and .sass
pnpm i -D sass
# .less
pnpm i -D less
pnpm i axios
pnpm add echarts --save
pnpm add -D @types/echarts
```
# 配置路由&pinia
```
pnpm i vue-router pinia --save
```
## 配置路由
### 目录结构
.
├── autoload
│ ├── index.ts
│ ├── layoutsRoutes.ts
│ └── modules.ts
├── guard.ts
├── index.ts
├── module
│ └── admin.ts
├── routes.ts
└── typings.d.ts
### 基本配置
`index.ts`文件
```typescript
import { createRouter, createWebHistory } from 'vue-router'
import NProgress from 'nprogress' // 配置progress bar
import 'nprogress/nprogress.css'
import { betterTodosRoutes, bbsRoutes } from './routes'
import createRouteGuard from './guard'
NProgress.configure({ showSpinner: false }) // NProgress Configuration
const router = createRouter({
history: createWebHistory(),
routes: [
{
path: '/',
redirect: '/betterTodos/home',
},
{
path: '/betterTodos',
name: 'betterTodos',
redirect: '/betterTodos/home',
component: () => import('@/layout/betterTodos/index.vue'),
children: betterTodosRoutes,
},
{
path: '/bbs',
name: 'bbs',
component: () => import('@/layout/bbs/index.vue'),
children: bbsRoutes,
},
{
path: '/login',
name: 'login',
component: () => import('@/views/login/index.vue'),
meta: {
requiresAuth: false,
},
},
{
path: '/:pathMatch(.*)*',
name: 'notFound',
component: () => import('@/views/not-found/index.vue'),
},
],
scrollBehavior() {
return { top: 0 }
},
})
createRouteGuard(router)
export default router
```
在 `main.ts` 中 use
### 自动注册路由的两种方式
有两种方式:
1.自动注册写在 layouts 和 views 里的组件
2.只自动注册写在`module`里的路由
根据环境变量`VITE_IS_AUTOLOAD` 的值 去选择 (本项目没的你选,只用了第二种方式)
`index.ts`
```typescript
/**自动注册路由的入口文件 */
import { RouteRecordRaw } from 'vue-router'
import getLayoutsRoutes from './layoutsRoutes'
import autoloadModuleRoutes from './modules'
//根据环境变量判断选用哪种路由自动注册方式
let routes: RouteRecordRaw[] = []
if (import.meta.env.VITE_IS_AUTOLOAD === 'true') {
routes = getLayoutsRoutes()
} else {
routes = autoloadModuleRoutes()
}
export default routes
```
#### 自动注册写在 layouts 和 views 里的组件
自动把 layouts 下的路由和其 views 里对应的子路由注册好
缺点:你的文件结构必须符合我函数里的要求 且 如果要自定义组件的一些信息要单独写在各个组件里 且 不直观
在`router`目录下新建`autoload`目录,再在`autoload`目录下新建`layoutsRoutes.ts`文件
```typescript
/*直接根据layouts里的文件和views里的文件自动注册路由*/
import { RouteRecordRaw } from 'vue-router'
const layouts = import.meta.globEager('@/layouts/*.vue')
const views = import.meta.globEager(`@/views/*/*.vue`)
function getLayoutsRoutes() {
const layoutRoutes: RouteRecordRaw[] = []
Object.entries(layouts).forEach(([filePath, module]) => {
const fileName = filePath.replace(/.+layouts\/|\.vue/gi, '')
const route = configRoute(fileName, module)
route.children = getChildrenRoutes(fileName)
layoutRoutes.push(route)
})
return layoutRoutes
}
/*下面这两个函数就是为上面那个函数服务的*/
function getChildrenRoutes(dirName: string) {
const childrenRoutes: RouteRecordRaw[] = []
Object.entries(views).forEach(([filePath, module]) => {
if (filePath.includes(dirName)) {
const fileName = filePath.replace(/.+views\/|\.vue/gi, '')
childrenRoutes.push(configRoute(fileName, module))
}
})
return childrenRoutes
}
// eslint-disable-next-line @typescript-eslint/no-explicit-any
function configRoute(fileName: string, module: { [key: string]: any }) {
const route: RouteRecordRaw = {
path: `/${fileName}`,
name: fileName,
component: module.default,
}
return Object.assign(route, module.default?.route) //如果模块有route对象,则将其里面的属性添加到(或覆盖掉)这里的route中
}
export default getLayoutsRoutes
```
在`route.ts`中引入布局路由
```typescript
import { RouteRecordRaw } from 'vue-router'
import layoutRoutes from './autoload/layoutsRoutes'
const routes: RouteRecordRaw[] = [
{
path: '/',
name: 'home',
component: () => import('@/views/home.vue'),
},
...layoutRoutes,
]
const routes = import.meta.env.VITE_IS_AUTOLOAD === 'true' ? getLayoutsRoutes() : [] //根据环境变量判断是否自动加载路由
export default routes
```
自定义某个组件的路由信息
```vue
```
#### 只自动注册写在`module`目录里的路由
新建 routes 目录放置各个模块的子路由配置
routes 目录下的 index.ts
```typescript
import type { RouteRecordRaw } from 'vue-router'
/* 加载bbs的子路由 */
const bbsModules = import.meta.globEager('./bbs-modules/*.ts')
const bbsRoutes: RouteRecordRaw[] = []
Object.keys(bbsModules).forEach(key => {
const defaultModule = bbsModules[key].default
if (!defaultModule) return
const moduleList = Array.isArray(defaultModule) ? [...defaultModule] : [defaultModule]
bbsRoutes.push(...moduleList)
})
/* 加载mall的子路由 */
const mallModules = import.meta.globEager('./mall-modules/*.ts')
const mallRoutes: RouteRecordRaw[] = []
Object.keys(mallModules).forEach(key => {
const defaultModule = mallModules[key].default
if (!defaultModule) return
const moduleList = Array.isArray(defaultModule) ? [...defaultModule] : [defaultModule]
mallRoutes.push(...moduleList)
})
/* 加载betterTodos的子路由 */
const betterTodosModules = import.meta.globEager('./betterTodos-modules/*.ts')
const betterTodosRoutes: RouteRecordRaw[] = []
console.log(betterTodosModules)
Object.keys(betterTodosModules).forEach(key => {
const defaultModule = betterTodosModules[key].default
if (!defaultModule) return
const moduleList = Array.isArray(defaultModule) ? [...defaultModule] : [defaultModule]
betterTodosRoutes.push(...moduleList)
})
export { bbsRoutes, mallRoutes, betterTodosRoutes }
```
### 路由守卫
在 utils 目录下添加`route-listener`文件利用发布订阅模式去监听路由变化
用 mitt 这个库来实现发布订阅模式,[点击这里看 mitt 的用法](https://blog.csdn.net/qq_41196217/article/details/120695349)
```typescript
/**
* 让menu和tabbar组件用watch去单独监听路由会浪费渲染性能。使用发布订阅模式去进行分发管理。
*/
import mitt, { Handler } from 'mitt'
import type { RouteLocationNormalized } from 'vue-router'
const emitter = mitt()
const key = Symbol('ROUTE_CHANGE')
let latestRoute: RouteLocationNormalized
export function emitRouteChange(to: RouteLocationNormalized) {
emitter.emit(key, to) // 触发事件
latestRoute = to
}
// eslint-disable-next-line no-unused-vars
export function registerRouteChangeEvent(handler: (route: RouteLocationNormalized) => void, immediate = true) {
emitter.on(key, handler as Handler) // 注册事件:当emitter.emit(key)时就会执行这个事件
if (immediate && latestRoute) {
handler(latestRoute)
}
}
export function removeRouteListener() {
emitter.off(key)
}
```
guard 目录下`index.ts`
```typescript
import type { Router } from 'vue-router'
import { emitRouteChange } from '@/utils/route-listener'
function setupPageGuard(router: Router) {
router.beforeEach(async to => {
emitRouteChange(to) // 触发route change
})
}
/** 暴露出这个函数在router目录的index.ts文件中创建守卫 */
export default function createRouteGuard(router: Router) {
setupPageGuard(router)
}
```
guard 目录下可以添加其他类型的守卫(比如权限校验的守卫--参考 arco-design-pro),然后都在`index.ts`中注册
## 配置 pinia
`index.ts`
```typescript
import { createPinia } from 'pinia'
import useAppStore from './modules/app'
const pinia = createPinia()
export { useAppStore }
export default pinia
```
`main.ts`中 use 一下
```typescript
import store from './store'
app.use(store)
```
`modules`目录存放各个 store
# 配置 axios&mock
## 配置 mock
[参考官网](https://github.com/vbenjs/vite-plugin-mock)
```
pnpm i -D mockjs @types/mockjs vite-plugin-mock
```
`vite.config.dev.ts`配置
```typescript
import { ConfigEnv, UserConfigExport, mergeConfig } from 'vite'
import { viteMockServe } from 'vite-plugin-mock'
import baseConig from './vite.config.base'
export default ({ command }: ConfigEnv): UserConfigExport =>
mergeConfig(
{
mode: 'development',
server: {
open: true,
fs: {
strict: true,
},
},
plugins: [
viteMockServe({
// default
mockPath: 'mock',
localEnabled: command === 'serve',
}),
],
},
baseConig,
)
```
然后在 mock 目录下创建各种接口
## 创建 Axios 类
`Axios.ts`
```typescript
import axios, { AxiosRequestConfig } from 'axios'
import { ResponseData } from '@/apis/axios/types'
import { getToken, removeToken } from '@/utils/storage/token-operator'
import router from '@/router'
export default class Axios {
private instance
constructor(config: AxiosRequestConfig) {
this.instance = axios.create(config)
this.interceptorsRequest()
this.interceptorsResponse()
}
public async request<
ResponseDataResult,
T = ResponseData, // 这里的泛型为啥这样定义,需要结合axios的request方法的类型定义去理解
>(config: AxiosRequestConfig): Promise {
// 异步方法必须返回一个Promise对象
// 做好传入参数的类型声明和返回值的类型声明
try {
const response = await this.instance.request(config)
return response.data // !!直接返回response里的data里的内容
} catch (error) {
return Promise.reject(error) // 怎么处理这个错误比较合理呢???
}
}
private interceptorsRequest() {
this.instance.interceptors.request.use(
config => {
// eslint-disable-next-line no-param-reassign
config.headers = {
Authorization: `Bearer${getToken()}`,
}
return Promise.resolve(config)
},
error => {
return Promise.reject(error)
},
)
}
private interceptorsResponse() {
this.instance.interceptors.response.use(
response => {
// 2xx 范围内的状态码都会触发该函数。
return Promise.resolve(response)
},
error => {
switch (error.response.status) {
case 401: // token失效了
removeToken()
router.push({ name: 'login' })
break
case 422:
break
default:
break
}
// 超出 2xx 范围的状态码都会触发该函数。
return Promise.reject(error)
},
)
}
}
```
## 根据 Axios 类创建一个实例
`index.ts`
```typescript
// 实例化一个axios出来使用
import Axios from '@/apis/axios/Axios'
const apis = new Axios({
baseURL: `${import.meta.env.VITE_API_BASE_URL}/api`,
timeout: 5000,
headers: {},
})
export default apis
```
## 创建 user 的 api
`user.ts`
```typescript
import apis from '@/apis/axios/index'
export interface infoDataResult {
name: string
age: number
}
interface loginDataResult {
token: string
}
export interface ILoginData {
account: string
password: string
}
const userApis = {
info() {
return apis.request({
// 泛型里传递的是返回的数据data里的result的类型
url: '/info',
})
},
login(params: ILoginData) {
return apis.request({
url: '/login',
method: 'post',
data: params,
})
},
}
export default userApis
```
# 自动注册组件&自动引入 api
## 组件自动注册的两种方式
### 1. 自动注册为全局组件
就在`main.ts`里加个函数
```typescript
function autoloadGlobalComponent(app: App) {
const components = import.meta.globEager('@/components/global/**/*.vue')
Object.entries(components).forEach(([filePath, component]) => {
const componentName = filePath.replace(/.+global\/|\.vue/gi, '')
app.component(componentName, component.default)
})
}
```
### 2. 自动按需加载组件
使用 [unplugin-vue-components ](https://github.com/antfu/unplugin-vue-components)可以自动按需要加载组件,我们常用的 ant design 、element plus 已经基于该插件实现了按需加载,我们再用其来自动按需加载`src/components`里的组件。
#### 安装插件
```shell
pnpm i -D unplugin-vue-components@^0.17.21
#下载其他版本可能会导致自动生成的类型声明文件不奏效,因为里面写的是declear module ‘@/runtime/vue’,而这个版本行是因为其自动生成的类型声明文件写的是declear module ‘vue’
```
#### vite.config.dev.ts
```typescript
import { defineConfig } from 'vite'
import vue from '@vitejs/plugin-vue'
import Components from 'unplugin-vue-components/vite'
export default defineConfig({
plugins: [
vue(),
Components({
//自动加载的组件目录,默认值为 ['src/components']
dirs: ['src/components'],
//组件名称包含目录,防止同名组件冲突
directoryAsNamespace: true,
//指定类型声明文件,为true时在项目根目录创建
dts: 'types/components.d.ts',
}),
],
})
```
#### 使用示例
运行 pnpm dev 命令后,我们现在可以在组件中直接使用 src/components 中的组件,而不需要 import 引入组件了。
因为定义了 `directoryAsNamespace` 选项,所以实际使用的组件名称前要加上目录名,vscode 也会自动根据 TS 类型进行提示的
#### element plus(可选)
Element plus 与 ant design 也提示了针对该插件的支持,配置好后也不需要 import 组件了。
可以下载 vscode 帮助插件:`element-ui-helper` 和 `Element Plus Snippets`
下面是 element plus 的 vite.config.ts 的配置项
```typescript
import { Plugin } from 'vite'
import AutoImport from 'unplugin-auto-import/vite'
import Components from 'unplugin-vue-components/vite'
import { ElementPlusResolver } from 'unplugin-vue-components/resolvers'
export default function (plugins: Plugin[]) {
plugins.push(
Components({
dirs: ['src/components'],
directoryAsNamespace: true,
//为true时在项目根目录自动创建
dts: 'types/components.d.ts',
//引入element plus自动组件支持
resolvers: [ElementPlusResolver()],
}),
)
}
```
现在我们可以直接使用 element plus 的组件了,而不需要 import 进来再使用了
```vue
houdunren.com
```
有些依赖的 css 会识别不到造成样式错误,建议在 index.html 项目模板中引入样式
```html
```
## 自动引入 Api
使用 [unplugin-auto-import ](https://github.com/antfu/unplugin-auto-import)可以自动导入 api,不需要 import。
没有使用时
```typescript
import { ref, computed } from 'vue'
const count = ref(0)
const doubled = computed(() => count.value * 2)
```
使用插件后
```typescript
const count = ref(0)
const doubled = computed(() => count.value * 2)
```
### 安装扩展
```shell
pnpm i -D unplugin-auto-import
```
### vite.config.dev.ts
下面是修改 vite.config.js 配置文件,来增加对 vue 与 vue-router 的 api 自动引用
```typescript
import { defineConfig } from 'vite'
import vue from '@vitejs/plugin-vue'
import AutoImport from 'unplugin-auto-import/vite'
export default defineConfig({
plugins: [
vue(),
AutoImport({
imports: ['vue', 'vue-router'], //自动引入vue和vue-router的api
//为true时在项目根目录自动创建
dts: 'src/types/auto-imports.d.ts',
}),
],
})
```
### 使用示例
现在在 vue 组件与.ts 文件中使用 ref 等 vue 的 api,就不需要 import 了
```typescript
const user = ref('123')
```
### element plus(可选)
Element plus 与 ant design 也提示了针对该插件的支持,配置好后也不需要 import api 了。
下面是 element plus 的 vite.config.ts 的配置项
```typescript
import { Plugin } from 'vite'
import AutoImport from 'unplugin-auto-import/vite'
import Components from 'unplugin-vue-components/vite'
import { ElementPlusResolver } from 'unplugin-vue-components/resolvers'
export default function (plugins: Plugin[]) {
plugins.push(
AutoImport({
//引入element plus自动api支持
resolvers: [ElementPlusResolver()],
imports: ['vue', 'vue-router'],
//为true时在项目根目录自动创建
dts: 'types/auto-imports.d.ts',
}),
)
}
```
现在我们可以直接使用 element plus 的 api,而不需要 import 进来再使用了
```typescript
ElMessage.success('houdunren.com')
```
不过有些依赖的 css 会识别不到造成样式错误,建议在 index.html 项目模板中引入样式
```html
```
# 表单验证
## 安装扩展包
```shell
pnpm i vee-validate@next @vee-validate/rules @vee-validate/i18n yup
```
## 使用
### 两种使用方式
#### 通过组件的方式去使用 validate
```vue
```
#### 通过 api 的方式去使用 validate
```vue
```
### 实际使用
#### 先封装好下载的那四个包
```typescript
import * as veeValidate from 'vee-validate'
import rules from '@vee-validate/rules'
import { localize } from '@vee-validate/i18n'
import zh_CN from '@vee-validate/i18n/dist/locale/zh_CN.json'
import * as yup from 'yup' //yup也是提供一些定义好的规则的,跟@vee-validate/rules一样,所以其实是二者选其一就可以了,yup更强大
veeValidate.configure({
//配置要写在定义规则的上面,否则中文会有问题
generateMessage: localize('zh_CN', zh_CN), //配置语言
validateOnInput: true, //配置是否在输入时进行验证
})
Object.keys(rules).forEach(key => {
//把所有规则都定义好
veeValidate.defineRule(key, rules[key])
})
const modules = { yup, ...veeValidate }
export default modules
```
#### 使用
```vue
```
# 集成 iconfont 库
## 集成 icon-park 库
[npm 官网](https://www.npmjs.com/package/@icon-park/vue-next) [图标库](https://iconpark.oceanengine.com/official)
### 安装
```
pnpm install @icon-park/vue-next --save
```
### 使用方式
#### 1.全局注册后使用组件
```typescript
import { install } from '@icon-park/vue-next/es/all'
import { createApp } from 'vue'
const app = createApp({})
// Install
install(app) // use default prefix 'icon', eg: icon is People, name is icon-people.
install(app, 'icon') // use custom prefix 'icon', eg: icon is People, name is icon-people.
app.mount('#app')
```
然后在要用的地方直接使用组件(e.g: ``)即可,记得加前缀 icon,因为你设置了这个前缀(其实默认也是这个前缀), 至于有哪些 icon 组件去图标库搜索复制即可。
#### 2. 动态使用
不全局注册,在要用的地方引入
```vue
import * as icon from '@icon-park/vue-next'
```
icon 的类型
```typescript
import { IconType } from '@icon-park/vue-next/es/all'
interface Menu {
title?: string
icon?: IconType
isActive?: boolean
route?: string
}
```
#### 3. 按需加载
看[npm 官网](https://www.npmjs.com/package/@icon-park/vue-next)
## 集成 font awesome gallery(可选)
[根据官网行事即可](https://fontawesome.com/docs/web/style/animate)
# 配置动画库
## animate
### 安装
```shell
pnpm install animate.css --save
```
### 在`main.ts`中引入
```js
import 'animate.css'
```
### Basic usage
After installing Animate.css, add the class `animate__animated` to an element, along with any of the [animation names](https://animate.style/#attention_seekers) (don't forget the `animate__` prefix!):
```html
An animated element
```
给路由切换添加动画效果
```vue
enter-active-class="animate__animated animate__bounceIn"
leave-active-class="animate__animated animate__bounceOut"
>
```
## gsap
### 安装
```
pnpm i gsap
```
### 使用
```vue
//封装的动画组件
```
```vue
//使用这个封装的动画组件
{{ item }}
```
# 主题切换
## 使用:root 主题切换
当我们使用:root 选择器定义全局属性,就可以通过该选择器进行主题切换的工作。
结合:root 选择器和 js,具体如下:
- 定义不同主题的全局属性,如下就是定义了黑色和白色主题:
```css
:root[theme='black'] {
--color: #000;
}
:root[theme='white'] {
--color: #fff;
}
```
- 通过 js 改变 theme 的值,就可以切换主题,如下:
```js
const setDocumentTheme = (theme = 'white') => {
const docElm = document.documentElement
if (!docElm.hasAttribute('theme')) {
docElm.setAttribute('theme', theme)
} else {
docElm.removeAttribute('theme')
}
}
```
也可以用 arco-design-pro 的方案,两者是一样的,只不过 arco-design-pro 是在``上加 theme 属性,而这个是在``上加 theme 属性