# fluttertpc_camerawesome
**Repository Path**: openharmony-sig/fluttertpc_camerawesome
## Basic Information
- **Project Name**: fluttertpc_camerawesome
- **Description**: No description available
- **Primary Language**: Unknown
- **License**: MIT
- **Default Branch**: master
- **Homepage**: None
- **GVP Project**: No
## Statistics
- **Stars**: 1
- **Forks**: 4
- **Created**: 2024-11-11
- **Last Updated**: 2025-05-07
## Categories & Tags
**Categories**: Uncategorized
**Tags**: None
## README
# 🚨 **重要提示 | IMPORTANT**
>
> **⚠️ 此代码仓已归档。新地址请访问 [fluttertpc_camerawesome](https://gitcode.com/openharmony-sig/fluttertpc_camerawesome)。| ⚠️ This repository has been archived. For the new address, please visit [fluttertpc_camerawesome](https://gitcode.com/openharmony-sig/fluttertpc_camerawesome).**
>
---
>

# CamerAwesome
📸 Embedding a camera experience within your own app should't be that hard.
A flutter plugin to integrate awesome Android / iOS camera experience.
This packages provides you a fully customizable camera experience that you can use within your app.
Use our awesome built in interface or customize it as you want.
---
## Native features
Here's all native features that cameraAwesome provides to the flutter side.
| System | Android | iOS |
| :--------------------------------------- | :-----: | :---: |
| 🔖 Ask permissions | ✅ | ✅ |
| 🎥 Record video | ✅ | ✅ |
| 🔈 Enable/disable audio | ✅ | ✅ |
| 🎞 Take photos | ✅ | ✅ |
| 🌆 Photo live filters | ✅ | ✅ |
| 🌤 Exposure level | ✅ | ✅ |
| 📡 Broadcast live image stream | ✅ | ✅ |
| 🧪 Image analysis (barcode scan & more.) | ✅ | ✅ |
| 👁 Zoom | ✅ | ✅ |
| 📸 Device flash support | ✅ | ✅ |
| ⌛️ Auto focus | ✅ | ✅ |
| 📲 Live switching camera | ✅ | ✅ |
| 😵💫 Camera rotation stream | ✅ | ✅ |
| 🤐 Background auto stop | ✅ | ✅ |
| 🔀 Sensor type switching | ⛔️ | ✅ |
| 🪞 Enable/disable front camera mirroring | ✅ | ✅ |
---
## 📖 Installation and usage
### Add the package in your pubspec.yaml
```yaml
dependencies:
camerawesome: ^1.3.0
...
```
### Platform specific setup
- **iOS**
Add these on `ios/Runner/Info.plist`:
```xml
NSCameraUsageDescription
Your own description
NSMicrophoneUsageDescription
To enable microphone access when recording video
NSLocationWhenInUseUsageDescription
To enable GPS location access for Exif data
```
- **Android**
Change the minimum SDK version to 21 (or higher) in `android/app/build.gradle`:
```
minSdkVersion 21
```
In order to be able to take pictures or record videos, you may need additional permissions depending
on the Android version and where you want to save them.
Read more about it in
the [official documentation](https://developer.android.com/training/data-storage).
> `WRITE_EXTERNAL_STORAGE` is not included in the plugin starting with version 1.4.0.
If you want to record videos with audio, add this permission to your `AndroidManifest.xml`:
```xml
```
You may also want to save location of your pictures in exif metadata. In this case, add below
permissions:
```xml
```
⚠️ Overriding Android dependencies
Some of the dependencies used by CamerAwesome can be overriden if you have a conflict.
Change these variables to define which version you want to use:
```gradle
buildscript {
ext.kotlin_version = '1.7.10'
ext {
// You can override these variables
compileSdkVersion = 33
minSdkVersion = 24 // 21 minimum
playServicesLocationVersion = "20.0.0"
exifInterfaceVersion = "1.3.4"
}
// ...
}
```
Only change these variables if you are sure of what you are doing.
For example, setting the Play Services Location version might help you when you have conflicts with
other plugins.
The below line shows an example of these conflicts:
```
java.lang.IncompatibleClassChangeError: Found interface com.google.android.gms.location.ActivityRecognitionClient, but class was expected
```
### Import the package in your Flutter app
```dart
import 'package:camerawesome/camerawesome_plugin.dart';
```
---
## 👌 Awesome built-in interface
Just use our builder.
That's all you need to create a complete camera experience within you app.
```dart
CameraAwesomeBuilder.awesome(
saveConfig: SaveConfig.image(
pathBuilder: _path(),
),
onMediaTap: (mediaCapture) {
OpenFile.open(mediaCapture.filePath);
},
),
```

This builder can be customized with various settings:
- a theme
- builders for each part of the screen
- initial camera setup
- preview positioning
- additional preview decoration
- and more!
Here is an example:

Check
the [full documentation](https://docs.page/Apparence-io/camera_awesome/getting_started/awesome-ui)
to learn more.
---
## 🎨 Creating a custom interface
If the `awesome()` factory is not enough, you can use `custom()` instead.
It provides a `builder` property that lets you create your own camera experience.
The camera preview will be visible behind what you will provide to the builder.
```dart
CameraAwesomeBuilder.custom(
saveConfig: SaveConfig.image(pathBuilder: _path()),
builder: (state, previewSize, previewRect) {
// create your interface here
},
)
```
> See more in [documentation](https://docs.page/Apparence-io/camera_awesome/getting_started/custom-ui)
### Working with the custom builder
Here is the definition of our builder method.
```dart
typedef CameraLayoutBuilder = Widget Function(CameraState cameraState, PreviewSize previewSize, Rect previewRect);
```
The only thing you have access to manage the camera is the cameraState.
Depending on which state is our camera experience you will have access to some different method.
`previewSize` and `previewRect` might be used to position your UI around or on top of the camera preview.
#### How do CamerAwesome states work ?
Using the state you can do anything you need without having to think about the camera flow
- On app start we are in `PreparingCameraState`
- Then depending on the initialCaptureMode you set you will be `PhotoCameraState`
or `VideoCameraState`
- Starting a video will push a `VideoRecordingCameraState`
- Stopping the video will push back the `VideoCameraState`
Also if you want to use some specific function you can use the when method so you can write like
this.
```dart
state.when(
onPhotoMode: (photoState) => photoState.start(),
onVideoMode: (videoState) => videoState.start(),
onVideoRecordingMode: (videoState) => videoState.pause(),
);
```
> See more in [documentation](https://docs.page/Apparence-io/camera_awesome/getting_started/custom-ui)
---
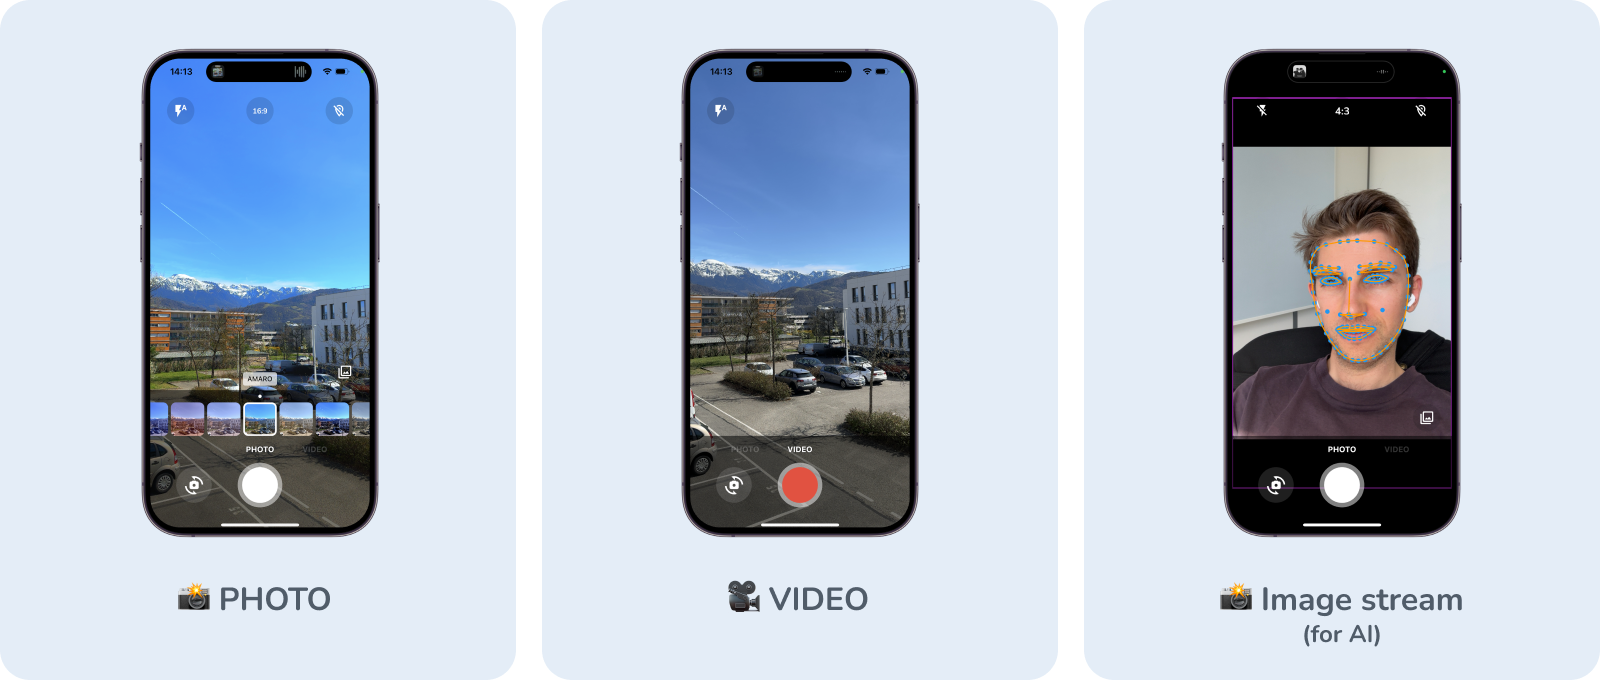
## 🔬 Analysis mode
Use this to achieve:
- QR-Code scanning.
- Facial recognition.
- AI object detection.
- Realtime video chats.
And much more 🤩

You can check examples using MLKit inside the `example` directory.
The above example is from `ai_analysis_faces.dart`. It detects faces and draw their contours.
It's also possible to use MLKit to read barcodes:

Check `ai_analysis_barcode.dart` and `preview_overlay_example.dart` for examples or
the [documentation](https://docs.page/Apparence-io/camera_awesome/ai_with_mlkit/reading_barcodes).
### How to use it
```dart
CameraAwesomeBuilder.awesome(
saveConfig: SaveConfig.image(
pathBuilder: _path(),
),
onImageForAnalysis: analyzeImage,
imageAnalysisConfig: AnalysisConfig(
// Android specific options
androidOptions: const AndroidAnalysisOptions.nv21(
// Target width (CameraX will chose the closest resolution to this width)
width: 250,
),
// Wether to start automatically the analysis (true by default)
autoStart: true,
// Max frames per second, null for no limit (default)
maxFramesPerSecond: 20,
),
```
> MLkit recommands to use nv21 format for Android.
> bgra8888 is the iOS format
> For machine learning you don't need full resolution images (720 or lower should be enough and
> makes computation easier)
Learn more about the image analysis configuration in
the [documentation](https://docs.page/Apparence-io/camera_awesome/ai_with_mlkit/image_analysis_configuration)
.
Check also detailed explanations on how to use MLKit
to [read barcodes](https://docs.page/Apparence-io/camera_awesome/ai_with_mlkit/reading_barcodes)
and [detect faces](https://docs.page/Apparence-io/camera_awesome/ai_with_mlkit/detecting_faces).
⚠️ On Android, some devices don't support video recording and image analysis at the same time.
- If they don't, image analysis will be ignored.
- You can check if a device has this capability by
using `CameraCharacteristics .isVideoRecordingAndImageAnalysisSupported(Sensors.back)`.
---
## 🐽 Updating Sensor configuration
Through state you can access to a `SensorConfig` class.
| Function | Comment |
| -------------------- | ---------------------------------------------------------- |
| setZoom | changing zoom |
| setFlashMode | changing flash between NONE,ON,AUTO,ALWAYS |
| setBrightness | change brightness level manually (better to let this auto) |
| setMirrorFrontCamera | set mirroring for front camera |
All of this configurations are listenable through a stream so your UI can automatically get updated
according to the actual configuration.
## 🌆 Photo live filters
Apply live filters to your pictures using the built-in interface:

You can also choose to use a specific filter from the start:
```dart
CameraAwesomeBuilder.awesome(
// other params
filter: AwesomeFilter.AddictiveRed,
)
```
Or set the filter programmatically:
```dart
CameraAwesomeBuilder.custom(
builder: (cameraState, previewSize, previewRect) {
return cameraState.when(
onPreparingCamera: (state) =>
const Center(child: CircularProgressIndicator()),
onPhotoMode: (state) =>
TakePhotoUI(state, onFilterTap: () {
state.setFilter(AwesomeFilter.Sierra);
}),
onVideoMode: (state) => RecordVideoUI(state, recording: false),
onVideoRecordingMode: (state) =>
RecordVideoUI(state, recording: true),
);
},
)
```
See all available filters in the [documentation](https://docs.page/Apparence-io/camera_awesome/widgets/awesome_filters).